Salora TAB7401 User manual

TAB7401

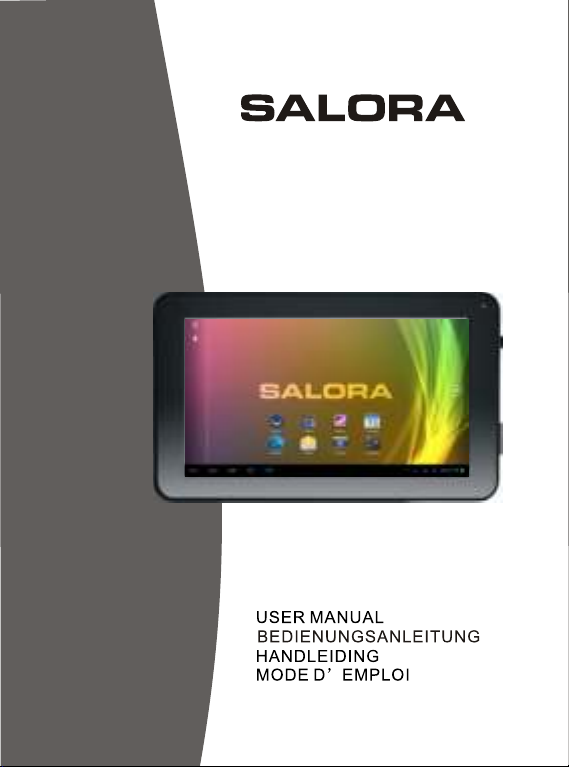
Thanks For Purchasing Your Tablet
This user manual has been specially designed to guide you through the
functions and features of your device.
1) Please read this manual carefully before using your device to
ensure safe and correct use.
2) The descriptions in this manual are based on the default settings of
your device.
3) Do not use this unit near water. Do not place over the unit any
container with liquid inside.
4) Please do not put your device in high temperature, moisture or dust
place; the tablet is not waterproof.
5) Avoid falling or violent collision, do not violently shake the touch
screen, otherwise, it could lead to damage or display unnormal.
6) If system shutdown automatically, bootable again soon after the
shutdown.
7) Please charge the tablet regularly if not use it for long time to avoid
the damage caused by the excessive consumption from battery.
8) Do not disassemble or use alcohol, thinner or benzene class to swab
product surface.
9) Please do not use the tablet when driving or walking in the street,
otherwise it may lead an accident.
10) Please choose the appropriate volume, if had tinnitus, please
lower the volume or stop using.
11) Memory space available dishonest nominal for the Android
system itself takes up part of the memory space and the operation
of the program will also take up space if you open them.
12) Storage capacity that dishonest nominal for Android system
occupies about hundreds of MB storage capacity, also in order to
install the software needs, the system must lay off certain storage
capacity, so theactual usable space and nominal space have
deviation.
13) When CPU in high-speed operation, especially in 3D games or in
long time playback high-definition video, the cover will have some
of hot.
14) Please keep this manual for future reference.
TM

Chapter One(overview)
Appearance
Buttons
Open and shutdown
Open and closestandby mode
Lock and unlockthe screen
Homepage information column
Textinput
Reset
USB Connect
Accessories
Catalog
1.1
1.2
1.3
1.4
1.5
1.6
1.7
1.8
1.9
1.10
1
2
2
2
2
3
3
4
4
4
Chapter Two(Internet)
Browser
Chapter Three (Applications)
File manager
Downloads
2.1
3.1
3.2
4
5
6
Chapter Four (Systemsetting)
Wireless networks setting
Sound setting
Display setting
Application setting
Date & Time setting
Language and inputsetting
4.1
4.2
4.3
4.4
4.5
4.6
Chapter Five (Specification)
6
6
7
7
8
8
9

1.1 Appearance
Chapter One Overview
Volume+
Volume-
Speaker
Front Camera
Back camera
MIC
USB
Earphone
POWER
TF CARD
RESET

1.2 Buttons
Power button
Long press the power button 2-3 seconds to open the screen
When open the tablet, short press this button to enter the off-screen
state and short press again to light up the screen.
Volume
Press Volume+/- to adjust the volume.
1.3 Open and shut down
Open
Long press the power button (see the appearance) 2-3 seconds,
pictures will show up until to the interface.
Shut down
Long press the power button, then the screen shows would you like to
shut down, press OK to shut down in charging state, when the tablet is
off, press the power button, it will shows charging feature, once again
to click power button, the tablet will be opened.
1.4 Open and close standby mode
Open the standby mode
In boot mode, you can tap the power button, the system will into the
standby mode which can save power.
Close the standby mode
In the standby mode, light tap of the power button of the device, enter
the normal state.
1.5 Lock and unlock the screen
Lock
You can set the sleep time in the system of display.
The system will sleep automatically and lock the screen to the standby
mode if without any inactivity when reaches the preset of standby time.
Unlock
Drag this to unlock the screen and enter the application interface.

?123
1.6 Homepage Information Column
1.7 Text Input
When use the tablet, you can use the virtual keyboard to enter text,
number, symbols directly by touching screen. After selecting the
Android input method, the default keyboard show as below:
To switch the numbers and letters, please press this
To switch the capital and lowercase letter, please press
3
Time
WIFI
Battery power
Back Volmue -
Volmue +
Host interface Screen shot
Recent search

1.8 Reset
Press the reset button on the right side of the device, then you device
will restart and reset.
1.9 USB connection
Please connect PC with in-box USB cable for your tablet and you will see
on your tablet, click this sign and turn on USB storage to connect
your device.
Turn off USB storage to disconnect your device with PC.
1.10 Accessories
OTG Cable
Power Adapter
USB Cable
User manuaI
1
1
1
1
Chapter two: Internet
2.1 Browser
Require network support before using a web browser, if there are
network supporting problems, please contact your network operator or
the service provider.
Tablet's web browser can connect to the Internet.
via WIFI to satisfy your business and individual network needs .
Please touch (Setting) to set up the WIFI so that can use the
browser normally.
Touch here (Browser) in the application list to enter the browser
pages.

Enter the URL-touch the input area to get the soft keyboard, then text
the UPL.
Bookmark search click this to add into the bookmark
Touch this to read the favorite website that collected
Touch this to search the internet
Touch this to add new browser
Touch this to close the browser
Browser supports the following features.
3.1 File manager
Touch (File manager) in the application list, it supports the files
mutual copy in this two places SD Card, internal memory and USB.
Chapter three: Application
3.2 Downloads
Click in the application list; you can preview the downloading or
done document contents.
Click download file to stop or delete the download contents

Chapter Four: System setting
Click here (Settings) to enter the system setting interface.
4.1 Wireless networks setting
This setting module includes: the wireless and network Settings
The wireless local area network Settings
Open wireless LAN switches, the system will scan available wireless
network automatically and display the wireless local area network in
the list
Among them, if the local area networks have the sign behind it, it
represents the network has been encryption, it needs to enter the
password to connection.
The sign represents the networks do not need a password can
be connected directly
You can choose the network from the list you want click it to connect
directly, also you can click the advanced, then click connected to
network; you can also select add wireless local area network to add by
hand
Network notice: open the switch, it will notice if there any opne
networks
The wireless local area network certificate: the wireless local area
network loading and management
4.2 Sound setting
In Sound setting, you can choose mute switch which can get more
detailed settings if you need. Click the volume setting can set up the
notice, the media and the disk boot switch voice alarm of volume and
choose the prompt operation sound and the bell and software

4.3 Display setting
Display settings contains: Brightness, Wallpapers Settings,
Automatic rotating Settings, Dormancy time and Font size.
Brightness
The user can adjust brightness manually to get the lightness you want.
Wallpaper Settings
In the wallpaper setting, you can set up the wall paper and dynamic
wallpaper; the wallpaper can be chosen from gallery.
Dormancy time
When the screens in light state a period of time, it will automatically
lock to save the power if without any operations.
Font size
You can set up the font size according to individual's favorite, there
were respectively:small, normal, large, huge.
4.4 Application setting
In the application setting, you can manage the running services and
access rights management and development but only for developer.
Application management
In this setting, it is easy to manage and delete some applications that
have been installed.
First, get into the application list, click the according to name sort
buttons to order the alphabet and number; click the all menu to scan
the running program or programs that provide by a third party software
developers.
Click on an application, you can see the application's relevant
information to clear
The cache, unload programs, clear the default value or forced to stop
operation, etc
Running services
In this setting, you can end and set up some programs that are running
Access management
In this setting, by using the opening or prohibition to manage the
applications to access content permissions.

4.5 Date & Time setting
In this setting interface, you can set up your system time and series
options.
Time setting
You can use automatic time from the network, to choose the time zone,
to set specific date and time and display format in time setting.
4.6 Language and input Setting
In this setting interface, you can choose the language you want
Input method
In here the input methods can be set by users, you can add the words
in the dictionary or to delete.
Android keyboard
You can set up automatic capital function of opening or closing.

191.4X116.0X12
7” 1024X600
TM ®
Android 4.4, KitKat
1.3GHz, Quad-core
Approx 300g
If at anytime in thefuture you shouldneed to dispose
of this productplease note thatwaste electrical
products should notbe disposed ofwith household
waste. Please recyclewhere facilities exist.Check
with your LocalAuthority orretailer for recycling
advice. (Waste Electrical and Electronic equipment
Directive)
Chapter Five (Specification)
Dimension(mm*mm*mm)
Weight
LCD
OS
Processor
Memory
WI-FI
Connections
Battery
Service time
Operating temperature
512MB DDR2 RAM, 8GB internal
Micro-USB X1, Micro-SD (up to
32GB), Headphone Jack
802.11b/g/n
3.7V 2100mAh Li-Poly
Up to 15h music mode, 3hinternet,
3h video
Between 0 et 40


Dank u voor het aankopen van deze tablet
Deze gebruiksaanwijzing isspeciaal gemaakt omu doorheen de
functies en eigenschappenvan uw toestelte leiden.
1) Lees dezegebruiksaanwijzing aandachtig omhet toestel opeen
veilige en correctewijze te kunnengebruiken.
2) De omschrijvingenin deze gebruiksaanwijzingzijn gebaseerd op
de standaard instellingenvan het toestel.
3) Gebruik hettoestel niet naastwater. Plaatsgeen voorwerpen,
gevuld met eenvloeistof, boven hetapparaat.
4) Plaats hettoestel niet opeen plaats meteen hoge temperatuur,
waar veel vochtof stof is.Het toestel isniet waterdicht.
5) Zorg ervoordat het toestelniet valt ofergens tegen botst. Schud
het scherm nietop een brutalewijze want ditkan leiden totschade
en een nietgoed werkend beeld.
6) Alshet toestel automatischuitschakelt, schakel hetdan opnieuw
in.
7) Laad deaccu van detablet regelmatig opals het toestelgedurende
lange tijd nietgebruikt wordt omschade te vermijdendoor
overdreven verbruik vande accu.
8) Haal hettoestel niet uitelkaar en gebruikgeen alcohol, thinnerof
benzine om hetoppervlak van hettoestel te reinigen.
9) Gebruik hettoestel niet terwijlu rijdt ofop straat loopt,want dat kan
ongelukken veroorzaken.
10) Kies hetgeschikte volume. Verlaag het volumeof stop het
luisteren in geval van oorsuizingen.
TM
11) HetAndroid systeem zelf neemteen deel vande
geheugencapaciteit in en het gebruik van een programma neemt
ook geheugencapaciteit in.
12) HetAndroid systeem neemtenkele honderden MBaan capaciteit
in. Ook alser software geïnstalleerdwordt, heeft hetsysteem
geheugen nodig. Eris dus eenverschil tussen detheoretisch
beschikbare en dewerkelijke geheugencapaciteit.
13) Alsde CPU ophoge snelheid werkt,bijvoorbeeld bij 3Dspelletjes
of langdurige video weergave in hoge definitie, kan het zijn dat de
behuizing warm wordt.
14) Bewaar dezegebruiksaanwijzing voor laterereferentie.

1.1
1.2
1.3
1.4
1.5
1.6
1.7
1.8
1.9
1.10
2.1
3.1
3.2
4.1
4.2
4.3
4.4
4.5
4.6
1
2
2
2
2
3
3
4
4
4
4
5
5
6
6
7
7
8
8
9
Hoofdstuk Een (overzicht)
Uitzicht
Toetsen
Openen en afsluiten
Openen en afsluitenin stand-by
Het scherm blokkerenen deblokkeren
Informatie homepage
Inbrengen van tekst
Terugzetten
USB aansluiting
Accessoires
Hoofdstuk Twee(Internet)
Browser
Hoofdstuk Drie (Applicaties)
File manager
Downloads
Hoofdstuk Vier (Systeeminstellingen)
Instellingen draadloos netwerk
Geluidsinstellingen
Scherminstellingen
Applicatie-instellingen
Instellen van datumen tijd
Instellingen van taalen input
Hoofdstuk Vijf (Specificaties)
Inhoud

1
Hoofdstuk Een: Overzicht
1.1 Uitzicht
Volume+
Volume-
Camera
USB
RESET
Power
Oortelefoon
TF kaart
Microfoon
Luidpreker
Camera achterzijde

2
1.2 Toetsen
Power toets
Druk gedurende 2-3seconden op depower toets omhet scherm inte
schakelen.
Als de tabletopen is, drukkort op dezetoets om hetscherm uit te
zetten en drukopnieuw kort omhet scherm inte schakelen.
Volume
Druk op Volume +/- omhet volume teregelen.
1.3 Openen en afsluiten
Openen
Druk gedurende 2-3seconden op depower toets ende beelden van
de interface verschijnen.
Afsluiten
Druk lang opde power toets.Het scherm vraagtof u wilafsluiten. Druk
op OK omnaar de statusvan laden tegaan. Alsde tablet
uitgeschakeld is, drukop de powertoets en delaadindicatie verschijnt.
Druk nogmaals opde power toetsom de tablette openen.
1.4 Openen en afsluiten in stand-by
De stand-by openen
In boot modus,druk op depower toets enhet systeem gaatnaar
stand-by om energiete besparen.
De stand-by sluiten
In stand-by,druk lichtjes opde power toetsom het toestelterug in te
schakelen.
1.5 Scherm blokkeren en deblokkeren
Blokkeren
U kan deuitschakeltijd op dedisplay instellen.
Het systeem schakeltautomatisch uit engaat naar stand-byindien er
geen activiteit isuitgevoerd alvorens deingestelde tijd bereiktis.
Deblokkeren
Sleep dit omhet scherm tedeblokkeren en naarde interface van
de applicatie tegaan.

?123
3
1.6 Informatie Homepage
1.7 Inbrengen van tekst
U kan hetvirtueel toetsenbord gebruikenom tekst, cijfersen
symbolen in tevoegen via hetaanraakscherm. Na deAdroid input
methode gekozen tehebben, ziet hetstandaard toetsenbord erals
volgt uit:
Om te wisselentussen cijfers enletters, druk op
Om te wisselentussen hoofdletters engewone letters, drukop
WIFI
Volmue -
Volmue +
Screen shot
Batterijvermogen
Tijd
Recent gezocht
Gastinterface
Terug

Hoofdstuk Twee: Internet
2.1 Browser
U heeft eennetwerk nodig omeen web browserte kunnen gebruiken.
Als er problemenmet het netwerkzijn, consulteer danuw netwerk
operator of serviceprovider.
De web browservan de tabletkan verbinding makenmet Internet via
WiFi om tevoldoen aan uwzakelijke of persoonlijkenetwerkeisen.
Druk op (Setting)om de WiFiin te stellenzodat u debrowser
normaal kan gebruiken.
Druk op (Browser)in de applicatielijstom naar depagina's van
de browser tegaan.
1.8 Terugzetten
Druk op deReset toets opde rechterkant vanhet toestel. Hettoestel
wordt herstart enteruggezet.
1.9 USB aansluiting
Sluit de PCop het tabletaan met eenUSB-kabel en uziet op het
tablet. Klik opdit symbool enschakel het USB storage in om uw
toestel te verbinden.
Schakel het USB storage uit om deverbinding tussen hettoestel en
de PC afte sluiten.
1.10 Accessoires
1
1
1
1
4
Stroomadapter
USB kabel
Gebruiksaanwijzing
OTG kabel

5
De browser ondersteuntde volgende eigenschappen.
Druk op deURL inputzone om het toetsenbord op te roepen en voeg
dan het URLin.
Klik op omdit als eenbookmark te bewaren.
Druk op omde voorkeur websiteop te roepen.
Druk op omop het Internette zoeken.
Druk op omeen nieuwe browsertoe te voegen.
Druk op omde browser afte sluiten.
Hoofdstuk Drie: Applicaties
3.1 File manager
Druk op (Filemanager) in deapplicatielijst. Het ondersteunt files
opgeslagen op deSD kaart, hetintern geheugen en USB.
3.2 Downloads
Druk op inde applicatielijst. Ukan de gedownload inhoud bekijken.
Klik op dedownload file omte stoppen of de inhoud van de download
te verwijderen.
Table of contents
Languages:
Other Salora Tablet manuals