Sam4s SHM-200 User manual

1
SHM-200 User Manual

2
Contents
1 Before Using the device....................................................................................................... 5
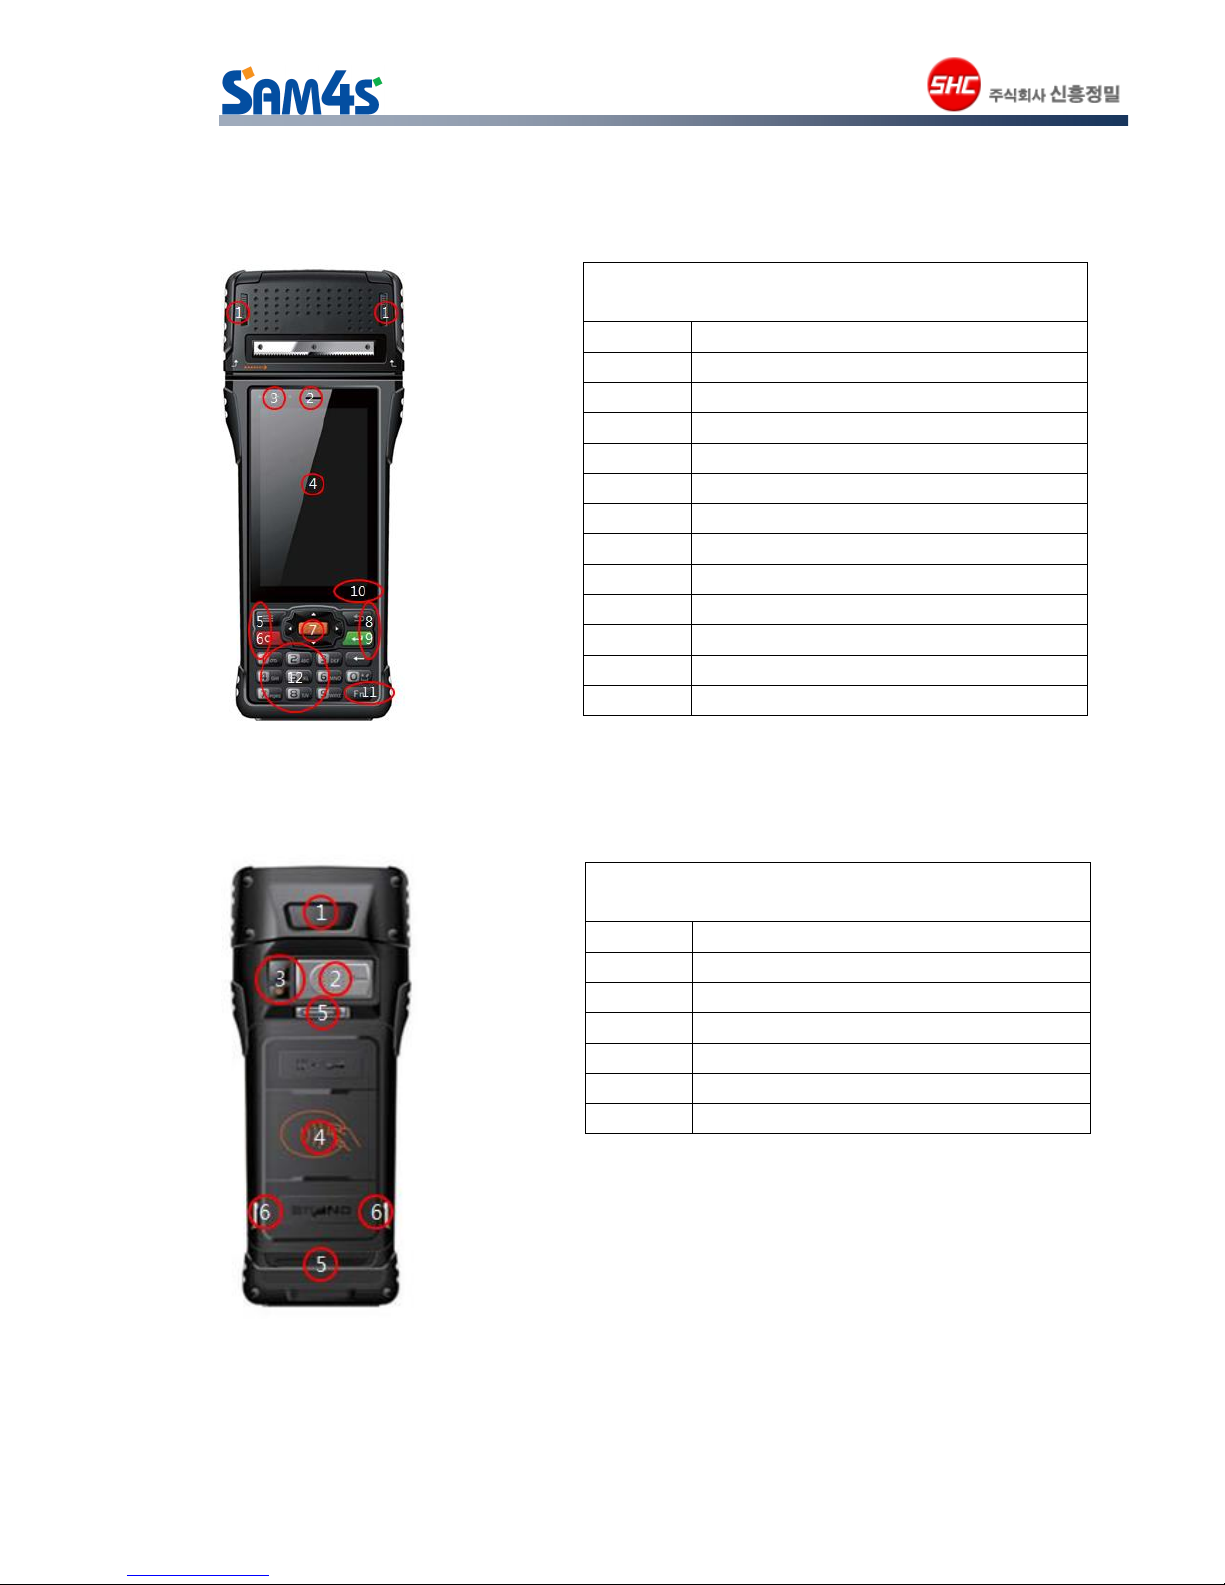
1.1 Front Panel View.................................................................................................................. 5
1.2 Back Panel View................................................................................................................... 5
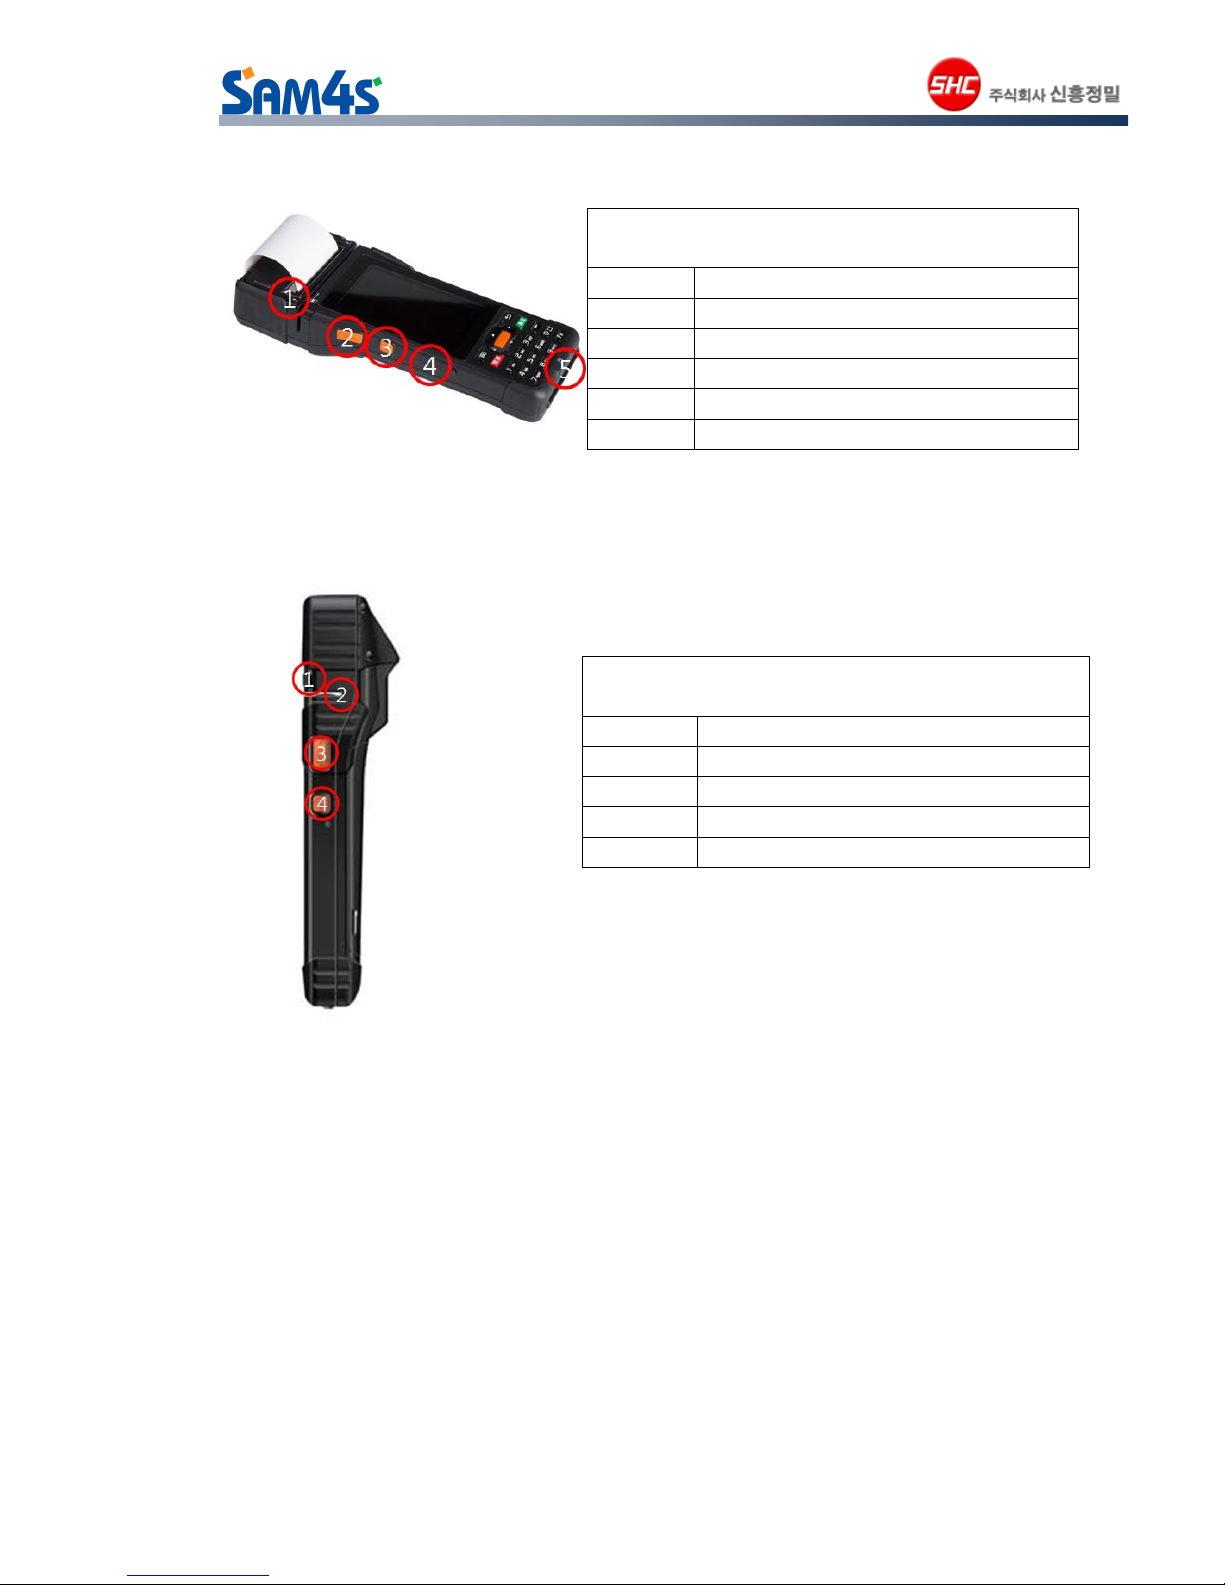
1.3 Left Panel View ..................................................................................................................... 6
1.4 Right Panel View.................................................................................................................. 6
1.5 Battery Cover: Install and Uninstall........................................................................ 6
1.6 T-Flash/SIM Card : Install and Uninstall............................................................... 7
2 Use SHM-200................................................................................................................................. 7
2.1 Startup and Shutdown.................................................................................................... 7
2.1.1 Boot the Terminal and Access the Home Screen.............................................. 7
2.1.2 To turn the terminal Off .............................................................................................. 8
2.1.3 Suspend........................................................................................................................... 8
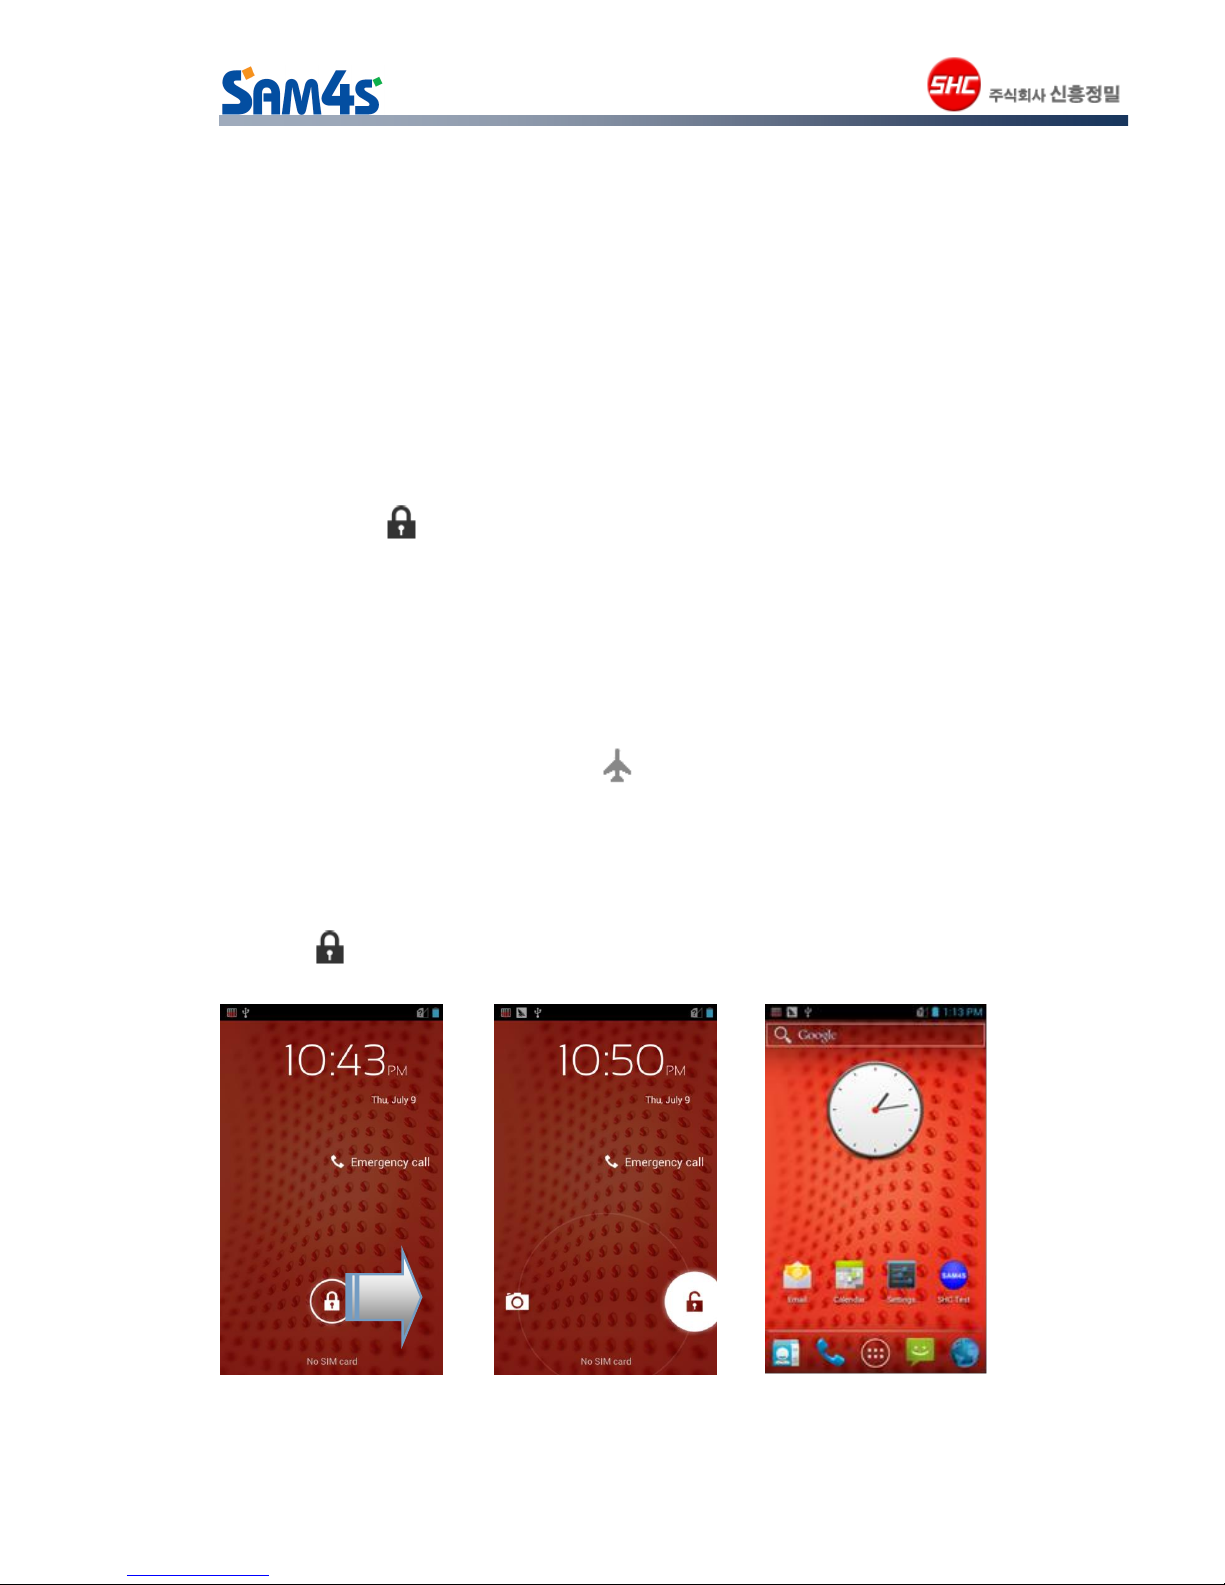
2.1.4 Airplane Mode................................................................................................................ 9
2.2 Device locking and unlocking.................................................................................... 9
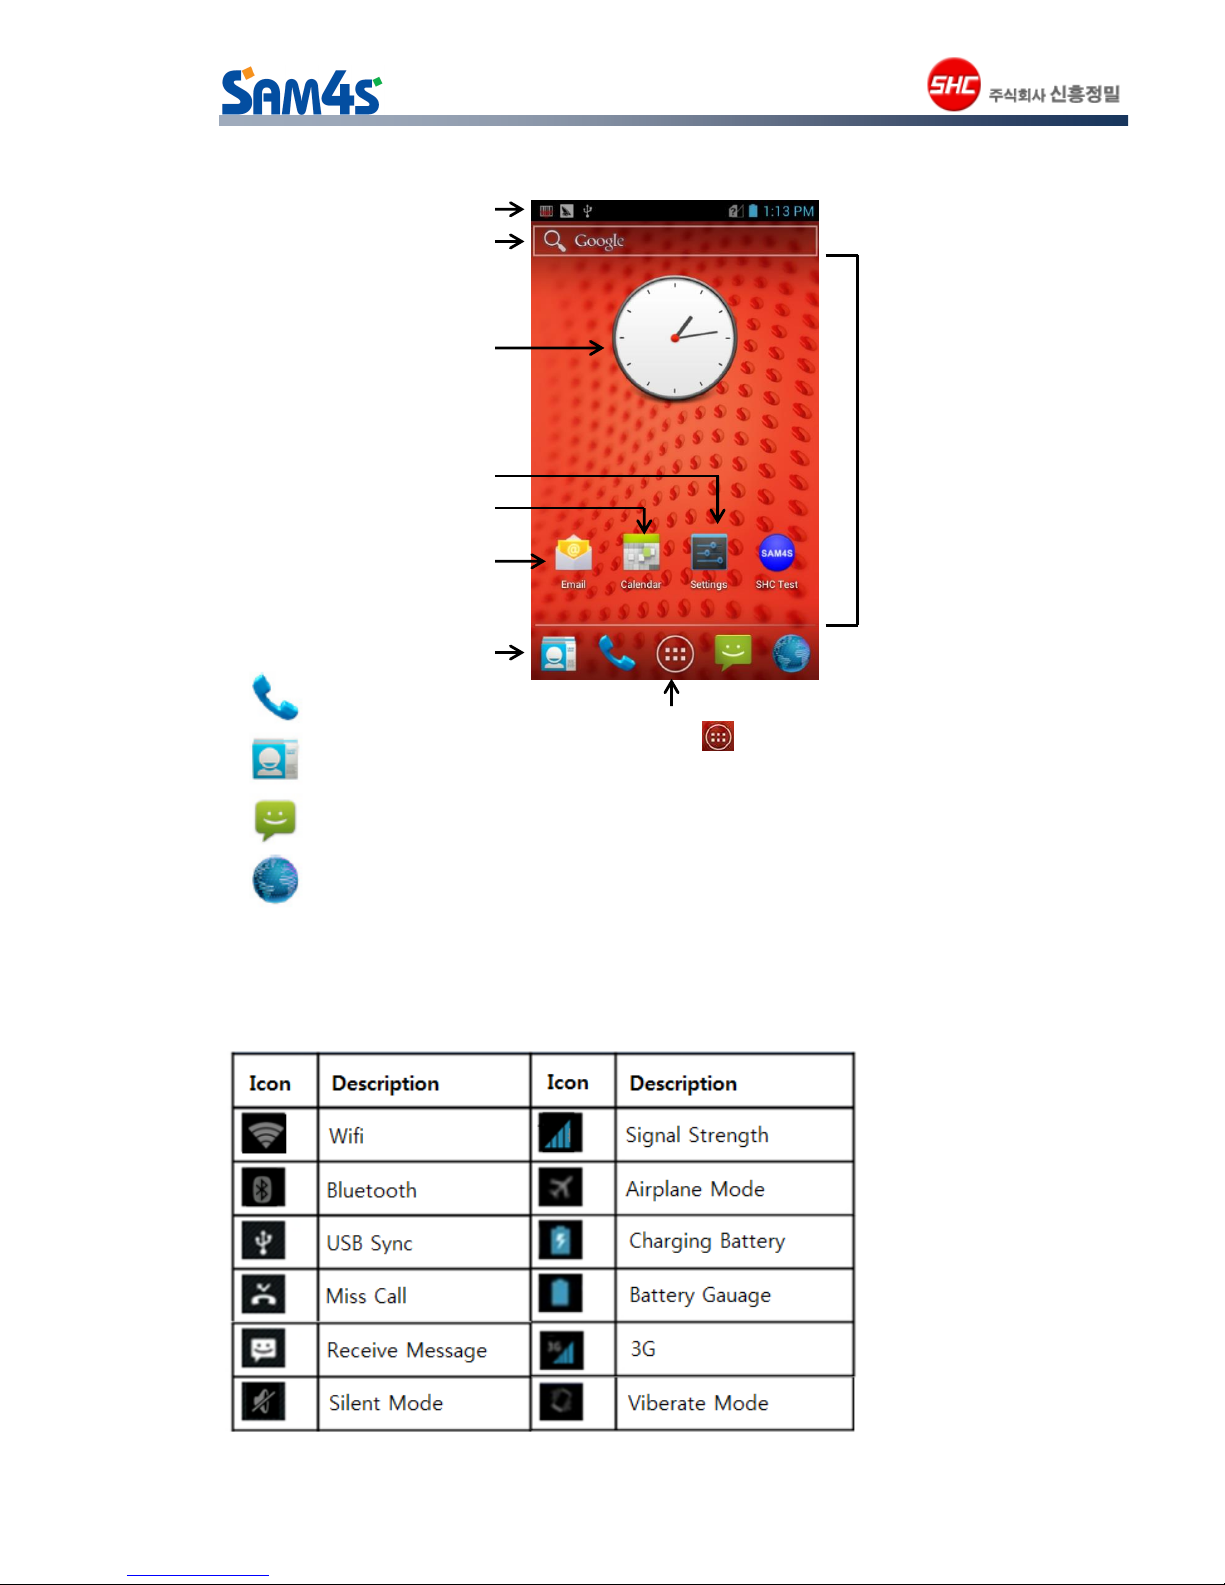
2.3 Home screen and main menu ................................................................................. 10
2.4 Status icons and indicators...................................................................................... 10
3 Basic functions......................................................................................................................... 11
3.1 MSR / IC-card....................................................................................................................... 11
3.1.1MSR .................................................................................................................................. 11
3.1.2IC-card............................................................................................................................. 11
3.2 PICC.......................................................................................................................................... 12
3.3 Scanner................................................................................................................................... 13
3.4 Fingerprint scanning ...................................................................................................... 15
3.5 Printer...................................................................................................................................... 15
3.5.1Paper Changing.......................................................................................................... 15
3.5.2Control Print................................................................................................................... 17
3.6 Setup and installation ................................................................................................... 17
3.6.1 Date and time settings............................................................................................. 17
3.6.2 Language and input method.................................................................................. 17
3.6.3 Display Settings........................................................................................................... 18
3.6.4 Security Settings.......................................................................................................... 18
3.6.5 Backup and reset........................................................................................................ 19
3.6.6 Ringtone........................................................................................................................... 19
3.6.7 Management Applications........................................................................................ 20

3
3.7 Phone features................................................................................................................... 21
3.7.1 Calls................................................................................................................................... 21
3.7.2 Contacts........................................................................................................................... 22
3.7.3 SMS and MMS.............................................................................................................. 22
3.7.4 Email ................................................................................................................................. 22
3.8 Network connection synchronization................................................................... 23
3.8.1 2G/3G data connection............................................................................................. 23
3.8.2 Wi-Fi Internet connection......................................................................................... 23
3.8.3 Bluetooth......................................................................................................................... 24
3.8.4 GPS.................................................................................................................................... 25
3.8.5 USB connection computer ...................................................................................... 25
3.9 Multimedia............................................................................................................................. 26
3.9.1 Camera............................................................................................................................. 26
3.9.2 Video................................................................................................................................. 27
3.9.3 Multimedia file management................................................................................... 27
3.9.4 Music Player.................................................................................................................. 28
3.9.5 Recorder.......................................................................................................................... 29

4
POS terminal SHM-200
Thank you for purchasing POS terminal SHM-200.
To ensure your safety and the proper use of this equipment, please read this guide carefully before
using.
About the configuration of this product, please refer to contracts related to the product, or consult
the product vendors who sell you.
Pictures in this guide are for reference only; if some pictures do not tally with the product, please
refer to our product.
Many networking features described in this manual are special services provided by the Internet
service provider. Whether these network services can be used or not, depends on the network
service provider.
Without the permission of our company, no person shall copy, extract, backup, modify, transmit,
and translate into other languages, to any portion of this manual in any form or by any means, for
commercial purposes.
Warning: may hurt yourself or others
Caution: may damage your equipment or other equipments
Note: the annotations, using hints or additional information

5
1. Before Using the device
1.1. Front Panel View
1.2. Back Panel View
Front
Number
Name
1
Printer Locking(Up: Open /Down: Close)
2
Receiver
3
LED
4
Display
5
Menu Key
6
Cancel Key
7
Scan, Direction Key
8
Back Key
9
Enter Key
10
Mic
11
Fn(Home) Key
12
Key Pad
Back
Number
Name
1
Scanner
2
Fingerprint Area
3
Camera & Flash
4
Battery Cover & Contactless Area
5
Hand Suspender Holder
6
Battery Cover Lock

6
1.3. Left panel View
1.4. Right panel View
1.5. Battery Cover : Install and Uninstall
- Press the Power button to place the terminal.
- Pull the battery latch back.
- Remove the battery door and release the battery retention strap.
- Remove the battery.
Left Side
Number
Name
1
Printer Cover Opener
2
Scan Key
3
Camera Key
4
USB Connector / DC Charger Cover
5
IC-Card Reader
Right Side
Number
Name
1
Printer Cover Opener
2
MSR Card Reader
3
Scan Key
4
Power Key

7
1.6. T-Flash / SIM Card : Install and Uninstall

8
2. Use SHM-200
2.1 Startup and Shutdown
2.1.1 Boot the Terminal and Access the Home Screen
The terminal begins the boot process as soon as power is applied. Do not press any
buttons or attempt to remove the battery during the initial boot process.
To turn the terminal On : Press and hold the Power Button
2.1.2 To turn the terminal Off:
- Press and hold the Power Button until the Phone Options menu displays.
- Touch Power Off
Power Button
Power Button

9
2.1.3 Suspend Mode
Suspend mode differs from Power off mode. Power off mode is the equivalent to having no
battery or external power source connected to the device. The terminal does not receive
incoming call when power is off since the device completely shuts down. In Suspend mode,
the device enters a low power state to conserve battery power. The radio associated with the
phone maintains enough power to wake the terminal for incoming phone calls.
Suspend mode automatically turns touch screen off and locks the terminal to save battery
power when the terminal is inactive for a programmed period of time.
- Press the release the power button to toggle the terminal in or out of Suspend mode.
- Drag the to the right to unlock the terminal.
2.1.4 Airplane Mode
- Press the hold the Power button until the Phone Options menu displays.
- Touch Airplane Mode to toggle the mode on or off.
Note. WhenAirplane Mode is turned on, shows on the status bar
2.2 Device locking and unlocking
Drag the to the right to unlock the display and access the Home Screen.

10
2.3 Home screen and main menu
2.4 Status icons and indicators
Status icons and indicator status bar at the top of the screen, the display device status
information and notifications.
Note : Device
software escalating,
status indicators may
show a different
device, please refer
to the actual subject.
Notification/Status Bar
Search Bar
Clock Widget
Settings
Calendar
E-mail
Favorites Tray
(Content is model dependent)
Home Screen Panel
Swipe left or right with your
finger to scroll between five
Home Screen panels.
Personalize the panel with your
choice of app shortcuts, folders,
and widgets
Tap the All Apps Icon to view
the apps and widgets loaded on your
device.
Phone App Shortcut
People App Shortcut
Messenger App Shortcut
Brower App Shortcut

11
3. Basic function
3.1 MSR / IC CARD
3.1.1 MSR
- On the Home screen click => SHC Test click
- MSR => Swipe Card => Get Result
3.1.2 IC-CARD
- On the Home screen click => SHC Test click
- IC-CARD => Reset IC CARD => Insert CARD=> Get Result

12
Note:
Reset IC Card : Read IC-Card Data
Eject IC Card : IC-Card is ejected
Send : Transportation of APDU messages
3.2 PICC
- On the Home screen click => SHC Test click
- PICC => Click Polling => Take Card at back Cover in Readable Area

13
Scanner
3.3 Scanner
Currently, SHM-200 provides a one-dimensional bar code scanner to obtain and decode the
information.
- On the Home screen click=> Scan Service Click
- Check the "Scan enabled" & “Scan Button enabled”& “Output foreground”.
- Enter an editing interface, such as text contents of the input interface, bar code scanning
light trained on articles, press key bar code scanning, barcode information is displayed in
the information bar at the scan is successful.

14
Function
Description
Scan enabled
Scanner Module On/Off
Scan Button enabled
Scanner Button Enabled/Disabled
Output foreground
Input scan data when focus editbox
Decoding Illumination
Scanner light on/off
LCD mode
十Beam Flash on/off
Coding format
Set Format Unicode/GBK
End Character
Set End Character Enter/Tab/Null
Auto Sleep
Need Insert
Continuous Scanning
Continuous mode On/Off
Scan timeout
Set Timeout 1sec –9secs
Long press the trigger to scan
Scanner beam is run during press the scan button On/Off.
Prefix
“Prefix data” + Scan data(ex- set the Prefix data “abc” =>
Scan “123” => output is “abc123”)
Postfix
Scan data + “Postfix data” (ex- set the Postfix data “abc” =>
Scan “123” => output is “123abc”)
Sound
Beep sound On/Off when finished scan.
Vibration
Vibrator On/Off when finished scan
LED
LED On/Off when finished scan

15
3.4 Fingerprint scanning
- On the Home screen click => SHC Test click => Click Fingerprinter
- Place your finger on the back of the phone that belly fingerprint contact area, click the
"Capture fingerprint" to get to the fingerprint blank squares at the figure below.
Note:
Capture Fingerprint : Just Capture Fingerprint
Store : Store Fingerprint. This funtion have to touch twice.
Search : Search the stored Fingerprint
3.5 Printer
3.5.1 Paper changing
1) Unlock Printer Cover
Slide up the Printer Cover locks

16
2) Open Cover
Open the printer pover in the direction of arrow.
3) Insert Paper
Insert paper roll and insert paper in paper cutter.
4) Close Cover
Close the printer cover and slide down printer cover locks.

17
3.5.2 Control Print
Insert Number in the Editbox. And press the test button. Then, it will be printed number times.
3.6 Setup and installation
3.6.1 Date and time settings
You may need to change the date and time in your device.
3.6.2 Language and Input Method
In the "Settings" select "Language and input method", select from the list the language you
want to switch => select the default, select the input method you want to switch the list.

18
3.6.3 Display Settings
Go to Settings => Display => You can set the brightness / wallpaper / Auto-rotate screen /
sleep / font size / close sensor
3.6.4 Security Settings
Go to Settings => Security Settings, you can set the screen lock / owner information / SIM
card lock, etc.

19
3.6.5 Backup and reset
- Go to Settings => Backup & reset => Restore factory settings
- This action will erase the following data:
System and application data and settings
Download the app
- It does not erase the following data:
Current system software and bundled applications
SD card files, such as music or photos
3.6.6 Ringtone
Go to Settings => Sound, you can set the volume, mute mode, ringtones and other

20
3.6.7 Management Applications
Go to Settings => Applications, enter the application management interface, you can view a
downloaded program status SD card, running and other options, you can tap the program,
open the application information interface, the program is forced to stop, unload, stop with
other relevant operations.
Table of contents
Other Sam4s Handheld manuals