1
CHPPR1
1 Channel Prog
User Instructions
rammer
The latest ESP product manuals
can be found on-line:
Features
1
Operation Guide
2
CHPPR1 is a single channel programmer, designed primarily for
timed control of your heating and hot water. Ideal for use with a
combination (combi) boiler.
24 hour, 5/2 day and 7 day selectable
2 or 3 ON/OFF periods selectable
1,2 or 3 hour boost
Advance to next programmed event
Automatic Summer/Winter time change
Factory set time & date
Program options-ON, OFF, All day or Auto
Large and clear to read illuminated display
With/without service interval functionality
Standard wall plate - simple plug in and replace
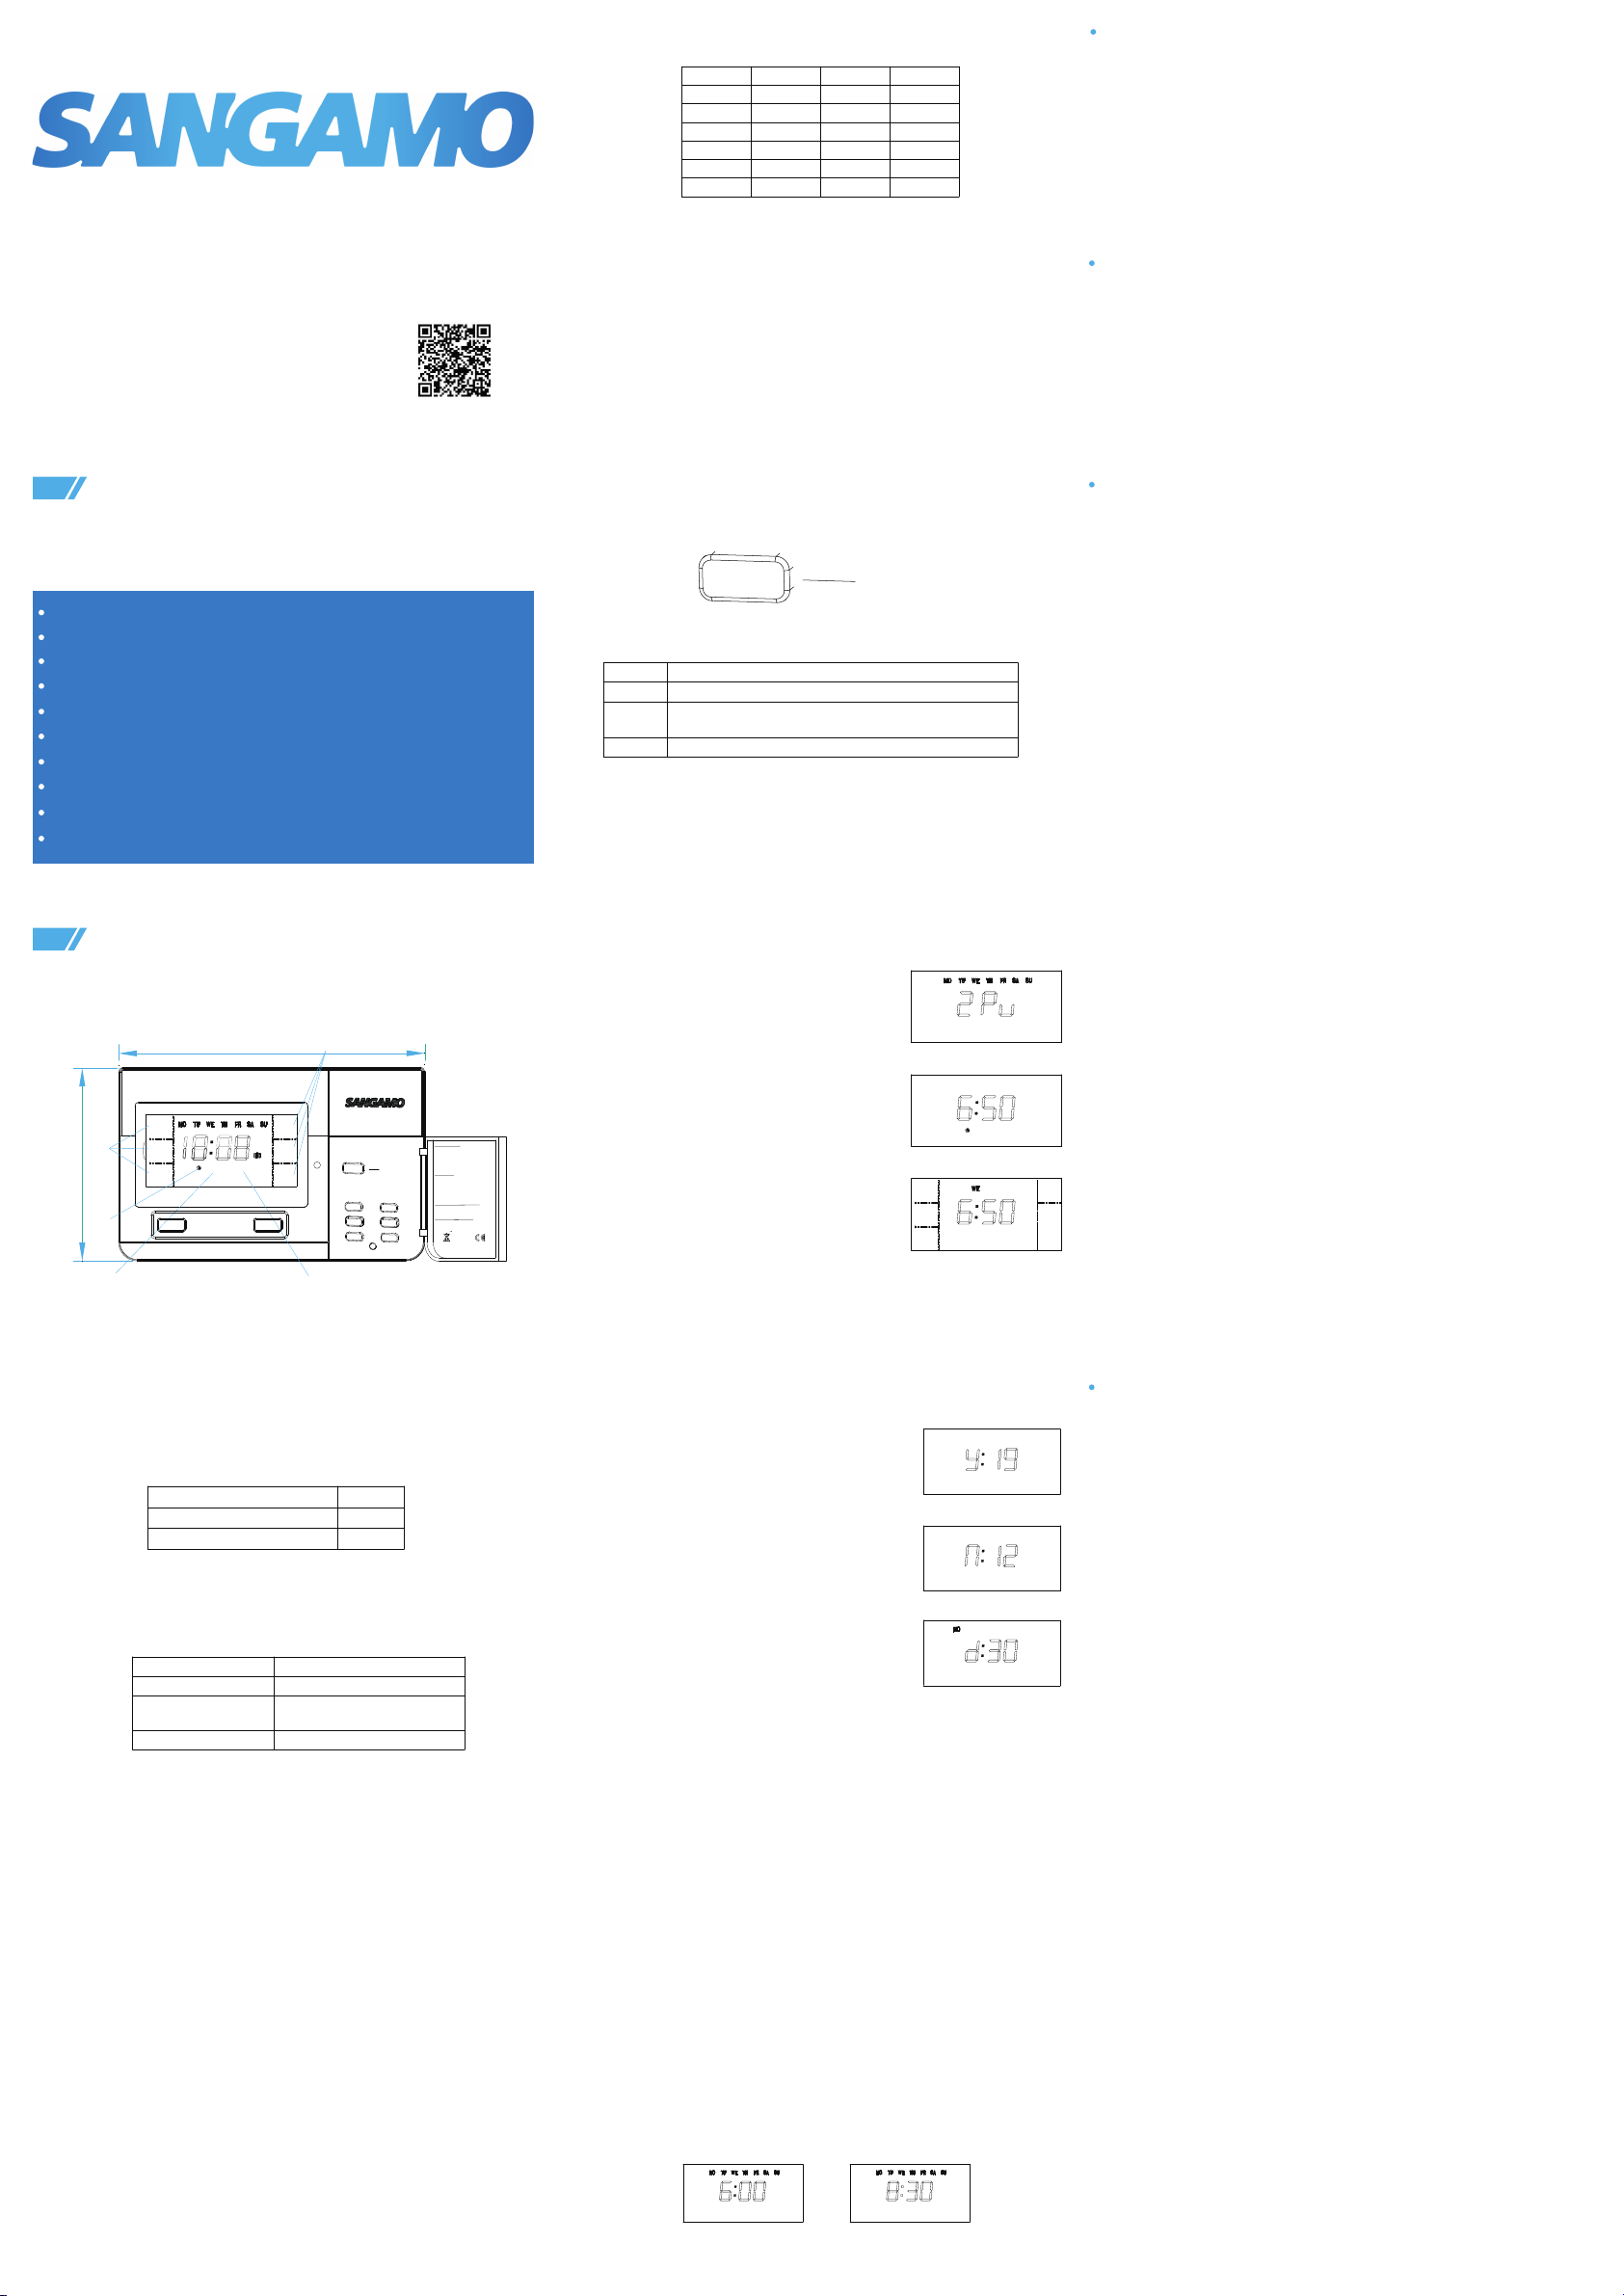
2.1 Open the front cover to show the hidden panel (as Fig. 1), and
complete all the settings as per below operation guide.
Fig.1
140mm
88.6mm
A M
P M
ON OFF
2 31
DATE
+ 1 H R
+ 2 H R
+ 3 H R
COPY
DAY
SET
-
NEXT
+
RESET
ON
OFF
AUTO
ALL DAY
CHPPR1
CURRENT SETTINGS
PressSET in turn to show product Configuration
(Set by your installer) Time Date
Program times for each channel Normal display
( Press+/- to adjust,NEXTto scroll date or program
times,DAY to scroll program days ©to copy
programs into next day )
MODE SETTING
PressMode button to select operating mode for a
channel
AUTO - Operate to the set programs
ON - Continuously ON
OFF - Continuously OFF
ALL DAY- On once between first ON and last OFF
ADVANCE ( AUTO / ALL DAY MODES)
PressADV to switch a channel ON or OFF temporarily
until the next programme time
USING +HR ( NOT IN ON MODE)
Press+HR to select1,2 or 3 Hours.
When OFF - will boost for the time
When ON - will extend current program by time
Elite Security Products
Unit 7,TargetPark,
Shawbank Rd, Lakeside,
Redditch, B98 8YN
Telephone: 01527 51 51 50
Fax: 01527 51 51 43
Web: www.espuk.com
ADV
ON OFF
AUTO
ALL DAY
+HR
ADV
<4>
<3>
<2>
<1>
<5>
2.2 Configuration:
When setting time, date or changing programme times the first
screen displayed indicates the configuration as set up by the
installer. (See ‘Setting The Time section).
The 24 hour, or 5 day/2day, or 7 day programming option as set up
by the installer can also be verified at this stage by how the Monday
to Sunday indicators are displayed.
2.6 Setting the Time:
Configuration Display
2 ON / OFF Pumped System 2 PU
3 ON / OFF Pumped System 3 PU
Programming Option
7 DAY
Mon to Sun lndicators flash
5 / 2 DAY
24 HOUR
Mon to sun individually shown
Mon to Fri together then Sat
& Sun together
Mon to sun together shown
A M
ON
ALL DAY
A M
Fig.2
Fig.3
Fig.4
If the unit is installed as a 24 hour programmer, the built in
programme will be the same for each day (i.e. Sat-Sun be same as
Mon-Fri above).
2.4 Factory Programme Settings:
2.3 Built in Programme:
For convenience, the programmer has a built in programme which
will be satisfactory for many people, but which can be changed
very easily (see section CHANGING PROGRAMME TIMES). Once
the unit is powered up this built in programme will run.If the user
changes from the built in programme and wishes to return to it,
then pressing the reset button with a non metallic pointed tool will
return the unit to the built in / default programme.
1st ON
2 PU Mon - Fri Sat - Sun
1st OFF
-
-
2nd ON
2nd OFF
1st ON
1st OFF
2nd ON
2nd OFF
3rd ON
3rd OFF
6:00am
8:30am
12:00 noon
12:00 noon
4:30 pm
10:30 pm
7:00am
9:00am
12:00 noon
12:00 noon
4:30 pm
11:30 pm
3 PU
2.5 Selecting Operating Mode:
ON
AUTO
Central Heating and Hot Water is ON continuously
ALL DAY
OFF
Central Heating and Hot Water will be switched ON or OFF as programmed
Central Heating and Hot Water will be switched ON only once each day
between the first ON time and last OFF time
Central Heating and Hot Water is OFF continuously
ON
OFF
AUTO
ALL DAY
NOTE: Every time the reset is pressed, the time and date
must be set again. See the sections ‘Setting The Time &
Setting The Date’.
1.Press the SET button once. The
configuration setting will appear on the
screen(see Fig.2).
2. Press the SET button again. The clock
icon [1] on the screen will flash(See Fig
3).
3. Press the +/- buttons to adjust the
time. Time will change quicker if pressed
continually.
4. Press SET once to move on to setting
the DATE or press multiple times to
return to RUN mode(Fig. 4).
If the unit is installed as a 24 hour programmer, the built in
programme will be the same for each day.
The COPY & DAY buttons have no affect if installed as a 24 hour
programmer.
The unit will automatically return to normal running mode if a period
of 30 seconds passes without any buttons being pressed.
Programming past midnight is NOT allowed. To overcome this the
program needs to be split in two parts from midnight as per
example-
Desired program period - on 10:00pm off 7:00am
make Prog 1 - on 12:00am off 7:00am
make Prog 2 - on 10:00pm off 12:00am
You can review or edit the date you have
set just by pressing NEXT button again and
repeating the sequence above. To confirm
the date and move on to PROGRAM mode
,press SET button once or press SET
button multiple times to return to RUN
mode.
2.7 Setting the Date:
The built in programme can easily be changed to better suit your
lifestyle.
1. Press SET button until 1 ON [3] appears. This indicates the time
shown on the display is the first ON time(see Fig.8).
2. By pressing the +/- buttons you can alter the ON time to the time
you want.
3. Press NEXT button, display will now show 1 OFF [3].
4. By pressing the +/- buttons you can alter the OFF time to the
time you want(see Fig.9).
5. Press NEXT button to access remaining ON/OFF periods and
alter in same manner as above.
6. To return to RUN mode, press the SET button until the display
return to run mode(Fig.4)
2.8 Change Program Times:
2.9 Programming Notes:
DATE
DATE
DATE
Fig.6
Fig.5
Fig.7
A M
ON
1
A M
OFF
1
Fig.8 Fig.9
If the unit is installed as a 7 day programmer, the initial programme
displayed will be for Monday.You can go to any date of the week by
pressing the DAY button repeatedly.The ON/OFF times can be
changed for each day as described above in the section “CHANG-
ING PROGRAMME TIMES”.
If you press the COPY button, the current programme will be
copied onto the next day.
If the unit is installed as a 5 day/2 day programmer, the initial
programme displayed will be for Monday to Friday.
Pressing the DAY button will take you to the programme for Satur-
day and Sunday.
The ON/OFF times can be changed for each day group as
described above in the section “CHANGING PROGRAMME
TIMES”.
If you press COPY button, the current programme will be copied
onto the next day group.
7 Day Programmer Option:
5/2 Day Programmer Option:
24 Hour Programmer Option:
NOTE: it is not possible to copy Sunday to Monday.
NOTE:Programming is in 10 minute segments.
1.Press the SET button until the Y:XX icon
(year)appears and the D(DATE)icon
[2] flashes(see Fig.5).
2.Press the +/- button to set the year.
3.Press NEXT button. M:XX appears(
month)(see Fig.6).
4.Press +/- button to set month.
Press NEXT button. D:XX appears(Day)
(see Fig.7).
5.Press +/- button to set day.
Press the reset button with a non-metallic pointed tool to restore
the built in programme.As well as restoring the built in programme,
it also resets the time to 12:00pm and the date to 01/01/2020.
Initially the display shows all segments lit for a few seconds, but
then will show the current configuration. See ‘Setting The Time’
section to continue.
As a safety feature, after reset the unit will be in OFF operating
mode. Reselect your required operating mode.
The ADVANCE function allows the user to move to the next ON or
OFF programme for a “one off” event, without having to change
the programme or change the operating mode.
Press the Central Heating channel ADV button. This will turn the
Central heating ON if it is in an OFF period and OFF if it is in an ON
period. It will stay in this state until either ADV button is pressed
again, or until a programmed ON/OFF period commences. The
word ADV [5] will appear in the left hand of the LCD.
Press the +HR button to make the desired selection with one, two
or three hours extra heating [4] and cancel options offered.
If the Central heating operating mode is OFF, then it will switch on
for the extra hours selected. If the Central heating mode is AUTO
or ALL DAY, then during an OFF period,it will switch on for the
extra hours selected. If during an ON period, then it will temporarily
extend that programme by the number of hours selected.
Warning: The +HOUR function is only available when
programme is in AUTO,ALL DAY or OFF operating modes.
Warning:The ADVANCE function is only available when
programme is in AUTO or ALL DAY operating modes.
2.10 Reset:
2.11 Using Advance:
To Advance Central Heating:
2.12 Using +HR Boost:
NOTE: If the programmer is in the OFF mode and then
+HR
button is pressed (+1 HR, + 2 HR, or + 3 HR) and the
resulting
time of the boost overlaps a START / ON time in the
AUTO mode
programme memory,then the boost will disengage. If
this
happens simply press +HR button again and then it will tempo-
rarily extend that programme by the number of hours selected.