Sangean Revery R8 User manual

GB
Version 1
SB-100

1
GB
The UNDOK App enables remote control of the Revery R8 (SB-100) running on your iPhone, iPod touch, iPad or Android smartphone. The
UNDOK™ App is available for Android and iOS. You can easily control every SmartLink device from your Smartphone or tablet with our full function
UNDOK™ App to stream your favorite music or station. Download and install free UNDOK™ App simply from the Apple iTunes App store or Android
Google Play store to control your music now.
The Bluetooth® word mark and logos are registered trademarks owned by Bluetooth SIG, Inc. and any use of such marks by SANGEAN
ELECTRONICS INC. is under license.
Sangean Revery R8 (SB-100) powered by Qualcomm®aptX™ audio.
Qualcomm is a trademark of Qualcomm Incorporated, registered in the United States and other countries, used with permission. aptX is a
trademark of Qualcomm Technologies International, Ltd., registered in the United States and other countries, used with permission.

2
Contents
Introduction .................................................................................... 1-10
Important safety instructions .............................................................. 4
Before you can use this product ......................................................... 5
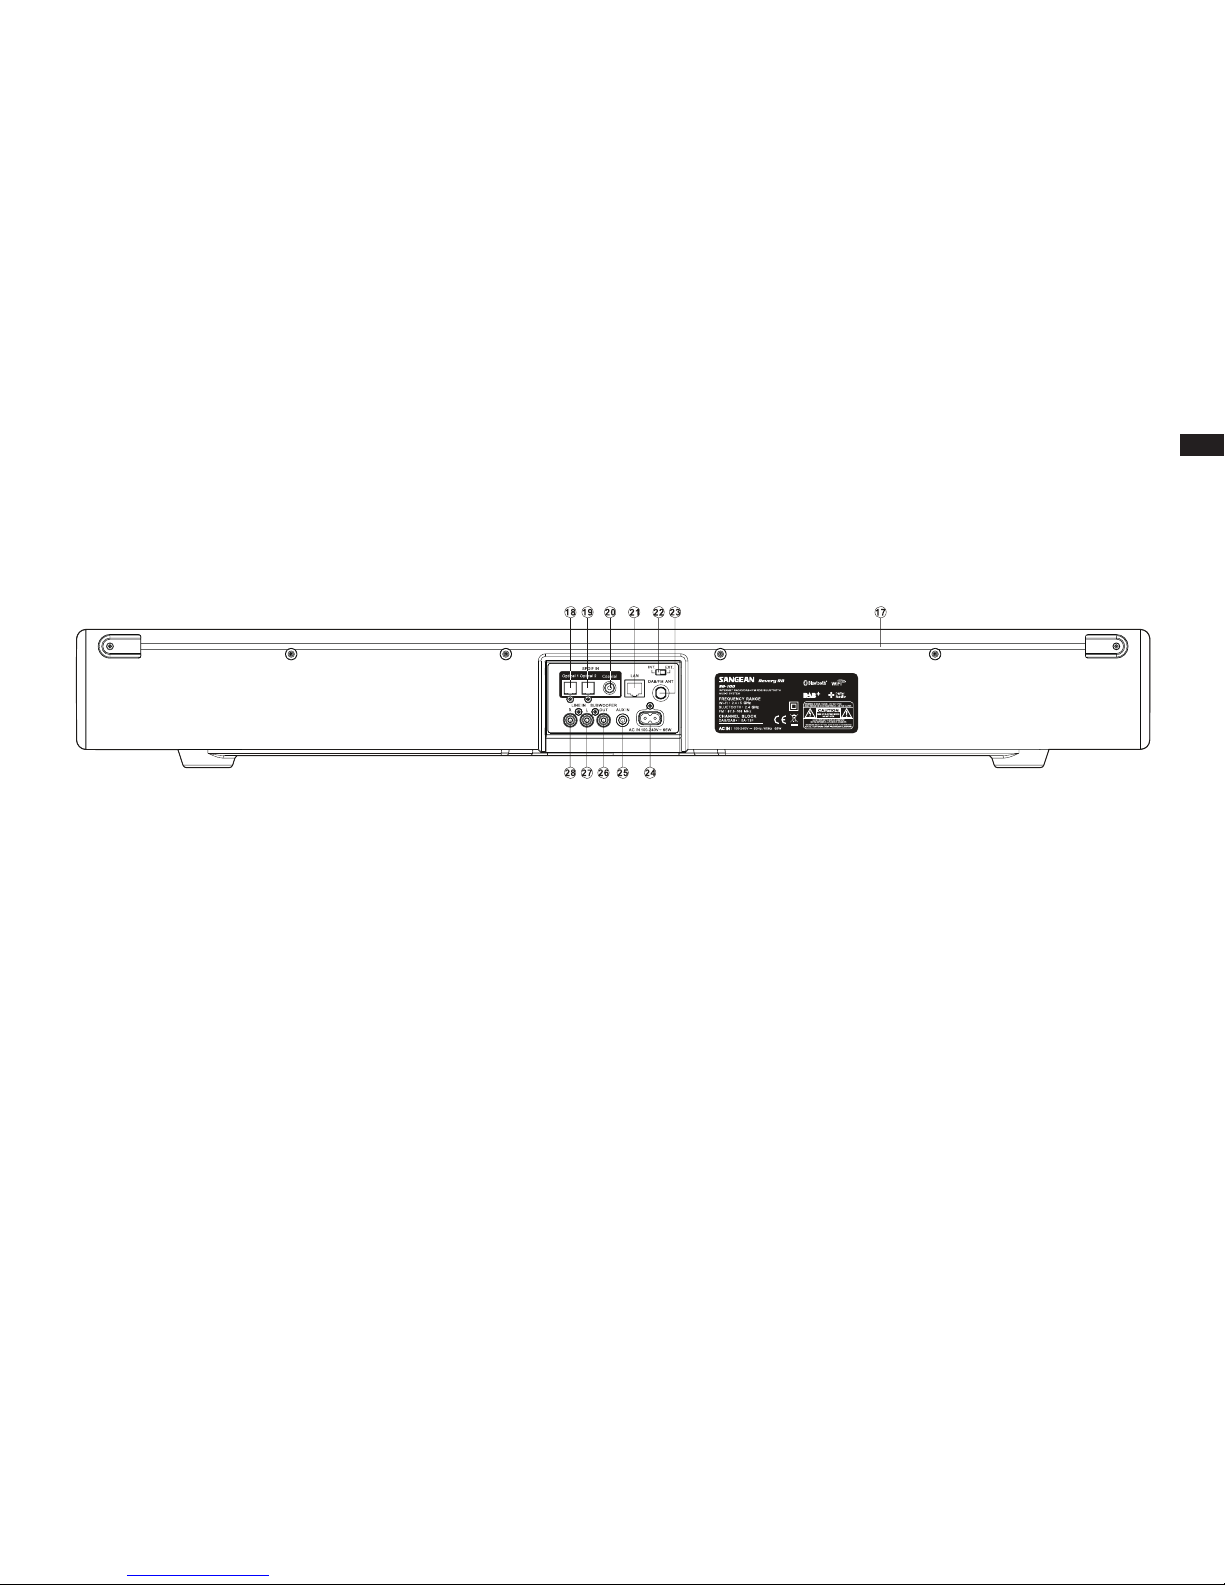
Controls and connections ................................................................ 6-7
Remote control operation ................................................................ 8-9
Navigation controls ........................................................................... 10
Installation .................................................................................... 11-20
Installing the soundbar ................................................................ 11-13
Connecting the soundbar ........................................................... 14-19
Infra-red repeater function ............................................................... 20
Antenna switch ................................................................................. 20
Network
conguration ............................................................
21-30
Connecting your soundbar to your computer network .................. 21-27
Using the UNDOK app ............................................................... 28-29
Network remote control options ....................................................... 30
Using an ethernet connection .......................................................... 30
Internet Radio mode .................................................................... 31-44
Internet Radio - the basics ............................................................... 31
Selecting a radio station by location and genre .......................... 32-34
Searching for a radio station by name ............................................. 35
Selecting a new or popular station .................................................. 36
Selecting a podcast ......................................................................... 37
Presetting stations ...................................................................... 38-39
Display modes ................................................................................. 40
Customising your soundbar ........................................................ 41-44
DAB mode .................................................................................... 45-52
Selecting a DAB radio station .......................................................... 46
Display modes ................................................................................. 47
Finding new DAB radio stations ....................................................... 48
Manual Tuning ................................................................................. 49
Dynamic Range Control settings ................................................ 50
Station order setup .......................................................................... 51
Prune stations .................................................................................. 52
FM mode ...................................................................................... 53-59
Operating your radio in FM mode .................................................... 53
Manual tuning .................................................................................. 54
Display modes ................................................................................. 55
Scan setting ..................................................................................... 56
Stereo / Mono switching .................................................................. 57
Presetting stations in DAB and FM modes ................................. 58-59
Music Player mode ...................................................................... 60-72
Use with Windows, Apple Mac, Linux .............................................. 60
Accessing your audio les via a UPnP server
.............................61-62
Locating and playing media les using UPnP
............................
63-66
Display modes ................................................................................. 67
Playlists ...................................................................................... 68-70
Prune servers .................................................................................. 71
Windows 'Play To' / 'Cast to Device' function ................................... 72
Listening to Spotify …………………....................……………….. 73-75

3
GB
Contents
Listening to music via Bluetooth streaming ……………...……. 76-79
Clock and Alarms ........................................................................ 80-89
Automatically updating the clock ...................................................... 80
Setting the clock format ................................................................... 81
Manually setting the clock .....................................................
82-83
Setting the alarm clock ..........................................................
84-86
Snooze timer ................................................................................... 87
Disabling alarms ............................................................................ 88
Sleep timer ....................................................................................... 89
Multi-room and UNDOK .........................................................
90-93
Display and Audio .................................................................
94-100
TV audio options ....................................................................
94-95
Equaliser function
..................................................................... 96-97
Subwoofer control ............................................................................ 98
Mute function ................................................................................... 98
Brightness control ....................................................................... 99
Inactive Standby timer ............................................................. 100
Language selection .................................................................. 100
Information ……………………………...................……….... 101-108
Factory reset .................................................................................. 101
Software update ............................................................................. 102
Network proles ............................................................................. 103
Clear network settings ................................................................... 104
Manual network conguration ........................................................ 105
Software version display and Audio FAQ ....................................... 106
Audio codecs .................................................................................. 107
Specications ..................................................................................108

4
Important safety instructions
1. Read these instructions.
2. Keep these instructions.
3. Heed all warnings.
4. Follow all instructions.
5. Do not use this apparatus near water.
6. Clean only with dry cloth.
7. Do not block any ventilation openings. Install in accordance with the
manufacturer’s instructions.
8. Do not install near any heat sources such as radiators, heat
registers, stoves, or other apparatus (including amplifiers) that
produce heat.
9. Do not defeat the safety purpose of the polarized or grounding-type
plug. A polarized plug has two blades with one wider than the other.
A grounding type plug has two blades and a third grounding prong.
The wide blade or the third prong are provided for your safety. If the
provided plug does not t into your outlet. Consult an electrician for
replacement of the obsolete outlet.
10. Protect the power cord from being walked on or pinched particularly
at plugs, convenience receptacles, and the point where they exit
from the apparatus.
11. Only use attachments/accessories specied by the manufacturer.
12. Use only with the cart, stand, tripod, bracket, or table
specied by the manufacturer, or sold with the apparatus.
When a cart is used, use caution when moving the cart/
apparatus combination to avoid injury from tip-over.
13. Unplug this apparatus during lightning storms or when unused for
long periods of time.
14. Refer all servicing to qualified service personnel. Servicing is
required when the apparatus has been damaged in any way, such
as power-supply cord or plug is damaged. liquid has been spilled
or objects have fallen into the apparatus, the apparatus has been
exposed to rain or moisture, does not operate normally, or has been
dropped.
15. To Reduce the Risk of Fire or Electric Shock, Do not Expose This
Appliance To Rain or Moisture.
16. The Shock Hazard Marking and Associated Graphical Symbol is
provided on the rear of unit.
17. Apparatus shall not be exposed to dripping or splashing and no
objects lled with liquids, shall be placed on the apparatus.
18. The power plug should be close to the soundbar, and easy to be
approached that during the emergency, to disconnect the power
from the soundbar, just unplug the power plug from the AC power
slot.
19. Where the MAINS plug or an appliance coupler is used as the
disconnect device, the disconnected device shall remain readily
operable.
CAUTION:
T
hese servicing instructions are for use by qualied service personnel only.
To reduce the risk of the electric shock, do not perform any servicing
other than that contained in the operating instructions unless you are
qualied to so.

5
GB
Before you can use this product
Before you can use your soundbar, you must have the following:
● A broadband Internet connection.
● A router (or equivalent wireless access point) providing a WiFi
signal or Ethernet connection, connected to your broadband Internet
Service Provider. The broadband modem, router and wireless access
point will often be a single combined unit supplied by your Internet
Service Provider or bought from a computer store.
● A smartphone or tablet which uses either the Android operating
system (version 4.0.3 or later) or Apple iOS (version 8 or later).
● If your wireless network requires a security password to allow
connection, then you either need to know the WEP, WPA or WPA2
key used for encryption so that you can get the soundbar to
communicate with the network, or your router needs to offer WiFi
Protected Setup (WPS).
● If you choose to connect the soundbar to your network using a wired
Ethernet connection, then an Ethernet cable of appropriate length
will be needed. If it is intended to listen to FM radio extensively, then
there may be benefit in using a shielded Ethernet cable since this
may reduce possible interference to the radio.
The soundbar is compatible with 802.11b, g, n or a networks and can
use 2.4 GHz or 5 GHz WiFi frequency bands.
If connecting using WiFi, the soundbar will typically work within a
10-
20 metre radius from your wireless router or access point. The
actual range achieved will depend upon the building type, other nearby
wireless networks, and possible interference sources. DAB and FM
radio functions can operate wherever the soundbar is able to receive a
suitable broadcast signal.
IMPORTANT: Before you continue, make sure that your router (or
access point) is powered up and working with your broadband Internet
service (use your computer, smart-phone or tablet to verify this). To
get this part of the system working you must refer to the instructions
supplied with those items.

6
Controls and connections
1. Menu Up / Right / Next button
2. Menu Down / Left / Previous button
3. Select / Stop button
4. Preset / Play / Pause button
5. Volume Up button
6. Volume Down button
7. Remote control sensor
8. Mode button
9. On / Standby button
10. LCD display
11. Menu button
12. Info button
13. Back button
14. Tweeter / Mid-range speaker x 2
15. Bass / subwoofer speaker x 2
16. NFC detection area

7
GB
Controls and connections - cont.
17. Infra-red repeater /
Internal DAB / FM antenna
18. Optical 1 digital input socket
19. Optical 2 digital input socket
20. Coaxial digital input socket
21. Ethernet socket (RJ45)
22. Internal / External antenna switch
23. External DAB / FM antenna socket
24. Mains input socket
25. Auxiliary input socket
26. External subwoofer output socket
27. Line input socket (left)
28. Line input socket (right)

8
Remote control handset
A. On / Standby button
B. Alarm button
C. Infra-red LED
D. Sleep / Clock Set button
E. CD Eject button (not available in this model)
F. Record button (not available in this model)
G. EQ button
H. Info / Menu button
I. Select / Stop button
J. Menu Right / Next button
K. Play / Pause button
L. Volume Up / Down button
M. Mute button
N. Random button
O. Repeat button
P. Key pad buttons 1-10/0
Q. Subwoofer Up / Down button
R. Menu Down / Folder Down button
S. Back button
T. Menu Left / Previous button
U. Menu Up / Folder Up button
V. Auto Tune button
W. Media button
X. Radio button
Y. Dimmer button
Remote control functions
Most of the functions of the SB-100 soundbar can be controlled using either the product or the remote
control. For the majority of this manual we will describe operation using the remote control.
There are a few functions which are more easily accessed using the remote control. These are:
Radio station presets DAB / FM auto-tune
Random function Audio mute
Repeat function

9
GB
Remote control battery replacement
1. Slide out the battery holder as shown.
2. Gently remove the batteries from the holder.
3. Insert 2 x CR2032 size batteries into the compartment with the positive side of the batteries
(marked +) facing upwards with the holder positioned as shown.
Note: The remote control uses CR2032 batteries. For optimum battery life, fit batteries in
locations A and B. The control can also be used with a single battery installed in location
A but the battery life will be reduced. The control will not work if there is only a single battery
installed in location B.
4. Replace the battery holder as shown and ensure that the battery holder clicks into place.
5. If the remote is not to be used for an extended period of time it is recommended that the
batteries are removed.
IMPORTANT: The batteries should not be exposed to excessive heat such as sunshine, re or
the like. After use, disposable batteries should if possible be taken to a suitable recycling centre.
On no account should batteries be disposed of by incineration.
WARNING:
● Do not ingest the battery. Chemical Burn hazard.
●
The remote control supplied with this product contains a coin/button cell battery. If the coin/button
cell battery is swallowed it can cause severe internal burns in just 2 hours and can be fatal.
● Keep new and used batteries away from children. They can be a choking hazard.
● If the battery compartment does not close securely, stop using the product and keep it away
from children.
● If you think batteries might have been swallowed or placed inside any part of the body, seek
immediate medical attention.
CAUTION:
Danger of explosion if the battery is incorrectly replaced. Replace only with the same or
equivalent type.
C
R
2
0
3
2
C
R
2
0
3
2
A
B

10
Navigation controls
This page describes the basic means of controlling your SB-100 Soundbar. Instructions for each
operating mode are given in the later sections of this book.
1. Pressing the On/Standby button brings your soundbar out of Standby mode. Pressing On/
Standby while the soundbar is in use will cause it to return to the Standby mode with the clock
display.
2. Pressing the Radio button (on the remote control) gives you access to each of the operating
modes in turn: Internet Radio, Spotify, DAB radio and FM radio.
Pressing the Media button (on the remote control) gives you access to each of the operating
modes in turn: Music Player, Bluetooth, Auxiliary Input, Optical 1, Optical 2, Coaxial and Line
Input.
3. Alternatively press and release the Mode button on the soundbar and then use the Menu Up
or Down and Select buttons to select the desired operating mode.
4. Pressing and holding the Info/Menu button (on the remote control) or press and release the
Menu button (on the soundbar) will access the menu system. The Info button also allows the
display of information relating to the radio station or music le being played.
5. Many operations require the user to make a selection from the menu. Highlight the menu item
using the Menu Up or Down buttons. Press and release the Select button to select that item.
If there are more than six items in a menu, then the display will automatically scroll up or down
so that the additional items become visible. A sliding bar on the right will give an indication
showing the current portion of the menu that is displayed.
If there are many items in a menu, then the soundbar allows the menu to 'wrap around' in ei-
ther direction. This can make it easier to reach items at the end of a long menu, such as a list
of countries or Internet radio stations.
6. If an error is made when navigating the menus, it is generally possible to go back to a higher
level menu by pressing the Back button.
http://
Internet
Radio
Bluetooth OPTICAL 1
OPTICAL 2 COAXIAL LINE IN
Internet radio
Spotify
Music player
DAB
FM
Bluetooth
Main menu
2
4
6
2
3-5
3-5
3
1
3-5

11
GB
Installing the soundbar
If your TV sits on a TV table or cabinet, then it will often be simplest to place the soundbar on
the same surface in front of the TV. Note that the soundbar’s infra-red repeater function will allow
your TV to respond to its remote control, even if its remote control sensor is obscured by the
soundbar.
If your TV is wall mounted, then you may use the mounting brackets supplied with the soundbar
to allow it to be xed to the wall beneath the TV.
Cautions
● Do not place magnetically sensitive items near the soundbar such as a hard disc drive etc.
● Depending on the installation environment, it may be better to connect the soundbar and
external devices (such as a TV) before installing the soundbar.
● Do not place the soundbar within 5cm (2") of the TV.
● Ensure the placement of the soundbar does not block access to any of the controls on your
TV.
● Ensure that there is sufcient slack in any cables before moving the soundbar, or disconnect
the cables before moving it.
TV

12
Attaching the soundbar to the wall
The soundbar is supplied with mounting brackets to allow wall mounting.
1. Use the mounting template to mark the hole positions before drilling. Take care to ensure that
there are no cables or pipes in the wall near the drilling locations.
IMPORTANT: Before drilling the holes and applying screws, please make sure that the screws
are the appropriate length for the wall material. The screws must be able to support the weight
of the installed soundbar. The soundbar and brackets weigh approximately 7 kg (15 Ib).
2. Use screw xings appropriate for the wall type. Do not overtighten the screws.
Note : Do not attach the soundbar to a wall that is made of weak materials such as plaster or
wood paneling which could cause the soundbar to fall resulting in damage to the soundbar or
personal injury.
3. The soundbar may be placed on the wall brackets as shown.
X2
X2

13
GB
4. Use the screws supplied with your soundbar to x the underneath of your soundbar to the wall
brackets. Do not overtighten.
Sangean will not accept any responsibility for any accidents caused by inadequate
installations.
5. To remove the soundbar from the wall carefully reverse steps 1-4 and put the wall brackets
and screws in a safe place for future use.
Important:
Under no circumstances should the soundbar be placed on the brackets without the fixing
screws also being used to secure the soundbar to the brackets. Vibration from the loudspeakers,
or an accidental pull on the cables could cause the soundbar to fall resulting in personal injury or
damaged to property.
It is the users responsibility to ensure that the xings which are used to secure the brackets to
the wall are suitable for the wall structure and are strong enough to support the weight of the
soundbar, brackets and cables. The soundbar and brackets weigh 7 kg (15 lb).
Cautions for wall mounting
● Secure the soundbar rmly to the wall and check the soundbar is securely xed to the wall
after the installation. Incorrect or inadequate installation could cause the soundbar to fall and
could result in damage to the unit or personal injury.
● Fix the cables in place where they will not become loose. If you accidently catch a loose cable
the soundbar may fall.
● Do not attach the soundbar to a wall that is made of weak materials such as plaster or wood
panelled walls.
● Ensure that you use the correct size screws that can support the weight of the soundbar.
● Never place any items on the soundbar.
● Keep children away from the cables of the soundbar. Pulling the cables could cause the
soundbar to fall.
● Do not install this equipment in a conned space such as a book case or similar unit.

14
Connecting the soundbar
The soundbar has been designed to allow a variety of methods of
connection to your TV and to other equipment.
In many cases, the TV will already be connected to a wide range of
devices. Typically these may include satellite or cable TV receivers,
DVD or Blu-ray players, games consoles, etc. Because the TV is
already receiving both audio and video signals from these sources, the
simplest and recommended way to connect the soundbar is to take its
audio signal from the TV. This allows the TV to continue to act as the
means of selection for these sources which helps to keep the operation
of the system as simple as possible.
The soundbar can be used in this way with TVs which have either a
digital audio output (typically an optical connection) or a “Line level
output” (typically via a pair of phono sockets). Such outputs are
designed to feed the audio signal to an external amplifier and are
generally located behind the TV. You should refer to the documentation
supplied with your TV for details of the audio connections available.
The use of your TV as the audio source for the soundbar is described
on later section. The means connection of other devices is described in
the subsequent pages. All of the connection illustrations are examples.
There are many ways to connect different types of devices, and while
we make some recommendations, you may choose to use different
connections for your own installation.
Settings for digital audio devices
If the soundbar is connected to a device with a digital output, some
conguration of that device may be required to ensure that audio signal
is played correctly from the soundbar. Devices such as cable TV and
satellite receivers, DVD and Blu-ray players generally allow their digital
outputs to be set to output the audio either in stereo or in surround
sound formats such as Dolby Digital or DTS. For use with the soundbar
the digital output must be set to Stereo, sometimes also referred to as
'Downmix', 'PCM' or 'PCM Stereo' in the device settings. If this is not
done, you may hear either a constant hiss or a loud buzzing instead of
the expected audio.
Multi-room capability
For most of its operating modes, the soundbar is able to share audio
with other connected multi-room products. So, for example, you could
choose to listen to an Internet Radio station, to a Spotify selection, or to
an external device such as an MP3 player, and have the sound played
through the soundbar and shared with up to four other devices at the
same time. The multi-room capabilities of the soundbar are explained in
more detail in the ‘Multi-room and UNDOK' section of this manual.
When using your soundbar while watching TV the multi-room function
is normally disabled with the TV sound being only available from the
soundbar. This is because the delays associated with sharing the sound
with other multi-room devices and keeping them all in step would result
in the sound being noticeably delayed compared to the image on the
TV.
The soundbar’s setting allow one input to be specied as the TV audio
input. This input is then not shared with other multi-room devices and
is played without signicant delay. When playing from other sources to
a group of multi-room products there is a very short delay added, but is
it only about half a second. In this case, all the connected devices will
play with their sound fully synchronised.
Details of the TV audio input selection and how it is configured are
given in the ‘TV audio options' section of this manual.
During installation
We recommend that the soundbar and any devices to be connected
to it are switched off (or at least in standby) while the connections are
made in order to prevent the possibility of damage or excessive volume
from the speakers.

15
GB
Audio Connection to your TV (recommended method)
The simplist and recommended way to connect the soundbar is to
connect it to an audio output on your TV. Many modern TVs may have
a digital output that can be used see Option A below.
An alternative output using a pair of audio sockets is sometimes
provided, see Option B.
1. Option A. Connect the TV and soundbar using an optical cable.
The connection type on the soundbar is often known as a Toslink
socket. Remove any protective endcaps from the optical cable (if
tted) and check the orientation of the plugs before inserting one end
into the TV and the other into one of the Optical Input sockets on the
soundbar.
2. Option B. Connect the TV and soundbar using a stereo audio cable.
The connection type on the soundbar is a pair of phono sockets
(sometimes called RCA sockets), one socket for the left channel and
one for the right. You may also use the 3.5mm stereo Auxiliary input
socket if that is more convenient. We do not recommend making
the connection to a headphone output from your TV since that will
generally be at a signal level which is too low for this purpose.
3. Use the TV Audio Input option in the system settings menu to specify
which input is to be used for playing sound from the TV. Once this
has been set, you simply press and release the Media button on the
remote control to select the appropriate input on the soundbar for TV
listening.
TV
Set top box / Satelite / Cable etc
Optical digital output
Optical cable
A
Plug the mains lead into
the mains socket and
switch on the wall socket
2
HDMI cable
(example)
Cable with phono plugs
B

16
Alternative audio connection methods
In some cases, there may not be a suitable audio output available from
the TV. If the TV is fed from a device such as a cable TV or satellite
receiver, then that receiver may have an audio output which can be fed
to the soundbar.
The example shows the TV connected to a cable TV or satellite receiver
using an HDMI cable, and with the audio being fed separately to the
soundbar, using either an analogue or digital connection. The choice
of connection method will depend on the capabilities of the cable TV or
satellite receiver.
1. Option C. Connect the cable TV or satellite receiver to the soundbar
using an optical cable. The connection type on the soundbar is often
known as a Toslink socket. Remove any protective endcaps from the
optical cable(if tted) and check the orientation of the plugs before
inserting one end into the TV and the other into one of the Optical
Input sockets on the soundbar. Ensure that the digital output is set to
stereo.
2. Option D. Connect the cable TV or satellite receiver to the soundbar
using a stereo audio cable. The connection type on the soundbar is
a pair of phono sockets (sometimes called RCA sockets), one socket
for the left channel and one for the right. You may also use the 3.5mm
stereo Auxiliary input socket if that is more convenient.
3. Use the TV Audio Input option in the system settings menu to specify
which input is to be used for playing sound from the TV. Once this
has been set, you simply press and release the Media button on the
remote control to select the appropriate input on the soundbar for TV
listening.
TV
Set top box / Satelite / Cable TV etc
Optical cableC
Plug the mains lead into
the mains socket and
switch on the wall socket
2
HDMI cable
(example)
Cable with phono plugs
Optical
digital
output
D

17
GB
Using a DVD or Blu-ray player to play CDs
A device such as a DVD or Blu-ray player can be used to watch a lm
on the TV with the audio signal coming via the TV to the soundbar.
If
it is desired to be able to play other media such as CDs, then
the addi
tional inputs of the soundbar allow the player to be directly
connected. In this way, the audio from the CD may also be shared
with other connected multi-room products. The audio connection from
the TV is then used when watching films from the player, while the
connection from the player to the soundbar is used when playing CDs.
This ensures that the audio for the lms is not delayed by multi-room
streaming, while the CD can be enjoyed around the house. In addition,
the TV does not then need to be switched on.
The diagram shows the DVD / Blu-ray player connected to the TV using
an HDMI connection (E). There is an optical connection from the TV to
the soundbar (F) for sound when watching TV or lms on DVD or Blu-ray
discs.
For playing CDs the diagram shows the use of either an analogue
connection (G) or a digital connection (H) from the DVD or Blu-ray
player to the soundbar. You would only need to use one of these two
options.
If you listen to DVD or Blu-ray discs with the soundbar connected using
a digital signal (not via the TV), you should ensure that the player's
output is set to stereo.
TV
Bluray / DVD / CD player
Optical cableH
HDMI cable (example)
Connecting your TV and Bluray / DVD / CD player
E
Optical lead
Connecting TV to Soundbar
F
Plug the mains lead into
the mains socket and
switch on the wall socket
Cable with phono plugs
Optical
digital
output
G

18
Using the Auxiliary input socket
Your Multi-room soundbar has an auxiliary input to allow audio from
devices such as an MP3 player, CD or turntable to be played to other
devices connected in a multi-room network.
1. Connect a stereo lead from the output of the chosen audio source
to the Auxiliary Input socket located at the rear of the soundbar.
Typically this lead will have a 3.5mm stereo plug at both ends.
2. Switch on your soundbar.
3. Press and release the Media button until the Aux In mode is selected.
4. Press 'Play' on the connected audio device if needed.
5. Depending upon the connected devices, you may need to adjust the
volume of any products connected to the soundbar. If used as part of
a multi-room group, you may also need to adjust the volume settings
of other products in the group.
Note: If the Line Input sockets are not being used to receive the audio
signal from your TV, then they may also be used as an additional
auxiliary input. MP3 player
Turntable
Stereo cable with
3.5mm plugs

19
GB
Connection to a external Subwoofer
Your multi-room soundbar has a built-in subwoofer capability which in
many cases will provide more than enough bass. An external subwoofer
can also be added if required, and the soundbar has an output
specically for this purpose.
We recommend that the soundbar and any devices to be connected
to it are switched off (or at least in standby) while the connections are
made in order to prevent the possibility of damage or excessive volume
from the speakers.
1. Connect a lead from the Subwoofer output socket located at the
rear of the soundbar to the input socket on your external subwoofer.
2. Switch on your soundbar and external subwoofer.
3. The subwoofer volume control on the soundbar remote control
adjusts levels of the internal subwoofer function and also the signal
levels to an external subwoofer.
You should refer to the documentation supplied with your external
subwoofer to determine how to connect to it and how to congure its
setting. The external subwoofer output on the soundbar is primarily
active for frequencies below 100Hz.
Note: If your soundbar or subwoofer is located in the corner of a room
(especially on the diagonal) then you may need to reduce the subwoofer
volume setting on the soundbar. This is because the reections from
the walls around the corner will tend to enhance the bass response of
the system. Conversely, in a large open area, you may wish to increase
the subwoofer volume setting on the soundbar.
Input
socket
External
Subwoofer
3
3
Other manuals for Revery R8
1
This manual suits for next models
1
Table of contents
Other Sangean Speakers manuals