Saniflo SANIFOS 110 P Manual

Operating/Installation manual
SANIFOS®
Pumping station for waste water,
floor-standing or underground
1803E
N
08.19
SANIFOS®110 P
SANIFOS®280
SANIFOS®610
SANIFOS®1300
EN

CONTENTS
Copyright / Disclaimer - SANIFOS®Installation and Maintenance
Manual - Original operating instructions.
All rights reserved. The contents of this document must not be
reproduced, modified or disclosed to third parties except upon written
consent from the manufacturer.
This document may be subject to change without notice.
SFA - 41 Bis Avenue Bosquet - 75007 PARIS
1. SAFETY....................................................................... pg.1
1.1 Identifying the warning signs ............................................ pg.2
1.2 General information ........................................................ pg.2
1.3 Intended use.................................................................... pg.3
1.4 Qualification and training of staff....................................... pg.3
1.5
Safety instructions for maintenance,inspection and installation
. pg.3
1.6 Consequences and risks of non-compliance......................... pg.4
with the operating manual
2. TRANSPORT / TEMPORARY STORAGE
RETURN / DISPOSAL.................................................... pg.4
2.1 Receiving inspection......................................................... pg.4
2.2 Transport ........................................................................ pg.4
2.3 Temporary storage / Packaging......................................... pg.5
2.4 Return ............................................................................ pg.5
2.5 Disposal at the end of life ................................................. pg.5
3. DESCRIPTION ............................................................ pg.5
3.1 General description.......................................................... pg.5
3.2 Scope of supply ............................................................... pg.6
3.3 Rating plate..................................................................... pg.7
3.4 Design and operating mode .............................................. pg.7
3.4.1
SANIFOS
®
110 P, SANIFOS
®
280, SANIFOS
®
610 (1 pump)
. pg.7
3.4.2 SANIFOS®610 (2 pumps) and SANIFOS®1300........... pg.7
3.4.3 Technical specifications .............................................. pg.8
3.4.4 Pump curves ............................................................. pg.9
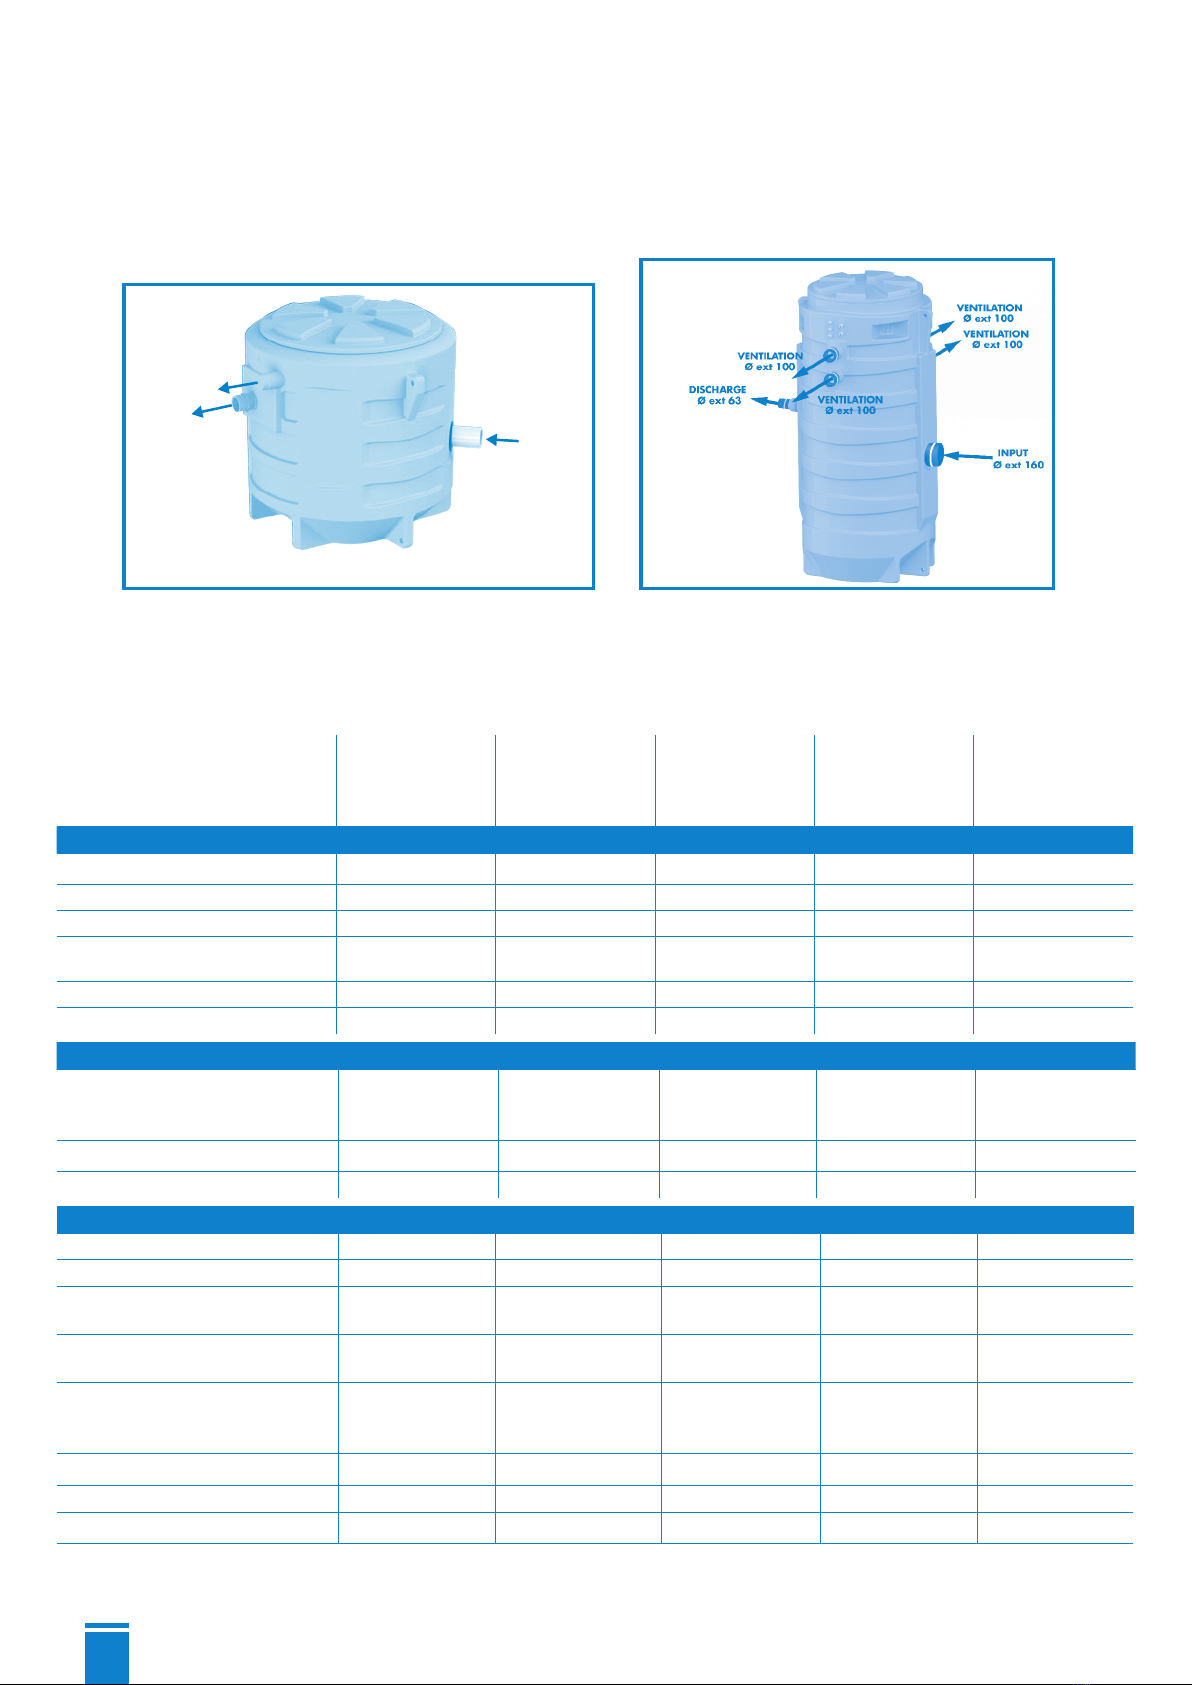
3.4.5 Product dimensions................................................... pg.10
3.5 Sump tank..................................................................... pg.12
3.6 Noise level.................................................................... pg.12
4. PREPARATION OF THE TANK ...............................pg.12
4.1 Preparation for the water inlet pipe ................................. pg.12
4.2 Installation of the pump in the tank .................................. pg.12
4.3 Electrical wiring ............................................................ pg.13
4.3.1 Wiring of pumps and floats ...................................... pg.13
4.3.2 Cable Output ......................................................... pg.15
4.4 Installing the tank cover ................................................. pg.16
4.5 Ventilation .................................................................... pg.16
4.6 Discharge hole ............................................................. pg.17
4.7 Water inlet holes ........................................................... pg.17
5. INSTALLATION / ASSEMBLY ................................pg.17
5.1 Installing the pumping station, floor-standing.................. pg.18
5.2 Installing the pumping station, underground ..................... pg.18
5.3 Adjusting the height of the cover to the ground ................. pg.20
6. SMART CONTROL BOX..........................................pg.21
6.1 Electrical characteristics of the control unit ........................ pg.21
6.2 Technical characteristics of the detection device ................. pg.21
6.3 Dimensions of the SMART remote control box .................... pg.22
6.4 Transport ...................................................................... pg.22
6.5 Connecting the control unit ............................................. pg.22
6.6 Using the SMART Control unit ......................................... pg.24
6.7 Option of connection to an external alarm ....................... pg.26
6.8 Remote wireless alarm box ............................................. pg.27
(delivered with SANIFOS®610 and SANIFOS®1300)
7. COMMISSIONING ..................................................pg.27
7.1 Prerequisites for commissioning........................................ pg.27
7.2 Application limit............................................................. pg.27
7.3 Starting and stopping .................................................... pg.28
7.4 Starting frequency ......................................................... pg.28
7.5 Commissioning with the control box ................................. pg.28
7.6 Operations required for commissioning ............................ pg.28
7.7 Decommissioning ........................................................... pg.29
8. MAINTENANCE .......................................................pg.29
8.1 General information / Safety instructions .......................... pg.29
8.2 Maintenance and inspection operations............................ pg.29
8.3 Maintenance contract ..................................................... pg.30
9. CHECKLIST FOR COMMISSIONING /
INSPECTION (1) AND MAINTENANCE (2)
......................pg.30
9.1 Checklist for commissioning SANIFOS®............................ pg.30
9.2 Checklist for maintenance of SANIFOS®........................... pg.31
Glossary
Clearance
The clearance is the space that needs to be provided for
interventions.
Discharge piping
Piping for raising wastewater above the back-flow level routing
it to the sewer.
Dual station
Pumping station for wastewater equipped with a second pump of
the same power that starts automatically when needed.
Effective volume
Volume to be discharged between the start level and the stop
level.
EN 12050-1
Current European standard for pumping stations for effluents
containing faecal material intended for discharge below the
back-flow level in buildings and on land.
Inlet piping
Line through which wastewater from sanitary fixtures is routed to
the pumping station.
ND (NOMINAL DIAMETER)
Parameter used to characterise parts that are suitable for each
other, for example: pipes, connections, sleeves.
Noise level
Expected sound emissions, expressed in sound pressure level
LpA in dB(A).
Pumping station for wastewater
Facilities for the automatic collection and pumping of
wastewater and blackwater above the back-flow level.
Separator
Equipment which prevents, by gravity, the penetration of
harmful substances into the discharge system by separating
them from wastewater, for example: grease trap.
Ventilation pipe
Ventilation duct limiting pressure variations inside the
wastewater pumping station. The pumping station must be
ventilated from above the roof (when it is installed inside the
house).
Wastewater
Water changed by the use that was made of it (for example:
domestic wastewater).

1
1. SAFETY
This device can be used by children who are at least 8
years old and by people with reduced physical, sensory
or mental capacities or those without knowledge or
experience, if they are properly supervised or if they have
been given instructions on safely using the device and the
associated risks have been understood. Children should not
play with the device. Children should not clean or perform
maintenance on the device without supervision.
ELECTRICAL CONNECTIONS:
The electrical installation must be carried out by a qualified
electrical engineer. The device's power supply must be
connected to ground (class I) and protected by a high
sensitivity differential circuit breaker (30 mA). Devices
without plugs must be connected to a main switch on
the power supply which disconnects all poles (contact
separation distance of at least 3 mm). The connection must
be used exclusively to provide the power to the product. If
the power cord is damaged, to prevent possible danger,
it must be replaced by the manufacturer, customer service
team or a similarly qualified individual. Regulations: be sure
to comply with the provisions of the standard in force in the
country of use (UK : BS 7671) concerning the protection
volumes in a bathroom.

2
1.1 Identication the warning signs
Danger
This term defines a high risk of danger, which can
lead to death or serious injury, if not avoided.
Warning
This term defines a hazard which could cause a risk
to the machine and its operation, if it is not taken into
account
Dangerous area
This symbol, in combination with a keyword,
characterises hazards that could lead to death or
injury.
Dangerous voltage
This symbol, in combination with a keyword,
characterises dangers associated with the voltage
and provides information on voltage protection.
Property damage
This symbol, in combination with the keyword
ATTENTION, characterises dangers to the machine.
1.2 General points
This operating and installation manual contains important
instructions to follow for the fitting, operation and maintenance
of the SANIFOS®pumping station. Observing these instructions
is essential for safe operation and prevents personal injury and
property damage. Please observe the safety instructions in all
the sections.
Before fitting and commissioning the pumping station, qualified
staff/the operator concerned must read and understand all
these instructions.
WARNING

3
1.3 Intended use
Only use the pumping station as described in this documentation.
• The pumping station must only be operated in technically
perfect condition.
• Do not use a partially assembled pumping station.
• The pumping station must only pump the fluids described in
this documentation.
• The pumping station must never operate without pumped fluid.
• Contact us for operating modes not described in this
documentation.
• Never exceed the usage limits defined in the documentation.
• The safe use of the pumping station is only guaranteed if
used as intended (in compliance with this manual).
1.4 Qualication and training of staff
Commissioning and maintenance of this device must be
performed by a qualified professional (ask us).
Please refer to the installation standard EN 12056-4 when
installing the station inside the house or to EN 752 if the station
is installed outside the house.
1.5 Safety instructions for maintenance,
inspection and installation
• Any alteration or modification of the pumping station will
void the warranty.
• Onlyuseoriginalpartsorpartsrecognisedbythemanufacturer.
The use of other parts may void the manufacturer's liability
for any resulting damage.
• The operator must ensure that all maintenance, inspection
and installation work is carried out by qualified, authorised
staff having previously studied this operating and installation
manual.

4
Before working on the station, turn it off and disconnect the
power supply.
• You must follow the procedure for shutting down the pumping
station described in this operating manual.
• Pumping stations discharging fluids that may be harmful to
health must be decontaminated. Before restarting the pumping
station, follow the commissioning instructions (➜paragraph
7, page 27).
• Keep unauthorised people (children, for example) away from
the pumping station.
• Never exceed the usage limits defined in the documentation.
• Follow all the safety precautions and instructions in this
operating (and installation) manual.
This operating manual must always be available on the site so
it can be accessed by qualified staff and the operator.
These operating instructions must be retained by the operator.
1.6 Risks and consequences of non-compliance
with the operating manual
Failure to comply with this operating and installation manual
will result in the loss of warranty rights and rights to damages.
2. TRANSPORT / TEMPORARY STORAGE
RETURN / DISPOSAL
2.1 Receiving inspection
• When handling the goods, check the condition of the packaging of the pumping station delivered (tank, pumps
and control box according to the model chosen).
• In case of damage, note the exact damage and immediately notify the retailer in writing.
2.2 Transport
Pumping station falling over.
Risk of injury if the pumping station falls!
• The pumping station must be transported in a vertical position.
• Observe the indicated weights.

5
• Never hang up the pump by the electric cable.
• Use a suitable means of transport.
• The pumping station has been inspected to make sure there is no damage due to transport.
• Choose suitable means of transport according to the weight table.
Weight of the pumping station
Weight Weight
SANIFOS®110 P SANIFOS®280
110 litre tank 10 kg 280 litre tank with hydraulics to be assembled 25 kg
SANIPUMP®with 10 metres of cable and float 13 kg SANIPUMP®with 10 metres of cable and float 13 kg
Complete station 24 kg Complete station 48 kg
Product on pallet 41 kg Product on pallet 57 kg
SANIFOS®610 (1/2 pumps) SANIFOS®1300
610 litre tank with pre-assembled hydraulics
and floats 55/67kg 1300 litre tank with pre-assembled hydraulics and
floats 116 kg
SANIPUMP®x1/x2 13/26 kg SANIPUMP®x 2 38 kg
SMART Alarm box 4.5 kg SMART Alarm box 4.5 kg
Remote alarm box 0.5 kg Remote alarm box 0.5 kg
Complete station 68/88 kg Tank on pallet 138 kg
Product on pallet 102/125 kg Motors on pallet 54 kg
2.3 Temporary storage / Packaging
In the case of commissioning after an extended storage period, take the following precautions for the installation
of the pumping station.
Damp, dirty or damaged holes and points.
Leakage or damage to the pumping station!
➜Clear the pumping station's blocked openings at the time of the installation.
2.4 Returns
• Properly drain the pumping station.
• Rinse and decontaminate the pumping station, especially if it has transported harmful, explosive, hot or otherwise
dangerous liquids.
2.5 Disposal at the end of life
At the end of its life, this product must be returned to a dedicated collection point.
• It cannot be treated as household waste.
• Ask your local council about where to take the old appliance so that it can be recycled or destroyed.
3. DESCRIPTION
3.1 General description
SANIFOS®110 P, SANIFOS®280, SANIFOS®610 and SANIFOS®1300 are wastewater pumping stations
specially developed for private, commercial and small-scale use (small buildings, shops,
public places). They are not intended for rainwater pumping.
They can be installed, placed inside the house or buried outside.
The tanks of the stations are made from high density polyethylene and have a high mechanical
resistance, are odour-resistant, UV-resistant and resistant to chemical attack. Their lid is
screwed and held in place by a safety screw (not provided).
The tanks of the stations are delivered with 1 or 2 pumps depending on the model. These
pumps are available with an SFA maceration system that allows the discharge of wastewater
in DN 40 (outer diameter 50) or with a vortex system for the discharge of wastewater in
DN50 (outer diameter 63).

6
These tanks have several inlets of different diameters for the inlet of the effluents, or drilling zones (refer to the
dimensions on pages 10-11).
These devices comply with the EN 12050-1 standard (pumping station for waste water containing faeces) as well
as the European directives on construction products, electrical safety and electromagnetic compatibility.
DoP available on our website in the product file ("Diagrams and technical data sheet" tab).
They must be installed in accordance with standards EN 12056-4 for indoor installation and EN752 for outdoor
installation.
3.2 Scope of supply
SANIFOS®110 P
On a pallet:
• SANIFOS tank®110 litres
• Hydraulic to be assembled
• SANIPUMP®submersible pump with float switch (float cable H07RN-F 2 x 1 mm² + earth), mounting base and
H07RN-F-3G type 1.5 mm² pump supply cable of 10 meters in length (in a separate package)
• In an accessory bag: 1 cable gland, cover and gasket
Note :
- The shut-off valves and the non-return valve are not supplied.
- SANIFOS®110 P is provided with a cover supporting up to 200kg.
SANIFOS®280
On a pallet:
• SANIFOS®tank 280 litres with cover and sealing ring
• Hydraulic pre-assembled in the tank including 1 shut-off valve and 1 non-return valve
• SANIPUMP®submersible pump with float switch (float cable H07RN-F 2 x 1 mm² + earth), mounting base and
H07RN-F-3G type 1.5 mm² pump supply cable of 10 meters in length (in a separate package), 1 chain (model
with extension)
• In an accessory bag: 1 vent socket 75mm, 2 hose clamps, 2 pipe seals (DN 50 and DN 100).
A 30 cm height extension is available for the SANIFOS®280 (see page 10).
SANIFOS®610
On a pallet:
• SANIFOS®610 litre tank with cover and sealing ring
• Hydraulic pre-assembled in the tank including
- single-pump model : 1 shut-off valve, 1 non-return valve
- 2-pump model : 2 shut-off valves, 2 non-return valves and 3 floats directly installed in the tank (float cable 07RN-F
2 x 1 mm²)
• 1 or 2 submersible SANIPUMP®pump(s) with mounting base (in 2 separate packs)
• SMART remote control box with power cable type H07RN-F-3G1.5 mm² (2.5 m length), power cables for
pumps type H07RN-F-4G1.5 mm² (4 meters long), float connection cables (4 meters) and quick connectors. For
the three-phase version, power cables type H07RN-F-5G 2.5 mm² (2.5 m long), power cables for pumps type
H07RN-F-4G1.5 mm² (4 meters in length).
• HF remote alarm unit
• Accessory bag with: 1 chain and 2 or 3 stainless steel snap hooks, 5 cable glands (2 x PG13 and 3 x PG11),
2 x IP 68 waterproof terminal blocks: 4 conductors for pumps, 3 terminal blocks IP 68: 2 conductors for floats,
2 pipe seals (DN 50 and DN100), 1 vent socket 75mm, 2 hose clamps, cable clips, screws.
SANIFOS®1300
On 2 pallets:
• SANIFOS®1300 litre tank with cover and gasket
• Hydraulic pre-assembled in the tank including stainless steel guide bars, 2 shut-off valves, 2 non-return valves
and 3 floats directly installed in the tank (float cable 07RN-F 2 x 1 mm²)
• 2 submersible SANIPUMP®pumps
• SMART remote control box with power cable type H07RN-F-3G1.5 mm² (2.5 m length), power cables for
pumps type H07RN-F-4G1.5 mm² (4 meters long), float connection cables (4 meters) and quick connectors. For

7
the three-phase version, power cables type H07RN-F-5G 2.5 mm² (2.5 m long), power cables for pumps type
H07RN-F-4G1.5 mm² (4 meters in length).
• HF remote alarm unit
• Accessory bag with: 2 chains and 2 stainless steel snap hooks, 5 cable glands (2 x PG13 and 3 x PG11), 2
x IP 68 waterproof terminal blocks: 4 conductors for pumps, 3 terminal blocks IP 68: 2 conductors for floats, 2
sockets Ø100/110/125, 5 hose clamps, 1 pipe seal, cable clips, screws.
A 40 cm height extension is available for the SANIFOS®610 and SANIFOS®1300 (see pg.10-11).
3.3 Rating plate
1
9
87
6
2345
1 Name of the pumping station
2 Power consumption of the engines
3 Supply voltage
4 Frequency
5 Protection index
6 Date of production
7 Identification number
8 Max height
9 Max flow rate
3.4 Design and operating mode
Thepumpingstationisequippedwithseveralhorizontalinletopeningsordrillingzones,for40/50/100/110/125mm
external diameter piping (depending on the model).
The motor-pump assembly conveys the pumped fluid in the discharge pipe with an external diameter of 50 mm
(DN 40) in maceration version or external diameter of 63 mm (DN 50) in vortex.
The ventilation duct (external diameter 75 mm, or 100mm on the SANIFOS®1300) allows the tank to always
remain at atmospheric pressure (1ventilation hole on the SANIFOS® 110 P, SANIFOS®280, SANIFOS®610 and
4ventilation holes on the SANIFOS® 1300 pumping station).
3.4.1 SANIFOS®110 P, SANIFOS®280 and SANIFOS®610 (single-pump model)
Operating mode:
Effluents enter the pumping station through the horizontal and vertical inlet openings.
They accumulate in a gas-tight, smell-proof and watertight plastic tank.
As soon as a certain fill level is detected by the float switch, the pump starts up automatically.
Effluents are automatically raised up to flow into the drain pipe.
As soon as the effluent level reaches a minimum effluent level in the tank, detected by the float switch, the pump
switches off automatically.
3.4.2 SANIFOS®610 (2-pump model) and SANIFOS®1300
Operating mode:
Effluents enter the pumping station through the horizontal and vertical inlet openings. They accumulate in a gas-
tight, smell-proof and watertight plastic tank. When the effluent enters the tank, the low float rises and then the high
float rises to reach the pump's activation level.
SANIFOS®110 P SANIFOS®280
DISCHARGE
DN 40 (Øext 50) for maceration model
DN 50 (Øext 63) for Vortex model
VENTILATION
Øext 75
INLET (opening to be drilled)
DN 50 or DN 100

8
The pump starts up and the effluents are lifted automatically to flow into the drain pipe.
As soon as the effluent level reaches a minimum effluent level in the tank, detected by the low float switch, the
pump switches off automatically.
SANIFOS®610 and SANIFOS®1300 contain 2 pumps that operate alternately. In case of malfunction, the alarm
is triggered by the alarm float and the 2 motors operate simultaneously.
If one of the 2 pumps is defective, the other one takes over.
3.4.3 Technical specications
SANIFOS®110 P SANIFOS® 280 SANIFOS®280
Vortex
SANIFOS® 610
1 pump
single-phase
SANIFOS®610
1 pump
single-phase
Vortex
Pump specifications
Flow rate (H = 1 m) 10.5 m3/h 10.5 m3/h 27 m3/h 15.7 m3/h 21 m3/h
Max height (Q=0) 14 m 14 m 13 m 14 m 14 m
ON/OFF level 320/120 400/100 400/100 500/140 500/140
Temp. Max. of incoming water
(intermittently - max. 5 mins) 70°C 70°C 70°C 70°C 70°C
Activation system Float Float Float Float Float
Overload protection Yes Yes Yes Yes Yes
Thermal
Power supply Single-phase
220-240 V/
50-60 Hz
Single-phase
220-240 V/
50-60 Hz
Single-phase
220-240 V/
50-60 Hz
Single-phase
220-240 V/
50-60 Hz
Single-phase
220-240 V/
50-60 Hz
Motor power consumption
1 x 1500 W 1 x 1500 W 1 x 1500 W 1 x 1500 W 1 x 1500 W
Maximum intensity absorbed 6 A 6 A 6 A 1 x 6 A 1 x 6 A
Tank specifications
Volume of the tank 110 litres 280 litres 280 litres 610 litres 610 litres
Tank materials polyethylene polyethylene polyethylene polyethylene polyethylene
FEA without extension
FEA with extension
182 mm 250-600 mm
550-900 mm
250-600 mm
550-900 mm
325-580 mm
725-980 mm
325-580 mm
725-980 mm
Discharge diameters
G 2''
DN.40
external Ø 50
DN.50
external Ø 63
DN.40
external Ø 50
DN.50
external Ø 63
Input diameters 2 x external Ø.
100/110/125;
2 x 40/50
Ø ext. 50/100
to be drilled
Ø ext. 50/100
to be drilled
Ø ext.50/100
to be drilled
Ø ext.50/100
to be drilled
Ventilation 1 x Ø ext. 75 1 x Ø ext. 75 1 x Ø ext. 75 1 x Ø ext. 75 1 x Ø ext. 75
Non-return valve 0 1 1 1 1
Shut-off valve 0 1 11 1
SANIFOS®1300
SANIFOS®610
DISCHARGE
DN 40 (Øext 50) for maceration version
DN 50 (Øext 63) for Vortex version INLET
(opening to be drilled)
DN 50 or DN 100
VENTILATION
Øext 75

9
SANIFOS® 610
2 pumps
single-phase
SANIFOS® 610
2 pumps
single-phase
Vortex
SANIFOS®610
2 pumps
three-phase
Vortex
SANIFOS® 1300
single-phase
SANIFOS®1300
single-phase
Vortex
SANIFOS®1300
three-phase
Vortex
Pump specifications
Flow rate (H = 1 m) - - - 16 m3/h 25 m3/h 32 m3/h
Max height (Q=0) 14 13.5 16.7 m 10 m 13 m 17 m
ON/OFF level 470/50 470/50 470/50 650/150 650/150 650/150
Temp. max. of incoming water
(intermittently - max. 5 mins)
70°C 70°C 70°C 70°C 70°C 70°C
Activation system Float Float Float Float Float Float
Overload protection Yes Yes Yes Yes Yes Yes
Thermal
Power supply Single-phase
220-240 V
50-60 Hz
Single-phase
220-240 V
50-60 Hz
Triple-phase
230-380 V
50-60 Hz
Single-phase
220-240 V
50-60 Hz
Single-phase
220-240 V
50-60 Hz
Triple-phase
230-380 V
50-60 Hz
Motor power consumption
2 x 1500W 2 x 1500W 2 x 2800 W 2 x 1500 W 2 x 1500 W 2 x 2800 W
Maximum intensity absorbed 2 x 6 A 2 x 6 A 2 x 6 A 2 x 6 A 2 x 6 A 2 x 7 A
Tank specifications
Volume of the tank 610 litres 610 litres 610 litres 1300 litres 1300 litres 1300 litres
Tank materials polyethylene polyethylene polyethylene polyethylene polyethylene polyethylene
FEA without extension
FEA with extension
325-610 mm
725-1010 mm
325-610 mm
725-1010 mm
325-610 mm
725-1010 mm
560-1460 mm
960-1860 mm
560-1460 mm
960-1860 mm
560-1460 mm
960-1860 mm
Discharge diameters DN.40
external Ø 50
DN.50
external Ø 63
DN.50
external Ø 63
DN.50
external Ø 63
DN50
external Ø 63
DN50
external Ø 63)
Input diameters Ø ext.50/100
to be drilled
Ø ext.50/100
to be drilled
Ø ext.50/100
to be drilled
Ø ext. 160
to be drilled
Ø ext. 160
to be drilled
Ø ext. 160
to be drilled
Ventilation 1 x Ø ext. 75 1 x Ø ext. 75 1 x Ø ext. 75 Ø ext. 100 Ø ext. 100 Ø ext. 100
Non-return valve 2 2 2 Yes Yes Yes
Shut-off valve 2 2 2 Yes Yes Yes
3.4.4 Pump curves
SANIFOS®110 P, SANIFOS®280 SANIFOS®610
SANIFOS®1300

10
3.4.5 Product dimensions
535
ext Ø 75
input
input
SANIFOS®110 P

11
input drilling zone
input drilling zone
anchor points anchor points
SANIFOS®1300 EXTENSION
SANIFOS®1300
Discharge DN50
Ventilation
Ventilation
Discharge DN50
input

12
3.5 Sump tank
The sump tank is designed for pressure-free operation. Wastewater is collected there at atmospheric pressure before
being discharged to the sewer. The ventilation duct allows the tank to always remain at atmospheric pressure.
Pumped fluids
Pumping unauthorised fluids.
Dangerous for people and the environment!
➜Only discharge authorised pumped fluids in the public sewerage network
WARNING
Authorised pumped fluids:
The following liquids are allowed in discharge systems:
• Water contaminated by domestic use, human excrement, toilet paper.
Unauthorised pumped fluids:
The following liquids and substances are banned:
• Solid materials, fibres, tar, sand, cement, ash, coarse paper, hand towels, wipes, cardboard, rubble, rubbish,
slaughterhouse waste, oils, greases, hydrocarbons etc.
• Wastewater containing harmful substances (for example, untreated greasy waste from restaurants).
Pumping these liquids and substances requires the fitting of a compliant grease trap.
• Rain water.
3.6 Noise level
The noise level depends on the fitting conditions and operating point.
This sound pressure level Lp is less than 70 dB (A).
4. PREPARATION OF THE TANK
The tank is delivered with hydraulic pipes mounted inside. When preparing the tank, check their presence.
The pump is delivered separately and must be installed inside the tank.
4.1 Preparation for the water inlet pipe
(SANIFOS
®
280, SANIFOS
®
610, SANIFOS
®
1300)
SANIFOS®280, 610 and 1300 have several drilling zones to install the water supply pipe at the desired height.
Two diameters are possible for SANIFOS®280 and 610: 50 mm or 100 mm. Diameter 160 mm is possible for
SANIFOS®1300.
- Mark the intended location of the pipe on the tank with a marker.
- Drill with a hole saw with a diameter of 57 mm for a 50 mm pipe, 110 mm for a 100 mm pipe and 168mm for
a 160 mm pipe.
- Place the seal DN 50 for a 50 mm pipe, DN 100 for a 100 mm pipe, DN 160 for a 160 mm pipe.
4.2 Installation of the pump in the tank
SANIFOS® 610 :
•Disconnect the hydraulic pipes inside the tank (1 or 2 pipes to be deconnected, depending on the model), before
the shut-off valves.
• Take them out of the tank.
1. 2.
57mm or 110mm

13
SANIFOS®110 P, SANIFOS® 280 and SANIFOS® 610
•Connect the pipeline(s) to each pump (delivered separately).
•Once the connections have been made, lower the submersible pump(s) and their piping inside the tank and
reconnect the pipes.
•SANIFOS®280 with extension and SANIFOS®610 (1 pump): Attach the chain to the pump and connect to the top
of the tank using the hook provided for this purpose (useful during maintenance
of the device).
•SANIFOS®610 (2 pumps): Attach each end of the chain to a pump using a snap
hook. Attach the third snap hook in the middle of the chain then on the top of the
tank.
• Please check the positioning of the pumps in the tank as in the photo opposite.
SANIFOS®1300 :
•Attach the chain to the pump and connect to the top
of the tank using the hook provided for this purpose
(useful during maintenance of the device).
•Slide the pumps on the guide bars to the bottom
of the tank.
4.3 Electrical wiring
4.3.1 Wiring of pumps and oats
Use of waterproof terminal blocks (SANIFOS®280, SANIFOS®610 and SANIFOS®1300)
The connection with the waterproof terminal block makes it possible, when servicing the submersible pumps, not to
disconnect the power cables and not to pull the 10 m cable through the cable glands or through the ventilation duct used
for their passage in order to be able to remove the pumps from the tank.
Wiring the waterproof terminal blocks (4 conductors) for pumps
➜Terminal block TH400 5P (use only 4 poles)
Wiring the waterproof terminal blocks for floats
➜Terminal block TH391 2P
NOTE
On SANIFOS®610 and SANIFOS®1300, the floats are delivered with the tank and
must be connected to the SMART control box via the TH391 2P waterproof terminal
blocks. It is imperative that you respect the colours of the cables when making the
connections (black/black, brown/brown, grey/grey)

14
Preparing the terminal blocks
5 POLES
5 POLES
Screw terminals

15
SANIFOS®610 and SANIFOS®1300 floats
•Gather together the float cables
•Fix them to the stainless steel bar using a tie-wrap
4.3.2 Cable output
Case where the station is floor-standing
SANIFOS®110 P, SANIFOS®280, SANIFOS®610 and SANIFOS®1300
Use of cable glands: side outlet of the cables on the tank.
Locate the "pre-holes" specially for the passage of the cable glands, present on the tank.
About SANIFOS®610 and SANIFOS®1300, 5 pre-holes:
Passage of float cables through cable glands PG 11:
• Make a hole ø 17 mm
• Insert the cable gland with a silicone thread
• Tighten the inside nut
Passage of motor cables through cable glands PG 13:
• Make a hole ø 19 mm
• Insert the cable gland with a silicone thread
• Tighten the inside nut

16
Case where the station is buried:
Use of ventilation:
SANIFOS®280 and SANIFOS®610
• Cut into the ventilation passage.
• Pass the cable(s) through the tank outlet for ventilation.
• Provide a 75 mm diameter PVC conduit for routing the cables from the pumping station to the power supply.
SANIFOS®1300
• Cut into one of the ventilation passages (4 possible passages).
• Pass the cable(s) through one of the tank outlets for ventilation.
• Provide a 100 mm diameter PVC conduit for routing the cables from the pumping station to the power supply.
4.4 Installing the tank cover
Installing the O-ring of the tank cover
• Make sure that the face of the lid coming into contact with the
gasket is clean.
• Position the cover and screw it.
• Position the safety screw and tighten it.
4.5 Ventilation
According to the recommendations of EN 12050-1, pumping stations must be ventilated. The pumping station must
always be ventilated so that the tank is always at atmospheric pressure.
The ventilation must be completely free and air must flow in both directions (no
diaphragm valve fitted).
The vent pipe must not be connected to the vent pipe on the inlet side of a
grease trap.
Connect the ventilation duct Ø ext. 75 (SANIFOS®110P, 280 and 610) or
Ø ext. 100 (SANIFOS®1300) vertically to the vent hole using the flexible
sleeve.
On SANIFOS®280 and SANIFOS®610: 1 ventilation hole is available.
On SANIFOS®1300: 4 ventilation holes are available.
Carefully cut the end of the selected hole so that the through section is
completely clear.
Leave a part of the chamber to facilitate assembly of the fittings.
Ventilation should be at a distance of approximately 50 cm from the
tank cover.
WARNING
Insufficient ventilation. Risk that the pumping station will not work!
➜Ventilation must remain free
➜Do not block the vent outlet
➜Do not install an air intake valve (diaphragm valve).
Ventilation hole
Ø 75mm

17
4.6 Discharge hole
4.7 Water inlet holes
SANIFOS® 110 P
4 inputs available:
• 2 side inputs Ø ext. 40/50
• 2 side inputs Ø ext. 100/110/125
SANIFOS®280 and SANIFOS®610 SANIFOS®1300
1 side input available: DN 50 or DN100 1 side input available: Ø ext. 160
5. INSTALLATION / ASSEMBLY
• PVC pressure PN10 or 16 (recommended by the manufacturer)
• Flexible "reinforced" type HDPE
NOTE
To prevent the risk of back-flow of water from the sewer, install the discharge pipe in
a "loop" so that its base, at the highest point, is located above the back-flow level.
Improper fitting of the discharge pipe.
Leaks and flooding in the installation
room!
➜The pumping station must not be used as a
support point for piping.
➜Do not connect other drain pipes to the discharge
pipe.
➜Install shut-off valves on thesupply pipes and
discharge pipes (already installed on SANIFOS®
280, SANIFOS®610 and SANIFOS®1300).

18
5.1 Installing the pumping station, oor-standing
• The characteristics shown on the rating plate have been compared with those on the order and installation (supply
voltage, frequency).
• The installation room must be protected against frost.
• The installation room is adequately lit.
• The work has been prepared in accordance with the dimensions shown in the example installation and standard EN
12056-4.
• The plant room where the SANIFOS®will be installed must be large enough to allow a 600 mm clearance around
and above the device to facilitate maintenance.
• Stop valves (provided with certain devices) must be fitted on the effluent inlets as well as on the discharge line, as close
as possible to the pumping station.
• The discharge line must be designed to prevent any back-flow of sewage.
By fitting a non-return loop, located above the back-flow level, back-flow is avoided.
Please note: Unless otherwise specified locally, the back-flow level is the level of the highway (roads, pavement, etc.).
Extend this line after the non-return loop through a larger diameter pipe.
• Provide a sump to drain the room.
• The installation of an auxiliary pump for possible drainage of the plant room (for floods) is recommended.
• The pumping station must be ventilated above the roof.
• The pumped fluid is appropriate and authorised by this documentation (➜section 3.5, page 12).
• In case of discharge of greasy effluents, the use of a degrease tap is essential.
Wastewater other than those mentioned above, for example, of artisanal or industrial origin, must not be discharged
into the pipes without prior treatment.
5.2 Installing the pumping station, underground
Before burying the pumping station, a soil analysis must be carried out. This analysis must comply with DTU 64-1 and
the Order of 6 May 1996.
SANIFOS®610 installation
SANIFOS®280 installation
with extension
This manual suits for next models
3
Table of contents
Other Saniflo Water Pump manuals
Popular Water Pump manuals by other brands

Wilo
Wilo EMU KS Series Installation and operating instructions

Clarke
Clarke ECP20A1 Operation & maintenance instructions

Waterous
Waterous PB18 Series Operation, Maintenance and Overhaul Instructions

Circor
Circor IMO K12DHZ-312P Product service manual

SKF
SKF MAX-1-2-230-IF105-R-V2 Operating and maintenance instructions

Renkforce
Renkforce 2302381 operating instructions