SANJIANG JTY-GD-H605 User manual

Version:1013081124
Instruction Manual of JTY-GD-H605 Independent
Smoke Detector
Read through these instructions before using this device to ensure correct installation and use!
I. General
JTY-GD-H605 independent smoke detector (Detector hereunder) is a smoke-sensing detector. While
monitoring, the green indicator blinks per 60 seconds. When the concentration of the smoke reaches the set point,
the detector will emit an audible‘Didi tick’repeatedly and the red indicator on the detector will remain on during
the audible signal. The detector can revert to the normal condition when the concentration of the smoke goes
lower than the set point. And it includes self-check and battery low power indicate function. The state of the
detector can be sent to Sanjiang Cloud Platform based on the international LORAWAN standard protocol. For
details of the detector access platform mode and status information, see the Sanjiang Cloud Platform related
manual.
The detector is applicable in places where fire might generate volume smoke, i.e. in industrial and civil
buildings such as in the restaurant, hotel, teaching building, office building, computer room, archives and stack
room.
II. Features and technical parameters
Working voltage: DC9V(1200mAh)
Working current:
During monitoring <10µA
In alarm mode <25mA
Impulse current <120mA
LEDs: in three colors (green: normal; red: fire alarm; yellow: failed)
Alarm volume:>80dB(at a 3 meter (9.8 ft) distance)
Environment: Temperature: -10℃~55℃
Relative humidity:≤95%(40℃±2℃non-condensing)
Exterior size:106mm(4.2’’)×106mm(4.2’’)×46mm(1.8’’) (Length ×Width ×Height)
Weight: 162g
Mounting hole distance: 52-70mm
Housing material/color: ABS (white)
Standard: GB20517-2006
Areas covered: ≥40 ㎡(See the provisions in the GB 50116-2013 Code for Design of Automatic Fire
Alarm System).
III. Positioning
Where to install the smoke detector:
Residence, lounges, cafes, dance hall, hotel, apartment, inns, restaurant, etc.
Where NOT to install the smoke detector:
In the garage. Products of combustion are present when you start your car and could set off nuisance
alarms.
In front of forced air supply ducts used for heating and air conditioning, near ceiling fans, or other high
air flow areas.
In dusty areas. Dust particles may cause nuisance alarms or product failure.
In very humid areas. Moisture or steam can cause nuisance alarms.
In insect infested areas.
The kitchen and the place where smoke remains under normal circumstances.
Places where corrosion gases are likely to occur.
IV. Structural features and working principle
Detector structure diagram (see figure 1)

Figure 1 Figure 2
Note: The top cover, button, PCB, bottom cover and base in Fig.1 are assembled into a whole (Fig.2,
hereinafter referred to as detector).
Figure 3
External structure (see figure2/3)
Figure 4 Figure 5
Internal structure (see figure 5)
Operating principle: Smoke detection is done by the optical chamber, which include one set of infrared
emitting and receiving diode. The receiving diode can not receive the infrared light of the infrared
emitting diode when there is no smoke, and the circuit has no voltage output. When the smoke enters the
optical chamber, the infrared light emitted by the infrared diode is scattered, and the scattered infrared
light is received by the receiving diode so that a voltage output is generated in the circuit. The heavier the
smoke, the stronger the scattering and the higher the generated voltage. When the voltage reaches the
predetermined value, the detector will send an alarm signal and complete the alarm function.
V. Installation and testing
The detector installation is fixed by the special screw included, the included screws are suitable for most
types of ceiling materials, like wood, concrete or plaster. Fix the base to the ceiling . After installing the
base, screw the smoke detector to the base. The detector must be properly attached to the base.
The detector installation location shall meet the following requirements:
Optical chamber
Location of LED button
LED button
Battery
Optical chamber
PCB
Buzzer
Top cover
Bottom
cover
Base
Button
LED button
Sound outlet

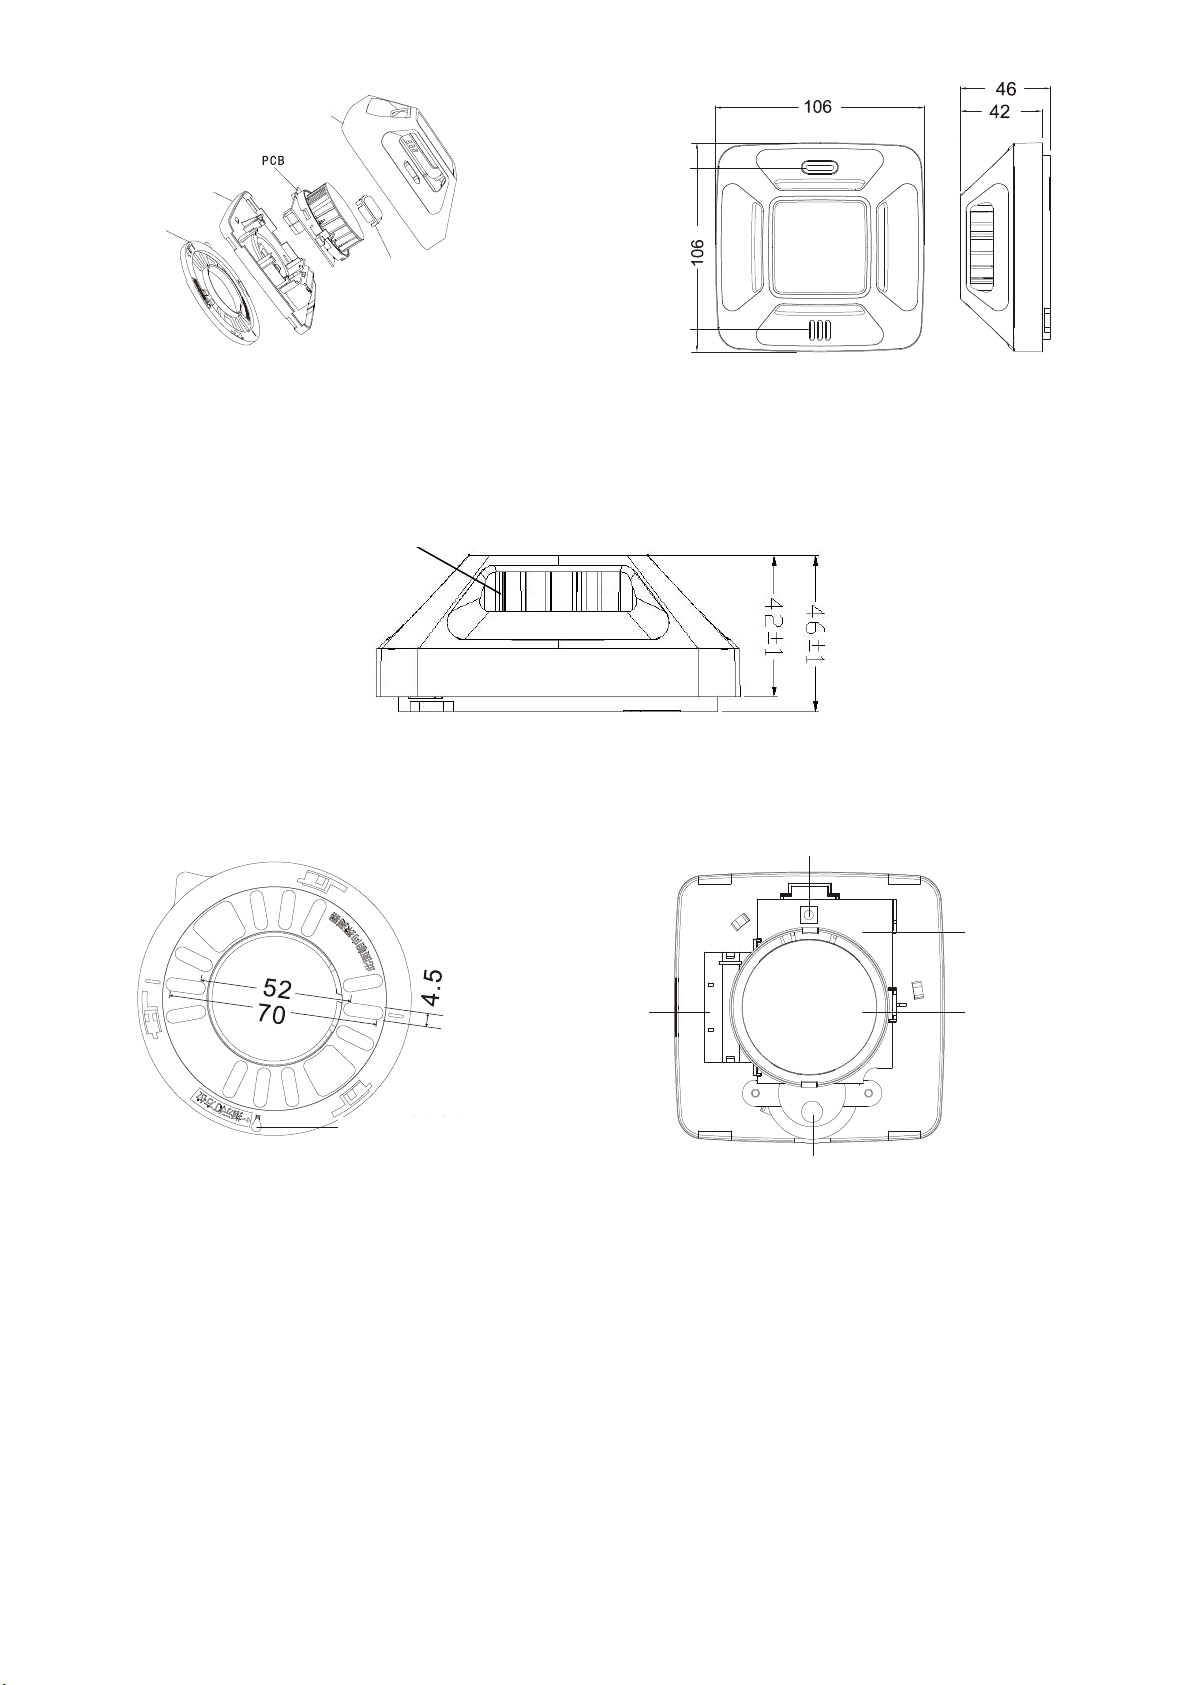
When the height of the installation is less than 6 meters. The distance between the lower surface of
the detector and the ceiling shall not exceed 0.3 m.
The smoke alarm should not be installed within 3m (9.8ft) in front of the air supply ducts.
The detector should be installed more than 0.6 meters away from the wall or the wall-beam.
Detector protection area:
When the space height is 6 ~ 12 meters, the protected area is 60 square meters
When the space height is less than 6 meters, the protected area is 40 square meters
Testing: Push the button on the cover and hold it down. This will sound the detector if the electronic
circuitry, horn and battery are working properly. The detector will emit an audible‘Didi tick’every 2
seconds and the red indicator on the detector will remain on. If no alarm sounds, the unit has defective
batteries or other failure. Erratic or low sound coming from your alarm may indicate a defective alarm.
Release the button the detector will return to normal operation.
VI. Operation and instructions
Indicator status :
Normal condition: the indicator (green light) flashes every 60 seconds.
Battery low power mode: the indicator (yellow light) flashes every 30 seconds.
Circuit failures condition: the indicator (yellow light) flashes every 2 seconds.
Alarm status: the indicator (red light) remains on.
Buzzer status:
Battery low power mode: emit an audible‘Di’every 30 seconds.
Circuit failures condition: emit an audible‘Di’every 2 seconds.
Alarm status: emit an audible‘Didi tick’every 2 seconds.
Alarm status:
When the concentration of the smoke reaches the set point, the alarm will emit an audible ‘Didi tick’
every 2 seconds and the red LED on the detector will remain on during the audible signal.
The alarm can revert to the normal condition when the concentration of the smoke goes lower than the set
point.
Hush function:
The hush function is very useful in a kitchen area or other areas prone to nuisance alarms. If a nuisance
alarm is set off, press the test button and holding it down for a minimum of 3 seconds. This will
temporarily desensitize the alarm circuit, the detector will silence immediately during this time. This
indicates that the detector is in a temporarily desensitized mode. The detector will reset in these following
situations:
A. Higher concentration of smoke;
B. The detector will automatically reset after approximately 1 minutes;
(The hush feature can be used repeatedly until the air has been completely cleared.)
VII. Troubleshooting
Failures
Causes
Methods
Remarks
Alarming
immediately after
power-on
Internal circuit is broken
Return to the manufacturer for repairs
Dust particles/Steam/Moisture
exceed normal condition
Repower on until the air has been
completely cleared
Unstable alarm
Press the LED button for more than 3
seconds or repower the detector again.
Cannot work when
it is powered on
Incompliant voltage
Check the battery voltage
Internal circuit is broken
Return to the manufacturer for repairs
Cannot alarm
during test
Internal circuit is broken
Return to the manufacturer for repairs
Buzzer failure
Return to the manufacturer for repairs
Battery low power
Replace the battery of the same model
No sound or low
volume of the
buzzer
Damage of the buzzer
Return to the manufacturer for repairs
Battery low power
Replace the battery of the same model
IIX. Maintenance
Test the detector once a week to make sure it works. Never use an open flame or combustible materials to
test the smoke alarm since this may damage the smoke alarm or ignite flammable materials nearby and
cause a fire.
Under normal circumstances, the battery life can reach about five years, but harsh environment such as
high temperature and humidity will shorten the battery life.

When the detector reports battery low power failure, please replace the same type of battery in time. After
the battery is replaced, press the test button to make sure the detector works in normal condition.
In the case of the detector about battery low power, replace the existing battery with a new one of the
same model in time in the way below:
A. Rotate the detector gently clockwise and then remove it from the base in the downward direction.
B. Take out the battery from the battery slot.
C. Mount the new battery according to the positive and negative electrode marks in the battery slot.
D. Align the detector’s mounting bayonet with the base, press it into the base and rotate it gently
anticlockwise to mount the detector.
E. If there is an audible and visual alarm after the testing button is pressed following battery
replacement, it suggests successful battery replacement.
When the detector meets failure condition, please do not disassemble the detector by yourself, for more
information, please contact the manufacturer. And return to the manufacturer for repair.
IX. Suggestions
Replace the battery after a real fire and the detector goes off.
It is recommended to return the detector that has been used for more than 3 years to the manufacturer for
maintenance and inspection.
It is recommended to replace detectors that have been in use for more than 10 years.
A smoke detector can provide an early warning of a fire but it does not prevent fires from occurring and is
not a substitute for an insurance policy..
The smoke alarm cannot set off an alarm signal if the smoke from a fire does not reach the smoke alarm.
X. Environmental disposal instructions
The crossed-out wheeled bin symbol indicates that the item should be disposed of separately from
household waste. The item should be handed in for recycling in accordance with local environmental
regulations for waste disposal. By separating a marked item from household waste, you will help reduce
the volume of waste sent to incinerators or land-fill and minimize any potential negative impact on
human health and the environment. For more information, please contact the manufacturer.
XI. Parking list
NO
Accessory
Quantity
1
JTY-GD-H605 detector
1PCS
2
9Vlithium battery(1200mAh)
1 PCS
3
Cross recessed pan head self-tapping screw
(wooden thread)3×18
2 PCS
4
Plastic expansion rubber plug Ø5×25
2 PCS
5
User’s Manual
1 copy
Address: 3/F., Guangcai Xintiandi Mansion, Nanshan Road, Nanshan District, Shenzhen, Guangdong, 518054, China
Tel:+86(755)86226969 Fax:+86(755)86223939 Http://www.fhsjdz.com
Table of contents
Other SANJIANG Smoke Alarm manuals
Popular Smoke Alarm manuals by other brands

Firex
Firex 243 Specification sheet

Channel Safety Systems
Channel Safety Systems Rapidfire user manual

Ista
Ista Fumonic 3 quick start guide

Siemens
Siemens Synco living AP260 manual

System Sensor
System Sensor Innovair DH200PL Installation and maintenance instructions

Metrona
Metrona RM 680110 User information