Santec Inc.
3501 Challenger Street, Torrance, CA 90503
Tel: (310) 542-0063 Fax (310) 542-5681
www.santecfaucet.com
INSTALLATION INSTRUCTIONS
PAGE 04
MaintenanceMaintenance
cleaningcleaning DuringDuring thethe installationinstallation oror throughthrough thethe yearsyears ofof
use,use, debrisdebris andand impuritiesimpurities maymay clogclog thethe filtersfilters
inin thethe bothboth inlets,inlets, causingcausing thethe waterwater toto bebe
restrictedrestricted oror decreaseddecreased considerably.considerably.
PleasePlease followfollow thesethese instructionsinstructions toto cleanclean thethe
filters:filters:
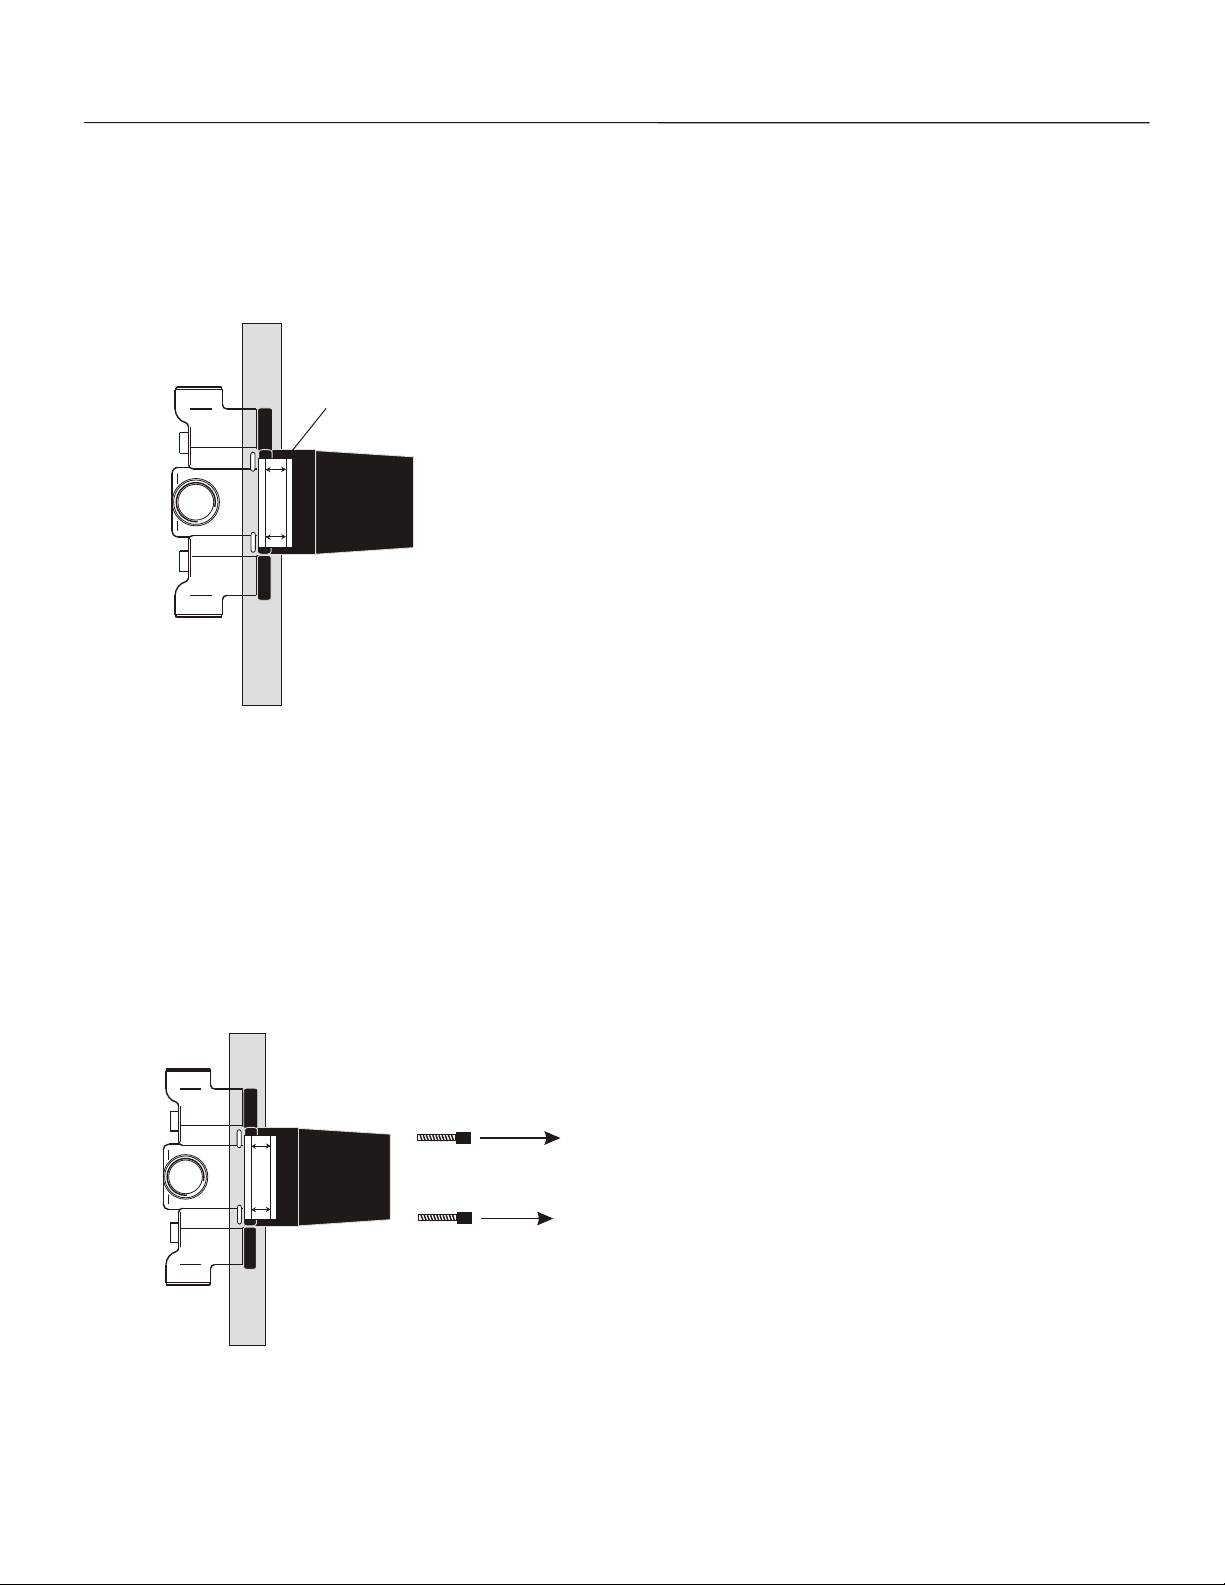
1-1- ShutShut offoff thethe waterwater supply.supply.
2-2- RemoveRemove thethe handlehandle screw,screw, handlehandle trim,trim,
trimtrim plateplate screwsscrews andand
thethe plate.plate.
3-3- RemoveRemove thethe checkcheck valvesvalves usingusing aa slotslot
screwscrew driver.driver. TurnTurn counter-clockwisecounter-clockwise toto
screwscrew them.them.
4-4- CheckCheck forfor debrisdebris depositeddeposited onon thethe screenscreen
underneathunderneath thethe checkcheck valve.valve.
5-5- FlushFlush thethe debrisdebris withwith water.water.
6-6- ReinstallReinstall thethe valves.valves.
CheckCheck ValveValve
shut-offshut-off
fullyfully openopen thethe waterwater flowflow throughthrough thethe valve,valve, makemake suresure thethe checkcheck valvevalve
shutshut offoff mechanismmechanism isis fullyfully open.open. (( TurnTurn thethe mechanismmechanism counter-clockwisecounter-clockwise toto
increaseincrease thethe waterwater flow).flow).
CartridgeCartridge CleaningCleaning
AfterAfter yearsyears ofof use,use, impuritiesimpurities andand limelime scalescale
cancan restrictrestrict thethe waterwater flow.flow. TToo cleanclean thethe
cartridge,cartridge, pleaseplease followfollow thesethese instructions:instructions:
--
1-1- RemoveRemove thethe handlehandle screw,screw, handlehandle trim,trim,
trimtrim plateplate screwsscrews andand
thethe plate.plate.
2-2- ShutShut offoff thethe waterlinewaterline byby turningturning thethe
checkcheck valvevalve shutshut offoff mechanismmechanism clockwise.clockwise.
MakeMake suresure thatthat thethe bothboth hothot andand coldcold sidessides
areare closed.closed.
shut-offshut-off
CartridgeCartridge filterfilter areaarea
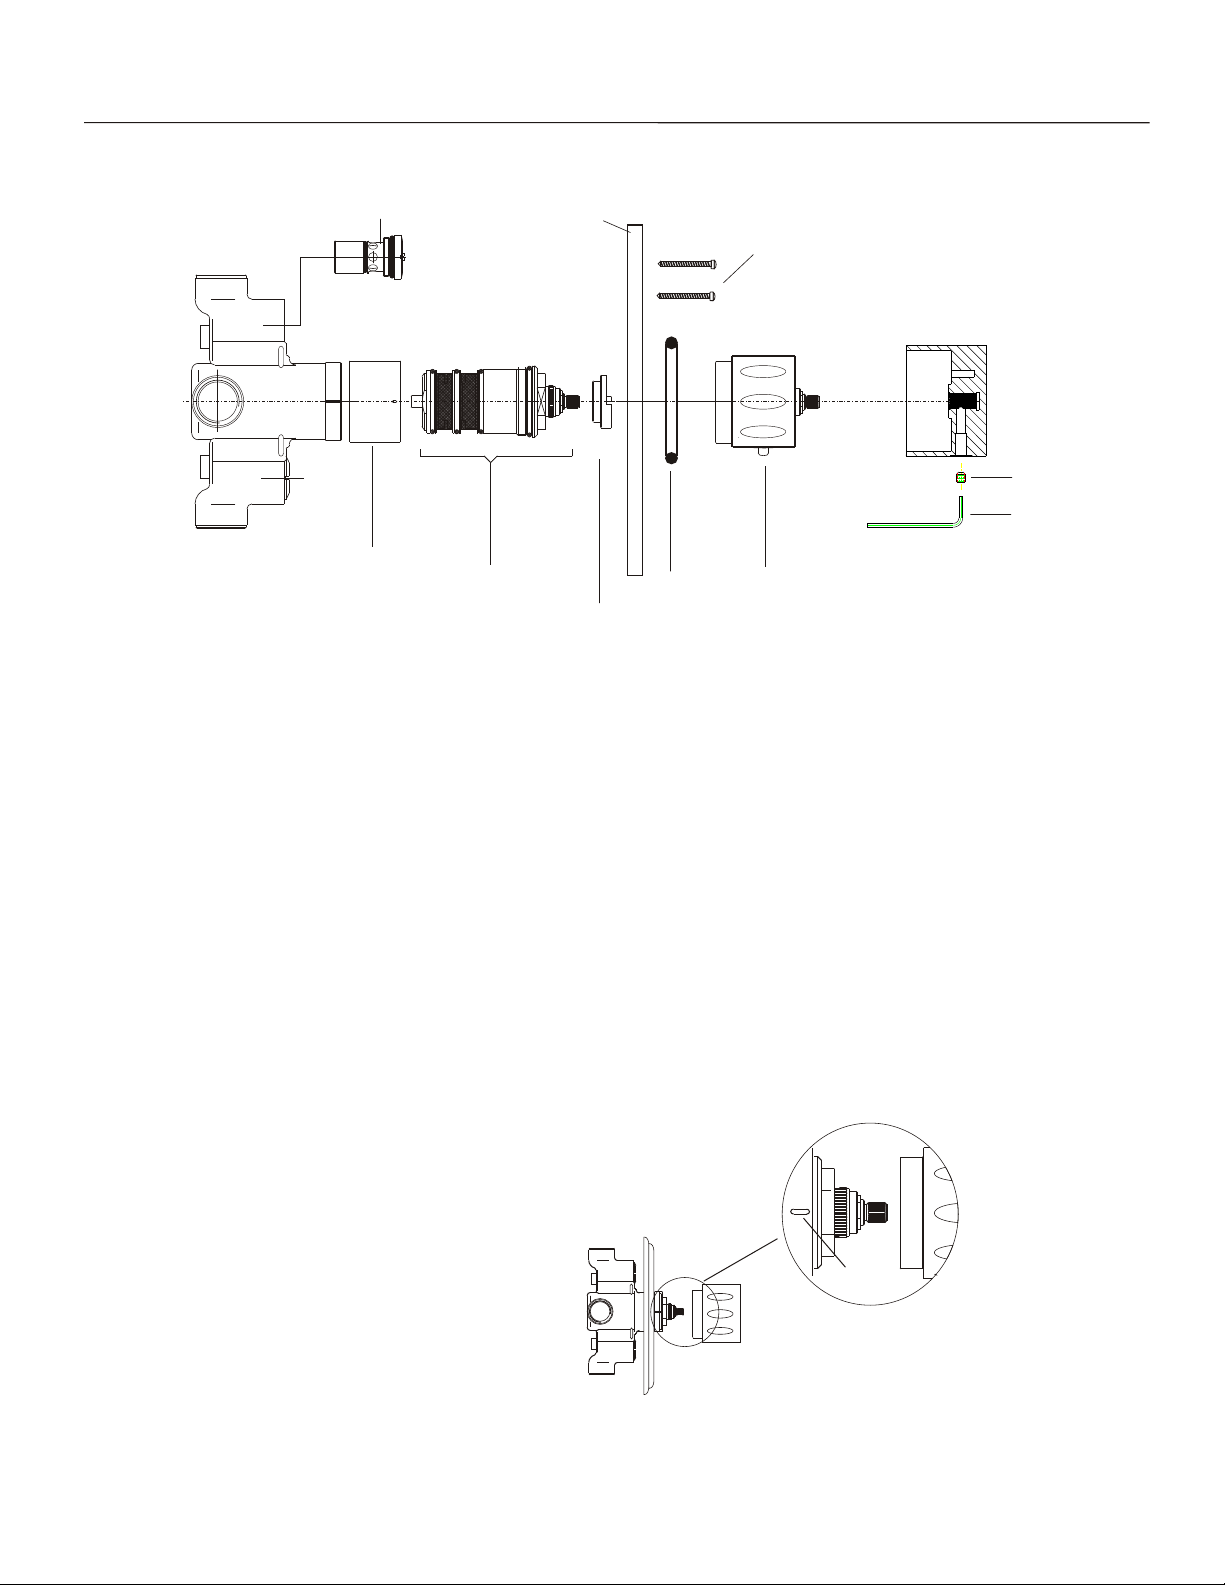
cartridgecartridge usingusing aa 30mm30mm wrench.wrench.
filterfilter underunder runningrunning waterwater oror soaksoak itit withwith vinegarvinegar oror de-scalingde-scaling agent.agent.
thethe cartridge.cartridge. makemake suresure thatthat thethe blueblue lineslines onon thethe cartridgecartridge areare aligned.aligned.
checkcheck valvevalve shutshut offoff mechanism,mechanism, turnturn onon thethe waterwater andand checkcheck waterwater flow.flow.
flowflow isis normal,normal, reassemblereassemble thethe trims.trims. TheThe TTemperatureemperature dialdial shouldshould bebe setset
alignalign withwith thethe bothboth blueblue lineslines atat thethe centercenter point).point).
blueblue lineslines
GeneralGeneral characteristiccharacteristic
-- SantecSantec thermostaticthermostatic valvevalve isis suitablesuitable forfor mostmost waterwater heaterheater systemssystems
providedprovided itit isis installedinstalled correctly.correctly.
-- LowLow pressurepressure storagestorage heatersheaters areare notnot recommendedrecommended forfor thisthis
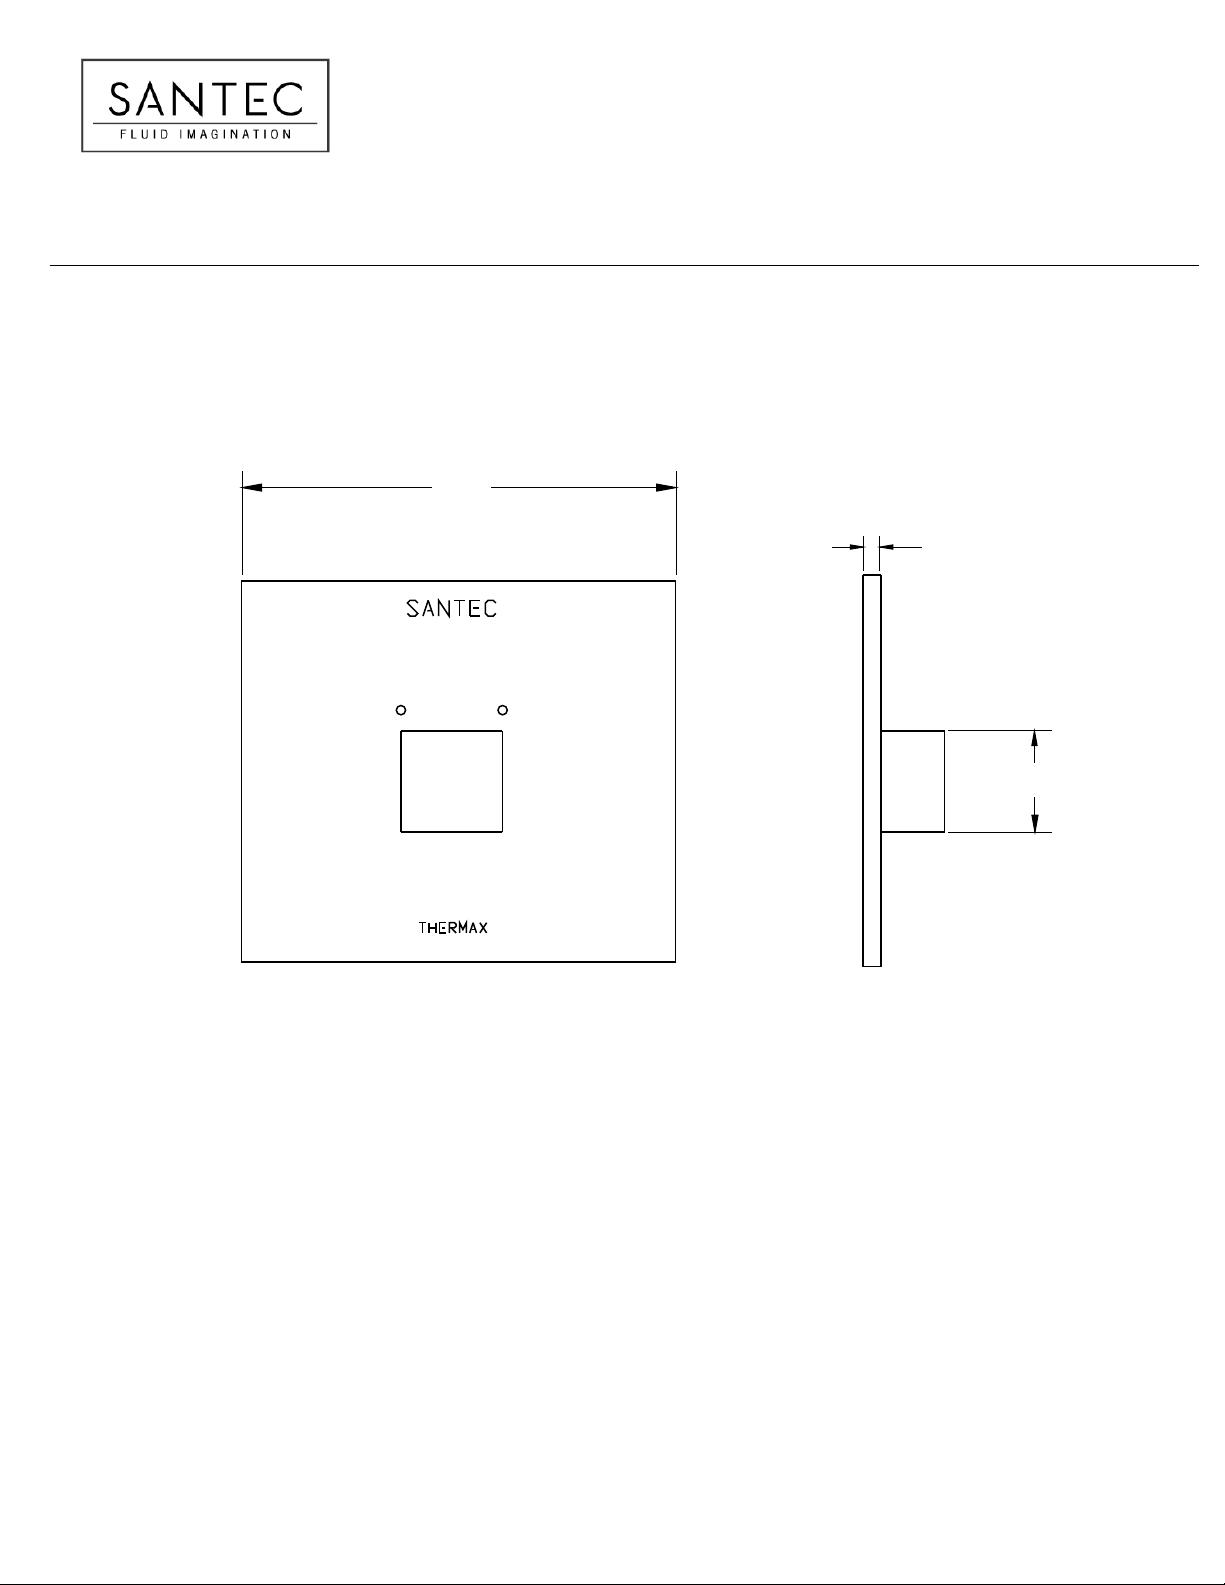
SpecificationsSpecifications
TTemperatureemperature
-- MaximumMaximum temperaturetemperature :: 140F140F
-- TTemperatureemperature dialdial range:range: 60F60F toto 140F140F
-- TTemperatureemperature LimiterLimiter setset atat 100F100F
OperationOperation PressurePressure
-- MaximumMaximum 75PSI75PSI
-- MinimumMinimum 77 PSIPSI
FLOWFLOW RATERATE CHARTCHART
NOTE:NOTE: ForFor pressurepressure greatergreater thanthan 7575 PSI,PSI, pressurepressure reducingreducing valvevalve
isis requiredrequired
NOTE:NOTE:
ThisThis ThermaxThermax valvevalve modelmodel doesdoes notnot havehave anan integralintegral
SeparateSeparate volumevolume controlcontrol unitsunits areare requiredrequired
FLFLOWOW
RARATETE
(G(GPMPM))
00
55
1010
1515
2020
2525
PRPRESESSUSURERE (P(PSI)SI)
1010 2020 3030 4040 5050 6060 7070
00
FilterFilter
HOT
HOT
checkcheck valvevalve
-- TToo
checkcheck valvevalve
3-3- RemoveRemove thethe
4-4- WashWash thethe
5-5- ReassembleReassemble
6-6- OpenOpen thethe
7-7- IfIf thethe waterwater
atat 38F38F ((
application.application.
volumevolume control.control.
COLD
WARM
WARMER
HOT
Thermostatic control