sapphire spas. myHotTub User manual

Spa owners manual

Register your spa
Please take a moment to register your warranty. This will allow us to contact
you in regards to important product notication and ensure that you enjoy
your Sapphire Spa for many years to come. Prior to registering, you will need
the serial number that is located within the equipment compartment of your
Sapphire Spa. To register please go to http://www.sapphirespas.com.au/
warranty-registration.
MYSPA RECORD
Please ll in the information below and save these instructions for future
reference. Sapphire Spas will request this information upon submission
of a service request.
Your Name
Date of Purchase
Spa Model Name
Date of Installation
Dealer
Dealer Address
Control System Number (circle) SV2 SV3 SV4 iTouch
Serial Number (located in the equipment compartment of your spa)
Filter maintenance 12
Acrylic surface cleaning 14
General maintenance 16
Draining your spa 18
Safety information 20
Important notice 20
Trouble shooting & error codes 21
Welcome 2
Step 1 – Inspection 4
Step 2 – Electrical 6
Step 3 – Filling your spa 8
Step 4 – Controlling your spa 10
Step 5 – Heat up 11
Welcome Contents
Please take the time to read the entire manual before operating your spa.
This manual holds vital information for a spa owner and we suggest keeping
it in a safe place.
This manual will acquaint you with the operation of your new spa and general
maintenance required. This manual may also be found on our website. Every
eort has been made to ensure the accuracy of this owner’s manual, however
Sapphire Spas reserve the right to change specications or design without
notication or obligation. If you have any questions about any aspect of your
spa set up, operation or maintenance, contact your authorised Sapphire Spas
dealership or Sapphire Spas Head Oce.
Owners Manual |32 |Owners Manual

As part of the Sapphire family our level of care doesn’t end
once you hand over the money. Remember that, as a Sapphire
Spa owner, you’re protected by our lifecare commitment;
just contact the team at your local store
Take the time to look through ‘WELCOME to our Family’ tab
on our website:
Welcome to our family
PREPARE for your spa
everything you need to know once you’ve
bought your spa, where to put it at home
& how to prepare for the delivery
INSTALL your spa
everything you need to know as you’re
installing your spa, including technical
information for your tradies
ENJOY your spa
we know all you want to do is jump in –
nobody wants to read the manual! As part
of the Sapphire Family we’re here to guide
you every step of the way with simple
instructions & practical videos, as you
enjoy your new spa at home
Tips & Tricks
we understand nothing ever goes to plan
so here’s the knowledge we’ve accumulated
over the years
mySpa@Home help
is a comprehensive collection of ‘how to’
videos, manuals & quick references guides
to have right by your side as you enjoy
your new purchase
Owners Manual |54 |Owners Manual

Pump connection Release valve open (gate)
Release valve open (inline)
slide lter face upwards
unwrap your new spa what do I do rst?
Inspect for damage
Carefully unwrap your spa and thoroughly inspect
it for any damage. If you notice any transit damage
to your product, please photograph the damage,
keep all paperwork/labels and contact the dealer
from which the spa was purchased immediately.
Rotate jets
Rotate all jets to the ‘on’ position.
Wipe out excess water
Your Sapphire Spa has been thoroughly factory
tested during the manufacturing process to ensure maximum
reliability and long term satisfaction. Wipe out any excess
water from the spa that may have drained from the plumbing
after testing and make sure the spa
is clean prior to lling.
Check pump connection and release valves
Prior to lling your spa, remove the side panels where
the engine compartment and control equipment are
situated. Ensure all your pump connections are tight
and release valves are
open as they may have shifted during transit.
Remove filter tray & cartridges
Slide lter face upwards, then remove lter
tray cover & lter cartridges before lling
(2 x cartridges in spa pools / 4 x cartridges
in swim spas)
Check air controls
Ensure all air controls on the topside of your
spa are turned to the ‘o’ position. Failure
to turn o the air controls will extend your
heat up time dramatically.
Warning: It is important that home owners comply with state and council regulations which are in place to improve
safety outcomes. Additional information can be obtained from your local council or please visit spasa.com.au
VIDEO INSTRUCTIONS
Visit the mySpa@Home support page
sapphirespas.com.au/myspa-at-home
for video instructions.
Owners Manual |76 |Owners Manual

myHotTub
spa pool prior to lling
Attaching cover lifter
Once your spa is in it’s nal position, we
recommend attaching your cover lifter before
you ll your spa, to ensure enough clearance
for the lifter mechanism to operate freely.
Do not place too close to nearby walls
All cover lifters have dierent clearance parameters
Access in cabinet power supply BEFORE FILLING
Before lling your spa, remove door panel and bring
power out of the corner that’s applicable especially
if 15amp cord & plug are supplied as cord is 4.5MTS
in length from the control box.
Check the drain valve
Ensure the drain valve of the spa pool is closed.
Please note: all drain valves are external,
excluding myHotTub (as above inside cabinet)
hose
spa pool equipment access
remove these screws
with an allen key
where applicable
remove the raised
joiner strips which
hold panels in place
where applicable
removable side panel
extends up under
acrylic ange (ange
is 90mm in height)
ideal electrical
conduit access
through corners
of spa as we’ve
allowed 35-40mm
access to enable
conduit to be hidden
Detail for removing the cabinet doors,
plumbing location, electrical power cord
/ conduit access to power control box
Owners Manual |98 |Owners Manual

remove these screws
with an allen key
where applicable
remove the raised
joiner strips which
hold panels in place
where applicable
removable side panel
extends up under
acrylic ange (ange
is 90mm in height)
ideal electrical
conduit access
through corners
of spa as we’ve
allowed 35-40mm
access to enable
conduit to be hidden
Detail for removing the cabinet doors,
plumbing location, electrical cabling
conduit access to power control box
Pump connection Release valve open (gate)
Release valve open (inline)
swim spa prior to lling swim spa equipment access
Check the drain valve
Ensure the drain valve on the outside of the spa
cabinet is closed.
Check pump connection and release valves
Prior to lling your spa, remove the side panels where
the engine compartment and control equipment are situated.
Ensure all your pump connections are tight
and release valves are open as they may have shifted during
transit.
Heat & Cool pump installation
We’ve compiled all technical information for
your tradies but call your local store if there’s
something that you can’t nd here
Take the time to look through ‘WELCOME
to our Family/install your spa’ tab on
our website:
Owners Manual |1110 |Owners Manual

electrical
tradie information
Qualified electrician
Ensure a qualied electrician has
hooked up your power source.
SV Series Spa Controls
Electrical Wiring (Terminal Block Connections)
AUS / NZ / European Models (230-240V AC)
230-240V (5 wire) three phase
11
230-240V (3 wire) single phase
Terminal Wiring
P3 Link to CS
P2 Link to CS
CS Link to P3 and P2
P1 Phase
G Earth
N Neutral
*Dip Switch 5 OFF
*Dip Switch 6 OFF
230-240V (4 wire) dual phase
Terminal Wiring
P3 Link to CS
P2 Phase 2
CS Link to P3
P1 Phase 1
G Earth
N Neutral
*Dip Switch 5 ON
*Dip Switch 6 OFF
Terminal Wiring
P3 Phase 3
P2 Phase 2
CS Not used
P1 Phase 1
G Earth
N Neutral
*Dip Switch 5 ON
*Dip Switch 6 ON
Tools Required: Wire Strippers, Phillips head screwdriver, flat head screwdriver
Remove five (5) x Phillips screws from mains lid to access terminal block.
Cut away appropriate length of outer insulation from mains power cable and
strip away 25mm (1") of wire insulation from the end of each wire.
Route mains cable through one of the two snap out holes provided and
secure the cable with a gland to provide adequate cable strain relief
(Tighten gland with use of a tool to ensure supply line anchorage point
cannot be removed by hand).
Push the wires into the correct terminals as labelled. Refer wiring guide below
or on the sticker inside the terminal block area.
Tighten all screws on the terminal block with a screwdriver and check to
ensure each wire has been firmly secured. Then screw mains lid back on.
WARNING
This appliance must be supplied through a residual current device
(RCD) having a rated residual operating current not exceeding 30mA.
Correct wiring of the main electricity board, RCD and spa pack is critical.
.
When installing appliance refer to your local wiring regulations.
When installing mains power cable providing service loops (additional wire
length for future serviceability) to incoming wiring is recommended.
* Refer Dip switch information on page 11
N
P1
P2
CS
P3
G
N
P1
P2
CS
P3
G
N
P1
P2
CS
P3
G
Owners Manual |1312 |Owners Manual

DO NOT fill spa by placing hose in the foot well
Filling a spa this way will create a large number of
air pockets in the pipe work and may cause diculty
when priming. Always ll spa through the lter area.
Double check release valves are open
Remove cabinet doors (using allen key supplied)
and double check that all release valves (refer step
one – inspection) in the plumbing system are fully
open to maximise the amount of air that can escape
the pipe work during lling.
Fill spa to the correct level
Fill the spa to the half way point of the lter weir
to ensure adequate water ow.
Remove filter cartridge(s) before filling
Remove lter cartridge(s) before lling
to enable lling of the spa through the lter itself.
This will ood the pipe work with
water and minimise the chance of air
pockets forming in the plumbing during
the lling process
Initiate water priming sequence
Every time the power is turned on the SV controller
will initiate a water priming sequence on start up.
During priming sequence the ltration pump will run
for up to 20 seconds at a time in an attempt to purge
air from the plumbing. The keypad display will scroll
PRIMING during this sequence. If the spa controller is
successful in clearing all of the air from the pipe work,
the system will begin normal operation. However, if
air is still detected the spa controller will shut down
and display a fault code ‘ER3-Water Prime’ (refer to
trouble shooting).
Fill to here
lling your spa almost time to jump in
MANUFACTURER RECOMMENDATION:
DO NOT FILL YOUR SPA WITH
HOT WATER!
The acrylic surface of your spa is designed
to be warmed slowly and evenly by the
inbuilt heating system
Owners Manual |1514 |Owners Manual

Fit your hardcover
With your settings selected, it’s time
to t your hardcover. Place the hardcover
on your spa pool to insulate your spa
and obtain maximum heat up. Failure
to t your hardcover correctly will extend your
heat up time dramatically. Once
tted, allow your spa to heat to your
selected temperature and add chemicals
as necessary
heating up your spa
VIDEO INSTRUCTIONS
Visit the mySpa@Home support page
sapphirespas.com.au/myspa-at-home
for video instructions.
turn on your spa powering it up
ONCE THE SV SYSTEM HAS PRIMED,
IT BEGINS NORMAL OPERATION.
Set the date/time and temperature.
Refer to your “Quick Reference Guide”
supplied for basic operation of your
particular touchpad (SV2 / SV3 / SV4 /
smartTOUCH).
Place the hardcover on
your spa for optimal heating
to required temperature
Owners Manual |1716 |Owners Manual

DO NOT:
7Use laundry detergents or household
cleaners to soak your filters
7Use a power washer or dishwasher
to clean your filters
7Use muriatic acid for acid soaking
/washing filters
IT IS RECOMMENDED THAT YOU:
✓Clean your spa filters every two weeks.
More often when bather load is heavy.
✓ Clean your filters with every water change.
✓ Replace filters after 12 months of use.
maintenance lters
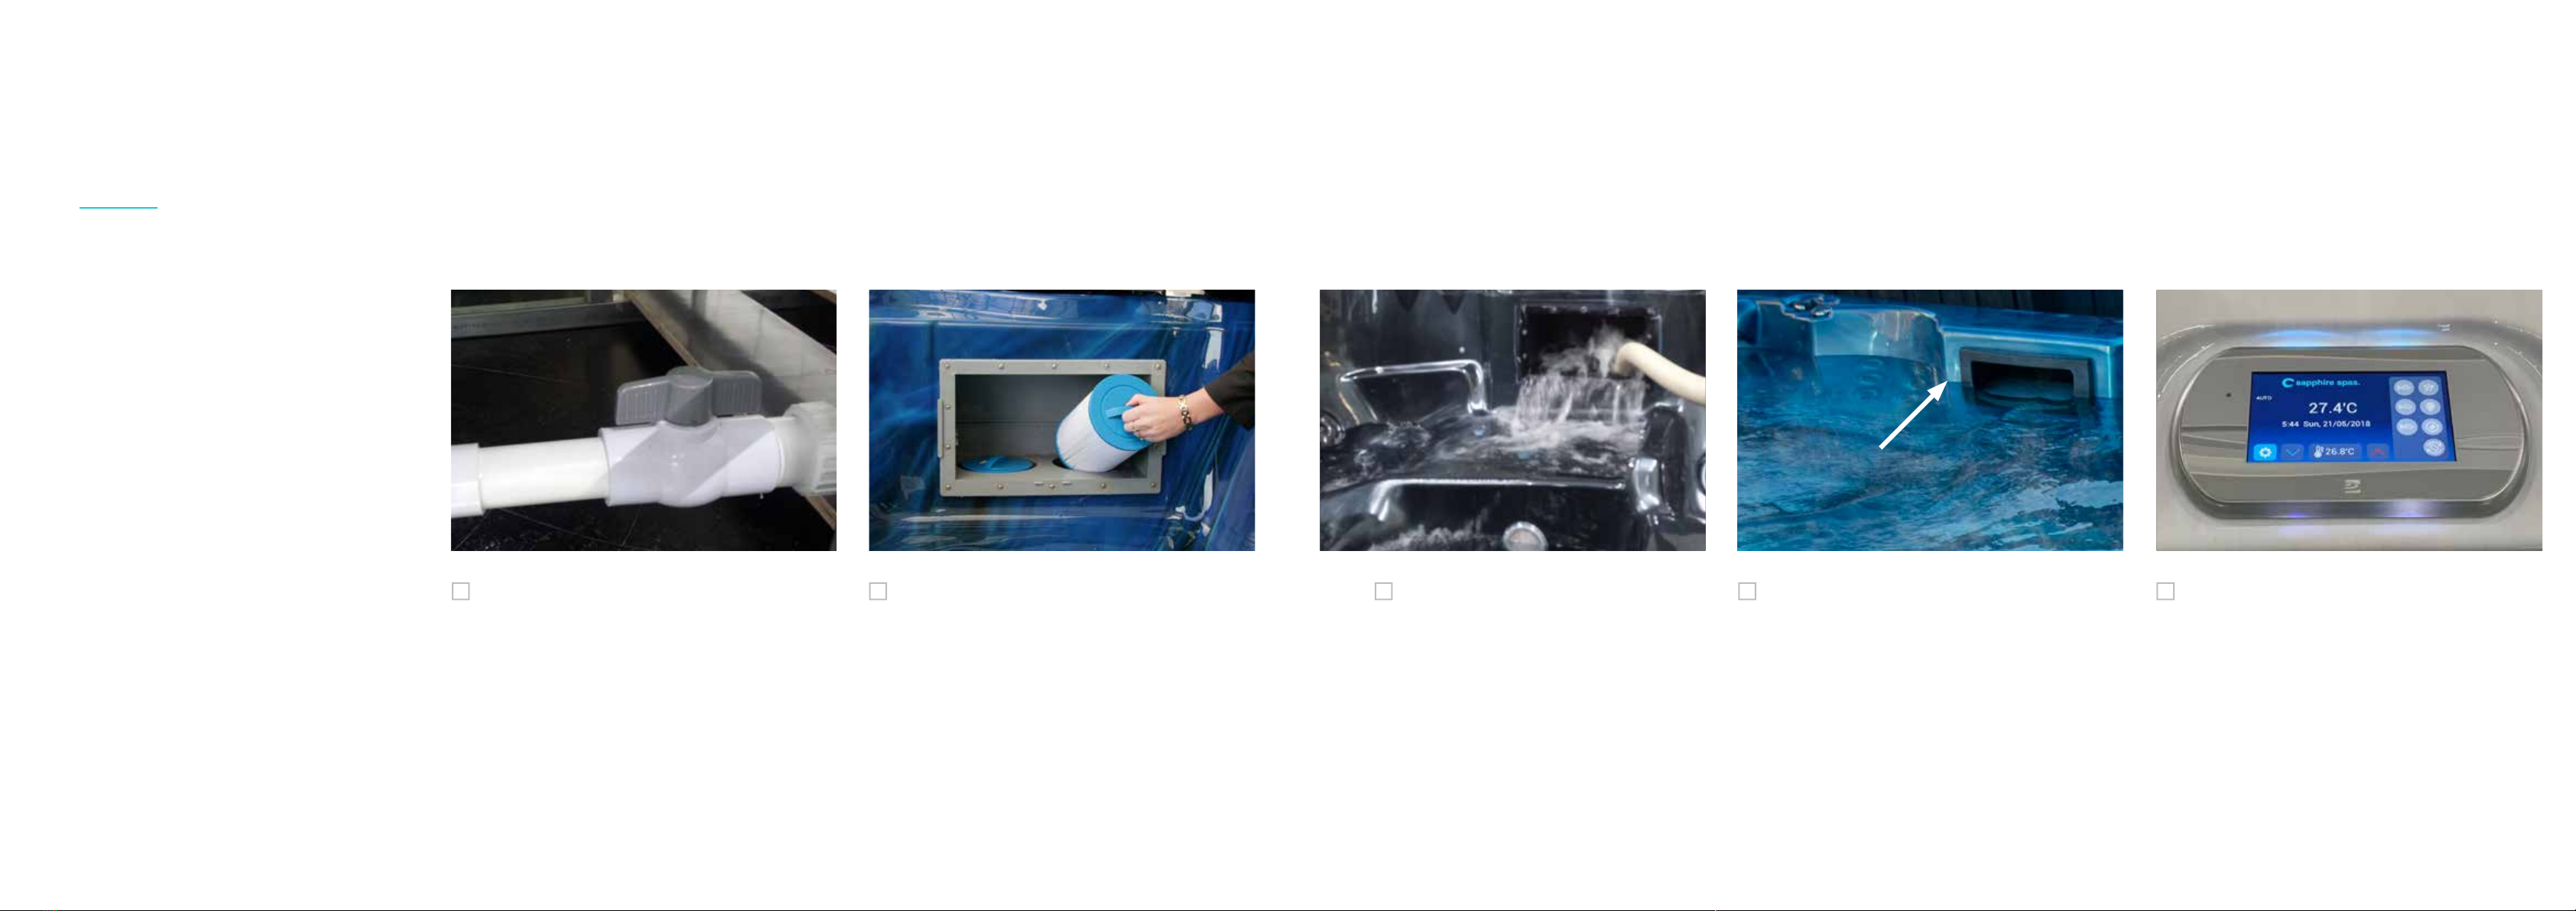
Remove filter faceplate
To remove lters, place two hands on the lter
faceplate, evenly slide it upwards until you can freely
remove it.
Remove all cartridges (2 in spa pools /
4 in swim spas)
Remove both spa pool cartridges (& top 2
swim spa cartridges) by rotating anti clockwise
Lower 2 swim spa cartridges need to be unscrewed
from base of lter box – you may need to use the top
cartridge to loosen the lower ones
Slide out cartridge cover
After removing the faceplate you can easily slide
out the leaf catcher.
Inspect cartridge
Example of cartridge that requires cleaning.
Locate cartridges
Locate the 2 x lter cartridges in the
base of the lter box.
Note: Swimspas have 4 x lter cartridges
– lower 2 cartridges screw into the base
of the lter box, then 2 top cartridges twist
onto the top of these
Remove debris with hose
Use a garden hose to apply a water stream
at an angle downwards to make sure all debris
and foreign matter is dislodged by spraying in
between each pleat in the lters.
Spa lter cartridges are made of a polyester micro-pore pleated lter media designed to trap small contaminants
suspended in the water. Sapphire Spa lters are a genuine 100 sq.ft. of lter media designed to give maximum
area for collection of particle matter in the water. Please note that Sapphire Spas Swimspas have 200 sq. ft.
of lter media providing maximum particle matter collection.
Your spa lter system is crucial for the overall quality of the
spa water. Dirty, worn out lters will fail in their job of trapping
spa contaminants and will put undue strain on the spa
pump motor, possibly shortening the life of the equipment.
Owners Manual |1918 |Owners Manual

Your Sapphire Spa is manufactured
from the highest grade acrylic material
available. To ensure that it keeps its
nish for many years, a small amount
of maintenance is required periodically.
General cleaning
Acrylic is very easy to clean and
generally stains and dirt will not adhere
to the surface, however you may wish
to wipe down the acrylic surface with
a soft, damp cloth/sponge and a
non-abrasive cleaner (ex. Methylated
spirits) after use or during your normal
maintenance program.
Stubborn marks
For more stubborn marks, your should
consult your Sapphire Spa dealer for
advice on a recommended acrylic
surface cleaner.
Crazing
May occur in acrylic surface as ne lines
when spa is exposed to extremely high
temperatures even with cover on.
These are non structural and not covered
under warranty.
Surface scratches
You may also experience surface
scratches caused by general wear
and tear. If so, it is strongly
recommended that you consult your
Sapphire Spas dealer before attempting
to remove them using the following
method. Apply car polish or a similar
product and lightly rub out the scratch
in a circular motion.
Sunlight & UV exposure
Do not expose the acrylic shell to direct
sunlight or UV for any prolonged period
as this may have a detrimental eect on
the surface and possibly void warranty.
Dirt & sand
Avoid allowing dirt and sand, caused
by bathers entering the spa, simply by
placing a mat or footbath in the entry
areas of the spa. This will assist in the
easier maintenance of the acrylic surface.
Cedar cabinets
If you have chosen a cedar cabinet
for your spa, you can rest easy knowing
it has been engineered and designed
withthe highest grade 20mm western
red cedar available and has been
treated with premium grade, mould
resistant stain.
Regular treatment of the cabinet will
enhance the natural look of the cedar
and ensure that your spa will always
be the centre piece in its location for
many years to come.
Consult your dealer for the ideal product
to stain and protect your cabinet.
To treat your cabinet you will need to
lightly sand the timber, then apply a good
even coat of stain. Small marks and
scratches can be treated the same way.
Your cabinet life will depend on how
you choose to maintain it and harsher
conditions will determine how often the
timber requires treatment.
If you notice the cedar losing its richness
of colour, it may be time for a treatment.
Sapphire Spas recommend treatment
after 6 months of usage,
and then periodically every 12 months.
Duratek cabinets
Duratek cabinets must be washed down
with a soap and water
solution every 6-12 months.
surface cleaning acrylic maintenance general
Owners Manual |2120 |Owners Manual

Your Sapphire Spa is supplied with a vinyl,
key lockable hardcover. All hardcovers
contain unique heat sealed foam to prevent
moisture retention which can result in added
weight and sagging. Our spa covers are top
stitched to add strength and durability and
use unique, fully key lockable ABS locks.
Maintaining your hardcover should be part
of your regular maintenance routine. Dirt acts
as an abrasive to the vinyl and can cause wear
to the folds, seams and stitching.
Keeping your cover clean is quiet simple but
you must follow a routine for cleaning and
treatment with a vinyl protector. Your local
Sapphire Spa dealer will be able to assist you
with an ideal vinyl protectant.
For long lasting results we suggest:
―Rinse the cover with cool water using
a garden hose.
―Spray with your preferred protectant
and wipe clean.
―For stubborn dirt we suggest a small
sponge, similar to one you would use
on your car.
―Rinse again thoroughly with water.
―Do not allow children or pets to walk
or jump on the hardcover.
―Do not lift or pull your cover by its straps,
flaps, skirts or heat seals.
―Never use laundry/dish washing
detergents, abrasives, alcohol based
products or harsh household cleaners.
These can actually remove some of the
top coat and cause premature vinyl failure.
―Rotate foam inserts if you notice any
sagging or water pooling.
It is important that you make specic times
to give your spa the ‘once over’, probably
every 3 to 4 months.
The following is a guideline that you may
like to follow:
―Disconnect the power source.
―Drain the water from your spa.
―Remove any dirt or sand and inspect
the acrylic surface.
―Remove filters and clean as suggested.
―Treat and stain cabinet (if required).
―Clean your hardcover as suggested.
―Remove your headrests and clean.
―Refit all spa products and refill spa.
Your Sapphire Spa headrests are designed for bather comfort
and require very little maintenance.
It is recommended that you remove your headrests to clean behind
them when you drain your spa. The headrests are secured by two small
lugs at the back and can easily be pulled o with your hands.
Thoroughly clean the head rests with a damp cloth or sponge. The headrests
are covered by a warranty of two years exclusive only to Sapphire Spas.
With care and good chemical balance your head rests will last many years.
maintenance water quality maintenance water quality
Owners Manual |2322 |Owners Manual

LINK MISSING
Pull cap out
Locate the drain valve towards the
base of your spa cabinet and pull cap
out from the housing approximately 2”
until it snaps into place.
Remove cabinet door at main touchpad
Remove screws with allen key
supplied, then remove cabinet door
Locate drain hose
You will nd the drain hose within the cabinet
to the right (as shown above)
Turn release valve to open position
to allow water to flow from spa
Connection to garden hose
If the hose supplied is not long enough
to reach your discharge point, will can
purchase these white pvc ttings to attach
the black garden hose attachment supplied
Remove cap
Remove the cap by unthreading counter-
clockwise to reveal the threaded connection.
Fit hose adaptor
Fit the hose adaptor supplied to the threaded
connection of the spa drain and snap your
garden hose to this.
Extend thread connection
Pull to extend the threaded connector
and allow reasonable ow through
the valve to empty the spa. The spa
water will drain out through gravity
feed only, so this may take several
hours. Ensure you run the water
to an approved discharge area. It
is advisable if you wish to discharge
water on the garden or grass, that
you do not treat the spa for several
days beforehand so chemical build-
up will not harm the area. Once the
spa is emptied, push the threaded
sections back together to seal the
drain valve. After a total drain use
a towel or sponge to remove any
excess water that may remain.
draining your spa pool draining your swim spa
Depending on bather usage and the type of sanitising system used, your Sapphire Spa
needs to be drained regularly every two to four months.
This is necessary because the amount of total dissolved solids becomes excessive,
making it dicult to maintain balance of the water and sanitiser eectiveness is hampered.
You only need to drain o approximately 1/3 of your water to refresh your system and
maintain good, clean water again. It is advisable to completely drain your spa pool every
6 months or sooner if necessary.
Owners Manual |2524 |Owners Manual

energy expense
how to minimise
To ensure you are getting the most out of your spa without breaking
your budget Sapphire Spas have equipped your SpaPool/SwimSpa with
the highest grade technology on the market today. Your componentry
will run your SpaPool/SwimSpa at the cheapest rates possible.
Control systems will vary between dierent spas so make sure you
educate yourself on the control system your spa has tted via our
youtube videos and your enclosed manual.
Sapphire Spas recommend taking the following precautions to make
sure you aren’t wasting your heat:
―Keep your hardcover on whenever the spa isn’t in use. Not only is
this a safety precaution but it is designed to lock in the heat and make
sure your spa isn’t running over its regular heating schedule.
―Keep your chemicals balanced. Unbalanced water can cause a build-up
of grime and scale inside your heater element causing it to malfunction.
―Keep your filters clean. Clogged or dirty filters will reduce the circulation
of your spa water, causing undue strain on the pump motor and heater
element hampering their ability to heat effectively.
―Protect your spa from extreme cold conditions that may reduce the
water temperature causing unnecessary expense.
heat&cool pump
installation
If you’ve purchased a heat & cool pump with your spa, please take the time
to look through ‘WELCOME to our Family/install your spa’ tab on our website:
Owners Manual |2726 |Owners Manual

information for your safety
To avoid accidents and possible drowning,
extreme caution must be exercised to prevent the
unsupervised access to the spa by my children.
―To reduce the risk of injury, children must
always be supervised when using the spa.
―Lower water temperatures are recommended
for young children as they are especially
sensitive to hot water.
―Test the water temperature with your hand or
a thermometer before allowing your child to
enter the spa to ensure it will be comfortable.
―For childrens’ safety, make sure you always
lock the cover after using the spa and ensure
lockable gates and enclosures are secure.
―Do not allow children to climb on the spa
cover; this may void your warranty.
―Remind children that wet surfaces can be
slippery & to always be careful when entering
and exiting the spa.
―DO NOT place any electrical appliances,
extension leads, lights etc within 5 metres
of the spa.
―Do not remove any fittings from the spa
without consulting the dealer from which the
spa was purchased and/or Sapphire Spas.
Incorrect removal of any joints or fittings
could result in an injury.
―The water temperature of the spa should
never exceed 40 degrees.
―Pregnant women, obese persons, people
with a history of heart disease, irregular blood
pressure diabetes or circulatory system
problems should exercise caution & consult
their doctor before using a spa.
―The use of drugs, alcohol and medication
before or during use of the spa may lead to
unconsciousness and possible drowning.
―Ensure you have a satisfactory break after
strenuous exercise before using the spa.
―People with infections, sores or skin
abrasions should not use the spa.
―Observe a reasonable time limit when using
the spa.
―Always enter/exit slowly.
―Maintain areas around the spa and ensure
good drainage to avoid slippery conditions
and possible injury.
―It is crucial that you maintain water chemistry
even when you are not using the spa.
―We do not recommend using the spa alone.
―The hardcover must be secured when spa
is not in use.
―Do not allow diving or jumping into the spa.
―It is recommended to display a Resuscitation
Chart in close proximity to your spa.
Should you experience any problem whatsoever,
do not hesitate to contact your authorised
Sapphire Spas store
Common sources of trouble
Here are some tips to help diagnose and rectify
some more common sources of trouble, if you
choose to have a go yourself rst.
SV spa controllers feature self-diagnostics and
scrolling error messages to quickly troubleshoot
possible problems. Should the spa control
encounter a problem the error code / message
will scroll across the topside panel screen until
the problem is resolved. If an error condition
is experienced all spa functions are shut down
and the spa should not be used until the error
condition has been xed. A list of error codes
with descriptions of problems and possible
solutions is detailed below for your reference.
Sapphire Spas have excellent warranties and
only use quality equipment, but it is important to
understand that much like tyres on a car, some
items do wear. These items include pumps &
mechanical seals.
IMPORTANT NOTE: for most error codes mains
power to the spa control must be turned OFF
and then back ON before the error condition
will be cleared.
Heartbeat LED
All SV model spa packs feature a red ashing
heartbeat LED light. The heartbeat LED is located
on the front right hand side of the spa pack itself
(installed underneath spa skirt). The heartbeat
LED ashes to indicate the current health/
status of the spa pack. When the spa pack is
functioning correctly with no errors to report the
heartbeat LED emits a single ash in a constant
pulse much like a heartbeat (ON, OFF, ON, OFF).
If the spa pack encounters a fault the heartbeat
LED will begin ashing in sequence with the error
code number being experienced (i.e. ER2 = ON
ON; OFF ON,ON OFF). If the keypad display
is ever blank, a spa user can still determine the
health status of the SV controller by removing
a door and checking the heartbeat LED on the
front of the spa controller itself.
Service reminder messages
Maintenance reminders such as “SERVICE
FILTERS” can be programmed to scroll across
the screen every 60 seconds after a certain time
period has elapsed. If your keypad display begins
scrolling a service reminder every 60 seconds this
message can be cancelled/reset by pressing the
OK button whilst the service message is scrolling.
Service filters
A default service reminder scheduled to occur
every 2 or 4 weeks. This reminder is to prompt
the spa owner to thoroughly clean and service
their spa lters. The lters will either require
cleaning, soaking in a lter cartridge degreaser
solution or replacing. Refer to spa reseller for
details on recommended cleaning methods.
How to cancel “Service Filters” scrolling
message, then press OK
The most common error codes are ER-3
and ER-4. For any other error codes please
check the website.
IT IS YOUR RESPONSIBILITY TO ENSURE YOUR CHILDREN
AND OTHERS ARE SAFE IN YOUR SPA AND THAT YOUR SPA
IS INSTALLED UNDER YOUR AREA’S COUNCIL REGULATIONS.
As per regulations and Australian Standards Numbers AS1926.3 – 2010 Swimming Pool
Safety Part 3: Water recirculation systems, and AS 2610.2 – 2007 (Incorporating Amendment
No.1) Part 2: Private Spas, Sapphire Spas complies with all relevant Authorities in the
Manufacturing of Spa Pools in Australia. All Standards are approved and agreed with SPASA
of which we are nancial members. Sapphire Spas has a duty of care to maintain both Quality
of Product and compliance to Australian Standards, which is our commitment as a responsible
Australian Manufacturing Company.
IMPORTANT NOTICE
BEWARE DIRECT SUNLIGHT & UV EXPOSURE
Exposure of the acrylic shell of your spa to direct sunlight & UV may cause excessive
temperatures to build up beneath the surface and damage the spa. Installation of spa in
direct sunlight & UV may put the acrylic surface under stress and will void the warranty.
Keep the spa covered at all times when not in use to prevent the possibility of damage
and voiding of warranty.
BEWARE INCORRECT CHEMICAL USE
The misuse of chemicals on any Sapphire spa will void warranty. Please ensure your
chemicals are being tested correctly as per your area’s water chemistry. Your local Pool
& Spa specialist will be able to assist you in a spa chemical balance plan. Sapphire
Spas do not deal directly in chemicals. If you notice your jet faces becoming lighter
in colour, jet backings becoming chalky or your headrests beginning to fade, please
contact the dealer from which the spa was purchased.
troubleshooting & error codes
Owners Manual |2928 |Owners Manual

Error code Problem Cause Solutions
ER-3 water prime Water prime failed – air detected in
heater tube.
Airlock in pipe work, low water
level, dirty lter cartridges.
―Press Pump A button to retry water prime.
―Check spa water level (refill if necessary).
―Remove filter cartridges and press Pump A button to retry prime.
―Bleed airlock from pipe work by slightly loosening couplings on front of filtration pump.
―Remove filter cartridges and flush water down pipe work with a hose.
ER-4 thermal trip Heater thermal trip activated.
Heater has been active and has
had insucient water ow over the
element. Low or no water ow has
caused the heater temperature to
exceed its maximum limits and
the spa control has shut down
operation to prevent any damage to
the heater unit.
Low water level, airlock in pipe
work, closed shut-o valves, dirty
lter cartridges, ltration pump
failed or operation intermittent.
―Turn mains power OFF and wait 10-15 minutes for element to cool and thermal
cut-out device to reset. Then turn power back ON.
―Check spa water level (refill if necessary).
―Remove filters and clean as per manufacturer’s recommendations or replace
cartridges if required.
―Check under spa cabinet to ensure all shut-off valves are in the OPEN position.
―Bleed airlock from pipe work by slightly loosening couplings on front of filtration
pump, releasing plastic bleed screw, or by removing filters and flushing water down
pipe work with a hose.
TROUBLESHOOTING AND ERROR CODES SPA WATER MAINTENANCE TROUBLESHOOTING
SPA WATER MAINTENANCE TROUBLESHOOTING
Problem Probable causes Solutions
Cloudy water ―Dirty filters.
―Excessive oils / organic matter. •
―Improper sanitization.
―Suspended particles / organic matter.
―Overused or old water.
―Clean filters.
―Shock spa with sanitizer.
―Add sanitizer.
―Adjust pH &/or alkalinity range.
―Run jet pump(s).
―Drain and refill the spa.
Water odour ―Excessive organics in water.
―Improper sanitization.
―Low pH.
―Shock spa with sanitizer.
―Add sanitizer.
―Adjust pH to rec range.
Chlorine odour ―Chlorine levels too high.
―Low pH.
―Shock spa with sanitizer.
―Adjust pH to recommended range.
Musty odour ―Bacteria or algae growth. ―Shock spa with sanitizer (if problem is visible or persistent, drain, clean and refill the spa).
Organic buildup or
ring around spa
―Build-up of oils and dirt. ―Wipe off scum with clean rag (if scum ring around spa severe, drain the spa, use a spa
surface and tile cleaner to remove the scum, and refill the spa).
Algae growth ―High pH.
―Low sanitizer level.
―Shock spa with sanitizer & adjust pH.
―Shock spa with sanitizer.
―Maintain sanitizer level.
Eye irritation ―Low pH.
―Low sanitizer level.
―Adjust pH.
―Shock spa with sanitizer.
―Maintain sanitizer level.
Skin irritation / rash ―Unsanitary water.
―Free chlorine level above 5ppm.
―Shock spa with sanitizer.
―Maintain sanitizer level.
―Allow free chlorine level to drop below 5ppm before spa use.
Stains ―Total alkalinity and pH too low.
―High iron or copper in water source.
―Adjust total alkalinity and/or pH.
―Use a metal deposit inhibitor
Scale
―High calcium content in water.
―Total alkalinity and pH too high.
―Adjust total alkalinity and pH.
―If scale requires removal, drain the spa, scrub off the scale, refill the spa and balance the water.
It is always advisable to consult your local dealer and provide them with a water sample for testing.
Owners Manual |3130 |Owners Manual

Your local retailer
01951 FEBRUARY 2021 V2 Specifications subject to change without notice / images are only representation of actual product
we hope this owners manual has
helped you get to know your new spa
for more information visit ‘Welcome to our Family’ TAB ON
OUR WEBSITE for tips & tricks on spa usage & maintenance.
if you have any queries about anything stated in this manual,
please contact your local store
sapphirespas.com.au
sapphirespas.nz
Table of contents
Popular Hot Tub manuals by other brands

American Standard
American Standard Cadet 6'x42 2774.018H parts list

Aquatic
Aquatic HOTSOAK 58 AI7242RUOHS Specification sheet

American Standard
American Standard Cadet Elite Corner Whirlpool 2775E parts list

Dimension One Spas
Dimension One Spas Californian Specifications

Therapure
Therapure EST5868 owner's manual

COVANA
COVANA Evolution installation manual