Sartorius 16419 User manual

Operating Instructions | Betriebsanleitung
Sterisart®Universal Pump 16419
Sterisart®Universal-Pumpe 16419
1000072189

Contents 3
Contents
1 General Safety Information ......................................4
2 Intended Use of the Sterisart®Universal Pump .......................5
3 Important Notes on the Safe and Proper Usage of the Sterisart®
Universal Pump ...............................................5
4 Unpacking the Pump and Checking the Equipment Supplied.............6
5 Description of the Sterisart®Universal Pump.........................7
6 Startup......................................................9
7 Application..................................................10
8 Operating the Sterisart®Universal Pump 16419 .....................11
9 Cleaning and Sanitization ......................................12
10 Installation in an Isolator.......................................13
11 Important Notes Concerning the Warranty .........................13
12 Troubleshooting ..............................................14
13 Technical Specifications........................................15
14 Ordering Information for the Sterisart®Universal Pump ...............16
15 Ordering Information for Consumables ...........................17
16 Literature...................................................18
17 Storage and Shipping..........................................18
17.1 Storage .........................................................18
17.2 Returning Devices and Parts........................................18
18 Disposal ....................................................19
18.1 Information on Decontamination ...................................19
18.2 Disposing of Device and Parts ......................................19
18.2.1 Information on Disposal ....................................19
18.2.2 Disposal ..................................................19
19 Conformity..................................................20
20 Legal information about licenses and trademarks ...................20
20.1 Millipore™.......................................................20

4 General Safety Information
1 General Safety Information
Explanation of Safety Symbols Used
These operating instructions contain important information which is visibly marked.
This information must be observed in order to avoid hazards to users as well as to
avoid damage and|or malfunctions to the device.
Symbols in the operating instructions:
Important Note! Important information
Danger! General danger with risk of injury
Laser warning
General information and|or help
Symbols on the manufacturer‘s ID label
AC voltage
Return and disposal
Observe instructions for use
Manufacturer

Intended Use of the Sterisart® Universal Pump 5
2 Intended Use of the
Sterisart®Universal Pump
The new Sterisart®Universal pump is a peristaltic pump equipped with appropriate
devices for attaching a closed sterility test system and a sample container.
The pump draws liquid from the sample container into the specially designed double
tubing, distributing the liquid equally to both sample containers of the sterility test
system. The sample is rinsed in a similar way. After the nutrient media is added, the
sample containers are incubated for a prescribed time and evaluated.
3 Important Notes on the Safe
and Proper Usage of the Sterisart®
Universal Pump
– The Sterisart®Universal pump must be switched off before any electrical
connections are made or broken (e.g. when plugging in or unplugging the power
cable or foot switch).
– The Sterisart®Universal pump must only be used with the original current-carrying
parts supplied with it (power cable with ferrite core, D-Sub connecting cable and
foot switch). The D-Sub protective cap supplied must cover the port when the
D-Sub connecting cable is not connected.
– The Sterisart®Universal pump is designed for use with Sterisart®NF filtration
systems. The suitability of any other tubing must be approved by Sartorius.
– Only plastic and glass bottles with a filling volume of 500 ml or less are permitted
to be placed in the delivered bottle holder.
– Only authorized Sartorius service technicians are allowed to open the pump
housing.
– Do not expose the Sterisart®Universal pump to extreme temperatures.
– Improper use or handling will invalidate the manufacturer‘s guarantee.
– Sterisart®Universal pump may only be used with a grounded, readily accessible and
fuse-protected electrical outlet that complies with national standards.

6 Unpacking the Pump and Checking the Equipment Supplied
4 Unpacking the Pump and Checking
the Equipment Supplied
When unpacking the Sterisart®Universal pump 16419 make sure not to leave
any parts in the packaging. The equipment supplied includes the following accessories
(one of each):
– Sterisart®Universal pump 16419
– Power cable (depends on country rating)
– Container for draining
– Pump cover for container for draining (Sterisart®units)
– Drain tubing
– Fastening arm
– Bottle holder
– Support rod
– Bow
– Clamping lever with sleeve
– Operating instructions German|English

Description of the Sterisart® Universal Pump 7
5 Description of the Sterisart®
Universal Pump
Fig. 1
The Sterisart®Universal pump 16419 (see Fig. 1) consists of pump housing (1) with pump
head (2), lever (3), bow (4) and handles (5). On the right handle, there is also a bolt with
a tilting lock for the container for draining (11). The selecting knob (6) is at the front on
the right. The stand (7) with the holding ring for bottles (8) and fastening arm (9) and the
optional ampoule breaker (10) is located on the left side of the pump.
The container for draining (Fig. 1; 11) for the sterility test containers is located on the
right side of the pump. The drain tubing can be attached to the appropriate connector
(barb) on the container for draining (Fig. 1; 12).
Laser warning
The internal barcode scanner emits a laser beam.
Do not look directly into the beam.

8 Description of the Sterisart® Universal Pump
1 2 3 4 5 6
Fig. 2
Located on the rear panel (see Figure 2): a laser warning label (1), On|Off switch (2),
AC power socket (3), socket for the foot switch (4), an RS-232 interface port for
connecting a PC/MMC card reader (5) and the manufacturer’s ID label (6).

Startup 9
6 Startup
Set up the Sterisart®universal pump ergonomically in a suitable area (cleanroom,
laminar flow work bench, isolator).
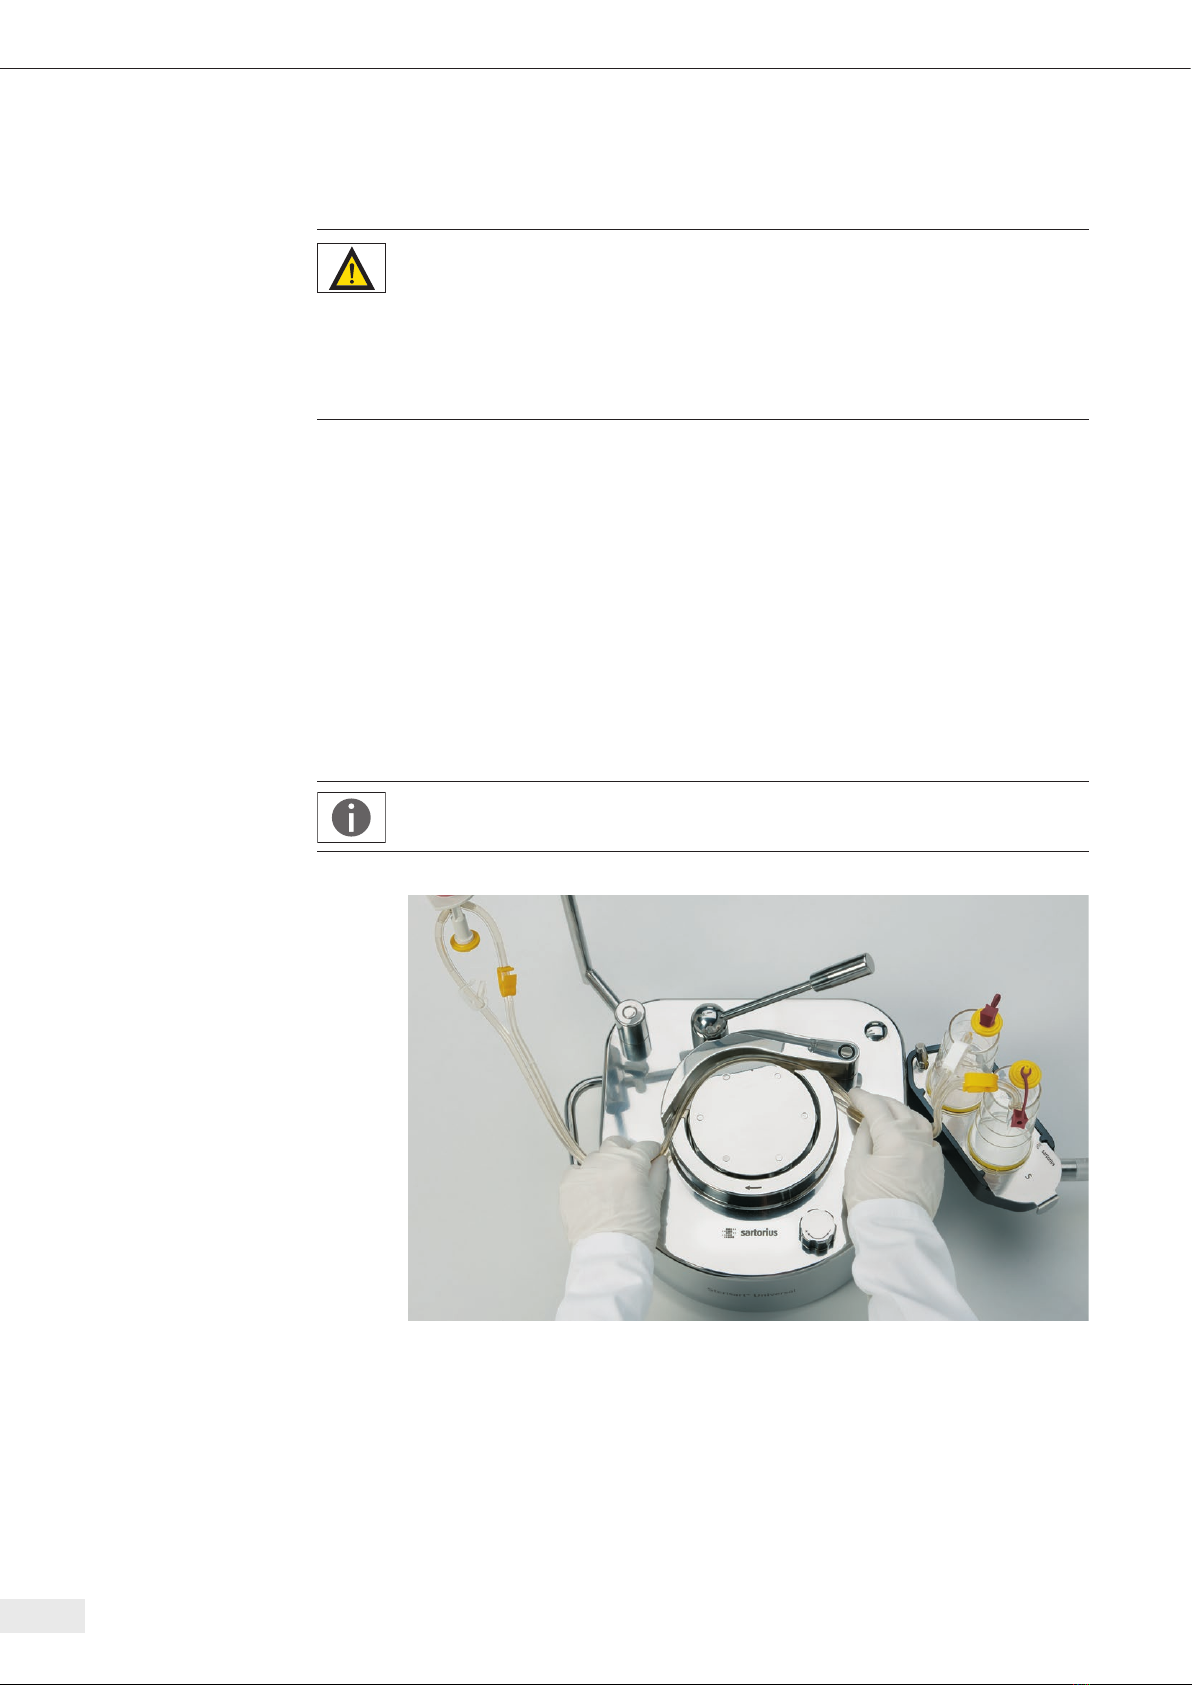
Before initial start-up, the accessories supplied must be assembled on the Sterisart®
Universal pump. Please proceed in the following order:
– At the back left, push the support rod (Fig.1, 7) onto the pin of the upper part of the
pump until it is firmly in place. The holes in the foot of the support rod allow the
positioning of the support rod to be altered.
– Fasten the bottle holder (Fig. 1, 8) and the fastening arm (Fig. 1, 9) to the support
rod. If necessary, attach the ampoule breaker (Fig. 1, 10) beforehand.
– Insert the bow (Fig. 1, 4) and the clamping lever (Fig. 1, 3) on the corresponding
bolts on the top of the pump. The lever is jacketed in a plastic sleeve, which can be
removed for cleaning. If signs of wear appear on this sleeve after it has been in use
for some time, it can be re-ordered as a spare part (see chapter “Ordering informa-
tion for the Sterisart®Universal Pump”).
– After connecting the drain tubing to the barb (Fig. 1, 12) of the container for drain-
ing (Fig. 1, 11); attach the container for draining to the appropriate bolts on the
right handle (Fig. 1, 5). The container for draining and the cover plate are attached
by moving the tilting lock.
– Fasten the end of the drain tubing to the appropriate drain.
Very Important Note!
Always make sure that there is a sufficient liquid level differential (> 5 cm) bet-
ween the container for draining and the drain. This makes safe drainage possible
and prevents backflow into the container for draining. Make sure that the drain
tubing is kept lower than the pump to prevent the drain pan from overflowing.
Treat the waste as a biohazard. Only dispose of it in accordance with current
regulations.
– Plug the foot switch into the designated socket located on the rear panel (see Fig. 2,
4). Fasten the plug to the socket by turning it clockwise.
– Plug the power cable into the male power socket on the back of the Sterisart®
Universal pump and into a grounded electrical outlet (Fig. 2, 3).
– Use the On|Off switch (Fig. 2, 2) at the rear side of the Sterisart®Universal pump to
turn it on.

10 Application
7 Application
Caution!
General danger with risk of injury
Do not operate the Sterisart®Universal pump until the tubing has been properly
installed. The pump may only be operated with the tubing inserted and only by
one person at a time. Never pump any flammable, corrosive or explosive fluids.
Users should always wear tight-fitting clothing (no ties, etc.).
To be able to operate the pump, Sterisart®sterility test systems must be installed
beforehand. To do this, follow the steps given below:
Remove the sterility test systems from their respective packaging and place the steril-
ity test sample containers in the container for draining on the right side of the pump.
– Now open the lever and the bow.
– Keep the tubing around the rotor of the pump (the arrow on the fixed part sur-
rounding the pump head indicates the subsequent direction of rotation), so that no
kinks occur and the tubing is not under tension (Fig. 3). The tubing is attached by
simply inserting it (with it lying on the ground) and fastening the lever (Fig. 4). In
this way, the tubing is automatically correctly positioned.
Important Note!
When threading the tubing, make sure that it is not kinked or twisted.
Fig. 3
– To start the pumping process, the tubing must be fully inserted and the lever
must be engaged. A safety function ensures that the pump does not start if the
lever or the bow are open.

Operating the Sterisart® Universal Pump 16419 11
– After threading the tubing and closing the lever, insert the removal spike/needle of
the Sterisart®NF system as described in the instructions for the Sterisart®NF steril-
ity test system. Then attach the test liquid container (e.g., bag or bottle) by hanging
it on the support rod (bag) or by placing it in the holding ring on the support rod
(bottle). The holding ring accepts bottles of various sizes. The holder must be turned
so that the sterility test system tubing is not under tension after the spike|needle
has been inserted and so that the spike|needle cannot slip out of the container.
For testing ampoules, an ampoule breaker is also attached to the support rod.
Use the integrated knife to scratch the neck of the ampoule, then snap off the top.
The broken-off top of the ampoule falls into the collection container (which can be
emptied later).
– For the following pumping process, make sure that the Sterisart®NF sample
containers are correctly positioned in the intended holders, and that the tubing
has been inserted without tension or kinking.
Important Note!
When the lever is opened, the Sterisart®Universal pump is turned off
immediately by a safety function. In this event, the Sterisart®Universal pump
can be restarted after adequately closing all components.
8 Operating the Sterisart®Universal
Pump 16419
The Sterisart®Universal Pump 16419 can be started up either by pressing the selec-
ting knob or by activating the optional foot switch. The speed can be smoothly adju-
sted using the selecting knob. The pump is switched off by again pressing the selec-
ting knob or by releasing the foot switch.
Fig. 4

12 Cleaning and Sanitization
9 Cleaning and Sanitization
Caution!
Ports on the back panel are not tight.
The Sterisart®Universal pump is not suited for sanitization (gaseous or atomized)
with peracetic acid, hydrogen peroxide, or other decontamination procedures
commonly used in isolators, unless it is built into an isolator countertop. These
types of disinfectant can be used when the pump has been professionally
installed in the isolator.
– Before cleaning the pump rotor, turn off the main power switch and unplug the
power cable.
The following parts of the pump have to be removed for cleaning:
– Bow, lever, support rod and container for draining
– Disconnect the pump head:
– The rotor must be turned by hand until the marking on the upper side (black dot)
is pointing backwards.
– The marking indicates the position of the fastening screw that is located in the
rotor mid-section.
– Loosen this screw with a 4-mm Allen wrench. Do not turn the screw out
completely.
– Pull the rotor upwards.
– Pull the speed-selecting knob upwards.
Comply with the IP protection rating! No liquid may enter the Sterisart®
Universal pump. Disconnect the pump from line voltage before any cleaning,
maintenance, or repair work.
Cleaning stainless steel surfaces:
The stainless steel housing can be cleaned at regular intervals. Clean stainless steel
parts with a wet cloth. Customary cleaning agents suitable for stainless steel can be
used without risk. For surface sanitization, use commercially available disinfectants
that are suitable for stainless steel.
Do not use any cleaning agents on the stainless steel housing that contain sodium
hydroxide or acetic, sulfuric or citric acid. The use of steel wool cleaning sponges is
prohibited.
All stainless steel surfaces can be cleaned by wiping with a moist cloth and with the
following products:
– Peracetic acid, H2O2and acetic acid (2.5%)
– Quaternary ammonium
– Formaldehyde and glutaraldehyde
– Isopropyl alcohol
– Ethanol 70%
Autoclavable at 121°C for 20 min. are bow, lever, speed selecting knob, support rod,
bottle holder, counter-bottle holder and container for draining (complete).

Installation in an Isolator 13
Never autoclave the pump rotor and never submerge it into any liquid.
Only use a slightly moistened cloth|tissue for cleaning|desinfecting.
After cleaning, all parts should be secured as described in Chapter “6 Startup,”
page 9. The rotor is assembled as follows:
– The rotor shaft has a groove on the side turned towards the back.
– Push the rotor upwards onto the shaft.
– Turn the marking on the rotor towards the back, so that the groove on the rotor
shaft aligns with the marking on the rotor
– Tighten the screw in the rotor to guarantee that the rotor is firmly seated.
10 Installation in an Isolator
The installation must be carried out by the isolator manufacturer.
To install the Sterisart®Universal pump in an isolator, it must be opened up first.
Make sure to unplug it from AC current (mains supply) before opening it!
During assembly, please follow the installation instructions precisely (part of the
installation kit for isolators, order number 1ZE---0050). The instructions are available
separately from the manufacturer.
11 Important Notes Concerning the
Warranty
The correct functioning and safe use of the Sterisart®Universal pump is only guaran-
teed when it is operated according to the information given in these instructions.
The equipment manufacturer is responsible only for effects on safety, dependability
and performance of the instrument if assembly, extensions, new settings, changes or
repairs are carried out by persons authorized by him to do so, if the electrical instal-
lation in the room is in conformance with IEC requirements and if the equipment is
used in accordance with these operating instructions.
Any changes made to the Sterisart®Universal pump will invalidate the manufacturer‘s
warranty unless they are previously agreed to by authorized Sartorius Service staff, or
carried out by them.

14 Troubleshooting
12 Troubleshooting
This section lists a few problems that could arise in connection with the Sterisart®
pump. Several solutions are given for each problem. The first solution given is usually
the most likely one. If this does not solve the problem, go down the list of suggestions
until the problem has been solved.
Important Note!
The pump must be switched off before electrical connections are unplugged
or plugged in!
Should it not be possible to locate and solve the problem in this way, contact the
appropriate service center (see the back cover of this manual).
Problem Solution
No function; no display The pump is not switched on, or is not correctly connected to the electric supply.
Plug the power cable into the electric outlet correctly and to the Sterisart®Universal
pump. Switch on the on-off switch.
Check the electric supply; switch on multiple outlet sockets; check the wiring.
If these possibilities are not feasible, the primary fuse in the main line filter may be
defective.
Changing this, with the power cable unplugged, must only be performed by
authorized personnel!
The pump rotor does not rotate. The locking lever is open or the foot switch is not properly connected.
The bow has been removed from the pump.
Check the connection of the foot switch to the pump.

Technical Specifications 15
13 Technical Specifications
Dimensions pump in mm (W × D × H) approx. 336 × 260 × 210 (with lever)
Dimensions pump with holding
ring for bottles, container for
draining in mm
(W × D × H) 440 × 365 × 485
Weight: Basic model 16419 Approx. 13.5 kg
Maximum operating temperature 40°C
Further data IP41 in accordance to IEC 60529/EN 60529
Electrical connection
Voltage 100–240 VAC ± 10%
Frequency 50–60 Hz
Power consumption 100 VA
Pump
Pump flow rate 70–650 ml/min (depending on the tubing)
Tubing
Correct functioning of the Sterisart®Universal pump is only guaranteed when used
with tubing that has been approved by Sartorius.
Materials
Base plate, lever, bow, rotor Stainless steel 316L (1.4435)
Housing, connection port,
support rod, bottle holder
Stainless steel 316 (1.4401)
Connecting cable PVC
Container for draining, plastic
sleeve for lever, hydrodynamic
bearing for bow
PET
Hydrodynamic bearing for lever Iglidur X
Seals, gaskets, drain tubing Silicone

16 Ordering Information for the Sterisart® Universal Pump
14 Ordering Information for the
Sterisart®Universal Pump
Order No. Description
16419 Sterisart®Universal pump, basic model
16973 Ampoule tongs
1ZG---0009 Bottle holder
1ZF---0004 Fastening arm
1ZA---0002 Drain tubing
1ZW---0002 Ampoule breaker
1ZE---0033 Foot switch
1ZF---0013 Stand
1ZG---0028 Container for draining
1ZB---0001 Plastic sleeve for lever
1ZF---0007 Wing nut
1ZS---0005 Bow
1ZS---0002 Lever
1ZL---0003 Rotor
1ZG---0023 Cover for container for draining (Sterisart®sterility test units)
1ZG---0024 Cover for container for draining (Millipore™ sterility test units)
1ZG---0014 Adaptor for Sterisart®container for draining for use with
a Millipore™ Equinox pump
1ZG---0039 Transport trolley
1ZE---0041 Installation kit isolators
Additional accessories are available on request.

Ordering Information for Consumables 17
15 Ordering Information for
Consumables
Recommended disposable sterility test units for use with pump.
Order No. Description
16466-ACD Sterisart®NF alpha, dual-needle metal spike for closed containers
(box of 10, individually sterilized with ETO; single-packed).
16467-ACD Sterisart®NF alpha, 6-cm metal needle for open containers
(box of 10, individually sterilized with ETO; single-packed)
16468-ACD Sterisart®NF alpha, system for medical devices with Luer lock
connectors (box of 10, individually sterilized with ETO; single-
packed)
16466-GBD Sterisart®NF gamma, dual-needle metal spike for closed containers
(box of 10, individually gamma sterilized, double-packed).
Optimal for use in isolators.
16467-GBD Sterisart®NF gamma, 6-cm metal needle for open containers
(box of 10, individually gamma sterilized, double-packed).
Optimal for use in isolators.
16468-GBD Sterisart®NF gamma, system for medical devices with Luer or Luer
lock connectors (box of 10, individually gamma sterilized, double-
packed). Optimal for use in isolators.
16469-GBD Sterisart®NF gamma, system with adapter for prefilled syringes
(box of 10, individually gamma sterilized, double-packed).
Optimal for use in isolators.
16470-GBD Sterisart®NF gamma, system for slightly soluble powders in
unvented vials (box of 10, individually gamma sterilized, double-
packed). Optimal for use in isolators.
16475-GBD Sterisart®NF gamma, system for lyophilized or freely soluble
powders in unvented vials (box of 10, individually gamma steri-
lized, double-packed). Optimal for use in isolators.
16476-GBD Sterisart®NF gamma, system with short dual-needle metal spike for
closed containers (box of 10, individually gamma sterilized,
double-packed). Optimal for use in isolators.
16477-GBD Sterisart®NF gamma, system for liquids in plastic containers
(box of 10, individually gamma sterilized, double-packed). Optimal
for use in isolators.
16478-GBD Sterisart®NF gamma, system for medical containers with Luer lock
male connectors (box of 10, individually gamma sterilized, double-
packed). Optimal for use in isolators.
Additional Sterisart®units are available on request.

18 Literature
16 Literature
Data sheet Sterisart®Universal Pump English
Publ. No.: SLD2010-e Order No.: 85030-531-17
Brochure Sterisart®Universal Pump English
Publ. No.: SLD1003-e Order No.: 85030-531-14
17 Storage and Shipping
17.1 Storage
Procedure
t If the device is in operation:
t Decommission the device.
t Clean the device.
t Store the device according to the ambient conditions (see Chapter “13 Technical
Specifications,” page 15).
17.2 Returning Devices and Parts
Defective devices or parts can be sent back to Sartorius. Returned devices must be
clean, decontaminated, and properly packed.
Transport damage as well as measures for subsequent cleaning and disinfection of
the device or parts by Sartorius shall be charged to sender.
WARNING
Risk of injury due to contaminated devices!
Devices contaminated with hazardous materials [nuclear, biological or chemical
(NBC)] will not be accepted for repair or disposal.
t Observe the information on decontamination (see Chapter “13 Technical Specifi-
cations,” page 15).
Procedure
t Decommission the device.
t Contact Sartorius Service for instructions on how to return equipment or parts
(please refer to our website at www.sartorius.com for return instructions).
t Pack the device and the parts in an un-used original packaging.
The original packaging can be ordered (contact Sartorius Service).

Disposal 19
18 Disposal
18.1 Information on Decontamination
The device does not contain any hazardous materials that would necessitate special
disposal actions. The media (e.g. acids, bases) used during the process are potentially
hazardous materials that could cause biological or chemical hazards.
According to the EU Directive on Hazardous Substances, the owners of devices that
come into contact with hazardous substances are responsible for properly disposing
of these devices and for declaring such devices when transporting them.
WARNING
Risk of injury due to contaminated devices!
Devices contaminated with hazardous materials [nuclear, biological or chemical
(NBC)] will not be accepted for repair or disposal.
18.2 Disposing of Device and Parts
18.2.1 Information on Disposal
The device and the device accessories must be disposed of properly by disposal
facilities.
A lithium cell battery is installed inside the device. Batteries must be disposed of
properly by disposal facilities.
The packaging is made of environmentally friendly materials that can be used as
secondary raw materials.
18.2.2 Disposal
Requirements
The device has been decontaminated.
Procedure
t Dispose of the device. Follow the disposal instructions on our website
(www.sartorius.com). Inform the disposal facility that there is a lithium cell
battery installed inside the device.
t Dispose of the packaging in accordance with local government regulations.
t Dispose of the consumables in accordance with local government regulations.

19 Conformity
The attached documents confirm compliance of the device with the directives or
standards cited.
20 Legal information about licenses
and trademarks
20.1 Millipore™
Millipore™ is a registered trademark of Merck KGaA, Darmstadt, Germany or its
affiliates.
Table of contents
Languages:
Other Sartorius Water Pump manuals
Popular Water Pump manuals by other brands

Tomei
Tomei 255 lph installation manual

JohnDow Industries
JohnDow Industries JDI-050EV manual

Sulzer
Sulzer ABS XFP-PE4 Installation and operating instructions

Dover
Dover PSG Wilden Pro-Flo P220 Series Engineering, operation & maintenance

ITT
ITT Goulds Pumps EZMAG 3296 Installation, operation and maintenance instructions

Warren rupp
Warren rupp SANDPIPER BEAST SPB20 Service & operating manual