SBV 52295 User manual

23154
Reference 52295: 3/8" Drive Multi Angle Digital Torque adapter
4 to 203 Nm
Reference 52142: 1/2" Drive Multi Angle Digital Torque adapter
4 to 203 Nm
WARNING Read this material before using this product.
Failure to do so can result in serious injury.
SAVE THIS MANUAL.

INTRODUCTION
This instruction manual is intended for your benefit. Please read and follow the safety, installation,
maintenance and troubleshooting steps described within to ensure your safety and satisfaction. The
contents of this instruction manual are based upon the latest product information available at the
time of publication. Due to continuing improvements, actual product may differ slightly from the prod-
uct described herein. Tools required for assembly and servicing are not included.

IMPORTANT SAFEGUARDS
WARNING - TO AVOID DAMAGING DIGITAL TORQUE ADAPTER
• Never operate digital torque adapter when powered OFF. Always power adapter ON prior
to applying torque.
• Never use this digital torque adapter to loosen fasteners as damage may occur.
• Do not exceed the rated maximum torque value for the digital torque adapter as break-
age and/or a loss of accuracy could occur.
• Always verify the calibration of the digital torque adapter if you know or suspect its capac-
ity has been exceeded.
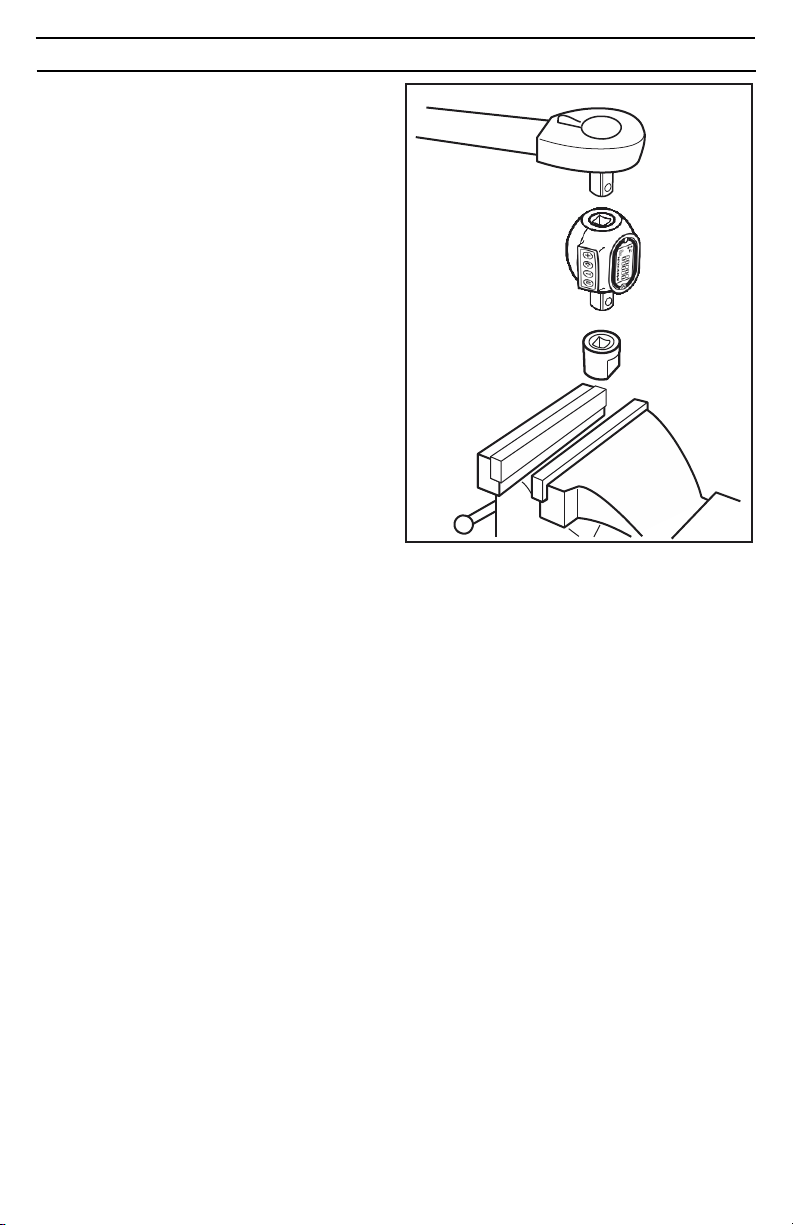
• Always pull - do not push - on the drive tool (ratchet) handle that is connected to the digi-
tal torque adapter.
• Adjust your stance to prevent a possible fall while applying torque.
• Apply torque slowly and grasp the center of the handle. Do not apply load to the end of
the handle.
• Avoid applying excessive torque, turn the ratchet slowly and steadily as you apply torque.
Pay attention to the LED light and sound indicators.
• Never submerge the digital torque adapter in water or any other liquid.
• If the tool gets wet, immediately wipe it dry with a soft, clean towel.
• Do not expose this wrench to dust or sand as this could cause serious damage.
• Use the digital torque adapter only for its intended purpose as described in this manual.
• Do not use the digital torque adapter if it is not working properly or if it has suffered any
damage.
• Do not disassemble the digital torque adapter.
• Do not expose the digital torque adapter to extreme temperatures, humidity, direct sun-
light.
• Do not shake violently or drop digital torque adapter.
• Do not use this tool as a hammer.
• Position batteries in proper polarity.
• Do not mix batteries of different type.
• Never clean the digital torque adapter with soap or solvents.
• Use a soft, dry, clean cloth to clean the digital torque adapter and LCD panel.
• Do not apply excessive force to the LCD display panel.
• Store in a clean dry place.
• Keep this tool away from magnets.
PRODUCT SPECIFICATIONS
Drive size: 3/8 or 1/2 inch (depending of reference#)
Accuracy:
CW: ± 1%
CCW (4-39Nm) ± 4%
CCW (40-203Nm) ± 2%
Mem
o
ry
p
resets:
10
Display resolution: 0.1 Nm
Operation mode: Peak/Trace
Unit selection: kg-cm, kg-m, lb-in, lb-ft, N-m
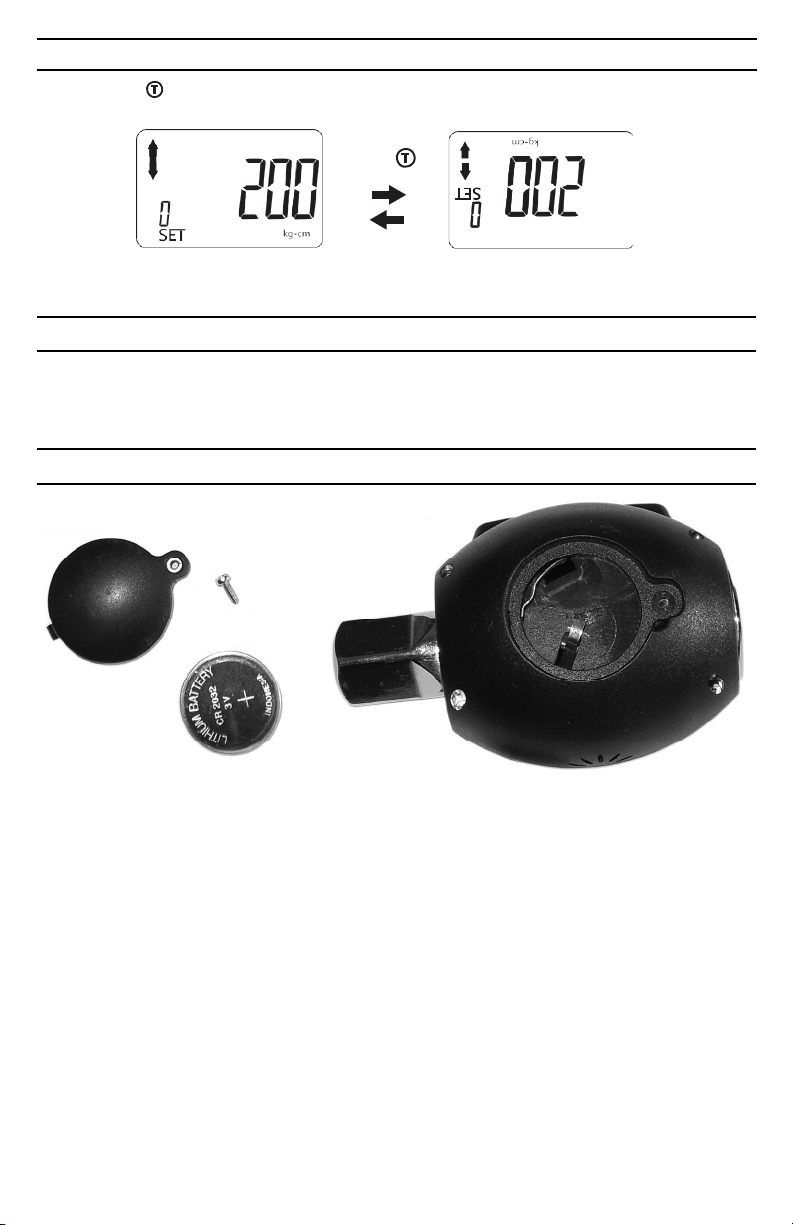
Battery: (1) DC 3V, CR2032
Ambient temperature range:
Operating: -10°C – 60°C (13.9°F – 139.9°F)
Storage: -20°C - 70°C (-4°F – 157.9°F)
Auto shut-off: 80 seconds
Torque range: 4-203 Nm

PRODUCT FEATURES
Warning buzzer
Mode key
LCD display
with backlight
Main keyboard
LED Calibration
adapter
Extension bar
The SBV Digital Torque Adapter displays fastener torque specification settings,
torque readings and peak hold measurements.
• Digital torque readout.
• Selectable for five torque units of measure: lb-ft, lb-in, kg-cm, kg-m and N-m.
• +/- 1% CW and +/- 4% accuracy (4-39Nm) or +/- 2% accuracy (40-203Nm)
• Clockwise (CC) and counterclockwise (CCW) operation indicated on display.
• Peak torque hold mode and Tracking torque mode selectable.
• White LED backlight for easy reading.
• Reverisble LCD display viewing orientation.
• Multiple preset torque value indicators: audible buzzer, vibration alarm, red LED warning
light.
• Displays percentage of preset torque value attained.
• Power saving automatic sleep mode activates after 3 minues of inactivity.
• Uses one (1) DC 3V, CR2032 battery.
• Batteries & storage case included.
CONTROLS
Mode
Add value
Digit shift
Peak hold/Trace
Units

LCD DISPLAY INDICATORS
Peak Hold
Trace
CCW
Auto/Manual
Low battery icon
Torque value
Preset target torque
Percentage of CW
preset torque
Unit of
measure
Preset number
LOW BATTERY VOLTAGE INDICATION
When battery voltage drops below 2.6
volts, a low battery warning icon will
appear on the LCD display.
When the battery voltage drops below 2.4 volts,
the low battery warning icon will begin to flash,
indicating that immediate battery replacement is
required.
Battery voltage under 2.6V Battery voltage under 2.4V
POWERING ON DIGITAL TORQUE ADAPTER
Press Mode button to turn digital torque adapter on and activate auto-zeroing process.
CAUTION:
Auto-zeroing process Normal mode
(Preset number 0 shown)
Make sure the displayed applied torque value is zero during the auto-zeroing period. Otherwise a
torque offset will be included.
SELECTING MEMORY PRESETS
Select 1 of 10 user programable memory presets.
Press
Normal mode
(Preset number 0 shown)
Press to scroll through ten (10) user programable memory presets.

SELECTING UNITS OF MEASURE
1. With the unit on, press the (Digit shift) key to display the “normal mode” screen.
2. Press the (Digit shift) key to the activate the “set torque value” screen (far right digit flashes).
3. Press the the (Units) key to toggle the Units of measure indicator until the desired unit of mea-
sure is displayed.
4. Five different unit selections are available: kg-cm, k-gm, in-lb, ft-lb, and N-m.
Press Press Press
NOTE:
When you change units, any target torque setting you have already entered will now be displayed in
the new unit value.
SETTING PRESET VALUES
1. With the unit on, press the (Digit shift) key to display the “normal mode” screen.
2. Press the (Digit shift) key to the activate the “set torque value” screen (far right digit flashes).
3. Press the the key until the desired first digit value is displayed (0 through 9).
4. Press the (Digit shift) key to move to the next higher digit position.
5. Repeat steps three (3) and four (4) as needed to enter the desired target torque value.
Press Press Press
Press Press Press
ATTENTION
If the value of the presetting being programmed exceeds 120% of
the rated maximum torque capacity of the adapter, the value will be
automatically reset to zero.
SELECTING PEAK HOLD/TRACKING MODES
In Track mode - The display will register “real-time” torque as it is applied. This is useful when you
are able to observe the digital display while applying torque to a fastener. Watching the torque value
increase can assist you in applying torque evenly and safely, especially as you approach your target
torque setting.
Tracking Mode Peak Hold Mode
Press

PEAK HOLD MODE OPERATION
In Peak hold mode, the digital display shows the maximum torque applied, which can be helpful for
verifying that the correct torque was applied when the digital display is not visible during use. This
mode is also handy when using the adapter to calibrate a torque wrench.
AUTO MODE:
Peak Hold Mode
Apply
torque
Percent of Target torque
applied is displayed.
Apply
torque
Continue applying torque
until preset torque value
is achieved.
Select pre-setting: 200 kg-cm
(in this example)
Release torque to zero-out torque
reading and then apply torque again.
Release
torque
Buzzer sounds: BiBiBiBiBiBiBi
Red LED flashes:
Vibration altert activates
Unit auto clears and updates to
display new peak value attained.
MANUAL MODE:
Toggle screen from Auto mode to Manual mode.
Auto mode
Press and hold
for 2 sec.
Manual mode
Icon will blink
Manual mode
Fully release
applied torque.
Display retains peak
torque achieved.
Apply
torque
Icon blinking
Press to manually clear currently displayed peak torque value.

TRACKING MODE OPERATION
In Tracking mode, the display will register torque as it is applied in real-time. This allows you to
observe the digital display while applying torque to a fastener. Watching the torque value increase
can assist you in applying torque evenly and safely, especially as you approach your target torque
setting.
Tracking Mode
Select pre-setting: 200 kg-cm
ATTENTION
If the value of the selected presetting is zero, a default
value of 120% of the rated torque capacity of the adapt-
er will automatically be loaded as the target torque
Apply torque to reach preset torque value
(200 kg-cm in this example)
At 50% of Target torque:
• Percentage of preset torque value is displayed
Apply
torque
At 70% of target torque:
• Percentage of preset torque value is displayed
• Buzzer sounds: Bi---Bi---Bi---
• Red LED flashes:
Apply
torque
At 90% of target torque:
• Percentage of preset torque value is displayed
• Buzzer sounds: Bi-Bi-Bi-Bi
• Red LED flashes:
Apply
torque
At 100% of target torque:
• Percentage of preset torque value is displayed
• Buzzer sounds: BiBiBiBiBiBiBi
• Red LED flashes:
• Vibration alert activates

CHANGING ORIENTATION OF DISPLAY
Press and hold button for 2 seconds to toggle the orientation of the display readout.
Press
POWERING OFF DIGITAL TORQUE ADAPTER
Press and hold Mode button for 2 seconds to turn unit off.
NOTE: This tool will automatically enter sleep mode after 3 minutes of inactivity.
BATTERY INSTALLATION AND REPLACEMENT
1. Requires one (1) DC 3V, CR2032.
2. Unscrew battery cover fastener with a jewelers’ phillips screwdriver.
3. Remove the battery cover.
4. Remove the old battery.
5. Clean battery terminals.
6. Install fresh battery in the digital torque adapter (with the “+” sign end facing upward).
7. Replace the battery cover and screw tight.
Note
• Remove battery if stored for a long period of time.
• Oil, water, dirt and sweat can prevent a battery’s terminals from making electrical contact. Wipe
both terminals before installing batteries.
Battery disposal
Only dispose of battery when fully discharged.
DO NOT dispose of battery in a fire.
Dispose of expended batteries and packaging materials in an environmentally responsible manner.

CALIBRATING A TORQUE WRENCH USING DIGITAL ADAPTER
1. Set your torque wrench to a value of approxi-
mately 25% of its maximum capacity. For
example, if your torque wrench has a maximum
capacity of 150 lb-ft, set it to 40 lb-ft.
2. Program the digital torque adapter for a torque
value that matches the torque wrench setting.
In our example, you would set the adapter for
40 lb-ft. Ensure the adapter is in the “peak”
mode as this will make it easy to reference
actual torque versus the torque indicated on
the wrench.
3. Connect the pre-set torque wrench and the
your calibration adapter (not inculded) to the
digital torque adapter. Secure the calibration
adapter in a bench vise. Ensure the calibration
adapter is securely tightened in the vise.
4.Turn the torque wrench smoothly and steadily,
applying torque to the calibration adapter until
your torque wrench reaches the preset value,
either by “clicking” (micrometer style torque
wrench), or displaying the desired setting
(digital or dial torque wrench).
5. Read the peak torque value shown on the digi-
tal torque adapter. Adjust your torque wrench
and repeat the procedure until the trque
wrench and digital torque adapter show identi-
cal torque values.
This manual suits for next models
1
Table of contents