Scandium SCEO08 Owner's manual

INSTALLATION · OPERATION · MAINTENANCE GUIDE
BUILT-IN ELECTRIC OVEN
SCEO08

Page 2
Index
1. Welcome..........................................................................................................................................3
2. Your Safety — General Warnings.....................................................................................................5
Saving Energy .....................................................................................................................................................5
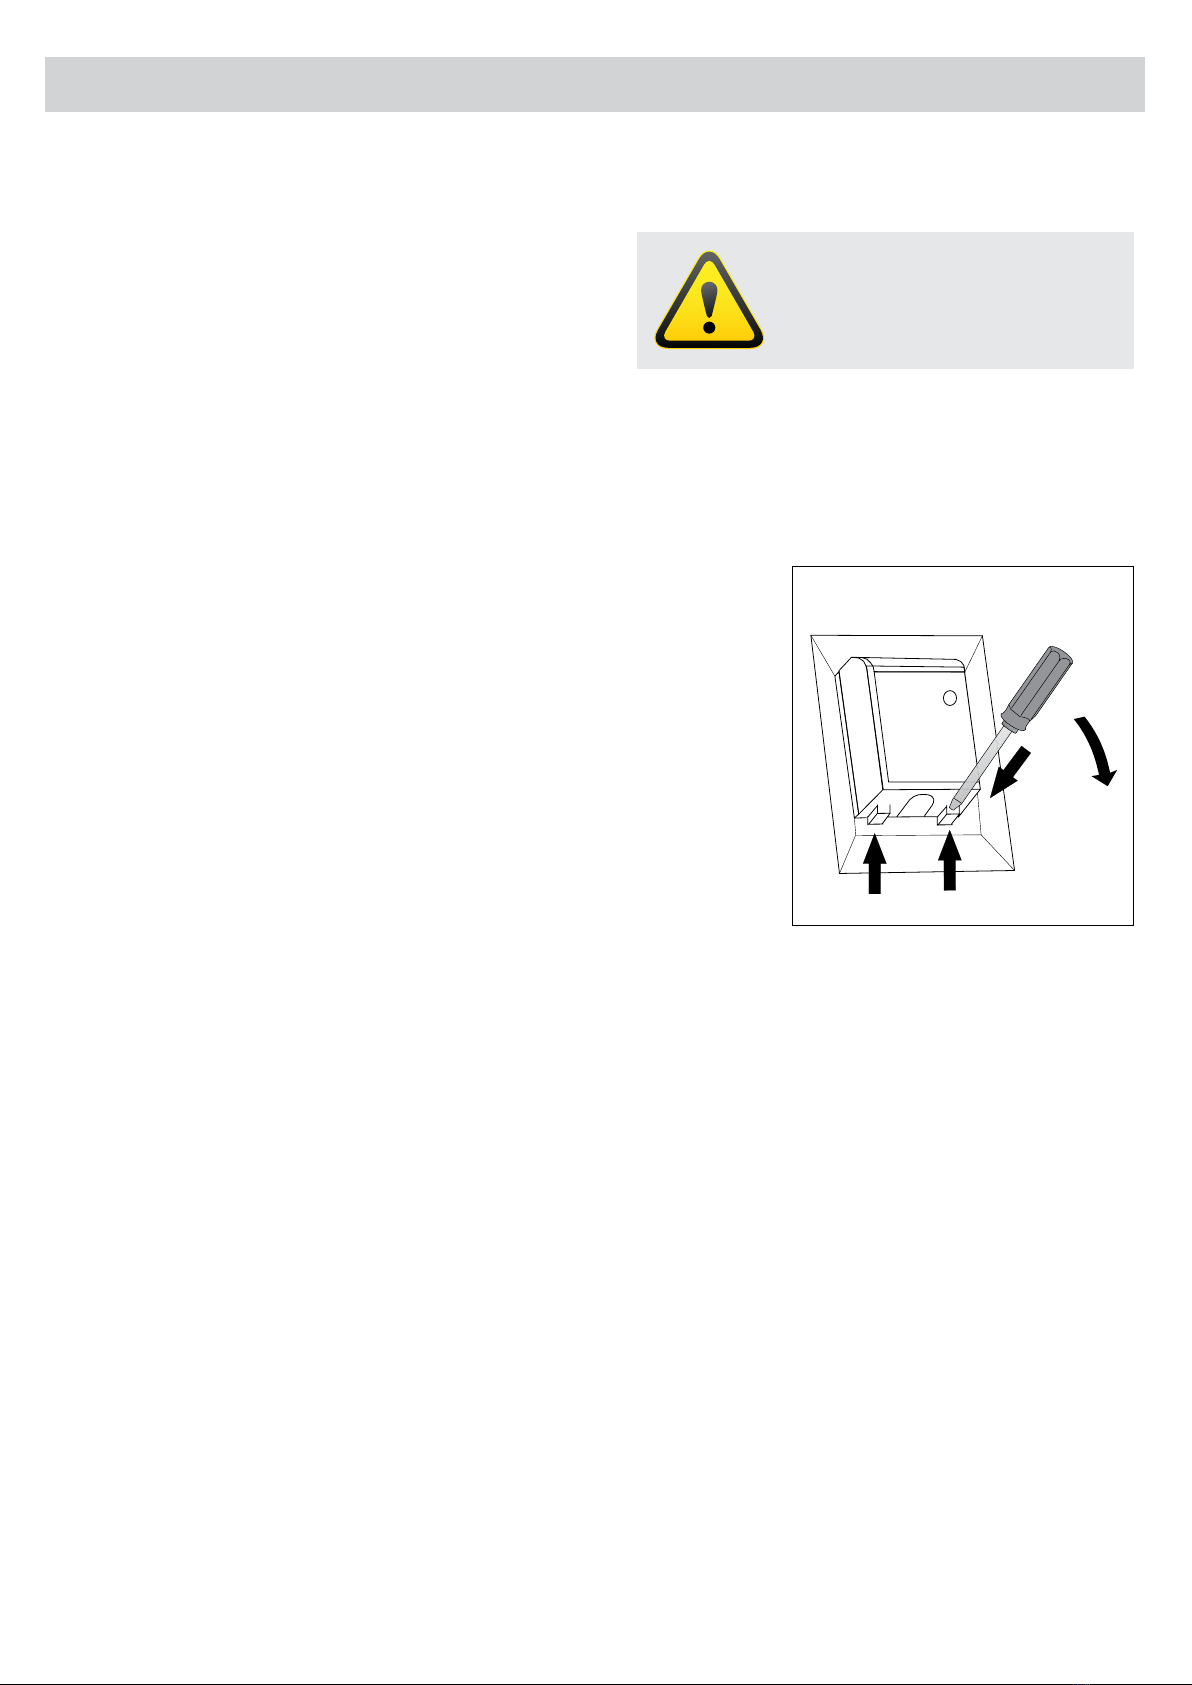
Unpacking ...........................................................................................................................................................5
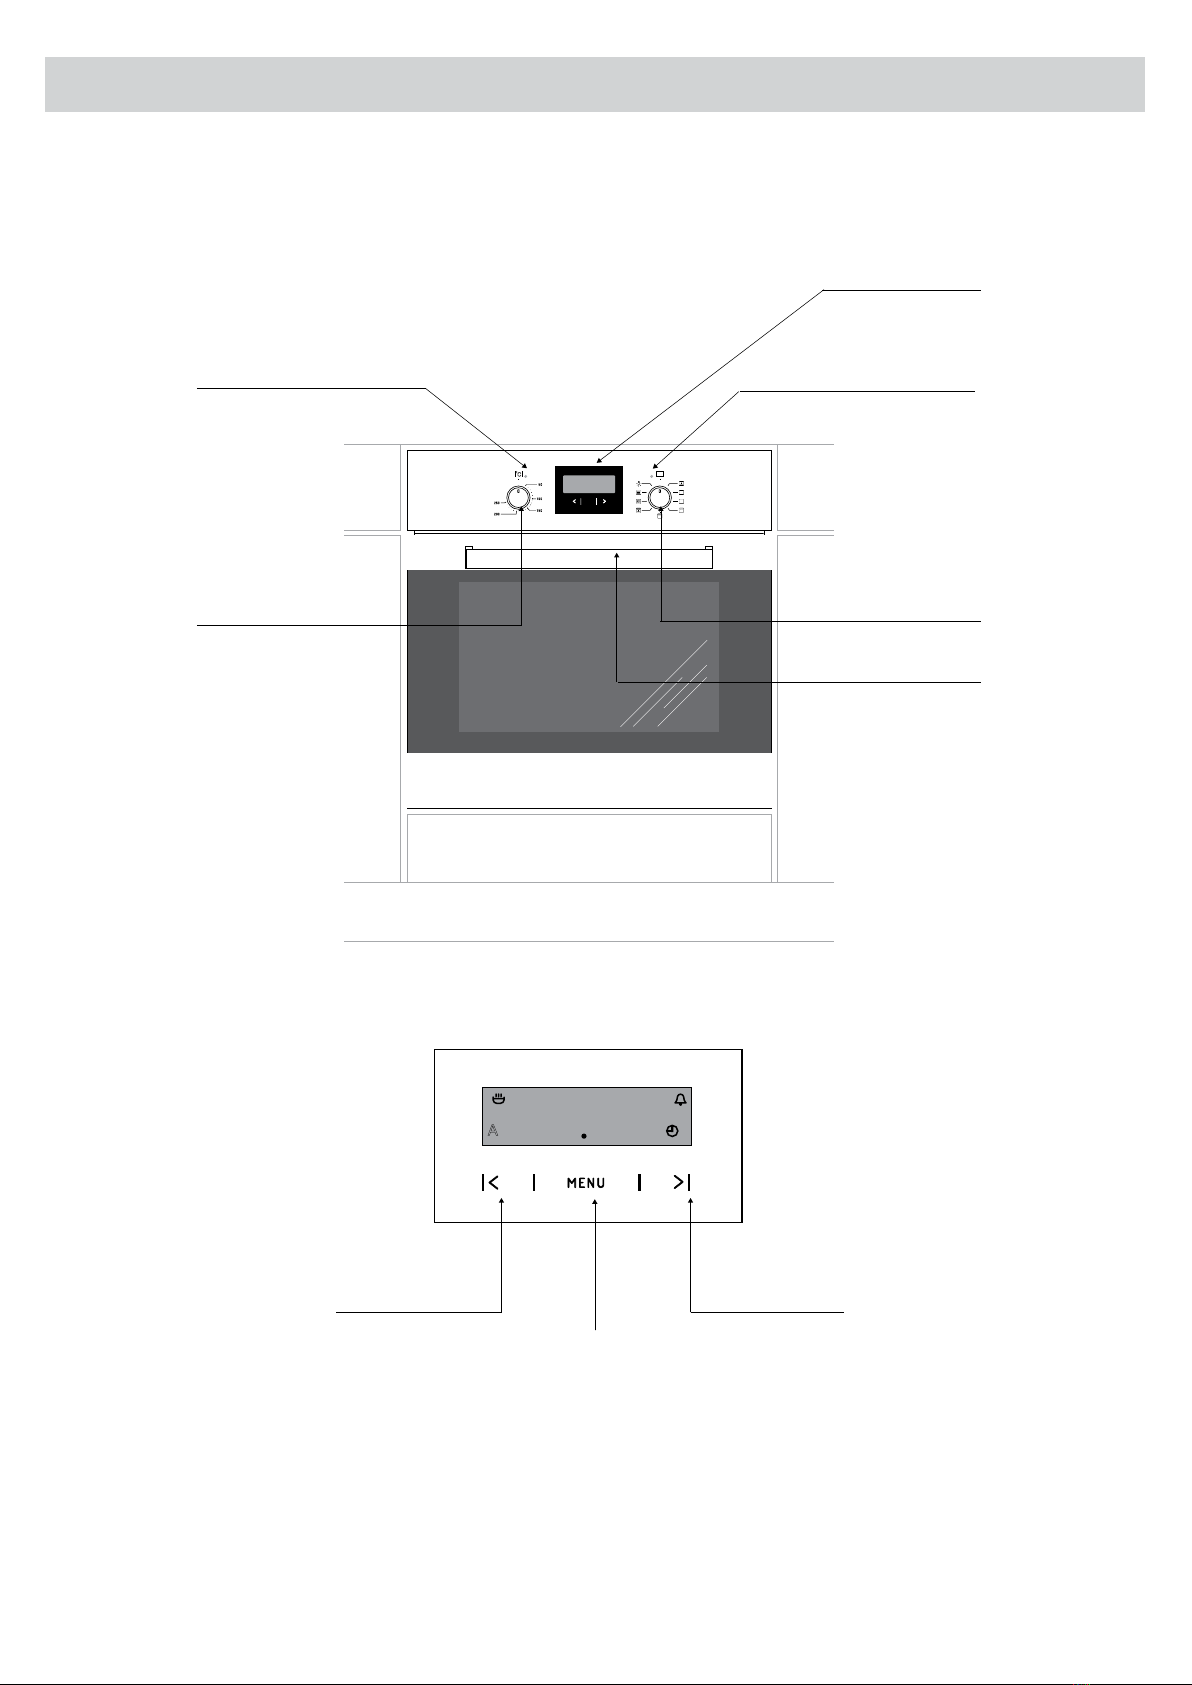
3. Appliance Description......................................................................................................................6
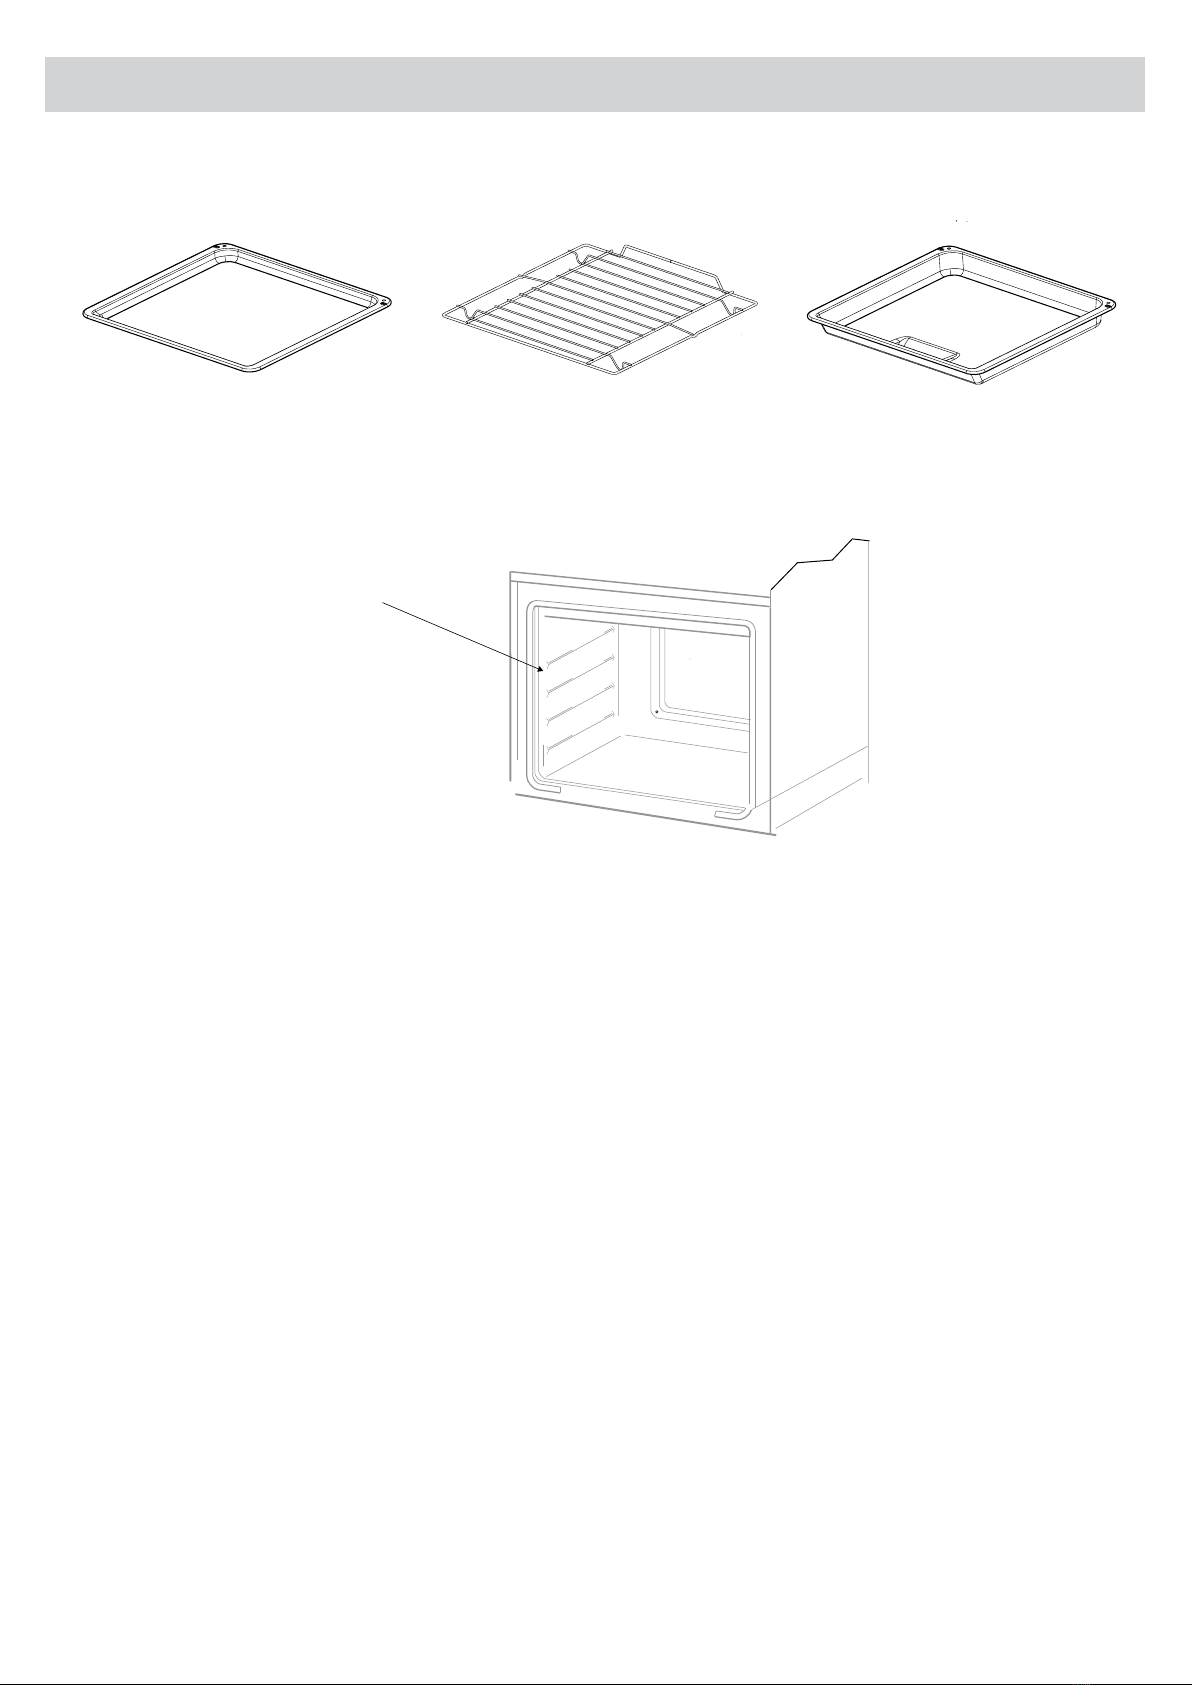
Cooker Fittings ...................................................................................................................................................7
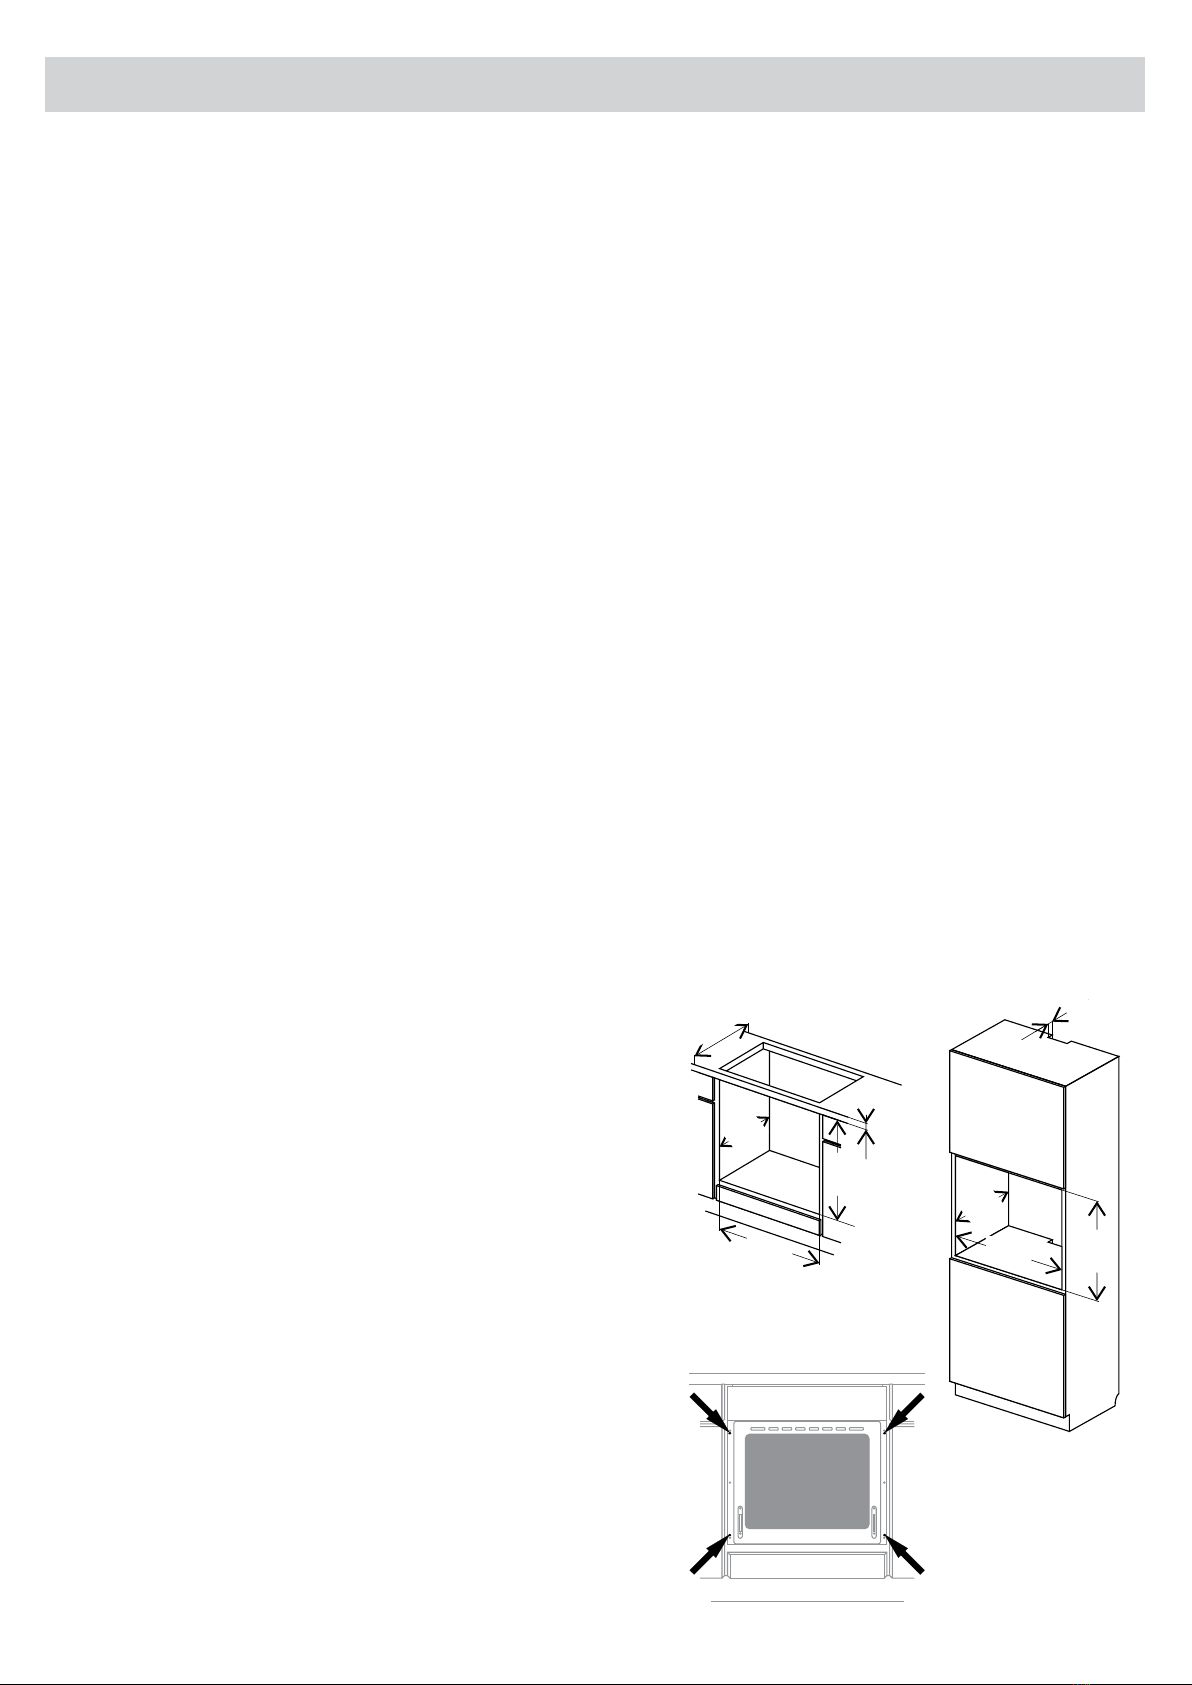
4. Installation .......................................................................................................................................8
Features of the Cabinet .....................................................................................................................................8
Inserting the Oven in the Cabinet.....................................................................................................................8
Electrical connection ..........................................................................................................................................9
5. Operation ........................................................................................................................................11
Before First Use...................................................................................................................................................11
Cleaning ..............................................................................................................................................................11
Electronic Programmer ......................................................................................................................................12
Current Time Set-up...........................................................................................................................................12
Timer....................................................................................................................................................................12
Semi-automatic Operation ................................................................................................................................13
Automatic Operation .........................................................................................................................................14
Oven and Fan with Automatic Air Circulation..................................................................................................15
Use of the Grill ....................................................................................................................................................17
6. Baking in the Oven — Practical Hints ..............................................................................................18
Baking..................................................................................................................................................................18
Roasting Meat.....................................................................................................................................................18
Practical Cooking Hints (Also indicated on the inside of the oven door)......................................................19
7. Cleaning and Maintenance...............................................................................................................20
Oven ....................................................................................................................................................................20
Replacement of the Oven Light Bulb ...............................................................................................................21
Removing the Side Racks...................................................................................................................................21
Door Removal .....................................................................................................................................................22
Removing the Inner Glass Panel........................................................................................................................22
Regular Inspections ............................................................................................................................................24
8. Troubleshooting...............................................................................................................................25
9. Operation In Case of Emergency .....................................................................................................26
10. Technical Data..................................................................................................................................27
11. Disclaimer ........................................................................................................................................27

Page 3
1. Welcome
Welcome
Thank you for purchasing this Scandium appliance.
To achieve the optimal performance from your appliance, and to avoid the risk of accident or damage, it is
essential to read this manual before installation and rst time use.
This guide contains important information on the use and maintenance of the appliance, as well as important
safety notes.
Your appliance has been thoroughly checked for safety and functionality before being packaged and leaving
the manufacturer.
Please keep this instruction manual in a safe place so you can refer to it at any time.
ATTENTION
Installation, regulation or maintenance, of both gas and electric appliances, should
only be executed by qualied and authorised personnel who are aware of the
installation regulations in force.
Please make sure to read this booklet carefully, containing general instructions for the
Installation, Operation and Maintenance of your appliance, before installation and
operation.
It is extremely useful to know, in detail, the best way of operating and maintaining
this appliance so you can enjoy its benets and be assure of the best results.
Please keep this instruction booklet with the appliance in case you pass it on to
someone else.

Page 4
2. Your Safety — General Warnings
WARNING: It is important that this instruction book be retained with the appliance for future reference.
Should the appliance be sold or transferred, always ensure that the book is left with the appliance in order that
the new owner can get to know the functions of the appliance and the relevant warnings. These warnings are
provided in the interest of safety. You MUST read them carefully before installing or using the appliance.
• This appliance is designed for domestic use. It must be used by adults.
• Children should be supervised to ensure that they do not play with the appliance.
• The appliance is not intended for use by persons (including children) with reduced physical, sensory or
mental capabilities, or lack of experience and knowledge, unless they have been given supervised or
instruction concerning use of the appliance by a responsible person for their safety.
• Do not use harsh abrasive cleaners or sharp metal scrapers to clean the oven door glass as they can
scratch the surface, which may result in the glass door shattering.
• Ensure that the appliance is switched off before replacing the interior lamp to avoid the risk of
electric shock.
• Do not use steam cleaning devices to clean the appliance.
• DANGER OF BURNS! Hot steam may escape when you open the oven door. Be careful when opening
the oven door during or after cooking. DO NOT lean over the door when you open it. Please note that
depending on the temperature the steam can be invisible.
• Ensure that small items of household equipment, including connection leads, DO NOT touch the hot oven.
• Do not put pans on the opened door of the oven.
• Do not use the oven in the event of a technical fault. Any faults must be xed by an appropriately qualied
and authorised person.
• In the event of any incident caused by a technical fault, disconnect the power and report the fault to the
customer service centre to be repaired.
• The rules and provisions contained in this instruction manual should be strictly observed. Do not allow
anybody who is not familiar with the contents of this instruction manual to operate the oven.
• The appliance has been designed only for cooking. Any other use (for example for heating) does not comply
with its operating prole and may cause danger.
• During use the appliance becomes hot. Care should be taken to avoid touching heating elements inside the
oven.
• Accessible parts become hot during use. Young children should be kept away.

Page 5
2. Your Safety — General Warnings
Saving Energy
Using energy responsibly not only saves money but also helps the environment.
• Make sure the oven door is properly closed.
Heat can leak through spillages on the door seals. Clean up any spillages immediately.
• Do not install the oven near refrigerator or freezer.
Otherwise energy consumption increases unnecessarily.
Unpacking
The appliance has been packed to protect it from damage during transport. After unpacking,
please dispose of the packing materials in a way that will not cause damage to the
environment.
All materials used for packaging of the appliance are environmentally friendly and 100%
recyclable and marked with the appropriate symbol.
Caution! During unpacking, the packaging materials (polythene bags, polystyrene pieces, etc.) Should be kept
out of reach of children.

Page 6
A
8888
C
O
MENU
3. Appliance Description
Temperature light
Electronic programmer
Oven operation light
Function selection knob
Control button “-” Control button “+”
Menu button
Oven door handle
Temperature control
Electronic Programmer
A
8888
C
O
MENU

Page 7
3. Appliance Description
Oven Fittings
A
8888
C
O
MENU
Moulded shelf
supports
Baking tray Grill rack Roasting tray
A
8888
C
O
MENU

Page 8
4. Installation
• The installation and technical assistance must only be performed by qualied staff. Carefully read the safety
instructions in this manual before using the oven. Incorrect installation, maintenance, assistance and use can
cause serious damage/injury to persons or objects.
• This product must be installed as instructed in this manual and in compliance with National Standards and
local regulations.
• Do not lift or pull the oven from the door handle.
• The purchaser is responsible for installation.
• Assistance provided by the manufacturer due to incorrect installation is excluded from the warranty.
Features of the Cabinet
• The kitchen area should be dry and equipped with efcient ventilation.
• When installing the oven, easy access to all control elements should be ensured.
• The cabinet and its components must be able to withstand temperatures of up to 90 °C without presenting
deformities and/or surface defects.
• The cabinet must enable the free passage of the oven connections.
• All household kitchen units must be protected with re resistant material in accordance with the standards in
force.
Inserting the Oven in the Cabinet
• Make an opening using the dimensions given in the
diagram for the oven to be tted.
• Make sure the mains plug is disconnected and then
connect the oven to the mains supply.
• Insert the oven completely into the opening without
allowing the four screws in the places shown in the
diagram to fall out.
• Ensure the oven is safely installed inside the cabinet. Use
screws to x the oven to the front face of the cabinet.
2
1
2
1
min 600
40
560
560
600
595
min 38
560
560
Measurements in mm

Page 9
4. Installation
Electrical Connection
The supply cable should be positioned so that it does
not reach a temperature of more than 75°C along its
entire length.
For xed wiring installation, the means for disconnection
with at least 3mm distance between contacts must be
incorporated in the xed wiring in accordance with the wiring rules.
• Access to the main terminal is gained by opening the terminal block cover at the rear of the appliance (use a
small at-bladed screwdriver).
• First strip the wires, then push the cable through the cable clamp in the terminal block cover.
• Connect the cable to the terminal block and tighten the cable clamp
screw (see diagram on next page).
• Close the terminal box, ensuring that the cover is engaged on the
locking tabs.
• The yellow/green cable must be longer than the other two by at least
20mm.
• If the supply cord is damaged, it must be replaced by the manufacturer,
its service agent or similarly qualied persons in order to avoid a hazard.
• Ensure the electric cable does not pass near or come into contact with
surfaces reaching a temperature above 75°C.
WARNING
This appliance must be earthed.
2
1
Terminal connection box cover

Page 10
4. Installation
In case of replacement of the electric cable, ensure the use of an electric cable certied according to the
Standards in force and suitable to the technical features of the product.
Use only exible cables:
Type HO5VV-F 3G1.5
WARNING
Disconnect the electric power supply before performing technical assistance or
maintenance on the product.
2
1
230V 1N~
Neutral (Black or Blue)
Live (Red or Brown)
Earth (Green/Yellow or sleeving)
Cable clamp
Terminal connection box

Page 11
5. Operation
1
2
1
2
1
2
Gently press and the knob
will pop out.
Turn the oven functions
selection knob to the
desired function.
Symbols printed around the knob indicate
available oven functions.
In ovens equipped with the electronic programmer, the time “ ” will start ashing in the display eld
upon connection to the power supply.
The programmer should be set with the current time. (See “Electronic Programmer”).
NOTE: If the current time is not set, the oven will not operate.
The electronic programmer is equipped with electronic sensors which are switched on by touching or pressing
the sensor surface for at least one second.
Each sensor reaction is conrmed by a beep sound. Keep the sensor surface clean at all times.
WARNING
To avoid burns, ensure oven chamber has cooled down sufciently.
If your oven is equipped with retractable knobs. In order to select a function do the following:
Before First Use
• Remove packaging, clean the interior of the oven with warm water and a little washing-up liquid.
• Take out and wash the oven ttings with warm water and a little washing-up liquid.
• Ensure there is sufcient ventilation in the room, or open a window.
• Heat the oven (to a temperature of 250°C, for approximately 30 minutes), allow it to cool, then remove any
stains and wash carefully.

Page 12
5. Operation
A
1200
A
8888 005
2 1 32 1 3
2 1 3 2 1 3
2 1 3
1000
A
1830
A
1200
A
8888 005
2 1 32 1 3
2 1 3 2 1 3
2 1 3
1000
A
1830
A
1200
A
8888 005
2 1 32 1 3
2 1 3 2 1 3
2 1 3
1000
A
1830
Electronic Programmer
Symbol Denition
A
1200
A
8888 005
2 1 32 1 3
2 1 3 2 1 3
2 1 3
1000
A
1830
Work time
A
1200
A
8888 005
2 1 32 1 3
2 1 3 2 1 3
2 1 3
1000
A
1830
Turn off time
A
1200
A
8888 005
2 1 32 1 3
2 1 3 2 1 3
2 1 3
1000
A
1830
Timer
A
1200
A
8888 005
2 1 32 1 3
2 1 3 2 1 3
2 1 3
1000
A
1830
Current time
Current Time Set-up
After plugging in or reconnecting to a power source, the display
shows “ ”, and the
A
1200
A
8888 005
2 1 32 1 3
2 1 3 2 1 3
2 1 3
1000
A
1830
ashes, set the current time using
buttons 2 and 3.
About 5 seconds after the time set-up has been nished, new data
will be memorised and
A
1200
A
8888 005
2 1 32 1 3
2 1 3 2 1 3
2 1 3
1000
A
1830
will go out.
The time correction can be done later, pressing button 1 until
A
1200
A
8888 005
2 1 32 1 3
2 1 3 2 1 3
2 1 3
1000
A
1830
starts to ash. Then you can correct the current time.
NOTE: If the current time is not set, the oven will not operate.
Timer
You can activate the timer at any time, regardless of the other
programmer functions. The measured time ranges from 1 minute
to 23 hours 59 minutes. To set up the timer, press button 1 until the
A
1200
A
8888 005
2 1 32 1 3
2 1 3 2 1 3
2 1 3
1000
A
1830
starts to ash, and the display shows “ ”, set up the timer
using buttons 3 and 2. The set-up time is presented on the display,
and the
A
1200
A
8888 005
2 1 32 1 3
2 1 3 2 1 3
2 1 3
1000
A
1830
is turned on.
After the set-up time has elapsed, a sound signal turns on and the
A
1200
A
8888 005
2 1 32 1 3
2 1 3 2 1 3
2 1 3
1000
A
1830
starts to ash again, press buttons 1, 2 or 3 to turn the signal off;
the
A
1200
A
8888 005
2 1 32 1 3
2 1 3 2 1 3
2 1 3
1000
A
1830
will go out, and the display will indicate the current time.
NOTE: If the sound signal is not turned off manually, it will turn off
automatically after about 2 minutes.
A
1200
A
8888 005
2 1 32 1 3
2 1 3 2 1 3
2 1 3
1000
A
1830
1. Programmer work function selection button
2. Button “-”
3. Button “+”

Page 13
A
1200
A
8888 005
2 1 32 1 3
2 1 3 2 1 3
2 1 3
1000
A
1830
5. Operation
Semi-automatic Operation
To turn the oven off at specied time, do the following:
• Set the oven function knob and temperature control knob in
positions where the oven should work,
• Press button 1 until the
A
1200
A
8888 005
2 1 32 1 3
2 1 3 2 1 3
2 1 3
1000
A
1830
starts to ash, and the display shows
“”,
• Set up the required cooking time using buttons 3 and 2, within
the range from 1 minute to 10 hours.
The set-up time will be memorised after about 5 seconds, the
display will show the current time again, and the
A
1200
A
8888 005
2 1 32 1 3
2 1 3 2 1 3
2 1 3
1000
A
1830
will be turned
on.
After the set-up time has elapsed, the oven will turn off
automatically, the sound signal will turn on, and the
A
1200
A
8888 005
2 1 32 1 3
2 1 3 2 1 3
2 1 3
1000
A
1830
will start to
ash.
• Set the oven function and temperature control knobs to the “off”
positions.
• Press buttons 1, 2 or 3 to turn the sound signal off; the
A
1200
A
8888 005
2 1 32 1 3
2 1 3 2 1 3
2 1 3
1000
A
1830
will go
out, and the display will indicate the current time.

Page 14
5. Operation
A
1200
A
8888 005
2 1 32 1 3
2 1 3 2 1 3
2 1 3
1000
A
1830
Automatic Operation
To turn the oven on for specied cooking time and turn off at a
specied time, set up the work time and the work end time:
• Press button 1 until the
A
1200
A
8888 005
2 1 32 1 3
2 1 3 2 1 3
2 1 3
1000
A
1830
starts to ash, and the display shows
“”,
• Set up the required cooking time using buttons 3 and 2, within the
range from 1 minute to 10 hours.
The set-up time will be memorised after about 5 seconds, the
display will show the current time again, and the
A
1200
A
8888 005
2 1 32 1 3
2 1 3 2 1 3
2 1 3
1000
A
1830
will be turned
on.
• Press button 1 until the A starts to ash,
• Set up the turn-off (cooking end) time using buttons 3 and 2,
which is limited up to 23 hours 59 minutes.
• Set the oven function knob and temperature control knob to the
required settings.
When
A
1200
A
8888 005
2 1 32 1 3
2 1 3 2 1 3
2 1 3
1000
A
1830
and A are on; the oven will operate between the set-up
work end time and the set-up work time, (e.g. the set-up work time
is 1 hour, the set-up work end time is 14.00, so the oven will start
automatically at 13.00).
After the work end time is reached, the oven will turn off
automatically, the sound signal will turn on and the A will ash
again.
• Set the oven function and temperature control knobs to the “off”
positions.
• Press buttons 1, 2 or 3 to turn the sound signal off and the display
will indicate the current time.
NOTE: You can check and correct programmed set-ups at any time.
You cannot, however, change the current time set-ups when the
programmer is in the semi-automatic or automatic operations.

Page 15
5. Operation
WARNING
When selecting any heating function (switching a heater element on etc.) the oven will only
be switched on after the temperature has been set by the temperature selection knob.
0Oven is off.
1
2
Independent oven lighting
Set the knob in this position to light up the oven interior.
1
2
Rapid Preheating
Element plus grill element and fan. Use to preheat the oven.
1
2
Defrosting
Only fan is on and all heaters are off.
1
2
Fan grill and upper element
When the knob is turned to this position, the oven activates the combined grill and fan function. In
practice, this function allows the grilling process to be speeded up and an improvement in the taste
of the dish. You should only use the grill with the oven door shut.
Oven and Fan with Automatic Air Circulation
The oven can be heated up using the bottom and top elements, the grill and the fan function.
Operation of the oven is controlled by the function selection knob. Turn the knob to the selected position, and
the temperature regulator knob – to set a required temperature.
1
2
1
2
Function Selection Temperature Selection
The oven is equipped with a retractable knobs. In order to select a function do the following:
• Gently press and release a knob which will pop out.
• Turn the oven function selection knob to the desired function.
• The oven can be switched off by setting both of these knobs to the position “ ”/“0”.

Page 16
5. Operation
1
2
Combined grill and upper element
In this setting both grill and top heater are on. This increases temperature in the top part of the
oven’s interior, which is suitable for browning and roasting of larger portions of food.
1
2
Grill
For cooking small portions of meat: steaks, schnitzel, sh, toasts and sausages, (thickness of grilled
dish should not exceed 2-3 cm and should be turned over during grilling).
1
2
Bottom element
When the knob is set to this position the oven is heated using only the bottom heater. Ideal for
baking cakes with fruit stufng.
1
2
Convection top and bottom elements
This setting is ideal for baking cakes, meat, sh, bread and pizza (preheat the oven and use a baking
tray) on one oven level.
1
2
Top heater, bottom element and fan assist
This setting is suitable for baking cakes and convection baking. When the
1
2
functions have been
selected but the temperature knob is set to zero, only the fan will be on. With this function, you can
cool the dish or the oven chamber.
Switching on the oven is indicated by two signal lights - yellow and red. The yellow light turned on means
the oven is working. If the red light goes out, it means the oven has reached the set temperature. If a recipe
recommends placing dishes in a warmed-up oven, this should be done after the red light goes out for the rst
time. When baking, the red light will temporarily come on and go out (to maintain the temperature inside the
oven). The yellow signal light may also turn on at the knob position of “independent oven lighting”.

Page 17
5. Operation
Using the Grill
To switch on the grill you need to:
• Set the oven knob to the position marked grill
1
2
1
2
1
2
.
• Heat the oven for approximately 5 minutes (with the oven door shut).
• Insert a tray with a dish onto the appropriate cooking level, if you are grilling on the rack insert a tray for
dripping on the level immediately below (under the rack).
• Close the oven door.
For grilling with the function grill and combined grill the temperature must be set to 250ºC. For the function
fan and grill it must be set to a maximum of 190ºC.
WARNING
When using the grill function it is recommended that the oven door is closed. When the
grill is in use accessible parts can become hot. Keep children away from the oven.

Page 18
6. Baking in the Oven — Practical Hints
Baking
• We recommend using the baking trays which were provided with your cooker.
• Cake tins and trays bought elsewhere can be used. Black trays and tins conduct heat better and shorten
baking time.
• Shapes and trays with bright or shiny surfaces are not recommended when using the conventional heating
method (top and bottom heating elements), as they can result in under cooking cake bases.
• When using the ultra-fan function it is not necessary to pre-heat the oven, for other types of heating you
should pre-heat the oven before the cake is inserted.
• Before the cake is taken out of the oven, check if it is ready using a wooden stick (if the cake is ready the
stick should come out dry and clean after being inserted into the cake).
• After switching off the oven it is advisable to leave the cake inside for about 5 minutes.
Roasting Meat
• Use heatproof bakeware for roasting, with handles that are resistant to high temperatures;
• When roasting on the rack, we recommend you place a baking tray with a small amount of water on the
lowest level of the oven;
• Turn meat over at least once during the roasting time. You should also baste the meat with its juices or with
hot salty water – do not pour cold water over the meat.

Page 19
6. Baking in the Oven
Practical Cooking Hints (Also indicated on the inside of the oven door)
Type of Dish
Oven Functions Temperature Rack Level Time in Minutes
1
2
160 - 200 2 - 3 30 - 50
1
2
150 3 25 - 35
1
2
160 - 180 2 20 - 40
1
2
150 3 65 - 70
1
2
220 - 240 3 10 - 15
1
2
210 - 220 2 45 - 60
1
2
190 2 - 3 60 - 70
1
2
230 - 250 4 14 - 18
1
2
225 - 250 2 120 - 150
1
2
160 - 230 2 90 - 120
1
2
190 2 - 3 50 - 60
1
2
160 - 180 2 45 - 60
1
2
190 - 210 2 40 - 50
1
2
170 - 190 3 40 - 50
WARNING
The gures given in the tables are approximate and can be adapted based on your own
experience and cooking preferences.

Page 20
7. Cleaning and Maintenance
By ensuring proper cleaning and maintenance of your oven you can have a signicant inuence on the
continuing fault-free operation of your appliance.
Before you start cleaning, the oven must be switched off and you should ensure that all knobs are set to
the position “off ”. Do not start cleaning until the cooker has completely cooled.
Oven
• The oven should be cleaned after every use. When cleaning the oven the lighting should be switched on to
enable you to see the surfaces better.
• The oven chamber should only be washed with warm water and a small amount of washing-up liquid.
• After cleaning the oven chamber wipe it dry.
• Steam Cleaning function:
- Pour 250ml of water (1 glass) into a bowl.
- Place in the oven on the rst level from the bottom.
- Close the oven door.
- Set the temperature knob to 50°C, and the function knob to the bottom heating position
1
2
.
- Heat the oven chamber for approximately 30 minutes.
- Open the oven door, wipe the chamber inside with a cloth or sponge and wash using warm water with
washing-up liquid.
- After cleaning the oven chamber wipe it dry.
WARNING
Do not use cleaning products containing abrasive materials for the cleaning and
maintenance of the glass front panel.
Table of contents
Popular Oven manuals by other brands

Blanco
Blanco OE606X Instructions for the use and care and installation

Dieter Knoll Collection
Dieter Knoll Collection DKB65902XK user manual

Kernau
Kernau KBO 0945 PT B user manual

Whirlpool
Whirlpool ENTRY BASIC Instruction, use and maintenance manual

Asko
Asko OCS8456S operating instructions

Baumatic
Baumatic B230CH-A instruction manual