Schuler Dental S-U-AURO-KULI User manual

1
DENTALFABRIKATION
SCHULER-DENTAL GmbH & Co.KG
Eberhard-Finckh-Straße 39
89075 Ulm / Germany
Fon +49 (0) 731 9 27 72–33
Fax +49 (0) 731 9 27 72–49
info@schuler-dental.com
www.schuler-dental.com
BEDIENUNGSANLEITUNG
S-U-AURO-KULI
Art.-Nr. 13 000 Geräte-Nr. G1 -. . . .
Sehr geehrter Kunde,
mit dem Kauf eines Produktes aus dem Hause SCHULER-DENTAL haben Sie sich für ein
Qualitätserzeugnis entschieden.
Damit Sie von Anfang an gute Arbeitsergebnisse erzielen, bitten wir Sie, die Betriebsanleitung vor
und während der ersten Inbetriebnahme durchzulesen.
Bitte schenken Sie Hinweisen auf den nachfolgenden Seiten ganz besondere Aufmerksamkeit.

2
Der S-U-AURO-KULI ist ein Kombinationsgerät für die Funktionen
•partielle Vergoldung von Objekten aus Cr-Co-Mo-Legierungen und anderen Dentallegierungen,
sowie
•elektrisch beheiztes Modellierinstrument für die Aufwachstechnik, in der Funktion ähnlich dem
bewährten S-U-ELEKTRO-KULI.
Im Lieferumfang enthalten:
Bezeichnung Art.-Nr.
S-U-AURO-KULI (Grundgerät) 13 000
Pinselelektrode (rot) 9750331701
Klemmenelektrode (schwarz) 9750332701
S-U-HANDGRIFF EN 563 10 394
S-U-PKT-AUFSATZINSTRUMENT NR.II 30 052
S-U-VERGOLDUNGSFLÜSSIGKEIT
20 ml (Elektrolyt)
81 420 019
Inhaltsverzeichnis
Punkt Thema Seite
1. Einsatzbereich und bestimmungsgemäße Verwendung . 2
2. Kurzanleitungen für eilige Inbetriebnahme ............ 2
2.1. Vergolden ... 2
2.2. Modellieren ................................................... 3
3. Ergänzende Informationen ........................................ 4
4. Störungen ........................................................... 4
4.1. Vergolden ................................................. 4
4.2. Modellieren .................................................. 5
5. Wartung ............................................................ 5
6. Technische Daten .............................................. 5
7. Hinweise ....................................................... 6
Bild 1 (Gesamtdarstellung) .................................. 7
8. Lieferbares Zubehör ............................................ 15
9. Ersatzteilliste 16
Anhang EU-Konformitätserklärung, Gerätepass, Garantieurkunde 17-19
1. Einsatzbereich und bestimmungsgemäße Verwendung
Der S-U-AURO-KULI ist speziell für Anwendungen in zahntechnischen Labors entwickelt worden.
Mit diesem Kombinationsgerät, das zwei unterschiedliche Funktionen in sich vereinigt, können Objekte auf
einfache und zeitsparende Weise mit nur einer Flüssigkeit (Elektrolyt) vergoldet werden. Aktivieren und
Vergolden erfolgen in einem Arbeitsgang.
Außerdem können Sie mit diesem Gerät Kronen und Brücken in Wachs modellieren (Aufwachstechnik).
= Allgemeiner Sicherheitshinweis
= Hinweis für elektrische Sicherheit

2
Übrigens:
Da wir stets bemüht sind unsere Produkte zu verbessern und weiterzuentwickeln, freuen wir uns ganz besonders über Anregungen
von unseren Kunden.
2. Kurzanleitung für eilige Inbetriebnahme (siehe Bild 1, Seite 7)
2.1. Vergolden
2.1.1 ?Bitte überprüfen Sie, ob die Spannungsangabe auf dem Geräte-Typenschild mit der Netz-
spannung übereinstimmt. Falsche Netzspannung führt zur Zerstörung des Gerätes.
Netzstecker ?in Netzsteckdose stecken.
2.1.2.Schwarzen Stecker der Klemmenelektrode (Art.-Nr.97.50.332.701) in die schwarze
Buchse?stecken.
2.1.3.Roten Stecker der Pinselelektrode (Art.-Nr. 97 50 331 701) in die rote Buchse?stecken.
2.1.4.Mit Netzschalter ?Gerät einschalten.
Die Betriebsanzeige ?leuchtet grün (wenn S-U-HANDGRIFF EN 563 nicht gesteckt ist).
2.1.5.Objekt im Ultraschallgerät oder mit Seife und Wasser reinigen und trocknen.
2.1.6.Vergoldungsobjekt (Cr-Co-Mo-Prothese, Keramik-Verblendkrone, ...) an der Klemme der
Klemmenelektrode (schwarz) so befestigen, daß ein elektrischer Kontakt besteht.
2.1.7.Pinsel der Pinselelektrode bis zum Haaransatz in Vergoldungsflüssigkeit (Elektrolyt)eintauchen.
?Kontakt des Elektrolyten mit der Haut oder Kleidung vermeiden, da ätzend sauer. Haut und
Kleidung könnten geschädigt werden.
Bei versehentlichem Kontakt sofort mit viel Wasser abspülen.
Achtung: Kontakt von Nickel oder Aluminium mit dem Elektrolyten vermeiden, da dieser chemisch
beeinträchtigt werden könnte.
2.1.8.Vergoldungsobjekt mit dem Pinsel berühren. Aktivierungsstrom mit Drehknopf ??einstellen.
Das Leuchtband ?muß im roten Bereich den Wert 8 oder 9anzeigen. Mit langsamen, leicht
kreisenden Bewegungen das Objekt behandeln, bis sich der erste Goldniederschlag zeigt. Dies wird
nach 10 bis 20 Sekunden der Fall sein. (Aktivierungsphase).
Anmerkung: Falls die Aktivierungsphase wesentlich länger dauert, muß der Elektrolyt erneuert
werden.
2.1.9.Vergoldung mit verringertem Strom fortsetzen: Das Leuchtband muß den Wert 5 oder 6
anzeigen.
Achtung: keinen höheren Wert einstellen! (siehe auch Bild 2, Seite 3)
Leicht kreisende, langsame Bewegungen ausführen.
Die Gesamtvergoldungszeit für eine Prothesenklammer sollte etwa 3 Minuten betragen, damit
eine Schichtdicke von mindestens 1µm erreicht wird.
Falls Sie eine größere Fläche als 1 bis 1,5 cm2oder mehr als 2 bis 3 Zahnklammern vergolden
wollen, muß der Pinsel erneut in den Elektrolyten eingetaucht werden.
2.1.10.Gerät ausschalten. Vergoldungsobjekt gut mit Wasser spülen.

3
2.2. Modellieren
Hinweis: Aufsatzinstrument (Modellierspitze) nicht in Bunsenbrennerflamme halten!
2.2.1. ?Bitte überprüfen Sie, ob die Spannungsangabe auf dem Geräte-Typenschild mit der
Netzspannung übereinstimmt. Falsche Netzspannung führt zur Zerstörung des Gerätes.
Netzstecker ?in Netzsteckdose stecken.
2.2.2. Stecker des S-U-HANDGRIFF EN 563 (Nr. 10 394) in die Buchse ?stecken. (Die Elektroden für
Vergoldung können in den Buchsen ??und ??eingesteckt bleiben, da diese automatisch
abgeschaltet werden.)
2.2.3. Mit Netzschalter ?Gerät einschalten. Die Betriebsanzeige ?leuchtet grün.
2.2.4. Heizleistung mit Drehknopf ?einstellen. Zum schnelleren Anheizen kann auf Maximum gestellt
werden. Das Leuchtband ?zeigt in diesem Fall den Wert 8 oder 9 an. Die günstigsten Temperaturen
für das Aufwachsen liegen bei den Werten 4 bis 7.
2.2.5. Abziehen des Aufsatzinstrumentes (Modellierspitze): siehe Bild unten.
Ziehen Sie das Aufsatzinstrument nur in warmem Zustand ab, und verwenden Sie keine Zange.

4
Bild 2
Gold-Abscheidegeschwindigkeit
Schichtdicke pro Zeit
(Abscheidegeschwindigkeit)
die Abscheidegeschwindigkeit und
zersetzt den Elektrolyten
(starke Blasenbildung).

5
3. Ergänzende Informationen
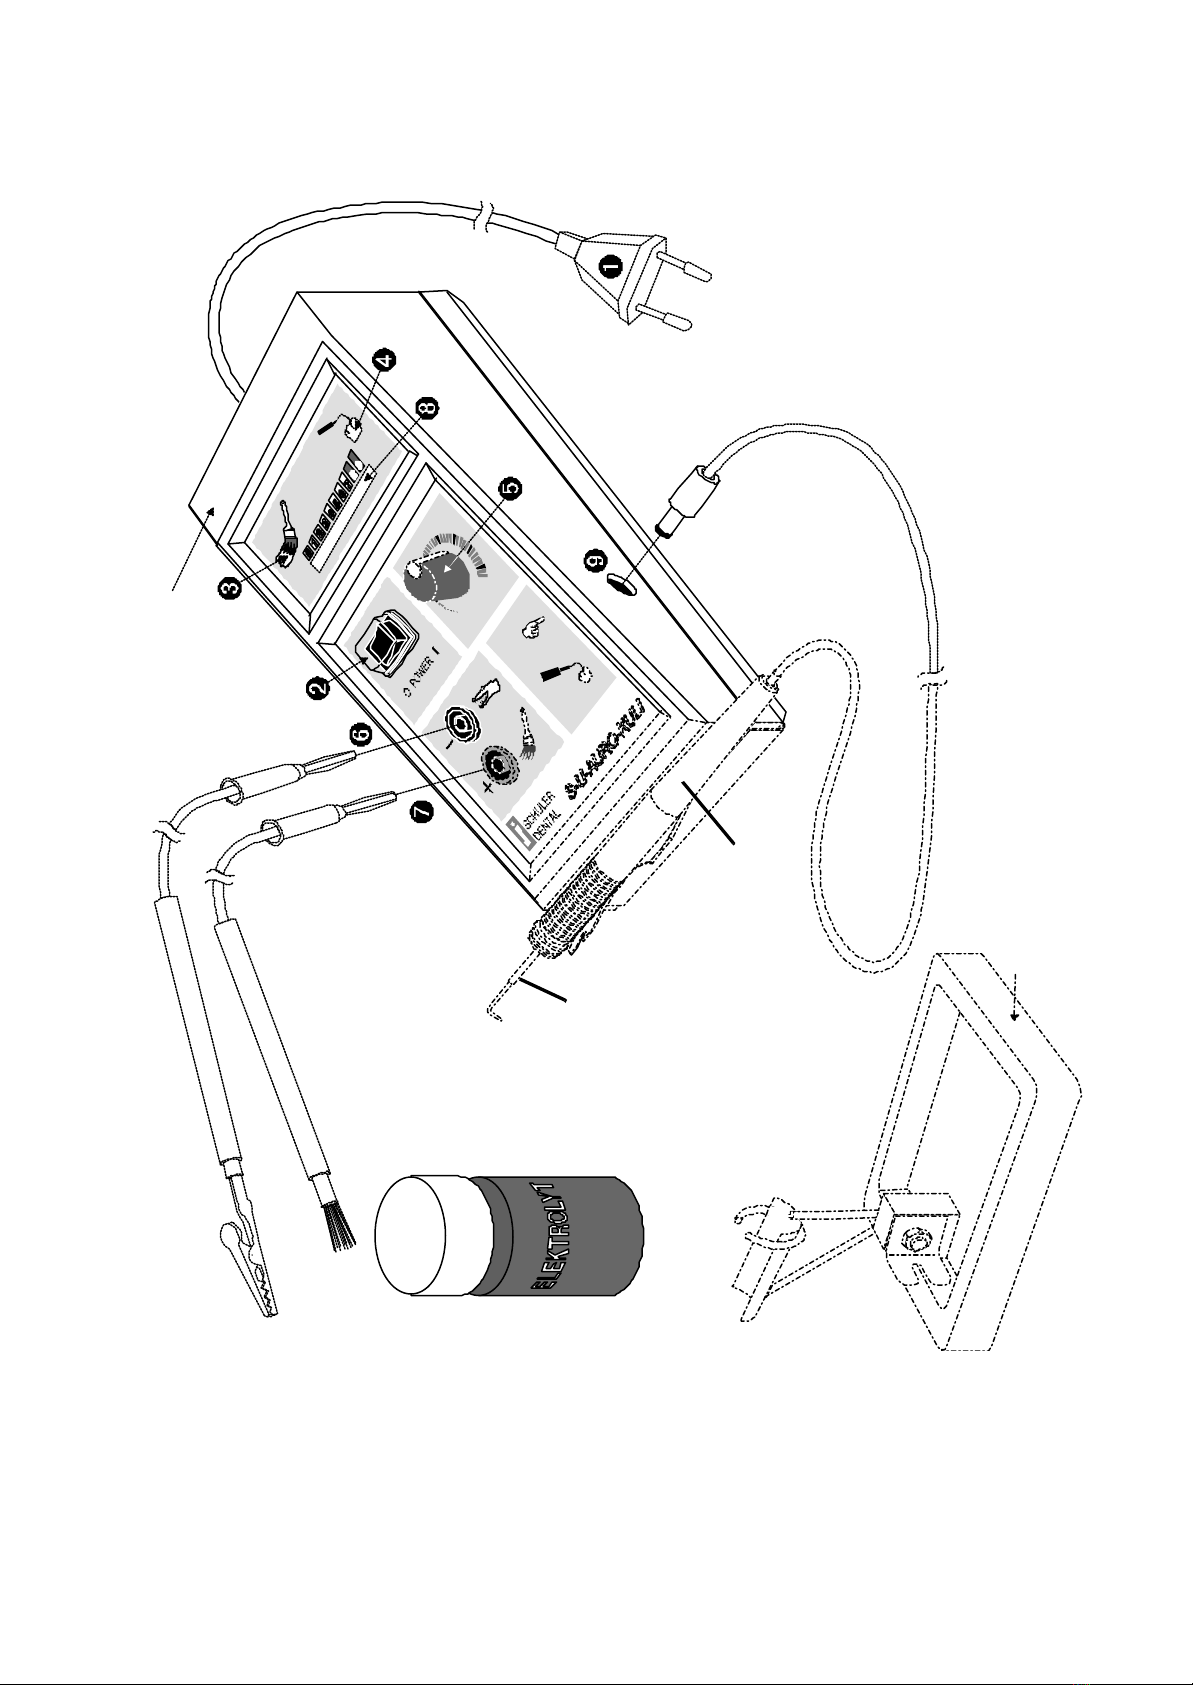
Die Gerätekombination Vergolden + Modellieren spart Kosten gegenüber zwei Einzelgeräten.
Eine Fehlbedienung der beiden Betriebsarten ist ausgeschlossen:
In der Grundeinstellung arbeitet der S-U-AURO-KULI in der Betriebsart Vergolden, welche mit der
Kontrolleuchte?angezeigt wird.
Sobald der S-U-HANDGRIFF EN 563 (Art.-Nr. 10 394) an die Buchse ?angeschlossen wird, schaltet sich
der S-U-AURO-KULI automatisch auf die Betriebsart Modellieren um. Die Kontrolleuchte ?erlischt, und
statt dessen leuchtet die Kontrolleuchte??.In diesem Modus kann kein Strom durch die
Vergoldungselektroden fließen.
Der S-U-AURO-KULI ist in beiden Betriebsarten gegen Kurzschlüsse in den Elektroden oder dem
Modellierinstrument durch eine aktive elektronische Strombegrenzung geschützt. Eine herkömmliche
Schmelzsicherung ist deshalb nicht vorhanden.
Ein Kurzschluß zwischen Pinselelektrode und Objekt wird mit einem Signalton gemeldet
(siehe auch Punkt 4. Störungen).
Sollte ein elektronischer Defekt innerhalb des Gerätes zu einer erhöhten Stromaufnahme führen, so schaltet
sich der S-U-AURO-KULI nach kurzer Zeit automatisch ab (siehe auch Punkt 4. Störungen).
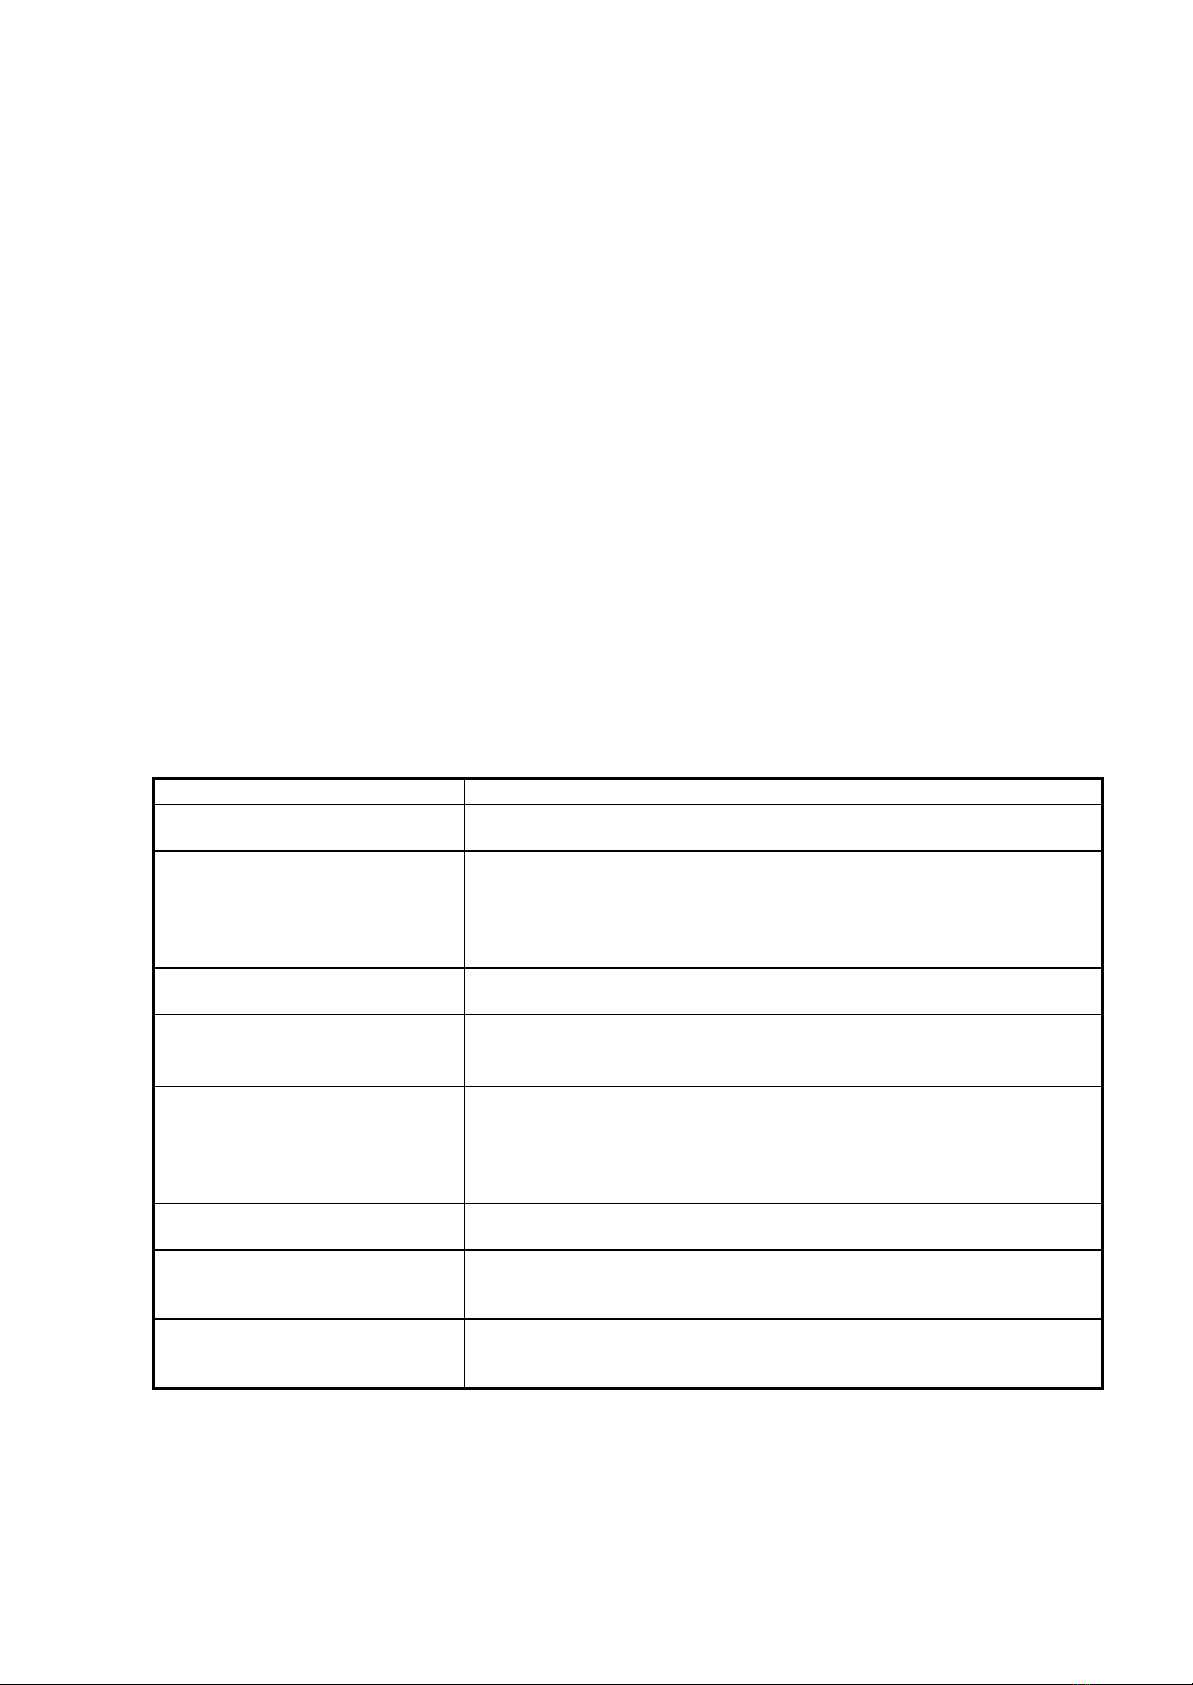
4. Störungen
4.1. Vergolden
Art der Störung Ursache, ?Abhilfe
Matte Vergoldung. Prothese war nicht hochglanzpoliert. ?Nochmals polieren, reinigen und
vergolden.
Braun verfärbte Vergoldung. zu hoch eingestellter Vergoldungsstrom. ?Nochmals polieren, reinigen
und auf Stufe 5 am Leuchtband?vergolden.
Ein höherer Vergoldungsstrom nach der Aktivierungsphase beschleunigt
nicht den Goldauftrag. Statt dessen wird der Elektrolyt vermehrt in Gase
zersetzt (starke Blasenbildung). Siehe auch Bild 2, Seite 3.
Plattierung ist nicht kratzfest. Objektoberfläche war fettig oder schmutzig. ?Nochmals polieren, gründlich
reinigen und vergolden.
Starke Blasenbildung am Pinsel. Ein zu hoher Vergoldungsstrom nach der Aktivierungsphase beschleunigt
nicht den Goldauftrag. Statt dessen wird der Elektrolyt vermehrt in Gase
zersetzt. Siehe Bild 2, Seite 3. ?Auf Stufe 5 am Leuchtband?vergolden.
Keine Anzeige am Leuchtband?.-Klemme der Elektrode wurde an einer nichtleitenden Stelle, z.B. am
Kunststoff oder Keramikverblendung angesetzt, oder
-Pinsel ist nicht mit Elektrolyt getränkt, oder
-der Strom wurde mit Knopf ?auf Minimum eingestellt.
?Ursachen beseitigen.
Signalton hörbar, keine oder
unterbrochene Plattierung. Pinselelektrode wurde zu stark auf das Objekt gedrückt. Dadurch entstand
ein Kurzschluß zwischen Pinsel und dem Objekt. ?geringerer Pinseldruck.
Zeit bis zum ersten
Goldniederschlag deutlich länger
als 30 Sekunden.
Elektrolyt ist verbraucht, oder verunreinigt, z.B. mit Kupfer oder Zink.
Vergolden von Modeschmuck kann den Elektrolyten schädigen.
?Neuen Elektrolyt verwenden.
Keine Funktion. Anzeigen?und?
leuchten nicht. Gerät hat aufgrund eines Defektes automatisch abgeschaltet. Netzstecker
herausziehen. Nach 30 Minuten wieder einschalten. Sollte das Gerät sich
erneut abschalten, so liegt ein Defekt vor. ?Zur Reparatur einschicken.

6
4.2. Modellieren
Art der Störung Ursache, ?Abhilfe
Modellierinstrument bleibt kalt,
keine Anzeige am Leuchtband Leitung vom S-U-AURO-KULI zum S-U-HANDGRIFF EN 563 ist unter-
brochen.
?S-U-HANDGRIFF EN 563 reparieren (lassen).
Modellierinstrument bleibt kalt,
Anzeige am Leuchtband Wert 8
oder 9.
S-U-HANDGRIFF EN 563 hat Kurzschluß.
?S-U-HANDGRIFF EN 563 reparieren (lassen).
Hinweis: Eine Erwärmung der Gehäuseoberfläche im Bereich des Anzeigefeldes ?auf ca. 40°C bei
längerem Betrieb ist normal.
5. Wartung
5.1 Vergoldungselektroden (Pinselelektrode, Klemmenelektrode)
Von Zeit zu Zeit sollte der Pinsel der Pinselelektrode auf Sauberkeit geprüft werden. Falls nötig, Metallstift
innerhalb des Pinsels mit feinem Scheuermittel und Wasser reinigen. Die weiße Kunststoffspitze auf dem
Metallstift darf dabei nicht verletzt werden.
Pinsel gut ausspülen und mit einem saugfähigen Vlies (Papiertaschentuch, Tupfer, ...) abtrocknen.
Keine anderen Reinigungsmittel verwenden.
Die Klemme der Klemmenelektrode muß für einen guten elektrischen Kontakt frei von Korrosion sein.
Reinigen Sie gegebenenfalls die Klemme wie oben beschrieben.
5.2 S-U-HANDGRIFF EN 563
Das Heizelement des S-U-HANDGRIFF EN 563 sollte frei von Schmutz oder Zunder gehalten werden, damit
der Wärmeübergang zum Aufsatzinstrument nicht beeinträchtigt wird. Ziehen Sie das Aufsatzinstrument nur
in warmem Zustand ab, und verwenden Sie dazu keine Zange. Reinigen Sie gegebenenfalls das
Heizelement behutsam, z.B. mit einem weichen Gummipolierer.
6. Technische Daten
6.1. S-U-AURO-KULI
Art.-Nr. 13 000
Betriebsspannung 220 -240 V
50 /60 Hz
(110-120 V auf Anfrage)
Leistungsaufnahme Leerlauf 8,5 W
max. 15 W
Vergoldungsstrom max. 200 mA
Heizleistung für Instrument max. 3,75 W
Breite, ca. 112 mm
Tiefe, ca. 200 mm
Höhe, ca. 65 mm
Gewicht ca. 770 g
Zulässige Raumtemperatur 10 -40°C
Abscheidegeschwindigkeit ca 0,3 µ/min.
6.2.
S-U-Vergoldungsflüssigkeit
(Elektrolyt), Art.-Nr. 81 420 019
metallischer Bestandteil Kaliumgoldcyanid
pH-Wert <1 (stark sauer)
Goldgehalt 1 g / 20 ml
Arbeitstemperatur 15 -40°C
ideal 25 -30 °C
praktische Ergiebigkeit ca. 300-400 cm2
bei 1µ Schichtdicke ca. 600-800
Zahnklammern
Goldschicht (Plattierung)
Feingehalt größer 99,9% *)
Dichte ca. 19 g / cm3
Härte ca. 160 HV
Farbe sattes Gelb,
wie Feingold
_________________________________________________________________________________________________
__
*) Rest Wasserstoff (Mikroporositäten)

7
7. Hinweise
?? Gerät und die elektrischen Leitungen vor Flammen (Bunsenbrenner) und Kontakt mit heißen
Instrumenten schützen. Modellierspitze nicht in die Bunsenbrennerflamme halten.
?Beachten Sie die Sicherheitshinweise (Sicherheitsdatenblätter) des verwendeten Elektrolyten.
Der Elektrolyt ist stark sauer und somit ätzend, sowie sehr giftig. Deshalb Kontakt mit Haut, Augen oder
Kleidung vermeiden.
?Niemals Badreste der S-U-Vergoldungsflüssigkeit zu anderen cyanidhaltigen Badresten gießen.
Vorsichtsmaßnahmen für den Umgang mit cyanidhaltigen Galvanisierbädern beachten (VBG57).
Verbrauchte Vergoldungselektrolyte müssen umweltgerecht entsorgt werden (z.B. über Edelmetall-
Scheideanstalten).
?Stellen Sie sicher, daß der Elektrolyt nie mit anderen Chemikalien in Berührung kommt, insbesondere
nicht mit Laugen oder Säuren.
?Bei Betriebstemperatur Modellierspitze (Sonde) oder Heizelement nicht berühren.
?Reparatur-oder Einstellarbeiten an elektrischen Teilen des Gerätes darf nur der Elektrofachmann
vornehmen. Vor Öffnen des Gerätegehäuses muß der Netzstecker gezogen werden.
?Elektrogeräte sollten grundsätzlich nicht über einen längeren Zeitraum unbeaufsichtigt eingeschaltet
sein, da ein Restrisiko für einen Defekt nie ganz ausgeschlossen werden kann.
Deshalb sollten Elektrogeräte -soweit dies der Arbeitsablauf zulässt -spätestens dann ausgeschaltet
werden, wenn die letzte Person den Raum, in dem das Gerät aufgestellt ist, verläßt.
?Kinder vom Gerät fernhalten.
?Bei eigenmächtigen baulichen Veränderungen des Gerätes oder Ergänzungen mit Bauteilen oder
Reparatur durch Personal, das nicht von SCHULER-DENTAL autorisiert ist, wird die EU-
Konformitätserklärung hinfällig und der Hersteller SCHULER-DENTAL übernimmt keine Haftung.
?Bei sachwidriger Verwendung des Gerätes übernimmt SCHULER-DENTAL keine Haftung.

8
Art.-Nr. 97 50 332 701
Art.-Nr. 97 50 331 701
Art.-Nr. 81 420 019
S-U-AURO-KULI
Art.-Nr. 13 000
Bild 1 Picture 1
lieferbares Zubehör
available accessory
Art.-Nr. 40 112
Art.-Nr. 30 052
Art.-Nr. 10 394

9
Operating Instructions
S-U-AURO-KULI
item no. 13 000 serial no. G1-....
Dear customer,
By purchasing a product from SCHULER-DENTAL you habe decided on a high quality product.
Please read these operation instructions carefully before and during using this device for the first
time to achieve good results from the very beginning.
Please pay particular attention to the notes highlighted with these singes.
Combination apparatus for functions
• partial gilding of objects from
Co-Cr-Mo-alloys and other dental alloys
• electrically heated modelling instrument for
the waxing up technique, similar in its
function to
S-U-ELEKTRO-KULI.
The delivery volume includes:
Description Item no.
S-U-AURO-KULI (basic unit) 13 000
brush electrode (red) 97 50 331701
clamping electrode (black) 97 50 332701
S-U-HANDPIECE EN563 10 394
S
-U-PKT-ACCESSORY
INSTRUMENT No.II
30 052
S-U-GILDING LIQUID, 20 ml
(electrolyte) 81 420 019
Table of contents
Point
Subject Page
1. Operating area and expedient application ................................... 9
2. Brief instructions for quick starting up ......................................... 9
2.1. Gilding
.................................................................................... 9
2.2.
Modelling
................................................................................ 10
3. Additional information for electronic fuse ..................................... 11
4. Failures
....................................................................................... 11
4.1. Gilding
.................................................................................... 11
4.2. Modelling
................................................................................ 12
5. Maintenance
............................................................................... 12
6. Technical data
............................................................................ 12

10
7. Remarks
...................................................................................... 13
Picture 1 (complete description) ..................................................
14
8. Available accessories 15
9. Spare parts list 16
Appendix
CE-declaration of conformity, unit pass, document of guarantee 17-19
1. Operating area and expedient application
S-U-AURO-KULI has been particularly developed for partial gilding and the waxing up technique. By means
of this device, objects can be gilded in a simple and time saving way with one liquid only (electrolyte).
Activating and gilding can be accomplished in one process.
= General advise for safety
= Advise for electrical safety
By the way:
Since we always strive to improve and further develop our products, we will be very pleased to receive your suggestions and ideas
for improvements.
2. Brief instructions for quick starting up (see picture 1, page 7)
2.1. Gilding
2.1.1. ?Please check whether the indication of voltage on type plate corresponds to your mains
voltage. Wrong voltage results in the destruction of the device.
Plug mains plug ?into socket.
2.1.2. Plug in the black plug of clamping electrode (Item no. 97 50 332 701) into black socket ??.
2.1.3. Plug in the red plug of brush electrode (Item no. 97 50 331 701) into red socket ?.
2.1.4. Switch on device by means of mains switch ?.
The operating indicator ?shines green (when S-U-HANDPIECE EN563 is not mounted).
2.1.5. Attach fat free, dry gilding object (Co-Cr-Mo-prothesis, ceramics veneer crown, ...) to the clamp
of the clamping electrode (black) in a way that there is electrical contact.
2.1.6. Dip brush of the brush electrode up to the hair line into gilding liquid (electrolyte).
??Avoid contact of electrolyte with your skin or clothes since it contains caustic acid. There is
a risk of skin injuries and clothes damages.
Attention: Please avoid contact of nickel and aluminium with the electrolytesince this could
cause a chemical reaction of the electrolyte.
2.1.7. Hold object and brush over the electrolyte receptacle, in order to prevent any loss of electrolyte.
Touch gilding object with brush. Adjust activating current by turning knob ??:
The LED-lamp-bar ?must indicate figure 8 or 9 in the red area. Treat object with slow,
slightly circling movements until first signs of golden precipitation occurs. This will be the case
after 10 to 20 seconds (activating phase).
Please note: Should the activating phase take considerably longer, electrolyte has to be
renewed.
Hold object and brush over electrolyte bath in order to prevent any loss of gilding liquid.

11
2.1.8. Dip brush again into electrolyte. Continue gilding process with reduced current intensity:
The LED-lamp-bar must indicate figure 5 or 6.
Attention: Do not set a higher figure! (see picture 2, page 3)
Do again slow and slightly circling movements.
The total time for the gilding of a denture clasp should amount to approx. 4 minutesfor a
thickness of approx. 1 µm.
During gilding process dip brush every 15 seconds into electrolyte.
2.1.9. Switch off device. Rinse object well with water. Polish object smoothly if required.
2.2. Modelling
Attention: Do not hold modelling instrument (tip) into flame of bunsen-burner!
2.2.1. ?Please check whether the indication of voltage on type plate corresponds to your mains voltage.
Wrong voltage results in destruction of the device.
Plug mains plug ?into socket.
2.2.2. Plug in the plug of S-U-HANDPIECE EN563 (Item no. 10 394) into socket ?. (Electrodes can remain
in sockets ??and ?since these are switched off automatically).
2.2.3. Switch on device by means of mains switch ?. The operating indicator ?shines green.
2.2.4. Adjust heating with turning knob ?In order to accelerate heating, turning knob can be set on
maximum. The LED-lamp-bar ?shows in this case figure 8 or 9. The most favourable temperatures
for waxing up are reached between figure 4 to 7.
2.2.5 To pull off modelling instrument (modelling tip): see picture below
Pull off modelling instrument in warm condition. Do not use nippers.
________________________________________________________
___

12
3. Supplementary information
The combination of a gilding and modelling device in one saves costs compared to two individual devices.
An operating error of the two operating modes is excluded.
In its basic set-up S-U-AURO-KULI operates in the "gilding" mode, indicated by the signal lamp ?.
As soon as the S-U-HANDPIECE EN563 (Item no. 10 394) is connected to the socket ?, S-U-AURO-KULI
switches automatically into the operating mode "modelling". The signal lamp ?goes out and instead
signal lamp shines ?. In this mode no current can flow through the gilding electrodes.
In both operating modes S-U-AURO-KULI is protected against short circuits in the electrodes or in the
modelling instrument through an active electronic current limitation. A conventional safety fuse does
therefore not exist.
A short circuit between brush electrode and object is indicated with a signal tone (see also point 2,
failures).
Should an electronic defect cause an increased current consumption within the device,
S-U-AURO-KULI will shortly switch off automatically (see also point 2. failures).
4. Failures
4.1. Gilding
Type of failure Cause, ?Remedy
Dull gilding. Denture was not given a high polish. ?Polish again, clean and gild.
Brown coloured gilding. Gilding current set too high. ?Polish again, clean and gild on step 4 of
LED-lamp-bar ?.
A higher gilding current after the activating phase does not accelerate gold
plating. Instead, electrolyte is increasingly disintegrated in gases
(considerably built-up of bubbles). See also picture 2, page 3.
Plating is not scratch resistant. Surface of object was greasy or dirty. ?Polish again, clean thoroughly and
gild.
Picture 2
Gold-Deposition-Speed
Current
Deposit vs. time
Best current intensity for gilding.
A higher current reduces
deposition speed and
desintegrates electrolyte
(considerable built-up of bubbles)

13
Considerable built-up of bubbles. Too high a gilding current after the activating phase does not accelerate
gold plating. Instead, electrolyte is increasingly disintegrated in gases. See
also picture 2, page 3.?Gild on step 5 of LED-lamp-bar ?.
No indication on LED-lamp-bar ?-Clamp of electrode was attached to a insulated spot, e.g. to
plastic or ceramics lining.
-brush is not soaked with electrolyte, or
-knob of current regulator ?was turned to minimum.
?Remove cuses of failure.
Signal tone audible,
no or interrupted plating. Brush electrode was pressed too tightly onto object. This caused a short
circuit between brush and object. ?Less pressure of brush.
Time period until first golden preci-
pitation markedly longer than 30
seconds.
Electrolyte is used up or polluted, e.g. with copper or zinc.
Gilding of costume jewellery can damage electrolyte.
?Use new electrolyte.
No function. Indications?and ?
do not shine. Device has been switched off automatically due to a defect . Pull mains
plug. Switch on again after 30 minutes. Should device switch itself off again,
there is a defect. ?To be repaired.

14
4.2. Modelling
Type of failure Cause, ?Remedy
Modelling instrument stays cold, no
indication on LED-lamp-bar. Connection of S-U-AURO-KULI to S-U-HANDPIECE EN563 is interrupted.
?S-U-HANDPIECE to be repaired.
Modelling instrument stays cold,
indication on LED-lamp-bar figure 8
or 9.
Short-circuit on S-U-HANDPIECE EN563.
?S-U-HANDPIECE EN563 to be repaired.
Note: Warming up of the housing surface near the LED-lamp-bar ?of up to approx. 40°C (103°F)
during longer use is normal.
5. Maintenance
5.1.
Brush of the brush electrode must be checked for cleanliness regularly. If required, clean metal pin in the middle of
the brush with fine scouring agent and water. Do not damage the white plastic point on the aglet.
Brush must be rinsed out well and dried with an absorbent fleece (paper tissue, swab, ...). Do not use any other
cleaning agents.
For good electric contact, the clamping of the clamping electrode must be free of corrosion. If necessary, cleen
clamping as mentioned above.
5.2. S-U-HANDPIECE EN563
The heating element of S-U-HANDPIECE EN 563 must be kept free of dirt or tinder so that the heat transmission to
the modelling instrument is not affected. Pull off modelling instrument only in warm condition. Do not use nippers.
If required clean heating element carefully, e.g. by means of asoft rubber polisher.
6. Technical data
6.1. S-U-AURO-KULI, Item no. 13 000
Voltage 220 -240 V
(110-120 V on request)
Consumption stand by 8.5 W
max. 15 W
Gilding current, max. 200 mA
Heating power
for instrument max. 3.75 W
Room temperature 10 -40 °C
Width. approx. 112 mm
Depth, approx.. 200 mm
Height. approx. 65 mm
Weight, approx. 770 g
6.2. S-U-GILDING LIQUID
(electrolyte), Item no. 81 420 019
Type of bath extremely sour
pH-value unused: 0.6
Gold content 4 g / l
recomended Room
temperature 20 -40 °C
Refining speed max. 0.25 µm/min
Layer characteristics
components 99.7% gold
+0.3% cobalt
layer colour rich yellow
hardness approx. 165 HV
Economy with a
layer of 1µm
theoretically: 42 cm2area
practically: 150 -300 tooth
clasps

15
7. Please note
???Device and electric lines must be protected of flames (bunsen-burner) and contact with hot
instruments. Do not hold tip of modelling instrument in flame of bunsen-burner.
????Please observe the safety information (safety data sheets) of the used electrolyte.
S-U-GILDING LIQUID (electrolyte) should not be in contact with skin or clothes since it is very sour and
therefore toxic due to its contents of cyanid. Danger of pitting.
??Bath rests of S-U-GILDING-LIQUID must never be poured with bath rests of other cyanids. Please
adhere to measures of precaution for handling with electroplanting baths containing cyanide (VBG57). Bath
rests must be disposed of by parting works.
??Make sure that the electrolyte never gets in contact with other chemicals, particularly not with alkaline
solutions.
??Do not touch modelling tip (explorer) or heating element when working with operating temperature.
??All repairs and adjustment works on the device must be carried out by a certified electrician. Pull out
mains plug for all repairs.
??Do not leave electrical devices unsupervised for a longer period due to risk of failure. Therefore, electrical
devices should be switched off as soon as the last person leaves of the room.
??Children must be kept away from the device.
??In case of unauthorized structural modification, any supplementation of components or repairs by staff
not authorized by SCHULER-DENTAL, the CE-declaration of conformity becomes invalid and SCHULER-
DENTAL as manufacturer can not be hold responsible.
?SCHULER-DENTAL can not be hold responsible for any damage by inproper application.

16
bedienan\twindi1d.gwm||\all\bedien\d\13001.doc
Art.-Nr. 97 50 332 701
Art.-Nr. 97 50 331 701
Art.-Nr. 81 420 019
S-U-AURO-KULI
Art.-Nr. 13 000
Bild 1 Picture 1
lieferbares Zubehör
available accessory
Art.-Nr. 40 112
Art.-Nr. 30 052
Art.-Nr. 10 394

17
8. Lieferbares Zubehör Available accessories
ACHTUNG:Instrument Nr. IV bis X ist nur auf Anfrage lieferbar
Attention:Instrument No.IV to X can only be supplied on request
Aufsteckbares
Wachsmesser
Exchangeable wax knives,
large, width: approx. 6 mm
item no. 30 105
small, width: approx. 4 mm
item no. 30 100
S-U-MODELLIERSPITZE
S-U-Modelling tip as per M.H. Polz,
explorer no. 1
item no. 30 146
S-U-ABLAGESTÄNDER
S-U-SUPPORT "Universal" (see picture 1, page 7)
item no. 40 112
S-U-MODELLING INSTRUMENTS as per P.K.Thomas
no.
I
II
III
IV
V
VI
VII
VIII
IX
X
item no.
30 051
30 052
30 053
30 054
30 055
30 056
30 057
30 058
30 059
30 060
.

18
8. Ersatzteilliste für S-U-AURO-KULI
Spare parts list S-U-AURO-KULI
910020011 1 Stck. Wipp-Ausschalter 1 pol. schwarz
main switch 1 pol.,black
910020119 1 Stck. Schutzkappe für Wippschalter 19x25
dust cap 19x25
910140025 1 Stck. Drehknopf für Regelpotentiometer
turning knob
910140026 1 Stck. Pin für Drehknopf
pin for turning knob
9750331701 1 Stck. Pinselelektrode(rotes Kabel)
Brush electrode (red cable)
9750332701 1 Stck. Klemmenelektrode(schwarzes Kabel)
cable with electrode (black cable)

19
EG-Konformitätserklärung
Déclaration de conformité CE
Conférma di conformità di CE
Declaration of CE Conformity
EG-verklaring van overeenstemming
Declaración de conformidad de CE
SCHULER-DENTAL
GmbH & Co. KG
Eberhard-Finckh-Straße 39
D-89075 Ulm
Germany
Hiermit erklären wir, daß
Nous assurons que
Confermiamo che
We hereby confirm that
Hierbij verklaren wij dat
Confirmamos que
das Produkt: Gerät für elektroly.Vergolden und elektr.Modellieren
.Name des Erzeugnisses: S-U-AURO-KULI
Artikel-Nr.: 13 000
Geräte-Nr.: G1 -. . . .
übereinstimmt mit
complies with
est conform aux
in overeenstemming is met
è in conformità
es de conformidad con
Niederspannungsrichtlinie 73/23/EWG
EMV-Richtlinie 89/336/EWG
angewandte Normen
standards applied
normes appliquées
toegepaste normen
alle norme applicate
las normas aplicadas
EN 61 010-1:1994
EN 563 :1994
EN 50081-1:1993
EN 50082-2:1995
Datum: Ulm, 26.11.2007
.
Klaus Schuler, Dipl. Ing.
This manual suits for next models
1
Table of contents
Languages:
Other Schuler Dental Dental Equipment manuals