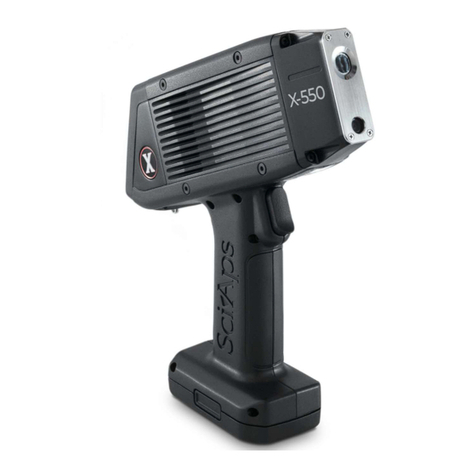
SciAps X-550 User manual

QuickStart Guide
X-550 and X-505
Handheld XRF Analyzers

SciAps X-550 and X-505 QuickStart Guide
2
Contents
1. Powering up the unit................................................................................................ 3
1.1 Inserting the battery................................................................................................. 3
1.2 Turning on the unit.................................................................................................. 3
2. Logging in ............................................................................................................... 4
3. Calibrating the unit.................................................................................................. 6
4. Taking a test ........................................................................................................... 8
5. Looking at Specifications......................................................................................... 9
6. Compare results to a different grade......................................................................11
7. Taking the next test................................................................................................13
8. Information about the test.......................................................................................15
9. Exporting tests .......................................................................................................16
10. Turning off the Unit.................................................................................................19
11. How to safely use SciAps XRF instruments............................................................20

1. Powering up the unit
1.1 Inserting the battery
The X-550 is battery operated. The battery is part of the bottom of the handle.
The battery is housed in the handle and forms the bottom of the
handle.
Insert the battery into the handle, until the connectors click into
place.
The battery is directional and keyed to only go in one way, so
don’t force it.
1.2 Turning on the unit
The on/off button is on the top of the unit.
Press it to turn the unit on.

SciAps X-550 and X-505 QuickStart Guide
4
2. Logging in
The factory-set name is admin.
The factory-set passcode is 12345.
The administrator can change this later on.
The X-Ray warning screen appears.
X-Rays can cause serious harm to people and animals!
Tapping OK on this screen means you understand that, and that
you will not use this XRF unit improperly.

SciAps X-550 and X-505 QuickStart Guide
5
The Analyze screen appears.
Tap Analyze to start your first analysis of a sample.
The screen listing the applications installed on your unit will
appear.
Tap the mode intended for the type of analysis you intend to do.
The rest of the screenshots in this QuickStart are
from the Alloy App.

SciAps X-550 and X-505 QuickStart Guide
6
3. Calibrating the unit
If this is the first time the unit is being used (or the first time the
unit being used for the day), the unit will need calibrating.
If calibration is required, the unit will automatically bring up the
Calibration window.
Place the 316 coupon that came with the unit on the nose.
If the coupon is not available, use a clean, known 316 steel
sample.
Make sure the 316 coupon completely covers the analysis
window
Tap Calibrate to begin the process.
Calibration takes 15 seconds.
1 of 15 means the first second of the 15 seconds of the
calibration.

SciAps X-550 and X-505 QuickStart Guide
7
When the calibration is successful, the Start screen appears.
Remove the coupon from in front of the aperture.
You can now use the instrument to test your samples.
If the calibration fails, an error message will be displayed.
Confirm the piece of 316 coupon is positioned correctly in front
of the window and retry the calibration.
If the calibration continues to fail, please contact SciAps
technical support at +1 339-927-9455

SciAps X-550 and X-505 QuickStart Guide
8
4. Taking a test
Align a sample with the window and tap START.
—OR—
Squeeze (and release) the trigger at the top of the handle.
The test will start.
Tests report findings in real time, so as the test continues and more information is obtained, the data
on the screen will be updated.
When the COMPLETED screen appears, the test is done and the final values are given.

SciAps X-550 and X-505 QuickStart Guide
9
5. Looking at Results
The top portion of the screen lists:
•
Test Number
•
Top Grade Match
•
Grade Match Score where 100 is a perfect score meaning
that all elements measured fit within the alloy grade
specification.
The first column on the left lists all detected elements. Scroll down
to see additional elements.
The second column is the concentration of that element.
The third column is the “confidence”or “uncertainty”of the
measurement.
The green column on the right is the Specifications column.
Specifications column lists the specification of the best alloy grade
match for the determined chemistry of the sample.
The grade specification will be highlighted in green if a detected
element is specified in the alloy grade and the amount detected is
within the grade’s specification.
In this example test, all elements found in the sample are in grade
316 and are within spec for that grade.

SciAps X-550 and X-505 QuickStart Guide
10
To see the complete information in the Specification column, tap
it.
The column will expand, showing the range of the spec for the
detected element for that grade.
In this test, all the detected elements are both found in SS 316,
and are within range for SS 316, so all the ranges are green.

SciAps X-550 and X-505 QuickStart Guide
11
6. Compare results to a different grade
The best match is always shown when a test completes.
You can look at other grades to see why they are not the best
match.
Tap the Compare icon.
The top three (3) matches will be listed.
The superscripted numbers after the grades is the grade match
score for that grade.
Tapping Other…will show you additional grades that have lower
grade scores than the three listed.
In this image, the grade match score for the top three (3) results
are:
100 for 316
89 for 321
87 for 303
Tap on a grade listed to see why it is not the best match.

SciAps X-550 and X-505 QuickStart Guide
12
In this example, 321 was selected.
Cr and Mo are not within specification for 321.

SciAps X-550 and X-505 QuickStart Guide
13
7. Taking the next test
Taking additional tests is the same as taking the first test. You may
start another test from the result screen or use the back button to
return to the targeting screen
From the current result:
Align a sample with the window and squeeze (and release) the
trigger.
OR
From the start screen, align a sample and tap START
Squeeze (and release) the trigger at the top of the handle.
The test will start.

SciAps X-550 and X-505 QuickStart Guide
14
Tests report findings in real time, so as the test continues and more information is obtained, the data
on the screen will be updated.
When the COMPLETED screen appears, the test is done and the final values are given.

SciAps X-550 and X-505 QuickStart Guide
15
8. Information about the test
Tap the “i” icon to see the available information about the specific
test.
You can view
•
Date and time,
•
Spectrum, and
•
Other user-created information of the test

SciAps X-550 and X-505 QuickStart Guide
16
9. Exporting tests
From the Home Screen, tap Results
The default screen will list all of the tests taken on the instrument.
Tap the Menu button to open additional export options, including
“Filter by Date” for quickly exporting a batch of results
Tap the Checkbox button to individually select multiple tests for
export

SciAps X-550 and X-505 QuickStart Guide
17
Tap the Export button when ready to finalize the export
Tap to select the desired export format.
Tap the filename to change the export location or tap the template
name (Default) to finish the export

SciAps X-550 and X-505 QuickStart Guide
18
The X-550 uses an embedded SD card to store the test results.
The SD Card can be accessed by connecting the analyzer to a
computer using the micro-USB cable
Once connected, the
analyzer’s SD Card will
show as a new drive from
the computer’s file
explorer
Navigate to the export
location selected at time
of export (default export
location is SD card\export)
Drag the exported files
over from the SD Card to
the desktop to save copies
locally on the computer

SciAps X-550 and X-505 QuickStart Guide
19
10. Turning off the Unit
Press and hold the on/off button for 2 seconds.
The Power off screen appears.
Tap Power off.
The unit will power off.

SciAps X-550 and X-505 QuickStart Guide
20
11. How to safely use SciAps XRF instruments
Radiation Safety is up to you.
As the owner or operator of an X-Ray tube device, you are responsible for understanding the safety
requirements and state regulations for using your X-ray tube equipment.
When the X-550 is not actively testing samples, no
X-rays are emitted.
When the X-550 is energized, X-rays are emitted,
through the window in the nosecone.
X-rays are invisible to the human eye;
you will not see them when they are
being emitted.
Stay safe when using handheld XRF instruments:
Best Practices for Safe Operation:
Trigger finger should be the body part closest to the analyzer window
Run tests with the XRF pointed away from other people
Pay attention to where the beam is pointed
Don’t hold samples in your hand
Maintain control of the analyzer
Limit operation to trained personnel
This manual suits for next models
1
Table of contents
Other SciAps Measuring Instrument manuals
Popular Measuring Instrument manuals by other brands

PCB Piezotronics
PCB Piezotronics TLD339A34 Installation and operating manual

Hanna Instruments
Hanna Instruments HI 9033 instruction manual

Viavi
Viavi SmartPocket OLP-35SC operating manual

RadComm
RadComm RC2PLUS user manual

Endress+Hauser
Endress+Hauser Prolevel FMC 662 Installation and operating instructions

ThermoWorks
ThermoWorks TW-USB-1 Installation and operation guide