scigiene RFR-0541-2 User manual

1
GEN 2 Wireless Local Alert
(RFR-0541-2)
User Guide
IMPORTANT!
PoweringofftheLocalAlertwilldeleteanysavednotifications orsensor
readings; however, any configuration changes will be saved.

2
Table of Contents
I. ABOUT THE GEN 2 LOCAL ALERT 3
QUICK START GUIDE 3
THE LOCAL ALERT INTERFACE 4
FEATURES 5
PRINCIPLE OF OPERATION 5
BEHAVIORS 6
II. ORDER OF OPERATIONS 6
SETTING UP A NEW NETWORK 6
ADDING THE LOCAL ALERT TO AN EXISTING NETWORK 6
III. SET UP IN SCIGIENE PREMIER 7
ADD DEVICE 7
SET UP 7
VALIDATION 8
ACTIONS 8
NOTIFICATIONS 9
SENSOR READINGS 10
IV. LOCAL ALERT OVERVIEW IN SCIGIENE PREMIER 11
MENU SYSTEM 11
DETAILS VIEW 11
READINGS VIEW 12
SENSOR STATE 12
SETTINGS VIEW 13
V. SECURITY 14
VI. TROUBLESHOOTING 15
VII. APPENDIX A 17
VIII. BEHAVIORAL FLOW CHART 18
SPECIFICATIONS 19
INTERPRETING SENSOR DATA 19
WARRANTY INFORMATION 20
CERTIFICATIONS 20
SUPPORT 21

3
I. ABOUT THE GEN 2 LOCAL ALERT
The GEN 2 Wireless Local Alert provides three additional ways to receive critical notifications and sensor readings from
Scigiene Premier. The Local Alert flashes a red LED, sounds an audible alarm, and displays the important message upon
receiving a notification. The Local Alert can also be used to display sensor readings from any sensor on the same
account.
INSIDE THE BOX
You should find the following items in the box:
•GEN 2 Wireless Local Alert
•Antenna
•5V Power Supply
•Four AA batteries
•Mounting Screws
GEN 2 WIRELESS LOCAL ALERT QUICK START
1. Create an Scigiene Premier user account.
2. Add wireless gateway(s) and sensor(s) to the network.
3. Add the Local Alert device to the sensor network.
4. Power on the gateway and verify it checks into Scigiene Premier.
5. Power on the sensors.
6. Power on the Local Alert (batteries or line power).
7. Set up notifications to use the Local Alert.
8. Test the Local Alert by triggering a notification.
1. Backlit LCD shows sensor readings, notifications, and status
2. Red LED for visual alerts
3. Speaker for audible alerts
4. Control button for viewing/deleting messages
5. Power on/off switch
6. SMA antenna port
7. Line-power supply port
8. Battery compartment (four 1.5V AA type batteries)
9. Screw slots for wall mounting

4
THE LOCAL ALERT INTERFACE
1. Message Type
This line will either indicate a notification or sensor message.
2. Device
The name of the sensor in Scigiene Premier.
3. Message
For notifications, these three lines will contain a custom or auto-generated message
identifying the notification. For sensor messages, these three lines will contain the sensor
data. These messages can be up to 63 characters long, beyond that the message will be
clipped.
4. Time
The time the notification or sensor message was generated. This will align with the
account time zone.
5. Sound
When this icon is present, the buzzer alarm is enabled.
6. Lights
When this icon is present, the LED alarm is enabled.
7. Screen
When this icon is present, text LCD alarms are enabled.
8. Messages
The left number indicates the current message being displayed. The right number
indicates how many total messages are on the Local Alert.
9. Signal Strength
This icon indicates the signal strength between the ALTA Gateway and the Local Alert
with up to four bars. Each bar indicates 25%. If there is a small x appearing above the
signal bars, there is less than 0% signal strength. If the signal bars are replaced with a
large X, the Local Alert is not connected to a gateway and will be unable to receive new
messages from Scigiene Premier.
10. Battery
This icon indicates the battery level of the Local Alert. There are six bars or three pairs of
bars. Each bar represents 16%. At 0% there will be 0 bars.
11. Time
Current time in military format with hours and minutes. The time zone is a configuration
matched to the time zone of the Local Alert's account. This configuration is sent when any
configuration is set in Scigiene Premier, then saved.

5
GEN 2 WIRELESS LOCAL ALERT FEATURES
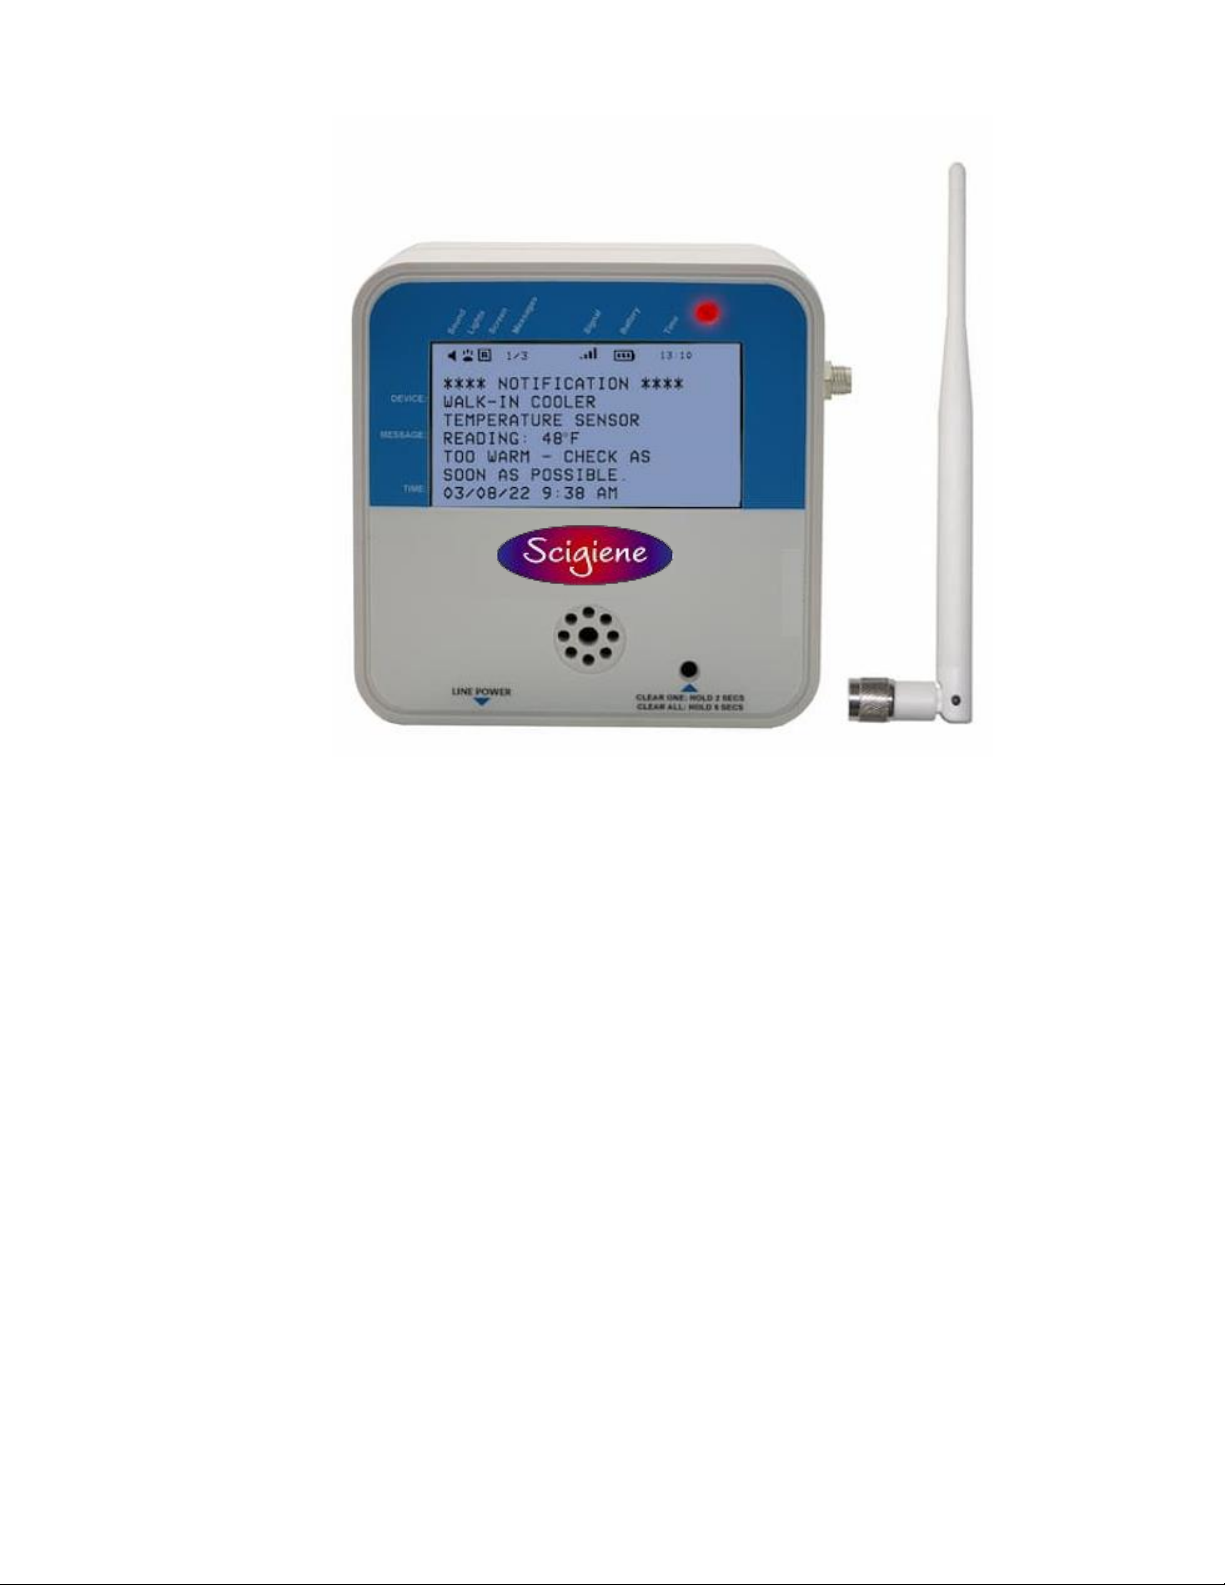
•Three alarm types: Flashing red LED, alarm tones, and custom message display
•Sounds a unique alarm tone sequence when it receives multiple notifications
•Each alarm setting is configurable in Scigiene Premier.
•The LCD shows device name, custom message or sensor reading, and notification time
•Stores up to 10 notifications/readings
•Reports the number of notifications and sensor readings saved on the Local Alert to Scigiene Premier
•Battery-powered, line-powered, or both
•Configurable alarm and snooze intervals
•Configurable Heartbeat and Poll Rate (how often the Local Alert checks the gateway for notifications)
•Displays the status bar while on line power
•Instantly receives notifications from the gateway when using line power and in a sleep state
•Power-saving features automatically enabled to extend battery life
•Wireless range of 1,200+ feet through 12+ walls1
•Frequency-Hopping Spread Spectrum (FHSS)
•Best-in-class interference immunity
•Best-in-class power management for longer battery Iife2
•Encrypt-RF Security (Diffie-Hellman Key Exchange + AES-128 CBC for sensor data messages)
•Data logs 2000 to 4000 readings if the gateway connection is lost (non-volatile flash, persists through the power
cycle):
o10-minute heartbeats = - 22 days
o2-hour heartbeats = - 266 days
•Over-the-air updates (future-proof)
•Free Scigiene Premier Basic Online Wireless Sensor Monitoring and Notification System to configure sensors,
view data, and set alerts to be sent via SMS text, email, or call.
1 Actual range may vary depending on the environment.
2 Battery life is determined by the sensor reporting frequency and other variables. Other power options are also available.
LOCAL ALERT - PRINCIPLE OF OPERATION
The GEN 2 Wireless Local Alert device receives messages (notifications and sensor readings) from Scigiene Premier and
delivers alarms via a flashing red LED, tones, and LCD. The Local Alert receives messages, generated in Scigiene
Premier, wirelessly through a gateway connected to the Scigiene Premier server, so notifications can be received locally
where someone is most capable of responding to a critical condition.
The Local Alert displays notifications and sensor messages. Notifications are messages generated by Scigiene Premier’s
notification system when a sensor sends data through a GEN 2 Gateway after it detects a change to a user-defined
condition. Notifications can be triggered by sensor specific conditions or even conditions in the Scigiene Premier system.
Sensor messages are sensor data messages forwarded from Scigiene Premier to the Local Alert through the Local Alert's
gateway. These sensor messages can be generated when data from any GEN 2 Sensor is received in Scigiene Premier.
When the Local Alert receives a notification, it can set off an audio-visual alarm comprised of a loud 85 dB buzzer, an
ultra-bright red flashing LED, and an LCD displaying a custom message to alert the user of a critical condition in their
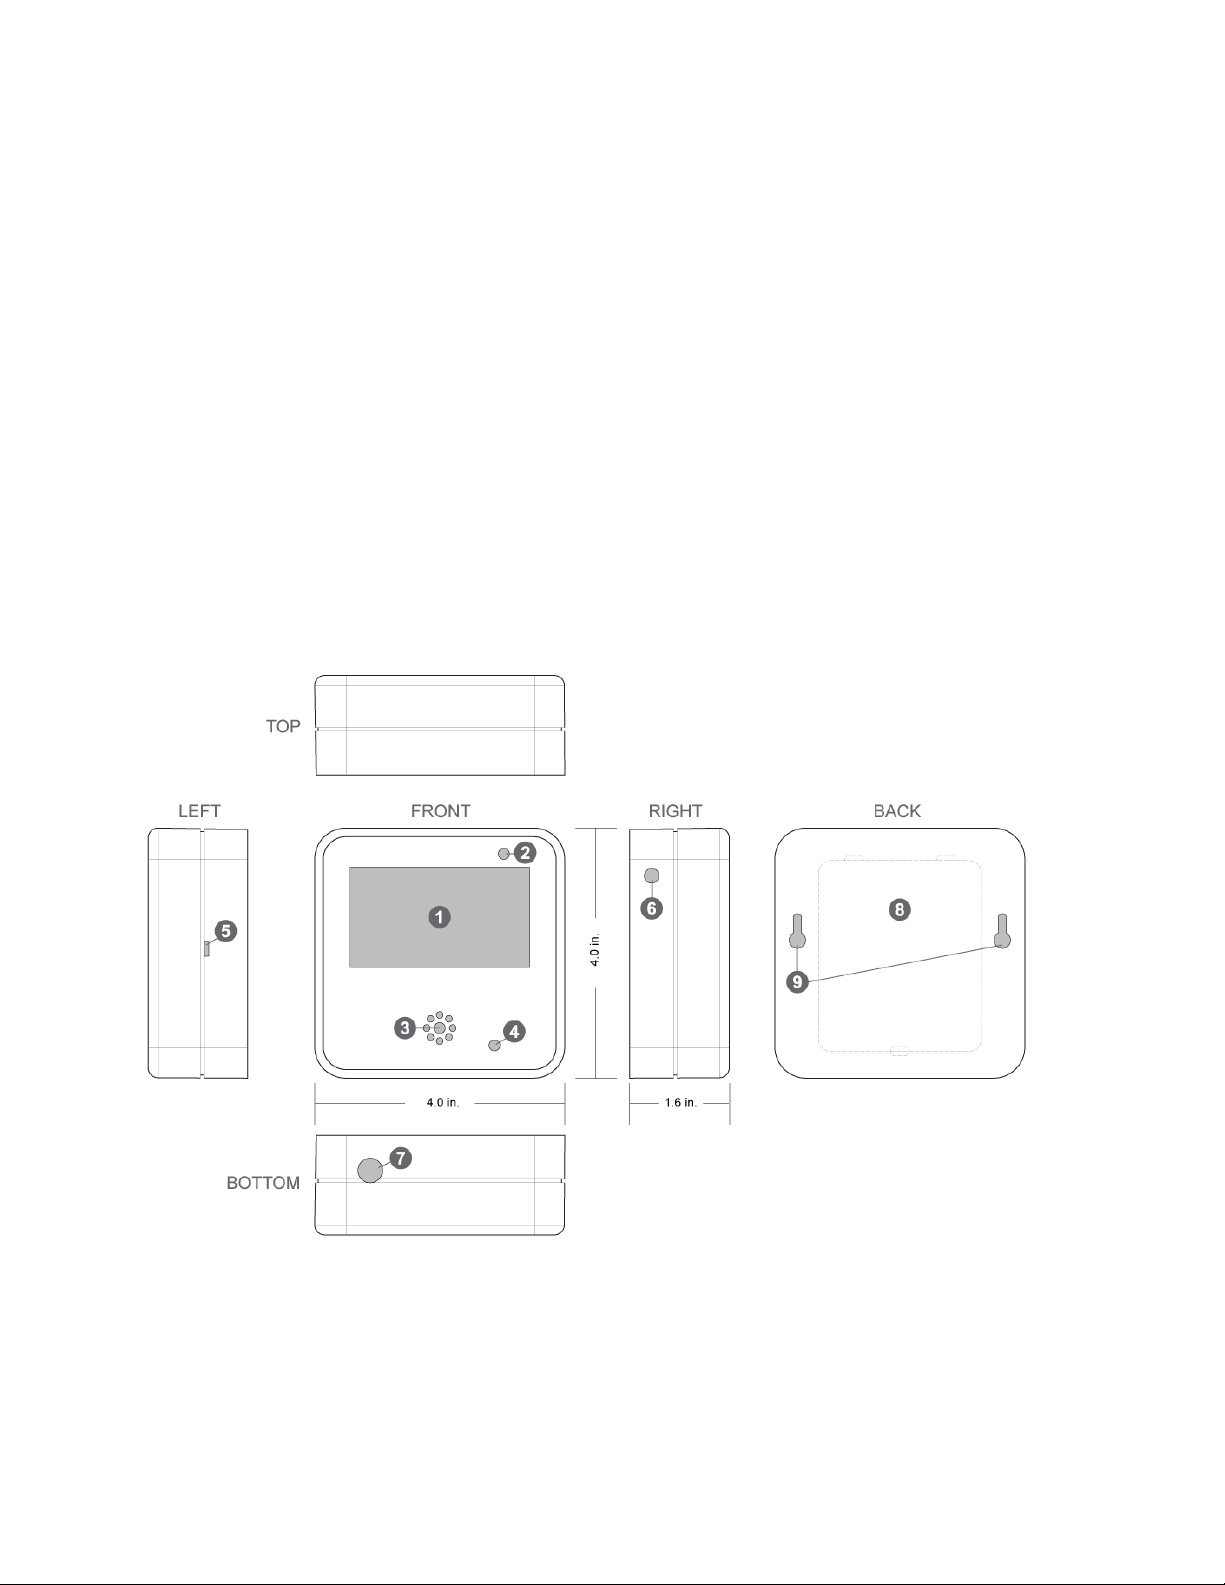
sensor network. After the alarm sounds, with a press of the button, the user can clear the alarm, view a custom
notification, the time the notification was sent, and which device detected the critical condition. The button can also be
used to clear notifications and reset the device.
When notifications are cleared on the Local Alert an acknowledgment message is also sent from the Local Alert to
Scigiene Premier through the Local Alert's gateway. Be aware that acknowledging/clearing notifications in Scigiene
Premier will not clear notifications already received on the Local Alert. Messages already received can only be removed
from the Local Alert by button holds, resetting the Local Alert, power cycling, or being overridden by more recent
messages.
The Local Alert can be set as a device to receive notifications using Scigiene Premier’s standard notification interface.
Within this interface the Local Alert’s specific alarms (LED, buzzer, scrolling message, backlight) can be set along with all
of the other standard notification features already available. The Local Alert can also be set up to display sensor
messages from other sensors on your Scigiene Premier account. The Local Alert does not communicate directly with
sensors. The Local Alert receives all messages (notifications and sensor messages) from Scigiene Premier.

6
When the Local Alert hasn’t received any notifications and is on line power, it will display the status bar indicating the state
of the Local Alert and the local time in military format.
The Local Alert can also display sensor readings from any sensor on the same account. Sensor readings, unlike
notifications, do not cause alarms to trigger, do not display automatically, and can't override notifications already saved in
memory. To view and scroll through sensor readings the user must press the button.
The Local Alert can save up to 10 messages in memory at any given time. If it exceeds 10 messages, the oldest message
is deleted. Notifications take priority over sensor readings in the memory, so when the memory is full and a new
notification is received, sensor readings are deleted before deleting notifications. If the memory is full of notifications
sensor readings will be ignored until there is an unoccupied memory slot or a slot with an older sensor reading.
The Local Alert can be reset by pressing and holding the button for 10 seconds. This is the preferred reset method
because this will send a clear-all message to the server prior to the reset. Turning the switch off only clears messages
locally, thus the messages on the server may remain unacknowledged.
LOCAL ALERT BEHAVIORS
1.RefertoAppendix Afor moredetailed information ontheLocal Alert’s behaviors.
II. ORDER OF OPERATIONS
It's important to understand and follow the order of operations for activating the GEN 2 Local Alert. If performed out of
sequence, the device may have trouble communicating with Scigiene Premier Software. Please complete the steps below
in the order indicated for best results.
SETTING UP A NEW NETWORK
1. Create an Scigiene Premier Account (If new user).
2. Register your gateway(s), sensor(s), and Local Alert in Scigiene Premier.
3. Power on / connect the gateway and verify it checks into Scigiene Premier.
4. Power on the sensor and verify it checks into Scigiene Premier.
We recommend powering sensors on near the gateway, then moving to the installation location, checking signal
strength along the way.
5. Power on the Local Alert and verify it checks into Scigiene Premier.
6. Configure the gateway, sensors, and Local Alert for use.
ADDING THE LOCAL ALERT TO AN EXISTING NETWORK
1. Register the Local Alert in Scigiene Premier.
2. Press the button on your gateway to download the Local Alert just registered in Scigiene Premier to the
gateway. The gateway can also be power cycled to download the Local Alert.
3. Power on the Local Alert and verify it checks into Scigiene Premier.
4. Configure the Local Alert for use.
Note: For information on setting up Scigiene Premier and the gateway, refer to
the Scigiene Premier User Guide and the gateway's user guide.
Note: Device-specific setup is covered in more detail in the following sections.

7
III. SETUP
If this is your first time using the Scigiene Premier online portal, you will need to create a new account. If you have already
created an account, start by logging into Scigiene Premier. For instructions on how to register and set up your Scigiene
Premier account, please consult the Scigiene Premier User Guide.
STEP 1: ADD DEVICE
1. Add the Local Alert to Scigiene Premier.
Add the Local Alert to your account by choosing Sensors in the main menu. Then, navigate to the Add Sensor button. The
Local Alert is added to your account similar to the way a sensor or gateway is added.
Desktop Mobile
2. Find the device ID.
The Device ID (ID) and Security Code (SC) are necessary to add a sensor.
These can both be located on the label on the side of your device.
3. Adding your device.
You will need to enter the Device ID and the Security Code from your sensor in
the corresponding text boxes.
Use the camera on your smartphone to scan the QR code on your device. If you
do not have a camera on your phone,
or the system is not accepting the QR code, you may enter the Device ID and
Security Code manually.
•The Device ID is a unique number located on each device label.
•Next, you’ll be asked to enter the Security Code from your device. A
security code consists of letters and must be entered in upper case (no
numbers). It can also be found on the barcode label of your device.
When completed, select the Add Device button.
STEP 2: SET UP
Select your use case.
Select Custom from the drop-down menu. Then select Skip.
You will complete these steps later in the setup

8
STEP 3: VALIDATION
Check your signal.
The validation checklist will help you ensure the Local Alert is
communicating with the gateway properly and has a strong signal.
1. Check that your gateway is powered on. If not, press (do not hold)
the button. Make sure there are lights on (System will complete):
Ensure that the gateway is registered to Scigiene Premier and is connected
to power with antenna(s) or an Ethernet cable allowing it to communicate
with the Internet.
2. Make sure your gateway has communicated with the Scigiene
Premier portal. If not, press (do not hold) the button on the gateway to
reset. (System will complete): This step will autocomplete if the gateway
is communicating with Scigiene Premier. Press the gateway utility button to
ensure the gateway has an updated sensor list and to speed up this
process.
3. Make sure Local Alert is powered: Attach the included antenna and
switch on the Local Alert (see the Powering Sensor On and Attach Antenna
sections for help in this area). Once you power the Local Alert on by flipping
the switch, the device will communicate with the gateway every 30 seconds
for the first few minutes.
4. Make sure your Local Alert is checking in with the gateway:
Checkpoint 4 will only complete when the Local Alert achieves a solid connection to the gateway. Press the action button
on your cellular gateway or Ethernet gateway to force communication.
Select the Save button when completed.
STEP 4: ACTIONS
Choose your actions.
Actions are the alerts that will be sent to your phone or email in the
event of an emergency. Low battery life and device inactivity are two
of the most common actions to have enabled on your device. See the
Actions Overview section for how to set actions for your Local Alert.
Select the Done button when completed.

9
STEP 5: NOTIFICATIONS FOR LOCAL ALERT
Go to Actions in Scigiene Premier and select add (+).
1. Select what Action triggers the notification and press the
Save button.
2. Press the Local Alert button then select one or more Local Alert devices to
receive the notification. Click the icons next to the selected Local Alert to
activate/deactivate different alarms. Click the right arrow button to advance to the
sensor selection screen. The message sent to the Local Alert can be customized by
clicking Send Notification and populating the SMS Message then pressing Save.
3. Select the sensors or gateways that will trigger the notification when the
action trigger condition is met, then press the Save button.

10
STEP 6: SENSOR READINGS FOR LOCAL ALERT
1. Select the Local Alert device in the
Overview screen.
2. Go to the Data tab.
3. Add sensors using the Attach
Sensor Messages screen.
Note: Pending Message History
displays all notifications and sensor
readings that have not yet been
received by the Local Alert. The Clear
Pending button will clear everything
in the Pending Message History list.
POWERING THE LOCAL ALERT ON AND INSTALLING THE ANTENNA
Attach Antenna
In order for the Local Alert to function properly, you will need to attach the included antenna. Simply screw the antenna
onto the barrel connector on the side of the device. Make sure the antenna connection is snug, but do not overtighten.
Refer to Antenna Orientation guide below for best radio performance.
Powering On the Local Alert
Insert batteries and/or line power and slide the switch on left side to the "On" position.
Antenna Orientation
In order to get the best performance out of your GEN 2 device, it
is important to note proper antenna orientation and device
positioning. Radio performance is best when device and gateway
antenna are pointing in the same direction and installed on the
same plane. For devices installed on the same horizontal plane
this means the antenna should be pointed straight up. If devices
are installed on the same vertical plane antenna should be
aligned on the same horizontal plane and still pointing in the
same direction.
Resetting Sensor
If the sensor needs to be reset for any reason, you can simply cycle the power by toggling the switch to the "Off' position
and waiting 30 seconds before powering back on. Holding the tactile button for 10+ seconds will also cause a reset.
Storage
Always set the power switch to the "Off" before storing the Local Alert to preserve battery life.

11
IV. LOCAL ALERT OVERVIEW IN Scigiene Premier
Select Sensors from the main navigation menu on Scigiene Premier to access the sensor overview page and begin
making adjustments to your Local Alert.
MENU SYSTEM
A. Sensors - Returns to the list of sensors and Local Alert devices on your account
B. Data - Lists sensors that Scigiene Premier can send data back to the Local Alert
C. Details - Displays a graph or recent message counts from the Local Alert
D. Readings - List of message counts received by the Local Alert over time
E. Actions - List of Actions that the Local Alert is configured to trigger
F. Settings - Configurations you can make to how the Local Alert functions
Directly under the tab bar is an overview of the Local Alert. This allows you to see the signal strength and the battery level
of the selected sensor or Local Alert. A colored dot in the left corner of the sensor icon denotes its status.
•Green indicates the Local Alert is checking in and within user-defined safe parameters.
•Red indicates the Local Alert has met or exceeded a user-defined threshold or triggered event.
•Gray indicates that no sensor readings are being recorded, rendering the Local Alert inactive.
•Yellow indicates that the sensor reading is out of date due to perhaps a missed Heartbeat check-in.
Details View
The Details View will be the first page you see upon selecting which sensor or Local Alert you would like to modify.
A. The sensor or Local Alert overview
section will be above every page. This will
consistently display the present reading,
signal strength, battery level, and status.
B. The Recent Readings section below
the chart shows your most recent data
received by the Local Alert.
C. This graph charts how the Local Alert
fluctuates throughout a set date range. To
change the date range displayed in the
graph, navigate to the top of the Readings
Chart section on the right-hand corner to
change the from and/or to date.

12
Readings View
Selecting the Readings Tab within the tab bar allows you to view the Local Alert's data history as time-stamped data.
Onthe farright ofthe Sensor History Data is acloud icon.( )Selecting thisiconwillexport anExcelfilefor
your Local Alert into your download folder.
The data file will have the following fields:
MessagelD: Unique identifier of the message in our database.
Sensor ID: If multiple sensors or Local Alert devices are exported, you can distinguish between the sensors or devices
using this number —even if the names are the same.
Sensor Name: The name you have given the Local Alert.
Date: The date the message was transmitted from the Local Alert.
Value: Data presented with transformations applied but without additional labels.
Formatted Value: Data transformed and presented as it is shown in the Scigiene Premier monitoring portal.
Raw Data: Raw data as it is stored from the Local Alert.
Sensor State: Binary field is represented as an integer containing information about the state of the Local Alert when the
message was transmitted. (See “Sensor State” explained below.)
Alert Sent: Boolean indicating if this reading triggered a notification to be sent from the system
Sensor State
The value presented here is generated from a single byte of stored data. A byte consists of 8 bits of data that we read as
Boolean (True (1) / False (0)) fields.
When broken into individual bits, the State byte contains the following information:
This value isspecifictothesensor profileandisoftenusedtoindicate error statesandothersensor
conditions.
UNUSED This sensor does not use these bits.
AWARE SensorsandLocalAlertdevicesbecomeawarewhencriticalsensor-specificconditionsaremet.Going
aware can cause theLocal Alert totrigger andreport before theHeartbeat and cause thegateway toforward the
data tothe server immediately, resulting in near immediate transmission of the data.
Thisbitis active when theLocal Alert isfirstpowered onorreset andremains activeforthefirstnine
messages when using default configurations.
STS Specific Codes
1.
The Local Alert does not have any specific STS codes this value will always be 0.

13
Settings View
To edit the operational settings for the Local Alert, choose the
Sensor option in the main navigation menu and then select the
Settings tab to access the configuration page.
A. Sensor Name is the unique name you give the Local Alert
to identify it in a list along with any notifications.
B. Heartbeat Interval is how often the Local Alert
communicates with the server if no activity is recorded.
C. Poll Rate: How often the Local Alert checks the gateway for
notifications.
D. Alarm Time: How long the alarm sounds before it snoozes.
E. Snooze Time: How long the alarm is turned off before
alarming again (a new notification will force the device back
into the alarm state).
F. Enable Backlight: This controls the LCD backlight when
displaying time and when scrolling messages during alarms.
G. Enable LED Alarm: Enables flashing LED in the Alarm On
state.
H. Enable Buzzer Alarm: Enables buzzer alarm in the Alarm
On state.
I. Enable Scrolling Display Message: Enables notification
messages in the Alarm On state.
J. Message Scroll Speed: How long a message is displayed
in the Alarm On state before scrolling to the next message.
K. Time Zone Offset: Sets the time on the Local Alert to the
same time zone as the Scigiene Premier account.
L. LCD Contrast: Increasing LCD contrast will darken the
LCD pixels and decreasing will lighten them. Increasing the
contrast too much can saturate the display making the
display unreadable. Decreasing the contrast too much can lighten the pixels to the point where the screen
appears blank.
M. Volume Control: The buzzer on the Local Alert can be set to High, Medium, or Low levels to better suit the
application needs.
N. Failed transmissions before link mode are the number of transmissions the Local Alert sends without response
from a gateway before it goes to battery-saving link mode. In link mode, the Local Alert will scan for a new
gateway, and if not found, it will enter battery-saving sleep mode for up to 60 minutes before trying to scan again.
A lower number will allow Local Alert devices to find new gateways with fewer missed readings. Higher numbers
will enable the Local Alert to remain with its current gateway in a noisy RF environment. Zero will cause the Local
Alert to never join another gateway. To find a new gateway, the battery will have to be cycled out of the Local
Alert.
Finish by selecting the Save button.

14
V. SECURITY
Scigiene GEN 2 Wireless, PoE•X (Power over Ethernet), and Wi-Fi Sensors are designed and built to securely manage
data. Scigiene works to ensure your data security is handled with the utmost care. The same methods utilized by financial
institutions to transmit data are also used in Scigiene's security infrastructure. Security features from sensors to gateways
to Local Alert devices include tamper-proof network interfaces, data encryption, and bank-grade security.
Scigiene’s proprietary sensor protocol uses low power and specialized radio equipment to transmit application data.
Wireless devices listening on open communication protocols cannot eavesdrop on sensors or Local Alert devices. Packet-
level encryption and verification is key to ensuring data traffic isn’t altered between sensors and gateways. Paired with a
best-in-class range and power consumption protocol, all data is transmitted securely from your devices, ensuring a
smooth, worry-free experience.
SENSOR COMMUNICATION SECURITY
Scigiene's sensor-to-gateway, secure wireless
tunnel, Encrypt-RF’", is generated using ECDH-
256 (Elliptic Curve Diffie-Hellman) public key
exchange to generate a unique symmetric key
between each pair of devices. Sensors, Local Alert
devices, and gateways use this link-specific key to
process packet-level data with hardware-
accelerated 128-bit AES encryption, which
minimizes power consumption to provide better
battery life. Thanks to this combination, Scigiene
proudly offers robust bank-grade security at every
DATA SECURITY ON THE GATEWAY
GEN 2 Gateways are designed to prevent prying eyes from accessing the data that is stored on the sensors and Local
Alert devices. Gateways do not run on an off-the-shelf, multi-function operating system. Instead, they run on a purpose-
specific, real-time, and embedded state machine that cannot be hacked to run malicious processes. There are also no
active interface listeners that can be used to gain access to the device over the network. The fortified gateway secures
your data from attackers and secures the gateway from becoming a relay for malicious programs.
OPTIONAL DATA AUTHENTICATION
SensorPrints is the industry's only end-to-end Internet of Things (IoT) data authentication platform for low-power wireless
sensors. SensorPrints authenticates data by issuing a unique fingerprint for each device within the IoT. Data is secured
from the point of generation to the point of consumption. Easy to install and use, SensorPrints is the definitive IoT security
solution for any enterprise.
SensorPrints authenticates data at both the point of generation and consumption, creating trust between the sensor and
server levels. Implementing 256-bit SHA 3 authentication, SensorPrints creates a "fingerprint" for a Scigiene Wireless
Sensor that contains an authenticated sensor message. When data is transmitted from the sensor, it is accompanied by a
generated authentication token. Upon receipt by the application, the token is evaluated via cryptographic hash function
against a unique per sensor secret key. This step provides an unprecedented level of full-coverage security for any
Scigiene user wishing to secure their IoT devices and data.

15
VI.TROUBLESHOOTING
Symptoms
Detailed Problem
Description
Solution
Not Checking into
Scigiene Premier
The Local Alert lost the
radio link to the gateway
or never connected to
the gateway.
Power cycletheLocal Alertbyturning theswitch off for60
seconds then toggling it on.
1.
Ensure thenetwork issetupcorrectly inScigiene Premier(the
sensorand gatewayareonsamenetwork).Pressthebuttonon
thegateway.
2.
If the network is set up correctly, reform thegateway.
3.
Move the Local Alert -10 feet from thegateway.
4.
Moveprogressivelyfurtherfromthegateway,ensuringatleast
two signal bars are showing. Keep in mind the signal bars
represent signal from the previous message, not the current
message. Werecommend takingtworeadings toverifysignal
strength.
5.
Check antenna on the gateway and the Local Alert.
Low Signal
Radio signal strength in
Scigiene Premier is
lower than expected.
1.
Ensure the gateway/LocalAlertantenna is properly connected.
2.
Ensurethegateway/LocalAlertantennaisoptimally oriented
with respect to the position of the Local Alert. (See Antenna
Orientation section in the User Guide).
Notifications Delayed
Notifications are taking
longer than expected to
appear on the Local
Alertafterthenotification
was generated in
Scigiene Premier.
1.
Check the Heartbeat on the gateway that the Local Alert is
connectedtoinScigiene Premier.The notification mustgetto
thegateway beforebeingsenttotheLocal Alertand messages
areonlysent down to the gateway when the gateway talks into
Scigiene Premier so a shorter gateway Heartbeat will shorten
this potential point of delay.
2.
If the Local Alert is on battery power only try reducing the Poll
rateontheLocalAlert.Similartothegateway,theLocal Alertwill
pick up notifications already sent to the gateway when it
communicates with the gateway, reducing the Poll rate will
reduce the delay in this process.
3.
If the Local Alert is on line power, the Local Alert's radio is
alwayslisteningfortrafficfromthegateway.Whenthegateway
receivesanotificationfromScigiene Premieritwilltransmitthe
notification immediately without first communicating with the
Local Alert. If the Local Alert hears this message, it will quickly
pick up the notification.IfforsomereasontheLocalAlertdoes
nothearthis message themessage willstillbereceivedon
LocalAlert’s next Poll or Heartbeat.
4.
Is the Local Alert consistently connected to the gateway? If
the Local Alert loses connection to the gateway, itwill not be
able to receivenotifications untilthisconnection is
reestablished.Refer to"NotCheckingintoScigiene Premier"to
troubleshootconnectionissues.

16
Symptoms
Detailed Problem
Description
Solution
Sensor Messages
Going Down to the
Local Alert are Delayed
Sensor Messages Going
Down to the Local Alert
are Delayed
1.Sensor messages arenotsent downurgently totheLocalAlert.
These messages willbedelayedbyuptothegatewayHeartbeat
+Local Alert PollRate after themessage isgenerated by
Scigiene Premier.
Misc Hardware Issues
Display, LED, buzzer,
backlight, or power input
issues.
1.
Double check configurations in Scigiene Premier and
make sure the display,LED,buzzer,andbacklightare
activatedintheLocal Alert settings page as well as in the
notifications.
2.
Power cycle the Local Alert. Upon power up, the Local Alert
activates theLED,display(allpixelsdarkened), buzzer(allthree
volumelevels),and thebacklight.Ifanyofthese doesnotappear
to be working contact Scigiene Support.
3.
TheLocalAlertcanbepowered frombatteryand/orlinepower.
Whenonbattery only,abattery icon willappear inthestatusbar
at the top of the display. If this icon has 0 bars filled, check the
batteries. Ifonline power, aline power icon willappear inplace
of the battery, if this icon appears then line power is working
properly.
Alarms are not Firing
as Expected
Either, alarms that are
not set are firing or
alarms that are set are
not firing as expected.
Alarms(LED,Buzzer,TextMessage,Backlight)arecontrolled by
theLocalAlert’s settings andactivealarmsinnotifications.Whena
notification is received by the Local Alert, it will activate alarms
based on Settings AND (Notification1OR Notification2 OR
...NotificationN). In simpler terms, if the alarm setting is off, that
alarm will not be able to activate regardless of what notifications
areset.Ifthe setting ison andatleastonenotification received by
the Local Alert has that alarm active, that alarm will activate.

17
VII. APPENDIX A
LED
TheLEDwillflashthreetimespernotification savedinmemory when anotification is
received andtheLED alarm is enabled ontheLocal Alert andin thenotification.
Itwillflashtwice after the button has beenheldfortwoseconds orfivetimes after the
button has been heldwhile viewing notifications/readings (see “Button" section).
It will flash three times slowly after being held for 10 seconds right before resetting.
Display
WhiletheLocalAlertisinactive andonlinepower thestatusbarwillbedisplayed along
with the current time.
While the Local Alert isinactive and only on battery power thedisplay willbeofftosave
power.
A notification message will appear on the display automatically after receiving a
notificationifthedisplayalarmisenabledinthe Local Alertconfigurationsandinthe
notification.
Afteranotification orsensorreadingisreceived, pressing thebuttononcewillcausethe
notification/reading to be displayed.
Buzzer
Ifthe buzzer alarm option isenabled inScigiene Premierandthebuzzeralarmisenabled
inthe notification, the buzzer will turn on when the Local Alert receives a notification.
Backlight
Thebacklight willbeonwhileinformation isdisplayedonthescreenwhenthebacklight
configuration is enabled in the Local Alert’s edit tab.
Whilenotifications/readingsarebeingviewedafterpressingthebutton,thebacklightwill
always turn on for enhanced readability. After thirty seconds of viewing a
notification/readingwithoutanyuserinteraction,thebacklightwillturnoffautomatically.
Pressing the button at this point will turn it back on.
Button
Pressing thebutton whiletheLocal Alertisalarming willturnthealarm offanddisplaythe
most recent notification message. While viewing notifications/readings, pressing the
button will scroll to the next notification/reading.
Pressing the button while thedevice issleeping (display andalarmsoff oronly the status
barisvisible), will cause the display status bar toappear along withamessage indicating
no messages.
Holdingthebuttonfor2seconds (untiltheLED flashes twice)willclearthecurrent
notification/reading being viewed.
Holding the button for 5 seconds (until the LED flashes five times) while viewing
notifications/readingswillclearallnotifications/readings.NOTE:TheLEDdoesnothave
to finish flashing when the button is held for the clear command to be accepted.
Memory
The Local Alert has 10 memory slots to hold notifications or sensor readings.
The mostrecentnotification takes priority inthismemory space.Ifanewnotificationis
received andthememory isfull,the oldest sensor reading willbedeleted firsttomake
roomforthenotification. Iftherearenosensor readings, theoldest notification willbe
deleted.Ifthere are openmemory slots, nothingwill bedeleted unlessthereading or
notification is cleared by the user.
Ifanewsensor reading isreceived andthememory isfull,theoldest sensor reading will
be deleted to make room for the new reading. But, if there are only notifications in
memory, the sensor reading will be discarded.

18
VIII. LOCAL ALERT BEHAVIORAL FLOW DIAGRAM

19
GEN 2 WIRELESS LOCAL ALERT SPECIFICATIONS
Power
Standard Operating Range
5 - 8 VDC (can be powered by line power or batteries.)
Power Options
- 5.5 VDC @ 900 mA power supply (included)
- 4 x AA sized 1.5V alkaline batteries (included)
Current Consumption
10 uA (sleep mode)
20 mA (radio RX mode)
37 mA (radio TX mode)
20 mA (buzzer)
520 uA (LCD)
30 mA (LCD backlight)
Operation
Radio Frequencies
Available: 940, 900, 868, and 433 MHz
Antenna
Connector: RP SMA Female | Gain: 3.0 dBi
Wireless Range
1200 ft. non-line-of-sight
Wireless Communication
Messages are sent from software through gateway (no direct sensor to device
communication is supported)1
Message Storage/Memory
10 messages (notifications or sensor readings)
Mechanical
Display
LCD (8 lines of text) | 128 x 32 pixels | 71.55 mm (diagonal)
Transflective (visible in sunlight without backlight)
LED
One Ultra Bright Red LED
(1630 mcd, 110° x 45 ° Viewing Angle)
Buzzer
~85 dB @ 30 cm, 2.5 KHz +/- 500 Hz
Enclosure
ABS plastic
Dimensions
4.0 x 4.0 x 1.6 in. (101.6 x 101.6 x 40.64 mm) Excluding antenna
Weight
11.2 ounces (with batteries installed)
Environmental
Operating Temperature
-18° to +55°C (0° to +130°F)2
Storage Temperature
-20° to +70°C (-4° to +158°F)
Certifications
900 MHz product; FCC ID: ZTL-G2SC1 and IC: 9794A-G2SC1. 868 and 433 MHz
product tested and found to comply with: EN 300 220-2 V3.1.1 (2017-02), EN 300
220-2 V3.1.1 (2017-02), and EN 60950
1GEN 2 Local Alert units require a GEN 2 Wireless Gateway for operation.
2At temperatures above 100°C, it is possible for the board circuitry to lose programmed memory.
INTERPRETING SENSOR DATA
User Interface:
xx Notifications, xx Sensor Readings
Raw Data: (data type, conversion, units)
Notifications: unsigned char, no conversion, NA
Sensor Readings: unsigned char, no conversion, NA
Raw Data (Exported .csv Representation)
Notifications | Sensor Readings
Example: 1 | 3

20
WARRANTY INFORMATION
(a)
Scigiene warrants thatScigiene-brandedproducts will befree from defects in materials and workmanship for a period of one (1)year from the
dateof delivery with respect tohardwareand willmaterially conform totheir published specifications foraperiodofone(1)yearwithrespectto
software.Scigiene may resell sensors manufactured by other entities and are subject to their individual warranties; Scigiene will not enhance
or extend those warranties. Scigiene doesnotwarrant thatthesoftwareoranyportionthereofiserror-free. Scigiene will havenowarranty
obligation withrespecttoProducts subjected to abuse, misuse, negligence or accident. If any software or firmware incorporated in any Product
fails to conform to the warranty set forth in this Section, Scigiene shall provide a bug fix or software patch correcting such non-conformance
within a reasonable period after Scigiene receives from Customer (i)notice ofsuchnon-conformance,and(ii)sufficient information regarding
suchnon-conformancesoastopermitScigienetocreate suchbug fix or software patch. Ifany hardware component of any Product failsto
conform tothewarranty inthis Section, Scigiene shall, atitsoption, refund the purchase price less any discounts, or repair or replace non-
conforming Products with conforming Products or Products having substantially identical form, fit,andfunction anddeliver therepaired or
replacement Product toa carrier forland shipment tocustomer within areasonable period afterScigiene receives from Customer (i) notice of
such non-conformance, and (ii) the non-conforming Product provided; however, if, in its opinion, Scigiene cannot repair or replace on
commercially reasonable terms it may choose to refund the purchase price. Repair parts and replacement products may be reconditioned or
new. All replacement products and parts become the property of Scigiene. Repaired or replacement products shall be subject to the warranty,
ifanyremains, originally applicable totheproductrepaired or replaced. Customer must obtain fromScigiene a ReturnMaterial Authorization
Number (RMA) prior to returning any Products to Scigiene. Products returned under this Warranty must be unmodified.
Customermay return allProducts for repair orreplacement duetodefects inoriginal materials and workmanship ifScigieneisnotified within
ninety(90) days of customer’s receipt of the product. Scigiene reserves the right to repair or replace products at its own and complete
discretion. Customer must obtainfromScigieneaReturnMaterialAuthorization Number(RMA)priortoreturninganyproductstoScigiene.
ProductsreturnedunderthisWarranty must beunmodified andinoriginal packaging. Scigiene reserves theright torefuse warranty repairs or
replacements foranyproducts that are damaged ornot in original form.For products outside the ninety-day warranty period repair services are
available atScigiene atstandard labor rates foraperiod ofone year from the Customer’s original date of receipt.
(b)
AsaconditiontoScigiene’s obligations undertheimmediately preceding paragraphs, Customer shallreturn Productstobeexamined and
replacedto Scigiene’s facilities,inshippingcartonswhichclearlydisplayavalidRMAnumberprovidedbyScigiene.Customeracknowledgesthat
replacementproducts may be repaired, refurbished or tested and found to be complying. Customer shall bear the risk of loss for such return
shipment and shall bear all shipping costs.Scigieneshalldeliverreplacements forProducts determined byScigienetobeproperly returned, shall
beartheriskofloss andsuchcostsof shipment of repaired products or replacements, and shall credit Customer’s reasonable costs of shipping
such returned Products against future purchases.
(c)
Scigiene's sole obligation under the warranty described or set forth here shall be to repair or replace non-conforming products as set forth
in the immediatelyprecedingparagraph,ortorefundthedocumentedpurchasepricefornon-conformingProductstoCustomer.Scigiene’s
warrantyobligations shall run solely to Customer, and Scigiene shall have no obligation to customers of Customer or other users of the
Products.
LIMITATION OF WARRANTY AND REMEDIES
THEWARRANTY SETFORTHHEREINISTHEONLY WARRANTY APPLICABLE TOPRODUCTS PURCHASED BYCUSTOMER. ALL OTHER
WARRANTIES,EXPRESSORIMPLIED,INCLUDINGBUTNOTLIMITEDTOTHEIMPLIEDWARRANTIESOFMERCHANTABILITYANDFITNESS FOR
A PARTICULAR PURPOSE ARE EXPRESSLY DISCLAIMED. SCIGIENE'S LIABILITY WHETHER IN CONTRACT, IN TORT, UNDER ANY
WARRANTY, IN NEGLIGENCE OR OTHERWISE SHALL NOT EXCEED THE PURCHASE PRICE PAID BY CUSTOMER FOR THE PRODUCT.
UNDERNOCIRCUMSTANCES SHALLSCIGIENEBELIABLEFORSPECIAL,INDIRECTORCONSEQUENTIAL DAMAGES. THEPRICESTATED
FORTHEPRODUCTS ISACONSIDERATIONINLIMITINGSCIGIENE'SLIABILITY.NOACTION,REGARDLESSOFFORM,ARISINGOUTOFTHIS
AGREEMENT MAY BEBROUGHT BY CUSTOMER MORE THAN ONE YEAR AFTER THE CAUSE OF ACTION HAS ACCRUED.
INADDITIONTOTHEWARRANTIESDISCLAIMED ABOVE,SCIGIENESPECIFICALLYDISCLAIMSANYANDALLLIABILITYAND
WARRANTIES, IMPLIEDOREXPRESSED,FORUSESREQUIRINGFAIL-SAFEPERFORMANCE INWHICHFAILUREOFAPRODUCT
COULDLEADTODEATH, SERIOUSPERSONALINJURY,ORSEVEREPHYSICALORENVIRONMENTAL DAMAGESUCHAS,BUTNOT
LIMITEDTO,LIFESUPPORTOR MEDICAL DEVICESORNUCLEAR APPLICATIONS. PRODUCTS ARENOTDESIGNED FORAND
SHOULDNOTBEUSEDINANY OFTHESE APPLICATIONS.
CERTIFICATIONS
United States FCC
This equipment has been tested and found to comply with the limits for a Class B digital devices, pursuant to Part 15 of the FCC Rules. These limits are
designed to provide reasonable protection against harmful interference in a residential installation. This equipment generates, uses, and can radiate
radio frequency energy and, if not installed and used in accordance with the instruction manual, may cause harmful interference to radio
communications. However, there is no guarantee that interference will not occur in a particular installation. If this equipment does cause harmful
interference to radio or television reception, which can be determined by turning the equipment off and on, the user is encouraged to try to correct the
interference by one of more of the following measures:
• Reorient or relocate the receiving antenna
• Increase the separation between the equipment and receiver
• Connect the equipment info an outlet on a circuit different from that to which the receiver is connected.
• Consult the dealer or an experienced radio/TV technician for help.
Warning: Changes or modifications not expressly approved by Scigiene could void the user’s authority to operate the equipment.
RF Exposure
Monn/f I/I/ire/ess I.ocaI Alert Confa/ns:
FCC ID: I TL-/tFsc i
Table of contents