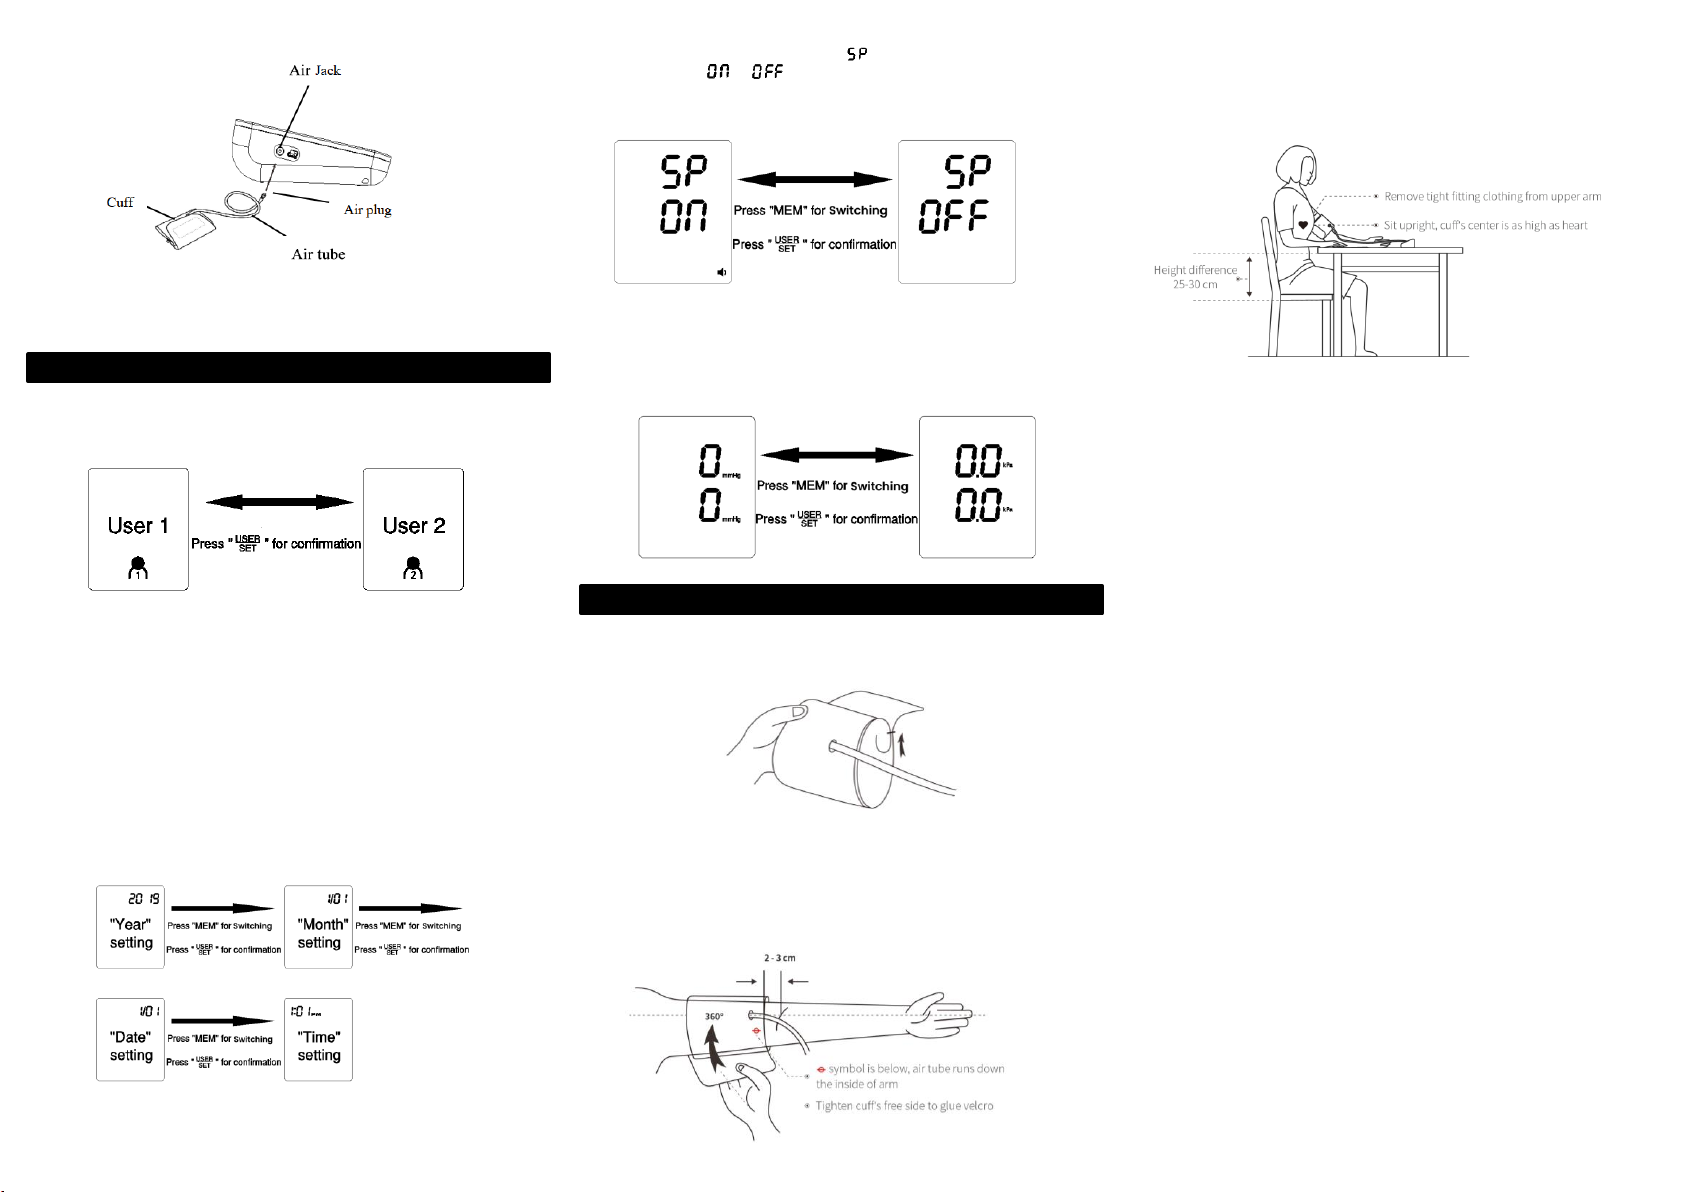
manuals.online logo
Brands
  1. Home
  2. •
  3. Brands
  4. •
  5. Screen
  6. •
  7. Blood Pressure Monitor
  8. •
  9. Screen JPD-HA120 User manual

Screen JPD-HA120 User manual

Screen Misura Pressione
Pressure Gauge
User Manual
REF: 970791796
English
CATALOGUE NR: JPD-HA120
English
PRODUCT COMPOSITION
The product is comprised of the host machine and the cuff of Electronic Blood Pressure
Monitor.
INTENDED USE
The Electronic Blood Pressure Monitor is intended to measure the systolic and diastolic
blood pressure as well as the pulse rate of adult person via non-invasive oscillometric
technique at medical facilities or at home
•SAFETY PRECAUTIONS
QUICK START GUIDE
Avoid smoking, eating, drinking caffeinated drinks or exercising for 30 minutes before
taking measurement.
1. Sit upright in a chair with both feet on the floor.
2. Remove tight fitting clothing from your upper arm along
with any thick clothing.
3. Pull on the end of the cuff until it wraps securely around
your upper arm. Place your arm on a table so that the cuff will
be at the same level as your heart.
4. The cuff will automatically inflate and the measurement will
start, upon pressing the “START/STOP” button.
5. When the measurement is complete, the cuff will
automatically deflate and your systolic and diastolic pressure
values and pulse
rate will be
displayed.
OVERVIEW
Monitor
Features
⚫Universal Cuff
⚫99 Readings * 2 Users
⚫Average of last 3 readings
⚫Irregular Heartbeat Detector
⚫Auto-off Power Saving Feature
⚫Bluetooth Transmission Function
⚫Operated by 4 AA batteries (USB 5V optional)
Display
Packing List
No.
Name
Quantity
1
Electronic Blood Pressure Monitor
1
2
Cuff
1
3
Dry Battery (AA)
4
4
User Manual
1
5
Zipped Cattying Bag
1
PREPARATION
2.1 Battery Installation
a)Open the battery cover as shown in the picture.
b)Place 4 AA dry batteries. Pay attention to the
battery electrode indication.
2.2 Battery power indication and
replacement
After the product is turned on, if low power symbol appears on the screen , the
measurement cannot be performed, and the battery must be replaced.
Do not use any expired battery;
If the product is not used for over 3 months, please
take out the batteries.
2.3 USB Power Supply
USB line can be connected for power supply of the product without battery.
2.4 Cuff
The applicable arm circumference range of the cuff is 22-36cm or 22-42cm.
Connection: Insert the air plug of cuff air tube into air jack of the Electronic Blood Pressure
Monitor. Figure shown as above:
Legend, mark and meaning
Warning message
Anti-electric shock degree is Type BF of the application part
When the product life expires and the end users discard the
products, send them to the designated collecting and separating
place for disposal according to the requirements from the local
environmental protection authority.
Consult the instructions for use.
This product complies with the MDD93/42/EEC requirements.
IP21
Degree of protection against the ingress of water.
Information of manufacturer
Date of manufacture
Authorized European Representative
t
PARTS
IDENTIFICATI
FUNCTION SETTING MODE
3.1 User mode
Switch between “User 1” and “User 2” can be processed in the “OFF” state or upon the
measurement completion, by short press on the “USER” button.
3.2 Year/Month/Date/Time setting
In the “OFF” state, enter the setting mode by long press on the “USER” button for 3~5s.
After entering the “Year” setting mode, the flashing 20XX will show on the screen. Press the
“MEM” button, and the value will be incremented among 2019 and 2099. Press the “USER”
button for “Year” value confirmation and move to the “Month” setting mode.
After entering the “Month” setting mode, 1/01 will flash on the screen. Press the “MEM”
button, and the value will be incremented among 1 and 12. Press the “USER” button for
“Month” value confirmation and enter the “Date” setting mode.
After entering the “Date” setting mode, 1/01 will flash on the screen. Press the “MEM” button,
and the value will be incremented among 01 and 31. Press the “USER” button for “Date”
value confirmation and enter the “Time” setting mode.
After entering the “Time” setting mode, XX:XX will flash on the screen. Press the “MEM”
button, and the “Hour” value will be incremented among 1~12 AM/PM. Press the “USER”
button for “Hour” value confirmation and enter the “Minute” setting mode. Press the “MEM”
button, and the value will be incremented among 00 and 59.
Note:
When setting time values, continue pressing the "MEM" button till the correct values are well
set. Value ranges are year (2019~2099), month (01~ 12), date (01~31), hour (1~12 AM/PM)
and minute (00~59). When the ceiling value of a certain time sector is reached, the relevant
value of the sector will start from the minimum individually.
3.3 Talking function setting (voice version only)
After entering talking function setting mode, “ ” will show up at the SYS area, with the
current voice status “ ” / “ ” and voice icon (not displayed, when talking function
mode is off) at the DIA area. Press the “MEM” button to switch the voice status, and press
the “USER” button for confirmation.
3.4 Unit setting
Either 0 or 0.0 will show up on the screen, upon entering the “Time” setting mode, by
pressing the “USER” button. Display of 0 indicates that the mmHg unit is selected; display
of 0.0 indicates that the kPa unit is selected. Unit will be switched upon every press on the
“MEM” button. After the unit is selected, press the “USER” button again to save the unit
setting.
CORRECT MODE OF USE
4.1 How to use the cuff
(1) Place the cuff flat on the table, leave the hook & loop downwards, and pass the end of
cuff through the metal ring to form a loop. The hook & loop shall point outwards.
(2) Pull the cuff through the upper arm to be measured, and wear the cuff correctly based
on the downward icon “ Φ ”, the air tube runs down the inside of your arm. Hook up the cuff
on the upper arm according to the illustration, ensure that the lower edge of cuff is 2~3cm
away from the elbow joint. Tighten the free edge of cuff to stick the hook & loop.
(3) The cuff should be wrapped on the upper armcomfortably, with tight space for twofingers.
Before measurement, remove tight fitting clothing from your upper arm along with any thick
clothing.Place the lower arm flat on the desktop, leaving the center of palm naturally
upwards, sitting upright, and ensuring the center of cuff and the heart are at the same level.
Note that the tube of cuff cannot be folded or bent.
Note: If you cannot use the left arm for measurement, please use the right arm for
measurement. All the measurements must be performed on the same arm for comparison.
4.2 Starting measurement
Power on state, after you wear the cuff correctly, the “cuff detection icon ” lights up, then
you can start the measurement:
(1) Press the “START/STOP” button, and the device will return to zero automatically, the air
pump will start to inflate the cuff, and the screen will display the change of the pressure in
the cuff.
(2) When reaching the stable pressure upon inflation, the air pump will stop the inflation,
and the pressure in the cuff will be reduced gradually and displayed on the screen. If the
inflated pressure is insufficient, the device will reinflate the cuff automatically for a higher
pressure;
(3) When the pulse is measured, the screen will display the “heart”
on the screen.
(4) Upon measurement completion, the measured values of systolic pressure, diastolic
pressure and pulse will be displayed on the screen.
(5) The screen will continue to display the measurement results, unless your long-press on
the “START/STOP” button to turn off the device. If there is no operation, the device will be
powered off automatically in 30s.
Note:
(1) When the icon shows up, it means body movements during the measurement, which
may result in incorrect measurement.
(2) Irregular heartbeat symbol appears in the result when irregular rhythm is detected 2 or
more times during a measurement. If it continues to appear, we recommend you to consult
with and follow the directions of your physician. (An irregular heartbeat rhythm is defined as
a rhythm that is 25 % less or 25 % more than the average rhythm detected while your monitor
is measuring blood pressure)
(3) If you suffer from an irregular heartbeat, measurements taken with this device should be
evaluated with your doctor.
4.3 Using memory function
This blood pressure monitor is available for the storage of 99 memories for each of 2 users.
If the 99 groups of memory data are full, they will be replaced automatically. After the blood
pressure monitor has been used for several times, in the OFF state, you can press the “MEM”
button to display the latest measurement result, and track the rest data one by one via
pressing the “MEM” button.When there are over 3 measurement data, press “MEM” button
for the average values of the latest 3 measurement data, recorded as “0”. Track the memory
data by pressing “MEM” button from the latest measurement, recorded as “1”. Then track
“2”, “3” or more via the same operation.
4.4 Clearing stored measurement data
In memory mode, you can delete all the measurement data of the two users by pressing the
“MEM” button for 3 seconds.
4.5 Use Bluetooth function
See the User manual of Jumper Health.
4.6 Classification standard for blood pressure condition
There is no definition of hypotension yet. Generally, if the systolic blood pressure is less
than 90mmHg (12kPa), it is hypotension
CONTRAINDICATIONS, PRECAUTIONS, WARNING AND
INSTRUCTION
(1) Warning:
Keep the device out of the reach of the children under 12 and people who can’t express
their intention. When children of 12~18 use the device, they should be accompanied by the
adults. Pregnant women shall use under the guidance of doctors.
Do not wrap the cuff over a wound, as this can cause further injury.
This model of Electronic Blood Pressure Monitor is suitable for the arm circumference range
of 22-36cm or 22-42cm, and if the arm circumference exceeds this range, you might fail to
obtain the correct measured value of blood pressure;
This model of Electronic Blood Pressure Monitor is not suitable for newborns or young
children;
The blood pressure is constantly changing. You shall notjudge the blood pressurecondition
with just one measurement result. The repeated measurement data over a period of time
will be more reliable;
Do not make self-diagnosis according to the measurement results. Please consult your
professional doctor with the measurement result record(s). The treatment based on the self-
diagnosis of measurement results is very dangerous;
Do not collide or drop the host to avoid collision or strong impact on the device;
Do not mix old and new batteries of different brands for use.
Indoor temperature, environment, noise, user's body position, speech or exercise might
affect the blood pressure measurements. The body movement, magnetic field and improper
wearing of cuff and sensor will affect the measurement as well.
TROUBLESHOOTING
* If you have trouble using the device, please check the following instruction.
STORAGE AND MAINTENANCE
•Keep the device away from direct sunlight, extreme temperatures, humidity or
moisture.
•Use a dry, soft cloth to clean the device, or if desired, use a cloth lightly
dampened with water.
•Do not use corrosive cleaner, benzene, thinner or other volatile liquids to
clean the device.
•Do not wash or expose the arm cuff to liquid.
•Remove batteries from the device when it will not be used for more than 3
months.
Disinfection:
•Recommended disinfecting agent:
•Isopropanol solution with 70% concentration
•Medical alcohol with 75% concentration
SPECIFICATIONS
Problem
Possible cause
How to correct
No display when
press the Power
button
Low battery
Replace new batteries or use
the USB for power supply.
The polarities of
batteries are installed
wrongly.
Install the batteries in correct
polarities.
No pressurizing
The air plug is
loosely installed.
Make sure the air plug is
securely inserted in the main
unit.
The air tube is
broken or leaked.
Purchase a new cuff.
“Err 1” displayed
The sensor doesn’t
work.
Please contact us for after-sale
service.
“Err 2” displayed
No pulse detected
Please check if the cuff wearing
is correct, and follow Section 4.1
How to use the cuff
“ Err 3 ”
displayed
The result of blood
pressure is
abnormal.
Please remeasure in the right
way.
“Err 4” displayed
The cuff is twined too
loose.
Please check if the cuff wearing
is correct, and follow Section 4.1
How to use the cuff.
“Err 5” displayed
The air bag of cuff is
ruptured.
Replace with a new cuff.
“Err 6” displayed
The air tube is
detected to be
obstructed in the
early stage of
pressurization.
Please check if the air tube is
clogged or folded before
measuring
Please measure again.
“Err 7” displayed
The air bag of cuff is
ruptured.
Replace with a new cuff.
“Err 8” displayed
Pressure value
exceeds the limit.
Don’t touch the cuff during the
measurement;
Don’t fold the air tube during the
measurement.
Note: If your problem cannot be solved by the above, please
contact customer service. Do not disassemble the device!
Product Name
Electronic Blood Pressure Monitor
Model
JPD-HA120
Display Mode
Digital display mode
Measuring Mode
Oscillographic method
Measuring Body Part
Upper arm
Measuring Range
Pressure value
0-295mmHg(0kPa-
39.3kPa)
Pulse value
40-199 pulse beats/min
Static measurement
accuracy
Pressure value
±3mmHg(±0.4kPa)
Pulse value
± 5% of read value
LCD display
Pressure
Unit : mmHg/ kPa
Pulse
Pulse rate per minute,
displaying three digits
Storage capacity
It can store 99 groups of measurement data for each of two
users
Power supply
4 AA dry batteries
/DC 5V USB external power supply
Power Off Mode
Manual power-off/ Auto power-off
Device weight
(without batteries)
About 285g
EMC Information-Guidance and Manufacture’s Declaration
1* WARNING: Use ofthis equipment adjacent to or stacked with other equipment should be
avoided because it could result in improper operation. If such use is necessary, this
equipment and the other equipment should be observed to verify that they are operating
normally.”
2* WARNING: Use of accessories, transducers and cables other than those specified or
provided by the manufacturer of this equipment could result in increased electromagnetic
emissions or decreased electromagnetic immunity of this equipment and result in improper
operation.”
3* WARNING: Portable RF communications equipment (including peripherals such as
antenna cables and external antennas) should be used no closer than 30 cm (12 inches) to
any part of the ME equipment, including cables specified by the manufacturer. Otherwise,
degradation of the performance of this equipment could result.”
Table 1
declaration - electromagnetic emission
Emissions test
Compliance
RF emissions
CISPR 11
Group 1
RF emissions
CISPR 11
Class B
Harmonic emissions
IEC 61000-3-2
Not applicable
Voltage fluctuations/
flicker emissions
IEC 61000-3-3
Not applicable
Table 2
declaration - electromagnetic immunity
Immunity test
IEC 60601 test level
Compliance level
Electrostatic discharge
(ESD)
IEC 61000-4-2
±8 kV contact
±2 kV, ±4 kV, ±8 kV, ±15 kV air
±8 kV contact
±2 kV, ±4 kV, ±8 kV,
±15 kV air
Electrical fast
transient/burst
IEC 61000-4-4
± 2 kV for power supply lines
± 1 kV for input/output lines
Not applicable
Surge
IEC 61000-4-5
± 0.5kV, ± 1 kV line(s) to lines
± 0.5kV, ± 1 kV, ± 2 kV line(s) to
earth
Not applicable
Voltage dips, short
interruptions and
voltage variations on
power supply input
lines
IEC 61000-4-11
0 % UT; 0.5 cycle At 0°, 45°,
90°, 135°, 180°, 225°, 270°and
315°
0 % UT; 1 cycle and
70 % UT; 25/30 cycles
Single phase: at 0°
0 % UT; 250/300 cycles
Not applicable
Power frequency
(50/60 Hz) magnetic
field
IEC 61000-4-8
30 A/m
30 A/m
NOTE: UT is the a.c. mains voltage prior to application of the test level
Table 3
declaration - electromagnetic immunity
Immunity test
IEC 60601 test level
Compliance level
Conducted RF
IEC 61000-4-6
3V
0.15 MHz to 80 MHz
6 V in ISM bands between 0.15
MHz and 80 MHz
Not applicable
Radiated RF
IEC 61000-4-3
10V/m
80 MHz to 2.7 GHz
10V/m
Table 4
declaration - IMMUNITY to proximity fields from RF wireless communications
equipment
Imm
unity
test
IEC60601 test level
Complianc
e level
Test
frequency
Modulation
Maximum
power
Immunity
level
Radi
ated
RF
IEC
6100
0-4-3
385 MHz
**Pulse
Modulation:
18Hz
1.8W
27 V/m
27 V/m
450 MHz
*FM+ 5Hz
deviation:
1kHz sine
2 W
28 V/m
28 V/m
710 MHz
745 MHz
780 MHz
**Pulse
Modulation:
217Hz
0.2 W
9V/m
9 V/m
810 MHz
870 MHz
930 MHz
**Pulse
Modulation:
18Hz
2 W
28 V/m
28 V/m
1720 MHz
1845 MHz
1970 MHz
**Pulse
Modulation:
217Hz
2 W
28 V/m
28 V/m
2450 MHz
**Pulse
Modulation:
217Hz
2 W
28 V/m
28 V/m
5240 MHz
5500 MHz
5785 MHz
**Pulse
Modulation:
217Hz
0.2 W
9 V/m
Note* - As an alternative to FM modulation, 50 % pulse modulation at 18 Hz may be
used because while it does not represent actual modulation, it would be worst case.
Note** - The carrier shall be modulated using a 50 % duty cycle square wave signal.
FCC Compliance Statements
This device complies with Part 15 of the FCC Rules. Operation is subject to the following
two conditions: (1) this device may not cause harmful interference, and (2) this device
must accept any interference received, including interference that may cause undesired
operation.
Note: This equipment has been tested and found to comply with the limits for a Class B
digital device, pursuant to Part 15 of the FCC Rules. These limits are designed to provide
reasonable protection against harmful interference in a residential installation. This
equipment generates, uses and can radiate radio frequency energy and, if not installed
and used in accordance with the instructions, may cause harmful interference to radio
communications. However, there is no guarantee that interference will not occur in a
particular installation.
If this equipment does cause harmful interference to radio or television reception, which
can be determined by turning the equipment off and on, the user is encouraged to try to
correct the interference by one or more of the following measures:
-- Reorient or relocate the receiving antenna.
-- Increase the separation between the equipment and receiver.
-- Connect the equipment into an outlet on a circuit different from that to which the receiver
is connected.
-- Consult the dealer or an experienced radio/TV technician for help.
Caution: Changes or modifications not expressly approved by the party responsible for
compliance could void the user’s authority to operate the equipment.
US Radiation Exposure Statement
This equipment complies with FCC radiation exposure limits set forth for an uncontrolled
environment. End user must follow the specific operating instructions for satisfying RF
exposure compliance. This transmitter must not be co-located or operating in conjunction
with any other antenna or transmitter.
After-sale Service
After-sale service unit: Shenzhen Jumper Medical Equipment Co., Ltd. Address: D
Building, No. 71, Xintian Road, Fuyong Street, Baoan, Shenzhen, Guangdong, China Tel:
+86-755-26696279 E-mail: [email protected]
Website: www.jumper-medical.com
MedPath GmbH
Mies-van-der-Rohe-Strasse 8, 80807 Munich, Germany
Shenzhen Jumper Medical Equipment Co., Ltd.
D Building, No. 71, Xintian Road, Fuyong Street,
Baoan, Shenzhen, Guangdong, China,518103
Tel: +86-755-26696279
E-mail: [email protected]om
Website:www.jumper-medical.com
Distributed by:
Screen Italia Srl
Via dell’Artigianato, 16
06089 - Torgiano - Perugia - Italia
www.screenpharma.it - [email protected]
Monitor Size
138mm (length) *120mm (width) * 59mm (height)
Screen Size
60mm (length) *77mm (width)
Cuff
Upper-arm-type cuff
(measured arm circumference 22-36cm or 22-42cm)
Annexure
Cuff, User Manual, Dry battery, Zipped Carrying Bag
Battery Life
High-performance dry battery can be used for about 300
times at normal temperature
Service Life
5 years
Date of Production
See label
If the device is
stored and
used in the
environment
out of the
designated
temperature &
humidity
ranges, it
cannot operate
normally.
Operating
environment
Temperature Condition 5 ℃-40 ℃
Humidity Condition 15%-85%RH
Atmospheric Condition 70kPa-106kPa
Transportation and
Storage
Environment
Avoid strong impact, direct impact, exposure or rain during
transportation. The packaged Blood Pressure Monitor shall
be stored indoors at the temperature of -20℃~55℃ and the
relative humidity of 10%~93%, atmospheric
Condition70kPa-106kPa, without corrosive gas and with
good ventilation

This manual suits for next models

1

Popular Blood Pressure Monitor manuals by other brands

Panasonic EW3004 operating instructions

Panasonic

Panasonic EW3004 operating instructions

AND UA-651BLE instruction manual

AND

AND UA-651BLE instruction manual

ReliOn HEM-780REL instruction manual

ReliOn

ReliOn HEM-780REL instruction manual

HEINE GAMMA G5 Series manual

HEINE

HEINE GAMMA G5 Series manual

Beurer BC 44 Instructions for use

Beurer

Beurer BC 44 Instructions for use

Omron M3-I Plus instruction manual

Omron

Omron M3-I Plus instruction manual

Omron RS6 instruction manual

Omron

Omron RS6 instruction manual

Qardio ARM A100 user manual

Qardio

Qardio ARM A100 user manual

alvita Plus manual

alvita

alvita Plus manual

Omron HEM-RML31 Instructions for use

Omron

Omron HEM-RML31 Instructions for use

Omron BP710 instruction manual

Omron

Omron BP710 instruction manual

HOFFEN BPM-8417 instruction manual

HOFFEN

HOFFEN BPM-8417 instruction manual

Microlife BP B2 Basic manual

Microlife

Microlife BP B2 Basic manual

eta ETA4297 Instructions for use

eta

eta ETA4297 Instructions for use

Topcom BPM Wrist 1480 user guide

Topcom

Topcom BPM Wrist 1480 user guide

Omron BP710CANN instruction manual

Omron

Omron BP710CANN instruction manual

Omron M2 Compact instruction manual

Omron

Omron M2 Compact instruction manual

Omron RS2 instruction manual

Omron

Omron RS2 instruction manual

manuals.online logo
manuals.online logoBrands
  • About & Mission
  • Contact us
  • Privacy Policy
  • Terms and Conditions

Copyright 2025 Manuals.Online. All Rights Reserved.