Sea Wit 9138H User manual
Switcher User's Guide
Model: 9138H/9116H
www.seawit-sales.com
szjkyhmd@sina.com

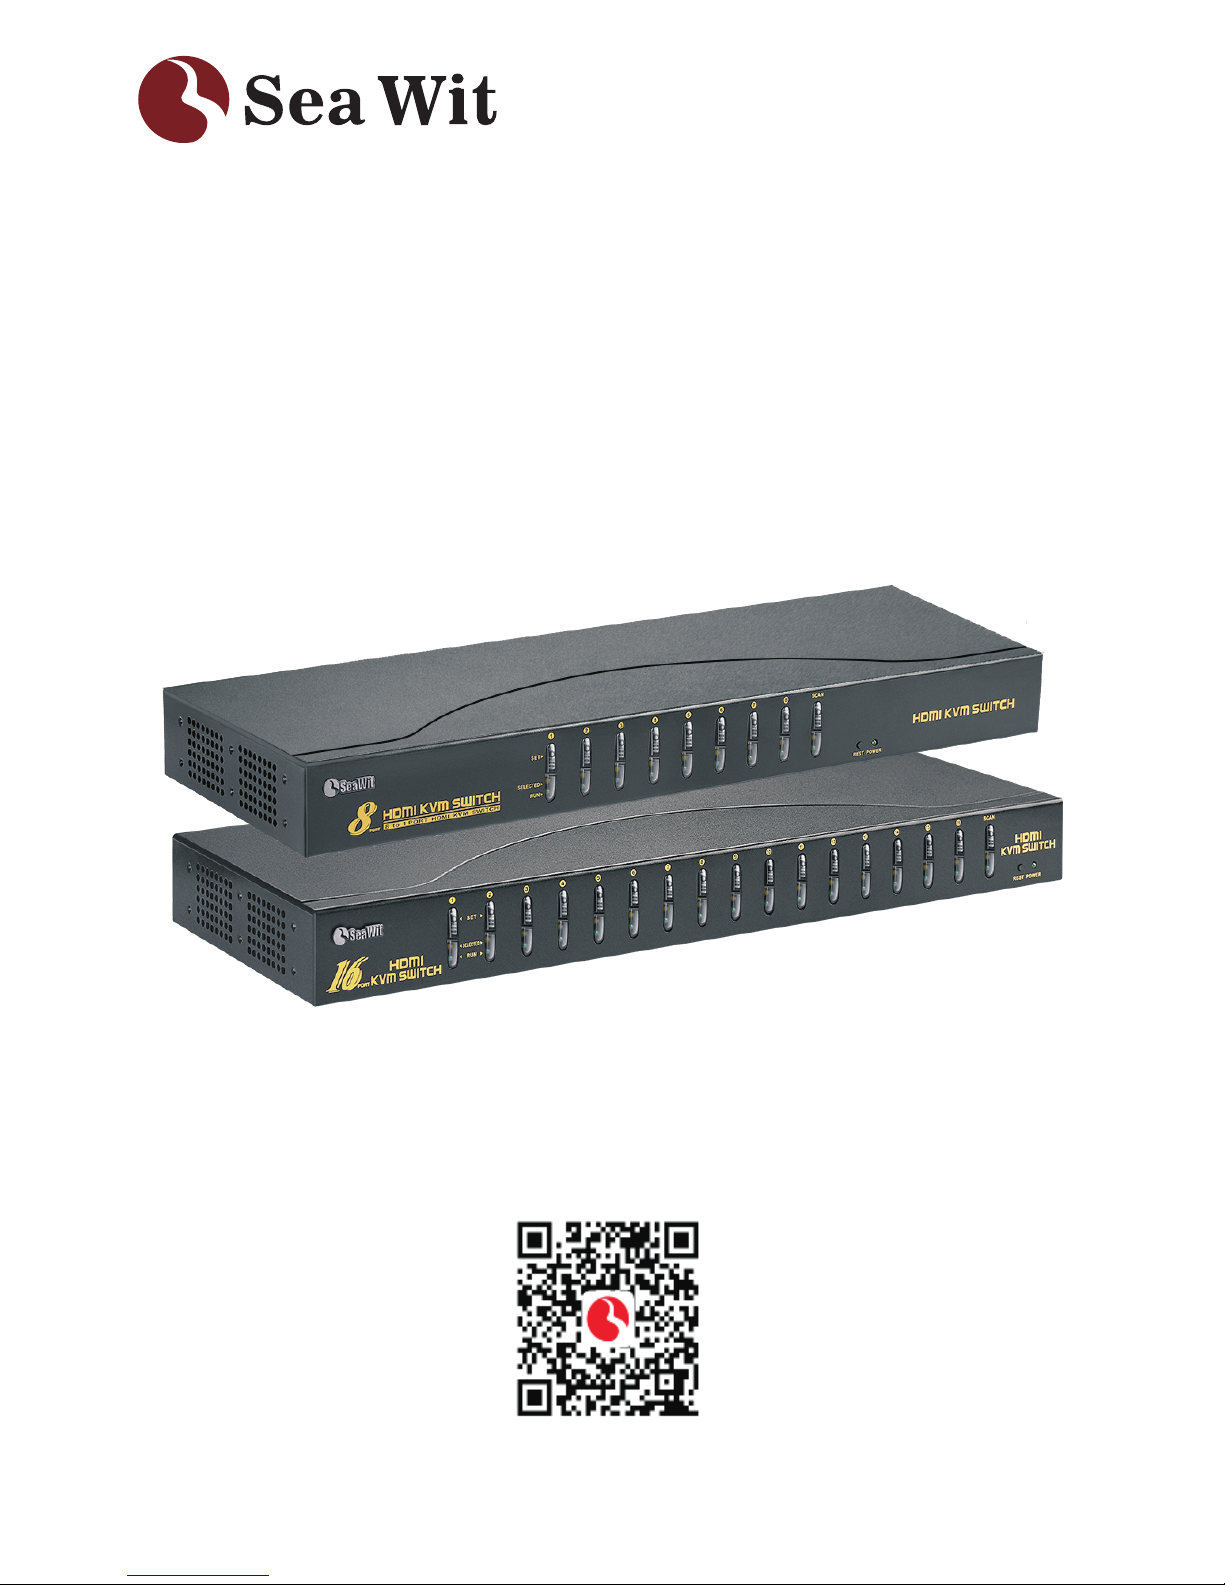
9138H/9116H HDMI KVM
Multi-computer Switch
SeaWit has been committed to the high-definition audio and
video products, is a comprehensive high-tech enterprise that
engaged in R&D, production and sales of HD audio and video
products. We are also a professional production supplier which
covering five major series of products: HDMI, VGA, DVI, KVM,
USB video and audio products.Our products are widely applied
in home digital theater; HDTV, top boxes, DVDs, TVs and
projectors retail and display venues; test centers of major brands
of TV, projectors and other display equipment manufacturers;
data monitoring and control center; high-definition signal
distribution conversion application center as well as conference
presentation and other places.
9138H/9116H switch is a 8 in 1 out/ 16 in 1 out multi-
functional switch, maximum support 1080p resolution, support
cross-system operation, and support EDID (extended display
identification data) dynamic synchronous display technology
which can ensure that the switch can switch fast and smooth as
well as the video image can be output without any distortion.
Please read carefully this installation precautions
before installation and connection.
Package Included····································· ···2
Switch Panel Instruction·······························································3
9138H / 9116H Connection Diagram··········································4
Installation Precautions·······························································5
Hot-key Setting·············································································7
Switch Method··············································································9
Specification················································································13
Frequently Asked Question·······················································14
Contact Information···································································15
··································
1
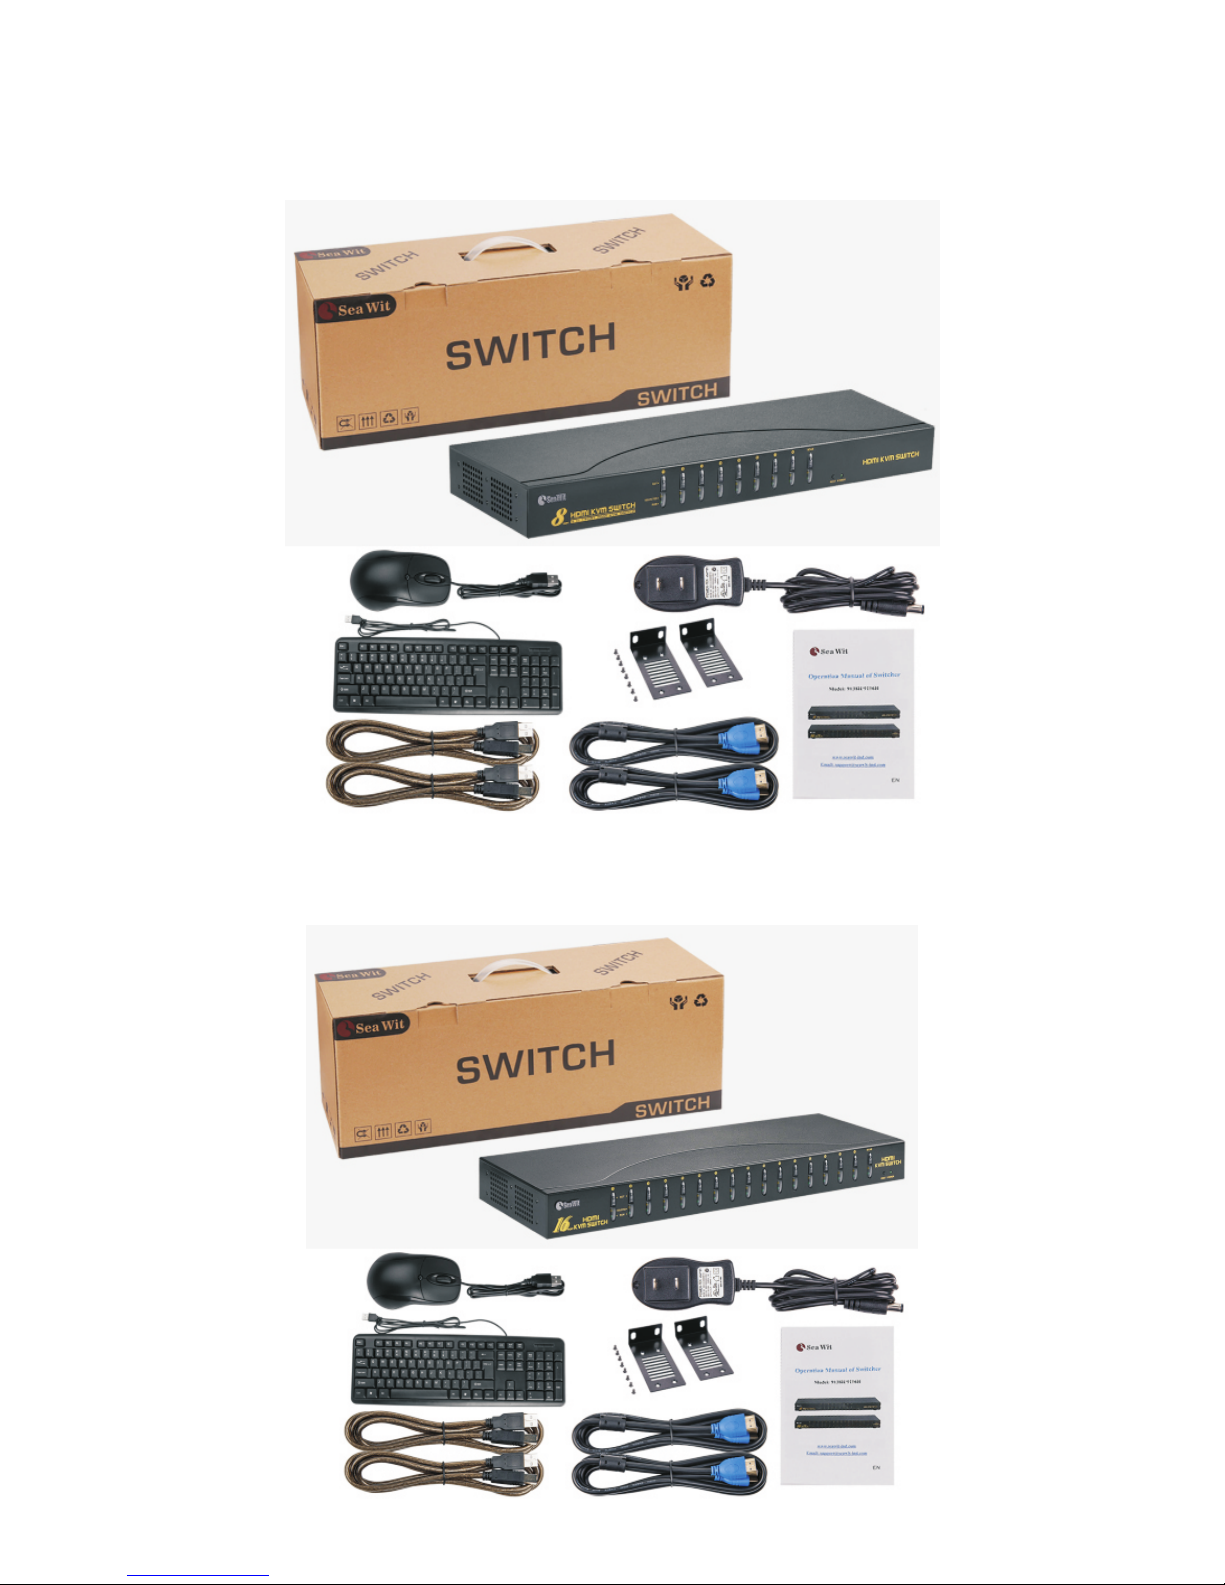
Package Included
9138H:KVM Switch + Instructions + Service Card + 2 HDMI Cables
+ 2 USB Cables + Power Adapter + Mouse +Keyboard + 2 Metal Rack
9116H:KVM Switch + Instructions + Service Card + 2 HDMI Cables +
2 USB Cables + Power Adapter + Mouse +Keyboard + 2 Metal Rack
2

Switch Panel Instruction
Switch Button 1-8
Indicator 1-9
Auto Scan
Reset
Power LED
ON/OFF
USB keyboard
USB mouse
HDMI out
HDMI IN 8 HDMI IN 6 HDMI IN 4 HDMI IN 2
HDMI IN 7 HDMI IN 5 HDMI IN 3 HDMI IN 1
DC Power USB port USB IN 8 USB IN 6 USB IN 4 USB IN 2
USB IN 7 USB IN 5 USB IN 3 USB IN 1
Switch Button 1-16
Indicator 1-17
Auto Scan
Reset
Power LED
ON/OFF
USB Port
HDMI out
DC Power
USB IN 16
HDMI IN 16 HDMI IN 14 HDMI IN 12 HDMI IN 10 HDMI IN 8 HDMI IN 6 HDMI IN 4 HDMI IN 2
HDMI IN 15 HDMI IN 13 HDMI IN 11 HDMI IN 9 HDMI IN 7 HDMI IN 5 HDMI IN 3 HDMI IN 1
USB IN 14 USB IN 12 USB IN 10 USB IN 8 USB IN 6 USB IN 4 USB IN 2
USB IN 15 USB IN 13 USB IN 11 USB IN 9 USB IN 7 USB IN 5 USB IN 3 USB IN 1
9138H
9116H
3
USB HUB
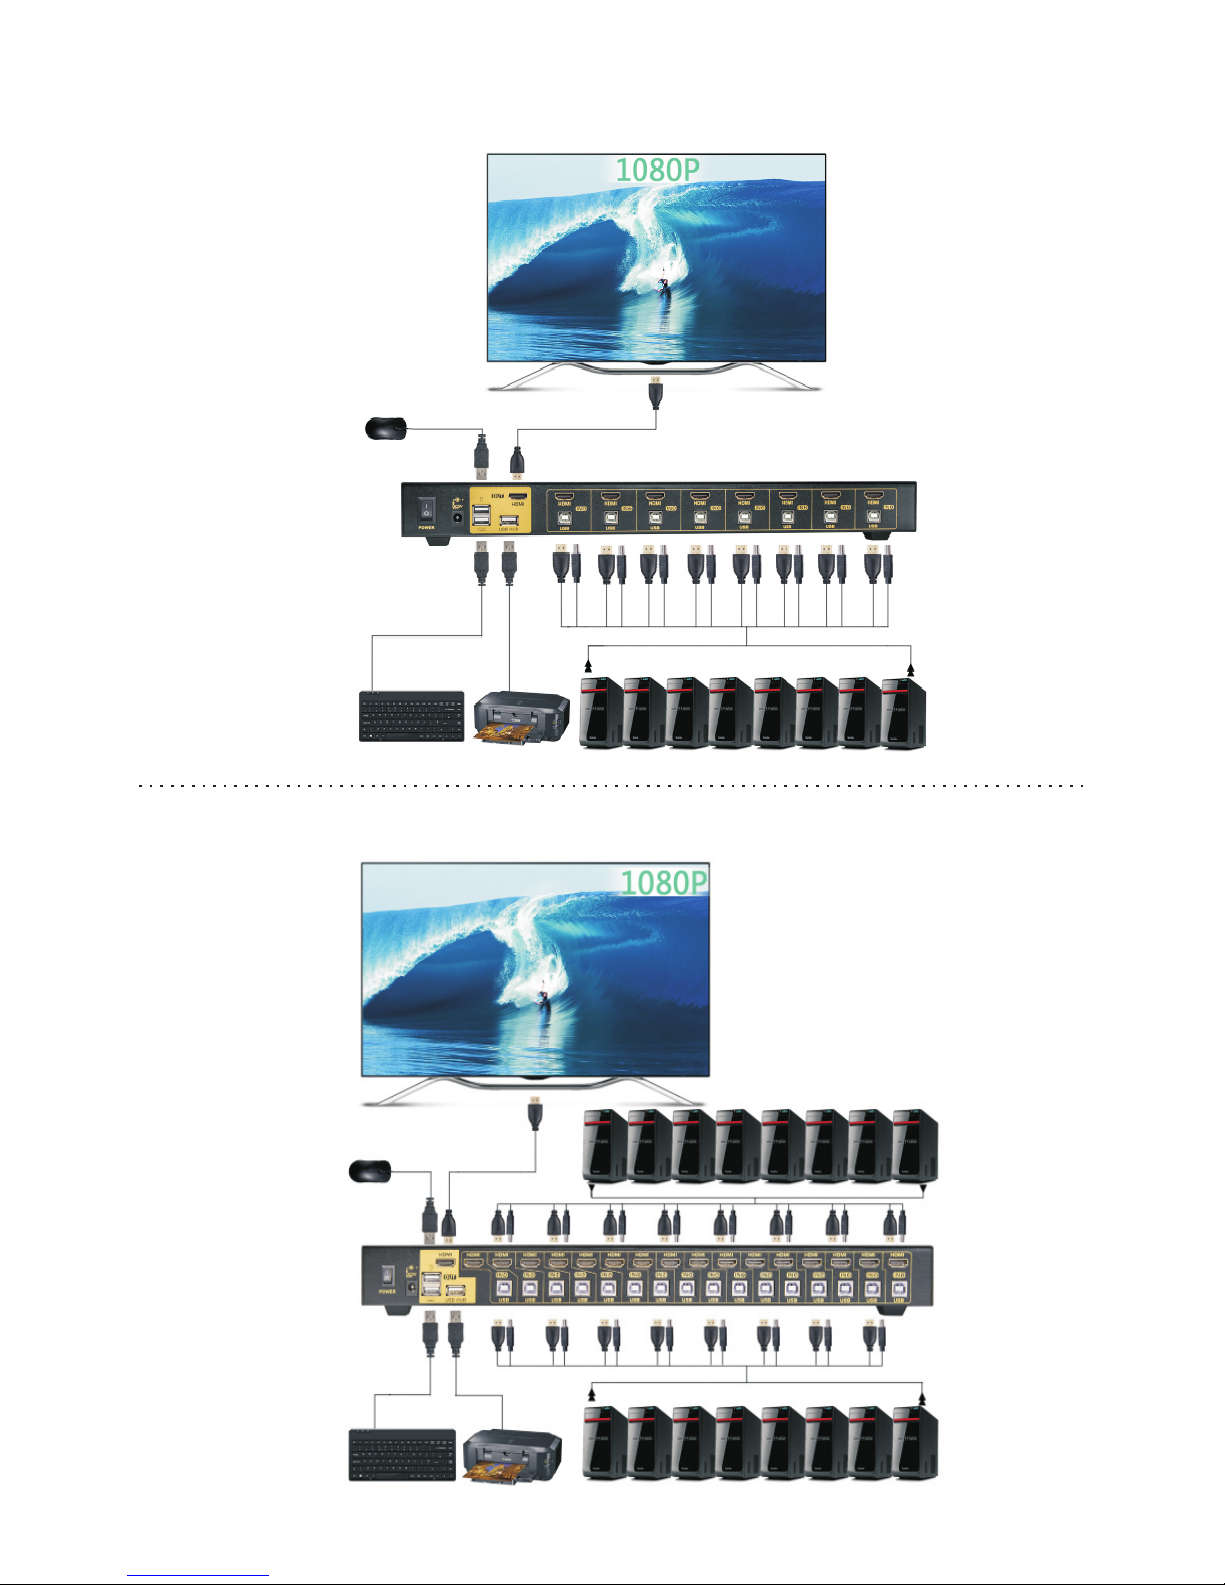
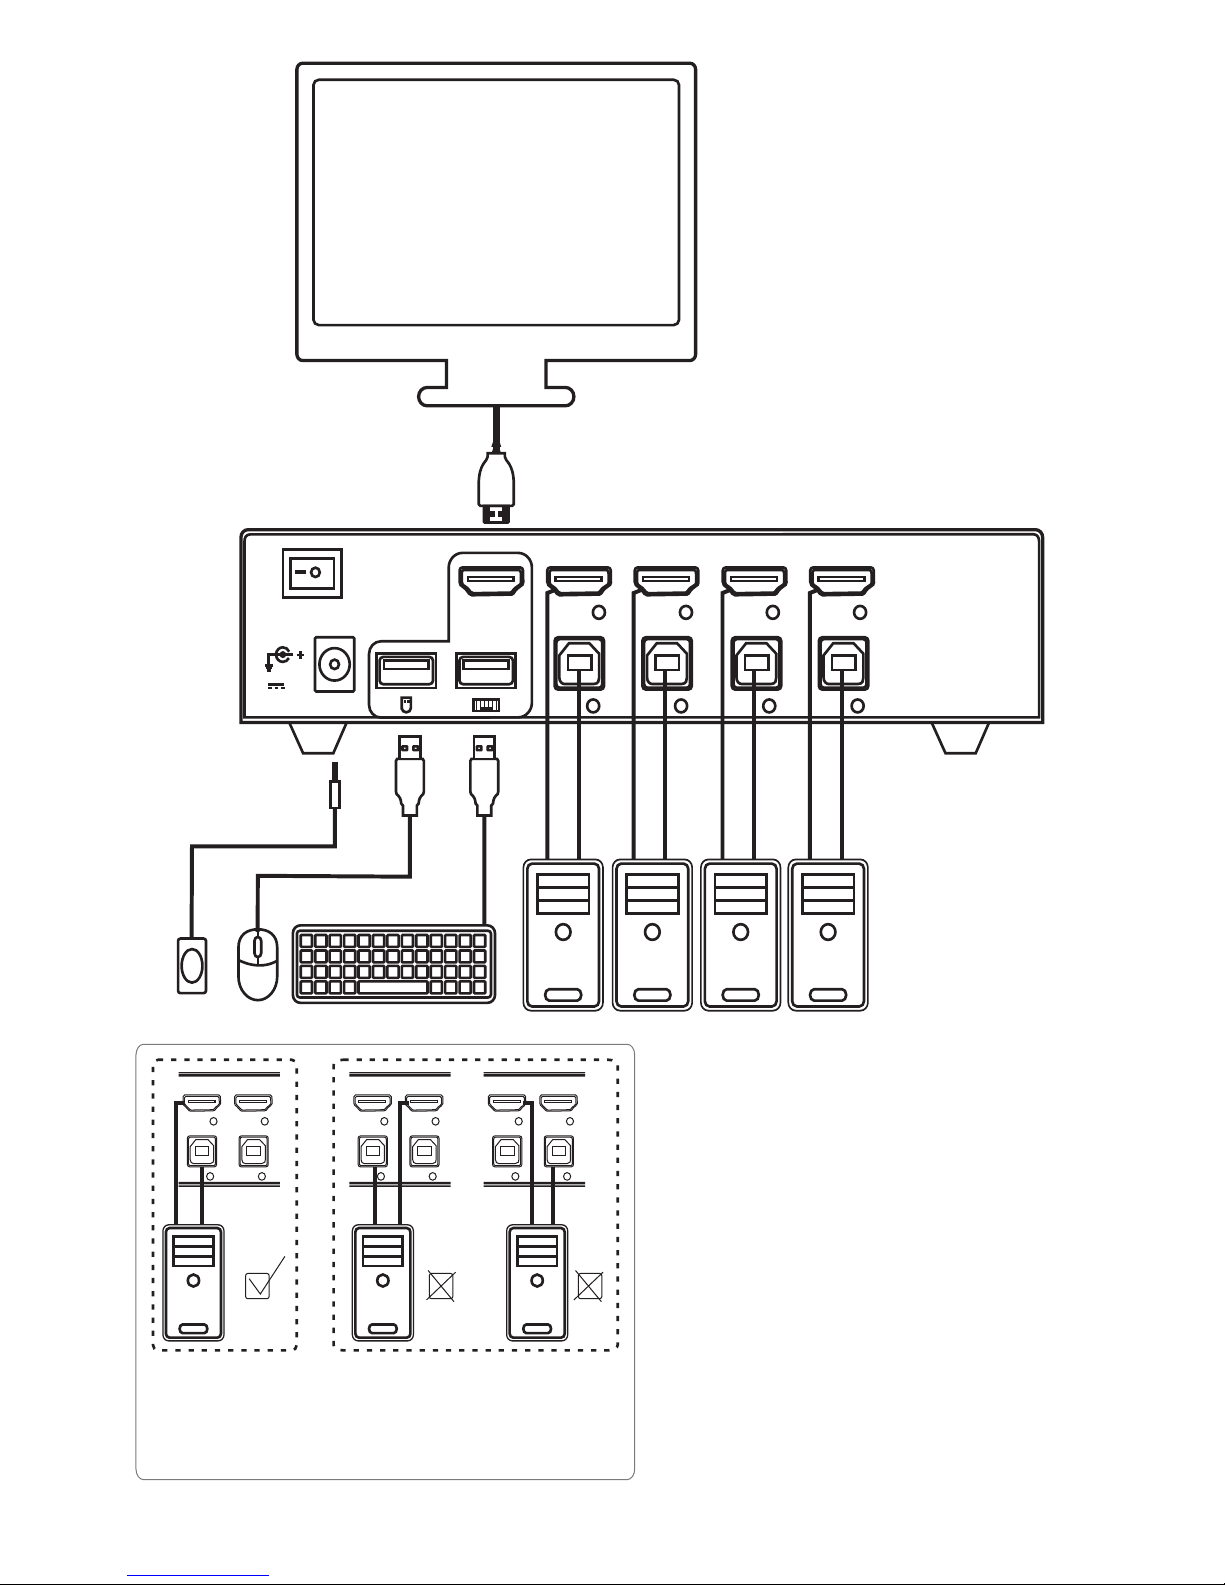
Connection Diagram
4
9138H
9116H
Installation Precautions
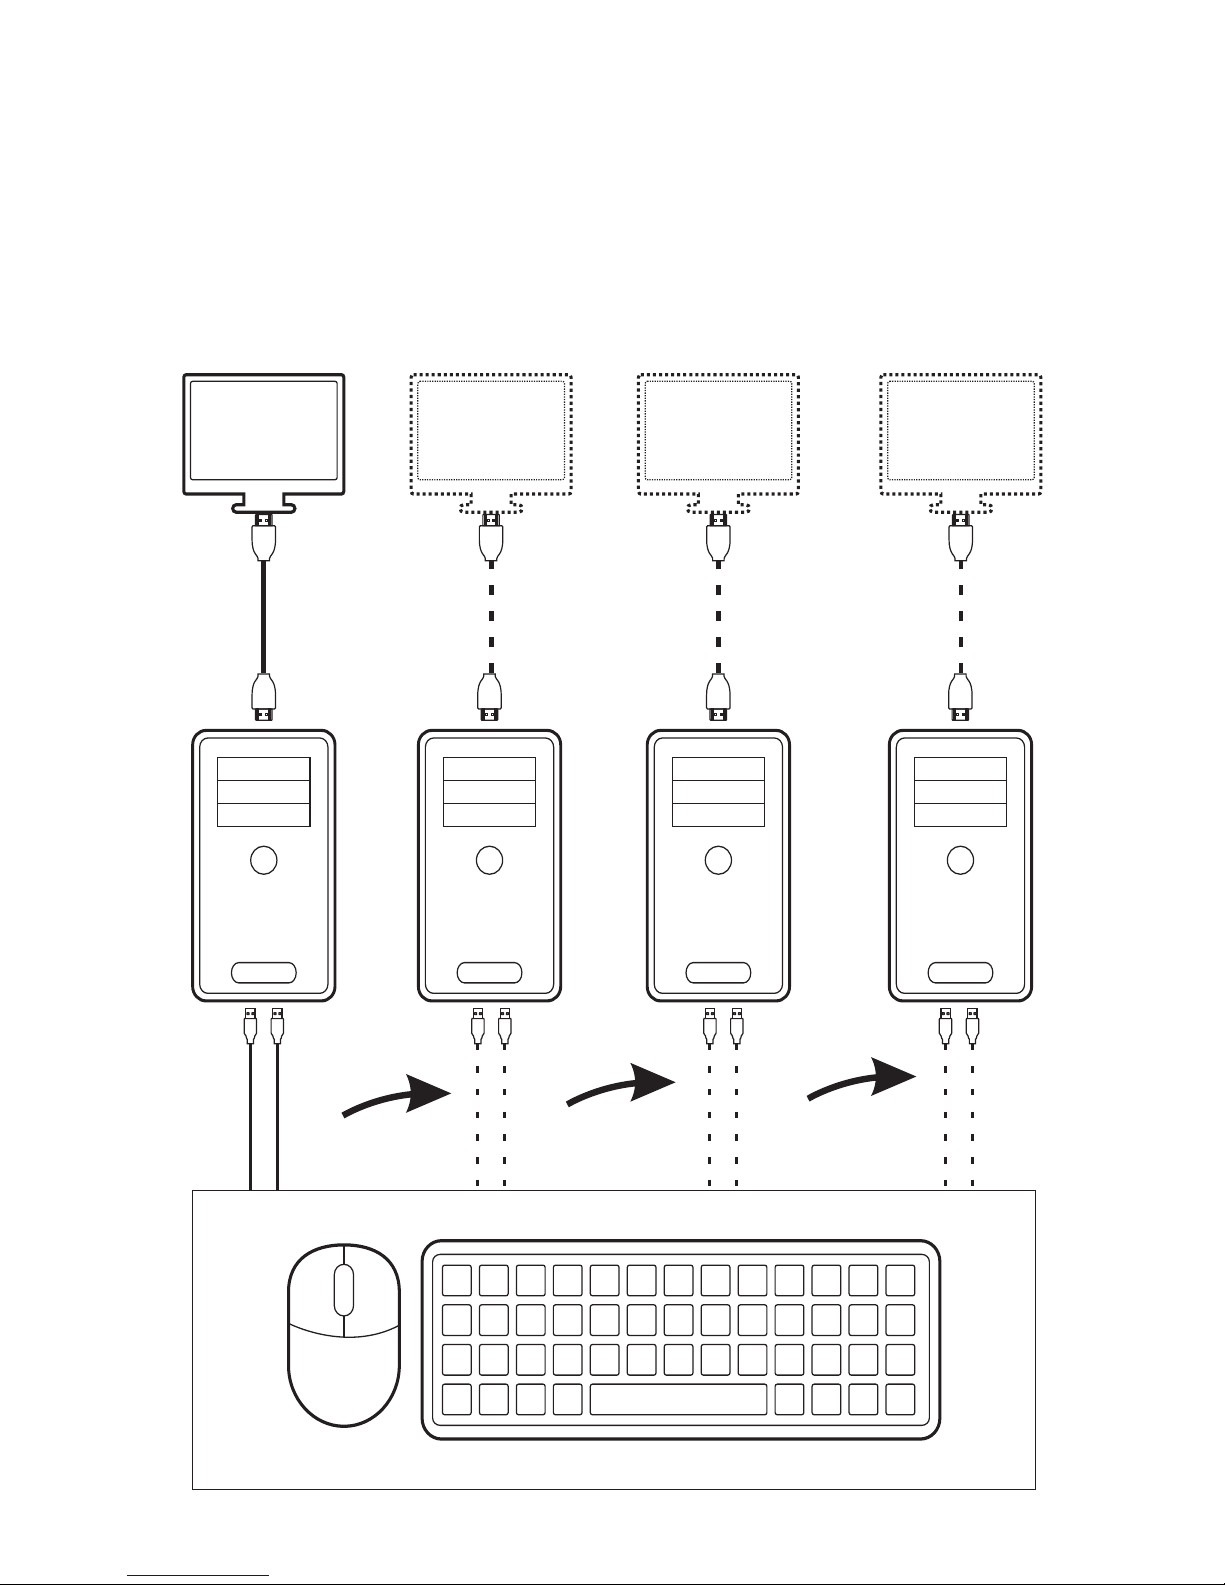
Before connecting the switch, please connect the mouse and
keyboard used to switch to each hosts that you want to connect
with the switch first, so that to ensure that the mouse and
keyboard could work normally on each computers. (Take 4 port
switch as an example)
PC 1 PC 2 PC 3 PC 4
5
HDMI OUT
ON OFF
DC5V
HDMI 4 HDMI 3 HDMI 2 HDMI 1
USB 4 USB 3 USB 2 USB 1
PC4 PC3 PC2 PC1
4 3 2 1
Pc1
HD M I 4 HDMI 3
US B 4 US B 3
Pc1 Pc1
Figure 1: A set of switch interfaces should
correspondingly connect to one host
output port.
Please according to the connection
diagram to connect all the equipments.
Then connect with the power and power
on the switch.
Please make sure that the interfaces are
all correctly connected. (Refer to figure 1)
Note
Recommended mouse and keyboard:
Conventional three-button mouse and
conventional keyboard.
Not recommended mouse and
keyboard: Gaming mouse and
keyboard, vertical mouse and
mechanical keyboard.
HD M I 4 HDMI 3
US B 4 US B 3
HD M I 4 HDMI 3
US B 4 US B 3
6

7
Hot-key Setting
The default hot-key is key. When the right 【Ctrl】
conflicts with other function keys, the hot-key can be reset to
【Num lock】 key, 【Scroll Lock】 key or left 【Ctrl】 key.
For example: Double-click right 【Ctrl】 key + 【Num Lock】 +
【Enter】 , then the hot-key is reset to 【Num Lock】 key; Double-
click right 【Ctrl】 key + Left 【Ctrl】+【Enter】, then the hot-key is
reset to left 【Ctrl】 key. If you want to reset the hot-key to right
【Ctrl】 key when the hot-key is set to left 【Ctrl】 key, you can
double-click left 【Ctrl】+ right 【Ctrl】+ 【Enter】, then the hot-key
will be reset to right 【Ctrl】 key. More details can be referred to
the following form.
right 【Ctrl】
Double-click right【Ctrl】+【Num lock】+【Enter】 Hot-key is reset to 【Num lock】 key
Double-click right 【Ctrl】+ left 【Ctrl】+【Enter】 Hot-key is reset to left 【Ctrl】 key
Double-click right 【Ctrl】+【Scroll Lock】+【Enter】 Hot-key is reset to 【Scroll Lock】 key
If you want to reset the hot-key to right 【Ctrl】 key when the hot-key is set
to left 【Ctrl】 key,please double-click left 【Ctrl】+ right 【Ctrl】+【Enter】
As shown in the figures:
Double-click right 【Ctrl】+【Num lock】+【Enter】, hot-key is reset to 【Num lock】 key.
Double-click right 【Ctrl】+ left 【Ctrl】+【Enter】, hot-key is reset to 【Ctrl】 key.

8
All hot-key combinations and their functions are shown as the
following form: (The default hot-key is key.)right 【 Ctrl 】
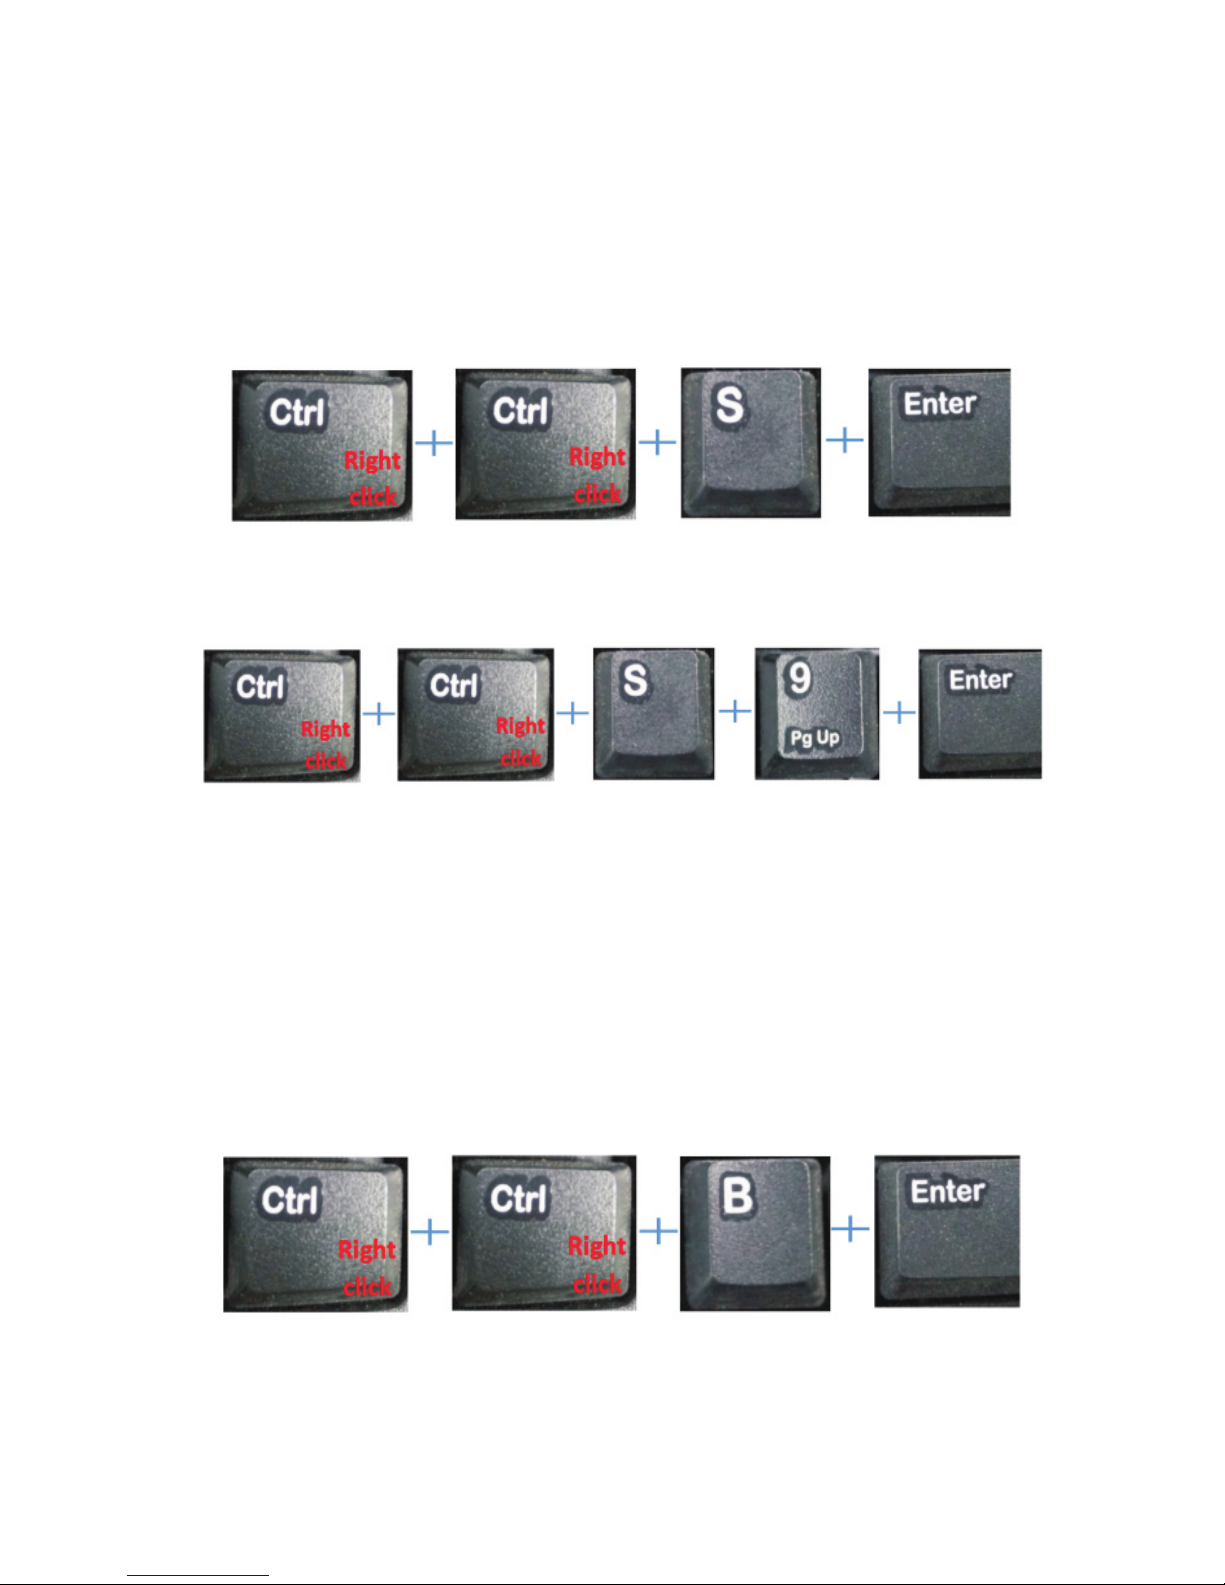
Right 【Ctrl】+ 【Ctrl】
+ number +【Enter】
Right 【Ctrl】+ Right 【Ctrl】
+【S】+【Enter】
Right 【Ctrl】+ Right 【Ctrl】
+【S】+ Number+【Enter】
Right 【Ctrl】+ Right 【Ctrl】
+【B】+【Enter】
Right 【Ctrl】+ Right 【Ctrl】
+【T】+【Enter】
Right 【Ctrl】+ Right 【Ctrl】
+【R】+【Enter】
Right
Port Switch: The audio, video,
keyboard and mouse will be switched
to the PC of the corresponding port
number (the number you press) which
is as the same as the lighted port
number of the switch panel.
Automatic Scan: Enable/stop the
automatic scan function, which also can
be realized by press the [Scan] button on
the switch panel.
Setting the interval time of auto scan:
the time can be set from 8 to 999
seconds (The default time is 8 seconds)
Buzzer: Enable/stop buzzer (The default
setting is enable state).The switch will
make a “Di” sound when the panel or hot-
key operation succeed.
Auto Detection for Active Port:
Enable/stop the detection of the active
port (The default setting is inactive
state, please must plug USB-B cables
when using this function.)
Auto detection means: 1, The switch
will auto detect whether the connected
computers are active or inactive and
skip the inactive port. When adding a
new computer to connect, the switch
will also automatically switch to the
new connected port. 2, The switch will
only detect the active computer when
the auto detection function is on.
Reset KVM System: To solve the
malfunction of the keyboard during the
using, which is like the reset function of
the switch panel. (Note: The setting of
the hot-key and state will not be reset. )

Switch Method
9
Note:
1, The keyboard and mouse must be plugged into the ports of
the KVM switch that with the keyboard and mouse logo. When
you use wireless keyboard and mouse, the bluetooth unified
receiver must be plugged into the port with keyboard logo.
2, During the automatic scanning, the automatic scan function
will be stopped when you press any button of of the switch panel
or press any hot-key combination.
3, The Sea Wit KVM switch does not support dormancy
awakening function. If the computes have gone to sleep, please
press the power button of the computers to wake up the
computers. It is recommended for user to turn off the sleep
setting of the connected computers.
Note:
The default hot-key is right [Ctrl] key, the following will take the
right [Ctrl] key as examples to illustrate.
1, Switch Panel Switch: Switching by pressing the panel switch
button to the corresponding connected device, the numbers of
switch button are corresponding to the numbers of connected
hosts.
2, Automatic Scan: A, Pressing the “Scan” button on the switch
panel; B, Pressing right [Ctrl] + right [Ctrl] +S + [Enter] keys of
the connected keyboard.
3, Hot-key Switch: Right [Ctrl] + Right [Ctrl] + Number (1 to 8/16) + [Enter]
The states of different color LED light shown:
The yellow light lights up means the connected host of the port is
currently displayed on the monitor (HDMI)

10
The green light lights up means the USB-B cables is working fine.
Scan button lights up means the automatically scan function is on
Power button lights up means the power is on.
1, Panel Switch:
Switching by pressing the panel switch
button to the corresponding connected device, the numbers of
switch button are corresponding to the numbers of connected hosts.
E.g.:Pressing button 1 on the panel, and the monitor will display
the PC connected to the port 1.
A, Manual Panel Switch:
While pressing button 5, the monitor will display the PC
connected to the port 5.
By that analogy, you can press the button and the monitor will
display the PC connected to the corresponding port.
B Automatic Scan by Pressing Panel Button:Pressing the [SCAN]
button on the switch panel, then the switch will enable
automatic cycle scan, pressing the [Scan] button again then can
stop automatic cycle scan.

11
2, Keyboard Switch and Operation:
Double-click right [Ctrl] key---Press number key (1 to 16)---Press
[Enter] key
Right [Ctrl] + Right [Ctrl] + Number + [Enter]
The KVM switch has the function of simultaneously switching
keyboard, mouse, audio and video signal.
As shown as the figures: 1
A. Manual Keyboard Switch:
12
B. Automatic Keyboard Switch:
C.The buzzer will sound during the switching:
D. Auto Detection for Active Port:
Press Right <Ctrl> + Right <Ctrl> + <S> + <Enter> enable the
automatic scan function. (The default interval time is 8 seconds)
Note: Press Right <Ctrl> + Right <Ctrl> + <S> + Time + <Enter> to
set the interval time of the automatic scan, the interval time can be
set from 8 to 999 seconds.
For example: The interval time of automatic scan function is 9
seconds, as shown as the figures.
Right <Ctrl> + Right <Ctrl> + <B> + <Enter>(The default setting is on)
Then press: Right <Ctrl> + Right <Ctrl> + <B> + <Enter> to turn off
the buzzer.
The default setting of the buzzer is “On”, the switch will make a
“Di” sound when the panel or hot-key operation succeed.
As shown as the figures:
( Please must plug the USB-B cables when using this function)
Right <Ctrl> + Right <Ctrl> + <T> + <Enter>

Specification
13
Auto detection function: The KVM switch can automatic
sequential scan all of the active connected devices. The default
setting of auto detection function is off.
Right <Ctrl> + Right <Ctrl> + <R> + <Enter>
Reset KVM System: To solve the malfunction of the keyboard
during the using, which is like the reset function of the switch
panel. (Note: The setting of the hot-key and state will not be
reset.
E. Reset by Keyboard:
Number of Connected Computer
Switch Method
Power / Wattage
Compatible System
Hot-plug
Auto Scan / Memory
HMDI
EDID
Resolution
Interval Time of Auto Scan
Operation Temperature
Storage Temperature
Humidity
Product Shell
Size(Length × Width × Height)
8/16
Switch Panel Switch/ Hot-key Switch
1×DC5V /3.2W
Support
Support
HDMI1.4a/HDCP
Support
1080p(HDTV)/1920×1200(DVI)
8 to 999 secs
0-50℃
-20-60℃
0-80%RH
Metal
440×150×42MM
Windows 10/7/2000/XP/Vista/Linux/Mac

Frequently Asked Questions
Question 1:Why there is no output?
1, Please make sure that whether the HDMI cables are firmly
connected to the ports of the switch and display monitor.
2, Please try to replace new HDMI cables.
3, Restart all devices.
4, Please make sure that the HDMI input cables do not exceed 3
meters and the HDMI output cables do not exceed 15 meters.
Question 2:Does the switch support wireless mouse and
keyboard?
Yes, the switch support wireless mouse and keyboard. And it is
recommended that hook up the USB receiver to each connected
hosts once to ensure that the wireless mouse and keyboard could
work normally before connect the switch.
Question 3:Can connect the product of VGA port with
9138H/9116H?
Yes, but you have to convert the VGA port to the HDMI port first,
what you need is a VGA to HDMI converter.
Question 4: What can I do if the mouse and keyboard cannot work
after connecting with 9138H/9116H?
1, If the mouse and keyboard are new one, please respectively
connect the mouse and keyboard to each computer once in order to
ensure that the driver of them are installed in the each computer.
2, The cables must be correctly connected to each host, A set of
switch interfaces should correspondingly connect to one host
output ports.
3, The switch should be connected with our 5V power adapter.
4, There is an on-off key in the back of the switch, please turn on the
switch when using.
5, The switch cannot support some kinds of mouse and keyboard
such as gaming mouse, please use the mouse sent with the switch
to test.
6, If everything is correct, please turn off the power, and then turn it
on again to restart the switch and connected computers.
14

Dear Customer, Sea Wit provides1-month package replacement,
1 year after-sales and lifetime technical team support for all
products, if you encounter any problems in installation process,
please feel free to contact us via Amazon email or our support email
( szjkyhmd@sina.com), we will be reply you within 24 hours.
We are committed to providing our customer with the best
shopping experience and service. All products have to pass strict
inspection before they leave the factory, if there is any damage
caused during the transportation, please feel free to contact us, we
will re-send you a new product for free, and you don’t have to return
the old one. Thank you again for your purchase and support!
Contact us
Facebook:szjkyhmd@sina.com
Twitter:leemei20
Skype:szjkyhmd@sina.com
Line: szjkyhmd@sina.com
Instagram:lmei32092
QQ:3401216094
WeChat:18923850307
YouTube:lmei32092@gmail.com
Our service Email:szjkyhmd@sina.com
Scanning the following QR code for more detail .
English
15
Contact Information
This manual suits for next models
1
Table of contents
Other Sea Wit Switch manuals

Popular Switch manuals by other brands


Philips
Philips Multimedia Base 6G3B12 Specifications

IPOX
IPOX UTP76 Series Quick setup wizard

Intellinet
Intellinet 560641 instructions

Cisco
Cisco Aironet 1000 Series Hardware installation guide

Moxa Technologies
Moxa Technologies EtherDevice EDS-4009 Series Quick installation guide

Leviton
Leviton Decora OSSMT-TM installation instructions