Seac GURU HP User manual

User Manual Ver. 1.0 WARNING: requires a Seac GURU Dive Computer
Made in Italy
GURU HP Transmitter

2English

IMPORTANT WARNINGS 4
GENERAL TRANSMITTER WARNINGS 4
WARNINGS (Transmitter) 5
Care and maintenance 6
Recharging the battery 7
PREPARING THE TRANSMITTER FOR THE DIVE 8
Mounting the Transmitter on the rst stage 8
Turning on the Transmitter and checking battery status 9
Connecting the Transmitter to the GURU 10
Changing the Transmitter communications channel 11
TRANSMITTER DURING THE DIVE 12
BAR / Psi 12
RBT and TANK RESERVE 13
RBT during a no-decompression dive 13
RBT in a DECO dive 14
The color code during the dive: 15
The Transmitter after the dive 16
CERTIFICATE OF GUARANTEE 17
3English

4English
Congratulations on your purchase of this SEAC SCUBA diving
device.
This SEAC computer Transmitter is a technologically advanced
instrument that is the result of the most extensive research
in the sector.
m WARNING!
This is NOT THE GURU COMPUTER MANUAL!
The GURU Dive Computer manual is available on the
website: www.seacsub.com.
m WARNING!
Sufficient training is necessary to adequately understand
the terminology used in this manual and certain functions
of the device.
m WARNING!
Periodically check the www.seacsub.com website for any
updates to this manual.
The version of the manual (e.g. 1.0) is shown on the cover.
m WARNING!
THE TRANSMITTER IS SOLD SEPARATELY FROM THE
GURU DIVE COMPUTER.
IMPORTANT WARNINGS
GENERAL TRANSMITTER WARNINGS
m WARNING!
You must read this user manual in full before using the
SEAC device. Using the computer or one of its accessories
incorrectly will void the warranty and can cause permanent
damage to the computer and/or its accessories.
m WARNING!
The dive computer IS NOT A SUBSTITUTE for diver training
and should only be used by divers who have been properly
trained.
m WARNING!
Use of the wireless Transmitter IS NOT A REPLACEMENT
for use of a submersible pressure gauge. In any case,
you must always have a submersible pressure gauge. The
wireless Transmitter might be subject to malfunction or
interference with other probes. Even if the Transmitter
is operating perfectly, you must still consult the pressure
gauge frequently during the dive.
m WARNING!
The SEAC computer and Transmitter are devices that are
auxiliary to the dive. Therefore, divers must always carry an
adequate table, a dive watch, and a pressure gauge so that
they can perform their decompression if the unit should
malfunction.
m WARNING!
SCUBA diving entails risks related to decompression
sickness, oxygen toxicity, and other dive-related risks. Even
a careful reading of this manual and use of the device will
not rule out potential dangers. Anyone unfamiliar with these
risks or who does not knowingly accept them must not dive
with a SEAC computer.

5English
m WARNING!
This is NOT THE MANUAL FOR THE SEAC COMPUTER. This
is the manual for the Transmitter (considered an accessory
of the computer). You must read the warnings provided
in the manual for your SEAC computer before diving. The
SEAC computer manual is available at www.seacsub.com.
WARNINGS (Transmitter)
m WARNING!
DO NOT EXPOSE THE TRANSMITTER TO PRESSURES
GREATER THAN 300 BAR (4351 Psi)
Maximum detectable pressure: 250 BAR (3625 Psi)
Maximum sustainable pressure: 300 BAR (4351 Psi)
The computer and Transmitter are NOT intended for
PROFESSIONAL use.
The computer and Transmitter are intended strictly for use in
sports (recreational or technical).
We advise against using them in professional or commercial
dives, except as an additional tool to support the diver.
• Check the battery status before every dive, although if the
Transmitter turns off during the dive it does not expose
the operator to any risk. (WARNING: Remember that a
pressure gauge is always mandatory on every tank you
use!). We do not recommend diving with the Transmitter
when it has less than 30% charge (red light).
• Before diving, always check that the Transmitter is intact and
shows no signs of cracks or breakage, that the seals on the
screws are intact, and that it has not been tampered with in
any way. If this check fails, do NOT use the Transmitter.
• Do not expose the Transmitter to blows or drops. Never lift
the tank by grasping the Transmitter, for any reason.
m WARNING!
DO NOT USE the Transmitter unless it is in perfect
condition! Using a Transmitter that is unsuitable for use for
any reason - falls, tampering, etc. - puts the user at risk. It
is the user's responsibility to ensure that the Transmitter
is in perfect condition before connecting it to the first
stage or using it in any way. Anyone unfamiliar with these
risks or who does not knowingly accept them must not
use the Seac Transmitter. If you have any questions about
connecting the Seac Transmitter to the first stage or about
the preventive safety checks that must be performed, ask
your instructor.

6English
Care and maintenance
• Keep your Transmitter clean and dry. Do not expose it to
chemical agents, including alcohol.
Use only fresh water to clean your Transmitter,
removing all saline deposits.
m WARNING!
Only wash the Transmitter when it is connected to the
first stage. Do NOT wash the Transmitter if the hole that
connects with the first stage is not properly protected from
the water.
When disassembled from the first stage, affix the
protective cap on the Transmitter threads. To dry the
Transmitter, leave it naturally in the shade. Do not use jets
of cold or hot air.
• Do not expose the Transmitter directly to the sun or sources
of heat higher than 50°C. Store it in a cool (5°C-25°C), dry
place, making sure to put the protective cap on the threads.
• Do not attempt to open, modify, or repair the Transmitter
yourself. Always contact SEAC.
• The warranty will be forfeited if the computer or the
Transmitter are opened by an unauthorized service center.
• Do not place the computer or the Transmitter in a hyperbaric
chamber.
• The GURU computer and the Transmitter are built to
withstand use in sea water, but after the dive they must be
rinsed thoroughly in fresh water and not exposed directly to
sunlight or sources of heat to dry them.
• Check that there are no traces of humidity on the inside of
the device.
m WARNING!
Do not attempt to open the device for any reason.
If you have problems, contact an authorized SEAC center,
or contact SEAC directly. Breaking the seals on the device
immediately and irreversibly voids all warranties on the
product.

7English
Recharging the battery
The SEAC Transmitter has a Li-Ion rechargeable battery with
no memory effect. The battery time data provided can vary +/-
15% depending on the ambient temperature.
m WARNING!
Always fully charge the battery before using the computer
the first time.
You can recharge the Transmitter by connecting it to a USB
wall charger (not included) with the USB cable provided with
the GURU. (The USB cable is not included in the Transmitter
package.)
122
We recommend using a USB wall plug (like those for
smartphones/tablets) for charging the Transmitter.
If you decided to use a USB port on a computer, make sure
that the computer does not suspend power when it switches
to stand-by mode. Charging the Transmitter from a computer
is not recommended because the device might not charge fully.
The Transmitter has approximately 100 hours of diving battery
time (this can vary +/-15% depending on temperature) or 2
years in standby (if the battery was fully charged before it was
stored).
Even if the SEAC Transmitter's next-generation battery has
no memory effect, we still recommend charging the battery
completely. Average charging time is 3-5 hours depending on
the residual charge level.
When charging, the SEAC transmitter activates the BLUE LED.
The blue light switches off when charging is complete. Once
the battery has charged, even if the device is left connected to
electrical power, the Transmitter automatically interrupts the
ow of power. If you leave the transmitter charging for longer
than necessary, and leave it long enough that the Transmitter
battery percentage drops below 95%, charging (and the blue
light) will reactivate automatically to charge the battery back
to 100%.
Nevertheless, we do not recommend leaving the Transmitter
on the charger for more than 8 consecutive hours.
m WARNING!
Don't leave the Transmitter with a completely dead battery
for long periods (e.g. 1-2 months); this can damage the
battery. The Transmitter memory records an alarm if it is
left dead for long periods. This eventuality is not covered
by the warranty. If you need to store the Transmitter for
an extended period, first charge the battery fully and
remember to recharge it from time to time.

8English
PREPARING THE TRANSMITTER FOR THE DIVE
Mounting the Transmitter on the rst stage
The Transmitter must be mounted on a High Pressure (HP) port on the regulator rst stage.
High pressure ports are usually marked "HP". Check the manual for your regulator to identify the correct port.
Mount the Transmitter using the same method, care, and caution you would employ when mounting a high pressure hose
connected to the pressure gauge. Assemble the Transmitter so that it does not interfere with the regulator hoses.
Always check that the sealing O-ring in the lower (threaded) part of the Transmitter is present, intact, clean, and properly
lubricated. Immediately replace the O-ring whenever it is damaged (HP O-ring: 8.73 x 1.78 NBR 70).
m WARNING!
If you do not know how to mount a device on a high pressure (HP) port, contact your instructor!
If the Transmitter is damaged, do NOT mount it on the regulator.
This image is only an example. The correct
connection position on your rst stage may
differ.
9English
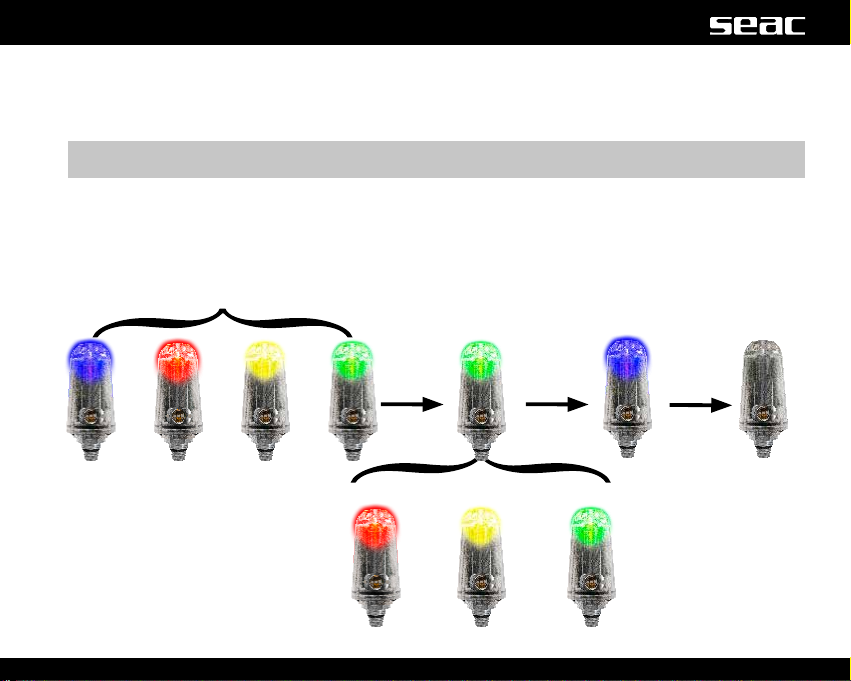
LED Check
Battery <30% Battery <50% Battery >50%
Burn-time
(3 sec.) End of Start-up
See the “Color Code
During the Dive”
Chapter
Turning on the Transmitter and checking battery status
The Transmitter will turn on automatically as soon as it detects tank pressure.
To start the Transmitter, connect it to a tank and open the tank valve. We always recommend that you open the tank gradually. If
you notice any gas leaking from any device mounted to the tank, close the tank.
m WARNING!
If you do not know how to open a tank safely, contact your instructor!
When starting up, the Transmitter performs an LED check, switching the LEDs on in sequence (Blue, Red, Yellow, Green).
Afterward, it shows the battery status by switching on one of the three LEDs for 3 seconds, depending on the battery time left (see
the image below). Finally, it conrms conclusion of the start-up phase with a blue ash.
Once the start-up phase is complete, the Transmitter begins to display the tank pressure using the Color Code system.

TX ID:
TANK RES:
B
CD
OFF
30
EXIT
RESET
0.0 0:00
21 --- ---
OC
MIX RBT BAR
10 English
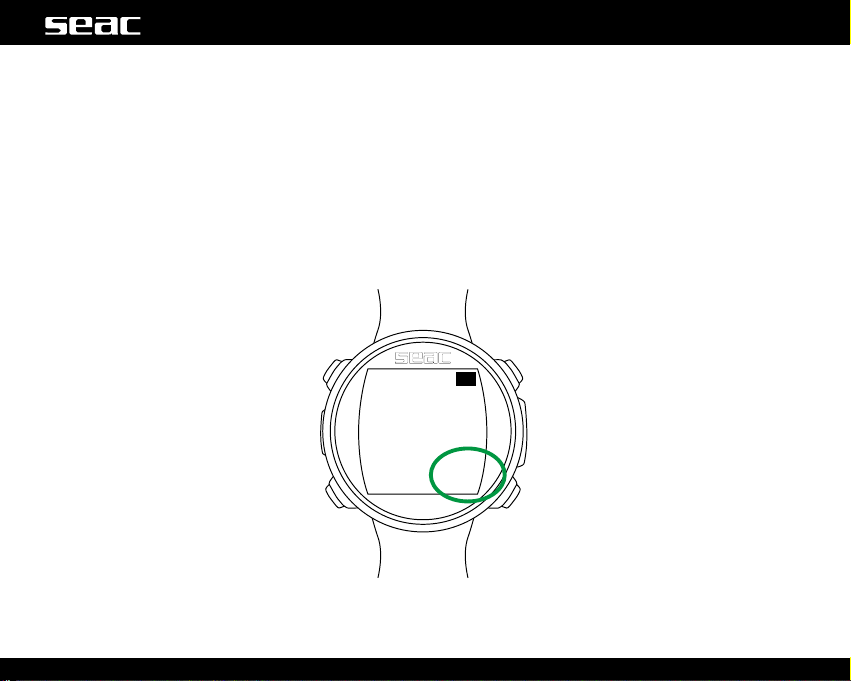
Connecting the Transmitter to the GURU
Once the Transmitter is turned on, access the TRANSMIT menu on the
GURU by pressing the button on the bottom left of the watch screen and
scrolling through the menu items.
To pair with the Transmitter for the rst time, position the GURU
approximately 20-30 cm from the Transmitter.
m WARNING!
Placing the GURU too close to the Transmitter could prevent them from
pairing correctly.
DISPLAY
SYS SET
PC MODE
TRANSMIT
20-30cm
Press the B button to begin searching for the Transmitter (SRC). When
pairing is complete, the Transmitter's TX ID will be displayed on the screen.
(Each Transmitter has 31 TX ID communications channels. The TX ID is
assigned to the Transmitter randomly. You can change the Transmitter TX ID
if there is interference with another Transmitter; see the dedicated section
in this manual.)
To check that the GURU has paired correctly with the Transmitter, activate
dive mode. Within 30 seconds, the tank pressure will be displayed in the
lower right part of the screen (BAR). (The RBT value will only be displayed
during the dive; see the dedicated section in this manual.)
Once paired, the GURU and Transmitter will connect automatically as soon
as the GURU activates OC (Open Circuit) dive mode.
m WARNING!
Using the Transmitter reduces the GURU's battery time to
approximately 20 hours of dive time. Set the TX ID to "OFF" if you are
not using the Transmitter.
SRC
Decrease
value
Next value

11English
Changing the Transmitter communications channel
If interference with other Transmitters occurs, you will need to change the communications channel (TX ID).
Each Transmitter has 31 channels. The channel is assigned randomly, and the channel assigned is saved to memory. It is not
changed until the Transmitter's battery dies or you perform the following procedure to change the TX ID.
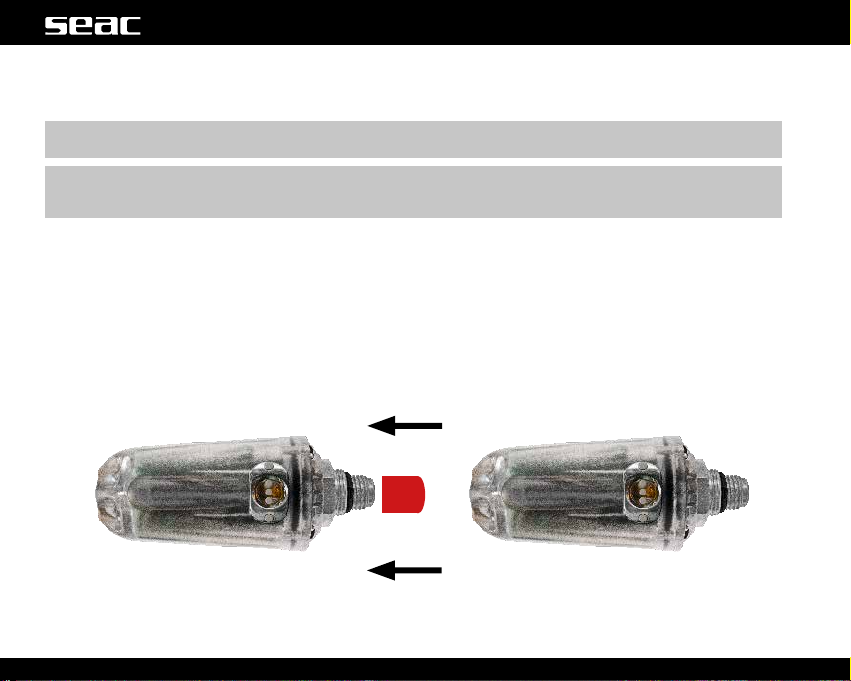
PROCEDURE:
Connect the Transmitter
(off) to a rst stage. Open the tank. Close the tank. Press the second stage purge button
and completely drain all pressure from
the Transmitter before it completes
the start-up phase. Wait 30 seconds
before turning the Transmitter on
again.
After you change the TX ID, you will need to pair the devices again, after selecting the RESET command on the GURU.
Select RESET (the TX ID is set automatically to OFF). Then pair the devices again as described in the correct chapter in this manual.
0.0 0:00
21 --- ---
OC
MIX RBT BAR
12 English
TRANSMITTER DURING THE DIVE
BAR / Psi
The lower right part of the GURU screen will display the BAR value (PSI if Imperial units of measure are set). The BAR value
indicates the pressure remaining in the tank.
The BAR value will be displayed about 30 seconds after the Transmitter is switched on. The BAR value is updated every 5 seconds.
If data transmission is interrupted, or is unstable for more than 1 minute, the BAR value will be hidden (“---”). The BAR value will be
restored as soon as communications are stable again for at least 1 minute.

13English
RBT and TANK RESERVE
The RBT value (Remaining Bottom Time) is shown in the lower part of the GURU screen.
The RBT value is calculated based on the current breathing rate. The GURU may need from 2-5 minutes of diving in order to acquire
sufcient data to calculate the RBT. Until a reliable RBT value is available, the RBT value is not displayed (“---”). The RBT value differs
from person to person, even at the same depth and tank pressure.
RBT during a no-decompression dive
If the dive remains within the no-decompression limits, the RBT value indicates the anticipated time remaining - given the current
depth and breathing rate - before the tank reaches reserve pressure (TANK RES, which can be set from the TRANSMITTER menu).
E.g. (If TANK RES. = 30 in the TRANSMITTER menu)
In a no-decompression dive, the RBT value will be “0” when there is 30 BAR of pressure left in the tank.
The TANK RES. (reserve) value can be changed from GURU's TRANSMITTER menu. The minimum value of TANK RES. is 10 BAR
and the maximum is 50 BAR.
m WARNING!
The RBT is a purely mathematic-statistical value based on the information acquired by the Transmitter. It cannot in any way
anticipate behaviors that increase gas consumption such as overbreathing or similar.
It must be used solely and exclusively as a generic statistical indication. It cannot in any way replace proper dive planning or an
awareness of your own physical and mental faculties.
Do not use the RBT value to extend the dive beyond the value established during planning. If you have any questions about how
to correctly program a dive, contact your instructor.

14 English
RBT in a DECO dive
If anticipated mandatory deco stops are expected (warning: Safety Stops and Deep Stops are not considered mandatory
safety stops), the RBT value indicates the remaining bottom time expected, given the current depth and breathing rate, so that
once the mandatory deco stops are complete, the tank pressure will reach the reserve pressure (TANK RES, which can be set
from the TRANSMITTER menu).
E.g. (If TANK RES. = 30 in the TRANSMITTER menu and dive with DECO stops)
In a DECO dive, the RBT value will be “0” when there is sufcient pressure left in the tank so that, if the ascent begins immediately
and the correct speed and mandatory deco stops are respected (the Deep Stop is not considered a mandatory stop), there will be
30 BAR of pressure remaining once the nal deco stop is complete.
The TANK RES. (reserve) can be changed from the TRANSMITTER menu. The minimum value of TANK RES. is 10 BAR and the
maximum is 50 BAR.
m WARNING!
The RBT is a purely mathematic-statistical value based on the information acquired by the Transmitter. It cannot in any way
anticipate behaviors that increase gas consumption such as overbreathing or similar.
It must be used solely and exclusively as a generic statistical indication. It cannot in any way replace proper dive planning or an
awareness of your own physical and mental faculties.
Do not use the RBT value to extend the dive beyond the value established during planning. If you have any questions about how
to correctly program a dive, contact your instructor.
15English
The color code during the dive:
The Transmitter has the special feature of being able to communicate the pressure remaining in your tank to your dive buddy or
instructor.
m WARNING!
Do not apply paints or solvents to the Transmitter. This can seriously damage the Transmitter (and invalidate the warranty).
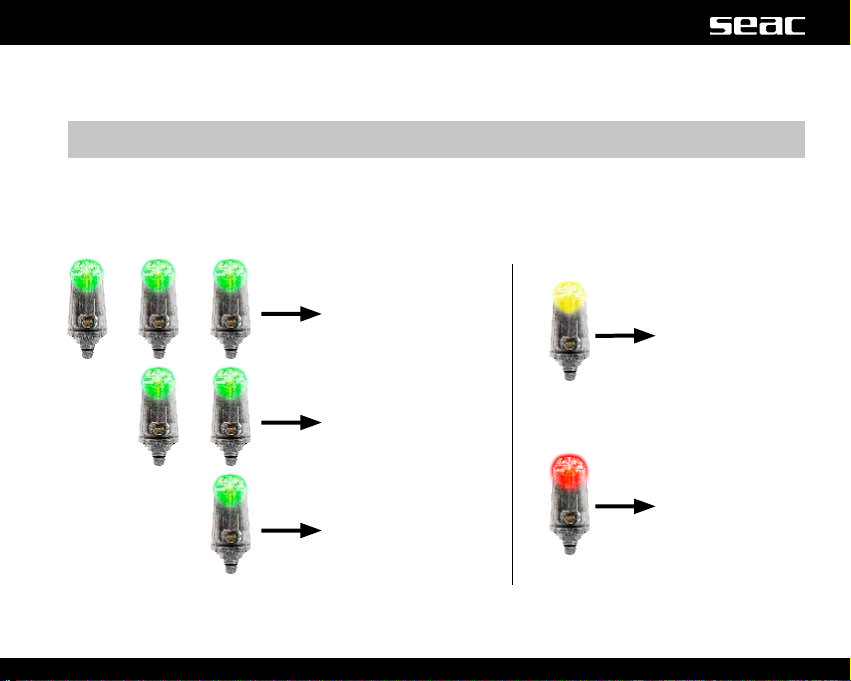
Throughout the entire dive, the Transmitter will ash Green, Yellow, or Red, depending on the pressure remaining in the tank as
follows:
3 GREEN ashes
tank pressure between
200 and 250 bar 1 YELLOW ash
tank pressure between 50
and 100 bar
1 RED ash
tank pressure between 1
and 50 bar
2 GREEN ashes
tank pressure between
150 and 200 bar
1 GREEN ash
tank pressure between
100 and 150 bar
16 English
The Transmitter after the dive
The Transmitter shuts off automatically 30 seconds after you close the tank and have drained the pressure remaining in the rst
stage.
m WARNING!
Use only fresh water to clean your Transmitter, removing all saline deposits. Surfactants and solvents must be strictly avoided.
m WARNING!
Only wash the Transmitter when it is connected to the first stage. Do NOT wash the Transmitter if the first stage connector
hole is not properly protected against the water.
When disassembled from the rst stage, put the protective cap on the Transmitter. Leave it to dry, shielded from the rays of the
sun, and do not use jets of cold or hot air.
You can leave the Transmitter mounted on the rst stage or remove it.
If you decide to leave it mounted, make sure it is not exposed to any blows. Refer to the Warnings and the "care and maintenance"
chapter of this manual.
If you decide to disassemble the Transmitter, make sure you close its threaded connection hole using the special cap. (Refer to the
manual for your regulator regarding how to protect the rst stage HP hole.)

17English
CERTIFICATE OF GUARANTEE
The warranty has a duration of 2 (two) years in accordance
with current European regulations.
To exercise the warranty, you must display a copy of your proof
of purchase upon request.
SEAC guarantees the correct operation of this product as
described in this document.
The warranty herein can be exercised according to the
conditions and limits expressly indicated below:
1. The warranty has a duration of 2 (two) years starting from
the time the product is purchased at a SEAC authorized
dealer and requires no prior or subsequent formal validation.
2. The warranty is acknowledged only to the original buyer of
the product at a SEAC authorized dealer.
The warranty is strictly individual; it is not transferable to
third parties unless previously and explicitly authorized by
SEAC.
3. The warranty covers all damage to the device caused by
malfunctions arising from factory defects. Each device is
tested in a hyperbaric chamber before it is made available
for purchase.
The warranty covers operating defects deriving from:
• Intrinsic defects caused by the use of materials considered
unsuitable.
• Clear errors in the design, manufacturing, or assembling of
the product or its components.
• Incorrect or inadequate instructions and recommendations
for use.
4. Any repairs, modications, transformations, adjustments or
tampering in general carried out on the nished product or
parts of it that are not authorized in advance by SEAC or that
are carried out by non-authorized personnel automatically
and immediately void the warranty.
Breaking the seals immediately voids the warranty.
5. The warranty entitles you to assistance and free repair in
the shortest possible time, or to a full free replacement of
the product (at the sole discretion of SEAC) or parts of it
whenever a malfunctioning defect specically described in
item 3 above is acknowledged by SEAC.
6. This warranty may also be exercised by shipping the
product believed to be defective to SEAC. The authorized
intermediary for this operation must be the SEAC dealer
where the product was purchased. If this is not practically
possible, solely upon authorization from SEAC, customers
may by authorized to send the defective product to any other
SEAC dealer or directly to SEAC itself.
In order to exercise the warranty, the product must be
accompanied by proof of purchase in the form of a copy of the
receipt or invoice (or other equivalent scal record showing the
name of the authorized SEAC dealer from which the product
was purchased as well as the date of purchase).
Whenever SEAC receives a product which:
• is not accompanied by proof of purchase having the above
mentioned characteristics;
• is in such condition as to determine the termination of the
warranty in accordance with the provisions of item 4 above;
• has defects resulting from external causes outside those
specically mentioned under item 3 above;
• has been used improperly and/or for uses other than those
for which the product was designed;
• has clearly been damaged or deteriorated through intensive
use or normal wear.
SEAC will not carry out any investigations on the product, and
will advise the sender/authorized dealer.
If the sender still wishes an inspection to be performed, the
sender will forward a request to SEAC within the subsequent
fteen working days; in this request he/she must expressly
state that he/she is willing to bear all the costs relevant to
said inspection (labor, spare parts if any, and shipping charges).

18 English
Failing this, SEAC will return the product at the expense and
care of the recipient.
The warranty always excludes defects or imperfections deriving
from:
- Improper use or excessive stress.
- Failure to follow the usage instructions.
- External agents, such as damage due to transport, blows or
falls, atmospheric agents, natural phenomena, or chemical
agents.
- Unauthorized personnel performing maintenance or repairs
or opening the device.
- Pressure testing out of the water.
- Accidents while diving.
- Use other than that intended for the product, or other than
that indicated in the instruction manual. The warranty does
not cover depletion of batteries.
Repairs or replacements made during the warranty period do
not imply any right to an extension of the warranty itself.
© 2017
Unauthorized reproduction prohibited, in whole or in part.
SEACSUB S.p.A.

19English

SEACSUB S.p.A.
Via D. Norero, 29
16040 S. Colombano Certenoli
(GE) Italy
Tel. +39 0185356301
Fax +39 0185356300
e-mail: [email protected]
www.seacsub.com
Seac USA Corp.
7925 NW 12th Street, Suite 229
Miami FL 33126
United States
Tel. +1 786 580 -3695
e-mail: [email protected]
www.seacsub.com
MADE IN ITALY • 06/17 • Artbook 13644/17
Table of contents
Languages:
Popular Transmitter manuals by other brands

Endress+Hauser
Endress+Hauser iTEMP TMT162 Brief operating instructions

Western Electric
Western Electric 6-B Instructions for use

Javad
Javad TRIUMPH-1 Configuration Example

Extron electronics
Extron electronics XTP T VGA user guide

Magnetek
Magnetek telePilot TX12M-1 Installation and user manual

Evikon
Evikon PluraSens E2658-ETO user manual


