Sealey BBQ04 User manual

INSTRUCTIONS FOR:
GAS BBQ PORTABLE
MODEL NO:BBQ04
Thank you for purchasing a Sealey product. Manufactured to a high standard this product will, if used according to these instructions
and properly maintained, give you years of trouble free performance.
1. SAFETY INSTRUCTIONS
IMPORTANT: PLEASE READ THESE INSTRUCTIONS CAREFULLY. NOTE THE SAFE OPERATIONAL REQUIREMENTS, WARNINGS & CAUTIONS.
USE THE PRODUCT CORRECTLY AND WITH CARE FOR THE PURPOSE FOR WHICH IT IS INTENDED. FAILURE TO DO SO MAY CAUSE
DAMAGE AND/OR PERSONAL INJURY AND WILL INVALIDATE THE WARRANTY. PLEASE KEEP INSTRUCTIONS SAFE FOR FUTURE USE.
1.1. GENERAL SAFETY
WARNING! The warnings, cautions and instructions in this manual cannot cover all possible conditions and situations that
may occur. It must be understood by the operator that common sense and caution are factors which cannot be built into this
product, but must be applied by the operator.
rWARNING! Hazardous fire or explosion may result if instructions are ignored.
r WARNING! Never use a flame to do the leak test and ensure no naked flames are nearby when doing the leakage test.
rWARNING! Accessable parts may be very hot. Keep young children and pets away.
r WARNING! If you smell gas: turn off the gas supply at the bottle, extinguish all naked flames, do not operate any electrical
appliances, check for leaks as detailed in this manual. If odour persists, contact your Sealey dealer.
rWARNING! Any modification to this appliance may be dangerous and is absolutely not permitted.
3 Read the instructions carefully before assembly and retain this manual for future reference.
3 Use outdoors only, stand on a level surface, remember hot fat may drip out of the drip tray
3 Handle the hot barbecue with the help of oven gloves.
3Leak test all connections after each tank refill.
3 The barbecue should be cleaned on a regular basis. Take care not to enlarge burner ports of orifice openings when cleaning the
burner or valves.
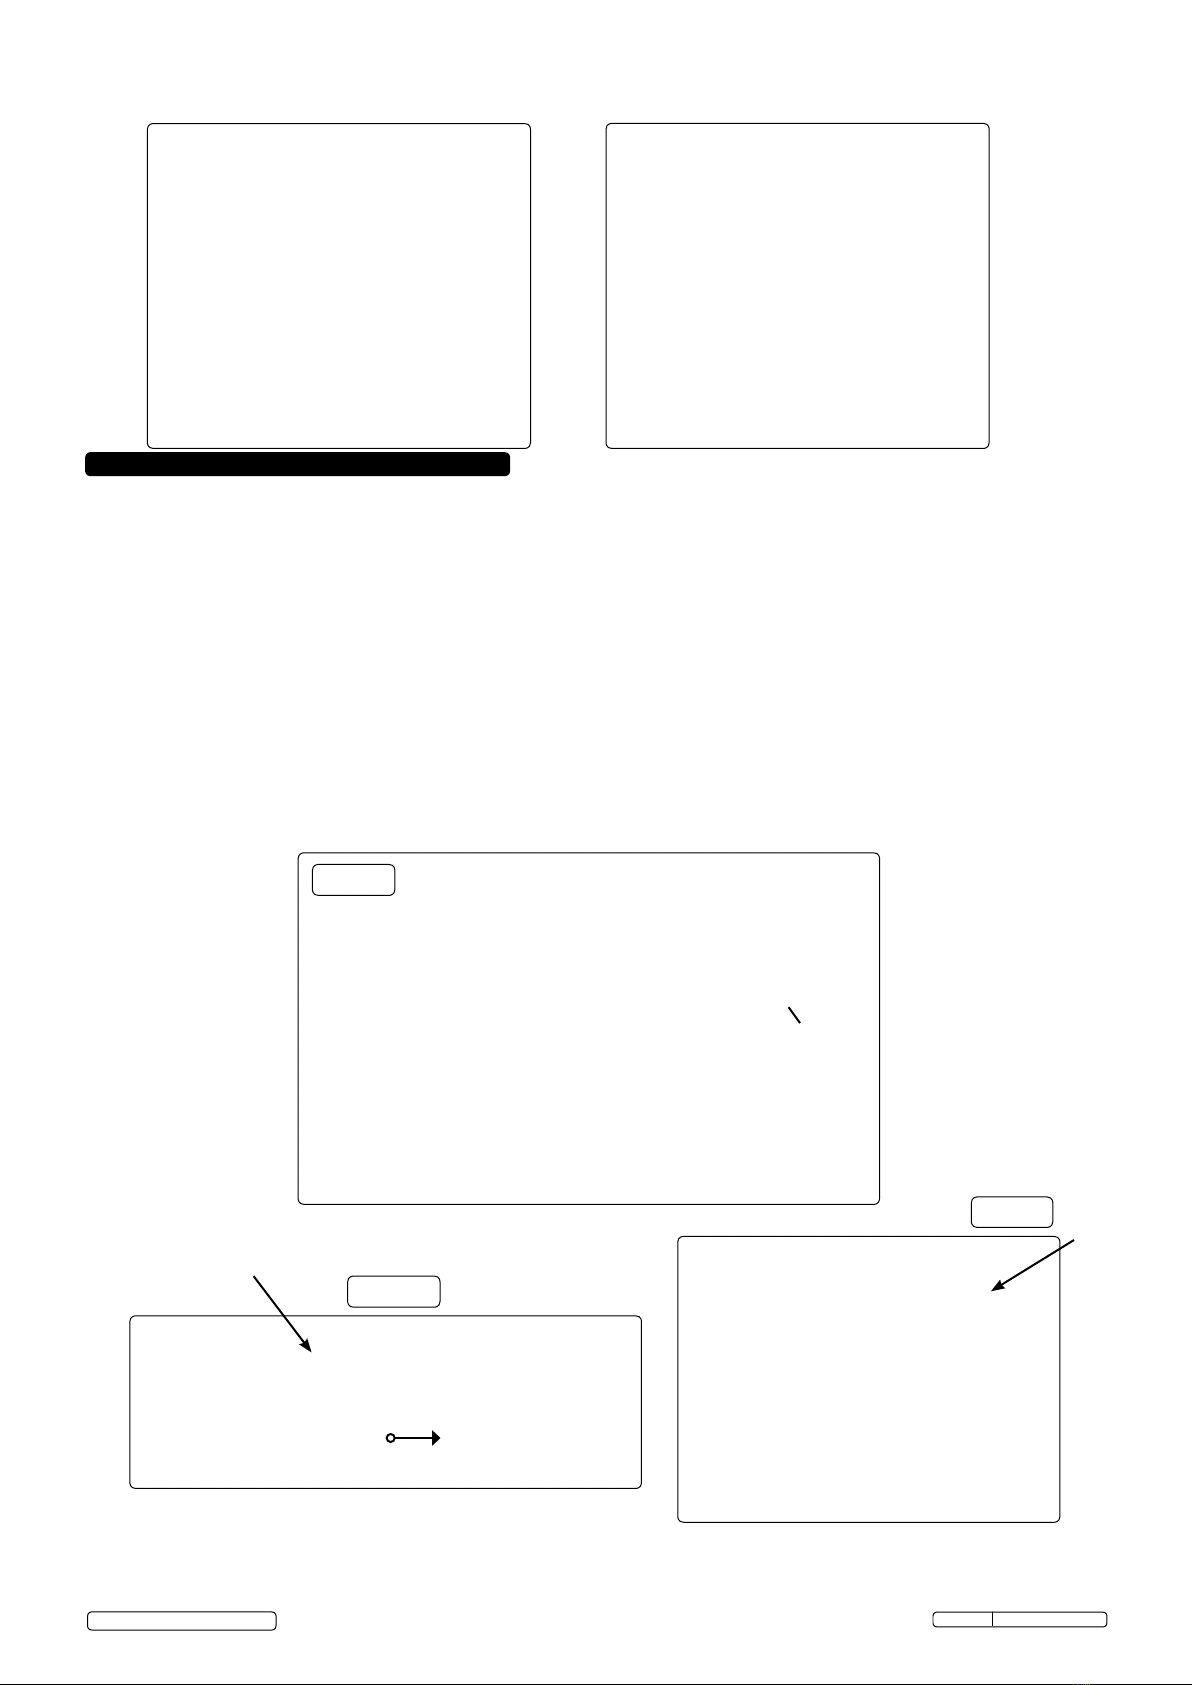
3Always do the gas leak check before you use the barbecue. Test the leakage on all the connections where gas passes by.
3Connect the regulator and hose onto the gas tank and the burner, close all the valves by turning the control knobs to the "OFF" (fully
clockwise) position.
3Put soapy water on all the connections where the gas reaches. Open the gas tank valve and regulator. If bubbles are seen, tighten the
connection if bubbles are still seen, close all valves, turn off the regulator and contact your Sealey dealer for help. Never use the
barbecue with a leak.
3The gas leak check must be done when first connecting the barbecue and every time the gas bottle is changed.
3The gas bottle can only be changed by a competent person.
3The lid must always be open when lighting the burner.
3Use oven gloves and sturdy long handled barbecue tools when cooking on the grill.
3Be prepared if an accident or fire should occur. Know where your first aid kit and fire extinguishers are and how to use them correctly.
3Keep any electrical supply cord and the fuel supply hose away from any heated surfaces.
3Ensure the appliance has completely cooled before storing.
7DO NOT store petrol or other flammable vapours or liquids in the vicinity of this or any other appliance.
7 Any gas cylinder not connected for use should not be stored in the vicinity of this or any other appliance.
7 This gas barbecue is designed for outside use only.
7 DO NOT move the barbecue whilst it is in operation.
7 DO NOT operate if there is a gas leak.
7 DO NOT attempt to disconnect any gas fitting if your barbecue is being used, including the gas hose and regulator.
7 DO NOT leave unattended from being lit to fully cooled.
7 DO NOT use this barbecue in a garage or any enclosed area. Keep the surrounding area clear, at least 1.0m from any combustable
materials and 0.5m from a brick wall.
7 DO NOT attempt any unauthorised interference of the main controls on this barbecue, i.e. gas taps, injectors, valve etc.
7 DO NOT attempt to use charcoal in this barbecue, do use the flame tamer plate. (fits immediately above burner)
7 DO NOT position on a surface that may be damaged by hot fat or heat.
1.2 BARBECUE/TROLLEY STAND SAFETY
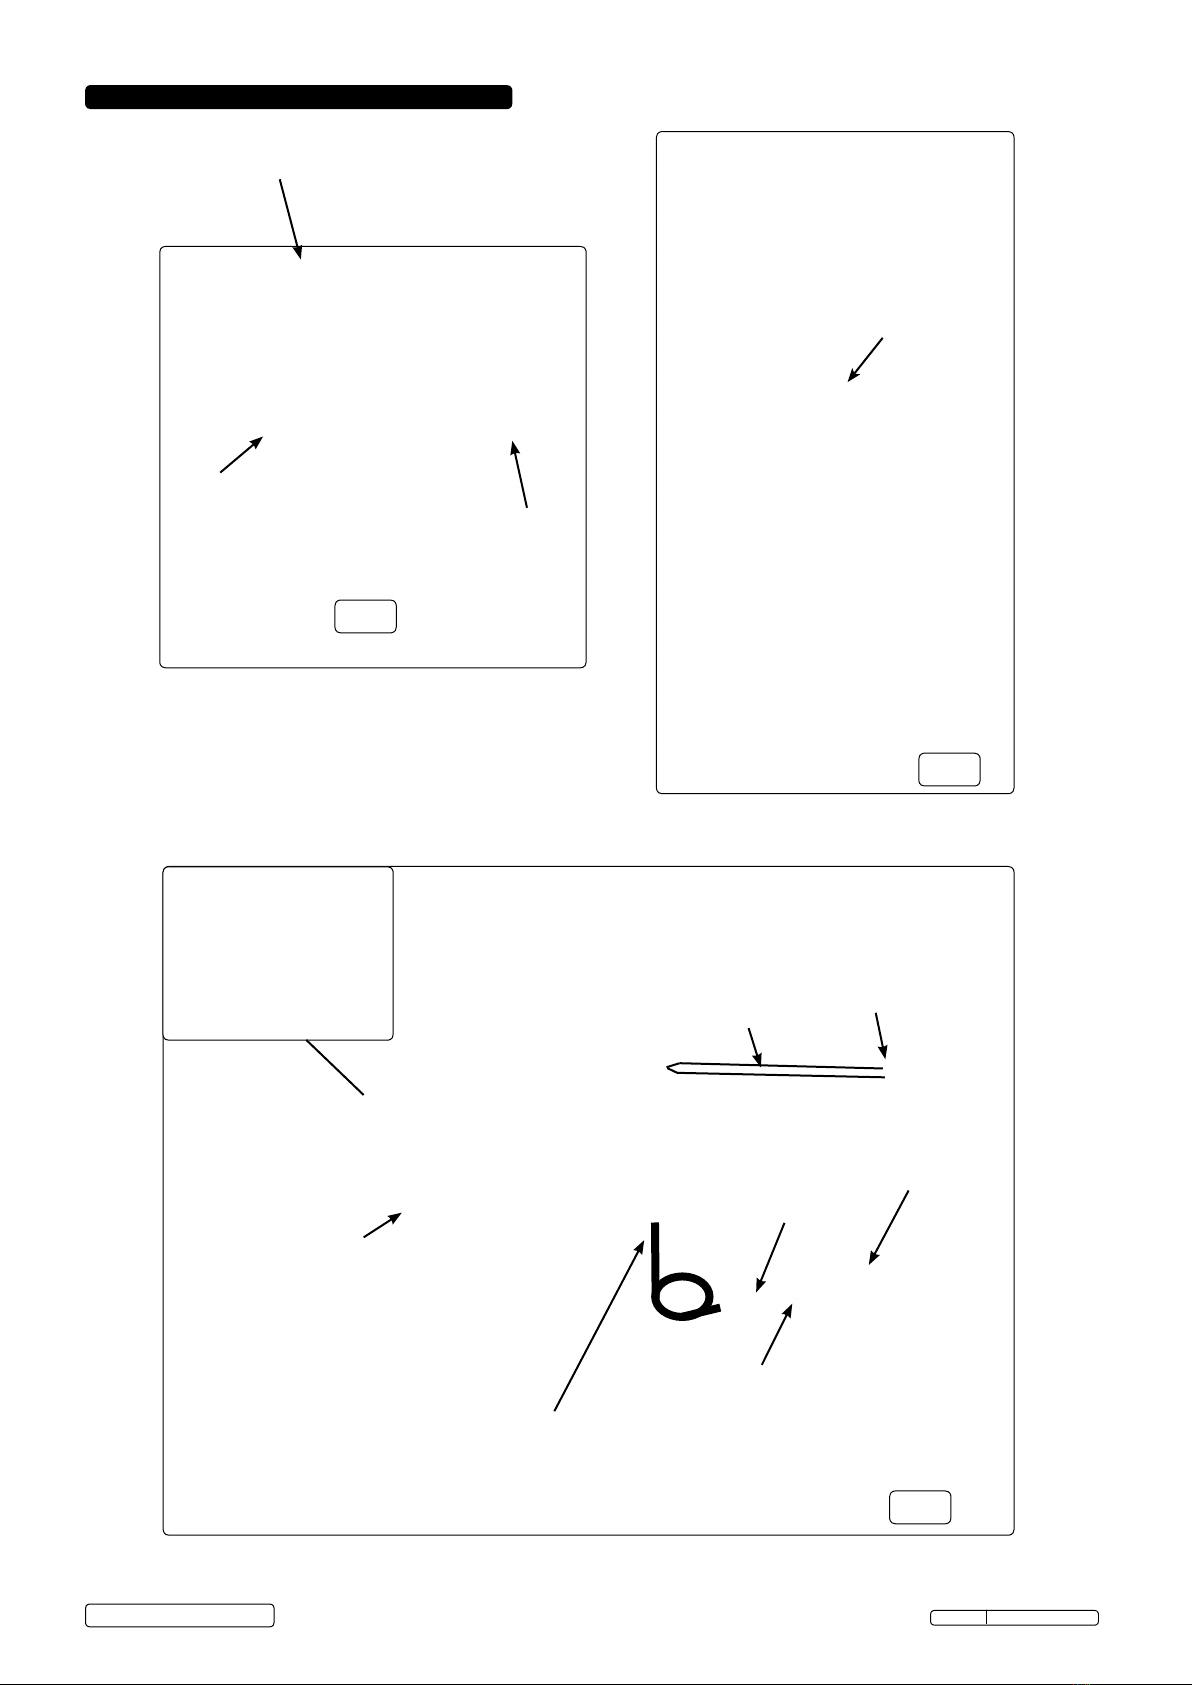
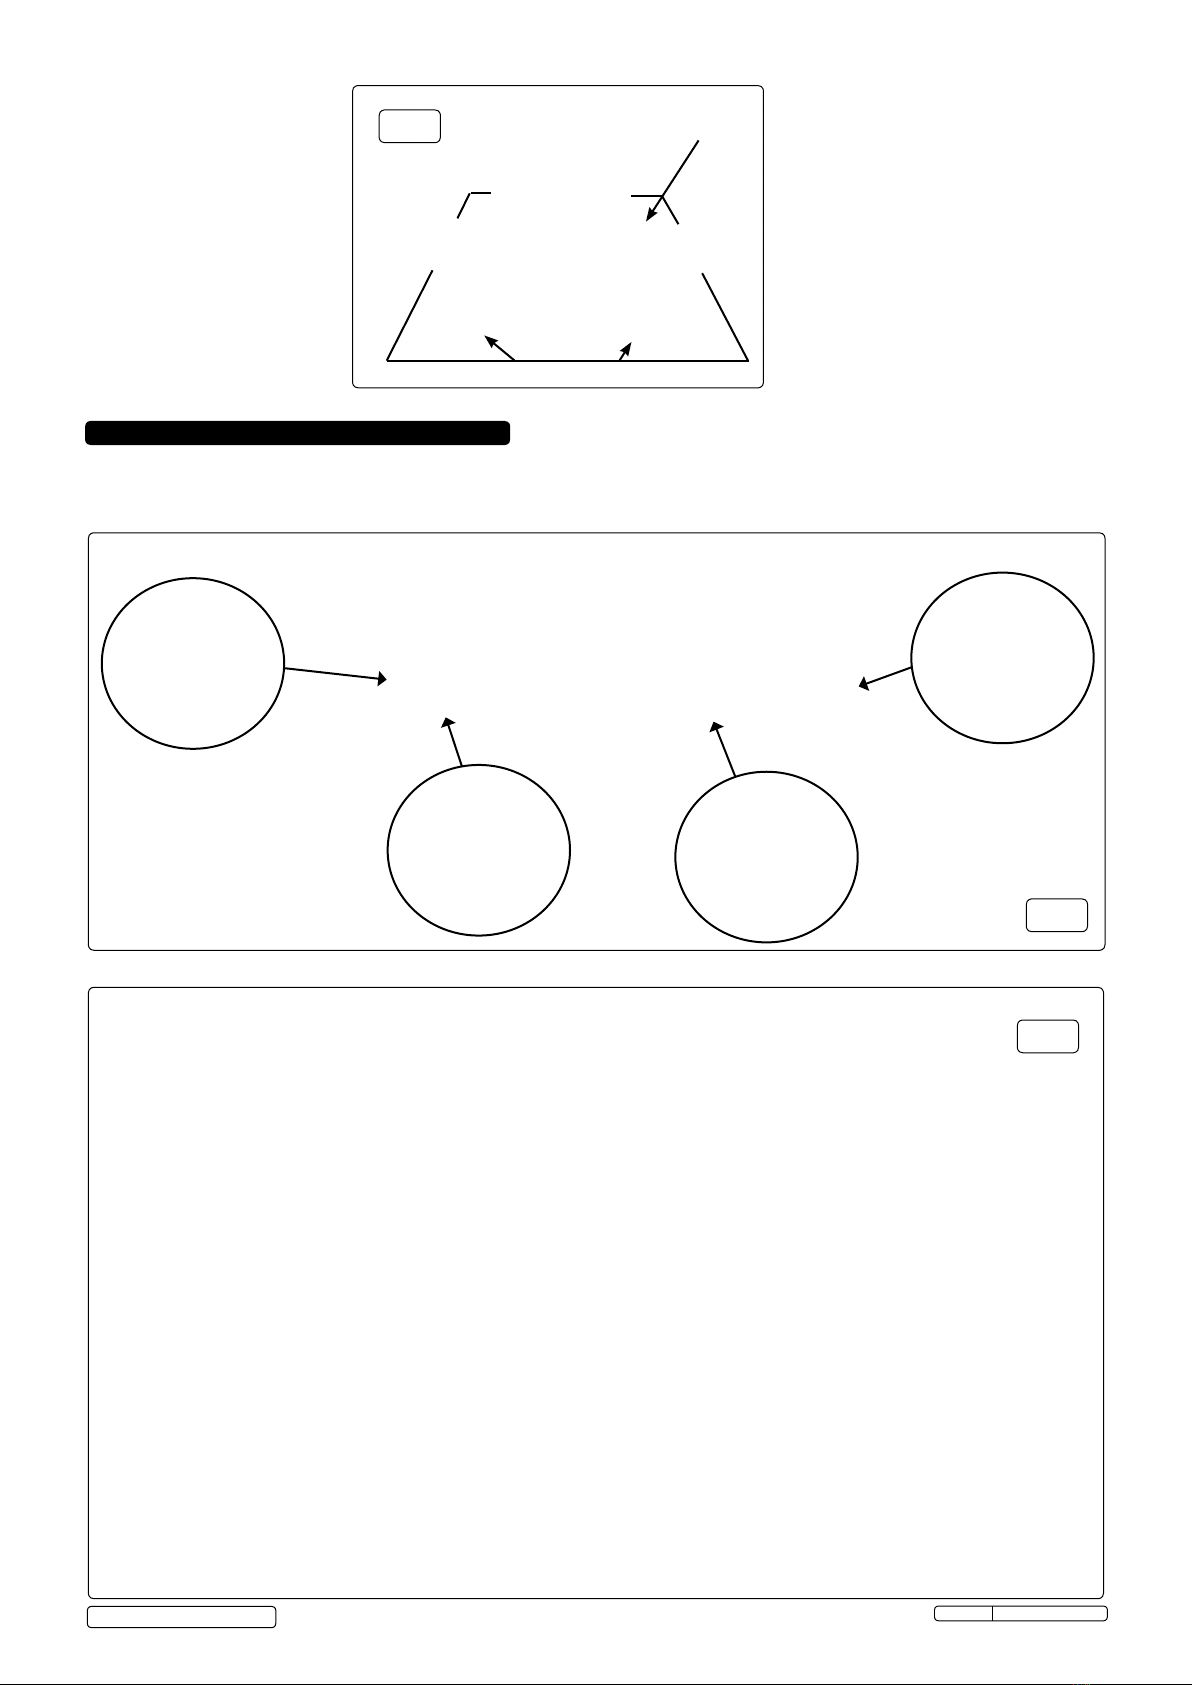
1.2.1 Be aware of finger traps when assembling as the frame is not self supporting until the barbecue module is fitted, section 4 and 6.
1.2.2 Read carefully section 6, fitting, removing, transporting and storing with barbecue module.
1.2.3 Ensure catch "Q" is engaged with local bracket when fitting barbecue module as described in 6.1.3.
1.2.4 Wear suitable gloves when handling light gauge sheet metal barbecue module.
Original Language Version BBQ04 Issue: 1 - 25/02/13
2. INTRODUCTION & SPECIFICATION
Portable gas barbecue with tted fold out side tables. Features piezoelectric ignition, variable heat control, large single burner and chrome grill.
Wheeled stand folds into transport trolley, ideal for picnics, camping, and home use. Grill unit detaches from stand and folding legs enable its
use as a table top barbecue. Supplied with propane gas clip-on regulator. Butane regulator not supplied.
MODEL: ................................................................................... BBQ04
Dimensions Standing and Open (WxDxH):........1040 x 450 x 930mm
Cooking Area:.................................................................420 x 340mm
Gas Types .................................................................Propane, Butane
Heat Output ................................................................................ 3.9kw
©Jack Sealey Limited 2013
NOTE: This appliance is not intended for use by persons (including children) with reduced physical, sensory or mental capabilities or lack of
experience and knowledge, unless they have been given supervision or instruction concerning the use of the appliance by a person responsible
for their safety. Children should be supervised to ensure that they do not play with the appliance.

3. MODES OF OPERATION
Pol nut
Bottle valve
Regulator
Hose, clip
each end
Burner under ame
tamer plate.
Gas control valve
Tapered barbed
hose connection
............................
Clip over handle
Transport and storage mode
Gas connections and cooking mode
fig.2
Original Language Version BBQ04 Issue: 1 - 25/02/13
©Jack Sealey Limited 2013
fig.3
Preparing for transport and storage
Release catch "Q"
underside section 5
Lid closed with shelves folded, grill
and ame tamer plate inside
fig.1
Igniter button
Plunger "P"
section 5
Piezoelectric ignition
(tamer plate removed)

4. ASSEMBLY OF TROLLEY FRAME
4.1 When starting to assemble, take all single parts out of the box and check if anything is missing according to the parts list in section
5.6. In the unlikely event of missing or damaged parts contact your Sealey Dealer immediately. Assemble all nuts and bolts loosely at
first. Tighten all connections after completion of frame alignment. This makes the barbecue trolley frame more stable. Tools required
for assembly of the trolley and barbecue include-: screwdrivers, pliers and spanners (6mm, 8mm, 10mm A/F)
Item 7 Item 5
Item 4 Item 6
P
P
P
P
Q
4.2 Connect upper frame item 4 to lower frame item 5. DO NOT fix with screws at this stage.
Swing out feet
Single module cooking mode
Non ammable
level surface
Original Language Version BBQ04 Issue: 1 - 25/02/13
©Jack Sealey Limited 2013
fig.4
fig.5
fig.6

PPQ
610mm approx.
4.3 Fit wheels to lower frame item 7.
4.4 Connect upper frame item 6 to lower frame item 7. Screw fix at this stage to complete "scissor" collapsible frame. The 710mm
dimension is for reference only. See section 5.2 for barbecue module fitting.
fig.8
Original Language Version BBQ04 Issue: 1 - 25/02/13
©Jack Sealey Limited 2013
fig.7

5. ASSEMBLY OF BARBECUE
Original Language Version BBQ04 Issue: 1 - 25/02/13
©Jack Sealey Limited 2013
5.1 Connect hinges item 12 loosely for final assembly and alignment with body item 1. Fit handle and fully tighten fixings.
5.2 Connect hinges item 13 and toggle clip item 11 loosely for final assembly and alignment with lid item 2.
fig.9
fig.10

Original Language Version BBQ04 Issue: 1 - 25/02/13
©Jack Sealey Limited 2013
5.3 Connect the side shelves item 3 with enough torque to provide a small resistance through the 180° sweep angle.
5.4 Offer the lid on to the body and insert hinge pins item17. Retain hinge pins with clips item 18. Tighten all fixings ensuring nesting of
the lid on main body.
5.5 Place flame tamer plate item 9 over tabs on internal brackets and lay the grill item 8 on main body ledges. Fold shelves inboard, close
the lid and toggle clip to secure. The barbecue module is ready for 'stand alone' or trolley mounting.
fig.11
fig.12
fig.13

P
PP
Ensure the sprung loaded catch is rotated and
engaged as shown in position "Q".
Slide the operating pin of spring loaded plunger to end of slot
against the force of the spring. Locate the extended plunger into the
associated barbecue hole position "P". Align frame with opposite
hole position "P" and release spring loaded plunger to self centre
as in the illustration.
Fit handle (16) to lid (21) with two self tapping screws.
Q
4
6
6. FITTING/REMOVAL BBQ MODULE
6.1 Fitting barbecue module to trolley frame
6.1.1. Fitting of the barbecue module to the trolley frame is best done with two people. If tted by one person it will be necessary to chock
the wheels and frame feet to avoid accidental collapse during tting.
6.1.2. With the trolley frame in its fullest upright position (see 610mm dimension in g.8) and the frame suitably supported, the barbecue
module (g.14) can be offered on to the trolley frame (g.8).
6.1.3. Rest slightly inclined barbecue, "P" up "Q" down, on to frame item 6 in (g.8) and pull the spring loaded catch in position "Q" (g.14
and g.16) through the slot and twist to register on local bracket.
6.1.4. Lower the barbecue elevated end "P" toward the frame item 4 (g.10). Slide the operating pin of spring loaded plunger to end of slot
against the force of the spring. Locate the extended plunger into the associated barbecue hole position "P". Align frame with opposite
hole position "P" and release spring loaded plunger to self centre as in the illustration (g.15).
r WARNING! The barbecue is manufactured from light gauge mild steel, wear suitable hand protection when fitting.
Note! Fitting method is suggested only, the user may prefer to t the spring loaded plunger pin rst "P" and nally the catch "Q".
Item No Description Qty
1 Barbecue body 1
2 Barbecue lid 1
3 Side shelf 2
4 Upper frame ("P"-"P") 1
5 Lower frame (feet) 1
6 Upper frame ("Q") 1
7 Lower frame (wheeled) 1
8 Grill 1
9 Flame tamer 1
10 Flame tamer support brkt 2
11 Toggle clip 1
12 Lid hinge 2
13 Barbecue hinge 2
14 Hub cap 2
15 Wheel 2
16 Handle 1
5.6 Parts list.
Item No Description Qty
17 Lid hinge pin 2
18 Hinge pin clip 2
19 M8 bolt 2
20 M6 X 60 round head screw 2
21 M6 X 12 screw 2
22 M5 X 10 screw 15
23 M3 X 10 screw 2
24 Washer 2
25 M6 Stiff nut 2
26 M5 Stiff nut 4
27 M5 nut 11
28 M3 nut 2
29 Nylon washer 2
30 Gas valve 1
31 Wheel plastic washer 2
32 Regulator and hose details 1
Original Language Version BBQ04 Issue: 1 - 25/02/13
©Jack Sealey Limited 2013
Venturi
fig.15
fig.16
Q
fig.14

7. OPERATION
To operate this barbecue you will need to purchase a gas bottle (fig.3).
7.1 INSTALLATION
7.1.1 The barbecue module is supplied assembled complete with only the lid handle requiring the customer to fit with two cross
head screws items 16 and 21.
7.1.2. The gas flame tamer plate is tie wrapped for transporting, these tie wraps must be removed.
7.1.3. Position your gas bottle at the side of your barbecue, not underneath, remember the bottle must be kept away from heat, and be in a
safe position.
7.1.4. Attach the regulator to the gas bottle (fig.3).
7.1.5. Perform the Gas Leak Test as described in Safety Precautions Section 1.
7.1.6. Check the hose before each and every use, looking for cracks, cuts or any abrasions.
7.1.7. If the hose is found to be faulty in any way, do not attempt to use your barbecue, replace the hose with one from your Sealey dealer.
7.1.8. Ensure the hose is free from any kinks or bends which will affect the gas flow, when using your barbecue. Also the hose must not
have undue tension and must not touch any part of the barbecue which may be hot.
7.1.9. When changing your gas bottle ensure there are no sources of ignition nearby and make sure the barbecue is switched off.
7.1.10. The barbecue must be kept away from flammable materials.
7.2 LIGHTING INSTRUCTIONS
r WARNING! The gas supply must be turned off at the gas bottle when the barbecue is not in use.
r WARNING! The lid must be open when lighting the burner.
7.2.1. Open the gas bottle valve fully [ACW] (fig.3).
7.2.2. Open the barbecue lid, then open the gas control valve fully [ACW] (fig.3).
7.2.3. Press the igniter once, it will generate a spark and light the burner. Try several times if the burner does not light on the first occasion.
7.2.4. If the burner does not light, turn the gas control valve to the OFF [fully clockwise] position and wait five minutes, then repeat steps
7.2.2. to 7.2.3.
7.2.5. To adjust the flame, turn the control knob to low [CW] or high position [ACW].
7.2.6. Turn the control knob to the OFF position [fully clockwise] to shut down the burner.
Original Language Version BBQ04 Issue: 1 - 25/02/13
©Jack Sealey Limited 2013
6.2 Removing the barbecue module from the trolley frame.
6.2.1. Removal of the barbecue module from the trolley frame is best done with two people. If removed by one person it will be necessary to
chock the wheels and frame feet to avoid accidental collapse during removal.
6.2.2. With the trolley frame in its fullest upright position and suitably supported, the barbecue module (g.14) can be removed.
6.2.3. Twist catch in position "Q" in (g.16) to align with the slot. Unless supported the trolley frame could now collapse without warning.
6.2.4. Slide the operating pin (g.15) of spring loaded plunger to end of slot against the force of the spring. Ease the module from the trolley
frame at the retracted pin side and release spring loaded plunger. Continue to ease the module from the frame until the opposite pin is
clear.
r WARNING! The barbecue is manufactured from light gauge mild steel, wear suitable hand protection when removing.
Note! Removal method is suggested only, the user may prefer to operate the spring loaded plunger pin rst "P" and nally the catch "Q".
6.3 Preparingtostoreortransportbarbecueandtrolleystandcomplete(g.1andg.2).
6.3.1. Twist catch in position "Q" in (g.16) to align with the slot. Unless supported the trolley frame could now collapse without warning.
6.3.2. Holding both trolley upper frame and nearest barbecue module handle, lower the complete assembly to the oor (g.17).
6.3.3. Apply trolley frame clip (g.17) to barbecue handle and raise the newly formed arrangement for transportation and storage (g.2).
Holding both trolley upper frame
and nearest barbecue module
handle lower complete assembly
to the oor.
Apply trolley frame clip to barbecue handle (see also g.2).
fig.17

9. TROUBLESHOOTING
Problem Possible Cause Solution
Burners will not light using the ignition system. Gas cylinder is empty. Replace with full cylinder.
Faulty regulator. Have regulator checked or replace.
Obstructions in burner. Clean burner.
Obstructions in gas jets or gas hose. Clean jets and gas hose.
Wire is loose or disconnected on Reconnect wire.
electrode or ignition unit.
Electrode or wire is damaged or faulty Change electrode or wire or change igniter.
push button igniter.
The distance between the burner and the Check and ensure the distance between the
electrode pin is too large or too small. burner and the electrode pin is 2-4mm.
Low ame or ashback (re in burner tube, a Gas cylinder is too small. Use larger cylinder.
hissing or roaring noise may be heard).
Obstructions in burner. Clean burner.
Obstructions in gas jets or gas hose. Clean jets and gas hose.
Windy conditions. Use barbecue in a more sheltered position.
01284 757500
01284 703534
sales@sealey.co.uk
Sole UK Distributor, Sealey Group,
Kempson Way, Suffolk Business Park,
Bury St. Edmunds, Suffolk,
IP32 7AR
www.sealey.co.uk
Web
email
8.1 CLEANING INSTRUCTIONS
8.1.1. To clean the barbecue, turn the burner on for 5 to 10 minutes. Grease will be burned off from the grill as well as the Flame Tamer Plate.
8.1.2. Ensure the barbecue is cold before continuing. The grill should be cleaned periodically by soaking and washing in soapy water. Use a
wire brush, steel wool or a scouring pad to remove stubborn spots. Alway rinse thoroughly with clean water.
8.1.3. The interior surfaces of the grill housing cover should be washed with hot soapy water.
8.1.4. Regularly clean the drip tray reservoir with hot soapy water. It is sited beneath the barbecue bowl and will be hot whilst barbecue is in
use (g.18).
8.1.5. Periodically check the burner to see that it is free from insects and spiders which may block the gas system.
8.1.6. Clean the venturi tube (g.14) on the burner very carefully, checking to see that it is free of obstructions. We recommend the use of a
pipe cleaner to clean the venturi tube area.
8.1.7. Any modications of this appliance may be dangerous and is not permitted. Do not alter parts sealed by the manufacturer.
8.2 STORAGE
8.2.1. The gas bottle must be stored outdoors in a well ventilated area and must be disconnected from your barbecue when not being used.
8.2.2. Ensure that you are outside and well away from any sources of ignition before disconnecting your bottle.
8.2.3. When using your barbecue after a period of storage, check for gas leaks and for any obstructions in the burner before using. Also
follow the cleaning instructions to ensure the barbecue is safe. Check that areas under the lid and ame tamer are free from any
obstruction, (insects, ingress etc.). This area must be kept clean, as it may affect the ow of combustion or air.
8.2.4. We recommend you use a barbecue cover to protect this item when not in use. Ensure it is cool before the cover is used. Covers must
be removed periodically to minimise moisture build up.
8. MAINTENANCE
Original Language Version BBQ04 Issue: 1 - 25/02/13
©Jack Sealey Limited 2013
NOTE: It is our policy to continually improve products and as such we reserve the right to alter data, specifications and component parts without prior notice.
IMPORTANT: No liability is accepted for incorrect use of this product.
WARRANTY: Guarantee is 12 months from purchase date, proof of which will be required for any claim.
INFORMATION: For a copy of our latest catalogue and promotions call us on 01284 757525 and leave your full name and address, including postcode.
Environmental Protection.
Recycle unwanted materials instead of disposing of them as
waste. All tools, accessories and packaging should be sorted,
taken to a recycle centre and disposed of in a manner which
is compatible with the environment.
Parts support is available for this product. To obtain a parts listing and/or diagram,
please log on to www.sealey.co.uk, email sales@sealey.co.uk or phone 01284 757500.
Slide out drip tray reservoir
fig.18
Table of contents
Other Sealey Grill manuals

Sealey
Sealey BBQ01 User manual

Sealey
Sealey BBQ03 User manual

Sealey
Sealey BBQ02 User manual

Sealey
Sealey BBQ01 User manual

Sealey
Sealey BBQ10 User manual

Sealey
Sealey BBQ07 User manual

Sealey
Sealey BBQ08 User manual

Sealey
Sealey BBQ11 User manual

Sealey
Sealey BBQ03 User manual

Sealey
Sealey BBQ05 User manual
Popular Grill manuals by other brands

Broil King
Broil King BSB405 Care & use/installation

Jackson Grills
Jackson Grills PREMIER700-BI owner's manual

Equipex
Equipex Sodir Panini VC Operation manual

Garland
Garland 9501 Programming instructions

Uniflame
Uniflame Outdoor LP Gas Barbecue Grill HBT822W owner's manual

ROYAL GOURMET
ROYAL GOURMET GD401C owner's manual