Sealife Sea Dragon SL963 User manual

Item SL963 & SL9631

2
Contents:
I. Safety Warnings .........................................................................3
II. In the Box ...................................................................................4
III. Product View with Call-outs....................................................5
IV. Preparing your flash............................................................6-15
V. Preparing your camera............................................................16
VI. Synchronizing your flash to non-SeaLife cameras..............17
VII. Testing the camera and flash..................................................18
VIII. Adjusting your camera exposure
and flash brightness................................................................19
IX. Preparing your camera......................................................20-22
X. External Flash adjustments ..............................................23-25
XI. Maintaining a waterproof seal ...............................................26
XII. Care and maintenance ............................................................27
XIII. Replacing the O-rings.............................................................28
XIV. Expanding your Flex-Connect™
Lighting System..................................................................29-30
XV. Great pictures made easy..................................................31-33
XVI. Troubleshooting Guide .....................................................34-36
XVII. Specifications............................................................................37
XVIII. Parts and service......................................................................38
XX. Important..................................................................................39
www.sealife-cameras.com
Español - Deutsch - Francais - Italiano - Nederlands

3
I. Safety Warnings
Turn OFF flash if foreign objects or water has entered the the battery
compartment or internal electronics. Continued use in this state may cause
fire or electrical shock. Contact the SeaLife service center for repairs.
The battery chamber is waterproof. If no water has entered the flash head,
the battery chamber may be cleaned without causing permanent damage to
the internal electronics. Rinse the waterproof battery compartment with
fresh water and allow the inside to dry. Replace the o-rings and apply lube.
Install new, fully-charged batteries and test fire flash. If flash does not operate
properly, please contact your local SeaLife dealer or the SeaLife service center
in your country.
Do not attempt to disassemble or access the electronic circuitry for
any reason. The internal electronics uses high-voltage components that may
result in severe electrical shock.
Do not expose flash to heat or direct sunlight for prolonged periods of
time.
Observe all SCUBA dive safety rules and control your buoyancy at all
times. Consult your dive instructor for dive safety questions.
Visit www.sealife-cameras.com for updates to this manual and techniques on
underwater photography. Check out the online guide called Great Pictures
Made Easy.

4
II. In the Box
Spare O-rings (SL96303)
O-ring Lube (SL9807)
O-ring remover (SL9808)
Sea Dragon Case
(SL942)
Universal Flash Link
Cable Adapter (SL992)
Sea Dragon Flash
(with attached diffuser, optical cable,
grip and tray. Grip and tray not
included with SL9631)
Sea Dragon Flash
Optical Cable Plug
(SL96307)

5
III. Product view with call-outs
Major parts
1 – Flash head
2 – Auto Bright light sensor
3 – Diffuser (removable)
4 – Release buttons
5 – Flex-Connect grip
6 – Tray
7 – Mounting screw
8 – Rubber friction pad
9 – Battery cap
10 – Pressure safety valve
11– Power On/Off dial
12 – Test button (Auto Learn
button) & Flash-ready
light
13 – Brightness adjustment
dial (Auto and Manual)
14 – Flex-Connect swivel
connector
6
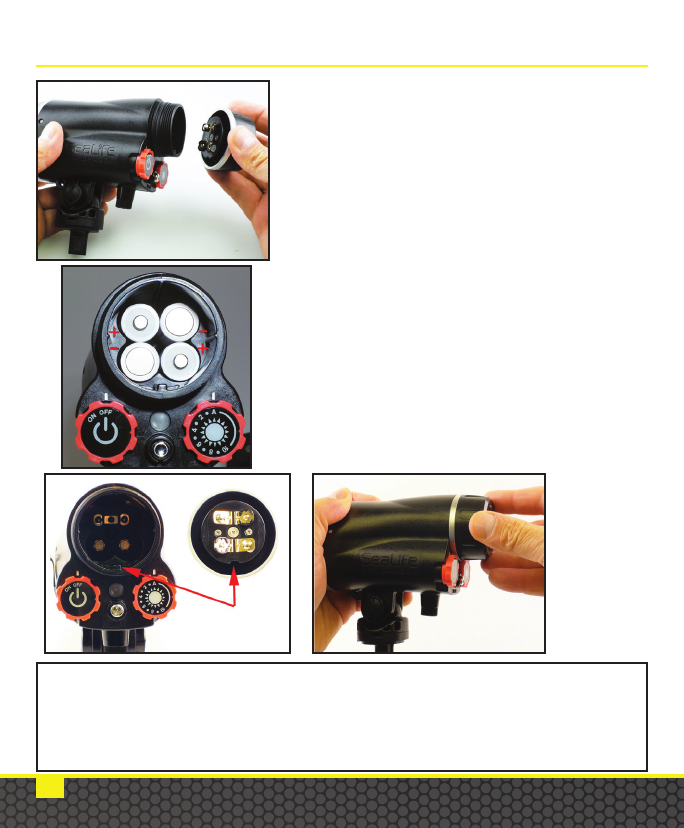
IV. Preparing your flash
INSTALLING BATTERIES:
1) Unscrew waterproof battery cap.
2) Insert 4 new or freshly charged AA
batteries according to the polarity
markings. For best performance, use
4 AA 2000mAh or higher Ni-MH
rechargeable batteries.
3) Align cap notch with key and screw on
waterproof battery cap. Lightly hand-
tighten - Do not overtighten using
excessive force or tools.
Important:
Make sure o-rings are perfectly clean, undamaged and lightly lubed. See page
26 for important information on maintaining a waterproof seal.
Align cap notch
with key

7
Attach camera (housing) to the tray. Carefully hand-tighten the
mounting screw. Do not over tighten!
Important:
Only attach the flash to cameras/housings with minimum thread depth
of 0.28” (7.2 mm) and using standard 1⁄4-20 tripod type thread. Never
force or over-tighten the screw, or you may damage the housing seal and
threads.
8
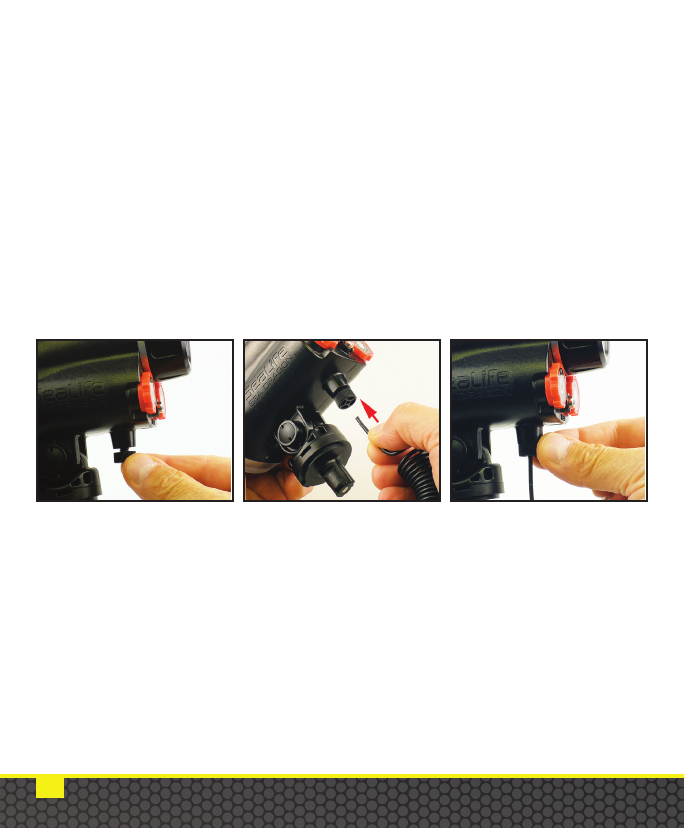
Connecting Flash Link optical cable to the external flash
The Flash includes the Flash Link optical cable (item #SL96208). The
optical cable is used to transmit light from the camera to the light
sensor under the flash head. The external flash will fire when the
light sensor detects light coming from the end of the cable.
The external flash should come with the optical cable already attached
to the flash head, but it is good to know how the cable can be removed
and re-attached.
1. Turn the cable locking screw counter-clockwise by about 2
rotations to loosen the clamping effect of the lock. Do not remove
the locking screws.
2. Insert the optical cable into the hole of the cable lock until the cable
stops [make sure cable is pushed up all the way].
3. Turn the cable locking screw clockwise to lock the cable into place
[finger tight only – Do not over tighten].
1. 2. 3.
9
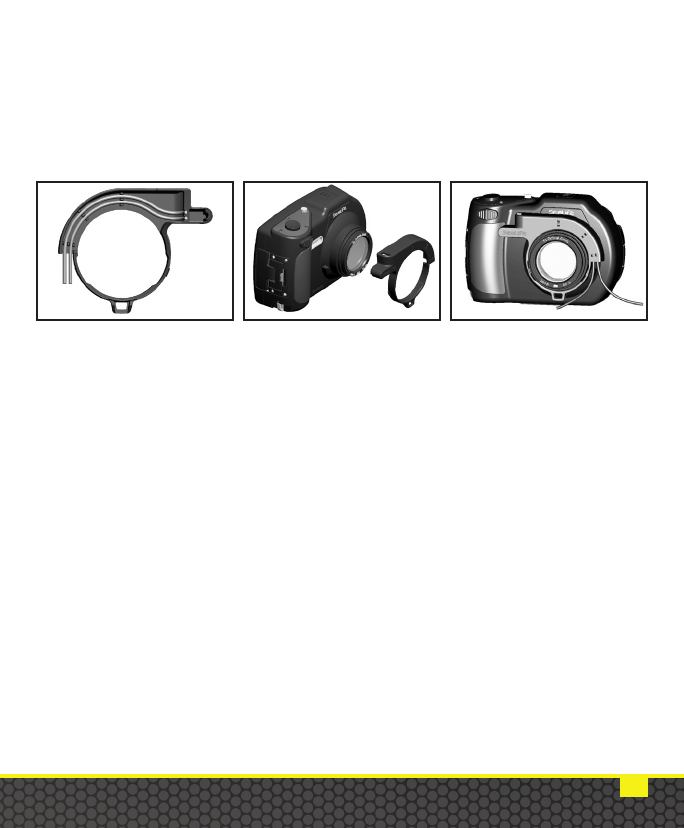
Connecting Flash Link optical cable to SeaLife cameras
For SeaLife DC1400 UW camera:
Attach the other end of the optical cable to the camera adapter
included with your SeaLife camera.
1. Push the optical cable into one of the grooves so it’s locked firmly
into position. The end of the cable must be directed at the camera’s
flash but should not stick out beyond the adapter. The adapter has
two grooves, so you can add another cable when using two flashes.
2. Attach the Flash Link adapter around the lens and push down until
it locks firmly into place. There are two small locking mechanisms
located on the outer edge of the adapter that should lock in to the
camera housing. Make sure the adapter is oriented so it is aligned
with the recessed flash window.
3. Once the cable and adapter is firmly attached, run the cables along
the bottom of the flash base and up the flash arm. The cables
should be secured to the flash arm using the Velcro ties provided
with your flash accessory.
1. 2. 3.

10
Connecting Flash Link optical cable to SeaLife cameras
For SeaLife DC2000 UW camera:
Installing Flash Link optical cable adapter
The DC2000 includes a Flash Link adapter necessary for making
optical cable connection between the underwater housing and one or
two Sea Dragon Flashes.
This manual suits for next models
1
Table of contents
Other Sealife Camera Flash manuals


