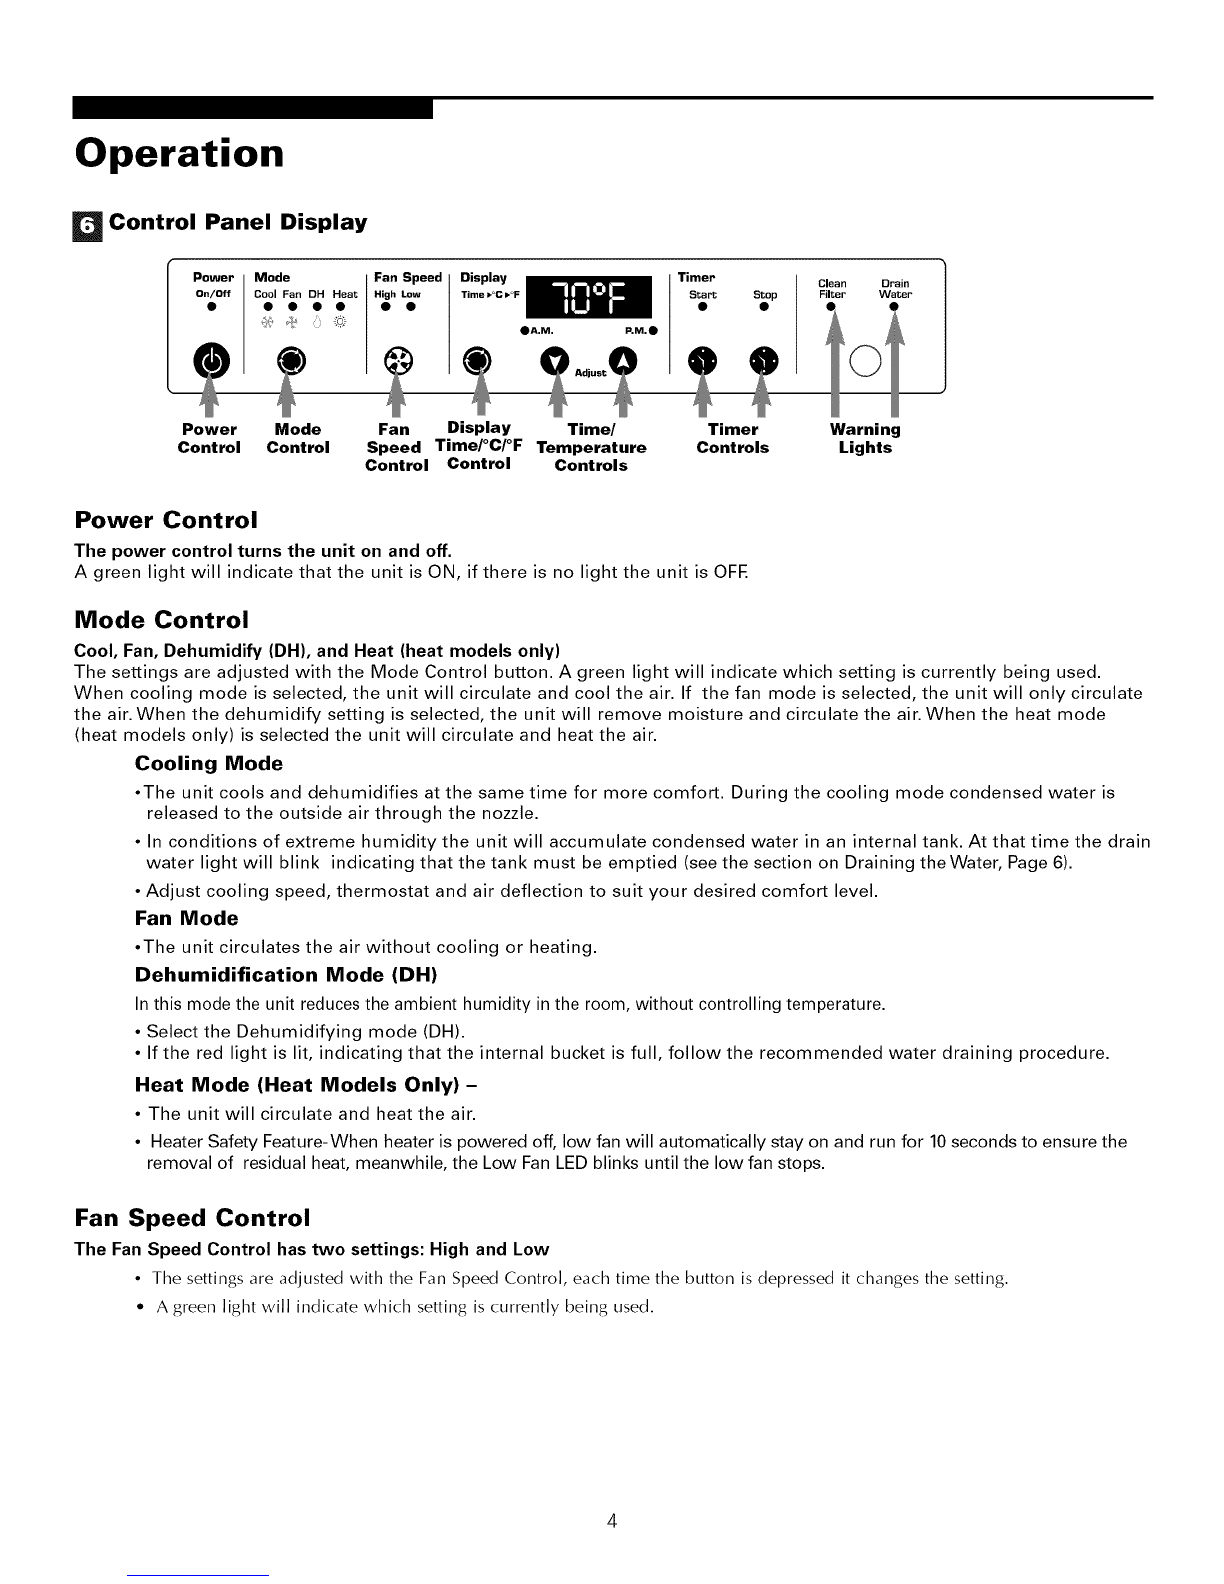
Sears Kenmore 23-11-2223N-003 User manual

ENGLISH
h:qportant Safety Instructions .................................... 1
Installation .............................................................. 3
Operation ................................................................ 6
Maintenance ............................................................ 7
Warranty .................................................................. 9
ESPANOL
Instrucciones importantes de seguridad .................. 11
Instalaci6n .............................................................. 13
Funcionamiento .................................................... 14
Mantenimiento ...................................................... 16
Garantfa ................................................................ 18
FRAN(_AIS
Directives de s6curit6 importantes .......................... 21
Installation ............................................................ 23
Utilisation .............................................................. 24
D6pannage ............................................................ 26
Garantie ................................................................ 28
Air Cleaner
Read and Save These Instructions
This Owner's Guide provides specific operating instructions for your model. Use the air
conditioner only as instructed in this guide. These instructions are not meant to cover every
possible condition and situation that may occur. Common sense and caution must be practiced
when installing, operating, and maintaining any appliance.
Record Your Model and Serial Numbers
Record in the space provided below the model and serial numbers.
Model Number:
Serial Number:
Purchase Date:
Sears, Roebuck and Co., Hoffman Estates, IL 60179 U.S.A.

important
RECOMMENDED CIRCUIT
WIRE SIZES
(As installed per building code):
PROTECTORSIZE WIREGAUGE
Safety instructions
Electrical Shock Hazard
•Plug unit only into grounded electrical outlet (Fig. 1 & 2).
• Do not use an extension cord or plug adapter with this unit.
• Do not operate unit with filter removed.
• Failure to follow these precautions could result in electrical shock, fire or
personal injury.
• Do not alter cord or plug end. Do not remove warning label on cord.
15 AMP #14 MINIMUM
20 AMP #12 MINIMUM
30 AMP #10 MINIMUM
©©
125V 250V
15A 20A
©©
250V 250V
15A 30A
Power Supply:
115V, 60HZ
AC Only 1-Phase
Outlet Requirement:
3-Prong Grounding Type
125V, 15Amp
Minimum Wire Size:
#14 (A.W.G.) 3-Wire
Use CopperWire Only
Circuit Protector:
15 AmpTime Delay Fuse
or
Circuit Breaker
C) Three-prong grounding
plug. Do not alter plug end,
I_) Grounded three-prong wall
receptacle
@Single outlet grounding
wall receptacle
Important Grounding Requirements
Your unit will operate on any 115 volt, 3-pronged (grounded), 60 Hz
circuit (Fig. 1 & 2). A separate line is not required, but it is advisable not
to overload the circuit with heavy duty appliances such as washing
machines, etc.
For your safety, this unit is equipped with a 3-pronged, grounding plug
and must be plugged into a properly grounded outlet. If your outlet is not
of the proper type, it is your responsibility to have the outlet and wiring
changed to the correct type. Do not cut off the third (grounding) prong.
Do not use an adapter.
For Your Safety
Do not store or use gasoline or other flammable vapors and liquids in
the vicinity of this or any other appliance.The fumes can create a fire
hazard or explosion.
Do not introduce objects in the air discharge area.This could cause
permanent damage to your unit.
Do not pour liquids on the air conditioner as this could cause a
malfunction. With the unit unplugged, use a damp cloth for cleaning
your unit.
Avoid using strong solvents to clean the air conditioner.
Clean the air conditioner filter every two weeks to avoid overheating
caused by air obstruction. Be net operate without filter.
The unit has a Primary air filter that must be cleaned with water every
two weeks.
This unit also has a Purification filter that should be replaced every year.
Do not wash this filter with water.
Do not obstruct the air intake area of your air conditioner, as this could
cause overheating, thus activating the units security switch and shutting
off the unit.
Do not block air circulation to exhaust tube, when in use.
Do not block air flow inside with blinds, curtains, or furniture.

Before Getting Started
BEF@RE STARTZNG Y@UR UNiT
• Read the instruction manual before operating the unit for the first time. It contains important information on
operation, safety, maintenance, service and warranty.
• Keep this instruction manual for future reference.
• Do not start a damaged unit.
•The assembly and connection of the unit must be carried out according to the instructions. If they are not followed
you run the risk of voiding the warranty.
Important information
1. The power cord is located in the rear of the unit.
2. Do not allow contact between the unit and water.
3. Do not cover the air discharge and air intake louvers of the unit.
4. Proper venting of the air to the exterior is required at all times.
The unit hascasters to ease movement. If it is necessaryto tilt the unit, it must first be emptied of water in the internal tank
using the drain valve at the bottom of the unit. (See the sectionWhen transporting the unit or Storing the unit for the season.)
_] Description of Parts on the Portable Cooling Unit
Filter Nozzle
Drain Hose
Upper Drain Valve
Bracket to Store
Exhaust Tube
Serial Plate
Exhaust Tube
Air Intake Louvers
Power Cord
Lower Drain Valve

Installation
MOBELE gNSTALLAT ON
I_Cooling Through a Window Application
uk]
If_ -- I
I I
BF
h
I I
13
Window Adapter Application
For use in air conditioning settings "Cool" and "Fan" only.
When using the air conditioner in "Cool" mode, the heat from
the room will need to be vented to the outside. Do not vent
the air to the outside when using "Dehumidify" or "Heat"
modes.
1. Place the nozzle in the exhaust tube.
2. Open the window (Fig. 4a). Place the window adapter in the
window, extending it to fit the width of the window (Fig. 4b).
3. Close the window(Fig. 4c).
4. Secure the window adapter to the window sill (Fig. 4c).
5. Insert the nozzle into the slot in the window adapter (Fig 4d).
I_1 Cooling Through a Door Application Mobile Installation
For use in air conditioning settings "Cool" and "Fan" only.
When using the air conditioner in "Cool" mode, the heat from
the room will need to be vented to the outside. Do not vent
the air to the outside when using "Dehumidify" or "Heat"
modes.
1. Place the nozzle in the exhaust tube.
2. Open the door slightly and position the nozzle between the
door and the door jamb (Fig. 5).
Important:
Do not over-stretch the exhaust tube
or make any unnecessary bends in it.

Operation
Control Panel Display
iMode
Cool Fan DH Heat
• • • •
•A.M. P,M._)
Timer
Start Stop
Power Mode Fan Display Time/ Timer
Control Control Speed Time/°C/°F Temperature Controls
Control Control Controls
Clean
Filter
Warning
Lights
Power Control
The power control turns the unit on and off
A green light will indicate that the unit is ON, if there is no light the unit is OFE
Mode Control
Cool, Fan, Dehumidify (DH), and Heat (heat models only)
The settings are adjusted with the Mode Control button. A green light will indicate which setting is currently being used.
When cooling mode is selected, the unit will circulate and cool the air. If the fan mode is selected, the unit will only circulate
the air. When the dehumidify setting is selected, the unit will remove moisture and circulate the air. When the heat mode
(heat models only) is selected the unit will circulate and heat the air.
Cooling Mode
•The unit cools and dehumidifies at the same time for more comfort. During the cooling mode condensed water is
released to the outside air through the nozzle.
•In conditions of extreme humidity the unit will accumulate condensed water in an internal tank. At that time the drain
water light will blink indicating that the tank must be emptied (see the section on Draining theWater, Page 6).
• Adjust cooling speed, thermostat and air deflection to suit your desired comfort level.
Fan Mode
•The unit circulates the air without cooling or heating.
Dehumidification Mode (DH)
In this mode the unit reduces the ambient humidity in the room, without controlling temperature.
• Select the Dehumidifying mode (DH).
• If the red light is lit, indicating that the internal bucket is full, follow the recommended water draining procedure.
Heat Mode (Heat Models Only) -
• The unit will circulate and heat the air.
• Heater Safety Feature-When heater is powered off, low fan will automatically stay on and run for 10 seconds to ensure the
removal of residual heat, meanwhile, the Low Fan LED blinks until the low fan stops.
Fan Speed Control
The Fan Speed Control has two settings: High and Low
• The settings are adjusted with the Fan Speed Control, each time the button is depressed it changes the setting.
•A green light will indicate which setting is currently being used.

Operation
Display Controls
Time/°C/°F Mode Control: The display control is used to change the current display setting.
• There are three settings on the display: Temperature in Fahrenheit, Temperature in Celsius, Clock
• The display will return from the time setting to the Fahrenheit setting after the control has not been depressed for five seconds.
• THE TEMPERATURE SETTING ONLY SHOWS THE SET TEMPERATURE, NOT THE ROOM TEMPERATURE.
Time/Temperature Controls: These buttons are used to change the set temperature, the clock, start time, and stop time.
Changing the SetTemperature
Select either Fahrenheit or Celsius on the display by using the Display Control, then change the set temperature in
increments of 1° using theTime!Temperature.
Setting the Clock
Select the time display with the Display Control and change the clock with theTime!Temperature controls.The time will
increase or decrease in one minute increments with each depression. If either the up or down buttons is held down, the
time will change continuously until the button is released.The AM and PM lights will change appropriately with the clock.
Timer Controls
TheTimer Controls can be used to set a time for the air conditioner to start as well as a time for the air conditioner to stop.
Setting a StartTime
Press the start or stop button.The display will now show the number of hours until the unit will automatically start.
Use theTime/Temperature controls to adjust the number of hours before start.The timer will be set after no buttons have
been depressed for five seconds. A light above the start button will indicate the timer is activated.
Setting a StopTime
While the unit is running, press the stop button.The display will now show the number of hours until the unit will
automatically stop. Use theTime/Temperature controls to adjust the number of hours before stop.The timer will be set
after no buttons have been depressed for five seconds. A light above the start button will indicate the timer is activated.
Shutting theTimer Function OFF
If the Start function is set:
Press the Start button for three seconds. The light will go off and the start function is now deactivated.
If the Stop function is set:
Press the Stop button for three seconds. The light will go off and the stop function is now deactivated.
Warning Lights: These lights will come on when the air conditioner needs attention.
Clean Filter Light
This light indicates that the primary filter needs to be cleaned.The air conditioner will continue to run even when the light
is on. However, the filter should be cleaned as soon as possible after the light comes on. After cleaning the filter, press both
Time/Temperature controls simultaneously to reset the filter monitor.
Drain Water Light
This light indicates that the internal water bucket needs to be drained.The unit will not operate until the water has been
drained. See the next page of the owners' manual for instructions on how to drain the water.The air conditioner must be
set to dehumidify when the water is drained.
Air Conditioner Remote Control
The functions work the same as your air conditioner's touch controls,
CAUT|ON_
Batteries may become hot, leak, or explode due to improper use.
oDo not install the batteries with the polarity (+/-) reversed.
oDo not subject batteries to fire or high temperatures.
oDo not attempt to recharge, short, or disassemble.
® @
on!off Fan Spoof
© ©
oisplav Node
© ©
S_art S_op
Timer Timer
BatteryInstallation_1'
oTape over lithium battery contacts before disposal. Follow local codes for battery disposal.
Keep batteries and other things that could be swallowed away from young children.
Contact a doctor immediately if an object is swallowed.

Maintenance
Upper Drain Valve
CLOSE
@
CLOSE
@
OPEN
Primary Filter
IN WATER EVERY 2 WEEKS)
Purification Filter
DO NOT WASH)
Draining the water
If the red light is lit, indicating that the internal bucket is full, follow the
recommended water draining procedure:
1. The unit must be switched to the off position.
2. Place a container under the upper drain valve and remove
the rubber plug from the upper drain valve (Fig. 7 a, b, c).
3.The drain hose is stored in the filter area. Insert the drain
hose on the upper drain valve pointing it towards the
container(Fig. 7 b).
4.Turn the upper drain valve from the closed position to the
open position (Fig. 7 c).
5.Turn the unit on and the mode to the dehumidify position.
The unit will turn on, allowing the pump to run and drain
the water from the unit.
6.When the water stops draining from the unit,
turn off the unit.
7. Close the upper drain valve, remove the drain hose,
remove the container of water, put the rubber plug back in
the upper drain valve (Fig. 7 d).
8.The unit can be turned to any operating mode.
Important:Do not forgetto putthe rubber plugbackin and turnthe
upperdrain valve90°tothe right or to the closedposition.If this isnot
donethewater will comeout ofthe unitwhen it isswitchedon.
Cleaning the Primary Filter
The unit has a Primary air filter (8a) that must be cleaned
with water every two weeks.
This unit also has a Purification filter (8b) that should be
replaced every year. Be net wash this filter with water.
1.Separate the primary filter from the Purification filter.
2. Wash the Primary filter with water.
3. After the Primary filter is completely dry, reassemble
with Purification filter and put back in the unit.
Cleaning the Exterior
•The air discharge grille can be cleaned with a rag or
sponge, warm water and mild detergent.
• Never use hot water, bleach, gasoline, acids, cleaning fluid
or a brush to clean the unit.This will
damage the cabinet and the air discharge area.
• Do not wash the unit with a hose.

Maintenance
Bottom Drain Valve
When transporting the unit or storing the
unit after the season
To avoid electric shock, unplug unit. Drain excess water from
the bottom tank by placing a pan under the lower drain
valve, remove the drain plug, and let the water drain into the
pan. When the water stops draining out, replace the drain
plug and remove the pan of water (Fig. 10).
Before using at the start of a season
•Turn the unit on for four to five hours to dry it out.
• Clean the Primary air filter and replace the Purification filter.
• Clean the cabinet and air discharge areas if necessary.
Service Instructions
Read carefully before calling for service
If the unit fails to start
V" Make sure the unit is plugged into an outlet.
V" Make sure the unit is not in the off position.
V" Make sure the circuit breaker has not been tripped.
If the unit does not function and the drain water light is blinking
V" Make sure the unit is standing level, if the light is still on, empty the internal water tank. (See the section on
Draining Water).
If the unit does not cool sufficiently
V" Make sure the exhaust tube and nozzle fit correctly to each other and to the window adapter.
V" Make sure the exhaust tube is not bent.
V" Make sure the upper drain valve is in the closed position and both drain plugs are in place.
V" Adjust the thermostat to a lower temperature.
V" Make sure the exhaust tube and nozzle have nothing inside them.
If the unit is too loud
V" Make sure the exhaust tube and nozzle fit correctly to each other and to the window mount.
V" Make sure the exhaust tube and nozzle have nothing inside.

Warranty Full One-YearWarranty on Air Conditioner
for one year from date of purchase, when this air conditioner is operated and
maintained for normal room cooling according to instructions in this owner's
manual, Sears will repair item, free of charge, if defective in material or
workmanship.
Full Five-Year Warranty on Sealed Refrigeration System
For five years from the date of purchase, when this air conditioner is operated and
maintained for normal room cooling according to instructions in this owner's
manual, Sears will repair the sealed refrigeration system (consisting of refrigerant,
connecting tubing, and compressor), free of charge, if defective in material or
workmanship.
Warranty Service
Warranty gives you specific legal rights, and you may have other rights which vary
from state to state.
SEARS, ROEBUCK and CO. Dept. 817WA, Hoffman Estates, IL 60719
Sears Service Maintenance Agreement
"We Service What We Sell" is our assurance you can depend on Sears for service.
Your air conditioner has added value when you consider that Sears has service
units nationwide, staffed with professional technicians trained on all appliances
Sears sells.They have the knowledge and sills, tools pars and equipment to insure
our pledge to you that "We Service WhatWe Sell"
Sears Maintenance Agreement
Maintain the value of your air conditioner with a Sears Maintenance Agreement.
Sears air conditioners are designed, manufactured, and tested for years of
dependable operation. Yet, andy modern appliance may require service from time
to time.The Sears Maintenance Agreement offers you an outstanding service
program for your air conditioner.
The Sears Maintenance Agreement
* Is your way to buy tomorrow's service at today's price.
* Eliminates repair bills resulting from normal use.
* Allows for as many service calls as required.
* Provides and annual Preventive Maintenance Check at your request to
keep your Air Conditioner in proper running condition.
For more information, call 1-800-827-6655

Just Call
1-800-4-MY-HOME
(1-800-469-4663)
24 hours a day, 7 days a week
For the repair of major brand name appliances in your own home...
no matter who made it, no matter who sold itt
For your nearest Sears Parts & Service location,
to bring in products like vacuums, lawn equipment and electronics.
For Sears Parts & Service, to order the replacement parts,
accessories and owner's manuals that you need to do -it-yourself.
www. sea rs.ca
To purchase orinquire abouta Sears Maintenance Agreement, call:
1-800-361-6665
9a.m. -- 8 p.m. Mon. -- Fri. EST, 9 a.m. -- 4 p.m. Sat.
Pour service en francais:
1-800-LE FOYER mc
(1-800-533-6937)
www. sea rs.ca

36 7326
17 2980
36 7327
17 2875
23 5653
18 3386
43 2783
31
173194
\/
21 5814
,_7 2813
17 3310
17 2813
35 5902
17 2819 _)
03 6082 (_
36 1851
48 9682
10

TAMAIRIOS RECOMENDADOS
DE LOS CONDUCTORES DEL
CIRCUITO
(Instalados segQn el c6digo de
construcci6n) :
CAPACIDADDE CALIBREDE LOS
LOSFUSIBLES CONDUCTORES
15AMP #14 COMO MINIMO
20AMP #12 COMO MINIMO
30AMP #10 COMO MINIMO
©©
125V 250V
15A 20A
©©
250V 250V
15A 30A
C) Enchufe de tres clavijas
con puesta a tierra. No
Modifique.
C) Tomacorriente para
enchufe de tres clavijas
conpuesta a tierra.
C) Tomacorriente mural
sencillo con puesta a
tierra.
Riesgo de Choque El_ctrico
• Enchufe el aparato solamente en un tomacorriente el6ctrico puesto a tierra.
• Con este aparato no use un cord6n de extensi6n ni un adaptador de enchufe.
• No haga funcionar el acondicionador de aire sin el panel delantero.
• El incumplimiento de estas precauciones pueden causar un choque el6ctrico, incendio o lesi6n
personal.
• No modifique el cord6n ni el enchufe del extremo.
Requisitos importantes
para la conexibn a tierra
Su unidad funcionara en cualquier circuito de 115 voltios, de 3 patillas (con conexion a
tierra) y 60 Hz. No se requiere Ifnea separada, pero es aconsejable no sobrecargar el circuito
con artefactos que usan mucha corriente como maquinas de lavar ropa, etc. Para su
seguridad, esta unidad esta equipada con un enchufe de 3 patillas de conexion a tierra y
debe enchufarse en un tomacorriente con la debida conexion a tierra (Figuras 1 y 2).
Si su tomacorriente no es del tipo adecuado, usted tiene la responsabilidad de hacer que se
cambien tanto el tomacorriente como los alambres al tipo adecuado.
No corte la tercera patina de conexion a tierra. No use un adaptador.
Para su seguridad
• No guarde ni use gasolina u otros vapores y Ifquidos inflamables en la vecindad de este o
cualquier otro artefacto. Los vapores emitidos pueden crear un riesgo de incendio o explosi6n.
• No introduzca objetos en el a'rea de descarga del aire. Esto puede causar datio irreparable a su
acondicionador de aire.
• No vierta Ifquidos de limpieza en el acondicionador de aire pues esto puede causar un
malfuncionamiento. Use un patio ht_medo para limpiarlo.
• Evite usar solventes fuertes para limpiar el acondicionador de aire.
• Limpie el filtro del acondicionador de aire cada dos semanas para evitar sobrecalentamiento
causado por obstrucci6n del aire.
• No obstruya el a'rea de entrada del aire de su acondicionador, pues esto puede causar
sobrecalentamiento, Io cual activara" el interruptor de seguridad y apagara" el aparato.
• No bloquee la circulacion del aire hacia el conducto de ventilacion, cuando el
acondicionador este en uso.
• No obstruya el flujo del aire hacia el interior con persianas, cortinas o muebles.
Suministro
de corriente: 115V, 60HZ
Corriente alterna monofasica
solamente
]'omacorriente
que se requiere: De 3 patillas,
tipo conexion a tierra
125V, 15Amp
]'amaSo minimo
del alambre: No. 14 (A.W.G.) de 3 alambres
Use solamente
alambre de cobre
Protector del
_ircuito: Fusible con retardo de
tiempo o interruptor de
circuito de 15Amp
11

Antes de empezar
ANTES DE ENCENDER SU UHZOAD
• Antes de usar la unidad por la primera vez, lea el manual de instrucciones que contiene informaci6n importante sobre su
operaci6n, seguridad, mantenimiento, servicio y garantfa.
• Guarde este manual de instrucciones para consultarlo en el futuro.
• No encienda una unidad que est6 dafiada.
• El ensamblado y la conexi6n de la unidad debe Ilevarse a cabo de acuerdo a las instrucciones. Si no se siguen, usted toma
el riesgo de invalidar la garantfa.
Informacibn importante
1. El cord6n de electricidad esta" situado en la parte posterior de la unidad.
2. No deje que la unidad est6 en contacto con el agua.
3. No cubra las rejillas de descarga y de toma de aire de la unidad.
4. En todo momento se necesita una salida adecuada del aire al exterior.
La unidad tiene ruedas para facilitar el movimiento. Si es necesario inclinarla, se debe primero vaciar el agua del tanque interno,
usando la valvula de drenaje en la parte inferior. Vea la seccion si se transporta o almacena la unidad durante la estacion.
I_1Descripci6n de las partes
de la unidad de enfriamiento portatil
Filtro Boquilla
Manguera
de drenaje
V&lvula de
drenaje superior
Placa con el
n_mero de serie
Tube
Rejillas de toma
de aire
Cord6n de
electricidad
V_lvula de drenaje
inferior
12

Instalaci6n
Ve_a_a YPoct_dE Y_s_Macfd_
I_Colocacibn del adaptador de ventana
uNI
If- -- I
I I
BF
h
I I
D
Colocacibn del adaptador de ventana
Para uso en los ajustes "Cool" (Frfo) y "Fan" (Ventilador)
solamente. Cuando use el acondicionador de aire en el modo
"Cool" el aire caliente de la habitacion debe ser ventilado
hacia el exterior. No ventile el aire hacia el exterior cuando use
los modos "Dehumidify" (Deshumidificacion) o "Heat" (Calor).
1. Coloque la boquilla en el tubo de escape.
2. Abra la ventana (Fig.4a) y coloque el adaptador,
extendiendolo para que se acomode a la anchura de la
ventana; cierre la ventana (Fig.4h).
a. Asegure el adaptador para la ventana en el alfeizar de la
ventana (Fig.4c).
4. Inserte la boquilla en la ranura del adaptador para ventana
(Fig.4d).
I_1 Aire acondicionado poniendo la
unidad en una puerta Instalacibn port&til
Para uso en los ajustes "Cool" (Frio) y "Fan" (Ventilador)
solamente. Cuando use el acondicionador de aire en el modo
"Cool" el aire caliente de la habitacion debe ser ventilado
hacia el exterior. No ventile el aire hacia el exterior cuando use
los modos "Dehumidify" (Deshumidificacion) o "Heat" (Calor).
1. Coloque la boquilla en el tubo de escape.
2. Abra la puerta un poco y coloque la boquilla entre la
puerta y la jamba (Fig. 5).
Importante: No extienda el tubo de escape ni Io doble sin
necesidad.
13

Funcionamiento
J_ Panel de Control
iMode
Cool Fan DH Heat
•A.M. P.M.S)
Timer Clean Drain
Start Stop Filter Water
Control de Control Control de la Display Controles de Controles del Luces de
Alimontaci6n do Modo Velocidad TimoI°CI°F Hora/ Roloj Advortoncia
del Control Tomporatura
Ventilador
Control de Alimentacibn
Este bot6n pone en marcha y apaga el acondicionador de aire.
Control de modo
Modo 'Cool' (Fri6), Modo 'Fan' (Ventilador), Modo 'DH' (Deshumidificador), y Modo 'Heat' (Calor) [solamente los modelos con calor].
Las posiciones se ajustan con el bot6n de control de modo. La luz verde indica que el modo se encuentra actualmente en uso. Cuando
se selecciona el modo 'Cool' (enfriamiento), la unidad hara" circular el aire y Io enfriara'. Si se selecciona modo 'Fan' (ventilaci6n) la
unidad s61o hara" circular el aire. Cuando se selecciona la funci6n de deshumidificaci6n, la unidad eliminara" la humedad y hara" circular
el aire. Cuando se selecciona el modo 'Heat' (calor), la unidad calentara" y hara" circular el aire.
Modo 'Cool' (Fri6)
•Para mayor confort, la unidad enfrfa y deshumedece al mismo tiempo. Durante el modo de enfriamiento, el agua condensada
pasa al exterior por medio de la boquilla.
• En condiciones de humedad extrema la unidad acumulara" el agua condensada en un tanque interno. En este caso la luz roja se
encendera" para indicar que se debe vaciar el tanque. Vea la secci6n sobre Drenaje del agua.
• Ajuste la velocidad de enfriamiento, el termostato y la deflexi6n de aire al nivel de confort deseada.
Modo 'Fan' (Ventilador)
• El acondicionador de aire solamente hara" circular el aire.
Modo 'DH' (Deshumidificador)
En el modo de deshumidificador, la unidad reduce la humedad del ambiente en la habitaci6n.
1. Compruebe que la va'lvula de drenaje superior est6 en la posici6n de cierre y que el tap6n de caucho est6 en su lugar (Fig. 7 d).
2. Escoja el modo de deshumedecer (Fig. 6).
3. Si la luz roja que indica que el balde interno esta" Ileno se enciende, siga el procedimiento que se recomienda para drenaje.
Modo 'Heat' (Calor) [solamente los modelos con resistencia electrica] -
• El acondicionador de aire circula y calienta el aire.
• Caracterfstica de Seguridad del Calentador - Cuando el calentador esta" apagado, el ventilador de baja velocidad se activara" y
funcionara" durante 10 segundos para asegurar la eliminaci6n de alg_n calor residual, a la vez que el diodo LED 'Low Fan'
(ventilador de baja velocidad) destella hasta que se detenga el ventilador de baja velocidad.
Control de la Velocidad del Ventilador 'Fan Speed' • Alta y Baja
El ajuste de la velocidad del ventilador se cambia cada vez que se oprime el bot6n de control de velocidad del ventilador.
• Una luz verde indicara" el ajuste que se ha seleccionado.
14

Funcionamiento
Controles de[ [ndicador Visual
Control de los Modos 'Time/°C/°F ' (Tiempo/°C/°F): El control
del indicador visual se usa para cambiar el ajuste actual.
Hay tres ajustes en el indicador visual:Temperatura en
grados Fahrenheit, Temperatura en grados Celsius y el Reloj
, El indicador visual volver_ del ajuste de la hora al ajuste
Fahrenheit si el control no ha sido oprimido durante cinco
segundos.
La temperatura en el indicador visual es la temperatura
implicita. NO es la temperatura real de la habitaci6n.
Controles del Tiempo/Temperatura:
Estas teclas se usan para cambiar el ajuste de la
temperatura, para cambiar la hora, para cambiar el tiempo
de puesta en marcha y el tiempo de parada.
Cambio del Ajuste de [a Temperatura
Seleccione ya sea grados Fahrenheit o Celsius en el indicador
visual usando el control del indicador visual y luego cambie
el ajuste de la temperatura en incrementos de 1° usando la
tecla 'Time!Temperature' (Tiempo/Temperatura).
Programaci6n del Reloj
Seleccione la visualizaci6n de la hora con el control del
indicador visual y cambie el reloj con los controles
'Time/Temperature'. La hora aumentar_ o disminuir_ en
incrementos de un minuto cada vez que oprime la tecla. Si se
mantiene oprimido ya sea el bot6n flechado hacia arriba o
hacia abajo, la hora cambiar_ continuamente hasta que se
deje de oprimir la tecla. Las luces AM y PM cambiar_n de
acuerdo con el cambio de la hora.
Controies de[ Temporizador
Los controles del temporizador ('Timer') pueden usarse para
programar la hora en que se desea que el acondicionador de
aire se ponga en marcha asi como tambien la hora en que se
desea que el acondicionador de aire se apague.
Programaci6n de un tiempo de Puesta en Marcha
Oprima la tecla 'start' (puesta en marcha) o 'stop' (parada). El
indicador visual mostrara entonces el n0mero de horas que
falta para la puesta en marcha autom_tica del
acondicionador.
Use los controles del tiempo y de la temperatura para
programar el n0mero de horas antes de la puesta en marcha.
E[ temporizador se programar_ si no se oprime ninguna tecla
durante cinco segundos. Una luz indicadora situada arriba de
la tecla 'Start' se ilumina indicando que el temporizador est_
activado.
Programaci6n de un Tiempo de Parada
Cuando el acondicionador est_ en funcionamiento, oprima la
tecia 'Stop' (parada). El indicador visual mostrar_ el nOmero
de horas que faltan para que el acondicionador se detenga
autom_ticamente. Use los controles del tiempo y de la
temperatura para programar el nOmero de horas antes de la
parada. El temporizador se programara si no se oprime
ninguna tecla durante cinco segundos. Una luz indicadora
situada arriba de la tecla 'Start' se ilumina indicando que el
temporizador est_ activado.
CANCELACION de la funci6n de[ temporizador
Si est_ programada la puesta en marcha:
Oprima la tecla 'Start' durante tres segundos. La luz se
apagar_ y la funci6n de puesta en marcha queda
desactivada.
Si esta progtamada [a patada:
Oprima la tecla 'Stop' durante tres segundos. La luz se
apagar_ y la funci6n de parada queda desactivada.
Luces de Advertencia: Estas luces se iluminar_n cuando el
acondicionador de aire necesite atenci6n especial.
Luz de Limpieza del Filtro
Esta luz indica que el filtro debe ser limpiado. E[
acondicionador de aire continuar_ funcionando aun cuando
la luz este encendida. Sin embargo, el fiitro debe ser
limpiado tan pronto como sea posible despues que la luz se
ilumina. Despues de limpiar el filtro, oprima
simult_neamente las teclas 'Time/Temperature'
(Tiempo/Temperatura) para reactivar el monitor del fiitro.
Luz de Vaciado de[ Agua
Esta luz indica que el dep6sito interno del agua necesita ser
vaciado. El acondicionador no funcionar_ hasta que no haya
sido vaciado. Vea la p_gina siguiente del manual del usuario
para obtener las instrucciones sobre como vaciar el dep6sito.
E[ acondicionador de aire debe estar ajustado para
deshumidificaci6n cuando el agua est_ siendo extraida.
Control Remoto del Acondicionador de Aire
Las funciones son id6nticas a ]as de ]os contro]es sensib]es al tacto de su acondicionador
de aire,
ATENC|ON
Las pilas se pueden calentart tener escape o explotar debido al use
incorrecto.
* No instale/as pilas con la polaridad (+/-) inversa°
* No exponga/as pilas a! fuege o a temperaturas altaso
* No intente recargart certecircuitar o desarmar/as pilas.
® @
On/Off Fan Sp_
© ©
D_spmav Mode
@ ©
Start Stop
TimeP Timer
Batteryinstallation_t_,
Mantenga fuera del alcance de los niffos pequeffos las pilas yotres artfculos que puedan ser tragados. P6ngase inmediatamente
en contacto con un m_dico si un niffo pequeffo se traga un objeto.
15

Mantenimiento
El
CLOSE
OPEN
Filtro Principal de Aire
)iar con agua cada dos semanas)
Dfiltros de purificaci6n
(NO LIMPIAR)
i
Drenaje del agua
Si se enciende la luz roja que indica que el balde interno est6
Ileno, siga el procedimiento que se recomienda para el drenaje:
1. Debe apagarse la unidad.
2. Coloque el recipiente bajo la va'lvula de drenaje superior y
saque el tap6n de caucho de dicha va'lvula (Fig. 7 a, b, c).
3. Inserte la manguera de desagLie en la va'lvula de drenaje
superior apuntando hacia el recipiente.
4. Mueva la va'lvula de drenaje superior de la posici6n de cerrado
a abierto (Fig. 7 b).
5. Encienda la unidad, ponga el interruptor en posici6n modo de
deshumidificaci6n, y la unidad se encendera', Io que permite que
funcione la bombay drene el agua (Fig. 6).
6. Apague la unidad cuando ya no salga agua.
7. Cierre la va'lvula de drenaje superior, saque la manguera de
drenaje, retire el recipiente de agua y vuelva a poner el tap6n de
caucho en la va'lwda de drenaje superior (Fig. 7 d).
8. Ahora la unidad puede ponerse en el modo de operaci6n
que desee.
Importante: Cuando cambie el modo de operaci6n nuevamente a
enfriamiento, no se olvide de volver a poner el tap6n y de girar la
va'lvula de drenaje superior 90 ° a la derecha o a la posici6n de
cierre. Si no realiza esta operaci6n, saldra" agua de la unidad al
encenderla.
Limpieza del (de los) filtro(s)
El acondicionador de aire tiene un filtro de aire primario
(8a) que debe ser limpiado con agua cada dos semanas.
Este acondicionador ademas tiene un filtro purificador (8b)
que debe ser reemplazado todos los afros. No lave este
filtro con agua.
1. Separe el filtro primario del filtro purificador.
2. Lave el filtro primario con agua.
3. Despu6s de que el filtro primario este completamente
seco, reinstalelo en el filtro purificador y coloquelos de
vuelta en el acondicionador de aire.
Limpieza del exterior
• La rejilla de salida del aire puede limpiarse con un trapo o
una esponja, agua tibia y un detergente suave.
• Nunca use agua caliente, lejfa, gasolina, a'cidos, Ifquidos de
limpieza ni cepillos para limpiar la unidad. El hacerlo daffara" el
gabinete y la zona de descarga del aire.
• No lave la unidad con una manguera.
16

Mantenimiento
Valvula de drenaje inferior
Si se transporta la unidad o se guarda
despu_s de la estacibn
A fin de evitar un choque electrico, desenchufe el
acondicionador de aire.
Drene el exceso de agua del tanque inferior colocando una
bandeja debajo del orificio de drenaje inferior. Retire el tap6n de
goma y deje que el agua drene hacia la bandeja. Cuando deje de
salir agua, vuelva a colocar el tap6n de drenaje inferior y retire la
bandeja con agua (Fig. 10).
Antes de usar la unidad al comienzo de la
estacibn
• Encienda la unidad durante cuatro o cinco horas
para que se seque.
• Limpie el filtro de aire.
• Limpie el gabinete y las zonas de descarga
del aire si es necesario.
Instrucciones de Servicio
L6alas cuidadosamente antes de solicitar el servicio.
Si la unidad no enciende
• Compruebe que la unidad est6 enchufada a un tomacorriente.
• Compruebe que la unidad no est6 en la posici6n de apagado.
• Compruebe que el interruptor del circuito no haya saltado.
Si la unidad no funciona y la luz roja esta encendida
• Verifique que la unidad est6 nivelada; si la luz sigue encendida, vacfe el tanque interno de agua (yea la secci6n sobre
Drenaje del agua).
Si la unidad no enfria Io suficiente
• Compruebe que el tubo de evacuaci6n de aire y el difusor est6n conectados entre sf y tambi6n al adaptador de ventana.
• Compruebe que el tubo de evacuaci6n de aire no esta doblado.
• Compruebe que las va'lvulas de drenaje estan en su sitio yen posici6n de cerrado.
• Ponga el termostato a una temperatura ma's baja.
• Compruebe que el tubo de evacuaci6n de aire y el difusor no tengan nada dentro.
Si la unidad hace demasiado ruido
• Compruebe que el tubo de evacuaci6n de aire y el difusor est6n conectados entre sfy tambi6n al adaptador para la
ventana.
• Compruebe que el tubo de evacuaci6n de aire y el difusor no tengan nada dentro.
17

Garantia Garantia de Un A_o en e| Aire Acondicionado
Sears reparara su aparato de aire acondicionado, sin cargo, si tiene defectos en
materiales o mano de obra hasta por un a_o a partir de la fecha de compra, cuando
sea utitizado para enfriamiento normal de una habitaci6n conforme alas instrucciones
en et presente manual.
Garantia de Cinco -A_os en e| Sisterna Se||ado de
Refrigeraci6n
Sears reparar_ el sistema de sellado de refrigeraci6n (consistente en el
refrigerante, tubeda y compresor), si tiene defectos en materiales o mano de
obra durante cinco ados a partir de la fecha de compra, cuando sea utilizado y
mantenido para enfriamiento normal de una habitaci6n conforme alas
instrucciones del presente manual.
Sears, Roebuck and CO. Dept. 817WA, Hoffamn Es_tes, IL 60719
Servicio Sears
Contrato de Mantenimiento
"Reparamos Io que Verldemos" es nuestra seguridad de que usted puede
depender det servico de Sears. Su aire acondicionado tiene un valor agregado cuando
toma en cuenta que Sears tiene unidades de servicio en todo et pais, equipado con
tecnicos profesionales especialados en todos los etectrodomesticos que Sears vende.
Tienen et conocimiento y talento, herramientas, piezas y equipo para asegurar nuestro
compromiso hacia usted, que es, "Reparamos 1oque Vendemos".
Contrato de Manteniemiento Sears
Mantenga et valor de su aire acondicionado con un Contrato de Mantenimiento Sears.
Los aires acondicionados Sears estan dise_ados, fabricados y probados para darle
a_os de operaci6n confiable. Sin embargos, cualquier etectrodomestico modemo
pudiera rquerir de servi o en un momento dado, et Contrato de Mantenimientos Sears le
ofrece un sobresaliente programa de servico para su aire acondicionado.
El Contrato de Mantenimiento Sears
• Es su mejor forma de comprar et servicio de manana a precios de hoy.
•Elimina tas cuentas de reparaci6n resultantes det uso normal.
Permite tantas tlamadas de servico como sean necesarias.
Provee una Inspecci6n de Mantenimiento Preventivo anual cuando usted to disponga
para conservar Aire Acondidionado en condiciones adecuadas de trabajo.
Para mayor informaci6n, Ilame al 1-800-827-6655
18

Lea y Guarde Estas Instrucciones
Esta Guia del Propietarion proporciona instrucciones de operacion especificas para su modelo. Use el aire acondicionado de
ventana solo como se indical en esta Guia. Las instrucciones no tienen la intencion de cubrir todas las posibles condiciones y
situaciones que puderan ocurrir. Siempre debe emplearse el sentido comun y precaucion al instalar, operar y mantener
cualquier electrodomestico.
Registre Sus Numeros de IVIodelo y de Serie
En el espacio abajo registre los nt_meros de modelo y serie.
No. de Nlodelo:
No. de S@rie: i
Fecha de Compra: ....
17 2980
17 2875 18 3386
36 36 7327 23 5653
$3 2783
q_31
173194 _7 2813
\/
21 5814
17 3310
17 2813
_90_ 35 5902
48 9682
18 3911_
17 2819@
03 6082(_ _)
36 1851
19
Table of contents
Languages:
Other Sears Air Conditioner manuals

Sears
Sears Kenmore Air Conditioner User manual

Sears
Sears Kenmore Room Air Conditioner User manual

Sears
Sears Kenmore 580.72056 User manual

Sears
Sears Kenmore P/N93SR-D02 User manual

Sears
Sears Kenmore Room Air Conditioner User manual

Sears
Sears 661.624921 User manual

Sears
Sears Kenmore Air Conditioner User manual