Sears Kenmore 580.72056 User manual

Owner's Manual
Manual del Propietario
®
ROOM AIR CONDITIONER
ACONDICIONADOR DE AIRE DE VENTANA
Model, Modelo 580.72056
Sears, Roebuck and Co., Hoffman Estates, IL 60179 U.S.A.
www.sears.com
All manuals and user guides at all-guides.com
all-guides.com

TABLE OF CONTENTS ........................2
WARRANTY ..............................................2
SAFETY .....................................................3
Important Safety Instructions ...................... 3
ELECTRICAL REQUIREMENTS .......4
INSTALLATION ........................................5
Installation Requirements ......................... 5
Installation ................................................ 6
How to Install ............................................ 6
Removal from Window ............................. 7
OPERATION .............................................8
How and Why ........................................... 8
Normal Sounds ........................................ 8
Capacity and Running Time ..................... 8
Features ................................................... 9
Using the Air Conditioner ......................... 9
Display ................................................... 10
Remote Control ...................................... 11
How to Insert Batteries Into Remote Control--.12
Air Direction Adjustment ......................... 12
MAINTENANCE .....................................13
Air Filter Cleaning ................................... 13
Air Conditioner Cleaning ........................ 13
How to Remove the Front Grille .................. 13
How to Replace the Front Grille .................. 13
TROUBLESHOOTING .........................14
Before Calling for Service ...................... 14
ESPAI_IOL ................................................15
SERVICE NUMBERS ............BackCover
FULL ONE YEAR WARRANTY ON
ROOM AIR CONDITIONER
For one year from the date of purchase, when this
air conditioner isoperated and maintained for
normal morn cooling according to instructions in this
owner's manual, Sears will repair this air
conditioner, free of charge, if defective in material or
workmanship.
FULL FIVE-YEAR WARRANTY ON
SEALED REFRIGERATION SYSTEM
For five years from the date of purchase, when this
air conditioner isoperated and maintained for
normal room cooling according to instructions in this
owner's manual, Sears will repair the sealed
refrigeration system (consisting of refrigerant,
connecting tubing, and compressor), free of charge,
ifdefective in material or workmanship.
WARRANTY SERVICE IS AVAILABLE BY
CONTACTING SEARS SERVICE AT
1-800-4-MY-HOME ®
Warranty coverage applies only to air conditioners
used for non-commercial, private household
purposes.
This warranty applies onlywhile this product is in
use in the United States.
This warranty gives you specific legal rights, and
you may also have other rights which vary from
state to state.
Sears, Roebuck and Co., D/817WA,
Hoffman Estates, IL 60179 U.S.A.
-2-
All manuals and user guides at all-guides.com

IMPORTANT SAFETY INSTRUCTIONS
The safety instructions below will tell you how to use your room air conditioner to avoid harm to yourself or
damage to your ROOM AIR CONDITIONER.
_FOR YOUR SAFETY
Do not store or use gasoline or other flammable vapors
and liquids in the vicinity ofthis or any other appliance.
Read product labelsfor flammability and other warnings.
_PREVENT ACCIDENTS
To reducethe riskoffire, electricalshock,or injuryto
personswhenusingyourairconditioner,followbasic
precautions,includingthefollowing:
•Be suretheelectricalserviceis adequatefor themodel
youhave chosen.
•Ifthe airconditioneristo be installedina window,you
willprobablywantto clean bothsidesof the glassfirst, if
thewindowis a triple-tracktypewitha screenpanel
included, youmaywantto removethe screen
completelybeforeinstallation.
• Be surethe airconditionerhas beensecurelyand
correctlyinsta(ledaccordingtothe separateinstallation
instructionsprovidedwiththis manual.Savethismanual
and installationinstructionsfor possiblefuture usein
removing or reinstalfingthisunit.
• Usegloveswhenhandling theairconditioner.Becareful
toavoidcutsfromsharpmetalfins on front and rearcoils.
ELECTRICAL INFORMATION
The completeelectricalratingof yournew roomair
conditionerisstatedonthe serialplate.Refer tothe rating
whencheckingthe electricalrequirements.
•Be surethe airconditionerisproperlygrounded.To
minimizeshockandfire hazards,propergroundingis
impodant.The powercord isequippedwitha
three-pronggroundingplugfor protectionagainstshock
hazards.
•Yourair conditionermust be plugged intoaproperly
grounded wall receptacle. Ifthewall receptacle you
intend to use is not adequately grounded or protected by
a time delay fuse or circuit breaker, have aqualified
electrician install the proper receptacle.
• Do not runair conditioner with a protective covering.
This could result in mechanical damage within the air
conditioner.
• Do notuse an extension cord or an adapter plug,
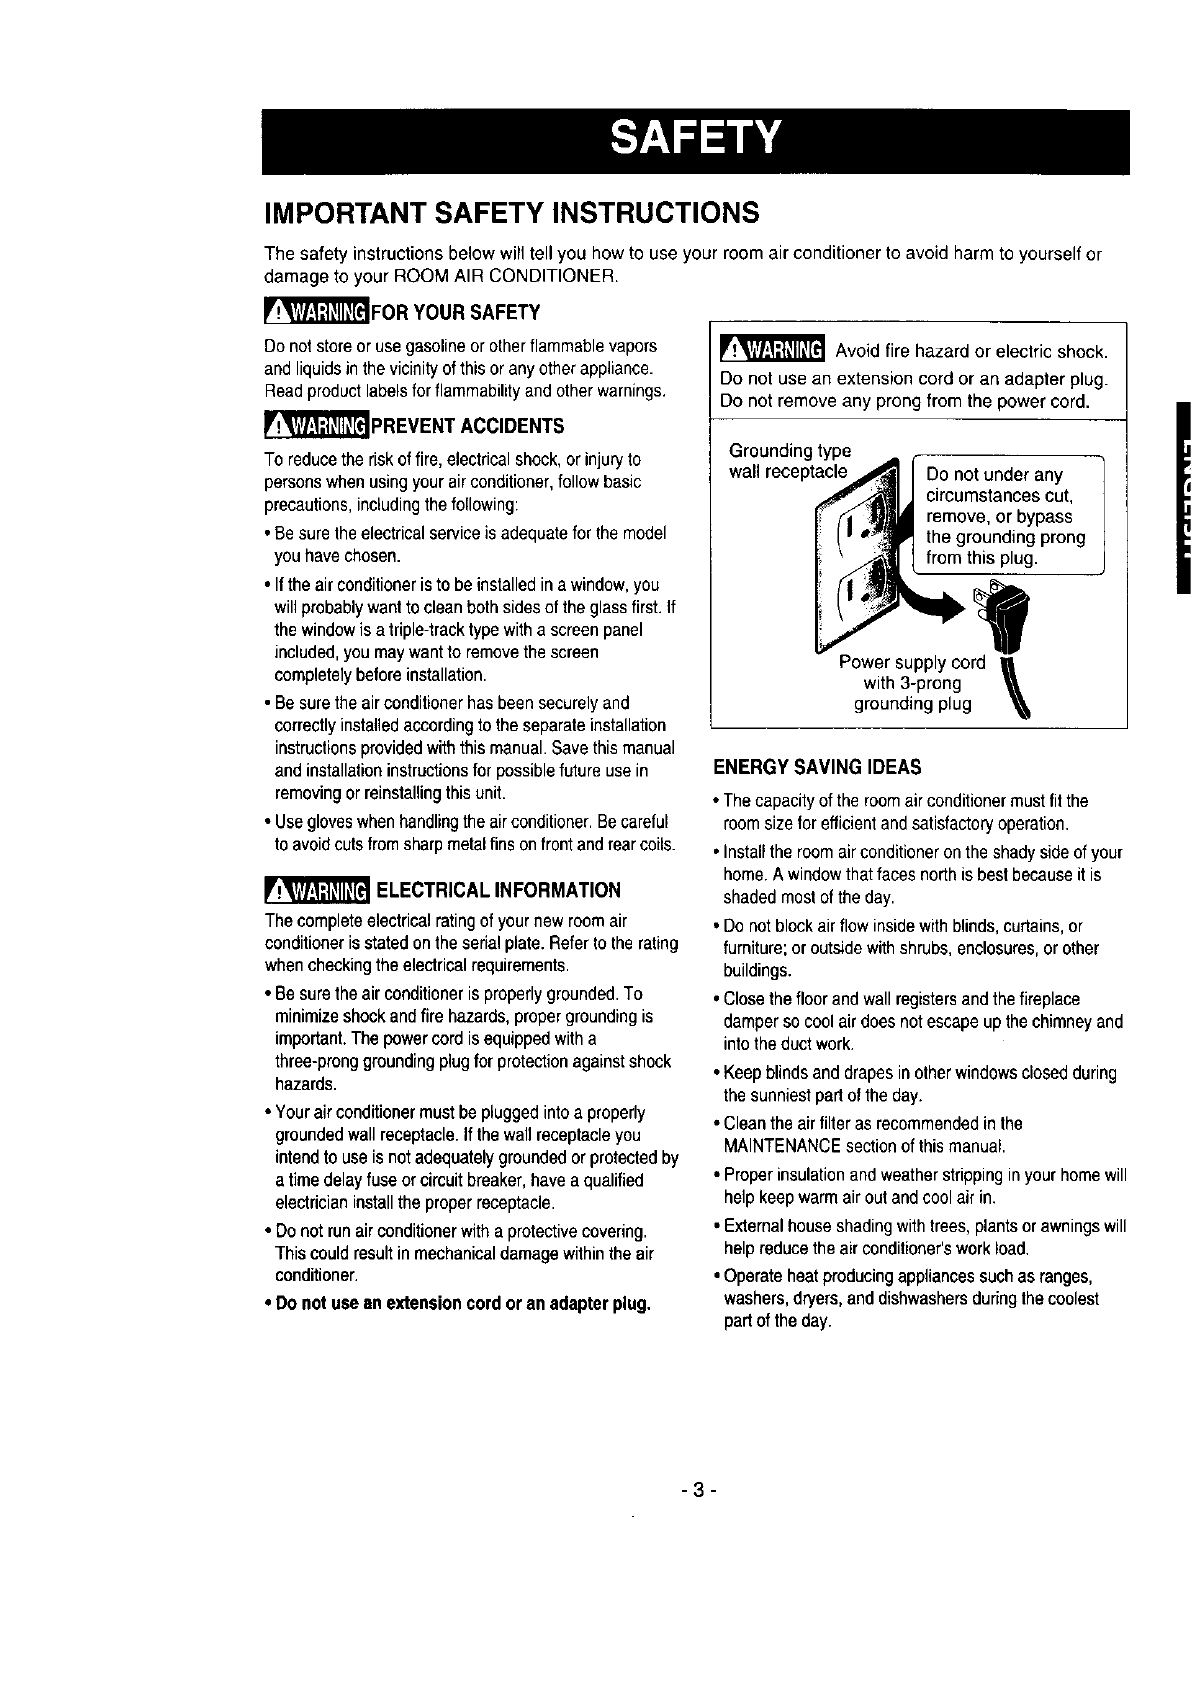
_ Avoid fire hazard or electric shock.
Do not use an extension cord or an adapter plug.
Do not remove any prong from the power cord.
Grounding type
wall receptacle Do not under any
circumstances cut,
remove, or bypass
the grounding prong
from this plug.
Power supply cord
with 3-prong \grounding plug
ENERGY SAVING IDEAS
• The capacity of the room air conditioner must fit the
room size for efficient and satisfactory operation.
• Installthe room air conditioner on the shady side ofyour
home. A window that faces north is best because it is
shaded most ofthe day.
• Do not blockair flow inside with blinds, curtains, or
furniture; or outside with shrubs, enclosures, or other
buildings.
• Close the floor and wall registersand the fireplace
damper so cool air does not escape upthe chimney and
intothe duct work.
• Keepblinds and drapes in other windows closed during
the sunniest part ofthe day.
• Clean the air tilter as recommended in the
MAINTENANCE section of this manual.
• Proper insulation and weather stripping in your home will
help keep warm air out and cool air in.
• External house shading with trees, plants or awnings will
help reduce the air conditioner's work load.
• Operate heat producing appliances such as ranges,
washers, dryers, and dishwashers during the coolest
pad of the day.
-3-
All manuals and user guides at all-guides.com

OBSERVE ALL LOCAL CODES AND
ORDINANCES.
DO NOT, UNDER ANYCIRCUMSTANCES,
REMOVETHEPOWERSUPPLYCORD
GROUND PRONG.
ELECTRICALGROUNDISREQUIRED ON
THIS APPLIANCE.
A 115-volt 60 Hz, AC only, 15A fused and
properly grounded electrical supply isrequired.
A time delay fuse or time delay circuit breaker
is recommended. Use a dedicated circuit,
serving only this appliance.
DO NOT USE AN EXTENSION CORD.
RECOMMENDED GROUNDING METHOD
For your personal safety, this appliance must
be grounded. This appliance has a power
supply cord with a 3-prong grounding plug. To
minimize possible shock hazard, the cord must
be plugged into a mating grounding type wall
receptacle and grounded in accordance with
the National Electrical Code (ANSI/NFPA 70)
latest edition and all local codes and
ordinances. If a mating wall receptacle is not
available, it is the personal responsibility and
obligation of the customer to have a properly
grounded 3-prong wall receptacle installed by
a qualified electrician.
AWARNING
Electrical Shock Hazard
Plug into a grounded 3 prong outlet.
Do not remove ground prong.
Do not use an adapter.
Do not use an extension cord.
Failure to follow these instructions can result
in death, fire, or electrical shock.
_3-pron9
3 nron,_ _ Igrounding
"P' _ _ _ I1_nl_\ 3 type wall
grounding __-_ IrVJ _ I
plug _ _'_'_1 _ receptacle
Ground
Power -_ prong
supply
cord
-4-
All manuals and user guides at all-guides.com

INSTALLATION REQUIREMENTS INSTALLATION HARDWARE
Your air conditioner will install into standard double
hung windows with actual clear opening widths of
22 to 36 inches (558mm to 914mm) (FIG. 1).
Lower sash must open sufficiently to allow a clear
vertical opening of 14 inches (356mm). Side louvers
and the rear of the air conditioner must have clear
air space to allow enough airflow through the
condenser for heat removal. The rear of the unit
must be outdoors, not inside a building or garage.
•_22" to 36" --
14"rain
Intedor wall
Sash
Winddow
"-_,_- Offset
•-- Sill
-- Exterior
"" .... "FIG. 1
ELECTRICAL SERVICE
Check your available electrical service. The power
supply available must be the same as that shown on
the unitnameplate (foundon left side ofcabinet).
All models are equipped with a 3-prong service plug to
provide proper service and safe positive grounding. Do
not change plug in any way. Do not use an adapter
plug. If your present wall outlet does not match your
plug, call a qualified electrician to make the necessary
corrections. SAVE CARTON and this OWNER'S
MANUAL for future reference. The carton is the best
way to store unit during winter or when not in use.
To avoidrisk ofpersonalinjury,propertydamage,or
productdamagedue to theweightofthis device and
sharpedgesthat maybe exposed:
•Air conditionerscovered inthis manualposean
excessiveweight hazard.Two or more peopleare
neededto moveand install the unit.
To preventinjuryor strain,use propertiffingand
carryingtechniqueswhen movingunit.
•Carefullyinspectlocationwhereair conditionerwill
be installed.Be sureit willsupportthe weightof
the unitoveran extended periodoftime.
• Handleair conditionerwith care.Wear protective
gloveswheneverliftingor carrying theunit. AVOID
the sharpmetalfins of front and rearcoils.
• Makesureair conditionerdoes notfalldudng
installation.
ITEM NAME OF PARTS Q'TY
A SHORT SCREW 11
B WOOD SCREW 5
C L BRACKET 3
D FOAM STRIP 1
E FOAM SEAL 1
FSIDE CURTAIN 2
G DRAIN PIPE 1
H SUPPORT BRACKET 1
REQUIREDT(3OLS:
•Tight Fitting gloves
• Standard screwdriver
•Phillipsscrewdriver
• Pliers
• Sharp knife
• 3/8-inch open end
wrench or adjustable
wrench
• 1/4-inch hex socket
and ratchet
• Tape measure
• Electric ddll
• 1/4-inch drill bit
-5-
All manuals and user guides at all-guides.com

INSTALLATION
Pick a locationwhich will allowyou to blowthe cold airinto
the area youwant Windows usedfor installationmust be
strong enoughto supportthe weightof the airconditioner
Good installationwith specialattentionto the properposition
of the unitwiltlessen the chancethatservice will beneeded.
Ifair conditionerisblockedbya stormwindowframe,see
step 9 on page7beforebeginningtoinstall.
HOW TO INSTALL
LISIDE CURTAINS
Insert the side curtains into the upper and lower
guides of the air conditioner. Fasten the curtains to
the unit with screws (ITEM A), as shown in FIG. 2.
ITEMA FIG. 2
_FOAM STRIP
Cut the adhesive-backed foam strip (ITEM D) to the
window width.
Remove the backing from the foam strip and attach the
foam strip to the underside of the bottom window. (FIG. 3)
L_ ATTACH L BRACKET
• Install the Lbrackets on the outer sill with the short
side of the bracket against the back of the inner
sill. Install one L bracket 8" to each side of center
line. See FIG. 5.
•The bracket helps to hold unit securely in place.
Be sure to place bracket edge flush against back
of inner sill. See FIG. 5.
• If air conditioner is blocked by storm window
frame, see step 9.
INNER SILL
OUTER SILL ITEM AINSIDE
3ENTER LINE
J
SHORT SIDE
OUTSIDE
L BRACKET FIG.5
UDRAINAGE
First, be sure to insert the drain pipe into base pan
before installation.
The air conditioner must be installed with a slight tilt
downward (see FIG. 8) for proper water drainage.
The air conditioner will drain the excess condensed
water through the drain pipe.
(iTEM D)
FIG. 3
_'! LOCATING UNIT IN WINDOW
Open the window and mark center line with pencil
on the center of the inner sill, as shown in FIG. 4.
FIG. 4
INCAP
DRAINPIPE
DP_IN plpE_BASE PAN REAR
FIG. 6
-6-
All manuals and user guides at all-guides.com
all-guides.com

_INSTALLTHE AIR CONDITIONER IN THE
WINDOW
•Carefully liftthe air conditioner and slide it into the open
window. Make sure the bottom guide of the air
conditioner drops into the notches ofthe L brackets.
• When the air conditioner drops intothe L brackets, the
air conditioner will be centered in window opening as
shown in FIG.7.
• While steadying the air conditioner, carefully bringthe
window sash down behind the upper guide ofthe air
conditioner, as shown in FIG.8.
I
\I FIG. 7
CENTER LiNE
DSECURE THE GUIDE PANELS
Extendthe guide panels(ITEM F)to fill thewindow
openingusing4 screws(ITEM B) to secure them, as
shown inFIG. 9.
f_l INSTALLTHE SASH SEAL AND SASH LOCK
• Cut the foam seal(ITEM E) to the window width.
Stuff thefoam seal betweentheglassand thewindowto
preventair and insectsfromgettingintotheroom,as
shownin FIG, 9.
•Fastenthe remainingL bracketoneitherside of the
windowusing screw(ITEM A).See FIG.9 inset.
Installingthisbracketpreventswindowfrom being raised
whichmay resultin unitfalling.
•Removethe screwsthatsecurethecabinetandbase
pan inthe right side.
•Attach thesupportbracket(ITEM H) in theinnerwindow
sillwitha screw(ITEM B), as shown Fig.10.
ITEM B
JFIG. 10
I_IlF AIRCONDITIONER ISBLOCKED BY STORM
WINDOW FRAME
• Ifstorm windowpresentsinterference, fasten a 2" wide
wood strip to the inner window sillacross the full width of
the sill, The wood strip should be thick enough to raise
the height of the window sillso thatthe unit can be
installedwithout interference from the the storm window
frame. See FIG. 11.
Top of wood strip should be approximately 3/4" higher
than the storm window frame to help condensation to
drain properly to the outside.
• Install a second wood strip (approximately 6" longby
1V2"wideand same thickness as first strip) in the center
of the outer sill flush against the back ofthe inner sill.
Screw theL brackets into this strip.
This will raise the Lbracket as shown in FIG. 11.
WOOD STRIP MOUNTED 1"MAX
ON TOP OFINNNER SILL _ _ _4"
CLEARANCE_
___ tiNDOW
INNER FRAME
SILL
OUTER
TSmEFIG. 11
REMOVAL FROM WINDOW
Turn the airconditioner off, and disconnect the power
cord. Remove the Lbracket and the screws installed
through the top and bottom of the guide panels, and save
for reinstallation later. Close the guide panels.Keepinga
firm gripon the air conditioner, raisethe sash, and
carefully tiltthe air conditioner backward, draining any
condensate water. Lift the air conditioner from the window
and removethe sash seal from between the windows.
L BRACKET
FIG, 9
•Airconditionerscoveredinthismanualposean
excessiveweighthazard.Twoormorepeopleare
neededtomoveandinstalltheunit.
Topreventinjuryorstrain,useproperliftingand
carryingtechniqueswhenmovingunit.
• Whenhandlingtheairconditioner,becarefultoavoid
cutsfromsharpmetalfins onfrontandrearcoils.
•Makesureairconditionerdoesnotfallduringremoval.
-7-
All manuals and user guides at all-guides.com

HOW AND WHY
Your room air conditioner provides the following
functions to make hot weather living more
comfortable:
• Cools and circulates room air.
• Lowers humidity by removing excess moisture.
•Filters out summertime dust, dirt, and some
airborne impurities.
The air conditioner performs these functions by
drawing room air through a filter which traps dust
and dirt particles. The air then passes over a
cooling coil which refrigerates the air and removes
excess moisture. The same air is then returned to
the room- cooler, drier, and cleaner. Moisture
removed from the room air is carded to the outside
and evaporated.
Your air conditioner is designed to be easy to
operate and to provide plenty of cooling power.
NORMAL SOUNDS FIG.12
Aside from the regular fan motor and compressor
sounds coming from your air conditioner, you will
once in a while hear a pinging sound. This is the
result of moisture being picked up from the air in the
room and thrown against the air conditioner's fan.
This is normal and should not be cause for concern.
Also, do not be alarmed if you hear a slight hissing or
gurgling sound coming from your air conditioner after
it is off. These are normal coolant noises.
CAPACITY AND RUNNING TIME
Proper unitsize is important in deciding the desired
comfort for the area you want to cool. The proper
size is determined by the number of square feet in
the area to be cooled.
Whenever the heat or humidity load is above normal
the air conditioner must run longer and more often
to keep the desired temperature you have selected,
Under heavy heat load conditions the air conditioner
may need to run constantly to keep the temperature
you want.
At times using the HIGH FAN setting to circulate the
room air may make it comfortable even though you
do not have the air conditioner set to cool the air.
This will decrease your cost of use.
Compressor
The modern high efficiency
compressor may have a high
pitched hum or pulsating
noise that cycles on and off.
Fan -Unit Vibration
You may hear air The unit may vibrate
movement from the and make noise
fan. because of poor wall
or window
construction.
Condense_
You may hear
droplets of water
hittingthe condenser,
causing a pinging or
clicking sound.
FIG. 12
-8-
All manuals and user guides at all-guides.com

FEATURES
7 1
8
FIG. 13
USING THE AIR CONDITIONER
_To reduce the risk of fire, electric
shock, or injury to persons, read the important
SAFETY instructionssection before operating this
appliance.
To begin operating the air conditioner after
installation, follow these steps:
1. Plug in the air conditioner. (To prevent electrical
hazards, do not use an extension cord or an
adapter plug.)
2. Set the TEMP control to the lowest number.
3. Set the MODE control to the COOL.
4. Adjust the louvers for comfortable air flow with
control tab.
5. Once the room has cooled, adjust the TEMP and
FAN SPEED control to the setting you find most
comfortable.
NOTE : If the air conditioner is turned off, wait 3
minutes before restarting. This allows pressure
inside the compressor to equalize. Failure to wait 3
minutes before restarting may cause inefficient
operation.
If you move the TEMP control to a warmer, then
immediately back to a cooler setting, the
compressor will shut off, although the fan will
continue to run. Wait 3 minutes before restarting.
Reviewthe DISPLAY section for othersettings.
(See page 10)
1. Cabinet
2. Horizontal Air Direction Control Tab
3. Cool Air Discharge
4. Inlet Grille
5. Air Filter
6. Control Board
7. Upper Guide
8. Curtain
9. Remote Control
-9-
All manuals and user guides at all-guides.com

DISPLAY
REMOTE CONTROL SIGNAL RECEIVER
TEMPERATURE SETTING
•Use this button to automatically control thetemperature
ofthe room. The temperature can be set within a range of
60°F to 86°F by increments of I°F,
I ,_ _ ENERGY SAVER
VTEMP J_. oThefanstopswhenthecompressorstopscooling.
Approximately every 3 minutesthe fan will turnon and
-- -- check the room air to determine ifcooling isneeded.
r
_. SAVER oI/- DISPLAY COOL/FAN
-- -- I | ° Everytime you push thisbutton, itwill toggle between
MODE COOLO R
• Youwillusuallyuseshut-offtimewhileyousleep.
I • Ifunit isrunning,Timersetsnumberof hoursuntilshut-off.
• Foryoursleepingcomfort,onceTimer isset,theTemperature
TIMER Osettingwillraise2°F after30 min.,and onceagainafteranother
L ON/OFF 30min.
• Everytime youpushTimer button,itadvancestheTimersetting
asfollows: 1 Hour _,2 Hours _.etc.m,12 Hoursmaximum.
IFAN "_
SPEED|
/LOj STARTTIME
•If unitisoff,Timer setsnumberofhoursbeforeunitstarts.
•EverytimeyoupushTimerbutton,itadvancestheTimersetting
asfollows:1 Hour _.2 Hours_.etc. t, 12 Hoursmaximum.
POWER
• Toturn the air conditioner ON, push the button.To turn the air
conditioner OFF, push the button again.
• This button takes priority over any other button.
• When you first turn it on, the unit is in cool mode, High fan
speed, Temperature setting at72°F.
FAN SPEED
•Ever/timeyoupushthisbutton,itadvancesthesettingas
follows:{High(F2) _.Low(F1) _High(F2)}
-10-
All manuals and user guides at all-guides.com

REMOTE CONTROL
Note:The RemoteController will notoperateproperly if strong lightshines onthe sensor windowof the Air
Conditioner or ifthere are obstacles between the RemoteControl and the Air Conditioner.
Every timeyou push button, you will hear a beep from the Air Conditioner.
POWER
•To turntheairconditionerON, pushthebutton.To turntheair
conditionerOFF, pushthebutton again.
•Thisbuttontakespriorityoveranyotherbuttons.
•Whenyoufirst turnit on, theunitisin coolmode, Highfan speed,
Temperaturesetting at 72°F.
TEMPERATURE SE'n'ING
•Thisbutton canautomaticallycontrolthetemperature
of theroom.The temperaturecanbe setwithina range of
60°F to86°F by increments of I°F.
FAN SPEED
•Everytimeyou push thisbutton itadvances thesettingas
follows:{(High(F2) _. Low(F1) =,High(F2)}
ON/OFF TIMER
SHUT-OFFTIME
• Youwillusuallyuseshut-offtimewhileyousleep.
• If unitisrunning,Timersets numberofhoursuntilshut-off.
•Foryoursleepingcomfort,onceTimerisset,theTemperaturesetting
willraise2°Fafter30 min.,andonceagainafteranother30 min.
•EverytimeyoupushTimerbutton,itadvancestheTimersettingas
follows: 1Hour P,2 Hours_.etc. _.12 Hoursmaximum.
STARTTIME
•Ifunitisoff,Timersetsnumberofhoursbeforeunitstarts.
•EverytimeyoupushTimerbutton,itadvancestheTimersettingas
follows: 1Hour P,2 Hours _,etc. =,12 Hoursmaximum.
/
/!ii
Ii • TEMP •
I"l
'1
i FAN SPEED
_il i TIMER MODE
_!l; I ENERGY
SAVER
ENERGY SAVER
Thefan stopswhenthe compressorstopscooling.
•Approximatelyevery3 minutesthefan willturnonand
checktheroomairtodetermineif coolingisneeded.
COOUFAN
•Everytimeyoupushthisbutton,itwilltogglebetween
COOL and FAN.
-11 -
All manuals and user guides at all-guides.com
all-guides.com

HOW TO INSERT BATTERIES
INTO REMOTE CONTROL
1. Remove the cover from the back of the
remote controller.
• Open the cover according to the arrow
direction on the cover.
2. Insert two batteries.
•Be sure that the (+) and (-)
directions are correct.
• Be sure that both batteries are new.
3. Re-attach the cover.
• Do not use
rechargeable
batteries.
Such batteries
differ from standard
dry cells in shape,
dimensions, and
performance.
• Remove the batteries
from the remote
controller if the air
conditioner is not
going to be used for
an extended length
of time.
AIR DIRECTION ADJUSTMENT
Using the Control Tabs, the air flow can be directed
to the left, right, up, down and straight ahead, or
any combination of these directions.
t
0
m
FIG. 14
-12-
All manuals and user guides at all-guides.com

AIR FILTER CLEANING
The Air Filler will become dirty as it removes dust
from the inside air. It should be washed at least
every 2 weeks. If the Air Filter remains full of dust,
the air flow will decrease and the cooling capacity
will be reduced, possibly damaging the unit.
•Pull the inlet grille forward and pull out the air filter.
• Wash the Air Filter in warm water. Be sure to
shake off all the water before replacing the filter.
HOW TO REMOVE THE FRONT
GRILLE
• Pull the inlet grille forward.
• Remove the screw securing the Front Grille.
• Push the grille up from the bottom and pull the top
of the grille away from the case to lift the top tabs
out of their slots.
FIG. 15
AIR CONDITIONER CLEANING
Clean the front grille and inlet grille by wiping with a
cloth dampened in a mild detergent solution.
The cabinet may be washed with mild soap or
detergent and lukewarm water, then polished with
liquid appliance wax.
To ensure continued peak efficiency, the condenser
coils (outdoor side of the unit) should be checked
periodically and cleaned if they become clogged
with soot or dirt from the atmosphere. Brush or
vacuum exterior coils to remove debris from fins.
FIG. 17
HOW TO REPLACE THE
FRONT GRILLE
Attach the front grille to the cabinet by inserting the
tabs on the grille into the slots on the front of the
cabinet. Push the grille in until it snaps into place.
FIG. 16 FIG. 18
-13-
All manuals and user guides at all-guides.com

BEFORE CALLING FOR SERVICE
Check the following list to be sure aservice carl isreally necessary. A quick reference to this manual may
help you avoid an unneeded service call.
THE AIR CONDITIONER WILL NOT OPERATE
Check if... Then...
Wallplugdisconnected.
Housefuseblownorcimuitbreakertripped.
PowerisOFF.
Unitwasturnedoffandthenontooquickly.
TEMPControlsetwarmerthanroomtemperature.
Pushplugfirmlyintowalloutlet.
Replacefusewithtimedelaytypeor resetcircuitbreaker
Pushthepowerbutton.
Turnunitoffandwait3minutesbeforerestarting.
TurnTEMPControltoalowertemperature.
AIR FROM UNIT DOES NOT FEEL COLD ENOUGH.
Check if... Then...
FANSPEEDsetatLOW.
TEMPControlsettoowarm.
Roomtemperaturebelow66°F(19°0).
Temperaturesensingtubetouchingevaporatorcoil,
locatedbehindairfilter.
PushFANSPEEDbuttontosetatHI.
TurnTEMPControltoalowertemperature.
Coolingmaynotoccuruntilroomtemperaturerisesabove66_F(19°C)
Straightentubeawayfromevaporatorcoil.
"n,lEAIRCONDmONERCOOtJNG,BUTROOMISTOOWARM-ICEFORMINGONCOOLINGCOILBEHINDFRONTGRILLE.
Check if...
Outdoortemperaturebelow66°F (19°C).
Airfiltermay bedirty.
TEMPControlsettoecoldfornight-timecooling.
Then.,.
Todefrostthe coil,setMODEtoFAN
Cleanairfilter.Referto Maintenancesectionofowner'smanual.
Todefrostthecoil,settheMODEto FANor"High Cool"withthe
TEMPcontrolto a highertemperature
"I]'IEAIRCONDI]10NERCOOUNG,BUTROOMISTO0WARM
Check if...
Dirtyairfilter-airrestricted.
TEMPControlsettoowarm.
Frontofunitisblockedbydrapes,blinds,furniture,
etc.Airdistributionisrestricted.
Doors,windows,registers,etc.open.Coldairescapes.
Unitrecentlytumedoninhotroom.
Cleanairfilter.RefertoMaintenancesectionofowner'smanua{.
TurnTEMPcontroltoalowertemperature.
Clearblockageinfrontofunit.
Closedoors,windows,registers,etc.
Allowadditionaltimetoremovestoredheatfromwalls,ceiling,_or, andfurniture.
THE AIR CONDITIONER TURNS ON AND OFF RAPIDLY.
Check if... Then...
I Outsidetemperatureisextremelybet. ISetFANSPEEDonHItobnngairpastcoolingcoiltaster.
NOISE WHEN UNIT IS COOLING.
Check it'... Then...
I Soundoffanhittingwater- fromthemoistureremovalsystem Thisisnormalwhenhumidityishigh.Closedoors,windows,andregistersWindewvibratlen- poorinstallatlen. I Refertoinstallationinstn,lctlensorcheckwithinstaller.
WATER DRIPPING INSIDE ROOM WHEN UNIT IS COOLING.
Check if... Then...
ITheairsendlti°nerisimproperlylestalled" ! ]3ltairc°nditlenerslightlyt°the°°tsidet°all°wwaterdrainage"Refertoinstallationinstructionscfcheckwithinstaller.
WATER DRIPPING OUTSIDE WHEN UNIT IS COOLING.
Check if... Then...
I ]]le unitisremovinglargequantitiesofmoisture "thisisnormaldudngexceasivelyhumiddays.
fromhumidroom.
I
]
-14-
All manuals and user guides at all-guides.com

INDICE DE MATERIAS .............................15
GARANTJA ................................................ 15
SEGURIDAD .............................................. 16
Importantesinstruccionesde seguridad .....16
REQUERIMIENTOS ELC:CTRICOS ......... 17
INSTALAClON ........................................... 18
Requerimientos para instalaci6n .......... 18
Instalacion ............................................. 19
C6mo instalarlo ..................................... 19
La eliminaeion de la ventana ................. 20
OPERACI(_N .............................................. 21
C6mo y por que ..................................... 21
Sonidos normales.................................. 21
Capacidad y tiernpode funcionamiento -..21
Caracterfsticas ..................................... 22
Uso del equipo de aire acondicionado ....-22
Despliegue ............................................ 23
Control remoto ....................................... 24
Como a Baterias de Adicion en el
Control Remoto ..................................... 25
Ajuste para la direccion del aire ............ 25
MANTENIMIENTO .................................... 26
Limpieza del filtro del aire ...................... 26
Limpiezadelequipodeaireacondicionado..,.26
C6mo sacar la rejilla frontal ................... 26
Como a reemplaza el grille anterior ......26
CORRECCION DE FALLAS ...................... 27
AntesdeLlamarparaServicio...................... 27
PARA PEDIR SERVICIO ......Cubierta Trasera
GARANT|A DE UN ANO POR EL
EQUIPO DE AIRE ACONDIClONADO
DE HABITAClON
Durante unaSo completo a partir de la fecha de
compra,si este equipo de aire acondicionado recibe
mantenimiento y se utiliza para el enfriamiento
normalde habitaci6n seg0n lasinstrucciones
indicadas en este manual del propietario, Sears
reparara gratuitamente este equipo de aire
acondicionado, sitiene alg6n defecto en materiales
ofabricaci6n.
GARANT|A TOTAL DE ClNCO ANOS
POR EL SISTEMA DE REFRIGERACI(_N
HERMETICAMENTE SELLADO
Durante cinco afios a partir de la fecha de compra,
si este equipo de aire acondicionado recibe
mantenimiento y se utiliza para el enfriamiento
normal de habitaci6n seg_n las instrucciones
indicadas on este manual del propietario, Sears
reparar_ gratuitamente el sistema de refrigeracibn
herm_ticamente sellado (que consiste en el agente
refrigerante, lostubos de conexi6n y el compresor),
si tiene algSn defecto en materiales ofabricaci6n.
EL SERVICIO DE GARANT|A ESTA A SU
DISPOSICI6N CON SOLO PONERSE EN
CONTACTO EL CENTRO DE SEARS AL
1-800-4-MY-HOME ®
La proteccion de garantfa cubre unicamente a los
equipos de aire acondicionado usados para uso
domestico y no para uso comercial.
Esta garantia s61o tiene validez mientras el producto
se este usando en los Estados Unidos.
Esta garantia le da derechos legales especfficos y
usted puede tener otros derechos que varian de
estado en estado.
Sears, Roebuck and Co., D/817WA,
Hoffman Estates, IL 60179 U.S.A.
-15-
All manuals and user guides at all-guides.com

IMPORTANTES INSTRUCCIONES DE SEGURIDAD
Las siguientes instrucciones de seguridad le indicar_.n como usar su equipo de aire acondicionado de
habitacion para evitar daSos para usted mismo y para su EQUIPO DE AIRE ACONDICIONADO.
POR SU SEGURIDAD
No almacene ni use gasolina u otros vapores y liquidos
inflamablescerca de _ste o cualquier otro
etectrodomestico. Lea las etiquetas de los preductos para
ver si contienen advertencias sobre el car&cterinflamable
de los mismosy otras advedencias.
_ARA PREVENIR ACCIDENTES
Para reducir el riesgode incendios, descargas el_ctricas
o lesionespersonales al usarsu equipo de aire
acondicionado, tome lasprecauciones basicas, entre las
que estan las siguientes:
• Asegurese de que la alimentaci6n electrica sea la
apropiada para el modeto que usted ha elegido.
• Si elequipode aire acondicionadodebeinstalarseen una
ventana,a ustedprobablementele convienelimpiar
primeroambos ladesdel vidrio.Si la ventanaes deltipo de
trespanelescon un panelincluidode pantalla,leconviene
sacar laventana completamenteantesdela instalaci6n.
• Aseg0rese de que el equipo de aire acondicionado ha
sido instaladocorrectamente y con seguridad seg0n se
sehala en las instrucciones separadas de instalacion
que vienen en este manual. Conserve este manual y las
instrucoiones de instalaci6n para usarlos posiblemente
en el future al sacar o volver a instalar esta unidad.
• Utilice guantes al manejar el equipo de aire
acondicionado, tenga cuidado para evitar cortadas con
las afiladas aletas met_licas que se hallan en los
serpentines frontales y posteriores.
INFORMACION ELECTRICA
En la placa de serie del fabricante se indicacua,I es la
capaeidadelL,ctrica nominalcompletade su nuevoequipode
aireacondicionadopara habitaci6n.Consulteestaplaca
cuandovayaaverificarlosreque0mientosel¢,ctricos.
•Aseg_resede queelequipode aimacondicionadotenga
unaconexi6ncorrectaa tierra.Parareduciralminimolos
riesgosde descargasel_ctricaseincendio,es imporiante
conectarel equipocorrectamenteatierra.El cord6nde
alimentaci6nel_.,'tncaestaequipadoconun enchufede tres
espigasconconexi6na tierraparaprotegertecontrariesgos
de descargasel_tricas.
• Suaireacondiciondodebeset enchufadeenuna tomade
lapared debidamenteconectadea la tierra.Sila tomade
cornentede pared queustedpiensausarnoest_
conectadacorrectamenteatierrao noest_protegidacon
unfusibledeaccibnretardadao conuninterruptorde
circuito,hagaque un electricistacalilicadele instalela toma
decorrientede pareden formacorrecta.
•No pongaafuncionarelequipade aireacondicionadocon
unacubiertaprotectoraexteriorencima.Estopodria
ocasionardahosmec_nicosdentrodelaim acondicibnado.
•Nouse un cablede extensi6nni unenchufeadaptador.
Evitelos peiigrosdeincendiosy
descargaselectncas.No useuncablede extensionni un
enchufeadaptador.NoelimineningunadeIasespigasdei
enchufedelcordondealimentaci6nelectrica.
Toma de
corriente de En ninguna
pared con circunstancia corte,
conexibn a extraiga o intente
eliminar la espiga de
tierra, conexi6n a tierra de
este enchufe.
Cordonde alimentacionelectricacon I
enchufede tresespigasconconexi6na tierra._
IDEAS PARA AHORRAR ENERGiA
• Lacapacidad del equipo de aire acondicionado debe
corresponder al tamafio de lahabitaci6n para el
funcionamiento eficiente y satisfactorio delequipo.
• Instaleel equipo de aireacondicionado de habitaci6n en
el lado sombreado de su hogar. Una ventana odentada
hacia el norte es la mejor porque tiene sombrala mayor
parte del dia.
• No bloquee el flujo de aire hacia el interior con
persianas, c_,dinaso muebles; o la parte de afueracon
arbustos, paredes uotras construcciones.
• Cierre el regulador de tire de la chimenea, las rejillas de
calefacci6n del piso y la pared, de tal modo que el aire
frfo no se escape ni porla chimenea ni por los
conductos.
•Mantengalas persianas y las cortinas de otras ventanas
cerradas durante la parte m_s soleada del dia.
• Limpie el filtro del aire como serecomienda en la
secci6n "MANTENIMIENTO" de este manual.
• El aislamiento correcto y las juntas hermeticas en
puertas y ventanas en su hogarle ayudar_.na mantener
el aire caliente afueray el aire frio adentro.
•AI dade sombra extemamente a la casacon &rboles,
plantas o toldos ayudar=_a reducir la cargade trabajo
del equipo de aire acondicionado.
• Opere los aparatos que producencalor como, por
ejemplo, hornos, lavadoras, secadoras y lavaplatos
durante la parte m&sfria del dia.
-16-
All manuals and user guides at all-guides.com
all-guides.com

RESPETE TODOS LOS C(_DIGOS Y
REGLAMENTOS.
BAJO NINGUNA CIRCUNSTANCIA CORTE,
QUITE O EVITE EL use DE LA CONEXI(_N
A TIERRA DE ESTA CLAVIJA,
ESTE APARATO NECESITA SER
CONECTADO A TIERRA.
Se requiere una alimentaci6n electrica CA,
adecuadamente cenectada a tierra con un
fusible de15A, de 60 Hz y de115 V. Se
recomienda un fusible de retardo o un
disyuntor de circuito que alimente solamente a
este aparato.
NO USE CABLE ELC:CTRICO DE
EXTENSION.
MI_TODO RECOMENDADO DE CONEXION
A TIERRA
Per su propia seguridad este aparato debe
conectarse a tierra. Este aparato viene
equipado con un cable de alimentaci6n y una
clavija de tres terminales. Para reducir al
m_ximo el peligro de cheque electrico, el cable
debe estar conectado a una conexi6n de pared
con conexi6n a tierra, y esta conexi6n debe
hacerse de acuerdo con la eltima edici6n del
Codigo Electrico Nacional (ANSI/NFPA 70), asf
come con los c6digos y reglamentos locales.
Si no existe una conexi6n de pared adecuada,
el ciiente tiene la responsabilidad y la
obligaci6n de mandar instalar, con un
electricista calificado, una conexi6n de pared
adecuada de tres terminales con conexi6n a
tierra.
AADVERTENCIA
Peligrode chequeelectnco
Conecteen unaconexi6nde paredde 3 terminales
Noquitelaterminaldeconexi6na tierra
Nouseadaptadores
Nousecableelectricode extensi6n
Sino sesiguenestasinstrucciones,puede
ocasionarsela muerte,unincendioo un cheque
el6ctrico.
Cable de-
alimentaci6n con
clavija dotada de
conexi6n a tierra
de 3 terminales. _
Toma de corriente ,'7---,I
de pared con Jl\t_"_I
conexion a tierra. "_ I
-N Terminal de
[ _ conexion atierra.
Bajo ninguna
circunstancia code, quite o
evite el use de la conexi6n
a tierra de esta clavija.
-17-
All manuals and user guides at all-guides.com

REQUERIMIENTOS PARA
INSTALACION
Suequipodeaireacondicionadoseinstalaraenvenlanas
estandardedoblepanelconanchosdeaberturalibrede558mm
a914mm(22a 36pulgadas).(Figura1)
Elmarcoinferiordebeabrirselesuficienteparapermitiruna
aberturaverticallibrede356mm(14pulgadas).Lasrejillas
desviadoraslateralesy laparteposteriordelequipodeaire
acondicionadodebentenerunespaciolibfedeaireparapermitir
suficienteflujodeairea travesdelcondensadorparaasi eliminar
elcalor Laparteposteriordelaunidaddebequedaralairelibre,
nodentrodeunedificioogaraje.
L_ll/
,_===a .;,_ Banda
I-t22'°3°1/
]114' min Repisa/] / Ventana
_',ci_._o-' ,_ Antepecho
_._ _.,_- Exterior
Paredinterior"---- -" Figura 1
SERVICIOELECTRICO
Compruebecualesla alimentacionel_trica queIlegaasu
domicilio.Laalimentaci6nelectricadisponibledebesetlamisma
quese muestraenla placadelfabricantedela unidad(quese
hallaenel ladoizquierdodel gabinetedecorrientealtema).
Todoslosmodelosestanequipadosconunenchufedetres
espigasparasuministrarunserviciocorrectoy unaeonexi6na
tierraseguray positiva.Nocambieelenehufede ningunaforma.
Nouseunenchufeadaptador.Sisu tomadecorrientedepared
actualnopuedeusarseconelenchufedelequipo,Uameaun
electricistacatificedoparaqueefect0elascorrecciones
necesarias.
CONSERVELACAJAyesteMANUALDELPROPIETAR]Opara
quelesirra comoreferenciaenel futuro.Lacajaeslamejor
maneradeconservarla unidadduranteel inviernoocuandono
estaenuse.
Para evitarel riesgode heridas personales,daffosen
los bienes, odaffo en elproducto debe set expuestoel
agudez de los bordes y el peso apto delaparato:
• El aire acondicionadodel que sehabla eneste
manualafirma peligrode pesoexcesivo.
Dos o mas personas se requiere para mover e inetalar
la unidad. Para evitar heridas o agotamlento, use
tecnicas apropiadaspara levntar y mover la unidad.
• Cuidadosamente inspeccione el lugar dondeel aire
acondicionadoserapuesto. Asegurese que el lugar
sostengael peso de launidad sobre un pedodode
tiempo prolongado.
• Mantengasu aire acondicionadocon cuidado. Use
guantes protectores cuando levanteo mueva la
unidad. EVITE lasaletas filosas de metalen el
serpentin delantero y de atras.
• Asegurese que el aire acondicionado nose caiga
durante la instalacion.
INSTALACION PIEZAS DE MONTAJE
TIPO NOMBREDEI.ASPIF.ZAS
A TORNILLO CORTO
B TORNILLO MEDIANO
C SUPPORT EN L
D BANDAADHESIVA
E BANDA DEL MARCO
F PANEL DEGUiA
G TUBO DEDRENAJE
H SOSTENGA PARC:NTESIS
CANTIDAD
11
5
3
1
1
2
1
1
HERRAMIENTAS REQUERIDAS
• Guantes apretados
• Destomillador normal
• Destornillador Phillips
• Pinsas
• Cuchillo filoso
•Llaveinglesao Ilave
abierta de 3/8"
•Llavehexagonal de cubo
y trinquete de 1/4 de
pulgada
• Cinta para medir
• Taladro electrico
•Brocade taladro de 1/4"
-18-
All manuals and user guides at all-guides.com

INSTALACION
Escoja un lugar que lepermita Ilevarel aire frio al area
quedesea. Las ventanasque se usen para la instalaci6n
deben tener laresistencia suficiente parasoportar el peso
del equipo de aire acondicionado. Una buena instalaci6n
con atenci6n especial a la correcta posicion de la unidad
disminuir_ laprobabilidad de que sea necesario efectuar
reparaciones.
COMO INSTALARLO
i] CORTINAS LATERALES
Introduzca loscortinas laterales en las guias del aire
acondicionado. Fije las cortinas a la unidad con los
tomUlos (TIPO A) como se muestra en la Figura 2.
TIPOA Figura 2
_FAJA DE SELLANTE
Corte la cinta selladora adhesiva (TIPO D) a la anchura
de la ventana.
Quite el dorso de la cinta selladora y peque la cinta
selladora ala superficie inferiorde laventana de abajo.
Vea la Figura 3.
BANDA
(TIPO D)
COLOCAR LA UNIDAD EN LA
Figura 3
VENTANA
Abra la ventanaymarquela lineacentralen el centro del
alfdizarinterior comose muestraen laFigura4.
L_ SOPORTE DE FIJACII3N L
• [nstale los soportes Len la solera externa con el
lado corto del soporle contra la parte trasera de la
solera interna. Instale un soporle L de 8" a cada
lado de la linea central. Vease la Figura 5.
• El soporte ayuda a mantener la unidad
correctamente en su lugar. Aseg0rese de colocar
el borde del soporte nivelado con la parle de atras
del alf_izar interior. Vease la Figura 5.
• Si el aire acondicionado esta bloqueado por el
marco de la ventana de tormenta, v_a el paso 9.
DESCANSO
EXTERIOR
\
DESCANSO
INTERIOR TIPO A INTERIOR
LINEA eEL CENTRO
EXTERIOR
MENSULA EN L Figura 5
DRENAJE
Primero, aseg(Jrese de insertar el tubo de drenaje
en el recipiente de base antes de la instalaci6n. El
equipo de aire acondicionado debe instalarse con
una Iigera inclinaci6n hacia la parte exterior
(FIGURA 8) para permitir el drenaje del agua.
El equipo de aire acondicionado puede drenar el
agua condensaaa a tray,s de la tuberfa de drenaje.
TUYAU
DRENAJE D'EVACUATION
_ARTEPOSTERIOR
TUBO DE DEL RECIPIENTE
DRENAJE DEBASE
PARTEINFERIOR eEL
RECIPIENTE DE eASE
_ilki/llll/I/ilili!
Figura 6
-19-
All manuals and user guides at all-guides.com

r_ INSTALE EL ACONDICIONADOR DE AIRE
EN LA VENTANA
• Levanteeuidadosamenteel acondicionadordeairey
deslicelo en la ventanaabierta.Asegurasede que la guia
inferior delacondicionadordeaire encajeendel sepode L
• AI encajar en del soporte L, el acondicionador de aire
estara centrado en la abertura de la ventana, como se
muestra en la Figura7.
• Mientras sujeta el acondicionador deaire, baje
cuidadosamente el marco corredizo de la ventana
detr_,sde la guia superior del acondicionador de aire,
come se muestra en la Figura 8.
t 0l
I \ I
Lfneacentral Figura 7
BORDE DE LA V£NTANA o,.o,
', E
ABOUT II,"
GU,,,NFER,OR,71__
Figura 8
_"_ FIJE LOS PANELES CORREDIZOS
Extienda los panelescorredizos para Ilenar la abertura de
la ventana, usando los 4 tomillos (TIPO B) parafijarlos,
come se muestra en la Figura9.
[_ INSTALE EL SELLO DE VENTANA CORREDIZA Y
EL SEGURO DE VENTANA CORREDIZA
• Corte el sello de ventana corredizaa la anchurade la
ventana.
Relleneel sello de ventana corredizaentreel vidrio y la
ventanapara evitarel ingresode airee insectosen la
habitaci6n,como se muestraen la Figura9.
• Atornille el segurode ventana corrediza,usando un
tornillo (TIPOA), cornosernuestra enla Figura9.
• Quite lostomillos que aseguran el gabinetey cacerola
despreciableen el ladocorrecto.
• Conecteel par_.ntesisde suport (TIPO H) en elalf_izal
interiordeventana conun tomillo ('FIPOB),
cuando Fig. 10.
TIPO B
a Parentesis(TIPOH)
Figura 10
a_lsI ELACONDICIONADORDEAIREESTABLOQUEADO
PORELMARCODELACONTRAVENTANA
• Sila contraventanainterfiere,fijeunlist6ndemaderade2" de
anchoal alfeizarinteriorde laventana,queatraviesela
anchuratotaldelalfeizar.Ellist6ndemaderadebeser
suficientementegruesoparalevantarlaalturadelalfeizardela
ventanadetal maneraquelaunidadpuedaserinstaladasinla
interferenoiadelmarcodela contraventana.Veala Figura11.
Lapartesuperiordellistondemaderadebeset
aproximadamente3/4"masaltoqueel marcodela
contraventanao ellistOndemadera(fuerade lacasa)para
queelvaporemanadodelaunidadpuedadrenar
adecuadamenlehaoiael exterior.
• InstaleunsegundolistOndemadera(deaproximadamente6"
delargoy 1"deanohoydelmismogrosordelprimerliston)en
eloentrodelalfeizarexteriorniveladoconla parleposteriordel
alfeizarinterior.AtornillelossoportesL entrela faja.Esto
levantaraelsoporteL comosemuestraenla Figura11.
1MAX
FRANJA DE MAOERA _ _ 3_4 PULG i
MONTADA,_OBRE , DE SEPARAC}ON _/
LApARTESUPER_OR_'_'_I • '
DEL DESCAN£O__INTERIOR VENqrANA DE
ANTEPECHO
INTERIOR
ANTEPECHQ
ER,ORFigura 11
LA ELIMINACIONDE LA VENTANA
Apagueelequipode aireacondicionado,desconecteel
cord6nde alimentaci6nelectrica,saqueel segurode marco
y los tornillos instaladosa travesde la partesuperiore
inferior de los panelesdeslizantesy guardetoda las para
volver ainstalarlosmastarde, Cierre los paneles
deslizantes.Agarrefirmementeel equipode aire
acondicionado,eleveel marcoe inclinecuidadosamenteel
equipode aire acondicionadohaciaarras,drenando
cualquieraguaque se hayacondensado,Desliceel equipo
de aire acondicionado1"pulgadahacia la derechay
seguidamentelevanteel equipodeaire acondicionadode la
ventanay saquelajunta hermeticade entre lasventanas.
CERP.AOURA DEL MARCO
BAFtDADEL
mFO E}
Figura 9
•Elaireacondidonadodelquesehablaenestemanualafirmapeligro
depesoexoesivo.
Dosornaspersonasserequiereparamovereinstatarlaunidad.Para
evitarheddasoagotamlento,usetecnicasapropiadosparalevntary
moverlaonidad.
•AImanejarlaunidad,tengacuidadoperaevitarcortarseconlasalertas
metalicaeafiladaequeestanenlosserpentinesfrontalypoeten_.
. Aseguresequeelaireaeondicionadonosecaigadurantelaieeta[acion.
- 20 -
All manuals and user guides at all-guides.com
Table of contents
Languages:
Other Sears Air Conditioner manuals

Sears
Sears Kenmore Air Conditioner User manual

Sears
Sears Kenmore 23-11-2223N-003 User manual

Sears
Sears Kenmore P/N93SR-D02 User manual

Sears
Sears 661.624921 User manual

Sears
Sears Kenmore Room Air Conditioner User manual

Sears
Sears Kenmore Air Conditioner User manual

Sears
Sears Kenmore Room Air Conditioner User manual
Popular Air Conditioner manuals by other brands

Webasto
Webasto Frigo Top 25 DS Instructions for use

Gree
Gree E-TAC Installation and operation instructions

Friedrich
Friedrich WallMaster WS10 Installation and operation manual

LG
LG LS-J0761CL Service manual

Johnson Controls
Johnson Controls York VIR 40A installation instructions

Technibel
Technibel MTA8FIA0R5I operating instructions