SEAS Catalina 30 User manual
OPERATING MANUAL
The BREEZE
AUGUST 10, 2021
SEAS MONMOUTH CHAPTER

SEAS Catalina 30 Operating Guidelines 8/10/2021
Page 1 of 28
Contents
Catalina 30 Specifications....................................................................................................... 2
Scope............................................................................................................................................. 3
Boarding....................................................................................................................................... 4
Pre-departure.............................................................................................................................. 4
Shore and Solar power, Battery, Circuit Switches and Circuit Breaker Checks...... 6
Starting engine:.......................................................................................................................... 9
Leaving the slip & Matawan or Cheesequake Creek –General procedure.............. 11
Getting Ready to Sail:............................................................................................................. 12
Sail Selection:........................................................................................................................... 13
Sail Trim:.................................................................................................................................... 14
Reducing Sail Area:................................................................................................................. 14
Preparing to re-start engine on return:.............................................................................. 14
Furling sails:.............................................................................................................................. 15
After docking: ........................................................................................................................... 16
Connecting shore or solar power: ...................................................................................... 17
Leaving the boat: ..................................................................................................................... 17
Refueling:................................................................................................................................... 18
Autohelm.................................................................................................................................... 18
Radar........................................................................................................................................... 19
Leaving the slip at Brown’s Point Marina – Detailed procedure................................. 19
Returning to the slip at Brown’s Point Marina................................................................. 20
Galley........................................................................................................................................... 21
Marine Lavatory (aka Head) .................................................................................................. 22
Head Operation......................................................................................................................... 23
Pump Out Procedure............................................................................................................... 23
NOTES: ....................................................................................................................................... 24
Inventory..................................................................................................................................... 25
....................................................................................................................................................... 28

SEAS Catalina 30 Operating Guidelines 8/10/2021
Page 2 of 28
Catalina 30 MK II Specifications
General Specifications
•Designer: Frank Butler / Gerry Douglas
•Year: 1987 - 1993
•LOA: 29’10”
•Keel: Fin
•Beam: 10’10”
•Keel Mat’l: Lead
•Draft: 5’3”
•Displacement: 10,200 lbs
•Hull Color: White
•Ballast: 4,200
•Deck Color: Beige
•Construction: FRP
Mechanical Specifications
•Engine: Universal M3-20
•Power: 18 hp
•Cylinders: 3
•Fuel: Diesel
•Propeller: 3 blade RH
•Fuel: Capacity: 21 gal
•Oil Grade: SAE 10W40 Diesel
•Oil Capacity: 3.2 qt.
•Coolant: 3 qt 50/50 Antifreeze
•Alternator Belt: Gates 7355 (10x893)
Rigging Specifications
•Standard
•Mast: 48’ bridge clearance
•I: 41’ (stem to mast head)
•J: 11’6” (stem to mast base)
•P: 35’ (main sail luff)
•E: 11’6” (main sail foot)
•Sail Area: 100% Jib: 235.75 sq ft
•Sail Area: Main: 201.25 sq ft
•Sail Area: Std Total: 437 sq ft
•Sail Area/Disp: 14.92
•Optional Tall Mast with Bow Sprit
•Mast: 50’ bridge clearance
•I: 43’ (stem to mast head)
•J: 13’2” (stem to mast base)
•P: 37’ (main sail luff)
•E: 12’ (main sail foot)
•Sail Area: 100% Jib: 283 sq ft
•Sail Area: Main: 222 sq ft
•Sail Area: 130% Jib: 368 sq ft
•Sail Area: Total: 590 sq ft
•Sail Area/Disp: 20.05
•Roller Furling Jib
•Lazy Jacks and catch bag Main
Accommodations
•Headroom: 6’3”
•Berths: 2x2, 2x1, 1x1/2
•Opening Ports: 4
•Opening Hatches: 2
•Navigation Station
•Private lavatory
•Galley
•Pressure water
•Water tank: 1x25 gal, 1x18 gal
•Hot water
•Shore power
•Shower
•Bimini (planned)
•Dodger
Calculations
•Comfort Ratio: 24.93
•S#: 2.04

SEAS Catalina 30 Operating Guidelines 8/10/2021
Page 3 of 28
Scope
This guideline exists to describe and set standards for how this boat will be used by
SEAS. It does not replace the Catalina 30 Owner’s Manual, nor the Universal M3-20
Engine Manual, nor any of the other manuals for equipment on the boat. It also does
not replace SEAS Skippers Information document or responsibilities; those
responsibilities apply on SEAS the BREEZE the same as on any other SEAS vessel. If
you need more information than is presented here you should refer to the
appropriate authoritative source. In addition, you, as a level 3 or 4 skipper, are
required to have certain minimum knowledge about boats, sailing, and crew
management. If you feel that you cannot safely operate SEAS the BREEZE using the
information in this and other sources, you should not skipper the boat. Sign on as
crew on activity sails with someone who can help you learn whatever you need to
build your skills.
SEAS Catalina 30 Operating Guidelines 8/10/2021
Page 4 of 28
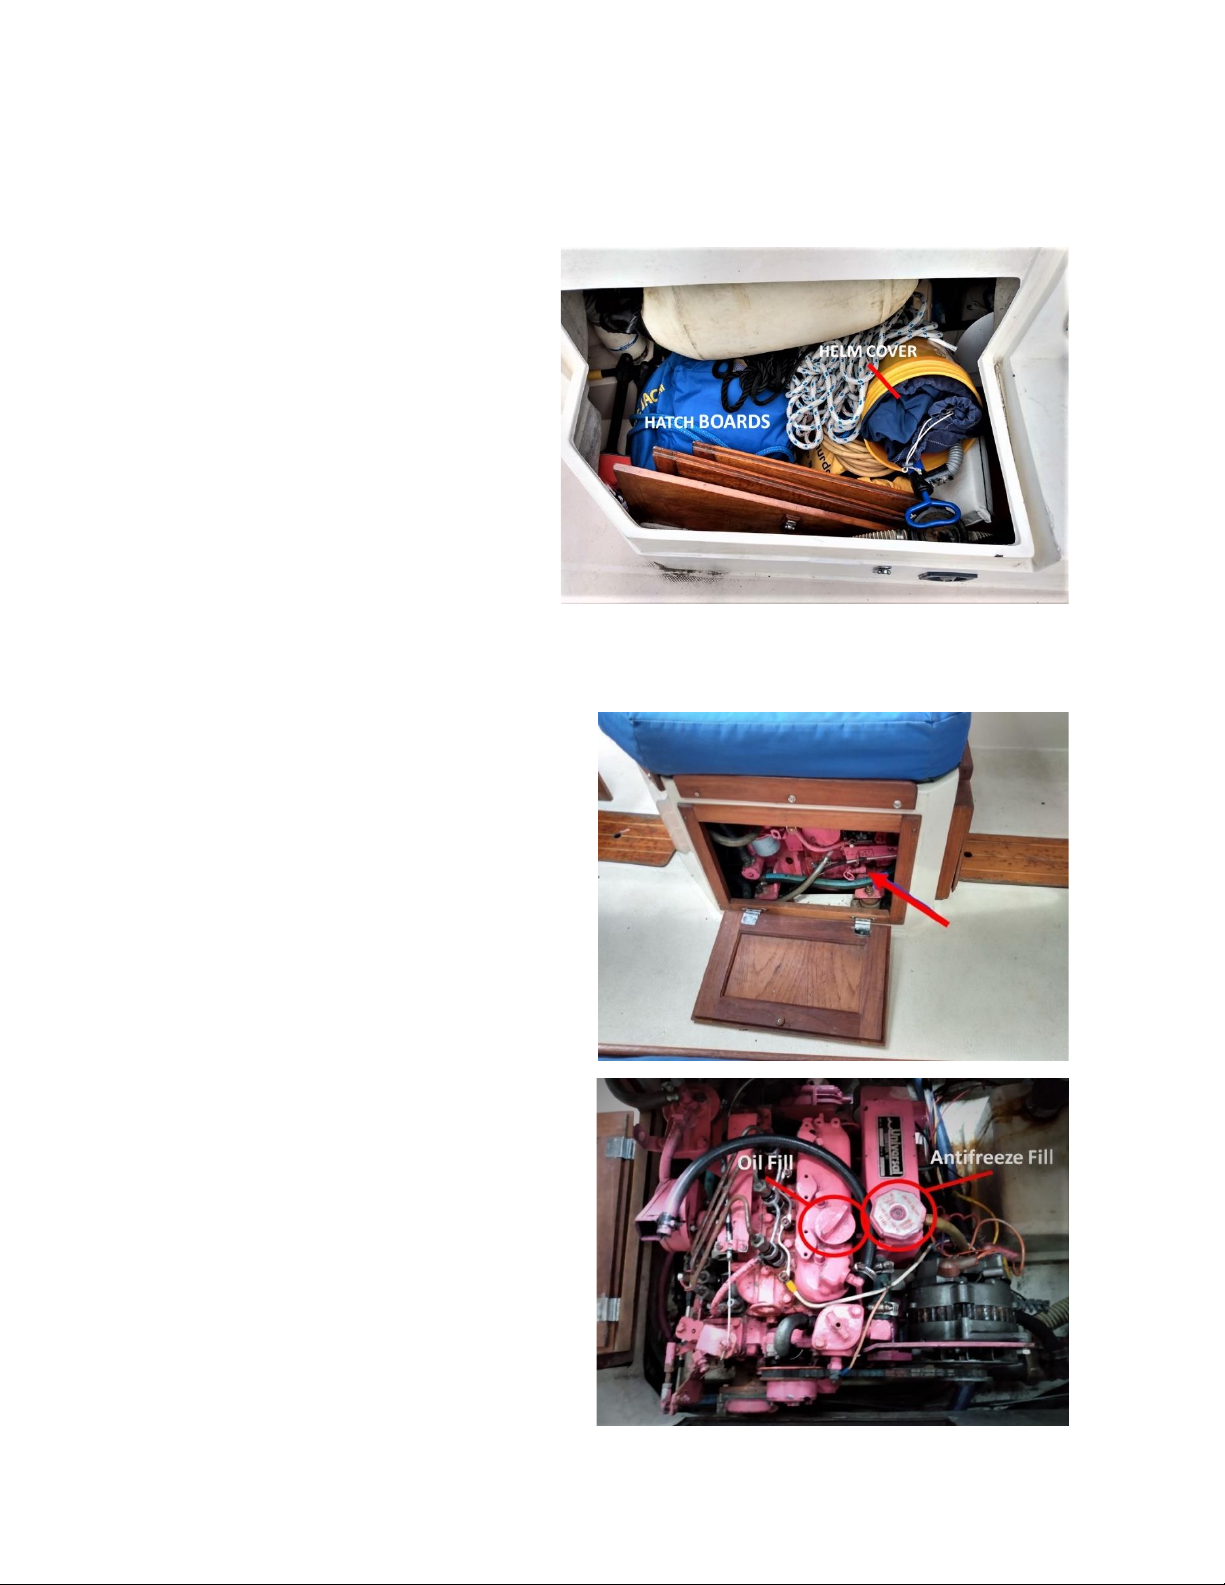
Boarding
Hatch Boards: stow in port
lazarette. Ensure that the hasp
does not scratch the other
boards.
Pre-departure
1. Engine OIL: Check oil level using
the dip stick before starting
engine for the first time each day.
If oil level is at or just below the
upper mark on dipstick it is OK. If
level is more than ½ way to lower
mark, add a small amount of oil
by pouring into oil fill on top of
engine. This engine has capacity
for 3.2 quarts of oil, so add small
amounts, wait several minutes
and recheck. Do not over-fill. If
level is very low, check engine for
traces of leaks, fill to mark on dip
stick and run a dock side engine
check and re-check oil level
before leaving dock. Notify
maintenance coordinator of low
engine oil level.
2. Fuel, Water, Oil Leaks: Check
engine compartment for fuel, oil,
or water leaks by looking in the
engine pan (under the engine) to
make sure it is not full of oil, fuel
or water. If any leaks are found
take steps to stop the leak. (Note
SEAS Catalina 30 Operating Guidelines 8/10/2021
Page 5 of 28
there is a pad in pan to absorb traces of fuel or oil, but pan should not be full of
any liquids.
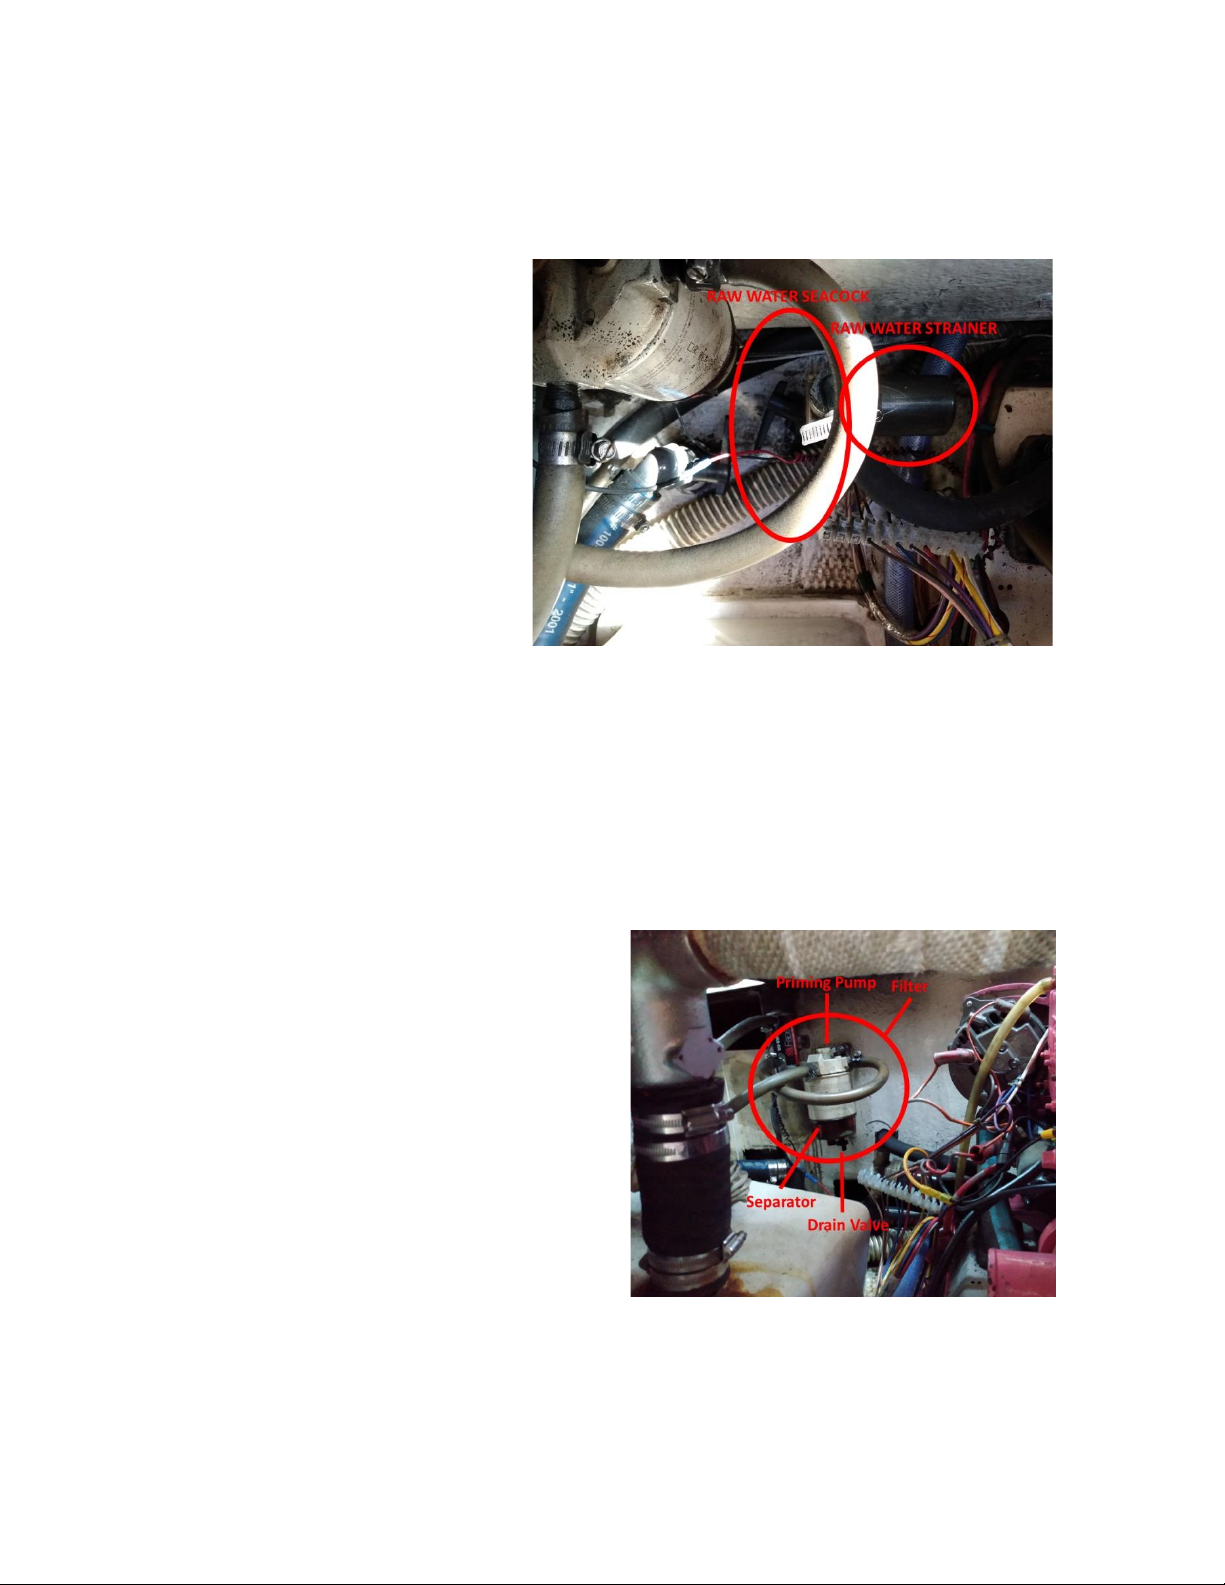
3. Raw water Strainer: Check raw water strainer (plastic clear bowl) with plastic
screen basket for seaweed, leaves or other debris. Strainer is in the engine
compartment secured to
port settee bulkhead. If the
strainer has debris, clean it.
To clean, close the
seacock, unscrew plastic
strainer basket, clean out
debris. Replace basket in
strainer, ensure that the
basket is in the center of
the container correctly in
the indent and then
carefully re-screw cover
over basket. Make sure
you do not cross-thread the
cover when re-installing it.
Open seacock and verify that the strainer is not leaking.
4. Raw Water Seacock: Located in engine compartment and accessed under the
port settee. The seacock valve is mounted vertically, When the lever in vertical
the seacock in open, when the lever is horizontal the seacock is closed. Rotate
the lever clockwise to the vertical position (the seacock is now open and
seawater can flow to the engine cooling system). If you cleaned the Raw Water
Strainer basket, check the strainer after opening the seacock, to ensure the raw
Water Strainer screw cover is secure and not leaking. Refer to the strainer
documentation in the ship’s library for more information.
5. Primary Fuel Filter: the primary fuel
filter is located below the port side
settee near the engine. Access it
from the engine room access panel
under the port settee short L
cushion. If the fuel/water separator
bowl shows water in it, drain the
water into a cup and pour onto a
water and oil absorbent towel to dry
out. Then dispose of the towel in the
trash. Oil and water don’t mix, so the
water will be at the bottom. Open the
drain valve to let water out, then
close it to keep the fuel in. Refer to
the filter documentation in the ship’s library for more information.
6. Fuel Level: The fuel tank is located under the quarter berth. The fuel gauge is
located on the instrument panel. Check tank level, if below ¼ level you will need
to purchase fuel before leaving marina or on your return before docking. The
SEAS Catalina 30 Operating Guidelines 8/10/2021
Page 6 of 28
capacity of the fuel tank is 21 gallons of diesel fuel. (Browns Point Marina does
not allow filling of fuel tanks from portable fuel jugs in the marina, see
Refueling procedure in this document for instruction on how to refuel.).
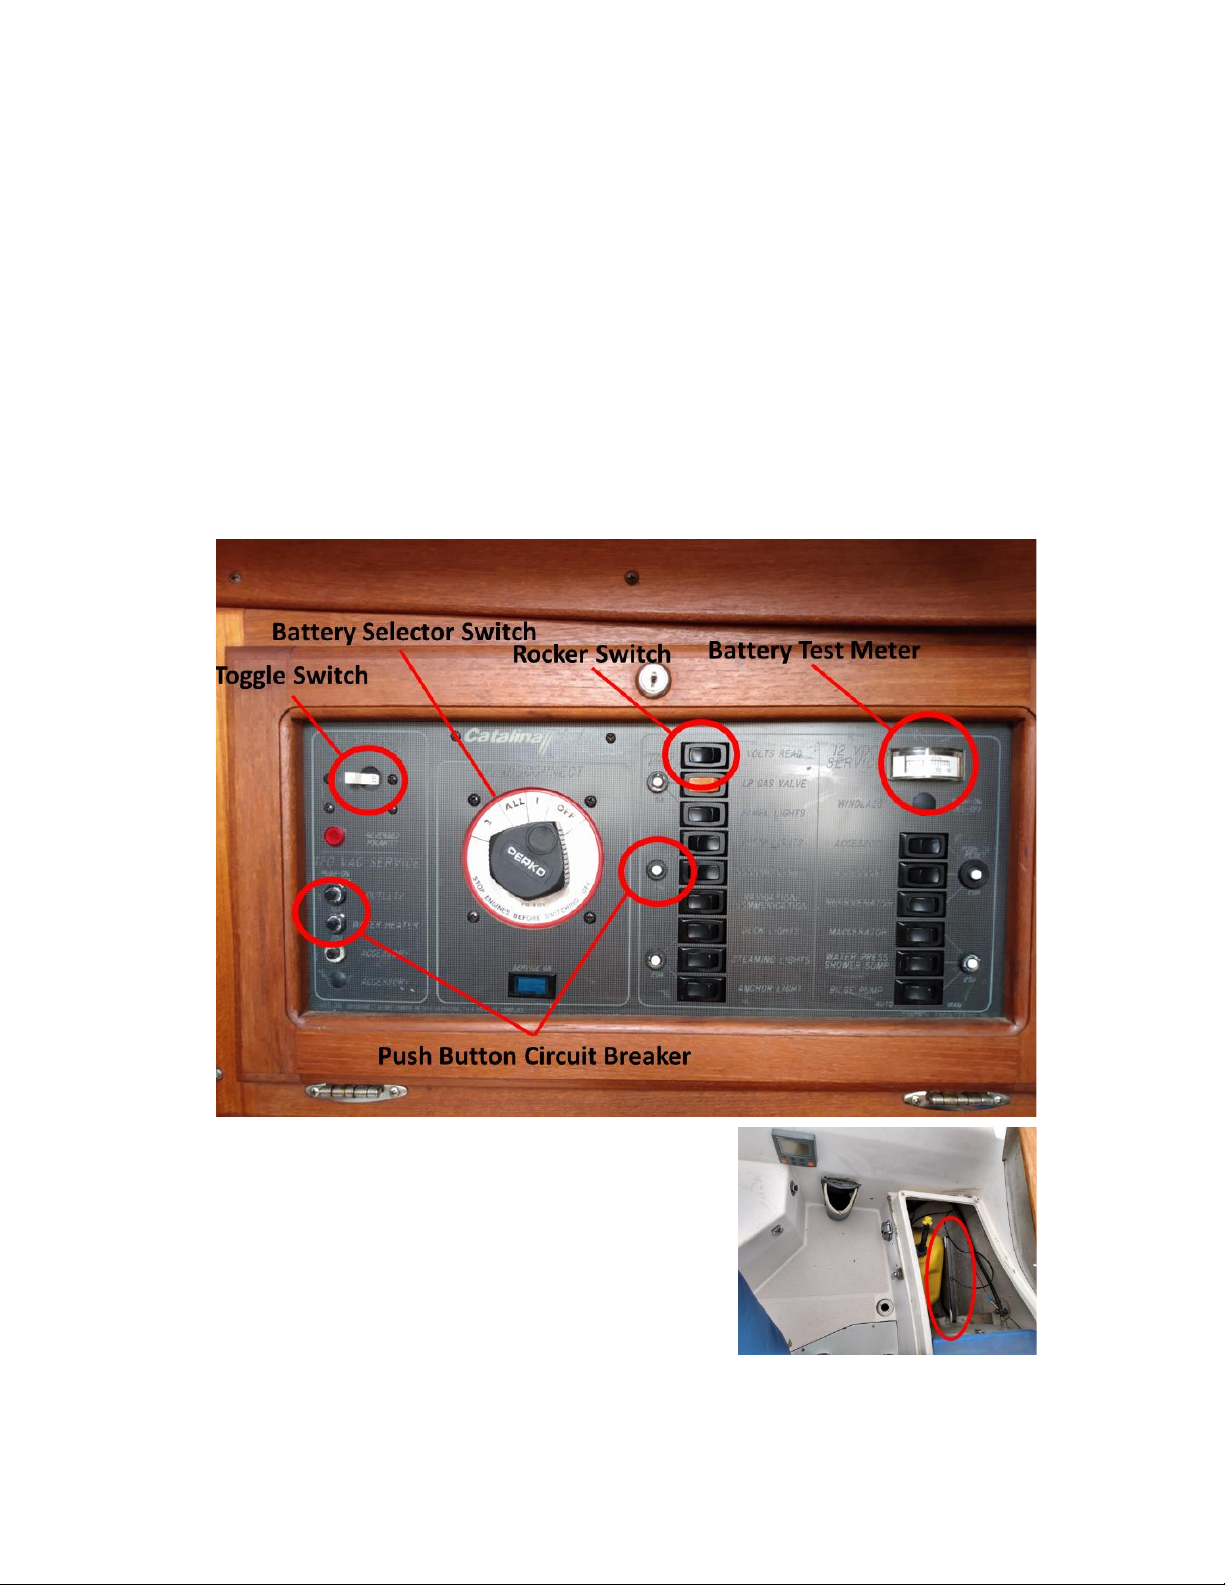
Shore and Solar power, Battery, Circuit Switches and Circuit Breaker
Checks
1. This boat has several types of switches on the electric circuit panel:
1. Toggle –the 120VAC switch is a toggle type circuit breaker
2. Push button circuit breakers –used for 120VAC circuits and 12VDC
circuits
3. Rocker switches –used for all 12VDA circuits
4. Rotary switch –used for battery selection
Look closely at the panel to learn the location and circuit served by each switch.
2. There is no shore power at Brown’s Point
Marina slip R71. A solar panel is installed to
keep the house battery charged. If departing
from Brown’s Point Marina stow the solar panel
in the aft lazarette and go to step 7.

SEAS Catalina 30 Operating Guidelines 8/10/2021
Page 7 of 28
3. 115 VAC Shore Panel: AC voltage panel is located on the electric circuit panel
above the navigation station. There are three push-type circuit breaker switches
(electric outlets, water heater, accessory), a main breaker toggle switch (right is
on, left is off) and one panel light (Red –
reverse polarity). Switch main AC breaker
off.
4. Shore Power plug: Turn off Shore power
at the dock power tower. Unplug shore
power cord on dock at the dock outlet. In
our home slip the cord is secured to dock
and outlet box with plastic wire ties. Leave
plug in center of coiled power cord.
5. Boat Shore power cord: Unthread black
plastic retaining ring around power plug.
Unplug shore power plug from boat. Thread
stainless steel cover over plug socket using
care not to cross-thread the cover. It
should thread on easily and not require a
lot of effort.
6. Coil Power cord: Coil power cord and
store it in the cockpit stern lazarette
starboard side.
7. Battery check: Test battery voltage as follows:
1. Set battery selector switch to 1
2. Turn on battery test switch
3. Read battery voltage on the battery test meter on the electric circuit panel
4. Turn off battery test switch
5. Set battery selector switch to 2
6. Turn on battery test switch
7. Read battery voltage on the battery test meter on the electric circuit panel
8. Turn off battery test switch
Both batteries should indicate approximately 12.5 volts. If battery reading is low
notify maintenance coordinator indicating which battery and the reading
observed. (Bilge pump is directly hooked to battery #2, a low voltage could
indicate pump has been running and there are water leaks –so check for water
leaks.) Batteries are currently charged by the engine or by the AC Charger
hooked up to shore power. A solar charger also is hooked to battery #2.
8. Set Battery Switch: Set battery selector switch to “ALL”.

SEAS Catalina 30 Operating Guidelines 8/10/2021
Page 8 of 28
9. DC Switches: Switch 12 volt DC
switches ON for departure:
Navigation/Communication
The bilge pump switches should be
on at all times.
10.Other switches: Note location of
cabin light, running light, and
steaming light switches in case you
require these during your trip.
11.Radio: Turn on VHF radio, listen for
traffic on channel 16 and check
weather (channels 1 and 5) before
leaving dock. You may also wish to
call a boat or marina for a radio
check. There is a remote mic in the
navigation station that can be used
in the cockpit. The remote has
microphone, speaker, and channel changer functions.
12. Helm Station: Remove cover from helm station, stow in port lazarette, check
reading on depth instrument. It is critical that the depth instrument be functioning.
Currently the depth gage displays the depth below the hull. Since this is a
function that is configurable by anyone at the helm you should not rely on the
reading as absolute. Do your own verification before departing. The draft of the
Catalina is 5 feet 3 inches; use extreme caution if depth reading is 6 feet or less.
Boat speed/log may always read zero if the paddle wheel is not spinning, this
instrument is not critical to operation of boat.
13.Steering Wheel Brake –release the Steering Wheel Brake by turning it counter-
clockwise until the steering wheel moves freely.

SEAS Catalina 30 Operating Guidelines 8/10/2021
Page 9 of 28
Starting engine:
1. Engine controls: The throttle and
gearshift control levers are located
on the binnacle in front of the
wheel on the sides of the compass.
2. Throttle control: The throttle
control lever is located on
starboard side of the compass.
Check operation of throttle by
rotating throttle lever forward. To
return engine to idle lightly rotate
throttle lever back. Unlike a car,
boat throttles do NOT return to idle
automatically when you let go; you
must move it manually.
3. Gearshift control: The gearshift control lever is located on port side of the
compass. Check operation of gearshift lever by rotating forward for FORWARD
gear, back to vertical for NEUTRAL and then rotate backward to REVERSE gear
and forward again for NEUTRAL. Become familiar with FORWARD, NEUTRAL,
and REVERSE positions of the gearshift lever so you will know what gear you
are in by looking at the lever and by feel of the position of the lever. Always set
throttle to idle before shifting gears. Move shift lever to “NEUTRAL” position
before starting engine. NEVER shift while the engine speed is above idle –if you
do you can damage the transmission. NEVER shift from FORWARD to
REVERSE, or from REVERSE to FORWARD without pausing in NEUTRAL –if
you do you can damage the transmission. Replacement transmissions cost about
$2000 (2021 prices.)
4. Key: Ignition key is kept in the engine compartment on the panel that provides
access to the engine oil dip stick. When taking out the key, check the oil level
and ensure that the engine cooling water seacock is open. Key is inserted into
ignition switch at bottom of engine instrument panel that is located on lower port
side of the cockpit by the helm. Make sure the shift lever is in NEUTRAL
position. Turn key clockwise one click, you will hear the low oil pressure alarm,
the electric fuel pump, and the engine room blower.
SEAS Catalina 30 Operating Guidelines 8/10/2021
Page 10 of 28
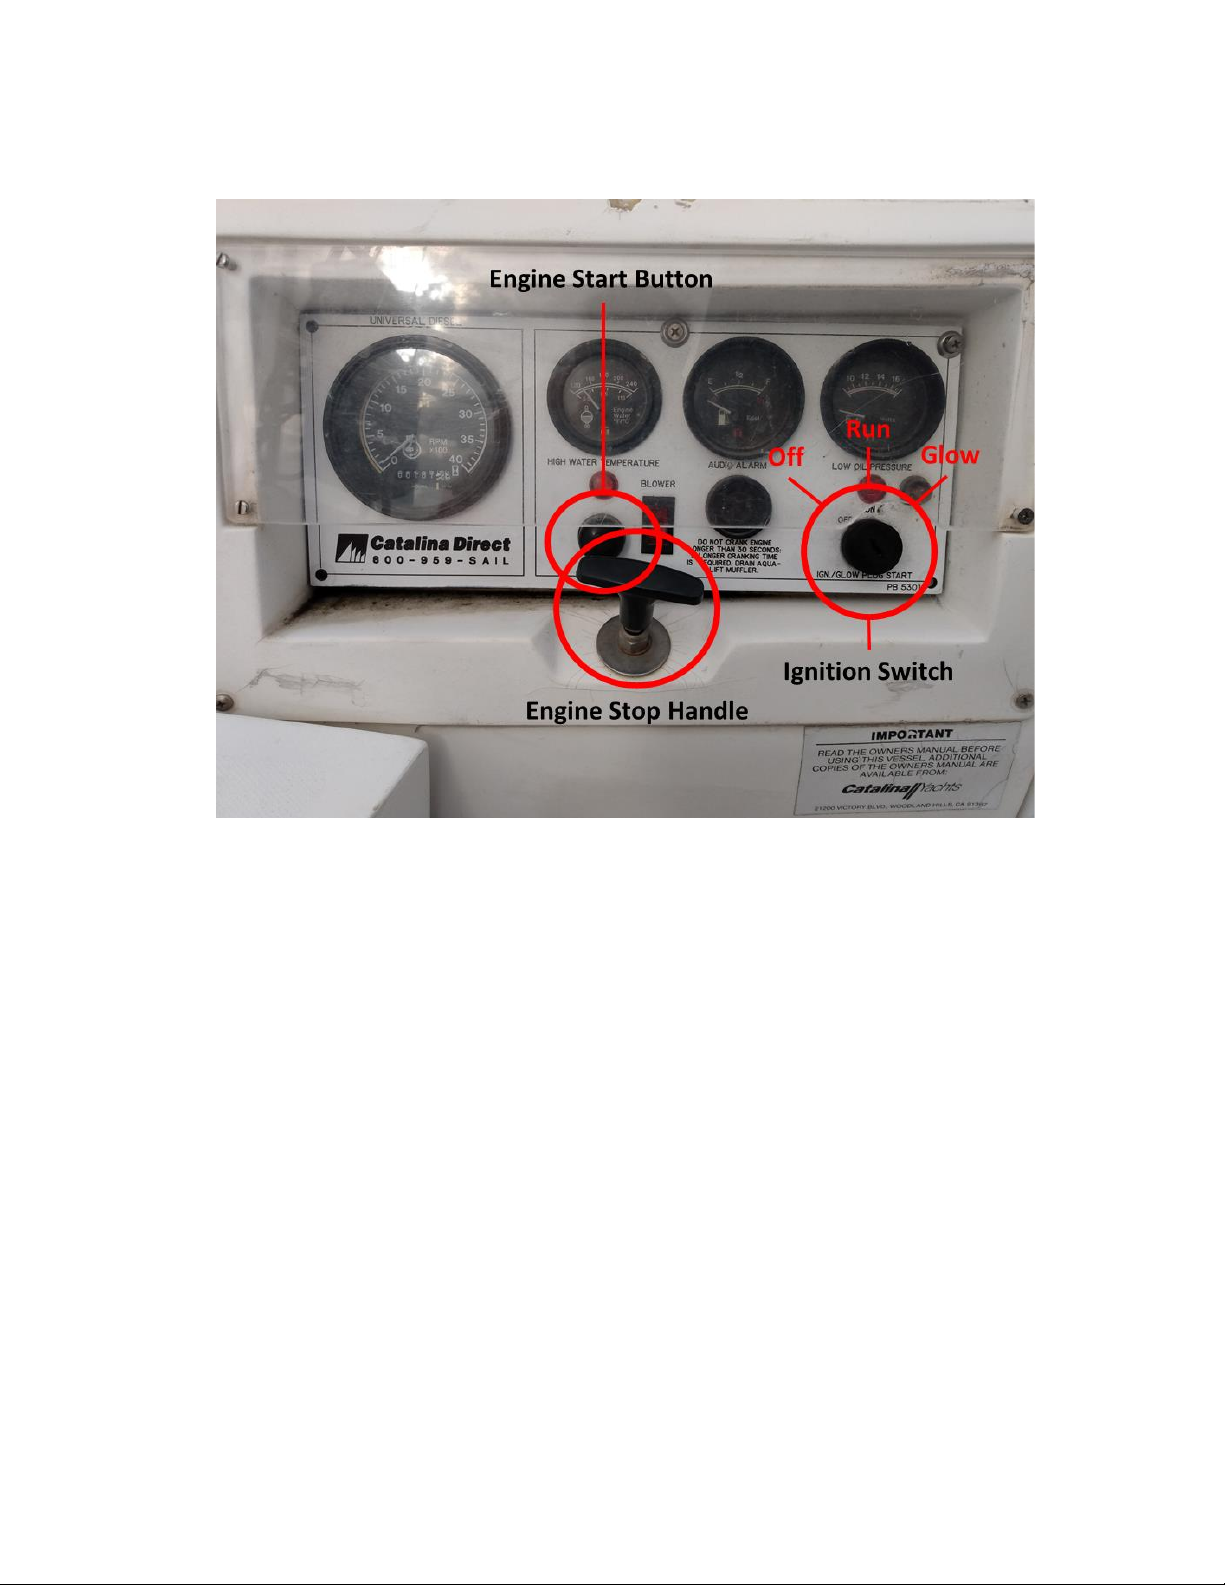
5. Engine Instrument Panel: The engine instrument panel is located on the port side
of the cockpit. Refer to the picture below:
6. Blower: this boat is equipped with an engine room blower. The blower is
switched by the ignition key. Always leave the blower switch ‘on’.
7. Glow plug switch: This boat has a Universal Diesel engine and requires that the
glow plugs be turned on to start the engine. To turn on glow plugs turn ignition
key to Glow for 10-20 seconds before attempting to start the engine.
8. Start switch: To start the engine press the Start button while holding the ignition
key to the Glow position. The engine should start after 1 - 2 seconds. Release
the Start button and the ignition key when the engine starts. If the engine does
not start, you probably did not turn on the glow plug long enough. WHEN
CRANKING THE ENGINE, CRANK FOR A MAXIMUM OF 10 SECONDS AND
PAUSE FOR A MINIMUM OF 20 SECONDS. REPEAT UNTIL ENGINE
STARTS. NEVER CRANK ENGINE LONGER THAN 10 SECONDS WITHOUT
A PAUSE TO PERMIT STARTER TO COOL. If engine fails to start after three
tries, notify the maintenance coordinator. When engine starts set the throttle so
engine idles smoothly without a lot of vibration.
a. NOTE: IT IS POSSIBLE TO SEVERLY DAMAGE AN ENGINE BY
CRANKING TOO LONG. Engines that have a water lift muffler can fill
the muffler with water to the extent that water gets into the engine and
prevents the engine from turning. This is called ‘hydrolock.’ Hydrolock
does not occur when the engine is running because there is enough
exhaust gas pressure to push the water out the exhaust. But there is
very little pressure when cranking the engine via the starter, so the

SEAS Catalina 30 Operating Guidelines 8/10/2021
Page 11 of 28
water builds up. After water gets into a cylinder and the exhaust valve
closes there is nowhere for the water to go and water is not
compressible. So continuing to crank will burn out the starter motor OR
break the starter gear or the flywheel gear OR break internal engine
parts. All of these results are costly and time consuming –and you are
responsible for both.
b. How long is TOO LONG? Universal says 30 seconds total cranking
time is too long.
c. Who keeps track of how long they crank the engine? You do… …if
you want the boat to stay in service.
d. What if the engine still didn’t start? Then something is wrong, and
that needs to be addressed. Solve the problem, drain the muffler, then
try again.
9. Exhaust & cooling water: Look over stern of boat at exhaust pipe in center of
transom. Make sure there is some water running out of exhaust along with
engine exhaust gasses. This engine uses both fresh water and sea water
cooling –so there ALWAYS should be water coming out of the exhaust when the
engine is running.
10.Engine exhaust pipe: After starting engine check the exhaust hose (engine
compartment). Make sure there are no exhaust gasses leaking from any of the
hose or hose connections.
11.Alternator output: At the 12 Volt DC panel use battery test switch to check
alternator output. Readings should be just above 12 volts to indicate charging
output of alternator. Turn off battery test switch after the test.
NOTE: Do not let engine run at a speed where it vibrates strongly; adjust throttle to
reduce or eliminate vibration. If there is vibration at high rpm, reduce rpm, if
there is vibration at idle increase throttle just slightly until vibration is reduced. If
vibration is present at all speeds, shift into reverse and throttle up for 5 seconds.
This can remove growth or other build-up on propellor. Shift into forward and
reset engine speed. You may need to repeat this procedure to eliminate the
vibration.
NOTE: It is especially important that the exhaust is checked periodically for water
flow to avoid engine and muffler overheating. If no water comes out of the
exhaust check the engine temperature gauge. Stop engine if it is overheating
(over 160oF.)
Leaving the slip & Matawan or Cheesequake Creek –General
procedure
1. Check wind and current and plan method of departure
2. Check railroad bridge (Morgan) closing estimates and plan arrival at route 35
bridge before the on-the-hour opening. Leave at least 15 minutes before the hour
to insure you will reach bridge before opening.

SEAS Catalina 30 Operating Guidelines 8/10/2021
Page 12 of 28
3. Assign departure responsibilities to the crew.
4. Assign one person as spotter in bow to look for other boat traffic and handle bow
lines. Bow person should remain at the ready with the anchor should an engine
failure or other emergency arise in the creek especially in the bridge area.
5. Assign fender and line handlers on port and starboard sides to fend off boats in
adjacent slips and hang spring lines on pilings.
6. On departure and entry keep a watchful eye on the depth gauge especially in the
Cheesequake creek and Keyport Harbor. There are shallow areas across from
Lockwood entrance, behind Railroad Bridge, and on both sides of Keyport
Harbor. Slow down and use extreme CAUTION if depth reading is 6 feet or less.
The Catalina 30 draws 5 ft 3 inches.
7. Tune VHF radio to Channel 13 and listen for Bridge attendant instructions. Call
Bridge attendant to request passage to ensure the bridge will be opened.
8. a. At Morgan: once past the bridge, go straight out past the first channel
marker lights, as there are rock jetties on both sides of the channel.
Stay in the channel, as the area immediately outside the bridge is
shallow.
b. At Matawan: once past Keyport #12 either follow the channel through
the mooring field or pass the mooring field to the west side
9. Check to see if the engine is continuing to spit water out of the exhaust. Check
periodically while under engine power.
Getting Ready to Sail:
1. When ready to sail, put mainsail up first and then unfurl the jib.
2. Turn off engine by pulling up on the engine stop handle on the instrument panel.
This will cut off the fuel to the engine and stop it. After engine has stopped push
the stop handle down, turn off key switch and move transmission lever to reverse
position to keep the propeller from rotating. Never turn the key switch off while
the engine is running as it will damage the alternator.
3. Battery Switch: With engine off switch battery switch to match day of month
(even day use #2 battery; odd day use #1 battery).
4. The main sheet traveler is adjustable manually by releasing the traveler lines
from the cam cleats (one at each end of track) then position the car where
desired and pull the lines through the cam cleats to lock in place.
5. Jib sheet blocks are adjusted by manually lifting the knurled knob on the block
and slide to a different position, then release the knob and ensure that it seats in
a hole in the track. The jib sheet blocks should be adjusted according to how
much jib is unfurled. There are labels next to the jib sheet track that correspond
to various amounts of jib exposed. For example, FULL, 75%, 50%, 25%. Look for
similar markings on the jib. Do not attempt to adjust the block position while there
is a load on the sheet. Best practice is to adjust the block for the lazy sheet then
adjust the block for the other sheet after the boat has changed tack. Alternatively,

SEAS Catalina 30 Operating Guidelines 8/10/2021
Page 13 of 28
temporarily release the working sheet to release the load, adjust the block, then
haul in on the sheet to trim sail shape as needed.
6. The boom topping lift may now be loosened at the mast (starboard side.) You
might choose to loosen it if it is interfering with main sail shape.
Sail Selection:
SEAS the BREEZE is equipped with the optional tall rig and bow sprit (TRBS) AND a
130% jib. These features ensure that the boat will move in even the slightest breeze.
They also mean that the boat needs to be reefed early. Following guideline minimizes
heeling and maximizes comfort. You may want to reef more or less than the guide. You
are responsible for making your own decisions about how much of the available sail
area to use.
Wind 0 –9 kts
Jib: all (17’)
Main: all
Wind 10 –12 kts
Jib: 90% (16’)
Main: all
Wind 13 –15 kts
Jib: 90%
Main: Reef 1
Wind 16 –18 kts
Jib: 75% (14’9”)
Main: Reef 1
Wind 19 –21 kts
Jib: 75%
Main: Reef 2
Wind 22 –25 kts
Jib: 50% (12’)
Main: Reef 2
Wind 26 –30 kts
Jib: 25% (8’6”)
Main: none
Wind 30 kts and up
Jib: 0%
Main: none
Here is a comparison of the key performance factors for the O’Day and Catalina. Sail
Area / Displacement is the ultimate indicator of performance: the higher the number, the
higher the performance.
The Catalina is a bigger, heavier boat, so it needs more sail area to meet the same
performance level as the O’Day.
Boat
Name
Displacement
Sail
Area
Sail Area /
Displacement
O’Day 28
SEAS the Day II
7300 lbs
370 sq ft
15.78
Catalina 30
Standard
10200 lbs
437 sq ft
14.93
Catalina 30
TRBS
SEAS the BREEZE
10200 lbs
590 sq ft
20.14
The C-30 Standard has less power (14.93) when compared to the O’Day (15.78.) The
C-30 Tall Rig Bow Sprit (TRBS) has almost 25% more power than the O’Day relative to
its displacement (20.14.) This is a LOT of power and needs to be managed accordingly.
Reefing does not slow the boat –it reduces heeling and makes the ride more
comfortable. You may even go faster because a properly reefed boat has less or no
weather helm. Reef early. Reef often.

SEAS Catalina 30 Operating Guidelines 8/10/2021
Page 14 of 28
Sail Trim:
Jib: The working jib sheet should bisect the angle between the foot and leach of the jib.
The jib sheet angle is adjusted by moving the jib cars fore and aft. The more the jib is
furled, the farther forward the cars should be. The more it is unfurled the farther aft the
cars should be. When the leach is fluttering and the foot is taut the car is too far aft.
Main: when hoisting the main sail it is critical that the luff be properly tensioned. If the
luff is loose the boat will heel more. The luff is properly tensioned when a slight crease
is visible in the luff for most of its length and boat is dead to wind. Also check the reef
clutches and lines –be sure they are set or released to suite your conditions.
Reducing Sail Area:
1. To furl the jib the furling line
must be secured to the cleat
behind the winch. When the jib
is furled part way, the jib sheet
blocks must be moved to
corresponding locations as
marked next to the jib sheet
track.
2. To reef the main sail there are
two reefing lines set up that
lead into the cockpit on the port
cabin top. When reefing the
main lower the main halyard,
haul in the appropriate reef line
until tight, close the clutch, then
hoist the main halyard until tight,
close that clutch. The reefing
lines are easily identified by
color: blue for reef 1, black for
reef 2.
3. If possible release reefing lines
before stowing the main sail by
hoisting the main sail all the way
up then lower it into the storage
bag.
Preparing to re-start engine on
return:
1. Turn battery switch to “ALL”.

SEAS Catalina 30 Operating Guidelines 8/10/2021
Page 15 of 28
2. Move transmission gear shift lever to neutral, throttle lever to idle (both in vertical
position).
3. Turn ignition switch to right to turn on glow plugs for 10-20 seconds
4. Push Start button to start the engine
5. When engine starts release Start button and ignition switch
6. Check to see if the engine is spitting water out of the exhaust. Keep checking
while under way.
7. Shift into gear and set throttle
Furling sails:
1. Furl jib until sheets wrap twice around the sail and secure furling line to cleat
behind winch. Snug the jib sheets on the winches.
2. Turn the boat into the wind, decrease throttle to the minimum possible to
maintain directional control
3. If you loosened the boom topping lift, now is the time to tighten it. Release the
mainsheet and boom vang, lift the boom so the aft end is higher than the fore
end, tighten the topping lift, tighten the mainsheet, tighten the boom vang.
4. Lower main sail, flaking it alternately port and starboard while standing in front of
the mast and pulling the luff half-way between luff cars. Move main halyard to
handhold on starboard side. Be careful about threading it through the lazy jacks.
5. Check wind and current and plan for entry into Cheesequake creek, or Keyport
Harbor and Matawan Creek.
6. Assign bow person to stand by with anchor in emergency.
a. Entering Cheesequake Creek: Tune into Channel 13 and listen for Bridge
attendant instructions. Call Bridge attendant to request passage to
ensure the bridge will be opened and that they know you intend to pass
through. (Don’t make them guess.)
b. Entering Keyport/Matawan: be sure to pass Keyport #12 to starboard
before turning toward #14, then toward private marker off Harbor View
Marina, then toward middle of Matawan Creek. Between Keyport #14 and
the private marker be careful not to drift more than ½ a boat length to
either side of the middle of the harbor.
7. On entry and departure keep a watchful eye on the depth gauge especially in the
creek and the area outside of the creek and past the Cheesequake lights 1 and 2
at the end of the jetties.
8. Check fuel level before returning to slip. If the fuel level is below 1/2 full, go to
the Marina Fueling dock and add fuel before docking. Tank capacity is 21
gallons. USE DIESEL FUEL ONLY. Fueling from jugs at the slip is prohibited.
Refer to refueling details.
9. Assign return responsibilities to Crew. On return ensure there is someone at the
ready on the anchor should an emergency arise. This is especially important in
Cheesequake Creek and Matawan Creek where the current can draw the boat
into a low bridge. Decide on a technique that will be used to dock the Catalina

SEAS Catalina 30 Operating Guidelines 8/10/2021
Page 16 of 28
30. Assign responsibilities to crew and ensure they know what is expected of
them.
10.When close to the slip reevaluate the chosen docking technique. If it is changed,
alert the crew and reassign responsibilities.
11.The docking conditions include traffic (power boats tend to move quickly in the
creek and have little regard for sailboats under power); wind (bow is swung by
the wind); current (boat will drift with the current –remember this is a fixed keel
boat) with a lot under the water line); boats in adjacent slips.
12.If conditions are too rough to dock
a. At Morgan, tie up at the Fueling dock and wait an hour or so as things will
change in that time. The current runs strongest for the hour before and
after mid-tide.
b. At Brown’s Point, motor out, anchor, wait an hour, motor in and try again.
After docking:
1. Secure bow, spring and stern lines so that boat is secure in middle of slip and
does not hit floating dock. At a transient dock, if backed in, cross the stern lines.
E.G. The line tied to the starboard side of the dock is cleated to the Port stern
cleat. Ensure that the stern lines can’t become tangled in the stern ladder.
2. Stop the engine by pulling up on the engine stop handle. This will cut off the fuel
to the engine and stop it. After engine has stopped push in the stop handle, turn
off engine key switch. WARNING: DO NOT TURN KEY SWITCH OFF WHILE
ENGINE IS RUNNING –YOU WILL DAMAGE THE ALTERNATOR.
3. Close the mainsail bag by zipping the top zipper and attaching the front cover
panel.
4. Center the rudder and tighten the steering wheel brake to prevent the rudder
from flopping around. (To tighten the brake turn clockwise until steering wheel
cannot move.)
5. Move the boom off center to port. Ensure that the boom cannot hit the piling.
6. Tighten halyards, sheets, furling lines, traveler lines
7. Stow GPS, remote mic,
cockpit cushions, winch
handles
8. Cover the helm station
9. Turn off radio and turn off
instrument and other breaker
panel switches. Move battery
switch to OFF position
10.Check for water in engine bay
11.Check Holding Tank level. If it
is more than ½ full arrange for
a pump out. See Pump Out
Procedure below.

SEAS Catalina 30 Operating Guidelines 8/10/2021
Page 17 of 28
Connecting shore or solar power:
1. Deploy solar panel OR shore power
2. To deploy solar panel: remove
from aft locker and lay on starboard
seat face up. Ensure that the cord is
hooked behind the rubber cushion to
protect it from the locker lid.
3. Cord and boat plug: At a transient
slip you may be able to connect to
shore power. Determine the best
way to lay the shore power cord so
that it will stay out of the water and
not get strained by the changing tide.
Unthread the cover from boat socket, line up plug with socket, insert and then
twist plug to lock in position. Screw black retainer ring to plug outlet.
4. Shore plug: Plug power cord into adapter at the shore power outlet. Turn on
shore power at the outlet
5. Plug power light: Check boat end of power cord, a light indicates that there is
power to the boat.
6. AC Breaker panel: Flip AC Power main breaker switch on (to right). Check light
for reverse polarity warning. Disconnect power immediately if reverse polarity
light is on.
7. Outlet breaker: Turn on AC breakers as needed.
8. Power Cord routing: Check power cord routing to make sure it is not chaffing
on the boat or dock and that it will not end up dangling in the water.
Leaving the boat:
1. Go below to secure hatches, make sure forward
hatch dogs are locked so that hatch cannot be
opened from outside. See photos:
2. Walk around boat before leaving. Check dock lines
and fenders. Ensure dock lines did not unwind from
dock cleats because of handling. Fenders should be
out of the water. Check for loose rigging. Make sure
furling line is secure
3. Check bilge for water
a. run pump if necessary to pump overboard.
b. NOTE: The bilge pump switch should be set to the ‘Auto’ position so
that pump runs as needed. There is a float switch that turns the pump on
when the water level in the bilge gets too high. Check that the bilge pump

SEAS Catalina 30 Operating Guidelines 8/10/2021
Page 18 of 28
float switch is operating. If not do not leave the breaker switch on as the
pump will run continuously and burn out.
4. Check 12-volt panel and battery switch: all should be turned off.
5. Hang ignition key on engine access door
6. Pack-up any trash and take ashore with you
7. Get locks from navigation station drawer
8. Install companionway boards and lock companion way and lazarettes.
Refueling:
1. Refueling from portable fuel cans is forbidden in most marinas.
2. Portable fuel cans can be carried onto boats. Just don’t dispense the contents
into the boat while in the marina.
3. Dispense the fuel into the tank when away from the marina
4. Use paper towels or oil absorbent towels to catch any spills that may occur.
5. Use the safety nozzle that is part of the portable fuel can.
6. Open the fuel fill port –be careful to ensure the port cover stays on-board
7. Ensure that you have firm hold of the fuel can
8. Tip fuel can to insert nozzle into fuel fill port before releasing the valve
9. Release the valve to dispense fuel into tank
10.Close the valve, return fuel can to upright position
11.Close the fuel can
12.Close the fuel fill port
13.Wipe area clean.
Autohelm
This boat is equipped with Raymarine ST4000+
Autopilot. There is a limit to how much force the
Autopilot can provide. If the boat is yawing widely
from side to side it is time to turn off the Autopilot
and steer manually. Refer to the Autopilot manual
in ship’s library for more details.
NOTE: Autopilot does not steer around obstacles.
You are still required to keep a lookout and steer
the boat around obstacles like other vessels,
reefs, and land. Autopilot also does not give you
right of way –you still must yield (or stand on)
according to right of way regulations.
The control panel is in the cockpit on the starboard side of the cockpit. The clutch is on
the helm station in front of the wheel port side.
1. To operate

SEAS Catalina 30 Operating Guidelines 8/10/2021
Page 19 of 28
a. turn on the circuit switch
b. press standby on the control panel
c. engage the clutch at the helm station (up is engaged)
d. press auto on the control panel
e. adjust heading by pressing +1, -
1, +10, -10 buttons
f. disengage temporarily by
pressing standby
2. To disengage
a. Press standby on the control
panel
b. Disengage the clutch at the helm
station (down is disengaged)
c. Turn off circuit switch
Radar
This boat is equipped with Simrad RADAR. The radar dome is on the front of the
mast; there are modules in various places in the boat. The display module is
mounted on a bracket attached to the cabin ceiling. It can be rotated so that it is
visible from the cockpit. If you use the radar, when done return the display
module to a position where people will not bump into it. Refer to the Simrad
manual in ship’s library for information about its operation. There is a laminated
Quick Reference sheet in the binder.
Leaving the slip at Brown’s Point Marina –Detailed procedure
•With the engine running, double check that there is water coming out of the
exhaust at the stern
•Determine which way the wind and/or current will push the boat as it comes out
of the slip. Keep in mind that all other things being equal the prop walk will take
the stern to port.
•There are 4 specific crew positions/duties:
oThe helmsperson will be in command; he/she will also take off the
starboard stern line.
oHaving determined which way the stern will want to go (starboard or port),
have a crew member pass a dock line around the piling on the opposite
side of the boat. For instance, if the stern will be pushed port, pass a line
around the piling on the starboard side. Both ends of this line should be on
board the boat in the crew member’s hands; it will be used to keep the
boat close to the piling and will eventually have one end released so that it
can be pulled on board. This is the warp line.
oA second crew member is at the bow ready to cast off first the bow lines
then the starboard spring line.
oA third crew member is at the piling on the port side, fending off as
needed.
Table of contents
Other SEAS Boat manuals

Popular Boat manuals by other brands


Key West Boats
Key West Boats boats Operating and maintenance instructions

NERIS
NERIS Smart 2 Assembly manual

Bayliner
Bayliner 285 Cruiser owner's manual

MasterCraft
MasterCraft Route 9 owner's manual

Edgewater Networks
Edgewater Networks Center Console 228 OWNER ASSISTANCE MANUAL

Quickboats
Quickboats foundation series user guide


