Quickboats foundation series User manual

USER GUIDE

2 Quickboats Foundation Series User Guide - Nov 2014
INDEX
1.Quickboats Foundation Series 3
2.Preparing your Quickboat for your adventure 5
2.1 Assembling your Quickboat 5
2.2 Attaching an outboard motor 12
2.3 Packaging away your Quickboat 12
2.4 Looking after your Quickboat and your friends 15
2.5 Maintaining your Quickboat & Troubleshooting 16
3.Quickboat specications and regulatory notices 18
3.1 Quickboat Warranty 19
4.Safety notices 20
4.1 General safety information 20
4.2 Safety equipment and rescue material 21
4.3 Risk of re 22
4.4 Hazards of ooding 22
4.5 Risk of hypothermia 22

3 Quickboats Foundation Series User Guide - Nov 2014
1. Quickboats Foundation Series
As a Foundation Series Quickboat owner you are one of
our most valued customers. We thank you for your fore-
sight in recognising the possibilities and the fun and the
joy that your Quickboat will bring.
This user guide and the accompanying advisory notes will
ensure you get the most out of your Quickboat, without
compromising safety. It contains details on how to assem-
ble and disassemble your Quickboat as well as guidelines
for proper use, maintenance, trouble shooting and some
basic safety guidelines. Read it carefully before using your
Quickboat. Keep this document in a safe place so that you
can refer to it at anytime.
We are truly delighted that you have joined the Quickboat
community and we’d love to hear your feedback. Please
let us know what you like to hear about, what you love
about your Quickboat and all the places you can take it.
Equally, we’d appreciate your thoughts on how we can
improve future Quickboats. You can get in contact with us
via email, Facebook or phone.
Wishing you blue skies and calm waters!
AUSTRALIA (HEAD OFFICE)
37a Pearse Street
Cottesloe, WA 6011
Email: connect@quickboats.com
Phone: 1 800 726 287 (1800 Q BOATS)
Email: connect@quickboats.com
Facebook: Quickboats
SOUTH AFRICA:
Ofce Phone: 011-524-0202
International: +27-11-524-0202
Email: info@quickboats.co.za
Geoff: 083-2277760
Michael: 082-4455114
EUROPE
Populierenhof 4
8091 DR Wezep
Netherlands
Email: [email protected]
Phone: 0031 (6) 83 55 18 20
Facebook: Quickboats Europe
TAIWAN
Company: Wang-Chi Enterprises
Contact: Feng-Ming Tsai
Email: hid923990@yahoo.com.tw
Phone: +886422240217-13
The Quickboat team Australia
Deryck, Nicole, James & John The Quickboat team Europe
Wibo & Annegreet

4 Quickboats Foundation Series User Guide - Nov 2014
8
9
765432
1
Image 1. Two bags
Image 2. Small bag
Image 3. Parts from the small bag
Image 4. All parts from the Quickboat

5 Quickboats Foundation Series User Guide - Nov 2014
2. PREPARING YOUR QUICKBOAT
FOR YOUR ADVENTURE
In this chapter you will learn how to assemble your Quick-
boat, attach an outboard motor, pack away your Quickboat
and keep your Quickboat beautiful.
2.1 ASSEMBLING YOUR QUICKBOAT
The easiest way to learn how to assemble your Quickboat
is to watch James’ assembly guide on YouTube. You can
nd it at this link:
http://www.youtube.com/edit?video_id=3LbFQybP38E
or
just Google “How to assemble your Quickboat”.
Please note that the foredeck assembly has changed since
the video was developed. Please follow the instructions in
this guide to build the foredeck section of your Quickboat.
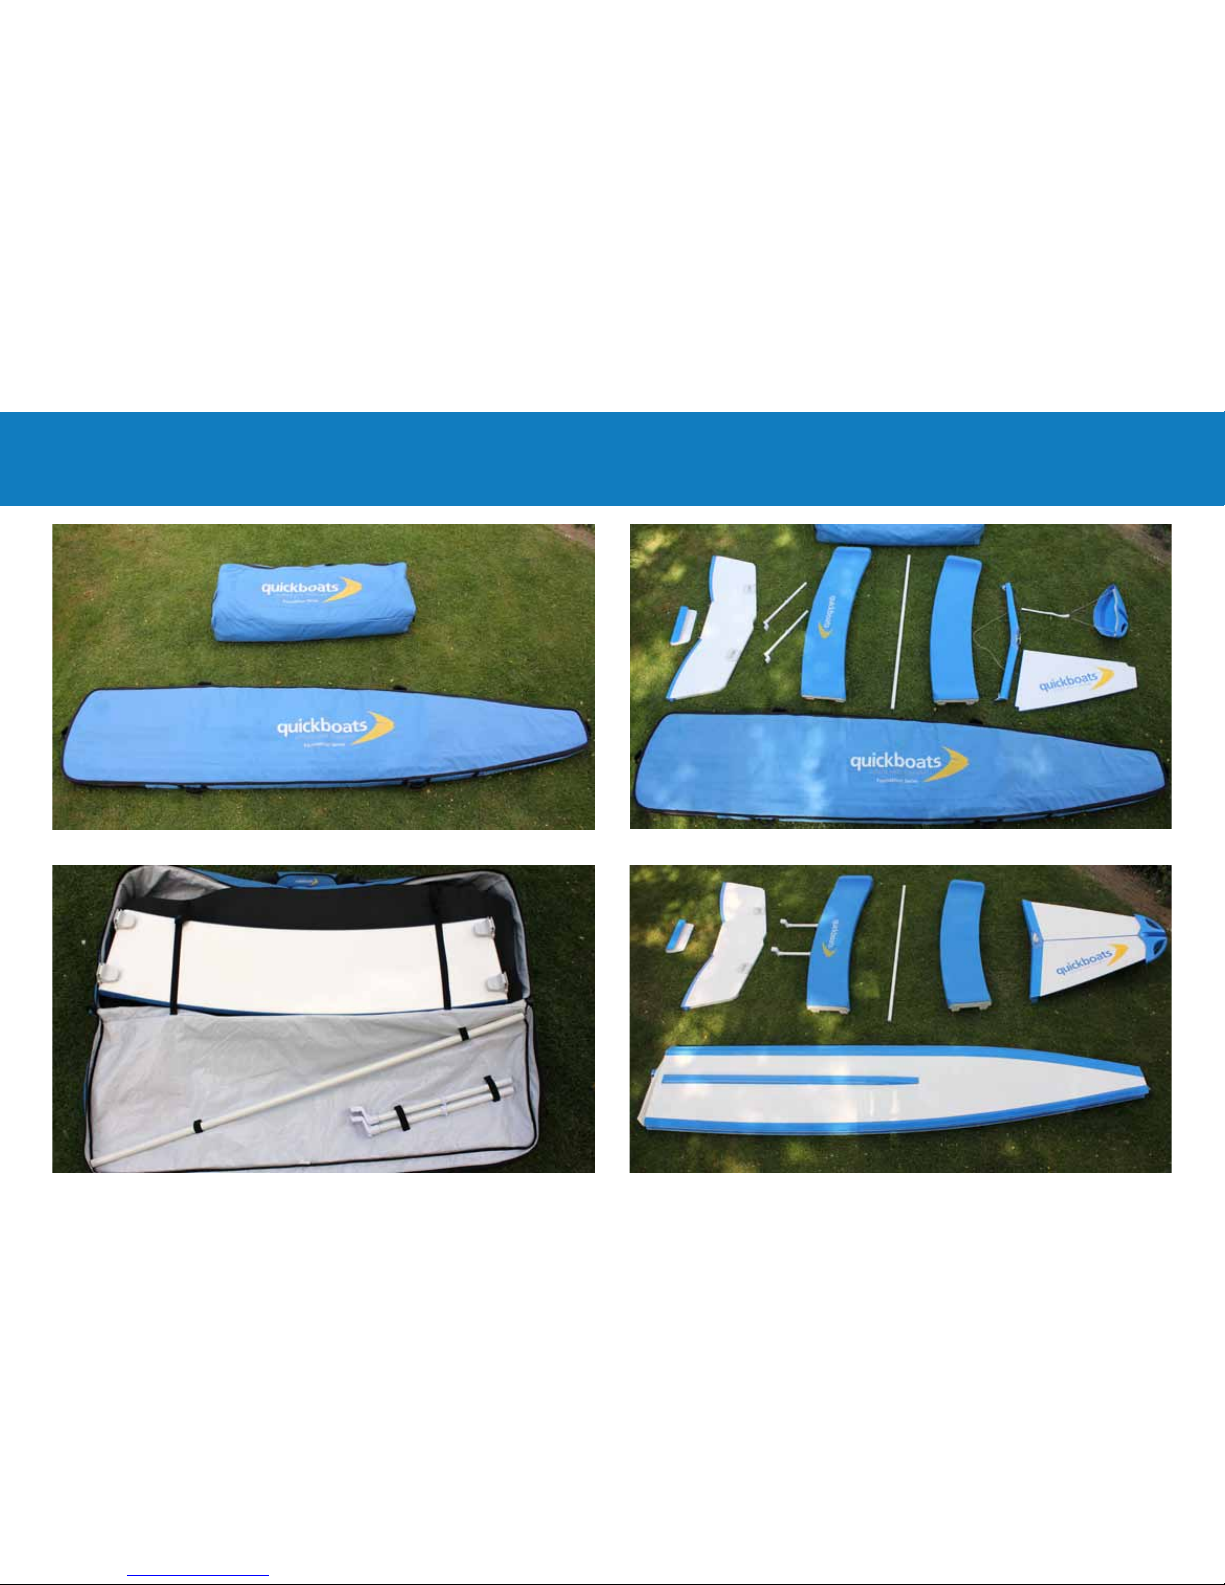
IMAGE 1. The Quickboat is packed in two bags; the long
bag with the hull and the short bag with the other pieces
that make up your Quickboat.
IMAGE 2. Open the short Quickboat bag and lay each
piece of your Quickboat out as if you are building the boat
without the hull. Keep the black padding aside to use when
you are packing the boat away.
IMAGE 3. Lay the pieces in the following order:
1. Motor plate
2. Transom
3. 2 x power transfer poles
4. Skipper’s seat (the one with the Quickboat logo on it)
5. Extender bar
6. Crew member’s seat
7. Cross brace
8. Nose cone
9. Foredeck plate
IMAGE 4. Open your Quickboat hull bag (the long one)
and place the hull next to the other pieces of the boat.
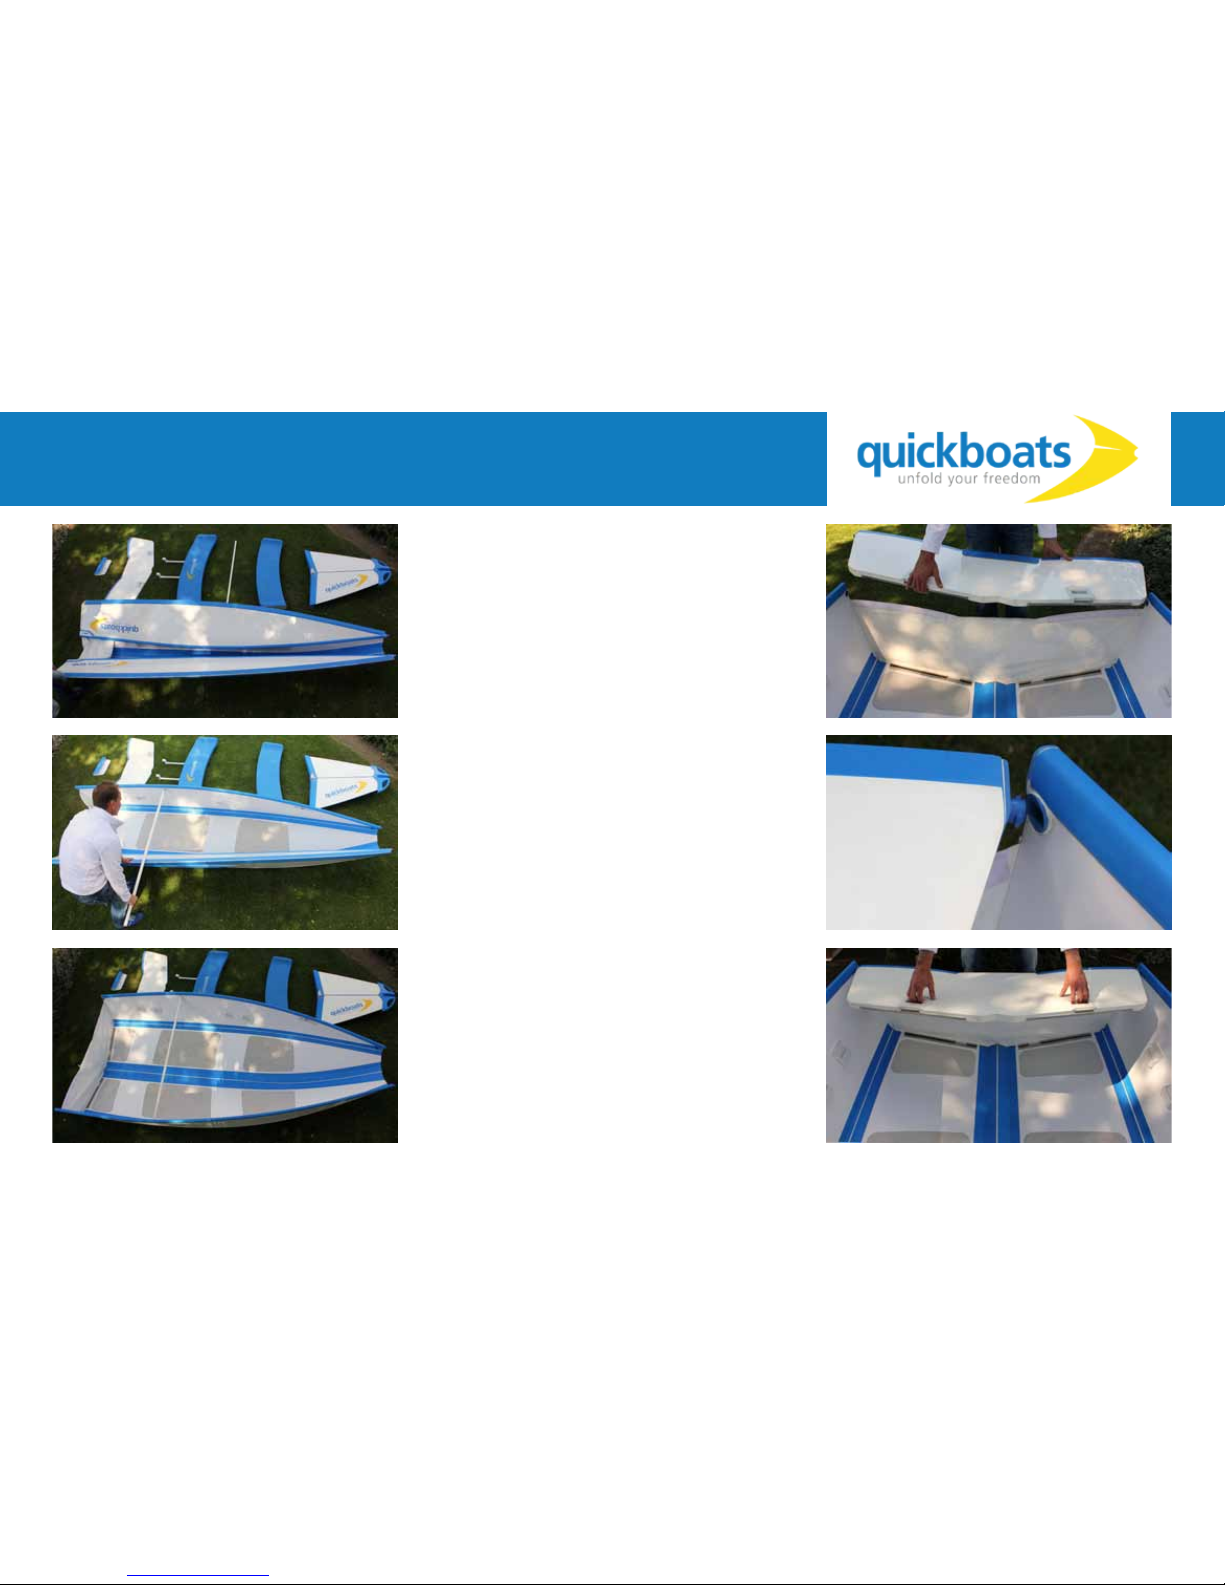
Before you start to build your Quickboat, you need to
assemble the foredeck and the skipper’s seat.
Assemble the foredeck
The foredeck is asembled from three parts: the cross
brace, the foredeck plate and the nose cone.
IMAGE 5. Unfold the foredeck. Slot the triangular shaped
foredeck neatly into the groove on the cross brace.
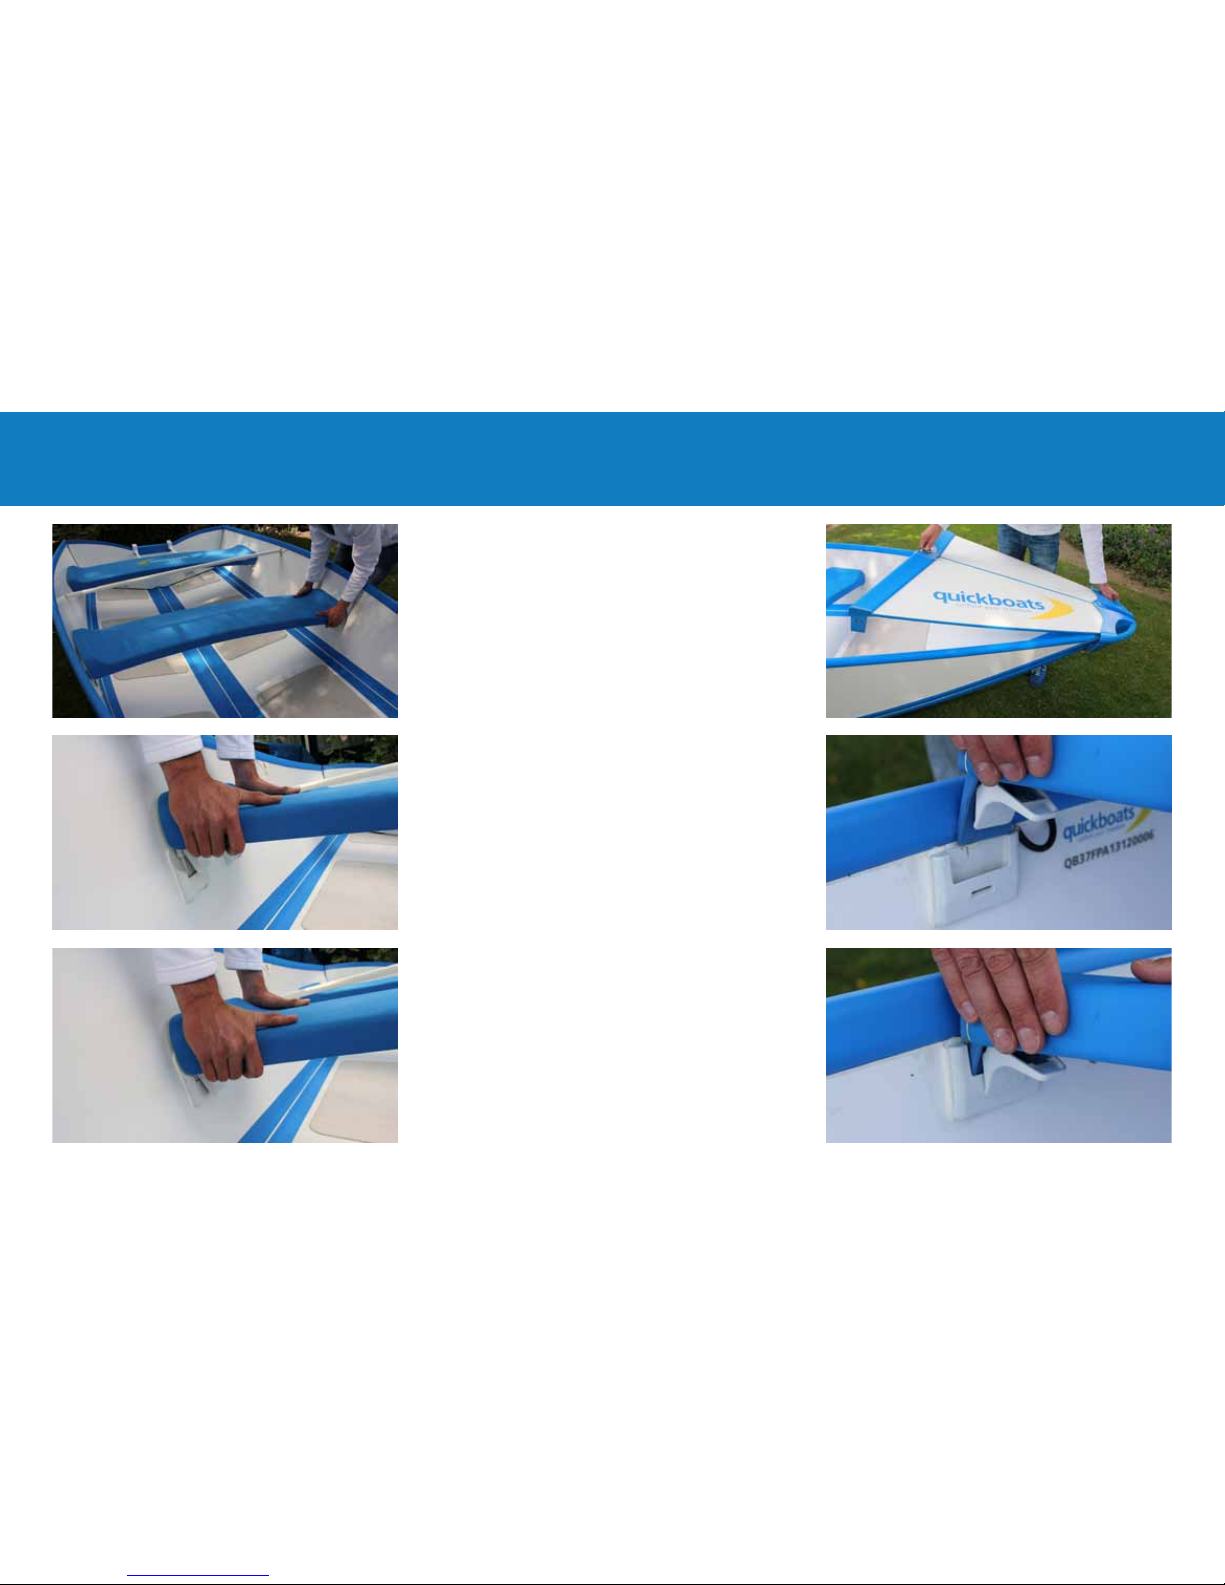
IMAGE 6. Pick up the nose cone and slot the groove of the
nose cone into place onto the foredeck.
IMAGE 7. To complete the structure, thread the white strap
through both loops of high tensile strap. Secure this strap
by threading through both metal rings, passing back over
the rst ring and threading through the second. Pull down
rmly to ensure the foredeck is secure (IMAGE 8 a-c).
Image 5. Place foredeck plate in the cross brace
Image 6. Place the nose cone on top of the foredeck
Image 7. Place the nose cone on top of the foredeck

6 Quickboats Foundation Series User Guide - Nov 2014
Assemble the Skipper´s Seat
IMAGE 9 a-c. The skipper´s seat has two holes and two
power transfer poles. Lock each of the power transfer
poles into the holes on the edge of the skipper´s seat by
inserting a pole into the hole and twisting clockwise. They
are locked into place when the white tongue sits rmly
within the blue groove.
IMAGE 10 a-c. Now you are ready to assemble your
Quickboat. Open the hull. Place one end of the extender
bar gently into the extender bar padding located under the
gunnel (the top rim of the boat) in the middle of the hull.
Gently pull the hull apart and secure it open by placing the
other end of the extender bar into the extender bar padding
on the opposite side of the hull.
Always assemble your Quickboat starting in the following
order:
• Transom
• Motor plate
• Skipper´s seat with power transfer poles
• Crew member’s seat
• Foredeck with cross brace and nose cone
Image 8a.
Image 8b.
Image 8c.
Image 9a.
Image 9b.
Image 9c..

7 Quickboats Foundation Series User Guide - Nov 2014
Image 10a.
Image 10b.
Image 10c..
IMAGE 11A. You start with the transom on the back of the
Quickboat. You will notice two ´T-Pivots´ on either side of
the transom. The two ´T-Pivots´ make a bayonet tting with
the ´blue´ holes at the rear of the hull.
IMAGE 11b. Gently slot each side into place at the holes.
You must do this with the transom at around a 90 degree
angle. You will need to gently push one of the side panels
out slightly to get each ‘T-pivot’ into the holes in the side
panels.
IMAGE 11c. Once in place the transom will begin to pivot.
There are two locking mechanisms for the transom:
• A stainless steel mechanism on the base of the hull
that locks into another stainless steel part on the base
of the transom;
• The white clips that lock over the stainless steel
mechanism.
Image 11a.
Image 11b.
Image 11c..

8 Quickboats Foundation Series User Guide - Nov 2014
IMAGE 12 a. Holding the white catches up, allow the tran-
som to pivot down until the stainless steel catches lock into
place. To ensure the lock is secure don’t be afraid to give
the transom a good nudge in, by pulling it back towards you
as you stand behind the boat.
IMAGE 12 b-c. Now click the white catches down so they
lock over the stainless steel. You will hear a clear ‘click’ as
they lock into place.
IMAGE 13 a-b. Fold the white membrane over the transom
and secure with the velcro.
IMAGE 14. Now place the blue motor plate over the two
blue catches. Ensure the shorter edge of the motor plate
is on the inside of the boat.
Image 12a.
Image 12b.
Image 12c..
Image 13a.
Image 13b.
Image 14.

9 Quickboats Foundation Series User Guide - Nov 2014
IMAGE 15 a-b. Pick up the skipper´s seat with the
locked-in power transfer poles and place the power
transfer poles over the blue catches protruding above
the motor plate.
IMAGE 16 a-c Gently allow the seat to pivot down and
lock it into place by ‘clicking’ all four of the white seat
catches into place.
Image 15a.
Image 15b.
Image 16a.
Image 16b.
Image 16c.

10 Quickboats Foundation Series User Guide - Nov 2014
Image 17a.
Image 17b.
Image 17c.
Image 18a.
Image 18b.
Image 18c.
IMAGE 17 a-c. Next, click and lock the crew member’s seat
into place as you did the skipper´s seat – ensuring
all four clips are properly inserted and locked into place.
As you do this you will notice the extender bar becomes
slack as the boat becomes rigid. You can now remove
the extender bar and pack this back into the boat bag.
IMAGE 18a. Take the foredeck over to the boat and line the
nose cone up with the ‘bullets’ at the end of each gunnel
(image 18a). Slip the nose cone over each of the ‘bullets’.
Ensure the cross brace clip ‘tongues’ are on the inside of
the hull when slipping the nose cone over the ‘bullets’.
IMAGE 18 b-c. Once the nose cone is secured over
the ‘bullets’, click the clips on each side panel into place
attaching the foredeck to the hull.
IMAGE 19. And there you have your Quickboat. Ready
to have some fun!!

11 Quickboats Foundation Series User Guide - Nov 2014
Image 19.

12 Quickboats Foundation Series User Guide - Nov 2014
Image 20a.
Image 20b.
Image 21.
2.2 ATTACHING AN OUTBOARD MOTOR
Each Quickboat model has a different maximum outboard
power. Check the Builder’s Plate on your boat. Each
country has different regulations on when a Recreational
Skippers Ticket is required. Check with the Department of
Transport or equivalent in your country.
To attach your outboard motor simply:
IMAGE 20a. Loosen the clamps on the motor bracket be-
fore taking it over to your Quickboat. Carefully lift the motor
from a horizontal to vertical position.
IMAGE 20b. Place the motor bracket over the blue
motor plate ensuring the motor is in the centre of the motor
plate. Tighten the clamps on the motor bracket evenly onto
the motor plate. Follow the outboard motor user guide for
operational instructions.
2.3 PACKING AWAY YOUR QUICKBOAT
It is always recommended that you hose your Quickboat
down to remove any sand from the clips and hinges before
you pack it away.
IMAGE 21. Before storing the Quickboat ensure it is clean
and dry.
To disassemble your Quickboat reverse the order in which
you assembled it:
1. Remove the outboard motor and any other contents
you have taken into the boat.
2. Remove the foredeck by unclicking the clips on
the cross brace and lift gently away from the boat.
3. Once off the boat, undo the foredeck strap holding
the foredeck components together.
4. Detach nose cone from the foredeck by pulling
it away.
5. Detach cross brace from the foredeck by pulling
it away.
6. Fold the foredeck in half at the hinge.
7. Remove the crew member’s seat by unclipping each
of the seat clips on both sides and keep it level whilst
lifting it upwards.
8. Insert the extender bar into the hull by gently opening
the hull slightly.
9. Remove the skipper´s seat by unclipping each of the
seat clips and then pivot it upwards to remove the
power transfer poles from their clasps.
10. Remove the power transfer poles from the skipper´s
seat by gently twisting them anti-clockwise and pulling
them out.
11. Lift the motor plate off the transom.
12. Detach the membrane from the transom by
disengaging the velcro.
13. Unclip the transom by lifting the white clip handles
and pivot the transom upwards before applying slight
outward pressure to the hull in order to release the
transom “T-Pivots”. This will release the transom
from the hull.
14. Now gently remove the extender bar and allow the hull
to fold in on itself. Keep control of the hull at this point.
IMAGE 20 a-n.
Your Quickboat is now ready to pack away.

13 Quickboats Foundation Series User Guide - Nov 2014
Image 20b.Place the transom into the bag
Image 20a. Open the small bag
Image 2oc. Place the motor plate on the transom into the bag
Image 20d. Cover it with the black protector padding.
Image 20e. Place the skipper´s seat face up on top of the black padding and zip up the
power transfer poles into the bag
Image 20f. Cover this also with the black protector padding.
Image 20g. Place the foredeck.
Image 20h. Cover the foredeck with a piece of black padding and place cross brace
Image 20i. Insert the nose cone at the front of the bag.

14 Quickboats Foundation Series User Guide - Nov 2014
Image 20j. Put the crew member´s seat on next, face down.
Image 20k. Secure the pieces with the straps.
2.4 LOOKING AFTER YOUR QUICKBOAT
AND YOUR FRIENDS
We have designed the Quickboat to enable you to
experience the fun and joy that comes with water
adventure. We encourage you to use your Quickboat for:
• Adventuring or exploring on lakes, rivers, estuaries
and other protected waters.
• Fishing, crabbing, prawning on lakes, rivers, estuaries
and other protected waters.
• Taking the family for a secluded picnic on lakes,
rivers, estuaries and other protected waters.
We would love to hear about your Quickboating adventures
and share them with our community. You can tell us all
about them via our website, Facebook or email.
Warnings:
The strength and rigidity of the Quickboat is achieved
through the structural integrity of the design. The Quick-
boat’s design is reliant on each of the Quickboat elements
(transom, seats, foredeck) working together. For this
reason, it is important than none of the elements are com-
promised. Hence, we do not warrant against the following
activities as they are not the intended use of the Quickboat.
Image 20l. Place the extender pole in the elasticised area on the inside top cover.
Image 20m. Zip up the bag.
Image 20n. Ready to head home with your Quickboat.

15 Quickboats Foundation Series User Guide - Nov 2014
Please do not:
• Step or sit on the foredeck of your Quickboat. This is not
designed to take any weight (even that of a child or dog).
• Tow your Quickboat from the nose cone.
• Ski or wakeboard from your Quickboat.
• Take your Quickboat into rough, choppy waters. It will
perform much better on protected water. If you nd
yourself in rough, choppy waters travel at 8 knots to
avoid excess pounding.
• Let your dog stand on the seats if he has unclipped
toenails. We have designed the seat covers for comfort
but with comfort comes the need for care. They will tear
if they are not stored or treated with love.
• Overload your Quickboat in excess of maximum
capacities outlined on the Builder’s Plate (including
the outboard motor).
• Sit on the cross brace.

16 Quickboats Foundation Series User Guide - Nov 2014
2.5 MAINTAINING YOUR QUICKBOAT
& TROUBLESHOOTING
Your Quickboat is covered by a 3-year warranty for any
signicant defects. However there are some aesthetic or
general maintenance repairs that you can easily carry out
should you need to. These are:
Cleaning
The best way to clean your Quickboat is to rinse it with
fresh water after each use to remove any sand or salt. Pay
particular attention to the stainless steel strips on the hull
and transom, the bayonet tting where the transom locks to
the hull and the hinges. These areas will benet from being
sprayed with water to remove sand after each use.
When packing away your Quickboat ensure it is substan-
tially dry before storing it in its bag. You do not need to
towel it dry as there is ventilation in the bags but you do
want to avoid any pooling of water as this could cause
mould and deterioration.
Polishing
Polishing your boat is not necessary however if you like a
shiny hull then any marine grade breglass polish is suit-
able on the outside panels. Polish is not recommended for
use on the inside of the boat.
Hinge aesthetic repairs
Over time the white Sikaex covering may begin to lift from
the hinges. This will not affect the structural integrity of the
boat. However, to make the boat beautiful again you may
wish to reapply a protective sealant over the hinge.
To do so we recommend Sikaex 521UV. This exible,
adhesive sealant is available from boat hardware suppliers
and adheres and seals well on all cleaned surfaces of the
Quickboat. We recommend checking the expiry date of the
product before purchasing and following the application
guidelines.
Water proof membrane repairs or reattaching parts
Should you tear your waterproof membrane or need to
re-attach any parts (this is highly unlikely) we recommend
‘Loctite 406’. This product can be used to adhere a new
piece of PVC membrane to repair a cut in the membrane
or re-adhere a loose part. In essence this product is an
efcient and easy to use glue that works well with the
Quickboat materials.
Damage to hull
Should you manage to somehow dent or puncture your
hull, for isolated non-structural damage up to 5cm (2
inches) long you can use an epoxy putty. We recommend
Selleys ‘Knead it Aqua’ for this purpose.
In any instance we are available to talk through any
questions or concerns you may have. Please do not
hesitate to contact us on:
Email: [email protected]

17 Quickboats Foundation Series User Guide - Nov 2014
3. QUICKBOAT SPECIFICATIONS
AND REGULATORY NOTICES
QUICKBOAT SPECIFICATIONS
Name of the craft Quickboat 3.7 Adventurer Quickboat 2.5 Companion
Brand of the craft Quickboats Quickboats
Type of craft Open hull boat Open Hull boat
CE design category*) C D
Maximum numbers of persons 4 2
Construction material Epoxy-high density
foam sandwich Epoxy-high density
foam sandwich
Maximum load on Builder´s Plate 360 kg 175 kg
LH(length of the hull) 3.7 m 2.5m
LWL (waterline length) 3 m 1.9m
BH (beam of the hull) 1.7 m 1.5m
BWL (beam at waterline) 1.57 m 1.3m
Tmin (Minimum draught) 0.23 m 0.20m
Ha(air draught) 0.61 m 0.59m
mLCC (light craft mass) 107 kg 62kg
mMTL (weight maximum load) 360 kg 175kg
mLDC (loaded displacement) 437 kg 212kg
All sizes are measured according to ISO 8666: Principle data
* Design category: The above mentioned information is classied as a vessel design category. Following you will nd the
explanation of the design categories:
Category A Ocean:
Designed for extended voyages where conditions may
exceed wind force 8 (Beaufort scale) and signicant wave
heights of 4 m and above but excluding abnormal condi-
tions, and vessels largely self-sufcient.
Category B Offshore:
Designed for offshore voyages where conditions up to, and
including, wind force 8 and signicant wave heights up to,
and including, 4 m may be experienced.
Category C Inshore:
Designed for voyages in coastal water, large bays, estuar-
ies, lakes and rivers where conditions up to, and including,
wind force 6 and signicant wave heigths up to, and includ-
ing, 2 m may be experienced.
Category D Sheltered waters :
Designed for voyages on sheltered coastal waters, small
bays, small lakes, rivers and canals when conditions up to,
and including, wind force 4 and signicant wave heights up
to, and including, 0,3 m may be experienced, with occa-
sional waves of 0,5 m maximum height, for example from
passing vessels.
Note 1 :The signicant wave height is the average height
of the three highest waves measured, which are an approx-
imation to the wave height estimated by an experienced
observer. Some waves may be twice as high.

18 Quickboats Foundation Series User Guide - Nov 2014
The Quickboat is inspected and certied by:
Dutch Marine Inspection BV, Notied Body for pleasure
crafts according to Directive 94/25/EG and 2003/44/EG:
NOBO number 2248
tel. : +31 597 – 67 10 00
Scheemderzwaag 2
9679 TM Scheemda
The Netherlands
http://www.dutchmarineinspection.nl
The certicate issued by DMI: 15-07-2014 with certicate
number: 45455-RCD-138472
Evidence of conformity (CE) is based on the European
Recreational Craft Directive (94/25/EC and 2003/44/EC).
This directive is mainly focused on increasing trade between
the Member States of the European community. These include
requirements relating to stability and structure. These
requirements are minimum requirements.
Nothing in this Act and/or standards relieve the skipper/owner
of his or her responsibility!
The granting of a category does not warrant that the craft is
suitable for all conditions within this category. Some conditions
relating to wave heights and winds within this category could pose
a safety hazard to the craft.

19 Quickboats Foundation Series User Guide - Nov 2014
3.1 QUICKBOATS PLAIN ENGLISH WARRANTY
Quickboats offer a 3 year warranty on all Quickboats:
Year 1
Year 1 is full parts and labour warranty. If there is any
defect in manufacture found in the rst 12 months from the
date of delivery of your Quickboat, Quickboats will pay for:
• Labour
• Replacement parts
• Materials for repair
• Freight to have the boat, or component of the boat
repaired or replaced.
The decision to repair or replace is solely Quickboats’
to decide.
Year 2 & 3
Years 2 and 3 of the warranty cover parts and materials
only. If there is a defect in manufacture of your Quickboat
found in the 13th month to 36th month from the date of
delivery of your Quickboat, Quickboats will pay for:
• Replacement parts
• Materials for repair
• Freight of the parts and / or materials
The owner is responsible for any labour charge and freight
cost of the boat to and from the repairer.
The decision to repair or replace is solely Quickboats’
to decide.
Warranty Steps
1. If you notice a defect on your boat please send us an
email or a letter including:
• A description of the defect
• Where on the boat the defect is located
• Photographs of the defect and its location on the boat
• A contact phone number
This will assist us in doing an initial assessment of the
defect, which will then determine the best way to x the
defect.
2. A Quickboats representative will call you and discuss the
defect, provide you with a claim number, and let you know
the best way of handling the claim.
**DO NOT SEND YOUR BOAT OR ANY PART BACK TO
QUICKBOATS UNLESS SPECIFICALLY REQUESTED
BY QUICKBOATS**
Fine-print
1. Quickboats warrants all components to be free from
defects in materials and workmanship for a period of three
years from date of original delivery.
2. The warranty is subject to the boat being used for rec-
reational purposes only and within recommended operat-
ing parameters. The warranty is applicable to the original
purchaser of the boat and is not transferrable.
3. The warranty is voided if the boat is:
• Used for commercial purposes of any kind;
• Used for competition or racing;
• Towed or used for towing;
• Used with a motor heavier or more powerful than
that stated on the Builders Plate;
• Loaded above the maximum weight stated on the
Builders Plate;
• Not used in accordance with the User Guide;
• Not assembled or packed away in accordance with
the User Guide;
• Not stored properly (ie packed away dry in its bags)
when not in use;
• Used outside of safe boating practices;
• Damaged by improper use, neglect or accident;
• The Hull Identication Number (HIN) plate or Builders
Plate are changed, defaced or detached in any way;
• Placed on a trailer (other than a Quickboats authorised
Beach-lift trailer).
4. Your boat has been hand made using high-tech compos-
ites for lightweight and strength. There may be some minor
indentations in the panels that do not impact on the boat’s
performance. These indentations are expected in this type
of product and are not covered under this warranty.
5. The internal panels, including seats, are not warranted
against degradation caused by fuel or rough treatment.
They are only warranted against defects in manufacture.
6. Quickboats retains the right to substitute comparable
product.
7. Certain legislation including the Trade Practices Act 1974
as amended (“the Act”) has the effect of giving a consumer
as dened therein certain rights which cannot be excluded,
restricted or modied by agreement. The provision of this
Agreement must therefore be read having regard to such
legislation to the extent that it may be applicable and noth-
ing in this Agreement shall have the effect of excluding,
restricting or modifying such rights.

20 Quickboats Foundation Series User Guide - Nov 2014
4. SAFETY
This chapter will inform you about general safety informa-
tion, safety equipment and rescue material, risk of re,
hazards of ooding and risk of hypothermia.
4.1 GENERAL SAFETY INFORMATION
Prior to departure, the skipper should familiarise himself
with the Quickboat and the route to the destination. The
skipper is responsible for the safety of the Quickboat and
its passengers. He should take all safety measures re-
quired in the case of an emergency. This applies not only to
coastal waters but also for navigation in inland waterways.
Above all the skipper should never overestimate their own
knowledge and skills. It is not a sign of weakness if you ask
for timely advice from experienced skippers, coastguard,
water police, rescue company or similar entities.
Attention to these points below:
• Always shut down the engine when you are swimming;
• The crew must be given appropriate training;
It is advisable to discuss a ‘man overboard’ situation prior
to departure. Should the skipper fall overboard during the
voyage, the passengers should be prepared to take action.
Warning!
Do not exceed the maximum
recommended number of persons.
Regardless of the number of persons
on board, the total weight of persons
and equipment must never exceed the
maximum load as indicated on the build-
ers plate on your Quickboat. Always use
the chairs and seats available.
Weight
Shape and weight affect the stability of your Quickboat.
The shape is determined by the line drawing of the
designer. It can not change. The weight is determinated
by the mass of your empty Quickboat and the equipment
of your Quickboat.
On the Builder’s Plate, you will nd the value of the
maximum loading capacity of your Quickboat. This value
indicates the mass that can be safely added to the ready
for use boat. Depending on the placement of the people
and equipment, this extra weight inuences the behavior
of the Quickboat.
Place heavy things as close as possible - and preferably
below - the waterline. Do not put too much weight in the
center or aft.
Attention!
Please be aware that accessories add
extra weight to the Quickboat. This also
means that the total weight of your ship
increases, and therefore you can carry
less load.
Speed
Dependant on conditions, you should adapt your speed in
the Quickboat to ensure damage is prevented and passen-
gers are safe. International Rules for Preventing Collisions
at Sea (COLREG) and good seamanship require that at
all times people should be careful, considering the current
diversion rules.
Mooring and towing
Local circumstances determine how you moor your Quick-
boat. The bollard on the foredeck is used when the Quick-
boat is towed. Towing should always be carried out at low
speed (e.g. 4 knots and only in protected waters) with the
line running through the handlebar at the nose. The bollard
can also be used to moor a ‘spring’. This is a diagonal
mooring line, which ensures that your Quickboat does
not move forward or backward along the side when it is
moored.
Always use good protective agents between shore and ship
to prevent damage. The power transfer poles attached to
the skipper´s seat and the transom can also be used as
bollards.
Table of contents
Popular Boat manuals by other brands

CORRECT CRAFT
CORRECT CRAFT Nautique 210 owner's manual

Yamaha
Yamaha SR230 Owner's/operator's manual

Wellcraft
Wellcraft 360 Coastal owner's manual

Grady-White Boats
Grady-White Boats SAILFISH 282 owner's manual

Meridian Yachts
Meridian Yachts 408 owner's manual

Meridian Yachts
Meridian Yachts 381 Sedan owner's manual