Seattle Coffee Gear Diletta Mio User manual


Thank you for joining the Diletta
Espresso Family!
You have made an excellent choice. Before you use your Mio for the first
time, read through this manual; inside you’ll find setup and first use
instructions, as well as some tips and tricks for best practices and some
common troubleshooting questions. If you have further questions, please
reach out to Seattle Coffee Gear’s cutomer servie team at 866-372-4734

Contents
Storage And Transportation 12
Machine Cleaning 13
PID Settings 14
Troubleshooting 16
Tips And Tricks 17
General Information 4
Use and Safety Instructions 5
Machine Overview 8
Accessories 9
Unboxing & Setup 10
Warnings
Intended Use
Safety Instructions
Water
Machine Safety
Noise And Vibrations
Machine Specifications
Unboxing
Initial Setup
Coffee Brewing
Milk Steaming
Daily Maintenance
Weekly Maintenance
Periodic Maintenance
Descaling
Adjusting Temperature
Eco Mode Settings
Default Settings
Be Clean
Coffee Quality
Grind Matters
Consistent Dosing
Shot Flavor
Milk Steaming
The machine does not start
Machine powers on but won’t heat
No coffee is deliverd
Inconsistent coffee delivery
No steam delivery
Machine reads temperature in Celsius
Accidentally changed defaul settings

Diletta Mio Espresso Machine User Manual 4
General Information
.
Keep this user manual after reading. If you have further questions, please reach out to
Seattle Coffee Gear’s customer service team at 866-372-4734 or send an email to
Seatle Coffee Gear assumes no responsibiliy for damage or failure in the event of:
• Use outside of intened purposes
• Alterations/customzations made to any machine component
• Use with non-original components
• Unauthorized/uncertified repairs
Use, modifcation, or repairs outside these criteria will void your warrany.

Diletta Mio Espresso Machine User Manual 5
Use and Safety Instructions
Warnings
Intended Use
• The packaging material (plastic bags, polystyrene, dust cover, cardboard, etc.) are a
potential source of danger and must be kept out of reach of children.
• Before connecting the machine to power, make certain that the rating sticker matches
your home electrical grid.
• The power cable must be smooth and not exposed to impact or handling by minors. It
must not be placed near liquids, water or heat sources, and must not be damaged.
• The use of adapters, multiple sockets, extension cords, or power strips is not advised.
• Position the machine on a waterproof surface (laminate, stainless steel, ceramic, granite
etc.) away from heat sources (ovens, stove tops, fireplaces, etc.) and in an environment
where temperature does not drop below 40 °F.
• Do not expose the machine to the elements, or install it in an environment with high
humidity, such as a bathroom.
• If the need for a replacement part arises, contact Seattle Coffee Gear repair.
• The machine in its packaging is to be stored in a dry location, free from humidity and
protected from the elements. The temperature must not be lower than 40 °F.
The Diletta Mio has been designed and built expressly for coffee brewing and the preparation of
coffee-based drinks. This machine is intended only for personal or household use.
Any use outside the above use case(s) will void your warranty. This machine is not intended for
commercial or office environments.

Diletta Mio Espresso Machine User Manual 6
Safety Instructions
Water
• Ensure that your home capacity and power rating is suitable for the maximum power
consumption indicated on the machine’s rating sticker before connecting the machine
to electric supply.
• The use of adapters, multiple sockets, extension cords, or power strips is not advised.
• Do not use this machine if there is damage to its cord, plug or any other part or if the
machine does not work properly.
• This machine has been designed for the sole purpose of producing coffee, hot water, and
steam for hot beverages. All other uses are inappropriate and dangerous. The
manufacturer shall not be held responsible for any damage caused by inappropriate use.
• Protect your machine from electrical issues:
1. Do not immerse the machine, cord, or plug in water or other liquids.
2. Prevent the power cable from being stretched or pulled tight.
3. Do not use the machine with wet hands.
4. Do not allow children to use the machine.
5. Do not use the machine with bare feet.
6. Do not spill any liquid over the machine.
7. Do not expose the machine to the sunlight, rain, snow, extreme temperatures etc.
8. Turn off and disconnect the machine from power before performing any cleaning.
• The machine must be positioned on a horizontal surface at a suitable height away from
children.
• If the machine operates in a faulty manner, is compromised in its performance, or stops
working, turn the machine off and disconnect it from power. Do not try to repair it. Please
contact Seattle Coffee Gear at 866-372-4734 or send an email to
The machine must be operated with soft, clean drinking water. If your local water supply has a
high mineral content, use a water softener, water filtration system, or bottled water. A build-up
of mineral deposits may restrict the flow of water within the machine and cause damage to
components or cause personal injury.
Improper water usage can result in the voiding of your warranty.

Diletta Mio Espresso Machine User Manual 7
Machine Safety
Noise And Vibrations
Width 10.75 inches
Depth 13 inches; 17 inches w/ portafilter
Height 15 inches
Gross Weight 44 pounds
Net Weight 35 pounds
Watts 1600W
Volts 120V
Amps 15A
Boiler Material Brass
Boiler Volume 400 mL
Reservoir Volume 2 L
• The machine’s brew circuit is fitted with a mechanical spring valve to protect
against overpressure. From the factory, this is set at 10 bar.
• Both pumps are fitted with thermal switches that resets automatically for
protection against overheating.
• All electrically powered heating elements are located inside the machine paneling.
Under regular use, the machine’s operating characteristics measure less than 70 dB.
The machine is supplied with rubber vibration damping feet. In normal conditions the
machine will not generate vibrations which could damage objects or cause injury to
persons.
Diletta Mio Espresso Machine User Manual 8
9
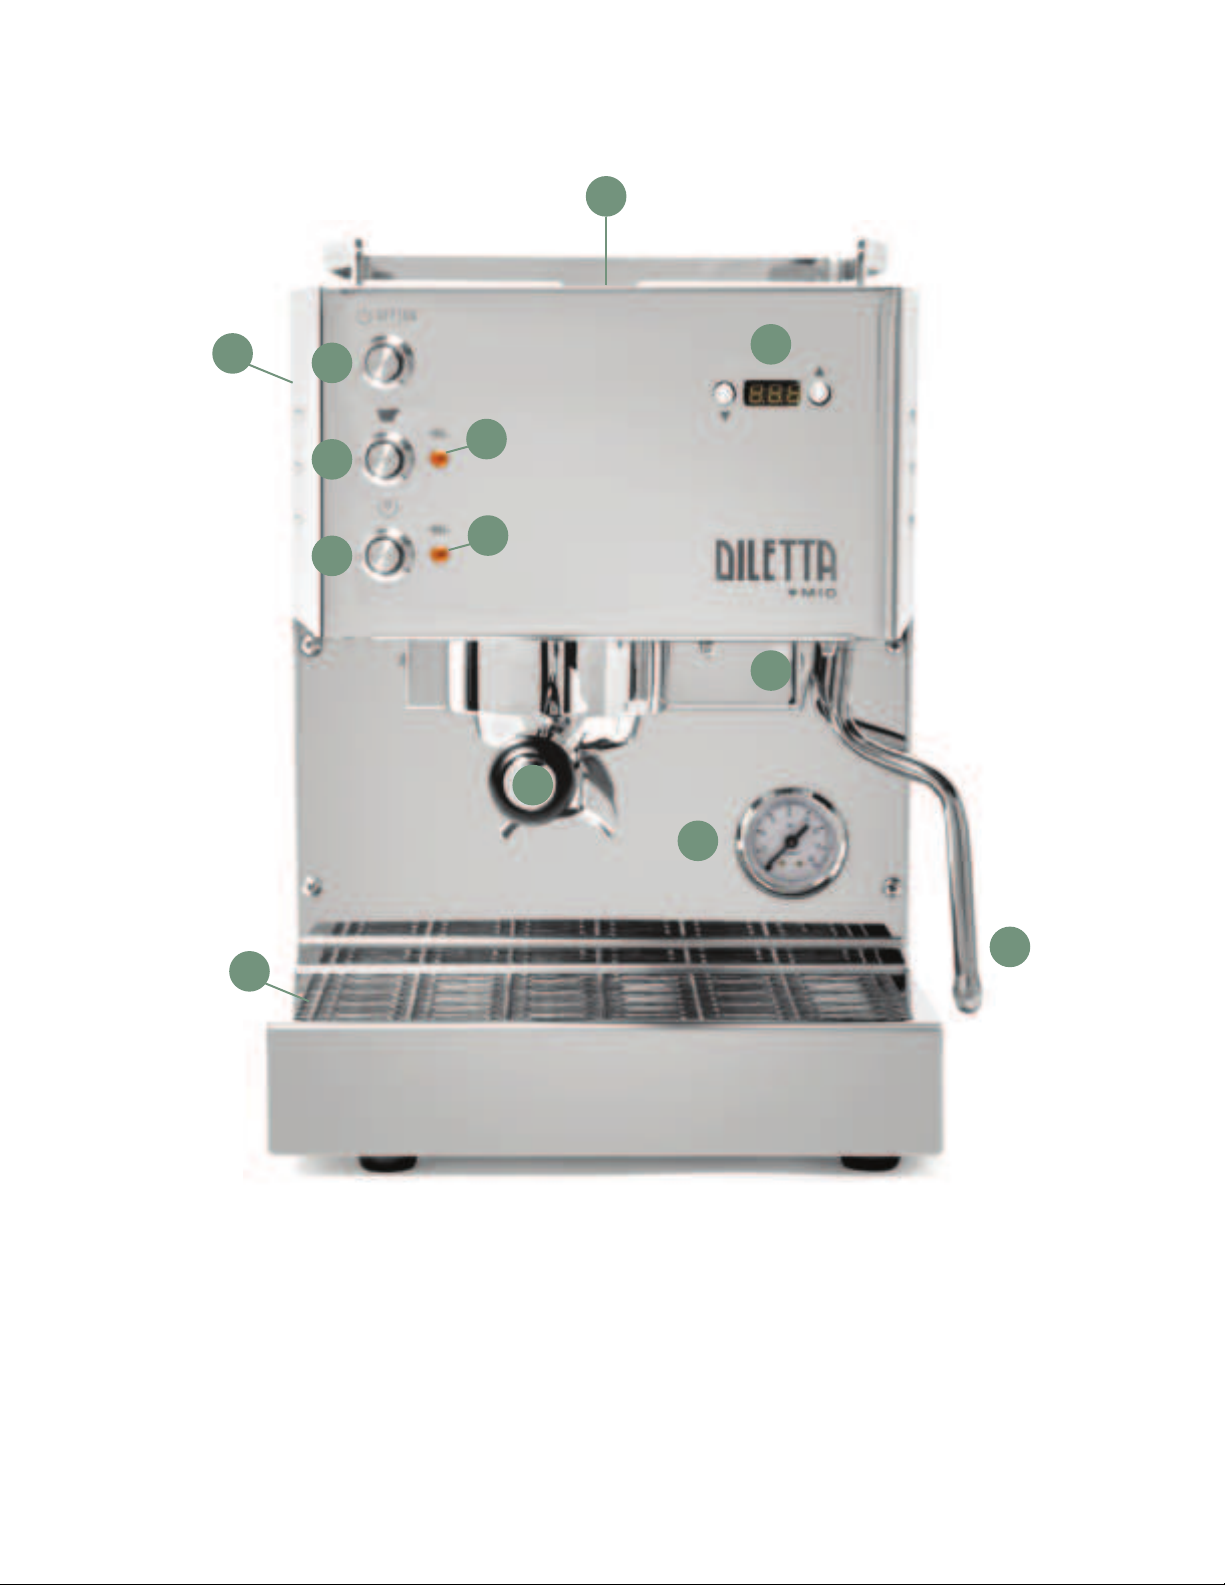
1. Cup Warmer
2. Steam Circuit Switch
Power Button
3.
4. PID Controller
5. Brew Button
6. Heat Indicator Light
7. Steam Button
8. Steam Circui Light
9. Adustable Pressure Valve
10. Portafilter
11. Brew Pressure Gauge
12. Drip Tray
13. Steam Wand
Machine Overview 1
234
56
78
9
10
11
12
13
Diletta Mio Espresso Machine User Manual 9
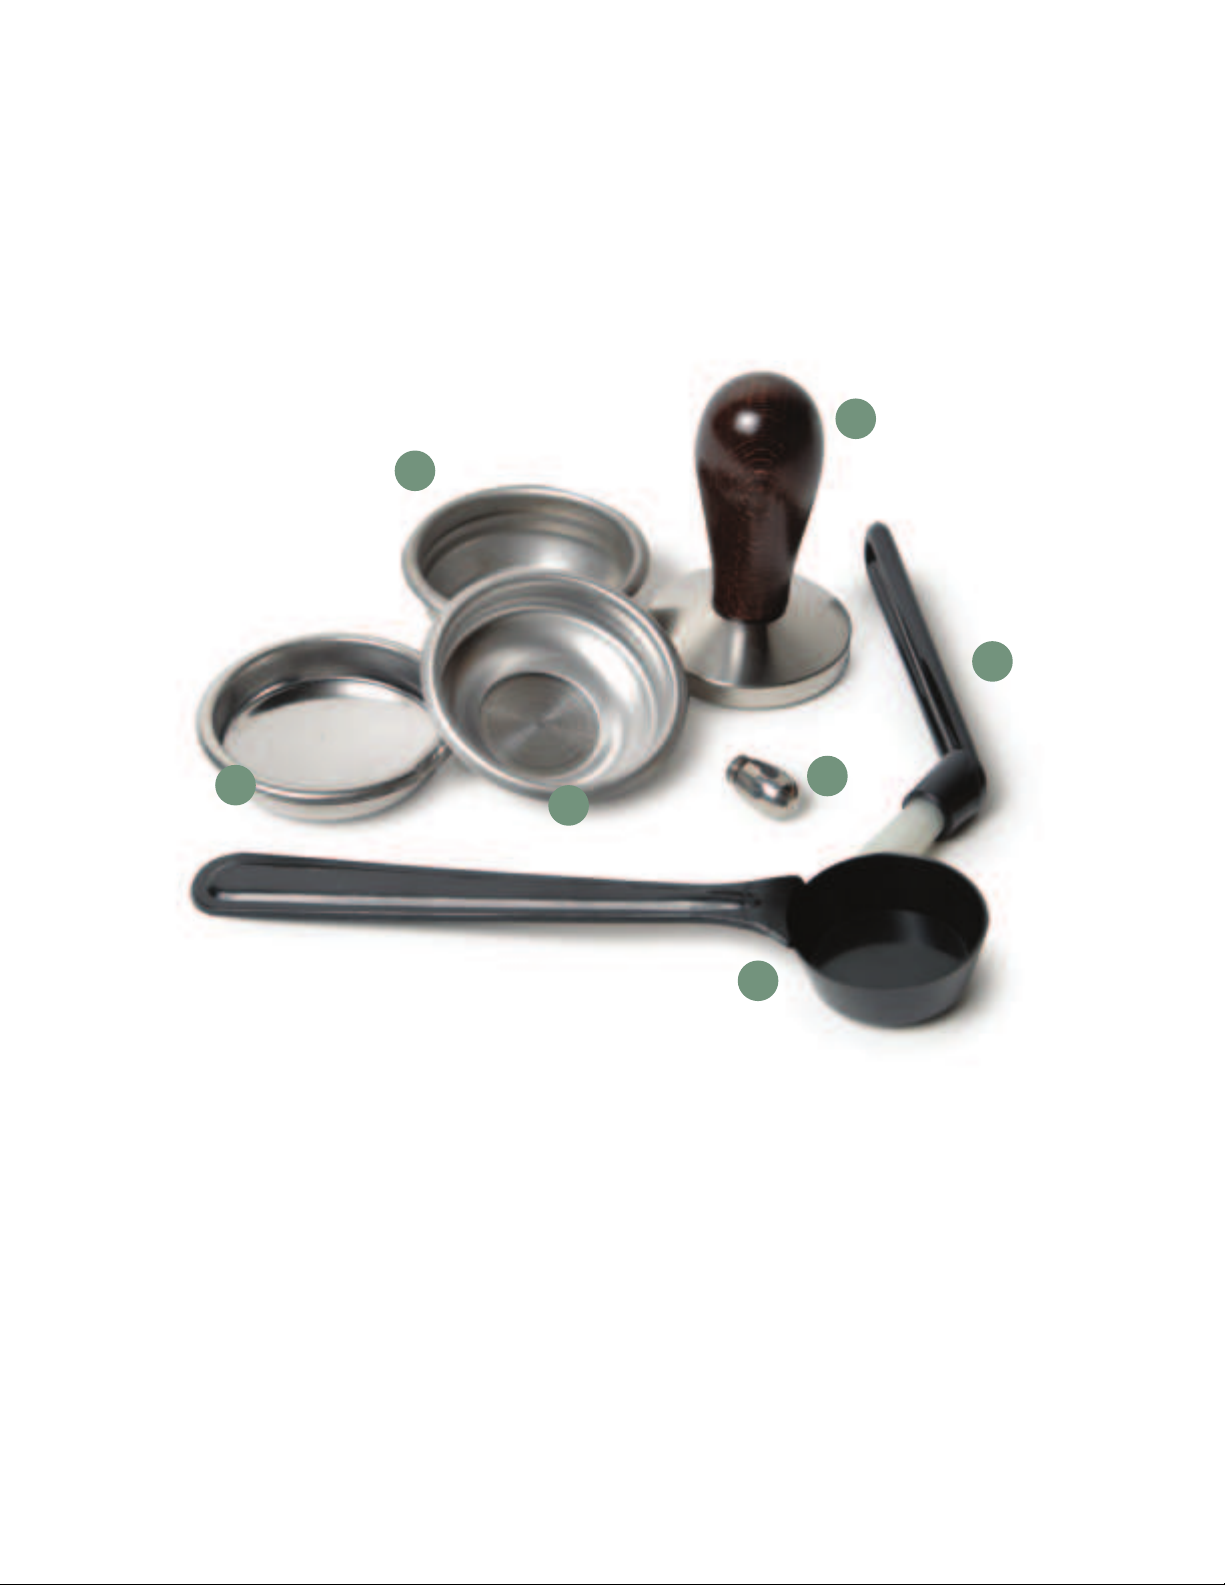
Accessories
1. 58mm Tamper
2. Double Basket
3. Group Brush
4.
5.
6. 2-Hole Steam Tip
Single Basket
Blind Basket
7. Scoop
1
2
3
4
56
7

Diletta Mio Espresso Machine User Manual 10
Unboxing & Setup
Unboxing
1. Before continuing, check box for damage and punctures. If significant damage is noted to
outer packaging STOP and call Seattle Coffee Gear’s Customer Service at 866-372-4734.
2. Remove top foam packaging; set aside.
3. Reach around the sides of your machine until you have a firm grasp of the machine base.
Do not attempt to lift machine by cup rail.
4. Lift carefully; set machine on countertop ensuring all 4 legs make good contact.
5. Remove the outer dust bag and accessory box; set aside.
6. Save packaging.
1. Check power cable and connector for kinks, then plug in to rear of machine, then into wall
socket.
2. Locate the water tank on the side of the machine; remove.
3. Rinse water tank, and fill with filtered water. Then replace.
4. Locate the power button, indicated with the symbol. Turn the machine on. PID will power
on and display ‘1st’. (Note, this step will only happen on first setup. Subsequent uses wil
skip directly to step 6.)
5. Locate the brew button, indicated with the cup symbol. Press the button and allow pump to
run for 15 seconds, press the brew button again to turn off pump.
6. Your brew boiler heating light will turn on. The boiler will heat quickly, however we recom
mend a minimum of 15 minutes to heat up before use.
7. If milk steaming is desired, select the switch on the side of the machine to the on ‘1’
position. The steam circuit light will illuminate while it comes up to temperature.
1. Remove the filter holder from the group seat, turning it clockwise.
2. Fill the portafilter with one or two doses of freshly ground coffee (according to the filter
inserted).
3. Press the coffee firmly with the included tamper.
4. Replace the portafilter holder into the group, turning counter-clockwise.
5. Place the cups under the corresponding spouts under the portafilter holder.
6. Press the coffee brew button to start the brew process. The PID display will begin counting
up.
7. When the desired amount of coffee has been delivered, press the coffee button again to end
the brew process.
Initial Setup
Coffee Brewing

Diletta Mio Espresso Machine User Manual 11
Milk Steaming
1. If you have not activated the steam circuit, select the switch on the side of the
machine to the on ‘1’ position. The steam circuit heating light will illuminate while
it comes up to temperature.
2. Wait until the heating light switches off before beginning steaming.
3. Immerse the steam wand into your milk and press the steam button. Pull steam
tip back toward the surface to texture milk, and sink back down to heat the milk.
When the desired temperature and texture is reached, press the steam button
again to end steaming.
4. After heating your milk, purge the steam wand by briefly turning on the steam to
clear the tip and assembly of residual milk.
5. Wipe down the steam wand of any residual milk.

Diletta Mio Espresso Machine User Manual 12
Storage And Transportation
To Store:
1. Perform all cleaning and maintenance procedures.
2.
3.
Switch off.
4.
Empty reservoir and drip tray.
5.
Allow machine to cool completely.
Ensure portafilteris not locked into group during storage.
To Transport:
1. Do not attempt to move machine unless it is cool and dry to touch.
2. If you saved the original packaging, great! This will be easy.
3. Make sure base foam and reinforced corner inserts are in place.
4. Cover machine in its dust bag, then lower slowly into the box.
Add the original top foam back to the box, ensuring a snug fit.5.
Don’t have your original packaging?
Please call Seattle Coffee Gear’s Customer Service line at 866-372-4734 for more instructions.

Diletta Mio Espresso Machine User Manual 13
Machine Cleaning
• Do not use water sprays, metal or abrasive tools (such as steel wool, metal brushes,
needles, etc.), or any abrasive detergents.
• We recommend a clean, damp microfiber cloth or sponge for most case and frame
cleaning.
• For cleaning the group and portafilter, only use coffee and espresso machine-safe
detergents.
• Make sure to purge and wipe down the steam wand of any residual milk after every
use.
• Clean the case panels, frame and drip tray with a clean microfiber cloth or sponge as
needed.
• Empty drip tray and clean out any residual coffee solids
• Empty portafilter after use and rinse with hot water before reinserting into group.
• While hot, scrub group gasket of any residual coffee oil with the included brush.
• Insert the blind basket into the portafilter, place in group, and backflush.
• To backflush, lift the group lever and run the pump for 15 seconds. Lower the group
lever to relieve pressure. Repeat 10-15 times.
• Soak your portafilter and baskets in hot water and/or a cleaning detergent like Cafiza
to loosen coffee oils. Wipe clean.
• Inspect group gasket and diffuser screen for excess coffee buildup or wear.
• To clear excess coffee oil from gasket and screen, repeat weekly backflush routine
using a dedicated cleaner like Cafiza
With the use of filtered or bottled water, regular descaling is not required. Damage to
your machine can result from improper descaling. Descaling at home is not recom-
mended. Damage to components or clogged lines from descaling are not covered under
warranty.
Daily Maintenance
Weekly Maintenance
Periodic Maintenance
Descaling

Diletta Mio Espresso Machine User Manual 14
PID Controller Settings
To Adjust Tempature
Eco Mode Settings
To Set Eco Mode
The Diletta Mio uses a PID to accurately manage the temperature of its brew
boiler. Brew temperature can be adjusted using the display on the face of the
machine.
1. While the machine is on, press the down arrow ‘ ’. PID display will read PRG for
‘program’
2. Press the up arrow ‘ ’ to display the current set temperature.
3. Adjust the Mio’s set temperature to desired temperature using either/both the up
and down arrows.
4. Once you have selected your brew temperature, wait 5 seconds. The PID display
will flash, and begin adjusting to the new set temperature.
5. We recommend keeping the set brew temperature between 195°F and 205°F.
1. While the machine is on, press the down arrow ‘ ’ twice. PID display will read
‘ECO’.
2. Press the up arrow ‘ ’ to display the current idle time setting
3. Adjust the Mio’s Eco Timer to desired idle time using either/both the up and down
arrows.
4. Once you have selected your idle timer, wait 5 seconds. The PID display will flash,
and return to the temperature readout.
5. We recommend setting the idle timer at 60 minutes.
The Diletta Mio also offers a programmable Eco mode to lower the machine’s electrical
usage when not in use. The Eco Mode can be adjusted in 10-minute increments, from
fully off, up to 240 minutes (4 hours). When eco mode is engaged, the PID display will
read ‘ECO’ and power will not be supplied to either boiler or steam circuit heating
elements. Eco mode can be exited by pressing any button on the machine.

Diletta Mio Espresso Machine User Manual 15
The Mio’s PID can also be used to adjust temperature scale (Fº or Cº), Boiler
temperature offset, and individual PID values.
It is NOT recommended to change these values from default, as incorrect settings
can negatively impact the function of your machine, or render it inoperable. If you
must access this menu (i.e. to adjust from Celsius to Fahrenheit) Follow these
steps below:
1. Make sure the machine is turned off.
2. Depress both Up ‘ ’ and Down ‘ ’ Arrows while turning on the machine.
3. F.03 will appear on the display. Release buttons.
4. Press the down arrow ‘ ’ to scroll through settings, and the up arrow ‘ ’ to
select the current setting to change.
5. Pause and wait for 5 seconds for the display to flash to save your current
selection.
6. When finished, turn machine off, then back on to exit menu and save all
settings
WARNING
Settings
Temperature Scale
Tank Alarm
First Boiler Fill
Proportional ‘P’ Value
Integral ‘I’ Value
Derivative ‘D’ Value
Boiler Value
Boiler Offset
PID Display
F.03
A
1st
p.
i.
d.
b.
F.04
F° Setting
F
0
0
0.5
0.0
3.0
6
10
C° Settings
C
0
0
0.5
0.0
3.0
6
5.5
Default Values
!

Diletta Mio Espresso Machine User Manual 16
Troubleshooting
The machine does not start
1. Ensure the plug is inserted correctly at case and wall socket connectors.
2. Ensure there is power to the socket.
3. Check the condition of the plug and the power supply cable.
The machine powers on but won’t heat
1. If the PID screen reads ‘1st’, your machine will not heat until the brew boiler is filled.
2. Press the brew button and run for 15 seconds, ensuring that there is water flowing from the
group into the drip tray.
No coffee is delivered
1.
2. The pump has overheated due to excessive use. Wait for the pump
to cool down and the thermal protector to reset.
Inconsistent coffee delivery
1.
2.
No steam delivery
1.
2. Nozzles clogged; clean the nozzles of the steam tip with a pin.
No water in the reservoir; refill with water.
Machine reads temperature in Celsius
1. Fahrenheit or Celsius temperature readings can be found in the PID settings section
I think I may have changed my machine’s
default PID settings and it is no longer
brewing like before
1.
Default PID values can be found in the PID Control section of the manual.
No water in the reservoir; refill with water.
Clean the filter in the filter holder.
The coffee grounds are too fine or too coarse. Adjust your grind size, dose amount, or tamping.

Diletta Mio Espresso Machine User Manual 17
Tips And Tricks
Be Clean
Coffee Quality
Grind Matters
Consistent Dosing
Shot Flavor
Milk Steaming
Always start with a blank slate for your espresso. Both your portafilter and group should
be clean and clear of any old grinds or residual coffee oils that may impart off-flavors or
slow the flow into your cup.
Make sure the coffee you are using is ideal for espresso. While pre-ground coffee may
work in an emergency, you’ll find much better results if you use fresh-roasted coffee
ground in your own home.
Good brew pressure is difficult to achieve without a good grinder. Espresso-ground coffee
should resemble the consistency of powdered sugar, and should be of uniform and
consistent particle size. If your grind is too coarse, shots will flow fast and feel watery. Too
fine, and shots will flow too slow or not at all.
Make sure to dose the right amount of coffee into your basket every time. Your Mio comes
with standard Italian single and double baskets, made for roughly 7-gram and 14-gram
doses of coffee. An espresso scale and high-quality grinder is highly recommended.
Focus on dialing in your grind for flavor first. Don’t worry if your shot time or dose differs
slightly from the recommended parameters on the bag.
There are two main stages to milk steaming. The first is texturing: bring your steam wand
tip to near the surface of your milk to incorporate air. Fine foam drinks like lattes require
less air, while drinks like cappuccinos require more texturing. The second is incorporat-
ing: sink your steam wand down into the milk. This heats the milk and swirls in your layer
of milk foam simultaneously.
Table of contents
Other Seattle Coffee Gear Coffee Maker manuals

Popular Coffee Maker manuals by other brands


La Spaziale
La Spaziale S 3 Manual for use and maintenance

MAGIMIX
MAGIMIX M100 Nespresso Essenza instruction manual

DeLonghi
DeLonghi Dinamica Plus ECAM37X.95 Instructions for use

KitchenAid
KitchenAid KCM514ER - JavaStudio Stainless-Steel Programmable... parts list

LAVAZZA
LAVAZZA Cap100US Instructions for installation and use

LAVAZZA
LAVAZZA LB 2801 Maintenance manual