Securiton Genius H User manual

Mounting Instructions
for Genius H®

2

3
Contents
1. General information ............................................................................4
2. Precautions ........................................................................................5
3. Warning notice ...................................................................................6
4. What to do when there is a fire? .........................................................7
5. Properties of the Genius H® ................................................................ 8
6. Mounting location and planning .......................................................10
7. Installing the smoke detector ............................................................13
8. Theft and removal protection (accessories) ........................................15
9. Operating and warning signals ..........................................................17
10. Functions of the test button ..............................................................19
11. Properties of the base .......................................................................19
12. Maintenance and care ......................................................................20
13. Note about disposal ..........................................................................21
14. Technical data ..................................................................................22
15. Genius H® and Genius Hx® ”Real Alarm Guarantee” and
10-year device guarantee ..................................................................24
16. Guarantee handling ..........................................................................24
17. Ordering information ........................................................................25

4
1. General information
In the event of a fire, deadly smoke can spread quickly throughout an entire
flat and often goes unnoticed. The Genius H® and Genius Hx® smoke detec-
tors warn early before these gases has deadly consequences.
Thanks to the new smoke detector technology, false-alarm-proof smoke de-
tection is achieved even when temperatures fluctuate. This is accomplished
by the detector's capability to adapt automatically to normal changes in its
environment and thus guarantees constant response sensitivity.
The Genius Hx®, with its special software algorithms, can even reliably
detect fire smoke in kitchens, which was not possible with yesterday's
detectors because of clouds of steam suddenly rising.
The electronics in both smoke detectors is so finely tuned that a smoke
detector typically has a service life of 10 years with one battery.
Should you wish to have fire and smoke alarms relayed to the fire brigade,
or if it is required, a fire alarm control panel compliant to DIN 14675 is
available. Hekatron is not liable for expenses which may be incurred as a re-
sult of alarming a service point such as a security service or the fire brigade.
VdS
G 209178

5
2. Precautions
The purpose of smoke detectors is to warn you early about
fire smoke and fires so that you can react quickly to danger
with the appropriate measures.
Smoke detectors cannot prevent or extinguish fires.
These smoke detectors react early and reliably to smoldering fires as well as
to open fires that develop smoke. The detector audibly outputs a loud alarm
tone and visually a flashing red light when it detects smoke.
Ensure that a sufficient number of smoke detectors are mounted. Only in
this way is it possible to achieve comprehensive monitoring and maximum
security (see page 10).
It is not permitted to paint the smoke detector or cover the smoke inlet
openings.
To ensure trouble-free operation of the smoke detector, the smoke detector
must be mounted correctly and maintenance and care instructions must be
observed.
Hekatron recommends DIN EN 14676 compliance for planning, mounting,
commissioning and maintenance.
Please read these mounting instructions completely before mounting and
commissioning the smoke detector and keep them in a safe place.

6
3. Warning notice
Mount the smoke detector only after all modifications, renovations and
similar work have been completed.
If smoke detectors are already installed before beginning work, they either
have to be removed or covered.
The removed smoke detectors must be protected from dust and similar
substances during the work (e.g. store in plastic bags).
Important: Once all work is completed, the smoke detectors
must be remounted and the coverings removed. A smoke
detector which is not mounted or is still covered will not
function and is therefore useless.
When smoke detectors are used in environments with high levels of dust
and/or dirt, service life may be reduced due to faster soiling.
7
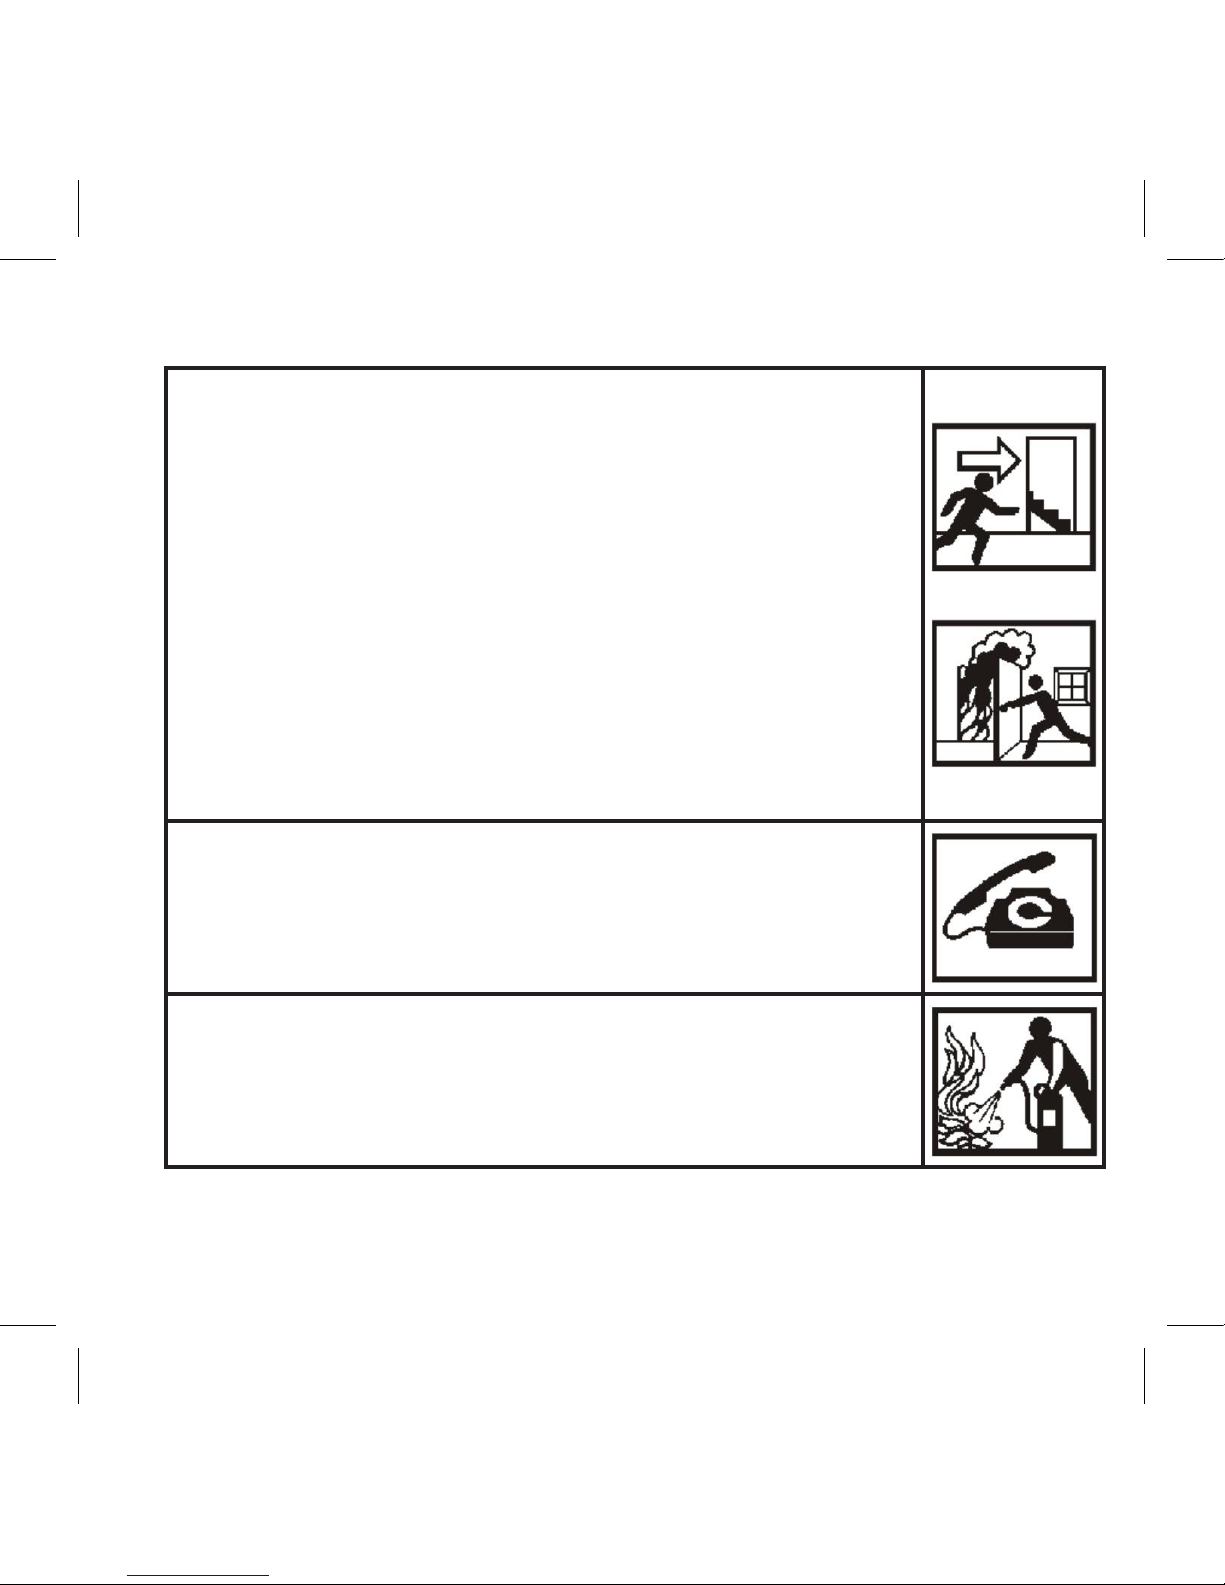
4. What to do when there is a fire
1 Save people
■Alert those who live with you.
■Immediately leave the room/building and close all
doors behind you on the way out; this hinders the rapid
spread of smoke and fire.
■Stay close to the floor if smoke is dense.
■Check whether all persons have vacated the room/
building.
■If for any reason you are unable to leave the room/
building, close all doors, seal all gaps and openings, and
try to gain someone's attention from the window.
2 Call the fire brigade
■Call the fire brigade only after you are safe.
3 Extinguish fire
■Fight the fire yourself only if it does not put you in
danger.

8
5. Properties of the Genius H®
■Automatic operational readiness
After the smoke detector is screwed into the base, it starts operating
automatically.
■Alarm memory
If the smoke detector has an alarm, the LED visually indicates it until it is
acknowledged. This means fast localisation.
■Integrated real-time clock
Suppression of status reports which do not influence the operation of the
smoke detector from 10 pm to 6 am CET thanks to an integrated real-
time clock. Your night time sleep is undisturbed.
■Reduced light strength
Automatic reduction of LED brightness from 10 pm to 6 pm CET by
means of the integrated real-time clock.
■Soiling compensation
The detector adjusts its base signal according to the detector's level of
soiling and achieves a longer service life than smoke detectors without
compensation. In the event that the maximum soiling level is reached
through adjustments, a fault is signaled.

9
■Soiling prognosis
Based on the level of soiling up to the present, the smoke detector
calculates how long it can still be operated if the rate of soiling remains
the same.
■Active service prognosis
A function test automatically generates the soiling prognosis. If the prog-
nosis is greater than 15 months, the test is confirmed as positive.
■Muting
The smoke detector can be muted for 10 minutes by pressing the test
button when there is an alarm.
■Time-delayed deactivation
Automatic, time-delayed deactivation after unscrewing the smoke detec-
tor from its base gives you enough time (5 minutes) to test the smoke
detector out of its base.
10
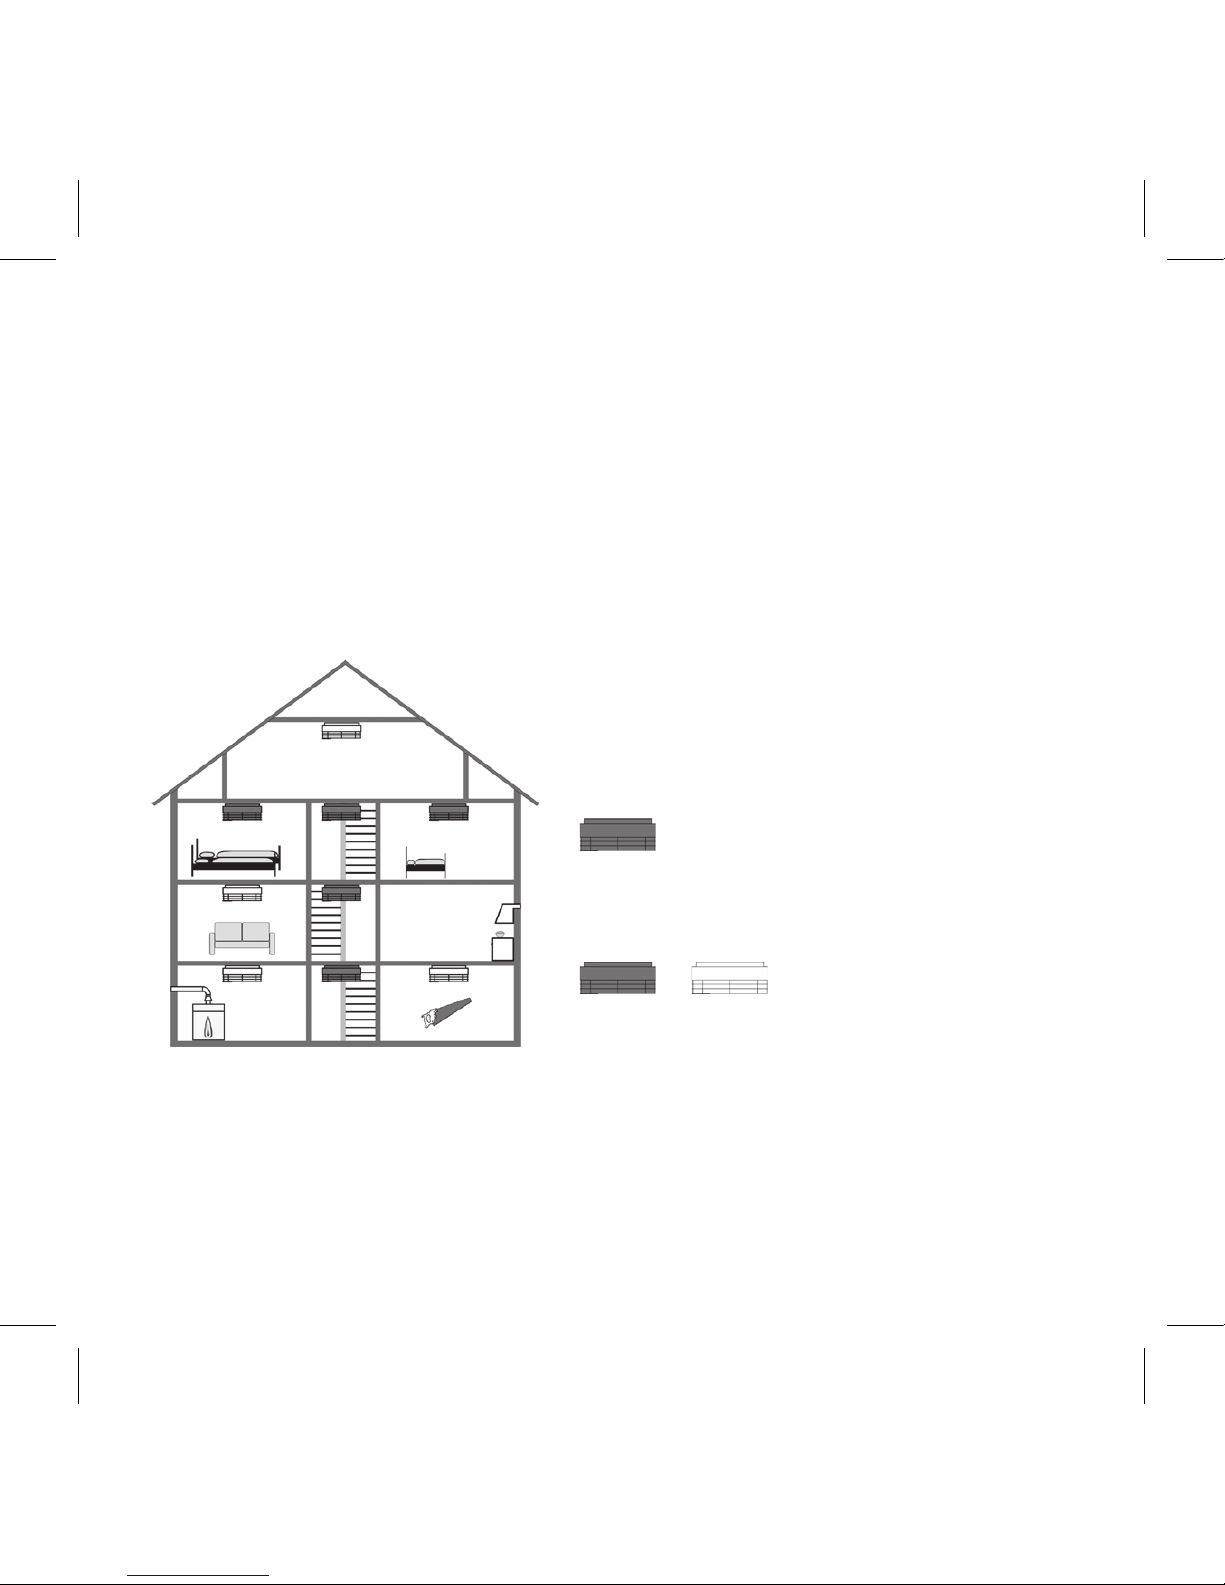
6. Mounting location and planning
The minimum configuration consists of mounting at least one smoke detec-
tor in each bedroom, children's room and in the hallways.
For the optimal configuration mount at least one smoke detector in all
rooms, hallways and entrance areas.
Mount the smoke detectors so that smoke from a fire can reach the detector
unimpeded to ensure early detection.
Minimum configuration
+
Optimal configuration
Notice: Please note that living rooms are often used for
sleeping.

11
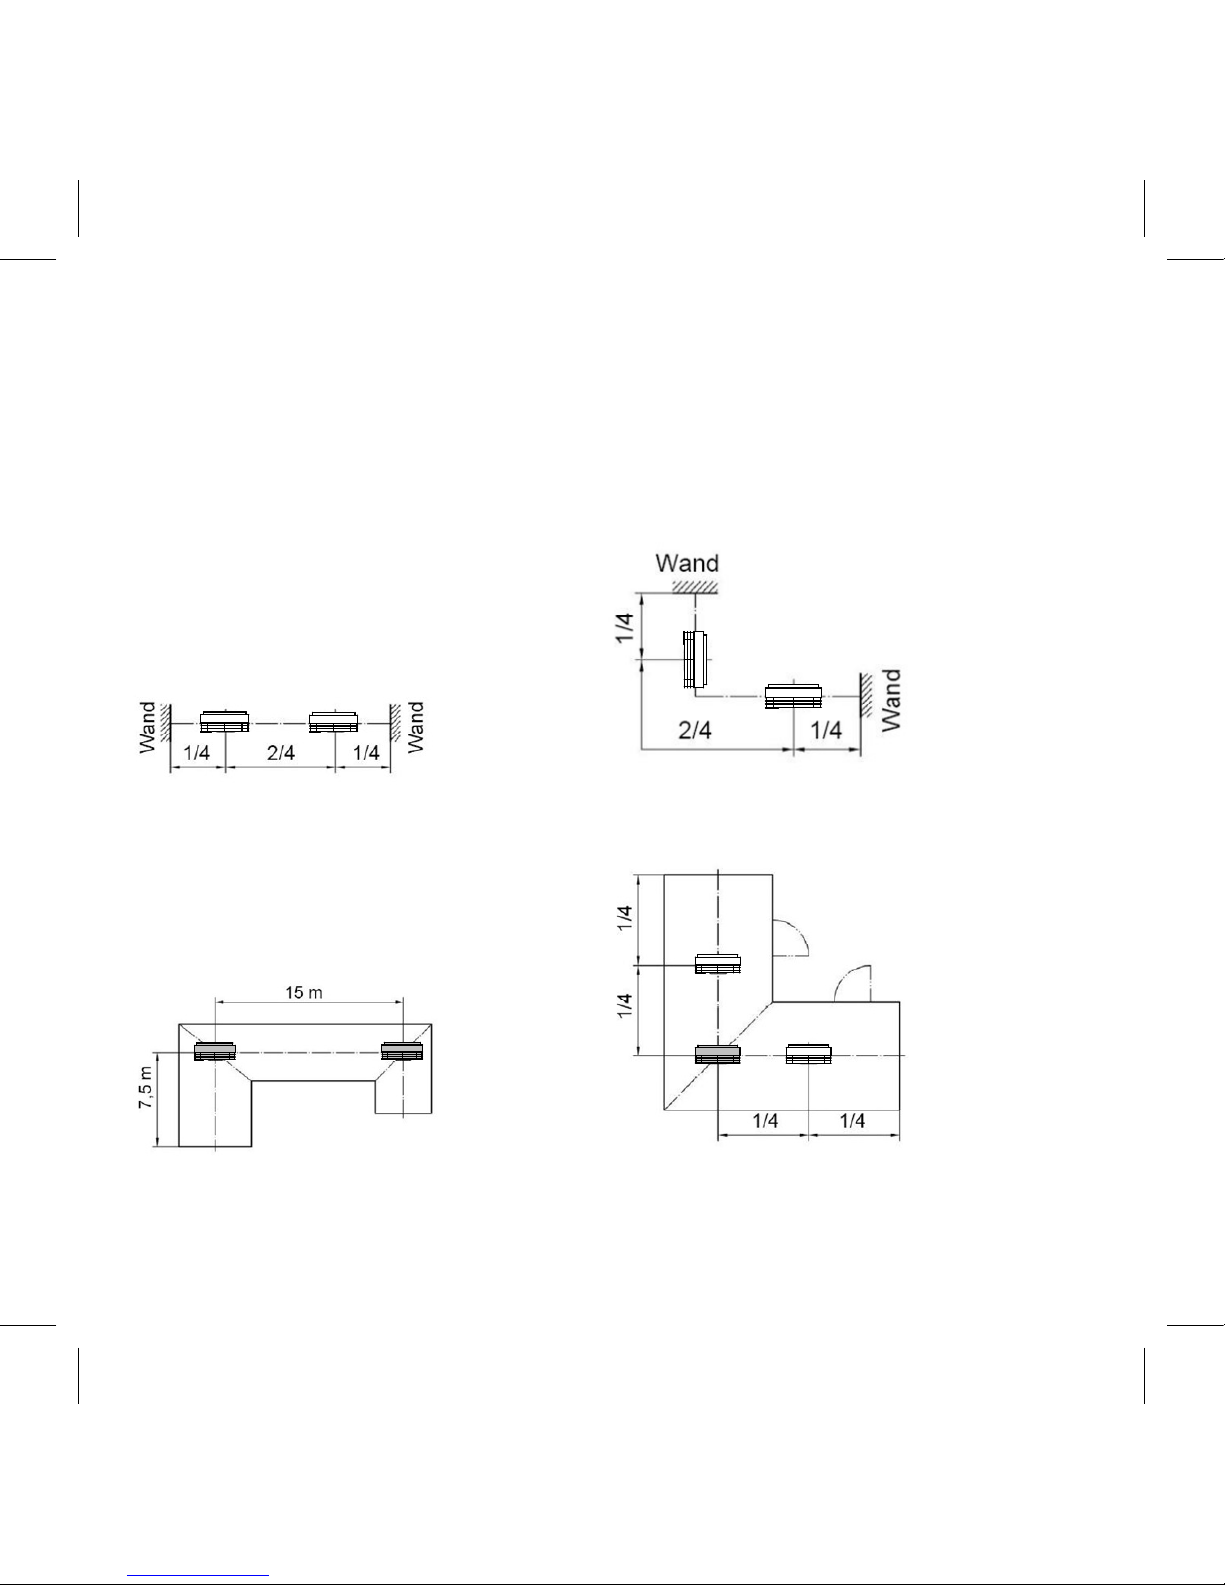
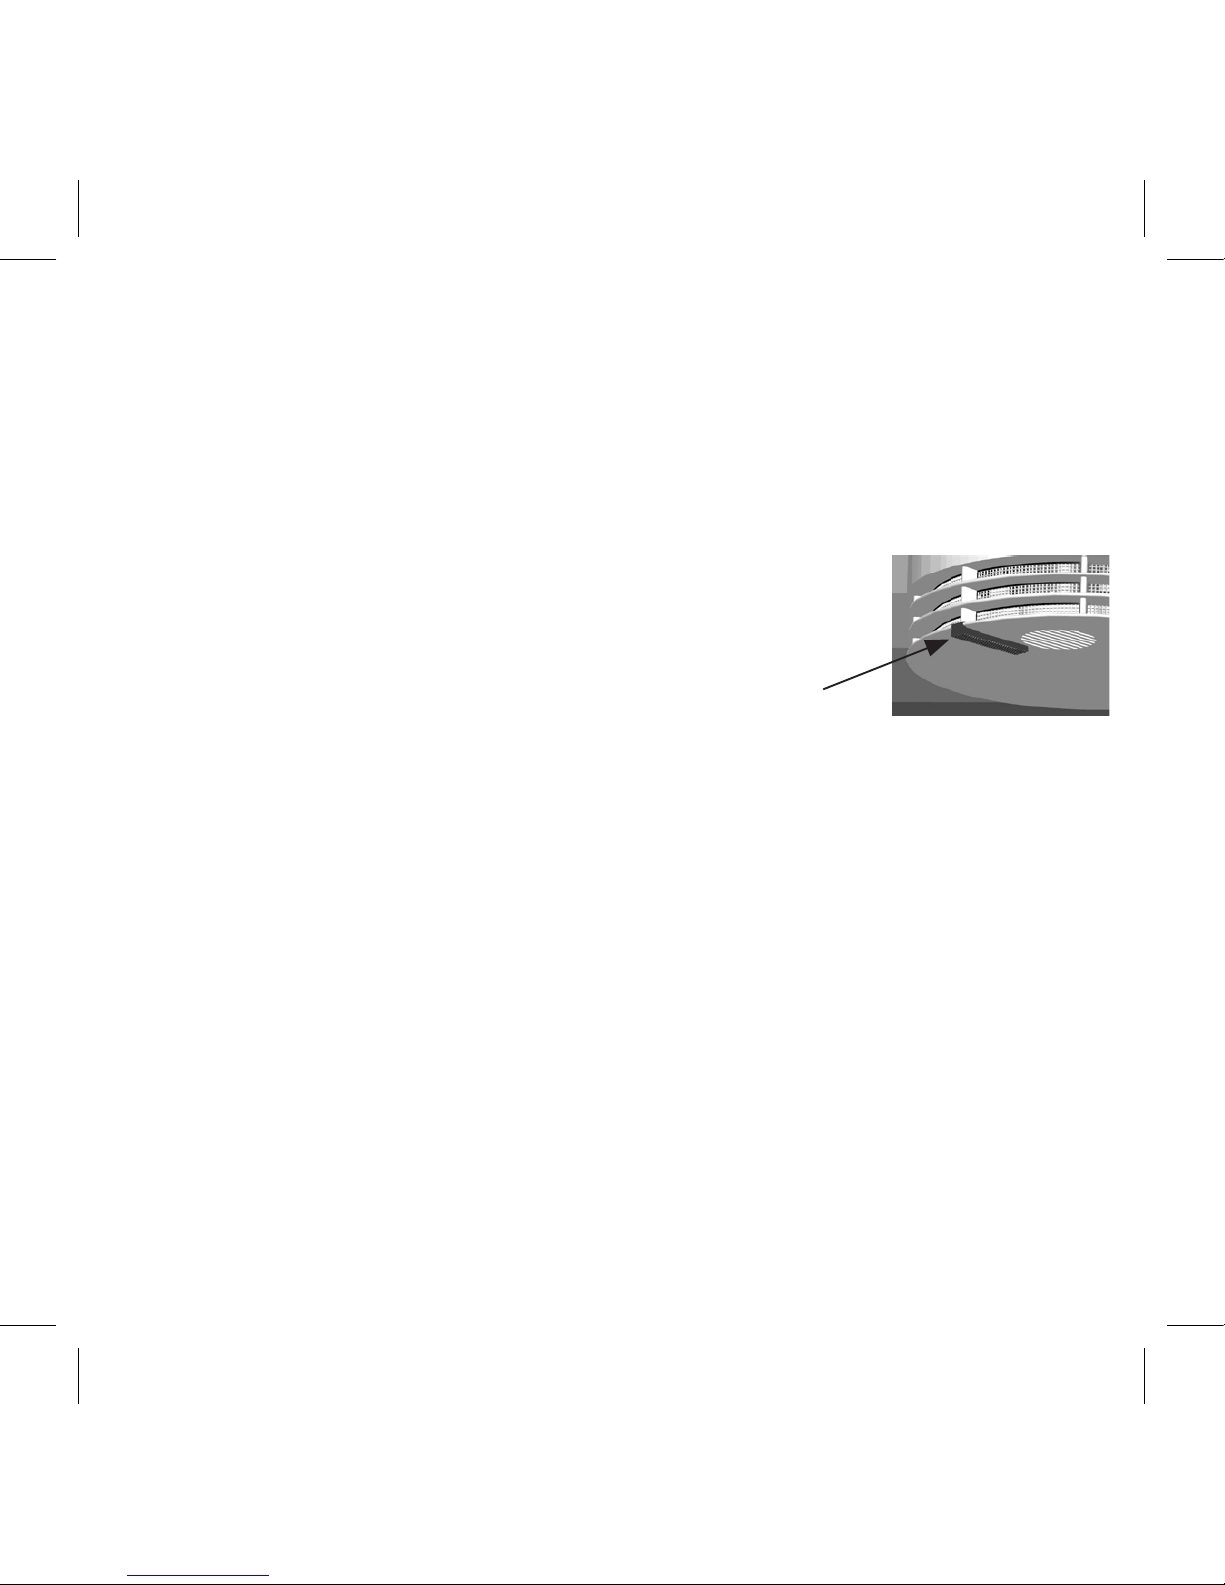
The smoke detector monitors a 60 m² area in a room with a maximum
height of 6 m.
It must be mounted on the ceiling and centred in the room as much as
possible. According to DIN 14676, the detector must be at least 0.5 m from
other fittings on the ceiling and from the walls. These fittings also include
switched power supplies, such as energy-saving lights, transmitters and
similar. If the detector is mounted in a ceiling peak, the following applies
concerning the ceiling angle:
■for a ceiling angle of up to 20°, the detector must be suspended
0.2 m - 0.5 m from the ceiling peak. The detector may be offset to the
side and mounted directly on the ceiling or roof.
■for a ceiling angle greater than 20°, suspended horizontally 0.2 m
- 0.5 m from the ceiling peak.
Smoke detectors are not intended for outdoor use.
12
6.1 Arrangement of smoke detectors in entrance areas, hallways
and in rooms with unusual shapes
In entrance areas and hallways with a maximum width of 3 m, the distance
between two smoke detectors may be up to 15 m. The distance to the front
side of an entrance area may not be greater than 7.5 m.
straight-line entrance area or hallway right-angle entrance area or hallway
in large entrance areas and hallways in corner areas

13
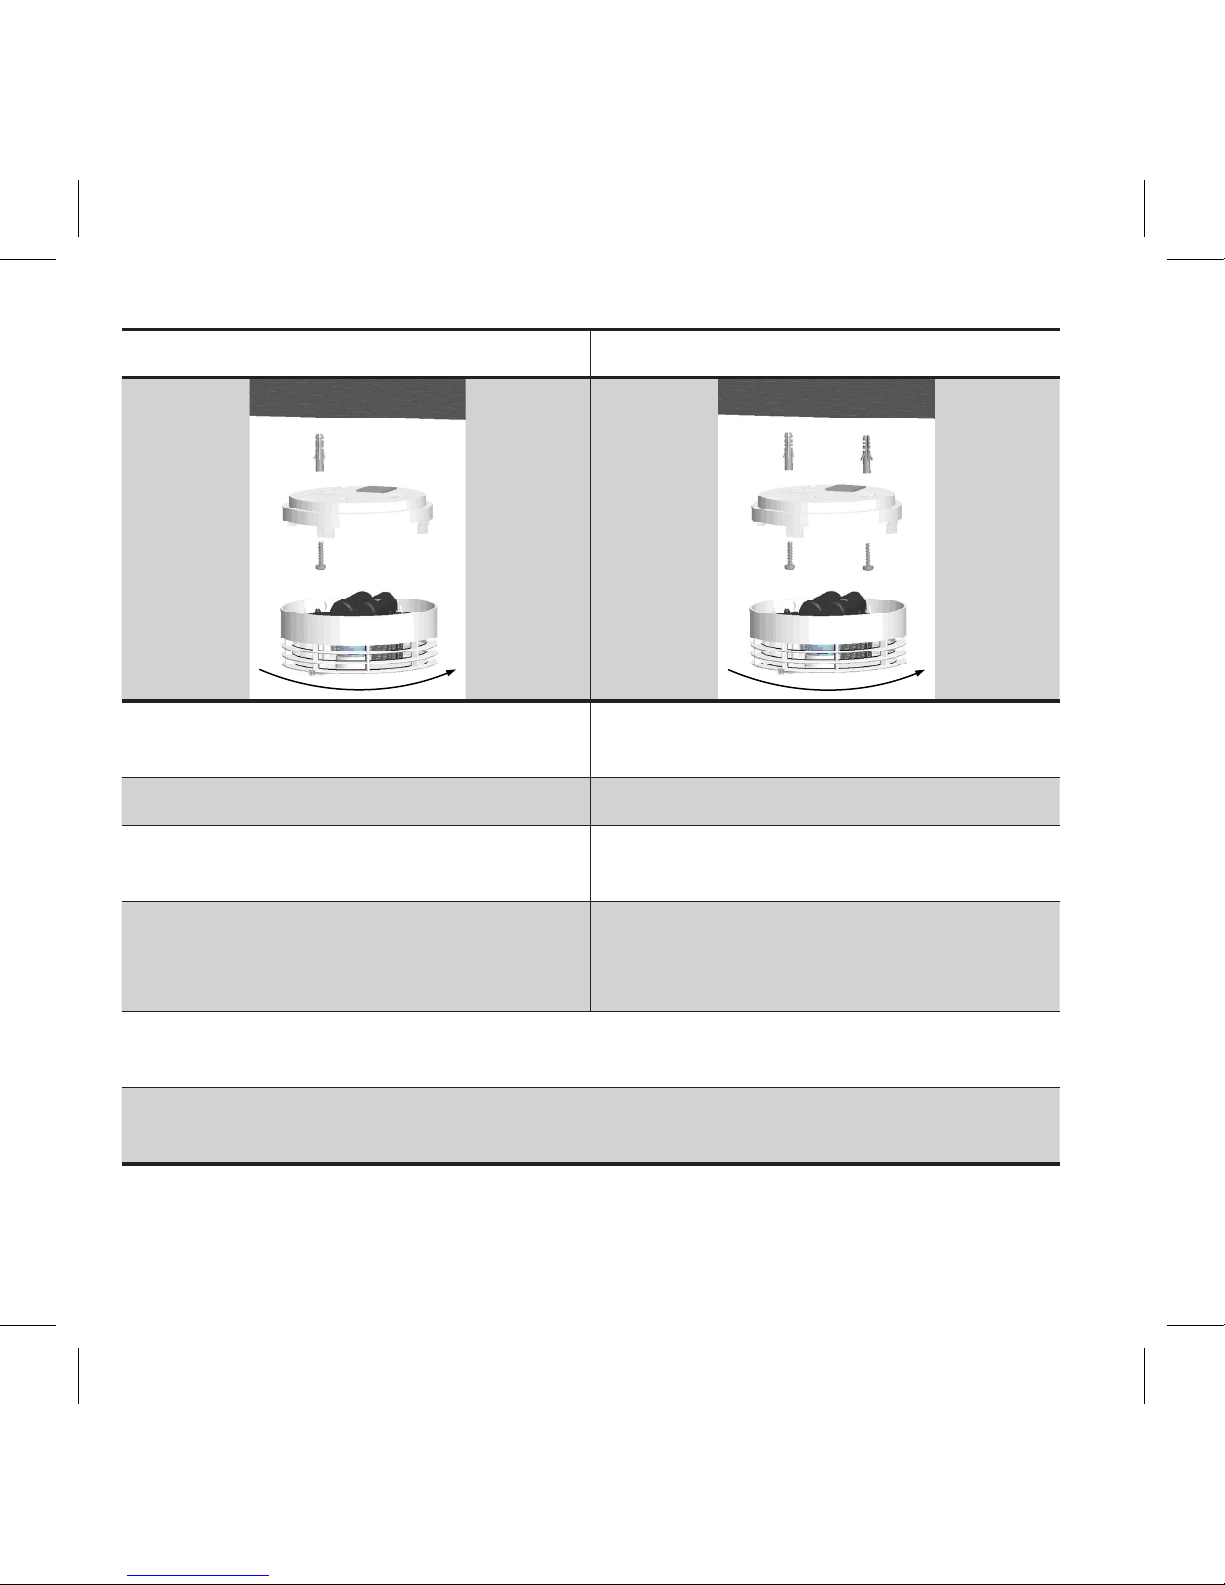
7. Installing the smoke detector
Use the supplied fastening materials when mounting the smoke detector. If
other screws are used, they must not protrude more than 5.0 mm into the
base.
We recommend using an oval head screw DIN ISO 7049, Phillips-head
screw H, form C, 3.5 x 25 mm.
The mounting surface must be flat.
14
One-hole mounting Two-hole mounting
1 Mark the place for the hole on the ceiling
and drill the hole.
1 Mark the place for the holes on the ceiling
and drill the holes.
2 Insert the dowel into the hole. 2 Insert the dowels into the holes.
3 Remove the protective foil from the adhe-
sive pad.
3 Hold the base onto the ceiling.
4 Lightly screw the base onto the ceiling,
press the base to the ceiling and then
tighten the screw.
4 Screw the base onto the ceiling.
5 Place the detector onto the base (the test button of the smoke detector has to be aligned
over the oblong hole in the base).
6 Turn the detector clockwise until the base goes into the smoke detector and snaps into
place (rotation of about 45°).
Once the detector is fastened in the base, it begins operation automatically
and carries out a function test.

15
8. Theft and removal protection (accessories)
To secure the smoke detector against removal by unauthorised persons,
removal protection in the form of a seal can be fastened to the detector and
base.
The seal is fastened to the detector in the housing wall opening.
1
Break out the predetermined
breaking point in the base
and turn the smoke detector
in the base.
Predeter-
2
Insert the seal in the opening.

16
3
After the seal is inserted, the
opening must be completely
closed.
4
To remove the seal, rotate it
90° using a screwdriver.
This shears off the head of
the seal and you can then
rotate the detector out of the
base normally.

17
9. Operating and warning signals
9.1 Fire alarm
Horn LED Cause What to do
Alternating, loud
horn
Flashes every
second
Smoke has been
detected
Leave the building
Off Double flash
every 48 sec.
Alarm memory
of this smoke de-
tector detected
a fire
Search the area for possible
fire sources. Reset the alarm
memory by pressing the test
button.
9.2 Signalling during the day (6 am to 10 pm CET)
Horn LED Cause What to do
Off Flashes every
48 sec.
Normal opera-
tion
----
Short signal tone
every 48 sec.
Flashes every
8 sec.
Fault or weak
battery
Replace smoke detector with
a new one. Acknowledge by
pressing the test button.

18
9.3 Signaling at night (10 pm to 6 am CET)
Horn LED Cause What to do
Off Flashes dimly
every 48 sec.
Normal opera-
tion
----
Once every 48 sec. Flashes every
8 sec.
Fault Replace smoke detector with
a new one. Acknowledge by
pressing the test button.
9.4 Signaling after acknowledgement
Horn LED Cause What to do
Off for 24 hours
after pressing the
test button
Flashes every
48 sec.
Weak battery Smoke detector is still
operational, but it should be
replaced by a new one within
30 days at the latest (battery
replacement not possible).
Off for 24 hours
after pressing the
test button
Off for 24 hours
after pressing
the test button
Fault (weak bat-
tery, no indica-
tion at night)
Smoke detector is no longer
operational and must be
replaced by a new one.
19
10. Functions of the test button
The test button initiates and acknowledges the various functions of the
smoke detector.
By lightly pressing the button, you can ...
■start the functional test in normal operation
■acknowledge a fault
■acknowledge/mute an alarm
■clear the alarm memory.
Test
11. Properties of the base
When the smoke detector is screwed into the base, it begins operation au-
tomatically and carries out a self-test. When the smoke detector is removed
from the base, it switches off after 5 minutes. If the Genius H® is removed
from the base during an alarm, the alarm is muted (see also Properties of
the Genius H® - Muting).

20
12. Maintenance and care
To guarantee the functional reliability of the detector, maintenance is
required at least once a year in compliance with DIN EN 14676. Proceed as
follows.
1
If needed, remove dust from the detector with a soft cloth.
2
If needed, remove soiling with a moist cloth. Do not use cleaning
agents.
3
Press the test button and compare the results with the following:
Horn LED Cause What to do
Test signal*
(3 x horn tone)
3 x with
horn
Smoke detector test
positive
No action required.
Off Every
48 sec.
Service prognosis < 15
months, detector still
functional
Replace smoke detector
as soon as possible.
Off Every
48 sec.
Weak battery See table 9.4
Off Off Detector defective Replace smoke detector
immediately.
* According to standard 14604, audible signalling is sufficient.
Table of contents
Other Securiton Smoke Alarm manuals


Popular Smoke Alarm manuals by other brands

System Sensor
System Sensor FTX-P1 Installation and maintenance instructions

Panasonic
Panasonic 1735 Specification sheet

Firex
Firex I240C user manual

BRK electronic
BRK electronic SCO2B Specification sheet

Firehawk
Firehawk FHH10W user manual

ESYLUX
ESYLUX PROTECTOR K 10 PLUS Installation and operating instructions


