Seeburg HDLM 8 User manual

SEEBURG HDLM 8
Operation Manual
HIGH DEFINITION LOUDSPEAKER MANAGEMENT

The manual is related to the HDLM 8 firmware version 2.0 and hardware revision 2
2010-2013, Revision 11
Copyright
SEEBURG acoustic line GmbH
Auweg 32
D-89250 Senden
GERMANY
www.seeburg.net
WEEE-Reg.-Nr.: DE 29853309
Trademarks:
All trademarks mentioned in this manual are property of their respective owners.
You may download this manual directly from your HDLM 8 by following URL:
http://<IP address of your HDLM 8 >/manual.pdf
Do not open the top cover of the HDLM 8. There are no user serviceable parts
inside. Improper operation, handling or maintenance can result in death or severe
injury.

Contents
1. Introduction 5
1.1. SignalPath ................................................ 5
1.2. Restoring after Power Failure . . . . . . . . . . . . . . . . . . . . . . . . . . . . . . . . . . . . . . 6
2. Connections 7
2.1. PowerSupply............................................... 7
2.2. AnalogInputsandOutputs ....................................... 7
2.3. AES/EBUDigitalInputs ........................................ 7
2.4. OptionalInterfaces............................................ 7
2.4.1. ADAT/SPDIF Optical Interface . . . . . . . . . . . . . . . . . . . . . . . . . . . . . . . . 7
2.4.2. Gigabit AVB-Interface (Audio Video Broadcasting) . . . . . . . . . . . . . . . . . . . . . . 7
2.5. USBInterface............................................... 8
2.6. Ethernet Interfaces with Built-in Switch . . . . . . . . . . . . . . . . . . . . . . . . . . . . . . . . 8
2.6.1. Use of the Network Interfaces by Third Party Components . . . . . . . . . . . . . . . . . 8
3. Operation 9
3.1. HomePagewithMainMenu ...................................... 9
3.2. Navigation................................................. 9
3.3. InputofValues .............................................. 10
3.3.1. Increasing the Number of Steps . . . . . . . . . . . . . . . . . . . . . . . . . . . . . . . . . 10
3.4. ConfirmChanges............................................. 10
3.5. Function Buttons MUTE and EQ ................................... 10
3.6. MuteAllImmediately .......................................... 11
3.7. KeyLock ................................................. 11
3.7.1. Lock................................................ 11
3.7.2. Un-lock .............................................. 11
3.8. TextInput................................................. 11
3.8.1. DeleteCharacters ........................................ 11
3.8.2. PredefinedKeywords....................................... 11
3.9. DigitalInputStates ........................................... 12
3.10. Fast Navigation for the Advanced User . . . . . . . . . . . . . . . . . . . . . . . . . . . . . . . . . 12
3.11.ProjectManagement........................................... 12
3.11.1.NewProject ........................................... 13
3.11.2.Loading .............................................. 13
3.11.3.Saving............................................... 13
3.11.4.Deleting.............................................. 14
3.11.5. Project Import from USB . . . . . . . . . . . . . . . . . . . . . . . . . . . . . . . . . . . . 14
3.11.6. Project Export to USB . . . . . . . . . . . . . . . . . . . . . . . . . . . . . . . . . . . . . 15
3.11.7.WriteProtection ......................................... 15
3.12.DeviceSettings.............................................. 16
3.12.1.Amplifiers............................................. 16
3.12.2. Delay Unit, Temperature . . . . . . . . . . . . . . . . . . . . . . . . . . . . . . . . . . . . 16
3.12.3.DeviceName ........................................... 17
3.12.4.Info ................................................ 17
3.12.5.Update .............................................. 17
3.12.6.MuteOnProjectLoad...................................... 17
3.13. Network and Digital Interfaces Menu . . . . . . . . . . . . . . . . . . . . . . . . . . . . . . . . . . 18
3.13.1.DigitalInterfaces......................................... 18
3.13.2. Input C Mode / Input D Mode . . . . . . . . . . . . . . . . . . . . . . . . . . . . . . . . . 18
3.13.3. Redundancy Mode (Fallback) . . . . . . . . . . . . . . . . . . . . . . . . . . . . . . . . . . 19
3.13.4. Optical Input (optional) . . . . . . . . . . . . . . . . . . . . . . . . . . . . . . . . . . . . . 19
3.13.5. Optical Output (optional) . . . . . . . . . . . . . . . . . . . . . . . . . . . . . . . . . . . . 19
3

3.14.InputBusMap .............................................. 20
3.14.1.dBScales ............................................. 20
3.15.InputBusProperties........................................... 20
3.15.1.Label ............................................... 21
3.15.2.PhysicalInputs.......................................... 21
3.15.3.Gain................................................ 22
3.15.4.Polarity .............................................. 22
3.15.5.Dynamics ............................................. 22
3.15.6.LocalLink ............................................ 22
3.15.7.NetworkLink........................................... 22
3.16.InputBusEQ............................................... 23
3.16.1.GraphicEQ............................................ 23
3.16.2.ParametricEQ(PEQ)...................................... 23
3.16.3.ShelvingEQ ........................................... 23
3.16.4.HighPassFilter(HPF) ..................................... 24
3.17.OutputMap................................................ 24
3.17.1.dBScales ............................................. 25
3.18.OutputProperties ............................................ 25
3.18.1.Label ............................................... 25
3.18.2.Loudspeaker ........................................... 26
3.18.3.InputBus............................................. 26
3.18.4.Gain................................................ 26
3.18.5.Polarity .............................................. 26
3.18.6.Delay ............................................... 26
3.18.7.LocalLink ............................................ 27
3.18.8.NetworkLink........................................... 27
3.19.OutputEQ ................................................ 27
3.19.1.ParametricEQ(PEQ)...................................... 27
3.19.2.ShelvingEQ ........................................... 28
3.19.3.HighPassFilter(HPF) ..................................... 28
4. Network Setup 29
4.1. OperationviaWebBrowser....................................... 29
4.2. App GoHDLM .............................................. 29
4.3. Automatic Network Configuration . . . . . . . . . . . . . . . . . . . . . . . . . . . . . . . . . . . 29
4.4. WirelessLANAccessPoint ....................................... 29
4.4.1. Wireless LAN Configuration . . . . . . . . . . . . . . . . . . . . . . . . . . . . . . . . . . . 29
4.5. Introduction in Manual IP Addressing . . . . . . . . . . . . . . . . . . . . . . . . . . . . . . . . . 29
4.5.1. Purpose.............................................. 30
4.5.2. Representation .......................................... 30
4.5.3. Usage ............................................... 30
A. Appendix 31
A.1.DefinitionofTerms............................................ 31
A.1.1.Project .............................................. 31
A.1.2.Loudspeaker ........................................... 31
A.1.3.LoudspeakerEditor ....................................... 31
A.1.4.InputBus............................................. 31
A.1.5.Output .............................................. 31
A.2.dBu,dBV,dBFSanddBGR ...................................... 32
A.2.1.dBuvs.dBFS .......................................... 32
A.2.2.dBV................................................ 32
A.2.3.dBGR............................................... 32
A.3. FAQ – Frequently Asked Questions . . . . . . . . . . . . . . . . . . . . . . . . . . . . . . . . . . . 33
A.3.1. Why is there no Low Pass Filter (LPF)? . . . . . . . . . . . . . . . . . . . . . . . . . . . . 33
A.3.2. Why can’t I set a particular Tweeter Louder? . . . . . . . . . . . . . . . . . . . . . . . . . 33
A.4.KeyboardOperation ........................................... 33
A.5.MenuStructure.............................................. 34
A.6.ProductSpecifications .......................................... 35
4

1. Introduction
The HDLM 8 is a powerful DSP audio processing device. It offers strong tools for management and
equalization of single or multi-path loudspeaker systems.
Simple Operation
All parameters can be reached in real time using the coloured high resolution display. The easy and
straight handling of the device opens up in few minutes, even to the unexercised user.
Remote Control without any Software Installation
You can control the HDLM 8 without the need of installing any software to your computer. Simply use
your web browser to reach the most important parameters in real time. Multiple users can control the
device at the same time.
Free App for Tablet Computers and Smart Phones
For Android and iOS based devices there is a free App called GoHDLM available. The range of functions
of this app corresponds completely to the HDLM’s built-in software. Optionally, there is a WLAN Stick
available which turns the HDLM 8 into a wireless access point with WPA2 encryption.
Hardware Moulded DSP
The HDLM 8 makes use of a digital signal processing unit, which is based on a FPGA device1. Com-
pared with traditional DSP, it computes about 480 filters aside from 16 compressor-limiter units in
32bits/96kHz nearly without any delay. The signal latency between analog inputs and outputs is just
0,76 milliseconds, which is approx. 0,26 meters of sound transmission.
Highest Signal Quality – Made in Germany
The most advanced converters by Burr Brown in conjunction with a very low clock jitter ensure undis-
torted and transparent sound with low noise. Strong and highly symmetrical output drivers are able to
drive long cables even in difficult environments.
The electronic components were assembled by an ISO certified company in Germany. The operating
system is based on Linux, which is a synonym for world-wide acceptance and high stability. Internal
settings are stored in a SQL data base.
1.1. Signal Path
Eight Inputs – Eight Outputs
The HDLM 8 provides eight Input Busses and eight Outputs. All signals of any physical input may be
mixed together to each Input Bus. Each Output is fixed to its corresponding analog one and will get its
signal by any Input Bus (Figure 1.1).
1Field Programming Gate Array; reconfigurable logic elements
5

Loudspeaker
12x X-Over/Phase Alignment/EQ
RMS+Voltage Limter
Input Bus Switch
Gain
Polarity
Delay
Local Group
Network Group
4 Band Parametric EQ
Low+High-Shelf EQ
High Pass Filter
Input Mixer
Soft-Knee Compressor/
Limiter
Gain
Polarity
Local Group
Network Group
31 Band Graphic EQ
5 Band Parametric EQ
Low+High-Shelf EQ
High Pass Filter
8x INPUT BUS 8x OUTPUT
= PHYSICAL OUTPUTS
Analog A
Analog B
Analog C
Analog D
Digital 1
Digital 2
Digital 3
Digital 4
Digital 5
Digital 6
Digital 7
Digital 8
PHYSICAL
INPUTS
Switch 1:nMix n:1
Figure 1.1.: Signal Path
Practical Options for Sound Adjustment
Besides the gain setting and a compressor-limiter unit, each Input Bus provides extensive filtering pos-
sibilities: Graphic EQ and Parametric EQ to equalize room acoustics, Shelving EQ for low and high
correction and a high pass filter for small speaker matching. Beyond that, all busses may be linked
together, both internally and network-wide in four groups.
These functions except the Graphic EQ are provided by each Output additionally. So you can practically
spread tasks to several assistants (e.g. the band’s sound engineer for Input EQ next to the PA operator
for Output EQ).
Revolutionary Simple Loudspeaker Configuration
From the viewpoint of a HDLM 8 user, multi-path loudspeaker systems are treated as closed and easy-
to-handle single active systems. Cross-over frequencies, equalization and power information are bundled
by the manufacturer in a loudspeaker library. The library is locked and cannot be modified. If you
own the full version of the HDLM 8, you may add additional loudspeaker systems comfortably using a
proprietary description language.
1.2. Restoring after Power Failure
In the case of a power failure, all parameters will be restored automatically. The HDLM 8 saves changes
after approx. five seconds to its internal memory.
6

2. Connections
2.1. Power Supply
The HDLM 8 has a built-in universal power supply, which will work at all voltages worldwide between
90 and 240 volt and a frequency of 50 to 60 hertz.
Thanks to the Neutrik PowerCon, the power cord is mechanically safe connected to the HDLM 8.
The PowerCon connector must not be engaged or disengaged under live. To
power off the HDLM 8, one should unplug the socket of the outlet. Alternatively,
one might use an outlet strip with switch.
2.2. Analog Inputs and Outputs
The inputs and outputs, utilizing Neutrik XLR receptacles, meet the standard AES14-1992. The maxi-
mum RMS voltage is 20dBu.
The input section is built around an advanced circuit, which behaves similar to a transformer: the
common mode impedance is sigificantly higher than in conventional electronic inputs. This comes to
substantially better immunity against hum and high frequency noise, which result usually by filthy con-
tacts, thus having a mismatched input impedance.
The output impedance of both pin 2 (hot) and pin 3 (cold) are highly balanced. Thus, interferences may
be filtered out very efficiently in the next device.
Metal film resistors and high-grade operational amplifiers deliver outmost noise-free and distortion-less
audio signal.
A special circuit at the analog outputs prevents loud clunk noise if the power supply is interrupted.
2.3. AES/EBU Digital Inputs
The XLR inputs Cand Dcan be individually switched to digital-in. These comply with the AES3
standard and are transformer-isolated. The audio signal will be converted to the internal sampling
frequency by an Asynchronous Sample Rate Converter, which is implemented in the FPGA. Thus, jitter
will be filtered out effectively. Latency is only 48 samples. Sampling frequencies between 32 and 96kHz
are supported. If both digital inputs are used, they must come with the same word clock, preferably
from the same source.
2.4. Optional Interfaces
2.4.1. ADAT/SPDIF Optical Interface
The HDLM 8 can be expanded with an ADAT interface to eight additional inputs. After that, the
HDLM 8 becomes an excellent output converter (D/A) and equalizer for digital mixing desks.
2.4.2. Gigabit AVB-Interface (Audio Video Broadcasting)
The HDLM 8 can be equipped with a 1000MBit AVB-aware ethernet interface. For further informations,
please ask SEEBURG directly.
7

2.5. USB Interface
The built-in USB 2.0 interface is used for:
•Importing and Exporting of Projects and Loudspeakers
•WLAN Access Point Antenna1
•Firmware Updates
Use standard USB sticks with FAT32 file system.
The interface is protected by a self-healing 500mA fuse.
2.6. Ethernet Interfaces with Built-in Switch
Via the Ethernet interfaces, one or multiple computers may be connected to configure the HDLM 8. The
configuration is via web interface, making special software installation unnecessary.
Use cable of category CAT-5e with RJ45 connectors.
2.6.1. Use of the Network Interfaces by Third Party Components
The HDLM 8 utilizes a fully compatible and real-time capable 10/100Mbps Ethernet Switch with two
ports. This is also ideal for connecting third party networking devices, such as lighting or video equip-
ment, or for the transmission of audio signals via DANTE or AVB. The data packets of the HDLM 8 are
relatively small. The communication works stable even in heavy-loaded networks.
1available as option
8

3. Operation
The handling of the display menus is divided consistently in navigation using the cursor buttons and
value input using the rotary encoder wheel. Additionally, there are dedicated buttons for Mute and EQ .
See also the definition of some terms as well as an overview of keyboard operation from page 31 onwards.
3.1. Home Page with Main Menu
After powering up the HDLM 8, the home page appears on the display. On account of large fonts this
page is easy to read, even from a distance.
Home Page
On the home page, the project name, the device name, the IP ad-
dress and the status of all channels is shown. Use the cursor buttons
to highlight a menu item. Use ENTER to invoke the appropriate
function.
Channel Status
On the Channel Status section, each Input Bus or Output is shown
as a coloured square (Table 3.1). Use MUTE ,EQ or ENTER to affect
the corresponding action.
Table 3.1.: Meaning of the Status Indicators
Appearance Indication
Gray No Signal
Green Signal > -40dBu
Yellow Signal > -1dBFS
Red Analog Overflow
Blue Gain Reduction
Blue Frame Selected
Red-Blue Frame Selected, Muted
Red Frame, M Muted
DDelay
3.2. Navigation
Select a menu entry using the cross-shaped cursor buttons (Figure 3.1). On selection, the item will
appear blue framed or backgrounded. Use ENTER to invoke the appropriate menu. To go back, use
EXIT .
9

Permanent holding down of a button leads to key repeat, similar as a computer keyboard. Some menu
entries end with three points (“...”), as an indication for another menu beyond that.
Figure 3.1.: Cursor Buttons
To return to the home page, hold down EXIT for about three seconds.
3.3. Input of Values
Variable properties are usually highlighted in green. Use the wheel (Figure 3.2) to change a value.
Figure 3.2.: Rotary Encoder
3.3.1. Increasing the Number of Steps
You may accelerate the input by a factor of ten. Hold down ENTER while turning the wheel.
3.4. Confirm Changes
For most properties, the change of a value takes place in real time. However, there are properties which
would make no sense to take effect immediately. These are displayed with a yellow background instead
and changes will only be valid after pressing ENTER .
3.5. Function Buttons MUTE and EQ
Press MUTE to mute or un-mute a selected Input Bus or Output. Press EQ to invoke the EQ page.
10

3.6. Mute All Immediately
Press ENTER while holding down MUTE . All Outputs will be muted immediately.
Figure 3.3.: All Outputs Muted
3.7. Key Lock
3.7.1. Lock
Press ENTER while holding down EQ . The function is available only on the home page.
3.7.2. Un-lock
Again, press ENTER while holding down EQ . The lock will be canceled.
3.8. Text Input
Text Input
Text input fields are green backgrounded having a yellow cursor. Use
the horizontal cursor buttons to move the cursor left or right. Use the
wheel to change the character at the cursor. To get a space character,
just move to the most right.
Usually, changes will take effect immediately, so there is no need to
confirm.
3.8.1. Delete Characters
Hold down ENTER while turning the wheel. According to the rotation, characters before or after the
cursor will be deleted.
3.8.2. Predefined Keywords
Where appropriate, the HDLM 8 offers a small list of predefined keywords below a text input field. Use
the list to assemble a complete label in seconds without the need of wheeling in character by character.
11

3.9. Digital Input States
Digital Input States
The state of the incoming digital signal will be shown in the right
column of the network/digital menu item. See page 18 Digital Inter-
faces.
3.10. Fast Navigation for the Advanced User
Combine the cursor buttons with the wheel to move on faster. Hold down a button while turning the
wheel. The selection follows according to the direction of rotation.
3.11. Project Management
Name of Project
To invoke the project menu, move the selection to the first entry of
the home page and confirm with ENTER .
The asterisk in the right indicates that changes have been made and
disappears after saving again.
Project Menu
Select a menu entry using the cursor buttons and confirm with
ENTER .
In the following, the individual properties of the Project Menu are described.
12

3.11.1. New Project
Input of Project Name
A new project requires necessarily a label. Using the wheel, enter the
name character by character and confirm with ENTER .
After creating a new project, all Outputs will be muted and set to
Direct Out. All EQs will be set to flat.
3.11.2. Loading
Load a Project
Select a project from the list. Confirm with ENTER .
The list is sorted alphabetically and by number of loading: often used
projects are shown first.
Dependent of the setting Mute On Project Load, all Outputs will mute (see page 17). You have to
un-mute them manually.
3.11.3. Saving
Overwrite a Project
Enter a new name using the wheel or select a project from the list
you want to overwrite. Confirm with ENTER .
Save a Project
The action will be confirmed with a message.
13
3.11.4. Deleting
Delete Projects
Select one or more projects using the cursor buttons and the wheel.
Confirm with ENTER . All projects tagged with a green check will be
deleted.
Hint: the current loaded project cannot be deleted.
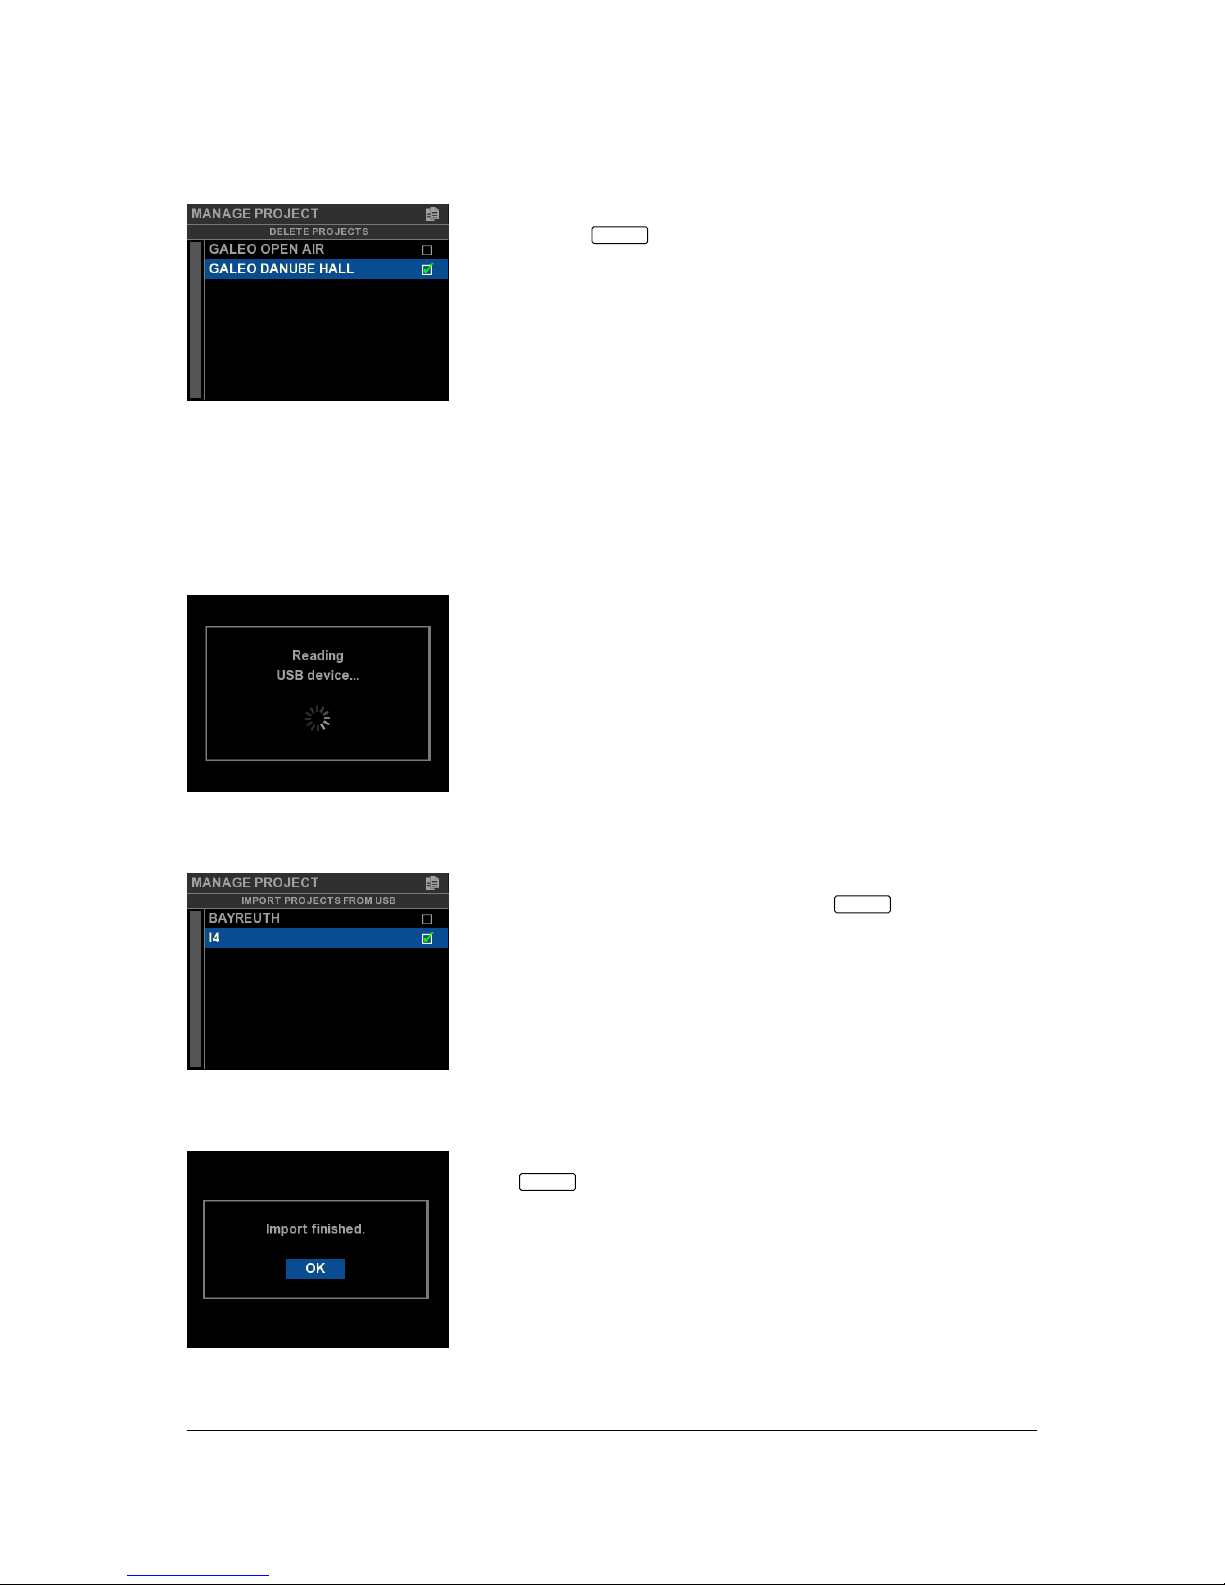
3.11.5. Project Import from USB
Show Files of USB stick
Plug in an USB stick into the HDLM 8 and confirm the message USB
device inserted?. The USB device will be searched on its top level for
files having the .hdlm8 extension.
Import Projects
Use the cursor buttons to select and choose one or more projects
using the wheel. After confirmation with ENTER , the tagged files
will be imported and stored permanently on the HDLM 8.
If there are new Loudspeakers used by the importing project files,
they will also be loaded into the Loudspeaker Library.
Import Completed
Do not remove the USB stick before you have confirmed this message
with ENTER .
14

3.11.6. Project Export to USB
Export Projects
Use the cursor buttons to select and choose one or more projects
using the wheel. After confirmation with ENTER , the tagged projects
will be stored to the USB device.
Export
Wait for the operation to be completed.
Additionally, the exported file contains all Loudspeakers used in the
corresponding project, so you may import this file on any HDLM 8
without trouble.
Export Completed
Do not remove the USB stick before you have confirmed this message
with ENTER .
3.11.7. Write Protection
Protect Projects
Use the Security menu to protect projects from overwriting acciden-
tally. There are two modes: a simple Read Only flag and protection
using a lock code (four digits).
The write protection will not take effect before saving the project!
15

3.12. Device Settings
The properties of the Device Settings menu are stored independently from the current project. Changes
will be saved internally within five seconds.
Invoke the Device Settings Menu
To invoke the Device Settings menu, select the second item on the
home page and confirm with ENTER .
In the following, the individual properties of the Device Settings menu are described.
3.12.1. Amplifiers
These are important parameters to the automatic calculation of the output limiters. Set the appropriate
gain of the connected amplifier to each channel.
Amplifiers
The eight rows correspond to the eight physical outputs. Optionally,
you may specify the peak output voltage Vpeak of the amplifier. The
HDLM 8 will ensure that the output signal will never exceed this
limit, even if there are larger values in the loudspeaker settings. By
that, amplifiers without or with insufficient limiters may be used
safely. Enter this value only if you know that your amplifiers do not
have clean working limiters.
Hint: the Vpeak limiter provides additional security, but always at the expense of dynamics1.
It is important that the amplifiers connected deliver exactly the same gain set
as in the Amplifiers Menu. Adjust the volume control on the amplifiers always
to 0dB (usually turned up full).
With incorrect settings, the speakers are not protected by the limiter! See the
manual for your amplifiers to find out the actual gain.
3.12.2. Delay Unit, Temperature
Set the average ambient temperature. This will be used to calculate the delay for given distance in the
Output Properties. Altitude and air pressure information were omitted, as they have only a very small
influence on the speed of sound in contrast to the temperature.
The unit for the delay can be selected between meters and feet. Depending on the unit, the temperature
is specified in degrees Celsius or Fahrenheit.
1The corresponding RMS limiter has a crest factor of 12dB.
16

3.12.3. Device Name
Device Name
Wheel-in a name for the device. This will be used to recognize the
unit on the network and on the home page display. Changes will take
effect immediately.
3.12.4. Info
The info page shows among other things the version of the firmware.
3.12.5. Update
Firmware Update
If you received an update file from the manufacturer, you may load
this from the USB stick at this point. The top level of the USB device
will be searched for the newest version.
All outputs will mute. This process takes about five minutes. After
completion, the HDLM 8 will reboot and reactivate its outputs.
Do not interrupt the ongoing update process!
Provide a stable power supply!
An interruption may cause that the device no longer works. This can only be
restored by the manufacturer or an authorized service center.
3.12.6. Mute On Project Load
Mute On Project Load
If this function is activated (default on new machines), any Output
will be muted after loading a new project. Otherwise, the last saved
mute state will be restored.
17

3.13. Network and Digital Interfaces Menu
Invoke the Network Menu
To invoke the Network Menu, select the third item on the home page
and confirm with ENTER .
The HDLM 8 offers automatic addressing. You need the manual (static) address-
ing mode only in some special cases.
Network Menu
If manual IP addressing is desired, set IP Config Mode to Static
and enter the IP address below. Each device needs an individual IP
address (see page 29).
Changes will take effect after confirmation with Set.
The settings Gateway and Netmask are not necessary for normal operation2.
3.13.1. Digital Interfaces
Digital Interfaces Menu
Any available digital input/output may be set up in this menu.
In the following, the corresponding functions will be described.
3.13.2. Input C Mode / Input D Mode
Switch here the XLR inputs Cand/or Dbetween analog mono or stereo digital AES/EBU. About signal
routing, see page 21 Physical Inputs.
2Network experts will use these parameters to control the HDLM 8 over the Internet.
18

3.13.3. Redundancy Mode (Fallback)
Analog inputs will be ignored, if a valid digital signal is present. In the case of losing the digital signal,
the HDLM 8 will switch back to the analog signal immediately without interruption.
Prerequisites
Assign at least one analog and one digital physical input to an Input Bus. In Fallback-Mode (if digital
is lost), the HDLM 8 will show Digital? on the home screen (Figure 3.4).
Figure 3.4.: Fallback in Redundancy Mode
3.13.4. Optical Input (optional)
Use the wheel to tell the HDLM 8 which digital input format is used. ADAT will take eight tracks, but
is fixed to 48kHz sample rate. SPDIF will take two tracks and may be feed with a sample rate between
32kHz and 96kHz.
The physical AES/EBU interface Ccannot be used at the same time, if the
optical input is set to SPDIF or if a valid ADAT-Signal is present.
The incoming digital signal will always be up-sampled by the internal low-latency Sample Rate Converter
to 96kHz.
3.13.5. Optical Output (optional)
Set this function to Loop for using the optical output as a latency-free loop-trough of the AES/EBU
input or the optical input (SPDIF or ADAT). Additionally, assign any pair of the Output Map to send
the HDLM 8 outputs as a digital 24bit/96kHz SPDIF signal.
19

3.14. Input Bus Map
Channel Status
Select a channel of the first row in the Channel Status section on the
home page and confirm with ENTER .
Input Bus Map
The screen changes to the Input Bus Map. The selected channel is
highlighted.
Below each row, a green line is shown, which indicates the level meter
of the bus. Activity of the compressors are indicated with blue lines
coming from the right. Channels without any input assigned will
appear black, without the blue background.
At the bottom of the screen, there is a dB scale with selectable units.
Input Bus Map with Mute
Use the cursor buttons to select a channel. Press MUTE to turn a
channel on or off. To invoke the EQ page, press EQ . Use ENTER to
invoke the Input Bus Properties menu of the corresponding channel.
3.14.1. dB Scales
Miscellaneous dB Scales
Use the cursor down button to move the selection to the dB scale
at the bottom of the screen. Use the wheel to change the unit (see
page 32).
3.15. Input Bus Properties
Input Bus Properties Menu
Choose a menu item.
In the following, the individual items of the Input Bus Properties menu are described.
20
Table of contents
Other Seeburg Recording Equipment manuals


