Segway NavimowNavimow H1500A-VF User manual

Read the User Manual carefully before use.
Make sure you understand all the instructions and safety warnings.
Version 1.0
06/14/2023
User Manual
Navimow

Table of Contents
Original Instructions
1. Navimow Overview
1.1 Introduction
1.2 Safety Warning
1.3 What's in the Box
1.4 Parts and Functions
1.5 Symbols and Decals
1.6 How the EFLS Works
1.7 How to Choose a Model
1.8 Specifications
2. Setup & Mapping
2.1 Before You Start
2.2 Install the Charging Station and the Antenna
2.3 Charge and Activate the Mower
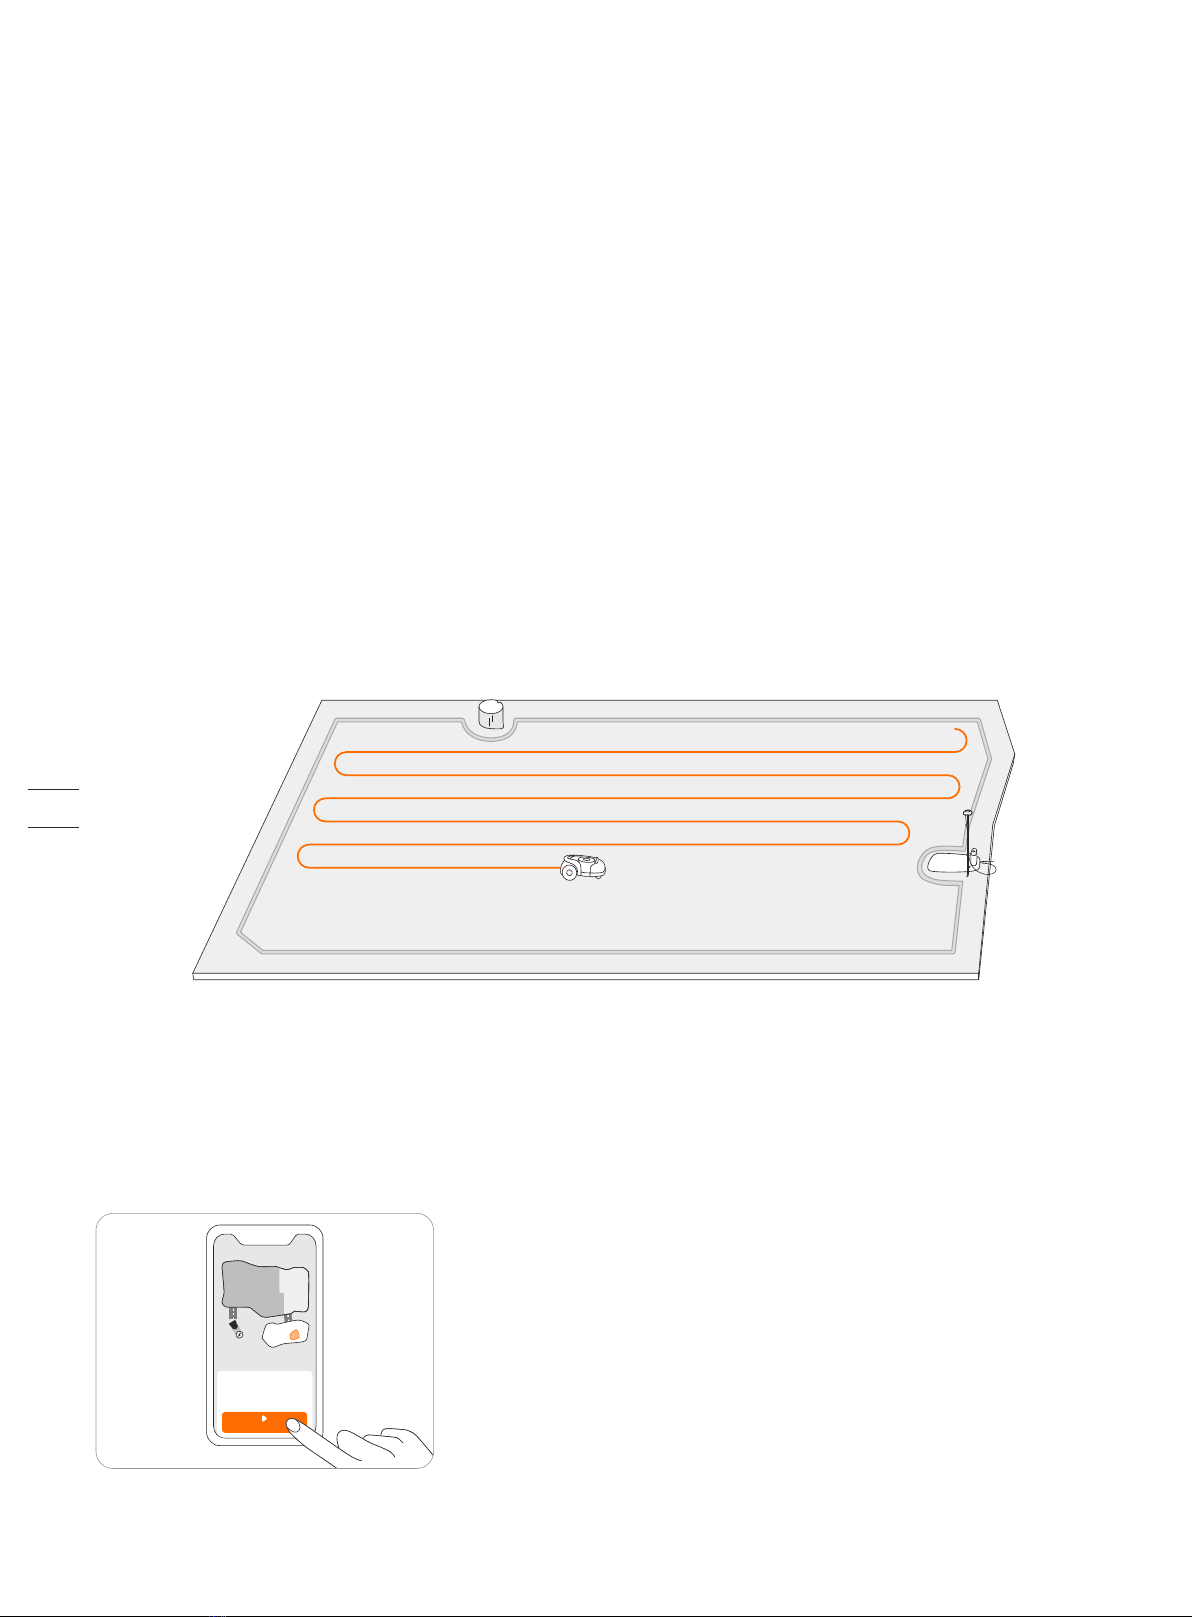
2.4 Set up the Work Area
2.5 Test Drive
3. Daily Use
3.1 Display and Control on the Mower
3.2 Light Cue
3.3 Mow
3.4 Navimow app
3.5 Notifications
3.6 Settings (Mower)
3.7 Settings (app)
3.8 IoT
3.9 Obstacle Avoidance
3.10 VisionFence Sensor (optional)
3.11 Accessories (optional)
4. Maintenance
4.1 Cleaning
4.2 Replace Blades
4.3 Transportation
4.4 Battery
4.5 Power Supply
4.6 Storage
4.7 Recycling and End-of-life Disposal
4.8 Others
5. FAQ & Troubleshooting
6. Important Information
6.1 Trademark and Legal Statement
6.2 EC DECLARATION OF CONFORMITY
6.3 UKCA DECLARATION OF CONFORMITY
6.4 Certifications
6.5 Limited Warranty
6.6 About the Manual
6.7 Contact Us
3
3
4
6
7
9
10
11
13
15
15
16
20
23
27
28
28
30
32
34
36
37
41
42
43
43
46
49
49
50
51
51
53
53
53
54
55
59
59
60
61
62
64
67
67

Welcome
Thank you for choosing Navimow!
With Exact Fusion Locating System (EFLS) and superb
traversing capabilities, Navimow can handle lawns of all
types. No perimeter wires are needed and it's super easy to
use, thanks to smart app connectivity and the intuitive
control panel.
Collection of grass is not necessary because the fine grass
clippings serve as a natural fertilizer. Enjoy the fun of
carefree mowing and a perfectly maintained lawn.
1. Navimow Overview
1.1 Introduction
Navimow
Segway Navimow is an advanced robotic mowing system that uses a virtual boundary, eliminating the need for complicated
perimeter wiring. Easy to operate and manage, Navimow gives you more free time to do the things you love and an effortlessly
impeccable lawn with every use.
Navimow contains a robotic mower, a charging station, and a GNSS (Global Navigation Satellite System) antenna. The robotic
mower and GNSS antenna simultaneously receive positioning signals from satellites to locate the mower and the work area. The
charging station charges the mower and transmits the satellite positioning signal received by the GNSS antenna to the mower to
improve the positioning accuracy of the mower.
The Mower
The robotic mower is powered by a lithium battery and can automatically cut grass in a defined work area. The work area can be
defined by remotely controlling the mower through the Navimow app as needed. When mowing, the mower's driving path is
automatically planned by the algorithm according to the shape of the work area to achieve the highest mowing efficiency. If the
entire lawn cannot be completed at one time, the mower will automatically return to the charging station to charge. When the
charging level reaches 85%, the mowing resumes from the position where it stopped.
Navimow app
The Navimow app is an important part of the Navimow system. You can follow the interactive guidance shown via the app to
complete the system installation and set up the work area. You can also use the app to adjust the settings of the mower, manage
the work area, view the work status of the mower, control the mower remotely, etc. You can also get the latest and most compre-
hensive official Help and Support content through the app.
MOW NOW
3
1)Be sure to install and operate the mower and the charging station according to the instructions. Go to navimow.segway.com for
the complete User Manual and the latest user materials.
2)The product can be used both by consumers and for professional purposes. Using the mower for purposes other than mowing
can bring serious injury. To avoid risks of injuries, please read and understand all the warnings and cautions. Please understand
that you can reduce the risk by following the instructions and warnings in this manual, but you cannot eliminate all risk. The
operator or user is responsible for accidents or hazards occurring to other people on their property.
3)Navimow has many built-in safety sensors, however, safety risks still exist. Set a mowing time when there are no people or pets
on the lawn. Inform the neighbors about the risks for accidents or hazards. When using the mower on a public lawn, or when
your lawn is open to your neighbor or street, protect or fence the lawn, or put up a warning sign around the working area that
says: WARNING! Automatic lawn mower! Keep away from the machine! Supervise children!
4)DO NOT modify the mower by yourself. Modifications could interfere with mower operations, result in serious injury and/or
damage, or void the Limited Warranty. Use only Segway approved parts and accessories.
5)The manufacturer recommends the user to be 18–70 years old. Be sure to get the necessary training before operating the machine.
WARNING
Never allow children, persons with reduced physical, sensory or mental capabilities or lack of experience and knowledge or people
unfamiliar with these instructions to use the machine. Local regulations may restrict the age of the operator.
Before Mowing:
Regularly check that all parts of the mower can function normally.
For the best mowing results, it is recommended to mow in dry weather. Mowing in the rain can make the grass stick on the
product and the mower may slip. DO NOT mow in bad weather, such as heavy rain, thunderstorms or snow.
Periodically inspect the area where the machine is to be used and remove all stones, sticks, wires, bones and other foreign
objects. The Limited Warranty does not cover damages caused by objects left on the lawn.
To avoid possible damage, keep the operating mower at least 1 m (3 feet) away from sprinkler heads. The mower and sprinklers
should NOT work simultaneously. Time the mower so that it works at a different time from sprinklers.
NEVER allow children to touch the power supply unit, charging station, blades, the battery compartment, or any parts with gaps such as
the wheels.
WARNING
Never operate the machine and/or its peripherals with defective guards or shields, or if the cord is damaged or worn.
When Mowing:
Keep away from the rotating blades! DO NOT put hands or feet under or near the rotating blades.
Watch out for projectile objects! Keep a safe distance from the mower when operating.
DO NOT leave the machine to operate unattended if you know that there are pets, children or people in the vicinity.
DO NOT overreach. Keep your balance at all times and always be sure of the footing on slopes. Walk, never run while operating
the machine or its peripherals.
WARNING
DO NOT allow children to be in the vicinity or play with the machine when it is operating.
DO NOT lift the mower in operation. DO NOT ride on the mower.
DO NOT mow on areas with slopes steeper than the maximum incline inside the working area (45%), as well as the boundary (10%).
If the mower makes an abnormal sound or signals an alarm, press the STOP button immediately.
If there are abnormal vibrations, turn o the mower, place it on level ground for about 30 seconds and then restart. If the issue
persists, contact authorized after-sales service.
DO NOT touch moving hazardous parts before they have come to a complete stop.
1.2 Safety Warnings
IMPORTANT
READ CAREFULLY BEFORE USE
KEEP FOR FUTURE REFERENCE
4
Safe Usage:
DO NOT operate the mower outside the temperature limits: 0–40℃ (32–104°F), because low/high temperatures can decrease
mower performance and even lead to accidents.
DO NOT place anything on the mower or the charging station.
It is recommended to conduct regular maintenance of the mower (see 4. Maintenance) by an adult.
Regularly check the warning devices to ensure they are effective. These devices include the buzzer, the LED light on the
charging station, and the ambient light on the mower.
Before charging, please read How to Charge in Chapter 2.3. Improper use may cause electric shock, overheating, or leakage of
corrosive liquid.
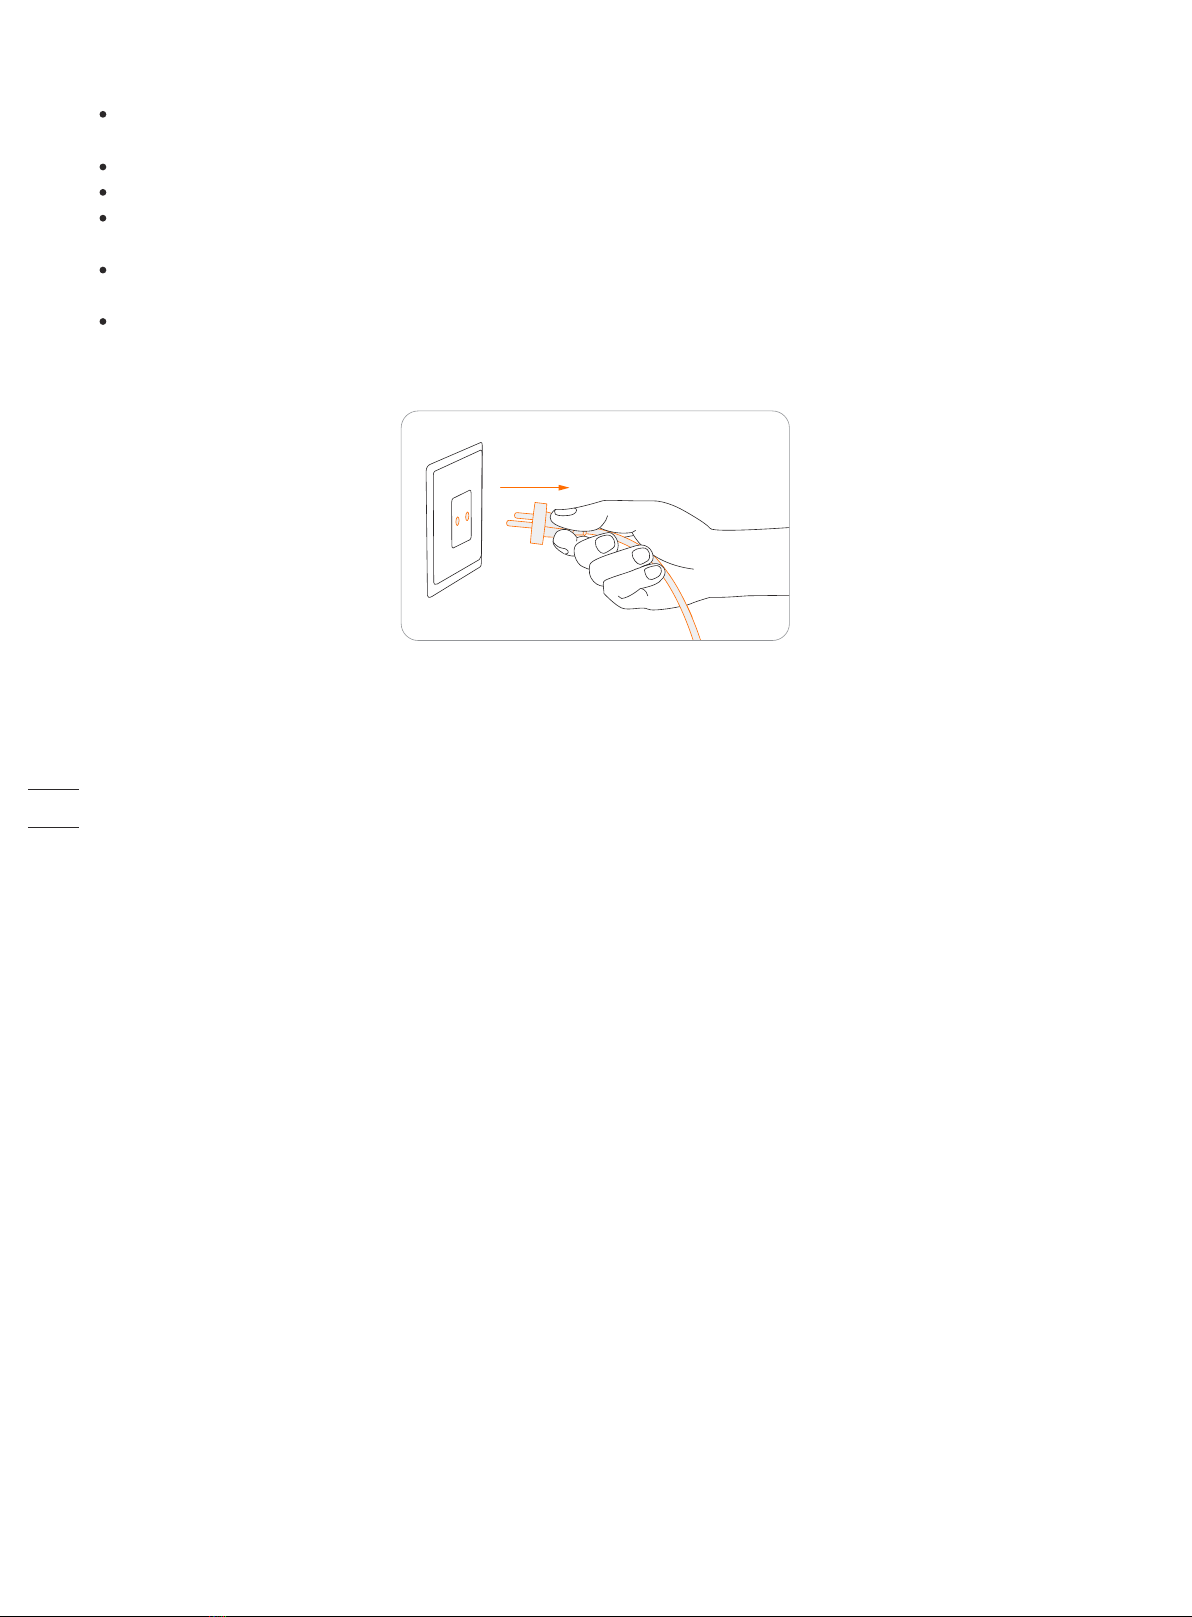
If the cord on the power supply or the extension cable becomes damaged or entangled during use, disconnect the power supply
from the power socket and then untangle. To avoid a hazard, pull the body of the plug rather than the cord when separating the
power supply from the power socket. Contact after-sales service and have a professional technician to repair or replace the
cord.
5
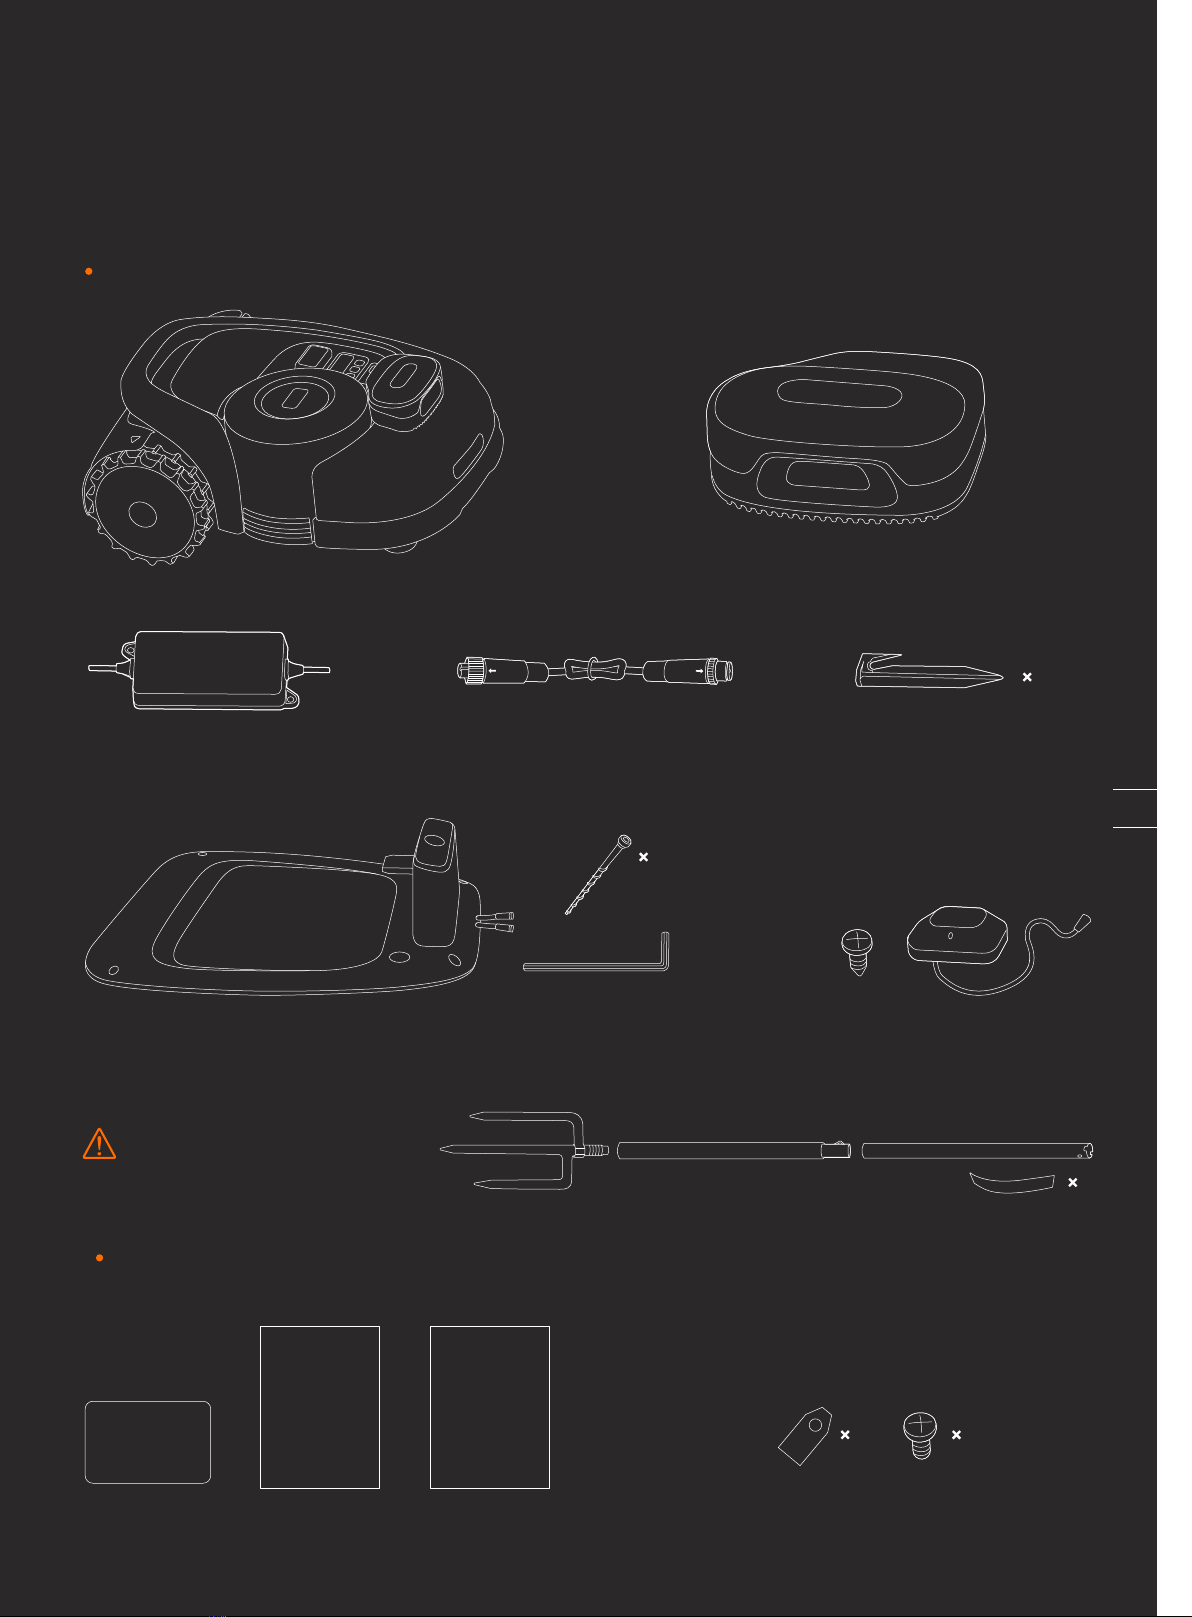
1.3 What’s in the Box?
If there are missing or defective parts, please contact
after-sales service. We recommend retaining the
package for future transportation and shipping.
Navimow
Quick Start Guide
Welcome Card Important Information
User materials
Quick Start GuideImportant Information
Welcome Card
VisionFence sensor
Spare blades and bolts
12
12
Power supply Extension cable Pegs to secure the extension cable
Charging station and the installation kit
Antenna installation kit
GNSS antenna kit
10
5
WARNING
Sharp edges. Do not point at people.
4
6

Ambient light: Navimow will have specific lighting effects to remind you to pay attention to the state of the mower. See 3.2 Light Cue.
Lifting handle: Helps you to lift the mower when necessary. See 4.3 Transportation.
Stop button: Stops the mower and the blade immediately. When the mower encounters a fault and displays a 4-digit error code,
press the STOP button to clear the error code and try to fix the fault. See 5. FAQ & Troubleshooting for detailed guidance.
Control panel: The buttons on the control panel can be used for the basic operations of the mower: switch the mower on and off,
start mowing, return to the charging station, enter the PIN code to unlock the mower, etc. See 3.1 Display and Control on the Mower.
Rain sensor: For raindrop detection. See Rain sensor in 3.6 Settings (Mower).
Bumper: When the bumper hits an obstacle and triggers the internal sensor, the mower will go backward and avoid the obstacle.
See Bumper in 3.9 Obstacle Avoidance.
GNSS antenna in the mower: In addition to the GNSS antenna connected to the charging station, there is also a GNSS antenna
inside the mower to improve positioning accuracy. See 1.6 How the EFLS Works.
Ultrasonic sensor: Certain models are equipped with an Ultrasonic sensor, which could detect obstacles and avoid collision. The
sensor is also sold separately and can be installed on all Navimow models. Consult your dealer for details.
1.4 Parts and Functions
Top view
STOP button
Control panel
Rain sensor
Buzzer
VisionFence sensor
Charging strip
Bumper
Lifting handle
Ambient light
GNSS antenna in the mower
7

NOTE: If the GNSS antenna has poor signal due to surrounding buildings or trees, the mower will not work properly. You need to
find a better spot for the antenna until the LED indicator turns green/blue. If no suitable place can be found, Segway recommends
purchasing the antenna extension kit for roof/wall installation.
Bottom view
NOTE:Drainage outlet: If the mower falls into water, take it out immediately and put the mower right side up to drain it. Never
submerge the mower in water, otherwise, the components may be damaged and the Limited Warranty will be voided.
Blade disc
Blade
Rear wheel/Hub motor
Blade fender
Battery compartment
Front wheel
Drainage outlet
Power interface
GNSS antenna
LED indicator
Contact strip
Antenna interface
LED indicator: Indicate dierent working states with various colors. See 3.2 Light Cue for details.
Blade: The blades can rotate freely after being attached to the blade disc. When mowing, the spinning blade disc will generate
centrifugal force to keep the blades pointing outside so that the blades can cut grass. When hitting an obstacle, the blade will
turn inside. See 4.2 Replace Blades for replacement guide.
Blade disc: Blade disc height adjustment through Navimow App. See How to change the cutting height in 3.6 Settings (Mower).
Charging station and the GNSS antenna
GNSS antenna: Receives satellite signals to improve the positioning accuracy of the mower. See 1.6 How the EFLS Works for
details.
8
This product conforms to the applicable
EC Directives.
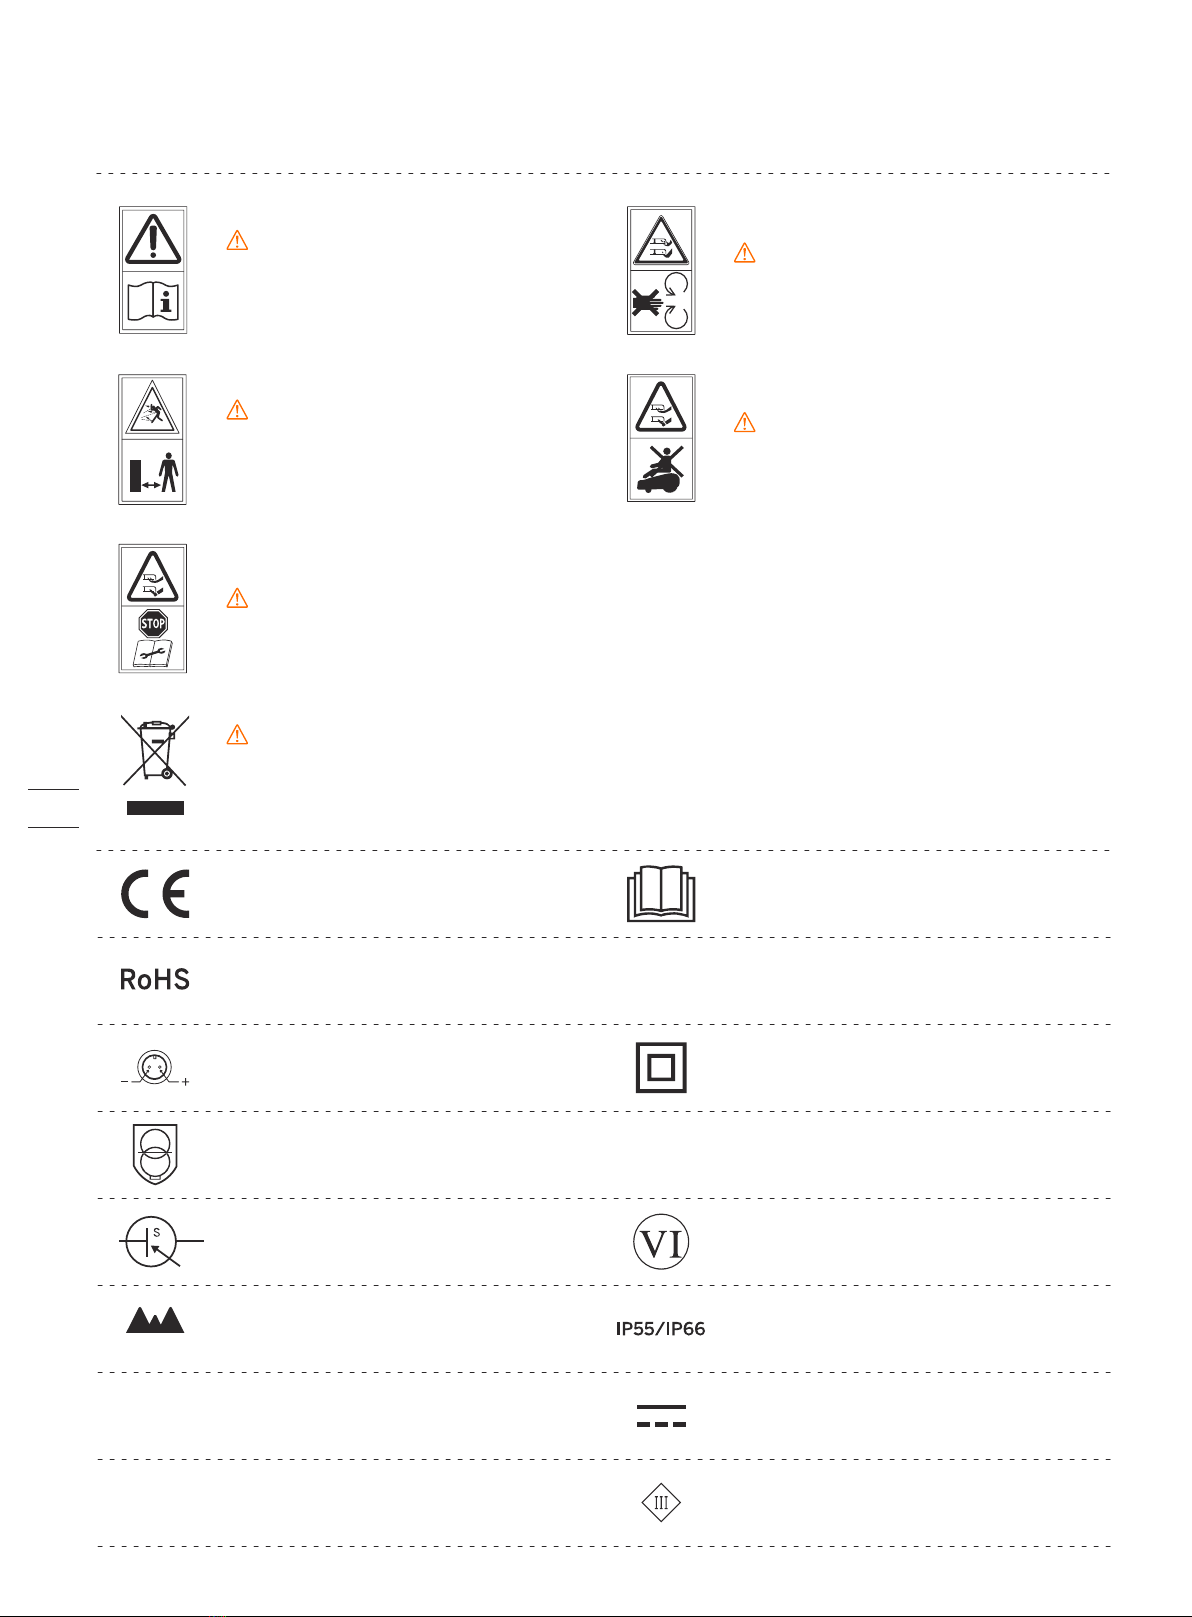
1.5 Symbols and Decals
Please study the symbols on the product and labels carefully and understand their meaning:
WARNING-Read instruction
manual before operating the
machine.
WARNING-Do not touch
rotating blade.
WARNING-Keep a safe
distance from the machine
when operating.
WARNING-Operate the disabling device before working on or lifting the machine*.
WARNING-It is not permitted to dispose of this product as normal household
waste. Ensure that the product is recycled in accordance with local legal
requirements.
WARNING-Do not ride on the
machine.
*The disabling device hereby refers to the PIN code. Make sure the mower is locked by
the PIN code before lifting or operating.
Polarity of the charging port
Class II appliance
IP55/IP66
SMPS incorporating a short-circuit-proof safety isolating transformer (inherently or
non-inherently)
SMPS (Switch mode power supply unit)
DoE Level VI eciency
The maximum altitude of use is 5000m
The maximum temperature of use is 40
℃
Direct current
Alternating current
Before charging, read the instructions
This product conforms to the regulations of Restriction of Hazardous Substances.
ta: 40℃
≤ 5000m
~Class III appliance
9
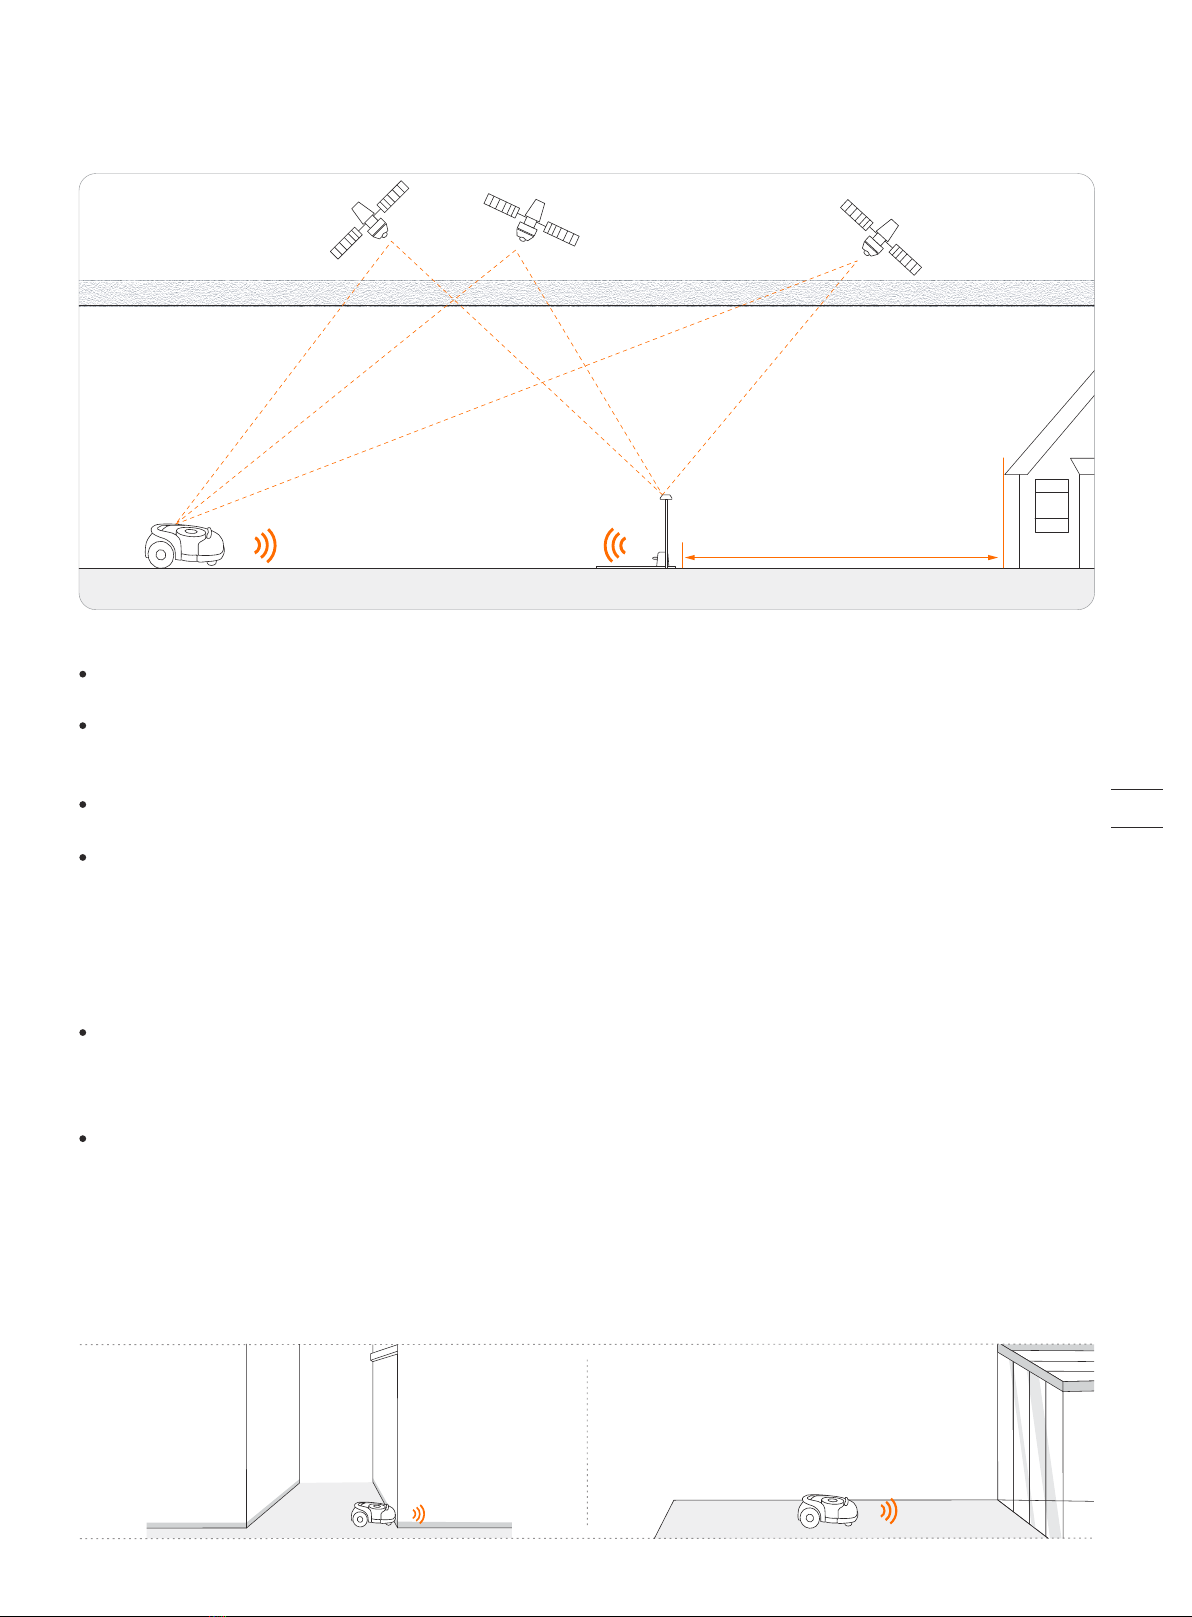
Multi-sensor data fusion improves the applicability of EFLS to complex environments, but serious satellite signal issues will still
greatly aect the normal operation of Navimow. Below are major cases of satellite signal issues:
Blocking
If there are any obstacles on or surrounding the antenna and/or the mower, the signal will be weakened or blocked.
Solution: DO NOT install the charging station and antenna under a roof, tree or anywhere that may block the signal. You can also
buy the antenna extension kit and install the antenna on the roof/wall.
Signal Interference
Signals from the satellite are transmitted to the antenna after being reflected by the wall, instead of directly from the sky. This
is called Multipath Eect.
Solution: install the antenna far from the house to get rid of the multipath eect. It is recommended not to use the mower in a
scenario with walls that have long and flat surfaces or that are made of glass or metal. The long and flat surface/glass and metal
surface will interfere with the signal, hence the mower may bump into the walls. The map should not be built between two high
walls, because the walls will block the signal and the mower will not be able to work in this area.
EFLS(Exact Fusion Locating System) is Segway's unique high-precision fusion technology. Based on satellite positioning, EFLS
technology integrates various sensor data to improve positioning accuracy and fault tolerance through algorithm fusion.
The mower can locate itself through satellite signals, which can also be picked up by the antenna. By comparing the satellite
signals from the antenna and the mower, errors in the transmission of the signal (such as the oset of the satellite signal as it
travels through the ionosphere) can be minimized, improving satellite positioning accuracy to the centimeter level.
In addition, the data collected by the gyroscope, accelerometer, magnetic compass, and odometer sensors can also be integrated
into this system through Segway's data fusion algorithms, further improving the applicability of Navimow to various environments.
With EFLS technology, Navimow can draw a precise work area in complex outdoor environments without laying boundary wires,
and optimize the mowing path through algorithms in the work area to achieve planned mowing results and maximize the
mower's work eciency.
lonosphere & troposphere lonosphere & troposphere
≥2m
1.6 How the EFLS Works
10

The use of Navimow relies on fine satellite positioning signals and has certain requirements for the site being used: relatively open
and flat, no high-rise buildings and trees, and a large area of the sky is visible.
We created a checklist with questions on lawn shapes, houses, trees and other objects in yards. After completing the checklist, you
will have a clearer understanding of whether Navimow is suitable for your yard and get a purchase suggestion. To complete the
checklist, visit https://navimow.segway.com/checklist.
If your yard has the following features, you will need to purchase the VisionFence sensor to help Navimow handle more complex
yards. For more information, visit https://navimow.segway.com.
There is a large area of a glass/metal wall or a wall
with a long and flat surface.
1.7 How to Choose a Model
Is Navimow suitable for your yard?
There are tall trees (usually above 5m (16.5ft)) with big tree
crowns.
The density of the trees is thick.
The lawn tightly surrounds the building, and other buildings are within close proximity.
If your yard has the following features, you may need to purchase the Antenna Extension Kit, and install the antenna at a higher
position to obtain better satellite signals, but the possibility of poor performance cannot be ruled out.
The satellite signal is poor in the narrow path connecting the front yard and the back yard.
The lawn has a long and narrow area with high walls
on both sides.≥5m (16.5ft)
≥110°
≥110°
11
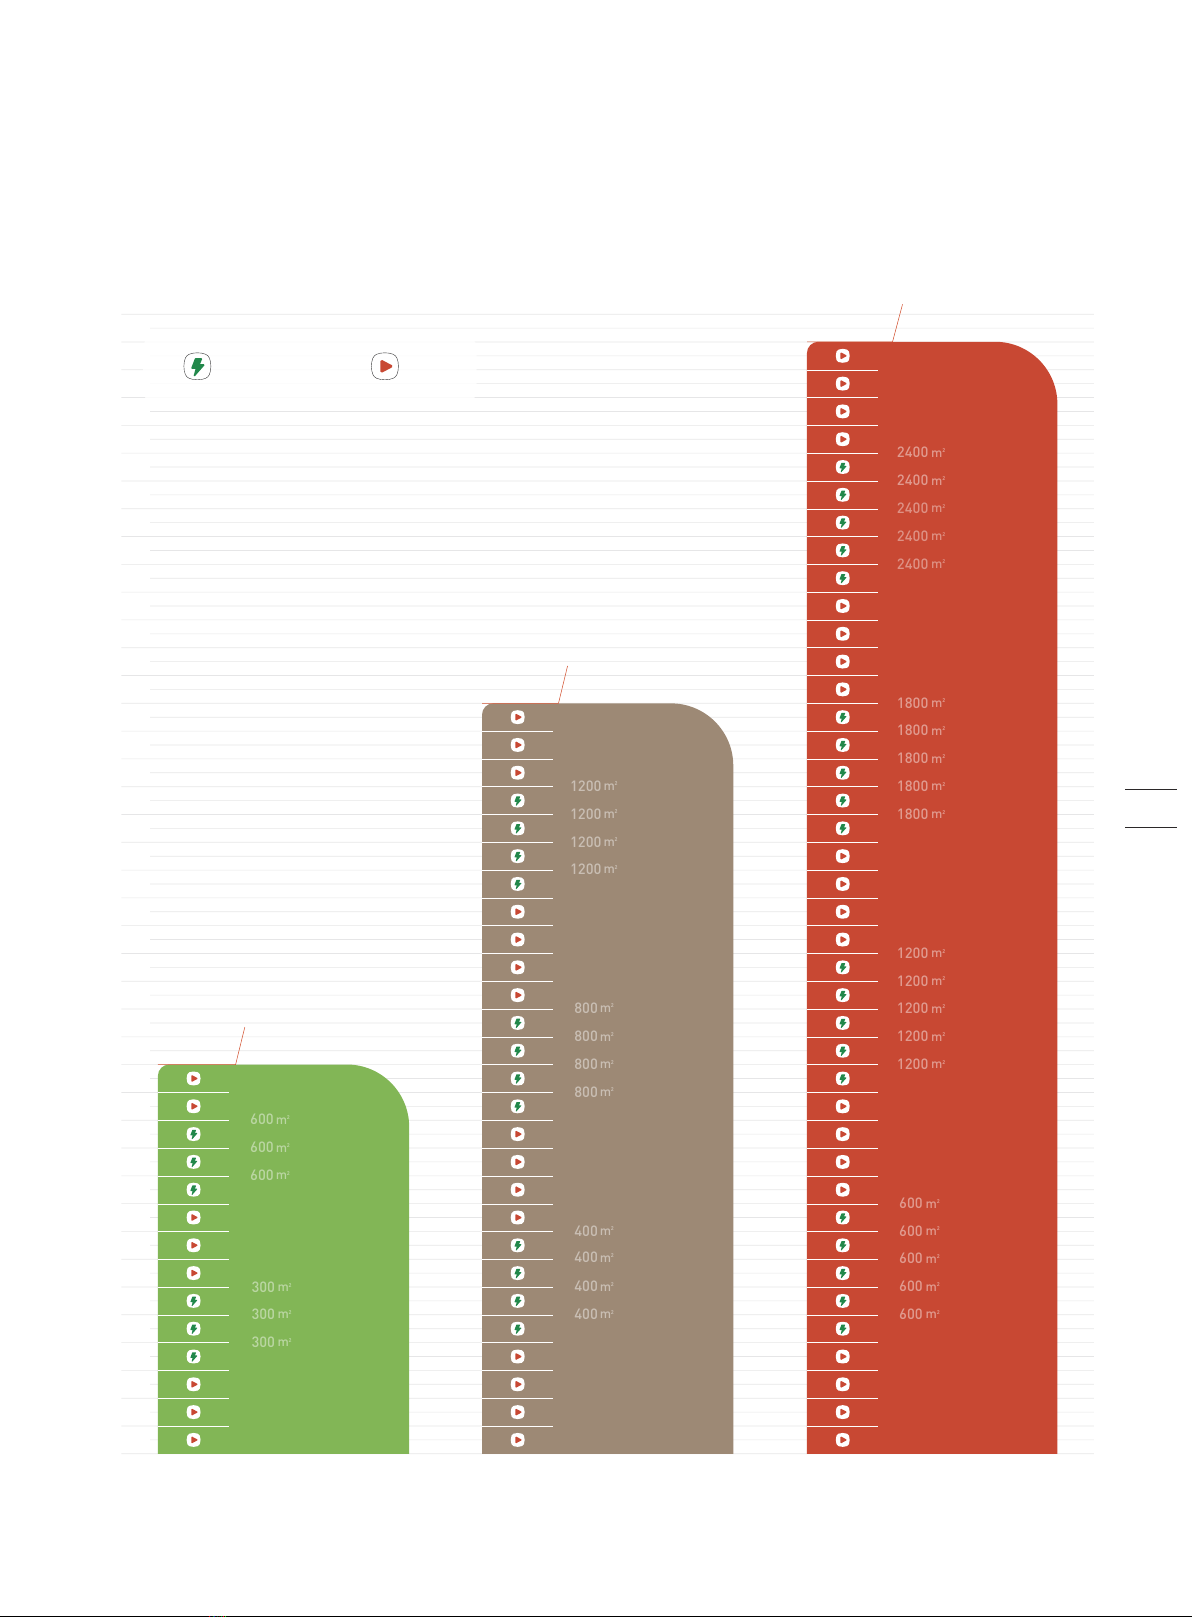
How to choose a Navimow model for your yard?
The charging time and working eciency are dierent for each model. Refer to the following chart to choose a suitable model
according to your lawn size and expected working hours.
01h
00h
H800A-VF H1500A-VF H3000A-VF
02h
03h
04h
05h
06h
07h
08h
09h
10h
11h
12h
13h
14h
15h
16h
17h
18h
19h
20h
21h
22h
23h
24h
25h
26h
27h
28h
29h
30h
31h
32h
33h
34h
35h
36h
37h
38h
39h
40h
41h
Working Time
Charging Mowing
m2
m2
m2
m2
m2
m
2
m2
m2
m
2
m
2
m2
m
2
m
2
m2
m2
m2
m2
m2
m2
m2
m2
m2
m
2
m
2
m2
m2
m2
m2
m2
m
2
m
2
m2
m2
m2
m
2
m
2
m
2
m
2
m
2
2400 min
3000 m20.74 acre
150
300
450
600
600
600
600
600
600
750
900
1050
1200
1200
1200
1200
1200
1200
1350
1500
1650
1800
1800
1800
1800
1800
1800
1950
2100
2250
2400
2400
2400
2400
2400
2400
2550
2700
2850 0.70 acre
0.60 acre
0.44 acre
0.30 acre
0.15 acre
m2
m2
m2
m2
m2
m2
m
2
m
2
m
2
m2
m2
m2
m2
m2
m2
m2
m2
m2
m
2
m2
m2
m2
m
2
m
2
m2
1500 m2
100
200
300
400
400
400
400
m2
400
500
600
700
800
800
800
800
800
900
1000
1100
1200
1200
1200
1200
1200
1300
1400
0.37 acre
0.30 acre
0.20 acre
0.10 acre
1620 min
840 min
m2
m2
m2
m2
m2
m2
800 m2
500
100 m2
m2
m2
m
2
m
2
m2
200
300
300
300
m
2
300
400
600
600
600
600
700
0.20 acre
12

1.8 Specications
Navimow
Segway
603 × 468 × 264 mm ( 23.7 × 18.4 × 10.4 in)
16.9 kg (37.3 lbs) 17.2 kg (37.9 lbs) 17.5 kg (38.6 lbs)
Mower frame: PP; cover: ASA
Basic Information
Product Name
Brand
Net Weight
(Battery Included)
Material
Dimensions:
Length × Width × Height
H800A-VF H1500A-VF H3000A-VF
GPS, Beidou, Galileo, GLONASS
800 m²(0.20 acre) 1500 m²(0.37 acre)
About 180 min
3000 m²(0.74 acre)
About 240 min
21 cm (8.3 in)
30–60 mm (1.2–2.4 in)
About 3 h About 4 h About 5 h
Mower Parameters
Recommended Mowing Area
Area Capacity per Hour
Cutting Width
Cutting Height
Charging Time
GNSS Working Mode
Typical Mowing Time
Per Full Charge[1]
Noise Emissions[2]
Measured Sound Power
Level LWA
Sound Power
Uncertainties KWA
54 dB(A)
3 dB(A)
Sound pressure
level LpA
Sound pressure
uncertainties KpA
45 dB(A)
3 dB(A)
100 m²(0.025 acre) 150 m²(0.04 acre)
8-inch hub motor
Driving Motor
Rated Speed
Motor Type
2800 rpm
Brushless motor
Blade Motor
Top Speed
Motor Type
Connectivity
ISM band radio connection
Bluetooth®
Frequency Range
Wi-Fi/Cellular Network
865-868 MHz
2400.0–2483.5 MHz
Cellular network
LTE-FDD: B1/B3/B5/B7/B8/B20/B28
LTE-TDD: B38/B40/B41
0–40℃(32–104°F);10–35℃(50–95°F)recommended
-20–50℃ (-4–122°F); 10–35℃ (50–95°F) recommended
Mower body IP66; charging station IP56; power supply IP55
Working Conditions
Working Temperature
Storage Temperature
IP Rating
Max. Incline at Boundary
Max. Incline Inside
Working Area
Minimum Angle
for Cutting Area
45 degrees
10%
90°
Battery Pack
Battery
Management System
Lithium-ion battery
21.6 V DC
Over-heating, short circuit, over-current and over-charge protection
Battery Type
Nominal Voltage
Nominal Capacity/Energy 5.1 Ah/110 Wh 7.65 Ah/165 Wh 10.2 Ah/220 Wh
0.4 m/s 0.6 m/s
NBW32D002D5N-AU
100–240 V AC
32 V DC MAX
2.5 A
Power Supply
Supply Unit Model
Input Voltage
Output Voltage
Output Current
Wi-Fi 2.4 GHz
(2400–2483.5M) [3]
+
13

[1] Tested at a standard cutting speed with a full battery at an ambient temperature of 25°C (77°F) while mowing a flat lawn. The
product can mow more per hour on open areas than on separated small lawns. When the grass is wet or long, the working capacity
is also smaller. The flatter the lawn surface, the larger the working capacity.
[2] The noise emission declarations conform to EN 50636-2-107.
[3] Wi-Fi connectivity is only available for products manufactured after week 39 2022.
Omni-directional wheel with built-in Hall sensor
Rubber tyres with hub motor
Other Features
Front Wheel
Rear Wheel
Sensors
IMU Sensor,
BladeHalt Sensor,
Bump Sensor, Lift
Sensor, Rain
Sensor, Wheel
Encoder
IMU Sensor,
BladeHalt Sensor,
Ultrasonic sensor,
Bump Sensor, Lift
Sensor, Rain Sensor,
Wheel Encoder
32 V DC
2.5 A MAX
25.2 V DC
2.5 A
LED
Charging Station
Input Voltage
Input Current
Output Voltage
Output Current
Indicator
H800A-VF H1500A-VF H3000A-VF
14

To ensure a successful setup, please scan the QR
code to download the Navimow app. Alternatively,
go to the Google Play Store (Android) or the
Apple App Store (iOS) and search "Navimow".
After installing the app, please register and log in.
2. Setup & Mapping
2.1 Before You Start
Prepare the app
NOTE: During use, the app will ask you for Bluetooth, GPS positioning, and Wi-Fi networking accesses when necessary. To ensure
normal use, it is recommended that you enable the above accesses. For more information, please refer to our Privacy Policy. Go to
Settings>app>About>Privacy Policy.
Prepare the lawn
Remove debris, piles of leaves, toys, wires, stones and other obstacles. Make sure children and pets are o the lawn. Please cut
your lawn to a height of no more than 6 cm (2.4 in).
<
6cm
(2.4in)
15

2.2 Install the Charging Station and the Antenna
Step 1: Find a good spot
Install the charging station on a soft and flat surface.
When placed outside, the charging station and the lawn should be kept at the same level.
In order to ensure that the antenna can receive good satellite signals, please choose a suitable location to install the charging
station and antenna:
1. Remain a certain distance away (greater than 2 m(6.6 ft)) from houses, trees and walls.
2. Install the charging station and antenna in an open space with nothing blocking the signal (for example, the tree canopy or the
sunshade umbrella), where the antenna has a clear sky view that at least 110° of the sky is unobstructed.
3. Please place the charging station on a flat non-hardened ground with the antenna upright. Do not install the antenna at an angle.
4. To ensure smooth docking, leave a minimum of 10 cm (3.9 in) at the back of the charging station and 1m (3.3 ft) at the front.
5. Stay away from sprinkler heads, fountains or other outdoor water systems.
6. Stay away from substations, generators, water pump stations and air conditioners.
Please choose the location carefully. Once the map is saved, if the location of the charging station or GNSS antenna is
changed, you need to create a new map.
≥2 m(6.6 ft) ≥2 m(6.6 ft)
<2 m(6.6 ft)
<2 m(6.6 ft)
>110°
35° 35° 16

If you can't find a suitable location on the ground, consider using the Antenna Extension Kit (sold separately) to mount the antenna
on a roof or wall for a better satellite signal. See Antenna Extension Kit in 3.10 Accessories (optional) for more information.
1. When installing the Antenna Extension Kit, please ensure that the antenna stays upward, and is not blocked by leaves, chimneys
and other facilities, so that the antenna has a clearance range greater than 110°.
2. When using the Extension Kit to install the antenna at a high place, it is also necessary to ensure that the charging station is not
too close to tall walls and trees on the ground.
WARNING! Roof top antennas of any sort should have lightening protection.
>110°
35° 35°
≥2 m(6.6 ft) ≥2 m(6.6 ft)
<2 m(6.6 ft)
<2 m(6.6 ft)
17

Step 2: Install the GNSS antenna
Connect the GNSS antenna to the charging station.
5Secure the cable on the pole with the supplied hook and loop tape.
6
3Slide in the tube with the antenna.
4
Fix the GNSS antenna on the tube.
12Unfold the base fork and insert it into the ground.A B
To make sure that the
antenna can be stably
connected to the charging
station once the
installation is completed,
please fully insert the base
fork into the groud.
Secure the nuts tightly to prevent water from
entering them.
Power interface
GNSS antenna
LED indicator
Contact strip
Antenna interface
90°
2
Rotate the other extension tube onto the base fork.
To ensure satellite signal, DO NOT put
anything on the antenna.
Caution: The illustrations in this user manual are for
your reference only. For the actual distance between
the antenna assembling metal tube and the charging
station, please keep it as long as possible. If the
distance is too small, the radio-frequency signal
generated by the charging station might interfere with
the satellite signal reception.
18
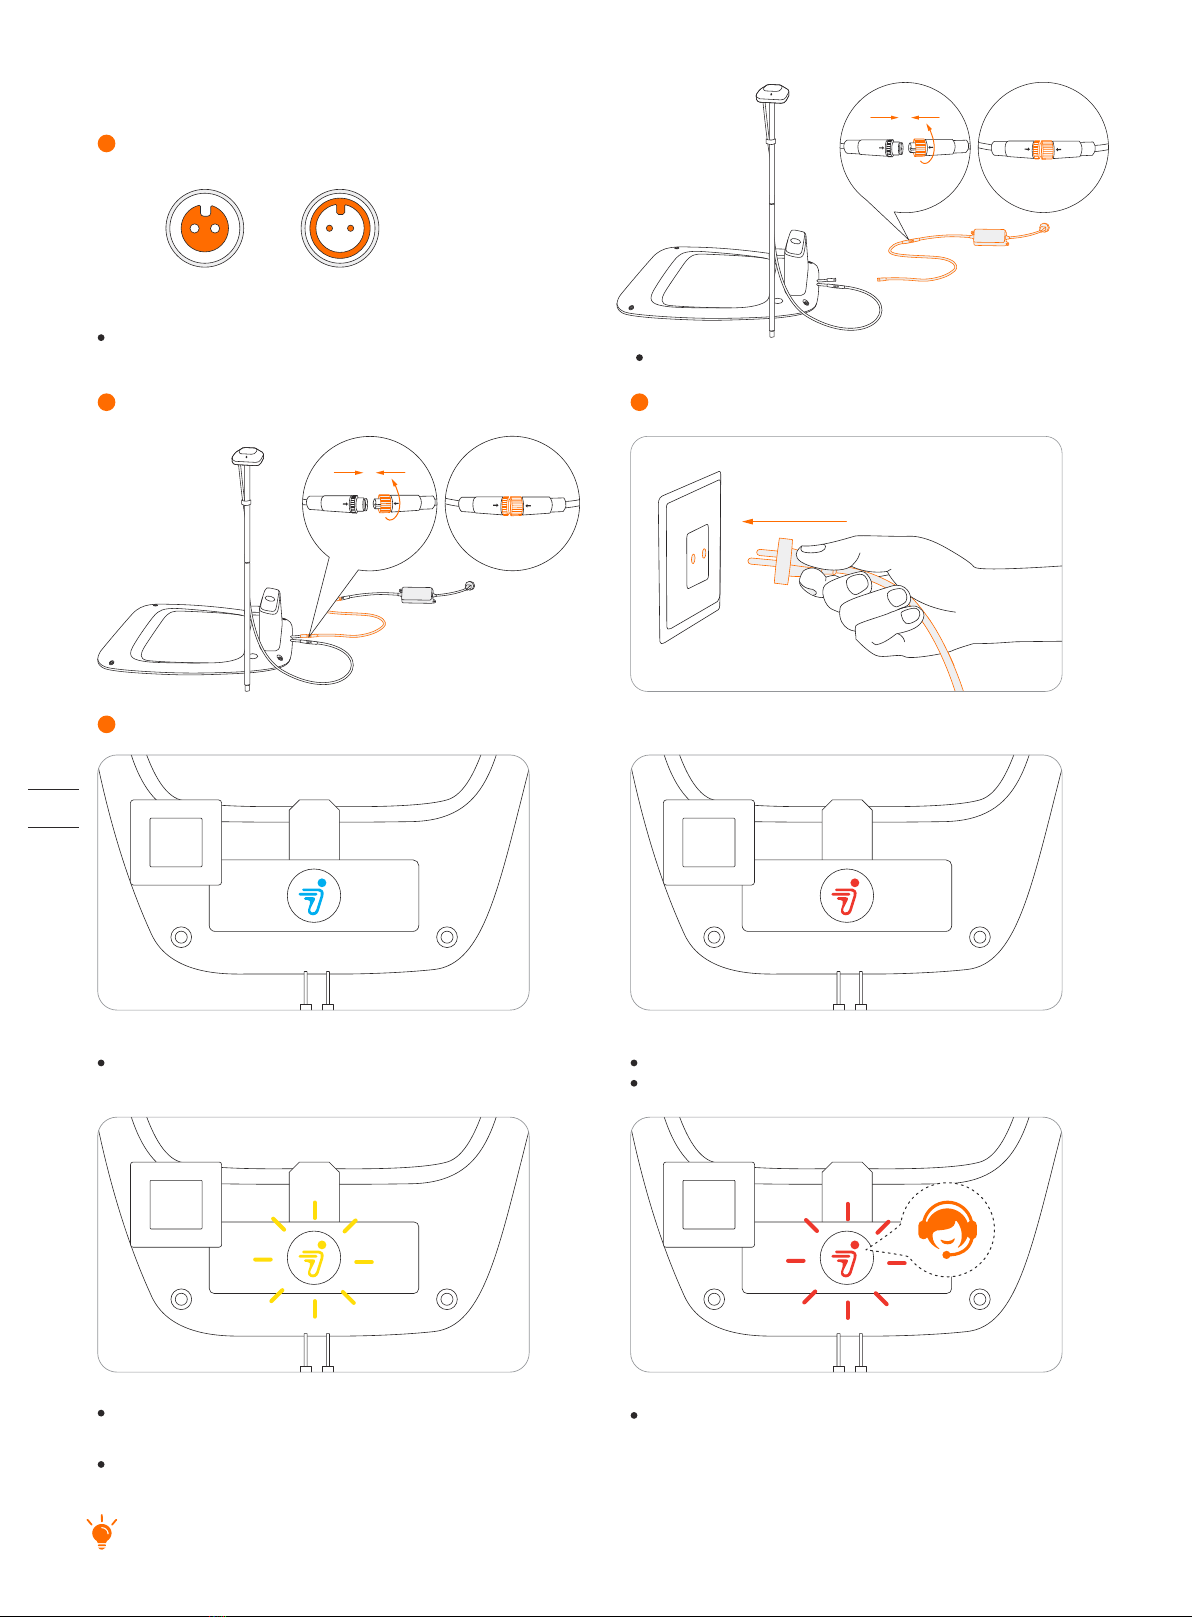
Check the signal.
4
Insert the power plug into a suitable power socket.
3
Connect the extension cable and the power interface.
2
If the signal is poor, relocate the GNSS antenna to an open space. Buy the antenna extension kit individually if you need to install it on
a wall or roof.
Flashing red:
Malfunction. Please contact after-sales service.
Solid blue:
Satellite signal is strong.
Solid red:No connection between the charging station and the mower.
The mower might be powered o.
Align the notch on the extension cable (A)
with the groove on the power supply connector (B).
A B
Turn the nuts until they are locked into each other.
Step 3: Check the satellite signal
Connect the extension cable with the power supply.
1
Note: To avoid performance degradation, always keep the
connectors, accessories, connection part of the charging station
and antenna away from any dirt or mud. Never allow water to get
into the connectors or any parts and connection points.
Poor signal, please relocate the charging station to
an open space (see Step 1).
The GNSS antenna is not connected to the charging
station (see ⑤in Step 2).
Flashing yellow:
19
This manual suits for next models
3
Table of contents
Other Segway Lawn Mower manuals


