Toro Recycler 22191 User manual

FormNo.3358-394RevA
21inHeavy-DutyRecycler®/Rear
BaggerLawnMower
ModelNo.22191—SerialNo.270000001andUp
Registeratwww.Toro.com.OriginalInstructions(EN)

Warning
CALIFORNIA
Proposition65Warning
Theengineexhaustfromthisproduct
containschemicalsknowntotheStateof
Californiatocausecancer,birthdefects,
orotherreproductiveharm.
Important:Thisengineisnotequippedwitha
sparkarrestermufer.ItisaviolationofCalifornia
PublicResourceCodeSection4442touseoroperate
theengineonanyforest-covered,brush-covered,or
grass-coveredland.Otherstatesorfederalareas
mayhavesimilarlaws.
ThissparkignitionsystemcomplieswithCanadian
ICES-002.
Theenclosed
Engine Owner’ s Man ual
issupplied
forinformationregardingtheUSEnvironmental
ProtectionAgency(EPA)andtheCalifornia
EmissionControlRegulationofemissionsystems,
maintenance,andwarranty.Replacementsmaybe
orderedthroughtheenginemanufacturer.
Introduction
Readthisinformationcarefullytolearnhowtooperate
andmaintainyourproductproperlyandtoavoidinjury
andproductdamage.Youareresponsibleforoperating
theproductproperlyandsafely.
YoumaycontactTorodirectlyatwww.Toro.comfor
productandaccessoryinformation,helpndinga
dealer,ortoregisteryourproduct.
Wheneveryouneedservice,genuineToroparts,
oradditionalinformation,contactanAuthorized
ServiceDealerorToroCustomerServiceandhave
themodelandserialnumbersofyourproductready.
Figure1identiesthelocationofthemodelandserial
numbersontheproduct.Writethenumbersinthe
spaceprovided.
Figure1
1.Modelandserialnumberplate
ModelNo.
SerialNo.
Thismanualidentiespotentialhazardsandhas
safetymessagesidentiedbythesafetyalertsymbol
(Figure2),whichsignalsahazardthatmaycauseserious
injuryordeathifyoudonotfollowtherecommended
precautions.
Figure2
1.Safetyalertsymbol
Thismanualuses2wordstohighlightinformation.
Importantcallsattentiontospecialmechanical
informationandNoteemphasizesgeneralinformation
worthyofspecialattention.
Contents
Introduction.................................................................2
Safety...........................................................................3
GeneralLawnMowerSafety.................................3
SafetyandInstructionalDecals.............................6
Setup............................................................................7
1InstallingtheHandle..........................................7
2InstallingtheDischargeTunnelPlug...................8
3FillingtheCrankcasewithOil.............................8
ProductOverview........................................................9
Controls...............................................................9
©2007—TheToro®Company
8111LyndaleAvenueSouth
Bloomington,MN554202
Contactusatwww.Toro.com.
PrintedintheUSA.
AllRightsReserved

Operation.....................................................................9
CheckingtheEngineOilLevel..............................9
FillingtheFuelTankwithGasoline.....................10
StartingtheEngine.............................................11
StoppingtheEngine...........................................12
OperatingtheBladeandtheSelf-Propel
Drive..............................................................12
UsingtheDischargeTunnelPlug........................12
CheckingtheBladeBrakeClutch........................12
AdjustingtheCuttingHeight..............................14
UsingtheGrassBag...........................................15
OperatingTips...................................................16
Maintenance...............................................................18
RecommendedMaintenanceSchedule(s)................18
Lubrication.............................................................18
LubricatingthePivotArms.................................18
LubricatingtheGearCase...................................19
EngineMaintenance...............................................19
ServicingtheAirFilter........................................19
ChangingtheEngineOil....................................19
ChangingtheOilFilter.......................................20
ServicingtheSparkPlug.....................................21
FuelSystemMaintenance.......................................21
EmptyingtheFuelTankandCleaningthe
FuelFilter.......................................................21
DriveSystemMaintenance.....................................22
AdjustingtheSelf-propelDrive...........................22
ControlsSystemMaintenance.................................22
AdjustingtheBladeBrakeCable.........................22
BladeMaintenance.................................................23
MaintainingtheCuttingBlade.............................23
Cleaning.................................................................24
CleaningundertheLawnMowerHousing...........24
CleaningtheDischargeTunneland
Plug................................................................25
CleaningtheBladeBrakeClutchShield...............25
CleaningundertheBeltCover.............................26
Storage.......................................................................26
PreparingtheFuelSystem...................................26
PreparingtheEngine..........................................26
GeneralInformation..........................................26
RemovingtheLawnMowerfromStorage............27
Troubleshooting.........................................................28
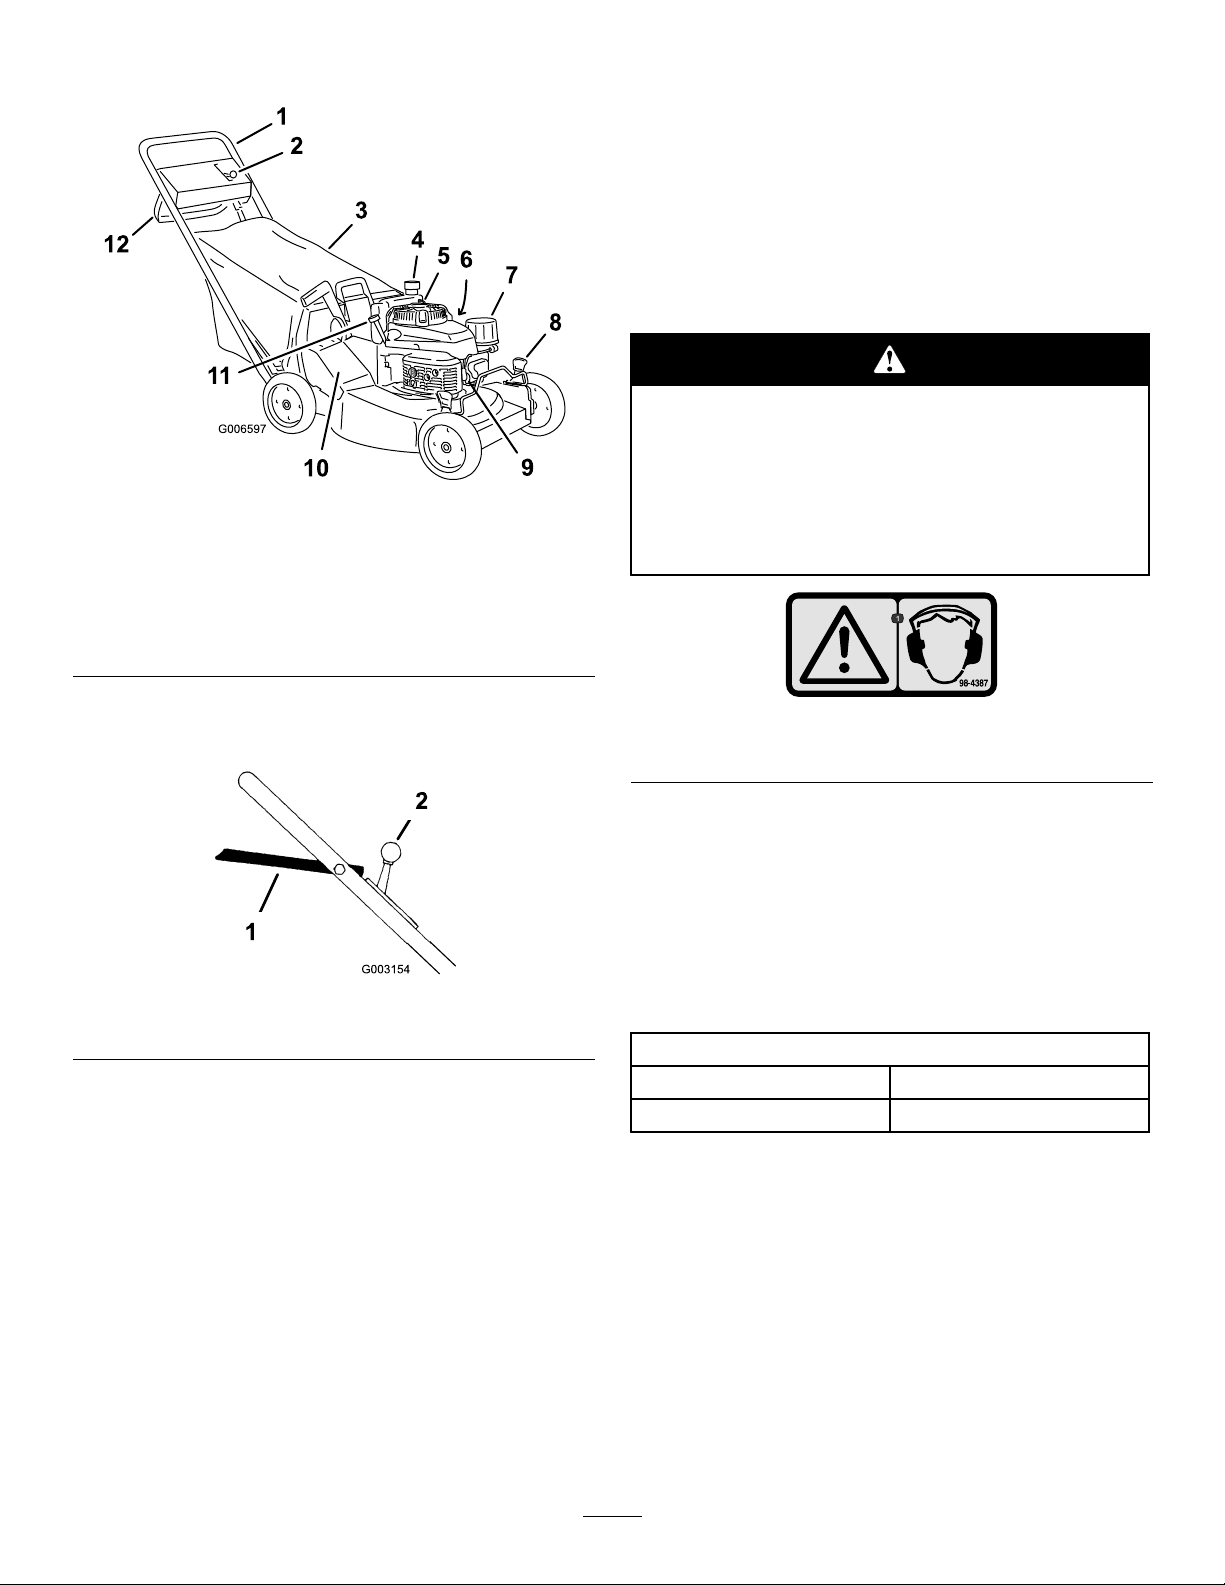
Safety
ThislawnmowermeetsorexceedstheCPSC
bladesafetyrequirementsforwalk-behindrotary
lawnmowersandtheB71.4specicationsofthe
AmericanNationalStandardsInstituteineffectat
thetimeofproduction.
Improperlyusingormaintainingthislawnmower
canresultininjury.Toreducethepotentialfor
injury,complywiththesesafetyinstructions.
Torodesignedandtestedthislawnmowerfortooffer
reasonablysafeservice;however,failuretocomply
withthefollowinginstructionsmayresultin
personalinjury.
Engineexhaustcontainscarbonmonoxide,an
odorless,deadlypoisonthatcankillyou.
Donotruntheengineindoorsorinanenclosed
area.
Toensuremaximumsafety,bestperformance,and
togainknowledgeoftheproduct,itisessentialthat
youandanyotheroperatorofthelawnmowerread
andunderstandthecontentsofthismanualbefore
theengineiseverstarted.Payparticularattention
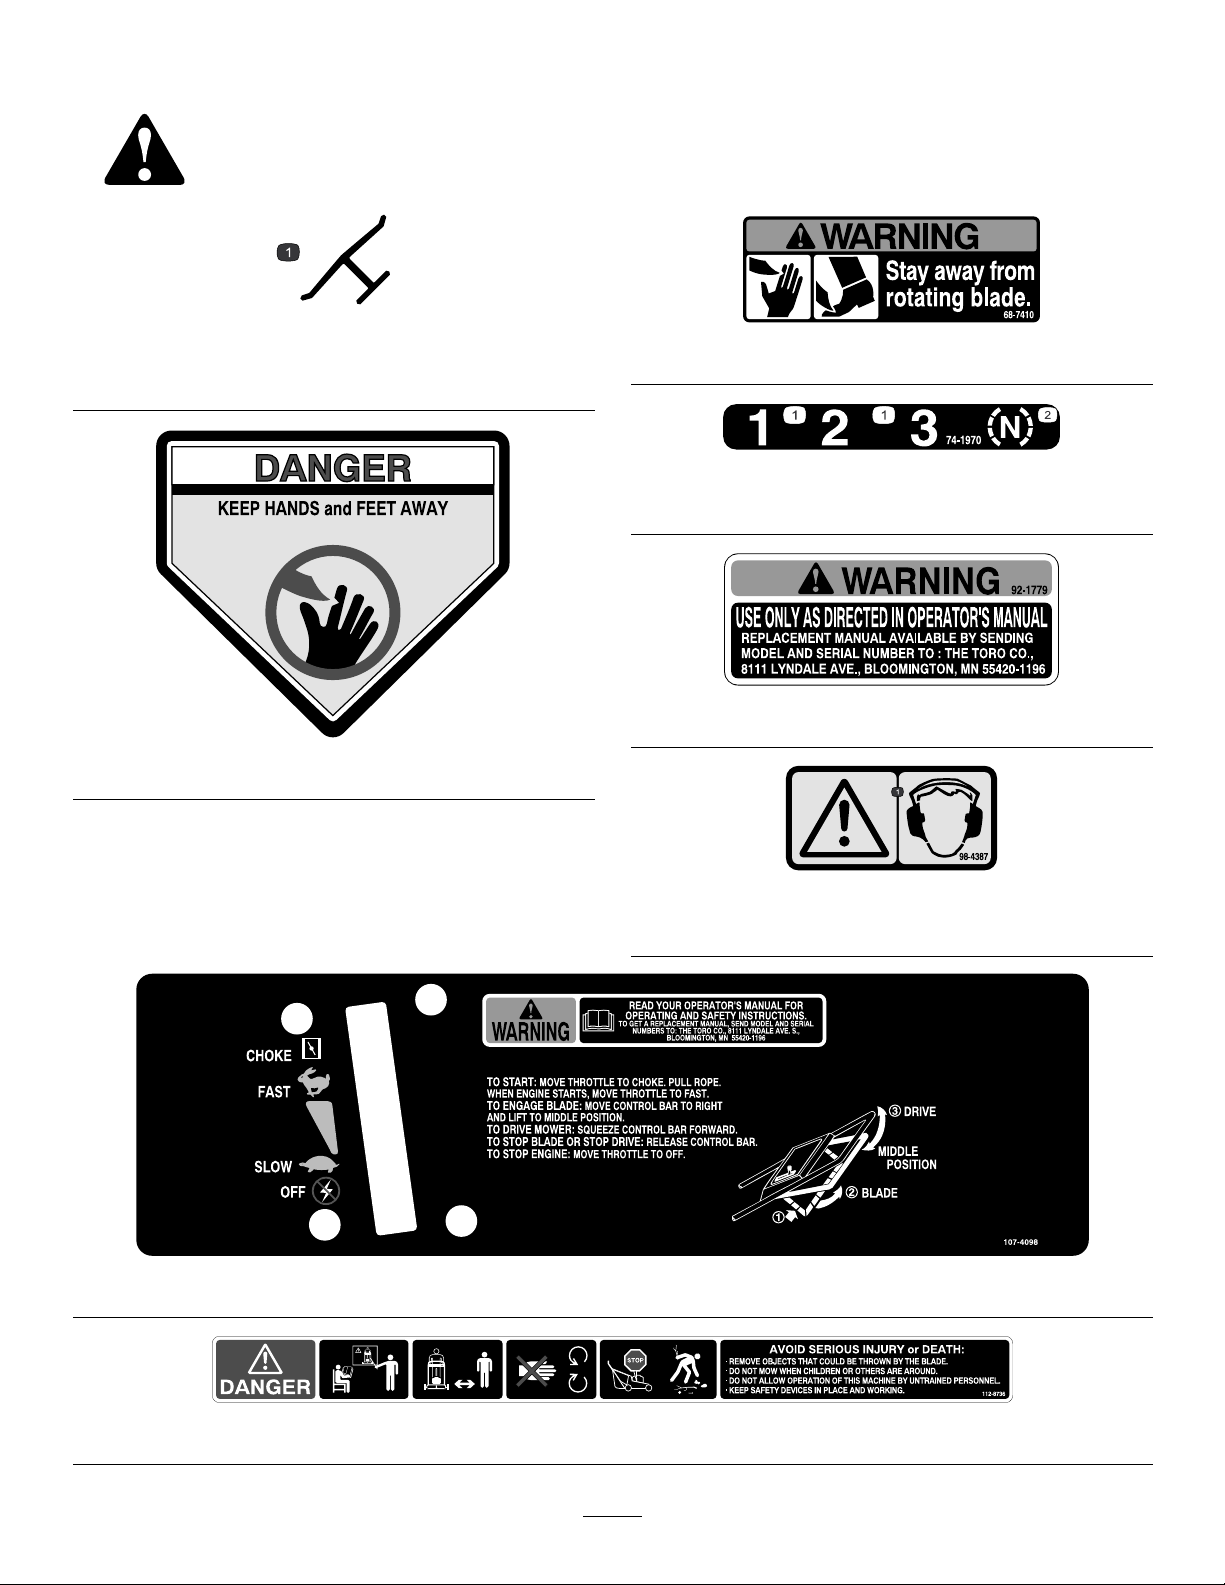
tothesafetyalertsymbol(Figure2)whichmeans
Caution,Warning,orDanger—“personalsafety
instruction.”Readandunderstandtheinstruction
becauseithastodowithsafety.Failuretocomply
withtheinstructionmayresultinpersonalinjury.
GeneralLawnMowerSafety
Thislawnmoweriscapableofamputatinghandsand
feetandofthrowingobjects.Failuretoobservethe
followingsafetyinstructionscouldresultinserious
injuryordeath.
Training
•ReadthisOperator’sManualcarefully.Bethoroughly
familiarwiththecontrolsandtheproperuseofthe
lawnmowerbeforestartingit.
•Neverallowchildrentooperatethelawnmower.
Localregulationsmayrestricttheageoftheoperator.
•Neverallowadultsunfamiliarwiththeseinstructions
tooperatethelawnmower.
•Nevermowwhilepeople(especiallychildren)orpets
arenearby.Stopthelawnmowerifanyoneenters
thearea.
3

•Tragicaccidentscanoccuriftheoperatorisnot
alerttothepresenceofchildren.Childrenareoften
attractedtothelawnmowerandthemowingactivity.
Neverassumethatchildrenwillremainwhereyou
lastsawthem.
•Keepchildrenoutofthemowingareaandunderthe
watchfulcareofaresponsibleadult.
•Bealertandturnthelawnmoweroffifchildren
enterthearea.
•Useextracarewhenapproachingblindcorners,
shrubs,trees,orotherobjectsthatmayobscure
vision.
•Keepinmindthattheoperatororuserisresponsible
foraccidentsorhazardsoccurringtootherpeopleor
theirproperty.
•Seethemanufacturer’sinstructionsforproper
operationandinstallationofaccessories.Use
onlytheaccessoriesthatareapprovedbythe
manufacturer.
Preparation
•Thoroughlyinspecttheareawhereyouwillusethe
lawnmower,andremoveallstones,sticks,wires,
bones,andotherforeignobjects.
•Whilemowing,alwayswearsubstantialfootwearand
longtrousers.
•Donotoperatethelawnmowerwhenbarefootor
wearingopensandals.
•Alwayswearsafetygogglesorsafetyglasseswithside
shieldswhenoperatingthelawnmower.
•Warning:Gasolineishighlyammable.Takethe
followingprecautions:
–Storefuelincontainersspecicallydesignedfor
thispurpose.
–Refueloutdoorsonlyanddonotsmokewhile
refuelling.
–Addfuelbeforestartingtheengine.Never
removethecapofthefueltankoraddgasoline
whiletheengineisrunningorwhentheengine
ishot.
–Ifgasolineisspilled,donotattempttostartthe
engine.Movethelawnmowerawayfromthe
areaofspillagetoavoidcreatinganysourceof
ignitionuntilthegasolinevaporshavedissipated.
–Replaceallfueltankandcontainercapssecurely.
–Ifyoumustdrainthefuelfromthefueltank,do
itoutdoors.
•Replacefaultymufers.
•Beforeusing,alwaysvisuallyinspecttheblades,
bladebolts,andcutterassemblyforwearordamage.
Replacewornordamagedbladesandboltsinsets
topreservebalance.
•Onmultibladedlawnmowers,usecareasrotating
onebladecancausetheotherbladestorotate.
Operation
•Donotoperatetheengineinaconnedspacewhere
dangerouscarbonmonoxidefumescancollect.
•Mowonlyindaylightoringoodarticiallight.
•Alwaysbesureofyourfootingonslopes.
•Walk;neverrun.
•Keeparmholdonthehandle.
•Forwheeledrotarylawnmowers,mowacrossthe
faceofslopes,neverupanddown.
•Exerciseextremecautionwhenchangingthe
directiononslopes.
•Donotmowexcessivelysteepslopes.
•Useextremecautionwhenreversingorpullingthe
lawnmowertowardyou.
•Beforeandwhilemovingbackward,lookbehindand
downforsmallchildren.
•Stoptheblade(s)ifyoumusttiltthelawnmower
fortransportationwhencrossingsurfacesotherthan
grassandwhentransportingthelawnmowertoand
fromtheareatobemowed.
•Neveroperatethelawnmowerwithdamagedor
missingguardsorshields,orwithoutsafetydevices
(suchasdeectorsandgrasscatchers)inplace.
•Donotchangethespeedsettingsontheengine.
•Disengageallbladeanddriveclutchesbeforestarting
theengine.
•Starttheenginecarefullyaccordingtoinstructions
andwithfeetwellawayfromtheblade(s).
•Donottiltthelawnmowerwhenstartingtheengine,
unlessyoumusttiltthelawnmowertostartit.Inthis
case,donottiltitmorethanabsolutelynecessaryand
liftonlythepartwhichisawayfromtheoperator.
•Donotstarttheenginewhenstandinginfrontof
thedischargechute.
•Donotputyourhandsorfeetnearorunderrotating
parts.Keepclearofthedischargeopeningatall
times.
•Neverpickuporcarryalawnmowerwhilethe
engineisrunning.
•Stoptheengineanddisconnectthespark-plugwire:
–beforeclearingblockagesoruncloggingthe
chute;
4

–beforechecking,cleaning,orworkingonthe
lawnmower;
–afterstrikingaforeignobject.Inspectthelawn
mowerfordamageandmakerepairsbefore
startingandoperatingthelawnmower;and
–ifthelawnmowerstartstovibrateabnormally
(checkitimmediately).
•Stoptheengine:
–wheneveryouleavethelawnmower;and
–beforerefuelling.
•Reducethethrottlesettingduringenginerun-out
and,iftheenginehasashutoffvalve,turnthefuel
offaftermowing.
•Stoptheblade(s)whencrossinggraveldrives,walks,
orroads.
•Shuttheengineoffandwaituntilthebladecomesto
acompletestopbeforeremovingthegrasscatcher.
•Donotoperatethelawnmowerwhileunderthe
inuenceofalcoholordrugs.
•Ifthelawnmowershouldstarttovibrateabnormally,
stoptheengineandcheckimmediatelyforthecause.
Vibrationisgenerallyawarningoftrouble.
Slopesareamajorfactorrelatedtoslipandfallaccidents
whichcanresultinasevereinjury.Ifyoufeeluneasy
onaslope,donotmowit.
•Watchforholes,ruts,orbumps.Tallgrasscanhide
obstacles.
•Donotmowneardrop-offs,ditches,or
embankments.Youcouldloseyourfootingor
balance.
•Donotmowonwetgrass.Reducedfootingcould
causeslipping.
MaintenanceandStorage
•Keepallnuts,bolts(especiallybladeattachment
bolts),andscrewstighttoensurethatthelawn
mowerisinsafeworkingcondition.
•Neverstorethelawnmowerwithgasolineinthe
tankinsideabuildingwherefumesmayreachan
openameorspark.
•Allowtheenginetocoolbeforestoringthelawn
mowerinanyenclosure.
•Toreducetherehazard,keeptheengine,mufer,
batterycompartment,andgasolinestorageareafree
ofgrass,leaves,orexcessivegrease.
•Checkthegrasscatcherfrequentlyforwearor
deterioration.
•Replacewornordamagedparts.
•Useextracarewhenhandlinggasoline;gasoline
vaporsareexplosive.
•Nevertamperwithsafetydevices.Checktheir
properoperationregularly.
•Keepthelawnmowerfreeofgrass,leaves,orother
debrisbuildup.Cleanupanyoilorfuelthatspills.
•Stopandinspectthelawnmowerifyoustrikean
object.Repairthelawnmower,ifnecessary,before
startingtheengine.
•Neverattempttomakewheelheightadjustments
whiletheengineisrunning.
•Grasscatchercomponentsaresubjecttowear,
damage,anddeterioration,whichcouldexpose
movingpartsorallowobjectstobethrown.
Frequentlycheckthecomponentsandreplacethem
withthemanufacturer’srecommendedpartswhen
necessary.
•Lawnmowerbladesaresharpandcancut.Wrapthe
blade(s)orweargloves,anduseextracautionwhen
servicingthem.
•Donotchangethespeedsettingsontheengine.
•Ifyoumustdrainthefuelfromthefueltank,doit
outdoors.
•Toensurethebestperformanceandsafety,purchase
onlygenuineTororeplacementpartsandaccessories.
•Maintainorreplacesafetyandinstructiondecals
whennecessary.
5

SafetyandInstructionalDecals
Safetydecalsandinstructionsareeasilyvisibletotheoperatorandarelocatednearanyareaof
potentialdanger.Replaceanydecalthatisdamagedorlost.
Manufacturer’sMark
1.Indicatesthebladeisidentiedasapartfromtheoriginal
machinemanufacturer.
43-8480
68-7410
74-1970
1.Transmissionspeeds2.Neutral
92-1779
98-4387
1.Warning—wearhearingprotection.
107-4098
112-8736
6

Setup
LooseParts
Usethechartbelowtoverifythatallpartshavebeenshipped.
ProcedureDescriptionQty.Use
Handle1
Bolt(5/16x1-1/4inches)2
Washer4
Thinnyloninsertlocknut(5/16inch)2
Bolt(5/16x1-1/2inches)2
Carriagebolt1
Locknut(5/16inch)2
Bagsupportrod1
Bagaligningplate1
Caplocknut3
1
Cabletie3
Installthehandle.
2Dischargetunnelplug1Installthedischargetunnelplug.
3Nopartsrequired–Fillthecrankcasewithoil.
Note:Determinetheleftandrightsidesofthemachine
fromthenormaloperatingposition.
1
InstallingtheHandle
Partsneededforthisprocedure:
1Handle
2Bolt(5/16x1-1/4inches)
4Washer
2Thinnyloninsertlocknut(5/16inch)
2Bolt(5/16x1-1/2inches)
1Carriagebolt
2Locknut(5/16inch)
1Bagsupportrod
1Bagaligningplate
3Caplocknut
3Cabletie
Procedure
1.Mountthehandletotheoutsideofthemower
housing(usingthebottomhole)withtwobolts
(5/16x1-1/4inches),washers,andthinlocknuts
(5/16inch)(Figure3).
Figure3
1.Bagsupportrod8.Thinnyloninsertlocknut
(2)
2.Carriagebolt9.Bottomholeinhousing
3.Bagaligningplate10.Washer(4)
4.Caplocknuts(3)11.Locknut(2)
5.Handle12.Bolt,(5/16x1-1/4inches)
(2)
6.Bolt,(5/16x1-1/2inches)
(2)
13.Cabletie(3)
7.Handlelatch(2)
2.Securethehandlelatchestothehandlewith2bolts
(5/16x1-1/2inches),washers,andlocknuts(5/16
inch)(Figure3).
7

Note:Installthewasherswiththecupsidefacing
thehandle.
Note:Youcanadjustthehandleheightfor
comfortableoperation.Standbehindthehandleto
determinetheheight.Toadjustthehandleheight,
positiontheboltsandthelocknutsthatsecurethe
handlelatchestothehandleintotheothermounting
holesinthelatches.
3.Insertthecarriageboltthroughthebagaligning
plateandthesecondholefromthetopontheleft
sideofthehandle,andsecureitwithacaplocknut
(Figure3).
4.Slidethebagsupportrodthroughthethirdfromthe
topmountingholesinthehandle,andsecureeach
endwithacaplocknut(Figure3).
5.Usecabletiestosecurethecontrolcablestothe
handle(Figure3).
2
InstallingtheDischargeTunnel
Plug
Partsneededforthisprocedure:
1Dischargetunnelplug
Procedure
1.Openthedischargedoorbypullingforwardonthe
handleandmovingitrearward(Figure4).Holdthe
dischargedoorhandletopreventthespring-loaded
doorfromclosingwhileyouinserttheplug.
Figure4
1.Dischargedoorhandle2.Plug,rotatedclockwise
2.Sincetheplugisslightlywiderthanthedischarge
tunnelopening,rotatetheplugclockwiseslightly
whileinsertingit(Figure4).
Note:Ensurethatthearrowontheplugdecal
pointsupward.
3.Pushtheplugallthewayinuntilthespringclipon
thebottomoftheplugclicksintoplace,lockingthe
plugsecurelyintothedischargetunnel(Figure5).
Figure5
1.Springclip
4.Releasethedischargedoorhandletolockthetop
oftheplug.
3
FillingtheCrankcasewithOil
NoPartsRequired
Procedure
Theenginecrankcaseisshippedwithoutoil.You
mustllitwithapproximately22ounces(0.65l)ofoil
beforestartingtheengine.RefertoCheckingtheEngine
OilLevelinOperation,page9foroilspecicationsand
instructions.
8

ProductOverview
Figure6
1.Handle7.Airlter
2.Throttlecontrollever8.Cuttingheightlever(4)
3.Grassbag9.Sparkplug
4.Fueltank10.Dischargetunnel
5.Starterhandle11.Oilll/dipstick
6.Oillter12.Controlbar
Controls
Figure7
1.Controlbar2.Throttlecontrol
Operation
Note:Determinetheleftandrightsidesofthe
machinefromthenormaloperatingposition.
Eachtimebeforeyoumow,makesurethatthe
self-propeldriveandthecontrolbaroperateproperly.
Whenyoureleasethecontrolbar,thebladeand
self-propeldriveshouldstop.Iftheydonot,contactan
AuthorizedServiceDealer.
Thismachineproducessoundlevelsinexcess
of85dBAattheoperator’searandcancause
hearinglossthroughextendedperiodsof
exposure.
Wearhearingprotectionwhenoperatingthis
machine.
Figure8
1.Warning—wearhearingprotection.
CheckingtheEngineOilLevel
ServiceInterval:Beforeeachuseordaily
Initially,llthecrankcasewith30ounces(0.88liters)
ofoil.Useonlyhigh-qualitySAE30orSAE10W30
weightdetergentoilthathastheAmericanPetroleum
Institute(API)serviceclassicationSF,SG,SH,orSJ.
OilCapacity
Withoillter29ounces(0.85liters)
Withoutoillter22ounces(0.65liters)
Beforeeachuse,ensurethattheoillevelisbetweenthe
AddandFullmarksonthedipstick(Figure9).
9

Figure9
1.Dipstick3.Add
2.Full
Note:Whenthecrankcaseisempty,pourabout3/4
ofthecrankcasecapacityofoilinthecrankcase,then
followtheprocedureinthissection.
1.Movethelawnmowertoalevelsurface.
2.Cleanaroundthedipstick(Figure9).
3.Removethedipstickbyrotatingthecap
counterclockwiseandpullingitout.
4.Wipethedipstickcleanwithacleancloth.
5.Insertthedipstickintothellerneck,thenremove
it.
Note:Toensureanaccurateoillevelreading,you
mustfullyinstallthedipstick.
6.Readtheoillevelonthedipstick(Figure9).
7.IftheoillevelreadingisbelowtheAddmarkon
thedipstick,slowlypouronlyenoughoilintothe
llerholetoraisetheoilleveltotheFullmarkon
thedipstick.
Important:Donotoverllthecrankcasewith
oilandruntheengine;enginedamagewill
result.Draintheexcessoiluntiltheoillevelon
thedipstickreadsFull.
8.Insertthedipstickintothellerneckandrotatethe
capclockwiseuntilitistight.
FillingtheFuelTankwith
Gasoline
Forbestresults,useclean,fresh,lead-freegasolinewith
anoctaneratingof87orhigher.Toensurefreshness,
purchaseonlythequantityofgasolinethatyouexpectto
usein30days.Usingunleadedgasolineresultsinfewer
combustiondepositsandlongerenginelife.Youmay
useleadedgasolineifunleadedgasolineisnotavailable.
Important:Donotaddoiltothegasoline.
Important:Donotusemethanol,gasoline
containingmethanol,gasoholcontainingmore
than10%ethanol,premiumgasoline,orwhitegas.
Usingthesefuelscandamagetheengine’sfuel
system.
Important:Donotusegasolinethathasbeen
storedsincethelastmowingseasonorlonger.
Incertainconditions,gasolineisextremely
ammableandhighlyexplosive.Areor
explosionfromgasolinecanburnyouand
othersandcandamageproperty.
•Fillthefueltankoutdoors,inanopenarea,
andwhentheengineiscold.Wipeupany
gasolinethatspills.
•Donotllthefueltankcompletelyfull.Add
gasolinetothefueltankuntilthelevelis1/4
to1/2in.(6to13mm)belowthebottomof
thellerneck.Thisemptyspaceinthetank
allowsthegasolinetoexpand.
•Neversmokewhenhandlinggasoline,and
stayawayfromanopenameorwherea
sparkmayignitethegasolinefumes.
•Storegasolineinanapprovedfuelcontainer
andkeepitoutofthereachofchildren.
•Neverbuymorethana30-daysupplyof
gasoline.
10

Whenfueling,undercertaincircumstances,a
staticchargecandevelop,ignitingthegasoline.
Areorexplosionfromgasolinecanburnyou
andothersanddamageproperty.
•Alwaysplacegasolinecontainersonthe
groundandawayfromyourvehiclebefore
lling.
•Donotllgasolinecontainersinsidea
vehicleoronatruckortrailerbedbecause
interiorcarpetsorplastictruckbedliners
mayinsulatethecontainerandslowtheloss
ofanystaticcharge.
•Whenpractical,removegasoline-powered
equipmentfromthetruckortrailerand
refueltheequipmentwithitswheelsonthe
round.
•Ifthisisnotpossible,thenrefuelsuch
equipmentonatruckortrailerfroma
portablecontainer,notfromagasoline
dispensernozzle.
•Ifyoumustuseagasolinedispensernozzle,
keepthenozzleincontactwiththerimof
thefueltankorcontaineropeningatall
timesuntilfuelingiscomplete.
Useafuelstabilizer/conditionerregularlyduring
operationandstorage.Astabilizer/conditionercleans
theengineduringoperationandpreventsgum-like
varnishdepositsfromformingintheengineduring
periodsofstorage.
Important:Donotusefueladditivesotherthan
afuelstabilizer/conditioner.Donotusefuel
stabilizerswithanalcoholbasesuchasethanol,
methanol,orisopropanol.
1.Cleanaroundthefueltankcap(Figure10).
Figure10
1.Oilll/dipstick3.Aircleaner
2.Fueltankcap
2.Removethecapfromthetank.
3.Fillthefueltankwithunleadedgasolinetowithin
1/4to1/2inch(6to13mm)fromthetopofthe
tank.Donotllintothellerneck.
Important:Donotllthetankmorethan1/4
inch(6mm)fromthetopofthetankbecause
thegasolinemusthaveroomtoexpand.
4.Installthefueltankcapandwipeupanyspilled
gasoline.
StartingtheEngine
1.Connectthewiretothesparkplug(Figure11).
Figure11
1.Throttlecontrollever3.Starterhandle
2.Primer4.Sparkplug
2.MovethethrottlecontroltotheFastposition.
11

3.MovethegroundspeedcontroltotheNeutral(N)
position(Figure12).
Figure12
1.Groundspeedcontrol
4.Pushintheprimeroncewithyourthumb,holding
itinforasecondbeforereleasingit(Figure11).
5.Pullthestarterhandlelightlyuntilyoufeel
resistance,thenpullitsharply.
6.Regulatethethrottleandthegroundspeedcontrol
asdesiredwhentheenginestarts.
Note:Iftheenginefailstostartafter3pulls,repeat
steps2through6.
StoppingtheEngine
1.Releasethecontrolbarandmovethethrottle
controltotheOffposition.
2.Disconnectthewirefromthesparkplugifyoudo
notusethelawnmowerorifyouleaveitunattended.
OperatingtheBladeandthe
Self-PropelDrive
1.HavethecontrolbarintheAposition(Figure13).
Figure13
2.Slidethecontrolbartotherightandraiseittothe
Bpositiontoengagetheblade(Figure13).
3.SqueezethecontrolbaragainstthehandletotheC
positiontodrive(Figure13).
Note:Todisengagethetractiondrivebutkeepthe
bladeengaged,graduallyreleasethecontrolbartothe
Bposition.Toself-propelwiththebladedisengaged,
squeezethecontrolbaragainsthandletotheCposition
withoutslidingthecontrolbartotheright.
Thelawnmowerhas3groundspeeds.1isslow ,2is
medium,and3isfast.Thegroundspeedcontrolis
locatedattherearofthebeltcover(Figure12).
Note:Youcanvarythegroundspeedbyincreasingor
decreasingthedistancebetweenthecontrolbarandthe
handle.Lowerthecontrolbartoslowthelawnmower
whenmakingaturnorifthelawnmowerismovingtoo
fastforyou.Ifyoulowerthecontrolbartoofar,the
lawnmowerstopsself-propelling.Squeezethecontrol
barclosertothehandletoincreasethegroundspeed.
Whenyouholdthecontrolbartightagainstthehandle,
thelawnmowerself-propelsatthemaximumground
speed.MovethegroundspeedcontroltotheNeutral
positionwhenyouusethelawnmowerfortrimming
andwheneveryouleavethelawnmower.
UsingtheDischargeTunnel
Plug
1.Stoptheengineandwaitforallmovingpartsto
stop.
2.Inserttheplug;refertoInstallingtheDischarge
TunnelPlug.
3.Toremovetheplug,movethedischargedoor
handlerearwardandliftupthespringcliponthe
bottomoftheplug.Whentheplugisunlocked,pull
itoutofthedischargetunnel.
Note:Whengrassisthickandlush,clippingsmay
collectonandaroundthedischargetunnelplug.
Thismaymakeremovingtheplugdifcult.Clean
theplugthoroughlyaftereachuse.
CheckingtheBladeBrake
Clutch
Checkthecontrolbarbeforeeachusetoensurethat
thebladebrakeclutchsystemisoperatingproperly.
NormalTest
ServiceInterval:Beforeeachuseordaily
1.Stoptheengineandwaitforallmovingpartsto
stop.
2.Movethelawnmowerontoapavedsurfaceina
non-windyarea.
3.Setall4wheelsintothe2-1/2inches(64mm)
cuttingheightsetting(Figure19).
12

4.SetthegroundspeedselectortotheNeutral(N)
position.
5.Takeahalfsheetofnewspaperandcrumpleitinto
aballsmallenoughtogounderthedeck(about3
inchesor76mmindiameter)asshowninFigure14.
Figure14
1.5inches(12.7cm)
6.Placetheballofnewspaper5inches(12.7cm)in
frontofthelawnmower(Figure14).
7.Starttheengine.
8.Movethecontrolbardowntoitslowestposition
(Figure15).
Figure15
9.Liftthecontrolbaruptoaboutoneinch(2.5cm)
belowthehandle;refertopositionAinFigure16.
Note:Thefan-likenoiseindicatesthatthelawn
mowerbladeisturning.
Figure16
1.1inch(2.5cm)
10.Releasethecontrolbar;refertopositionBin
Figure17.Youshouldheara“bang.”Theblade
shouldstopin3seconds.
Figure17
11.Immediatelypushthelawnmoweroverthe
newspaperball.
12.Stoptheengineandwaitforallmovingpartsto
stop.
13.Walkaroundthelawnmowertocheckforthe
newspaperball.Iftheballdidnotgounderthe
deck,repeatsteps6through12.
14.Pullthelawnmowerawayfromthenewspaper.
Ifthenewspaperballunravelsorisshredded,the
bladehasnotproperlystopped,resultinginan
unsafeoperatingcondition.ContactanAuthorized
ServiceDealer.
Tocheckforaproblemwiththebladebrakeclutch
systembeforeitaffectsitsnormaloperation,youcan
performtheSpecialTestthatfollows.
SpecialTest
1.Followsteps1through7fromtheNormalTest.
2.Movethecontrolbardowntoitslowestposition
(PositionBinFigure17).
3.Bringthecontrolbarupintothemiddleposition
about5inches(12.7cm)belowthehandlecrossbar
(PositionCinFigure18).
13

Figure18
Note:Thisintermediateposition(C)isnotthe
normaloperatingpositionofthecontrolbar.
However,ithelpstodetectastickingbladebrake
clutchsystemearlyenoughtopreventanunsafe
conditionlater.
4.Releasethecontrolbar(PositionBinFigure18).
Note:Ifyouhearaloud“bang,”youhaveraised
thecontrolbartoohigh.Repeatsteps2through
4above,butdonotraisethecontrolbarashigh
asinstep3.
5.Immediatelypushthelawnmoweroverthe
newspaperball.
6.Stoptheengineandwaitforallmovingpartsto
stop.
7.Walkaroundthelawnmowertocheckforthe
newspaperball.Iftheballdidnotgounderthe
deck:
A.Placetheballofnewspaper5inches(12.7cm)
infrontofthelawnmower(Figure14).
B.Starttheengine.
C.Followsteps2through6above.
8.Pullthelawnmowerawayfromthenewspaper.
Ifthenewspaperballunravelsorisshredded,
thebladebrakeclutchsystemsystemcouldbe
deterioratingtothepointwhereitcouldresultinan
unsafeoperatingcondition.ContactanAuthorized
ServiceDealerforaninspectionandrepairofyour
lawnmower.
Ifthebladebrakeclutchsystemisinoperative,
thebladewillcontinuetorotatewhenyou
releasethecontrolbar.Contactwithblade
couldoccur,causingseriousinjury.
•Checkthebladebrakeclutchsystem
operationbeforeeachuse.
•Neverusealawnmowerequippedwitha
bladebrakeclutchthathasaninoperative
safetysystem.
•TakeyourlawnmowertoanAuthorized
ServiceDealerforrepairifthesafetysystem
failstooperateproperly.
TestUsingtheGrassBag
Youcanusethegrassbagtoperformanadditionaltest
tocheckthebladebrakeclutchmechanism:
1.Installtheemptygrassbagonthedischargetunnel.
2.Starttheengine.
3.Pushthecontrolbardowntoitslowestposition.
4.Liftthecontrolbartothenormalbladeengaged
positionaboutoneinch(2.5cm)belowthehandle.
Thebagshouldbegintoinate,indicatingthatthe
bladeisengagedandrotating.
5.Releasethecontrolbar.Ifthebagdoesnot
immediatelydeate,itindicatesthattheblade
isstillrotating.Thebladebrakeclutchmaybe
deteriorating,and,ifignored,couldresultinan
unsafeoperatingcondition.Havethelawnmower
inspectedandservicedbyanAuthorizedService
Dealer.
AdjustingtheCuttingHeight
Eachwheelisadjustedindividuallywithawheelheight
adjustmentlever.Cuttingheightsare3/4inch(19mm),
1-1/4inches(32mm),1-3/4inches(44mm),2-1/4
inches(57mm),2-3/4inches(70mm),and3-1/4
inches(83mm).
14

Adjustingthecuttingheightleverscouldbring
yourhandsintocontactwithamovingblade
andresultinseriousinjury.
•Stoptheengineandwaitforallmovement
tostopbeforeadjustingthecuttingheight.
•Donotputyourngersunderthehousing
whenadjustingthecuttingheight.
1.Pullthewheelheightadjustmentlevertowardthe
wheel(Figure19)andmoveittothedesiredsetting.
Figure19
1.Wheelheightadjustmentlever
2.Releasethewheelheightadjustmentleverandseat
itsecurelyinthenotch.
3.Adjustallthewheelstothesamecuttingheight
setting.
UsingtheGrassBag
Occasionally,youmaywishtousethegrassbagfor
baggingextralonggrass,lushgrass,orleaves.
InstallingtheGrassBag
1.Stoptheengineandwaitforallmovingpartsto
stop.
2.Ensurethatthedischargedoorhandleisfully
forwardandthatthepinisengagedinthecatch
(Figure20).
Figure20
1.Bagframeonretaining
post
3.Handlefullyforward;
dischargedoorclosed
2.Pinengagedincatch
3.Slidetheholeinthebagframeontotheretaining
postonthedischargetunnel(Figure20).
4.Settherearofthebagframeontothebagsupport
rod.
5.Pullthedischargedoorhandleforwarduntilthepin
clearsthecatch,andmovethehandlerearwarduntil
thepinlocksinthebagnotch(Figure21).
Figure21
1.Pinlockedinbagnotch
Note:Thedischargedoorinthelawnmower
housingisnowopen.
15

MowingwiththeGrassBag
Aworngrassbagcouldallowsmallstones
andothersimilardebristobethrowninthe
operator’sorbystander’sdirectionandresultin
seriouspersonalinjuryordeathtotheoperator
orbystanders.
Checkthegrassbagfrequently.Ifitis
damaged,installanewTororeplacementbag.
RemovingtheGrassBag
1.Stoptheengineandwaitforallmovingpartsto
stop.
2.Raisethedischargedoorhandleandmoveitforward
toengagethepinwiththecatch(Figure20).
3.Graspthehandlesatthefrontandtherearofthe
bagandliftthebagoffthelawnmower.
4.Graduallytipthebagforwardtoemptytheclippings.
5.Toinstallthebag,refertoInstallingtheGrassBag.
Ifthedischargedoordoesnotclosecompletely,
thelawnmowercouldthrowobjects,causing
seriouspersonalinjuryordeath.
Ifyoucannotclosethedoorbecausethegrass
clippingsclogthedischargearea,stopthe
engineandgentlymovethedischargedoor
handlebackandforthuntilyoucanclosethe
doorcompletely.Ifyoustillcannotclosethe
door,removetheobstructionwithastick,not
yourhand.
Thelawnmowercanthrowgrassclippingsand
otherobjectsthroughanopendischargetunnel.
Objectsthrownwithenoughforcecouldcause
seriouspersonalinjuryordeathtotheoperator
orbystander.
Neveropenthedooronthedischargetunnel
whentheengineisrunning.
OperatingTips
GeneralTips
•Reviewthesafetyinstructionsandreadthismanual
carefullybeforeoperatingthelawnmower.
•Cleartheareaofsticks,stones,wire,branches,and
otherdebristhatthebladecouldhitandthrow.
•Keepeveryone,especiallychildrenandpets,away
fromtheareaofoperation.
•Avoidstrikingtrees,walls,curbs,orothersolid
objects.Neverdeliberatelymowoveranyobject.
•Ifthelawnmowerstrikesanobjectorstartsto
vibrate,immediatelystoptheengine,disconnectthe
wirefromthesparkplug,andexaminethelawn
mowerfordamage.
•Maintainasharpbladethroughoutthecutting
season.Periodicallyledownnicksontheblade.
•Replacethebladewhennecessarywithanoriginal
Tororeplacementblade.
•Mowonlydrygrassorleaves.Wetgrassandleaves
tendtoclumpontheyardandcancausethelawn
mowertoplugortheenginetostall.
Wetgrassorleavescancauseseriousinjuryif
youslipandcontacttheblade.
Mowonlyindryconditions.
•Cleantheundersideofthelawnmowerdeckafter
eachmowing.SeeCleaningtheUndersideofthe
LawnMowerHousing.
•Keeptheengineingoodrunningcondition.
•Settheenginespeedtothefastestpositionforthe
bestcuttingresults.
16

Operatingalawnmowerwithitsengine
runningataspeedgreaterthanthefactory
settingcancausethelawnmowertothrowa
partofthebladeorengineintotheoperator’sor
bystander’sareaandresultinseriouspersonal
injuryordeath.
–Donotchangetheenginespeedsetting.
–Ifyoususpecttheenginespeedisfaster
thannormal,contactanAuthorizedService
Dealer.
•Cleantheairlterfrequently.Mulchingstirsup
moreclippingsanddustwhichclogstheairlter
andreducesengineperformance.
CuttingGrass
•Grassgrowsatdifferentratesatdifferenttimesof
theyear.Inthesummerheat,itisbesttocutgrass
atthe2-1/4inch(57mm),2-3/4inch(70mm),or
3-1/4inch(83mm)cuttingheightsettings.Cut
onlyaboutathirdofthegrassbladeatatime.Do
notcutbelowthe2-1/4inch(57mm)settingunless
thegrassissparseoritislatefallwhengrassgrowth
beginstoslowdown.
•Whencuttinggrassover6inches(15cm)tall,rst
mowatthehighestcuttingheightsettingandwalk
slower;thenmowagainatalowersettingforthe
bestlawnappearance.Ifthegrassistoolongand
theleavesclumpontopofthelawn,thelawn
mowermayplugandcausetheenginetostall.
•Alternatethemowingdirection.Thishelpsdisperse
theclippingsoverthelawnforevenfertilization.
Ifthenishedlawnappearanceisunsatisfactory,try
oneormoreofthefollowing:
•Sharpentheblade.
•Walkataslowerpacewhilemowing.
•Raisethecuttingheightonyourlawnmower.
•Cutthegrassmorefrequently.
•Overlapcuttingswathsinsteadofcuttingafull
swathwitheachpass.
•Setthecuttingheightonthefrontwheelsone
notchlowerthantherearwheels.Forexample,set
thefrontwheelsat2inches(51mm)andtherear
wheelsat2-1/2inches(64mm).
CuttingLeaves
•Aftercuttingthelawn,ensurethathalfofthelawn
showsthroughthecutleafcover.Youmayneedto
makemorethanonepassovertheleaves.
•Forlightleafcoverage,setallthewheelsatthesame
cuttingheightsetting.
•Iftherearemorethan5inches(12.7cm)ofleaves
onthelawn,setthefrontcuttingheight1or2
notcheshigherthantherearcuttingheight.This
makesiteasiertofeedtheleavesunderthelawn
mowerdeck.
•Slowdownyourmowingspeedifthelawnmower
doesnotcuttheleavesnelyenough.
•Ifyoumowoveroakleaves,youcanaddlimeto
thegrassinthespringtoreducetheacidityofthe
oakleaves.
17

Maintenance
Note:Determinetheleftandrightsidesofthemachinefromthenormaloperatingposition.
RecommendedMaintenanceSchedule(s)
MaintenanceService
IntervalMaintenanceProcedure
Aftertherst8hours•Changetheengineoilwithouttheoillter.
Beforeeachuseordaily
•Checktheengineoillevel.
•Checktheoperationofthebladebrakeclutch.
•Inspectthemowerbladesforwearordamage.
•Cleanunderthelawnmowerhousing.
•Cleanthedischargetunnelandplug.
Every25hours•Cleanthefoampre-cleaner(morefrequentlyindustyconditions).
Every50hours
•Lubricatethepivotarms.
•Changetheengineoil(moreoftenindustyconditions).
•Checkthefuelhoseandreplaceitifnecessary.
•Cleanthebladebrakeclutchshield.
Every100hours
•Lubricatethegearcase.
•Cleantheaircoolingns.
•Changetheengineoilandoillter.
•Checkthesparkplug.
•Cleanthefuellter.
•Adjusttheself-propeldrive.
•Adjustthebladebrakecable.
•Cleanunderthebeltcover.
Every300hours•Replacethepaperairlter(morefrequentlyindustyconditions).
Yearlyorbeforestorage•Emptythefueltank.
Important:Refertoyour
Engine Operator’ s Man ual
foradditionalmaintenanceprocedures.
Ifyouleavethewireonthesparkplug,someonecouldaccidentlystarttheengineandseriouslyinjure
youorotherbystanders.
Disconnectthewirefromthesparkplugbeforeyoudoanymaintenance.Setthewireasidesothatit
doesnotaccidentlycontactthesparkplug.
Lubrication
LubricatingthePivotArms
ServiceInterval:Every50hours
1.Movetherearwheelcuttingheightleverstothe
centersetting.
2.Wipethegreasettingswithacleanrag(Figure22).
18

Figure22
1.Greasetting
3.Installagreasegunontothettingandgentlyapply2
or3pumpsof#2multi-purposelithium-basegrease.
Important:Excessivegreasepressuremay
damagetheseals.
LubricatingtheGearCase
ServiceInterval:Every100hours
1.Removethegrassbag.
2.Installagreasegunontothettingthroughthebelt
coveropening(Figure23).
Figure23
1.Beltcover2.Greasetting
3.Gentlyapplyoneto2pumpsof#2multi-purpose
lithium-basegrease.
4.Installthegrassbag.
EngineMaintenance
ServicingtheAirFilter
ServiceInterval:Every25hours—Cleanthefoam
pre-cleaner(morefrequentlyindusty
conditions).
Every300hours—Replacethepaper
airlter(morefrequentlyindusty
conditions).
Important:Donotoperatetheenginewithoutthe
airlterassembly;extremeenginedamagewill
occur.
1.Stoptheengineandwaitforallmovingpartstostop.
2.Disconnectthewirefromthesparkplug(Figure10).
3.Removethecoverandcleanitthoroughly(Figure24).
Figure24
1.Cover3.Airlterbase
2.Paperairlter
4.Removeandinspectthepaperairlter(Figure24),
anddiscarditifitisexcessivelydirty.
Important:Donottrytocleanapaperlter.
5.Removethefoampre-cleanerandwashitwithamild
detergentandwater,thenblotitdry(Figure24).
6.Installthefoampre-cleanerontothepaperairlter.
7.Installtheairlterassembly.
Note:Installanewpaperairlterifyoudiscarded
theoldone.
8.Installthecover.
ChangingtheEngineOil
ServiceInterval:Aftertherst8hours—Changethe
engineoilwithouttheoillter.
19

Every50hours—Changetheengine
oil(moreoftenindustyconditions).
1.Runtheenginetowarmtheengineoil.
Note:Warmoilowsbetterandcarriesmore
contaminants.
Oilmaybehotafterenginehasbeenrun,and
contactwithhotoilcancauseseverepersonal
injury.
Avoidcontactingthehotengineoilwhenyou
drainit.
2.Stoptheengineandwaitforallmovingpartstostop.
3.Disconnectthewirefromthesparkplug(Figure10).
4.Placeasuitabledrainpanundertherightsideofthe
lawnmower.
5.Removethedipstickbyrotatingthecap
counterclockwiseandpullingitout.
6.Raisetheleftsideofthelawnmowertodraintheoil
intothedrainpan.
Note:Youcanalsoremovetheoilfromthe
crankcaseusinganoilextractor.
7.Lowertheleftsideofthelawnmower.
8.Insertthedipstickintothellerneckandrotatethe
capclockwiseuntilitistight.
9.Recycletheusedoilaccordingtolocalcodes.
10.FillthecrankcasetotheFulllineonthedipstickwith
freshoil.RefertotheFillingtheCrankcasewithOil.
11.Wipeupanyspilledoil.
ChangingtheOilFilter
ServiceInterval:Every100hours—Changetheengine
oilandoillter.
Replacetheoillter(Figure25)afterevery100operating
hoursoryearly,whichevercomesrst.
Figure25
1.Oillter
1.Runtheenginetowarmtheoil.
Oilmaybehotaftertheenginehasbeenrun,
andcontactwithhotoilcancausesevere
personalinjury.
Avoidcontactingthehotengineoilwhenyou
drainit.
2.Stoptheengineandwaitforallmovingpartstostop.
3.Disconnectthewirefromthesparkplug(Figure10).
4.Draintheengineoil;refertoChangingtheEngine
Oil.
5.Placearagundertheoilltertocatchanyoilthat
mayleakoutasyouremovethelter.
6.Removetheoillter.
7.Useyourngertocoatthegasketonthenewlter
withoil(Figure26).
Figure26
1.Gasket
8.Installthenewlterandhandtightenit2/3turn
only.
20
Table of contents
Other Toro Lawn Mower manuals

Toro
Toro 03170 User manual

Toro
Toro 20899 User manual

Toro
Toro TimeCutter ZS 3200 User manual

Toro
Toro TimeCutter ZS 3200S User manual

Toro
Toro 74398 User manual

Toro
Toro Recycler 145-1538 User manual

Toro
Toro 30074 User manual

Toro
Toro Greensmaster 3250-D User manual

Toro
Toro Reelmaster 7000-D User manual

Toro
Toro Groundsmaster 228-D User manual

Toro
Toro TimeCutter Z5040 User manual

Toro
Toro GrandStand Series User manual

Toro
Toro Groundsmaster 4000 Series User manual

Toro
Toro 74448 User manual

Toro
Toro 29730 User manual

Toro
Toro 31223 User manual

Toro
Toro Recycler 20655 User manual

Toro
Toro Super Recycler 20383 User manual

Toro
Toro 4540 User manual

Toro
Toro 74410 User manual