MODE
PITCH
NOTE
KEY
MODE
PITCH
NOTE
KEY
MODE
PITCH
NOTE
KEY
MODE
PITCH
NOTE
KEY
that given by the instrument.
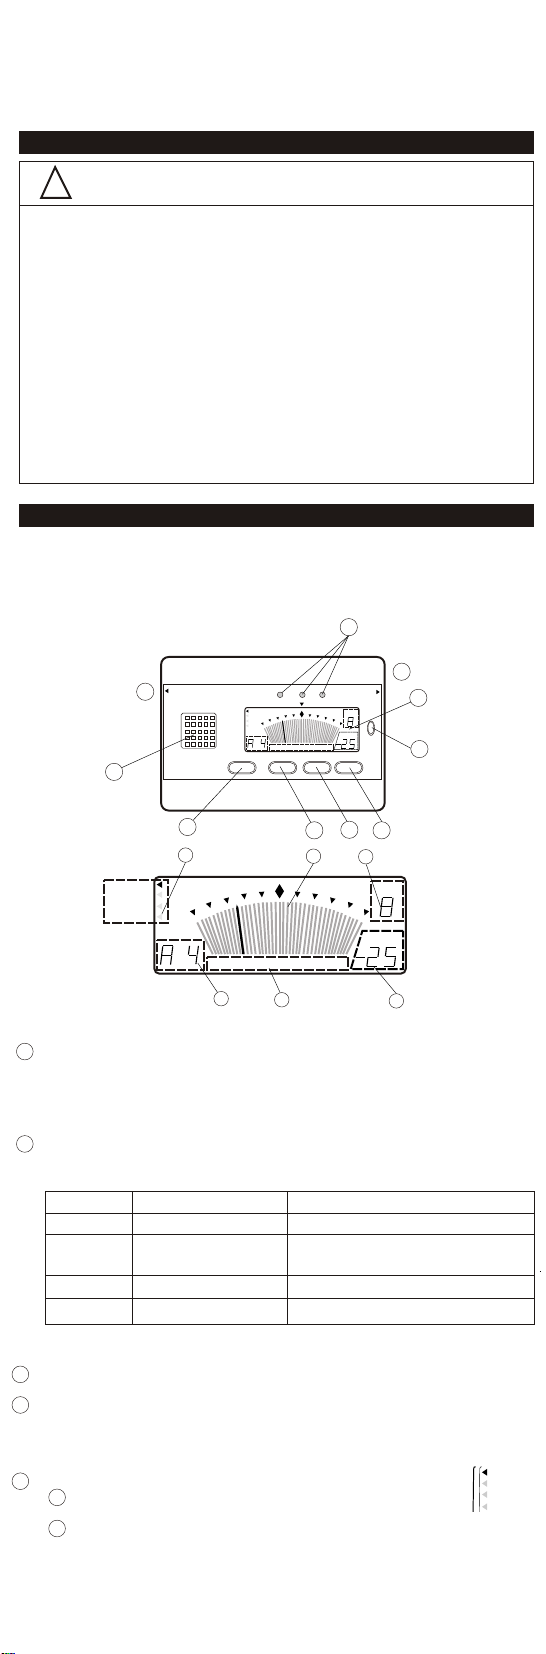
c Tuning mode indication
SEIKO CHROMATIC TUNER SAT500 The tuning mode currently selected is shown.
INSTRUCTION MANUAL d Cent/reference pitch indication
The difference in pitch between the note indicated on the display and the one
given by the instrument is shown numerically. While the pitch setting is made,
the current reference pitch is shown.
e Note Indication
! CAUTION
AUTO mode: The tuner automatically identifies and indicates the note given
by the instrument.
Do not disassemble, attempt to repair or tamper with the tuner as it may cause MANUAL and SOUND modes: The note you have set is indicated.
a short circuit.
Do not operate the buttons with wet hands as it could result in a short circuit or f Key Indication
electric shock. The current key setting is shown.
Do not expose the batteries to fire. They may explode, generate an intense
heat or catch fire. 5 Tuning guide
Install the batteries, checking that the (+) and (-) terminals are properly aligned. As a guide in tuning, it visually shows the difference in pitch between the note
Otherwise, a malfunction may result. indicated on the display and the one given by the instrument by means of the LED
Do not use or keep the tuner in the following places: lights.
Places where the tuner is exposed to extremely high temperatures
such as direct sunlight, near or on a heating unit. When the pitch of the input note is lower than that of the indicated note, the "b"
Humid places such as bathroom, sink or wet floor LED lights up.
Dusty places. When the pitch of the input note is higher than that of the indicated note, the “#”
Places where the tuner is subjected to strong vibrations. LED lights up.
If the tuner is left unused for along time, remove the batteries. Otherwise, When the instrument is in tune, the LED at the center lights up in green.
battery leakage may occur, causing, a malfunction.
Do not use thinner or alcohol to clean the tuner as it may result in damage. 7 Input jack
When tuning an electric/electronic instrument, connect the output cord of the
instrument to the input jack (7). While the cord is connected to the input jack (7), the
built-in microphone 9 will not work.
Before use, install the batteries included with the tuner, following the instructions in 8 Output jack
"BATTERY CHANGE". Bypass function
NOTE: The batteries included with the tuner are monitor batteries, and the The tuner outputs the signal input from the instrument connected with the input
battery life may be shorter than the specified period. jack 7 to an amplifier and other devices through the output jack 8.
Precautions on using the bypass function
1. Before connecting an amplifier to the output jack 8, be sure to set its
volume control to the lowest level, and turn it off, to prevent any
malfunction of the tuner and the amplifier. After checking that both the
tuner and amplifier are turned off, properly connect the amplifier to the
output jack 8 of the tuner.
2. Turn on the tuner first, and then turn on the amplifier.
3. Even if the volume control is set at the lowest level, noise may be heard
when they are turned on. This is not a malfunction.
9 Built-in microphone
Use it to tune acoustic instruments.
Precautions on using the microphone:
When tuning, bring the instrument as close as possible to the microphone.
Make sure that no cord is connected to the output jack7
10 Built-in speaker
In SOUND mode, it gives out the reference note you have selected.
11Slit stand
Insert a card or coin into the slit on the rear of the tuner to prop it up.
Caution:
Do not forcibly insert a card or coin that will not fit into the slit, as this may
cause damage to the tuner or injuries. Also, note that the card or coin used to
prop up the tuner may get scratched or damaged accidentally.
12 Strap hole
Use the hole to attach a strap to the tuner.
1 Power button Caution:
With each press, the tuner is turned on and off alternately. Do not apply undue force to the tuner by swinging it with the strap or pulling the strap
Auto power-off function forcibly, as this may cause damage to the tuner or injuries.
If no button operation is made or no sound is input into the tuner for
approximately 20 minutes while the tuner is turned on, it will be turned off
automatically to save the battery energy.
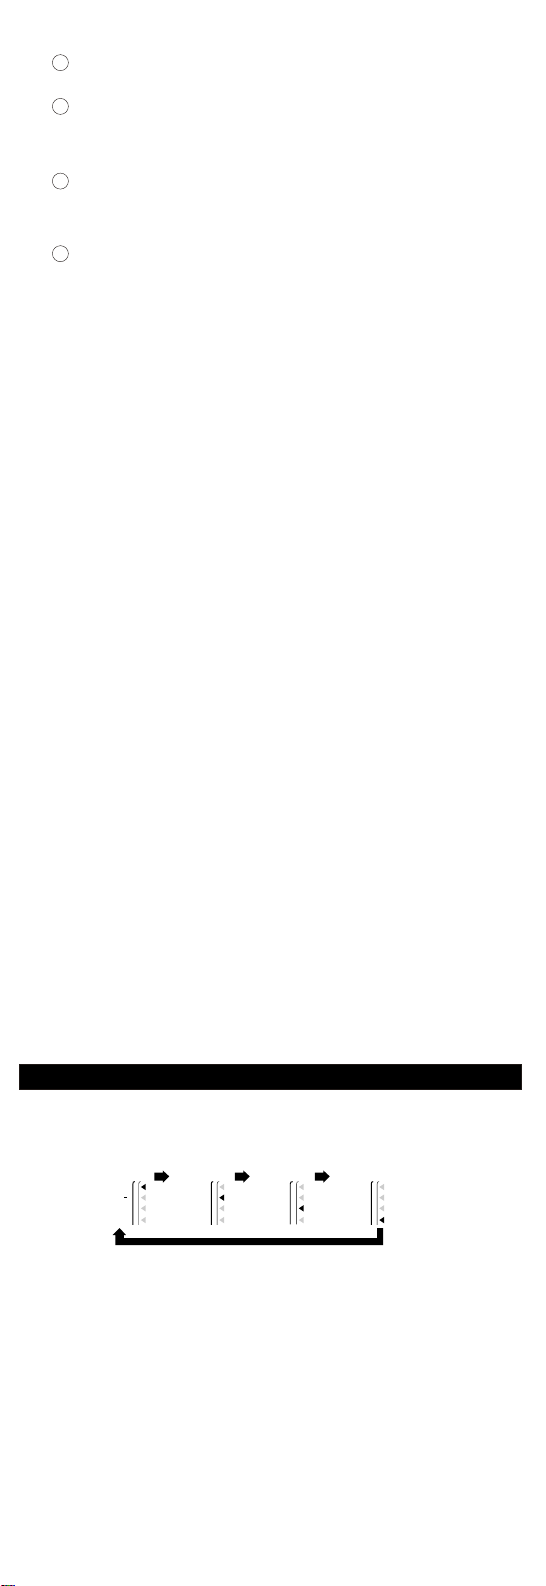
2 Selector button Press the selector 2, UP 3 and DOWN 4 buttons to set the tuner as desired.
Use the button to select the item of tuner setting. With each press, the setting item is
selected in order. Selection of the setting item:
With each press of the selector button 2, the setting item is selected in the following
Printed mark Setting Item Description order
Mode Mode setting To set the tuning mode.
Pitch Reference pitch setting To set the frequency of the reference
pitch (A4).
NOTE Note setting To set the note you wish to tune.
Key Key setting To transpose the key. Setting of items:
Press UP3 or DOWN 4 button to set the selected setting item.
* For details, see "TUNER SETTING'. The two buttons change the setting of the selected item in the opposite order. In
setting the reference pitch, UP 3 and DOWN 4 buttons increases and decreases the
3 UP button pitch' value, respectively. In setting the reference pitch, note, and key, the settings
change continuously by keeping the respective buttons pressed.
4 DOWN button
Use the buttons to change the settings of the item selected by pressing the selector Flashing of the indication and registration of the setting:
button 2. The two buttons change the setting of the selected item in the opposite The flashing indication shows that the setting procedure is still in process. By
order. For details, see "TUNER SETTING". pressing the selector button 2 to select another setting item, the current setting is
registered. If the tuner is left untouched with the indication flashing, the flashing
5 Liquid crystal display stops, and the setting is automatically registered in a certain period of time.
a Setting item indication
The pointer " " indicates the item currently selected. Mode setting
b Tuning meter Select the tuning mode
It shows the difference in pitch between the note indicated on the display and
FOR SAFE OPERATION
PARTS OF YOUR TUNER AND THEIR OPERATION
TUNER SETTING
ec
MODE
PITCH
NOTE
KEY
-0
5
#
AUTO SOUNDMANUAL
+50
b
bf
d
POWER
CENT
a
KEY
4
CENT
MODE
PITCH
NOTE
KEY
50
-
#
AUTO SOUNDMANUAL
KEY
+50
SEIKO
OUTPUT
SAT 500
CHROMATIC TUNER
10
12
10
3
POWER
SEIKO
SELECT UPDOWN
INPUT
6
7
9
5
b#
MODE
PITCH
NOTE
KEY