Seima SCV-SD1200-1 User manual
seima.com.au
Important!
Use acetic cured silicone sealant. Do not use epoxy type adhesives.
razor slider duo 1200 SCV-SD1200-1
ceramic top vanity wall mount or recessed kicker
1200W x 460D x 520H mm
White high gloss vanity with ceramic top
Osleek one-piece ceramic benchtop
Osmooth clean lines, no handles
Onon-porous painted white high gloss cabinet
Odurable finishes — easy to clean
Owall mount or recessed kicker options
Opremium soft-close drawer runners
Ogenerous storage space
Oallows flexible plumbing
configuration Cabinet with one drawer, one-piece ceramic top
product code OSCV-SD1200-1 1 taphole
Kickers that fit:
OSCV-SLKICK-43-31 430W x 310H x 250D mm
OSCV-SLKICK-60-31 565W x 310H x 250D mm
O
SCV-SLKICK-75-31 715W x 310H x 250D mm
OSCV-SLKICK-90-31 865W x 310H x 250D mm
kicker option Kicker requires assembly.
waste/overflow Suits standard 40 mm waste with overflow
(not supplied)
installation Refer to installation instructions provided.
Use acetic cured silicone sealant. Do not use epoxy
type adhesives.
dimensions All dimensions are nominal and subject to normal
ceramic manufacturing variations of ±5mm.
Specifications may vary without notice as part of our
continuous improvement practices.
DS-SCV-SD1200-1 | v1.0 | 06-13
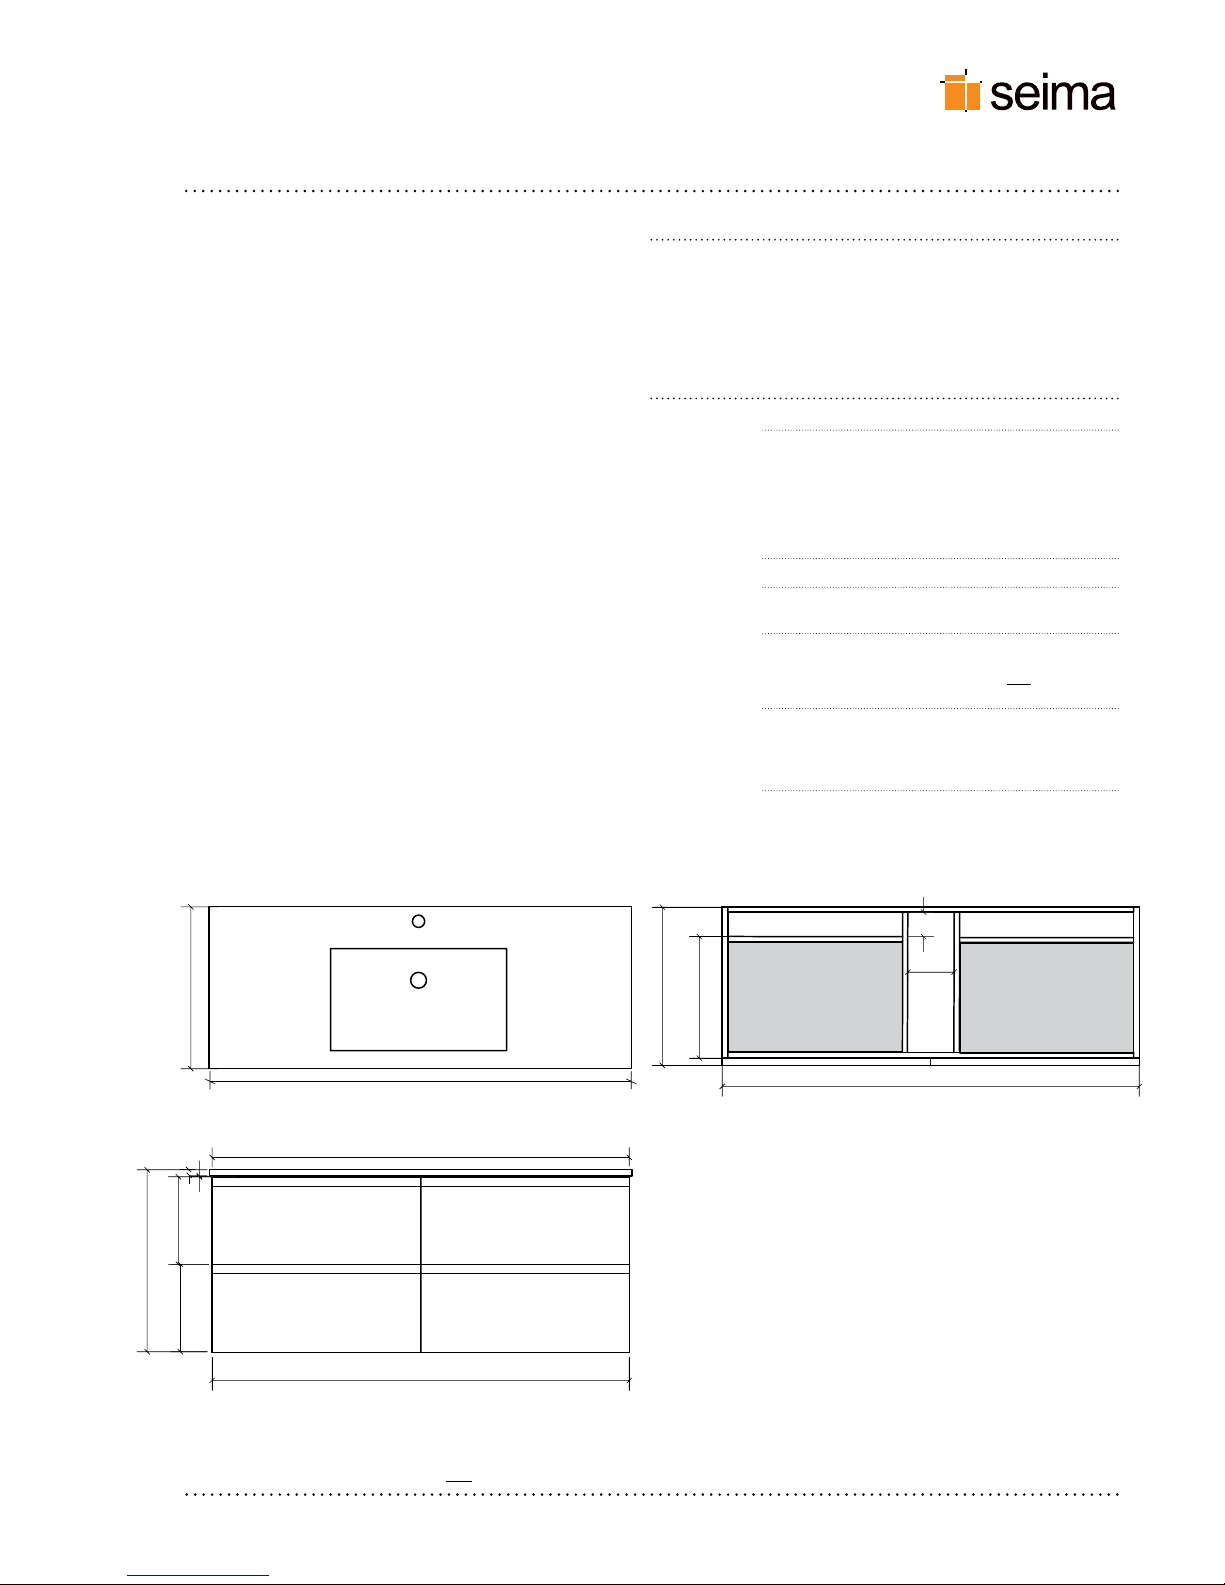
top cross-section view of cabinet
front view
top view of ceramic top
460
1200
450
345
1185
70
131
1185
1200
520
3
248.5 248.8
20
drawer
1 and 2
drawer
3 and 4
drawer 1
drawer 2
drawer 3
drawer 4

slider | slider duo vanity cabinet
installation guide .com.au
IN-Slider_SliderDuo | v1.0 | 3-14X9000005 | page 1 of 2
After installation, use a spirit level to check
that the cabinet is level.
WALL
FLOOR
Check the wall and correct if necessary
The wall must be level and plumb to avoid twisting of the cabinet which will cause the drawers to be out of alignment.
2.1 Use a spirit level to check that the wall is both level and plumb (see Abelow).
2.2 If the wall is not level and plumb, the wall will require packing before the vanity can be installed, to create a flat
installation surface (see Bbelow).
2
packing
behind cabinet
WALL
packing
behind
cabinet
WALL
FLOOR
FLOOR
The wall will require packing before installation if it is not level and plumb.Use a spirit level to check that the wall is both level and plumb.
Fix the cabinet to the wall
3.1 The position and type of wall mounting fixtures to be used will
depend on the wall fabric that the vanity is to be mounted on.
Consideration must be given to dead load and active load. The
vanity must be installed correctly for safety considerations.
3.2 All cabinets come supplied with a metal bracket fitted at each
top back corner. These two brackets stabilise the structure of the
cabinet, and also include bolt holes (two on each bracket) which
may assist with fixing the cabinet to the wall. However, please note
that these holes and the bolts supplied are not intended to be the
sole fixings for the cabinet — extra wall fixings will be necessary
(type to be determined by the licensed tradesperson installing the
vanity, taking into account the situation and wall fabric).
3.3 Installation height: If wall mounting, the cabinet can be installed
at any custom height. If a recessed kicker is to be installed under
the vanity, the cabinet must be installed at an appropriate height to
accommodate the kicker (kicker heights are either 200 or 310 mm).
3.4 Mark and drill the holes for plumbing pipes using a hole saw.
3.5 After the cabinet is installed, check that the cabinet is level using
a spirit level and make adjustments if required.
3
Important — read this first !
Note: These instructions show a Slider Duo 900 vanity cabinet which has two drawers. However, the instructions apply to all
Slider and Slider Duo vanity cabinets and all sizes — the characteristics and drawer mechanisms are the same for all units.
1.1 All Slider and Slider Duo vanity cabinets come assembled with drawers installed. For instructions on removing and
adjusting the drawers, see overleaf. (A recessed kicker is an optional extra — this is supplied separately.)
1.2 Inspect the vanity before installation, to ensure there are no visible defects. If a defect is found, do not install the vanity
and contact the supplier immediately. Claims for defects will not be accepted after the product has been installed.
1.3 The vanity must be installed by a licensed tradesperson. Failure to do so may void the warranty.
1.4 The cabinet is water resistant, not water proof. Ensure that the cabinet is installed at least 300 mm away from wet areas
such as showers, spas and baths. Failure to do so may void the warranty.
1
After installing the cabinet
4.1 Ensure that the drawers are aligned and fitted correctly — adjust if necessary (see 7overleaf).
4.2 Install the vanity top according to the manufacturer’s specifications.
4
A B
brackets
slider
+slider
duo

.com.au
slider | slider duo vanity cabinet
removing+ adjusting drawers
5To remove the drawer/s
5.1 Extend the drawer.
5.2 Each drawer has a plastic cover plate
on each side of the drawer (#1 and #2).
5.3 Remove both cover plates (#1 and #2)
to expose a small drawer release lever
under each plate — see detail.
5.4 To release and remove the drawer,
simultaneously push the drawer
release levers upwards (both sides
at same time) and slide/lift the drawer
away from the tracks. Repeat for each
drawer.
drawer
release
lever
remove
cover
plate #1
To replace the drawer/s
6.1 Fully extend the drawer runner on each
side of the cabinet.
6.2 Place the drawer onto the runners,
ensuring that the drawer is level on
the tracks, and continue to hold in place
(otherwise the drawer will fall).
6.3 Keeping the drawer level, gently push
the drawer along the runners into
the cabinet until you hear a click. This
indicates that the drawer is properly locked
into place on the track.
6.4 Once the drawer is back in place, replace the
cover plates on the sides of the drawer.
6
Place the drawer onto the runners, ensuring
that the drawer is level on the tracks.
Then gently push the drawer along the track
into the cabinet until you hear a click.
(under the cover plate)
These instructions show a Slider Duo 900 vanity
cabinet which has two drawers. However, the
instructions apply to all Slider and Slider Duo vanity
cabinets and all sizes — the characteristics and
drawer mechanisms are the same for all units.
To adjust the drawer/s
7.1 To move the drawer up or down, turn the
bottom screw located under the cover plate
on each side of the drawer.
7
Push lever on both sides
of the drawer at the
same time.
push lever upwards
to release drawer
remove cover plate #2
(on outside of drawer)
Turn this screw to move drawer up or down.
X9000005 | page 2 of 2
kicker—recessed slider | slider duo | designyo
assembly instructions
IN-Kicker-Slider | v1.1 | 3-14
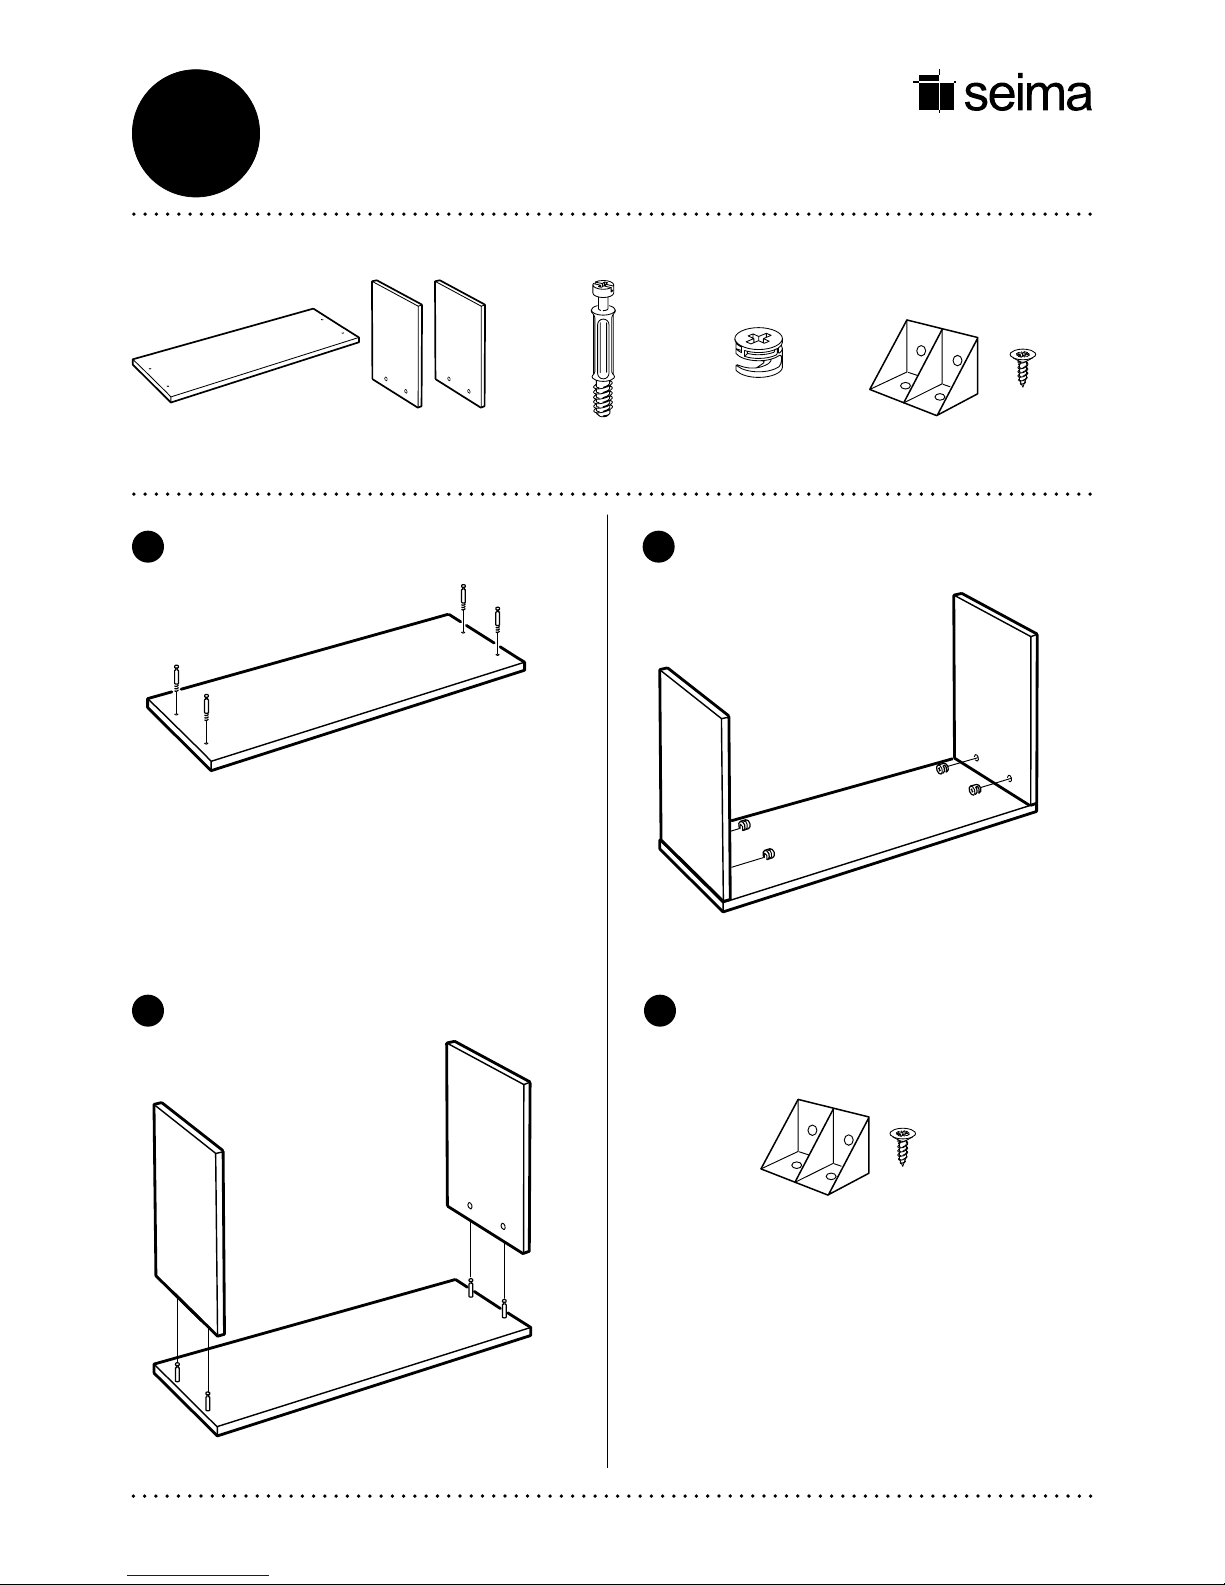
Package contents
1 x long front panel (holes are on panel inner)
2 x short side panels (holes are on panel inner)
4 x locknut screws 4 x locknuts 4 x angle brackets
16 x self-drilling screws
Insert locknut screws into holes of front panel.
Locate the two side panels onto the locknut
screws in the front panel.
Insert locknuts and use a screwdriver to turn the
locknuts to tighten (do not over-tighten).
The angle brackets and self-drilling screws can
be used to secure the assembled kicker to the vanity
cabinet. It is recommended that two brackets are
used on the front panel and one on each side panel.
.com.au
X9000002 | page 1 of 1
2
31
4
kicker
slider+
sliderduo
Popular Indoor Furnishing manuals by other brands

Regency
Regency LWMS3015 Assembly instructions

Furniture of America
Furniture of America CM7751C Assembly instructions

Safavieh Furniture
Safavieh Furniture Estella CNS5731 manual

PLACES OF STYLE
PLACES OF STYLE Ovalfuss Assembly instruction

Trasman
Trasman 1138 Bo1 Assembly manual

Costway
Costway JV10856 manual


