Selecta AC-L4 User manual

1.1. Tabla de
contenidos
1.1. Tablas de contenidos
1.2. Antes de empezar
1.3. Vista general del producto
1.4. Especificaciones de producto
1.5. Partes y funciones
1.6. Funcionamiento
1.7. Advertencias
1.8. Encontrando el problema
1.9. Diagrama de flujo del agua
1.10. Diagrama del circuito
2
2
3
4
5
6
7
8
8
9
1.2. Antes de
empezar
Su destilador ha sido diseñado teniendo en mente
la función, la fiabilidad y la seguridad del aparato.
Es responsabilidad suya instalarlo de acuerdo a los
requerimientos eléctricos locales. Para un funciona-
miento seguro, preste atención a los símbolos de
alerta a través del manual.
Este manual contiene información de funcionamien-
to y seguridad. Debe leer y comprender los conteni-
dos de este manual antes de usar el equipo.
Advertencia
Le advierte de posibilidad de peligro
Precaución
Le advierte de posibilidad de que el equipo sea
dañado
Nota
Tenga en cuenta las advertencias y consejos
Superficie caliente
Le advierte de peligro de quemadura por contacto
con superficie caliente.
Riesgo de explosión
Le advierte de posibilidad de explosión por
presión alta
!
- 2 -
090113
1.1. Tables of
contents
1.1. Tables of contents
1.2. Getting started
1.3. Product overview
1.4. Product specifications
1.5. Parts and functions
1.6. Operating
1.7. Warning
1.8. Trouble shooting
1.9. Water flow diagram
1.10. Circuit diagram
2
2
3
4
5
6
7
8
8
9
1.2. Getting
starting
Your water still has been designed with function,
reliability and safety in mind. It is your responsability
to install it in conformance with local electrical codes.
For safe operation, please pay attention to the alert
symbols through the manual.
This manual contains important operating and safety
information. You must carefully read and understand
the contents of this manual prior to the use of this
equipment.
Warning
Warning alert you to a possibility of personal injury.
Caution
Caution alert you to a possibility of damage to the
equipment.
Note
Notes alert you to pertinent facts and conditions.
Hot surface
Hot surface alert you possibility of burning injury
by hot instrument surface.
Explosive
Explosive alerts you to possibility of explosion by
high pressure.

1.3. Visión general
del producto
El destilador produce agua destilada directamente
del agua de red con un diseño que ocupa poco
espacio y una producción eficaz de agua.
El destilador es fácil de limpiar con sólo retirar la
parte superior del destilador (codensador). Con-
trolando el flujo de agua de refrigeración puede
ahorrar una gran cantidad de agua.
- 3 -
090113
1.3. Product
overview
Water still produces distilled water from tap water
with space saving design and effective distilled
water production.
Water still is easy to clean-up by just removing upper
part of the body (condenser unit). By controlling
cooling water flow, you can save a lot of water wasted
before.
Un diseño único y un sensor
del nivel de agua proporciona un funcionamiento
automático. Por falta de agua, el calentamiento es
automáticamente cortado para proteger la resis-
tencia de sobrecalentamiento.
Unique design and safety feature with
a water float switch provides
automatic operation. By lack of water, the heating is
automatically switched off to protect geater from over
heating.

1.4. Especificaciones del Producto
- 4 -
090113
1.4. Product Specifications
Model
Capacity
Dimensions (mm)
Heater
Cooling Water
Material Inner
Outer
Electrical Requirements
Switch
Sealing
Safety
AC-L4
4.0 l / hour
250 (W) x 222 (D) x 542 (H)
3,00 KW
Approx. 30 l
AC-L8
8.0 l / hour
260 (W) x 260 (D) x 610 (H)
6,00 KW
Approx. 60 l
Stainless Steel
Stainless Steel & Powder Coating
220 V or 110 V (only AC-L4) 50 / 60 Hz
Main Power with Pilot Lamp
Silicone Gasket
Low Water & Over Heating Cut-Out
W ->width; D ->depth; H -> height
Modelo
Capacidad
Dimensiones (mm)
Resistencia
Agua de refrigeración
Material Interior
Exterior
Requerimientos eléctricos
Interruptor
Sellado
Seguridad
AC-L4
4.0 l / hora
250 (A) x 222 (F) x 542 (H)
3,00 KW
Aprox. 30 l
AC-L8
8.0 l / hour
260 (A) x 260 (F) x 610 (H)
6,00 KW
Aprox. 60 l
Acero inoxidable
Acero inoxidable y pintura EPOXI como protección
220 V ó 110 V (sólo AC-L4) 50 / 60 Hz
Interruptor principal con lámpara piloto
Junta de silicona
Corte de corriente en caso de caudal bajo
y sobrecalentamiento
A ->ancho; F ->fondo; H -> altura

1.5. Partes y
funciones
1.5.1. Panel principal / 1.5.1. Main Controller
Interruptor eléctrico principal
Interruptor principal
POWER
INTERRUPTOR
off
on
4. Entrada de agua
4. Water inlet
11. Cierre de silicona
11. Silicone packing
7. Control del
nivel de agua
7. Water level
control
8. Sensor del
nivel de agua
8. Water level
sensor
3. Válvula de
drenaje del agua
3. Water drain valve
15. Interruptor
15. ON/OFF
switch
10. Resistencia
10. Heater
2. Unidad de
evaporación
2. Boiling Unit
13. Salida
agua destilada
13. Salida
agua destilada
13. Distilled water
outlet
12. Unidad de
condensación de vapor
12. Steam condensing unit
1. Condensador
1. Condenser
14. Salida exceso
vapor
14. Steam exhaust
hole
1.5.2. Cuerpo central
- 5 -
090113
Main electrical power supply switch
Main Power
1.5.2. Main Body
1.5. Parts and
Functions

1.6. Operación
- 6 -
1) El voltaje debe corresponder al voltaje dado
en la pletina que acompaña al destilador.
3) Sitúe el destilador sobre una superficie plana.
Antes de empezar
4) Sitúe el destilador cerca del suministro de agua.
1) Conecte la entrada de agua del destilador (4)
con el tubo de goma suministrado al grifo. Ajuste
firmemente el tubo con la abrazadera.
2) Conecte un tubo a la salida de agua (3) y
sitúe su extremo a una pila de desagüe a
una altura menor.
3) Conecte un tubo a la salida de agua
destilada (13) y sitúe su extremo en un
contenedor para agua destilada en un nivel
inferior al de salida.
Conexión de tubos
1) Abra el grifo y compruebe que no hay
ningún derrame entre las conexiones de agua.
2) Abra ligeramente la válvula de entrada de
agua (4)
3) Encienda el aparato (15). El piloto de la lámpa-
ra del panel principal se encenderá.
4) El destilador comenzará automáticamente
en cuanto el agua en la cámara alcance el
nivel suficiente.
Operación
090113
1.6. Operating
1) The main voltage must correspond to the voltage
given on the name-plate.
3) Place water still on a flat surface.
Before operating
4) Place water still near by water supply
1) Connect the water inlet tap (4) with a hose to the
water mains. Fasten hose with hose tie firmly.
2) Connect a hose to the water outlet (3) and
place its end in a drain on a lower level.
3) Connect a hose to the distilled water outlet (13)
and place its end in a distilled water reservoir on
a lower level.
Tubing connection
1) Turn the water supply on and check if there is any
water leakage between the tubing connections.
2) Slightly turn on water inlet tap (4)
3) Switch on (15). The pilot lamp in the main switch
will glow.
4) The water still will automatically starts when
water in the chamber reaches appropiate level.
Operation
2) Su instalación eléctrica debe ser capaz de
aguantar la siguiente intensidad:
230 V
AC-L4 14 Amp.
AC-L8 30 Amp.
2) Electrical wiring must be, at least :
230 V
AC-L4 14 Amp.
AC-L8 30 Amp.

1.7. Advertencias
Los depósitos de cal deberían ser quitados del
evaporador una o dos veces al mes dependien-
do del grado de dureza del agua de suministro.
Quite la parte superior del destilador y quite el
cierre de silicona. Se recomienda una mezcla
del 10% de ácido fórmico, 10% de ácido acético
y 80% de agua destilada para la limpieza del apa-
rato. Vierta la mezcla en el evaporador justo por
encima del depósito de cal que haya más alto
y encienda el destilador. El evapo-
rador está limpio después de 10 a 15 minutos
aproximadamente. Vierta la mezcla y la cal y
enjuáguelo a fondo con agua.
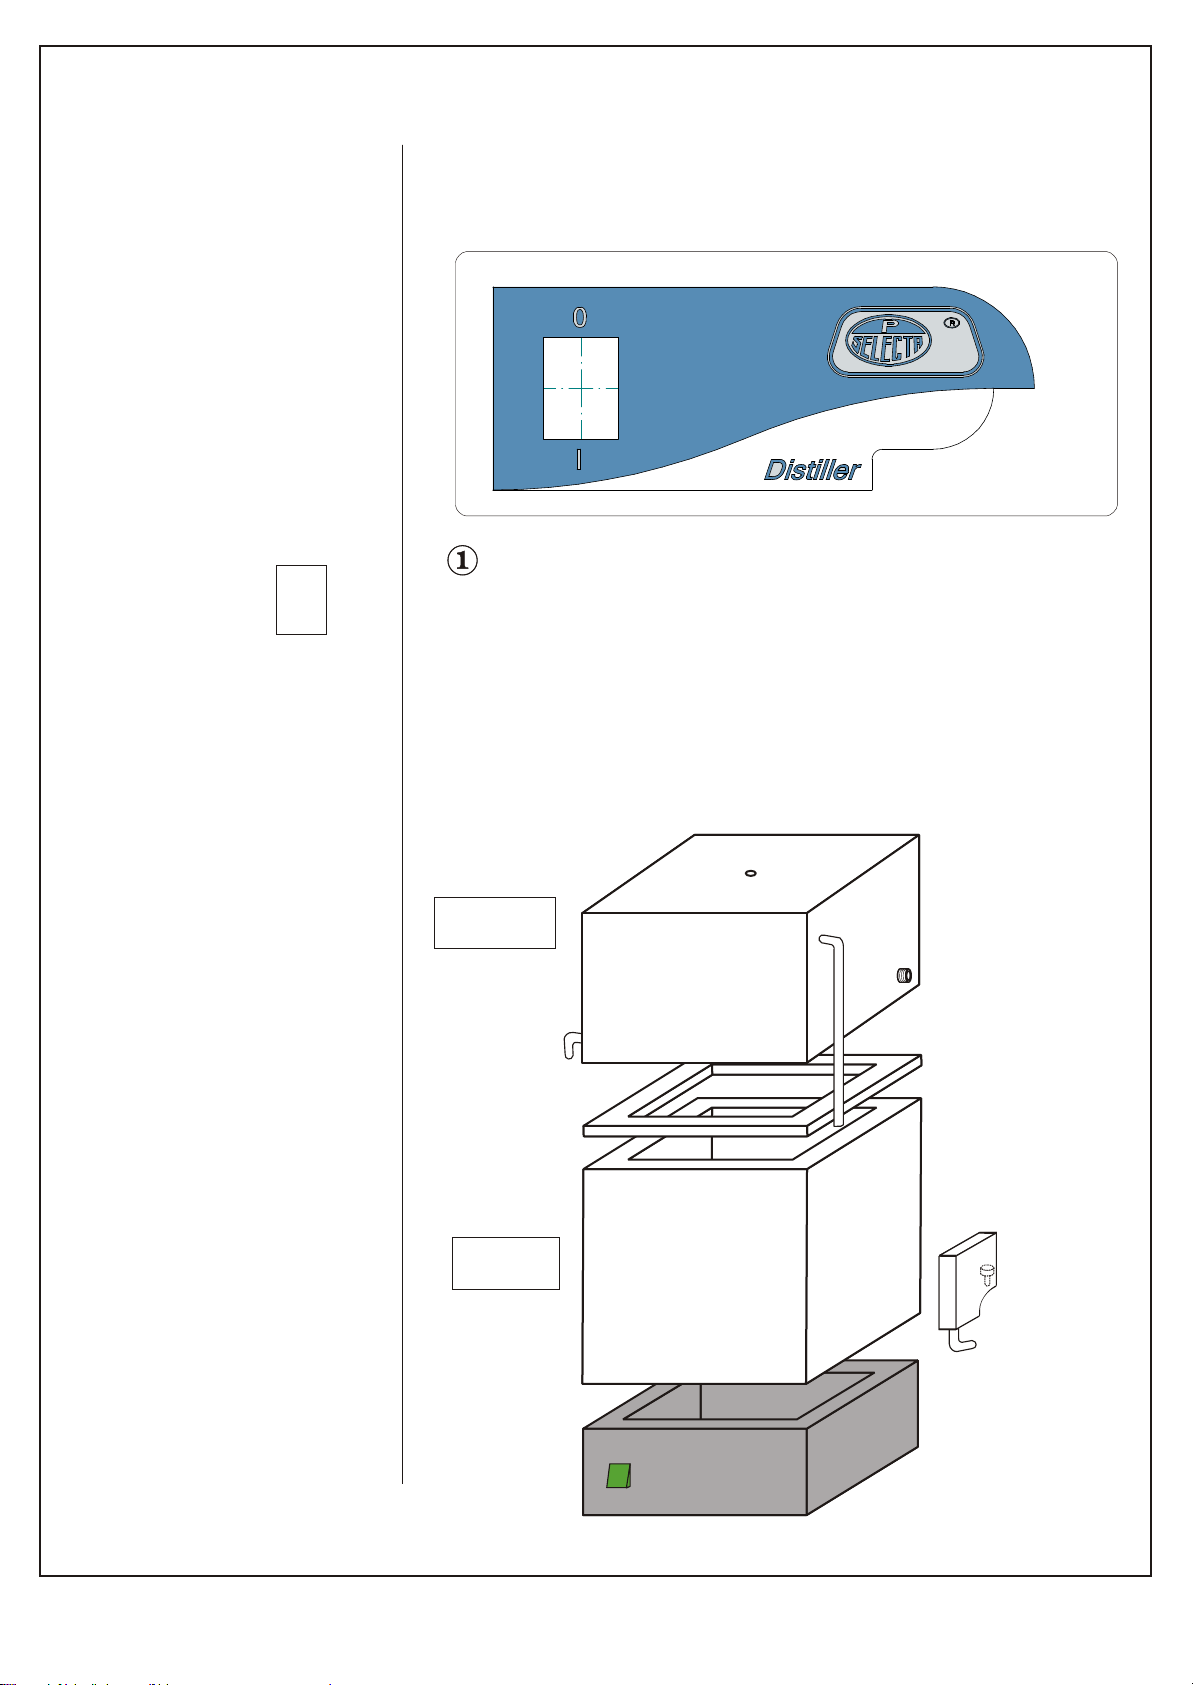
2. Sitúe el destilador en una superficie plana.
3. No toque la superficie de la parte superior del
destilador. Durante su funcionamiento la
superficie superior del destilador y el vapor que
sale del agujero es muy caliente.
4.
- 7 -
090113
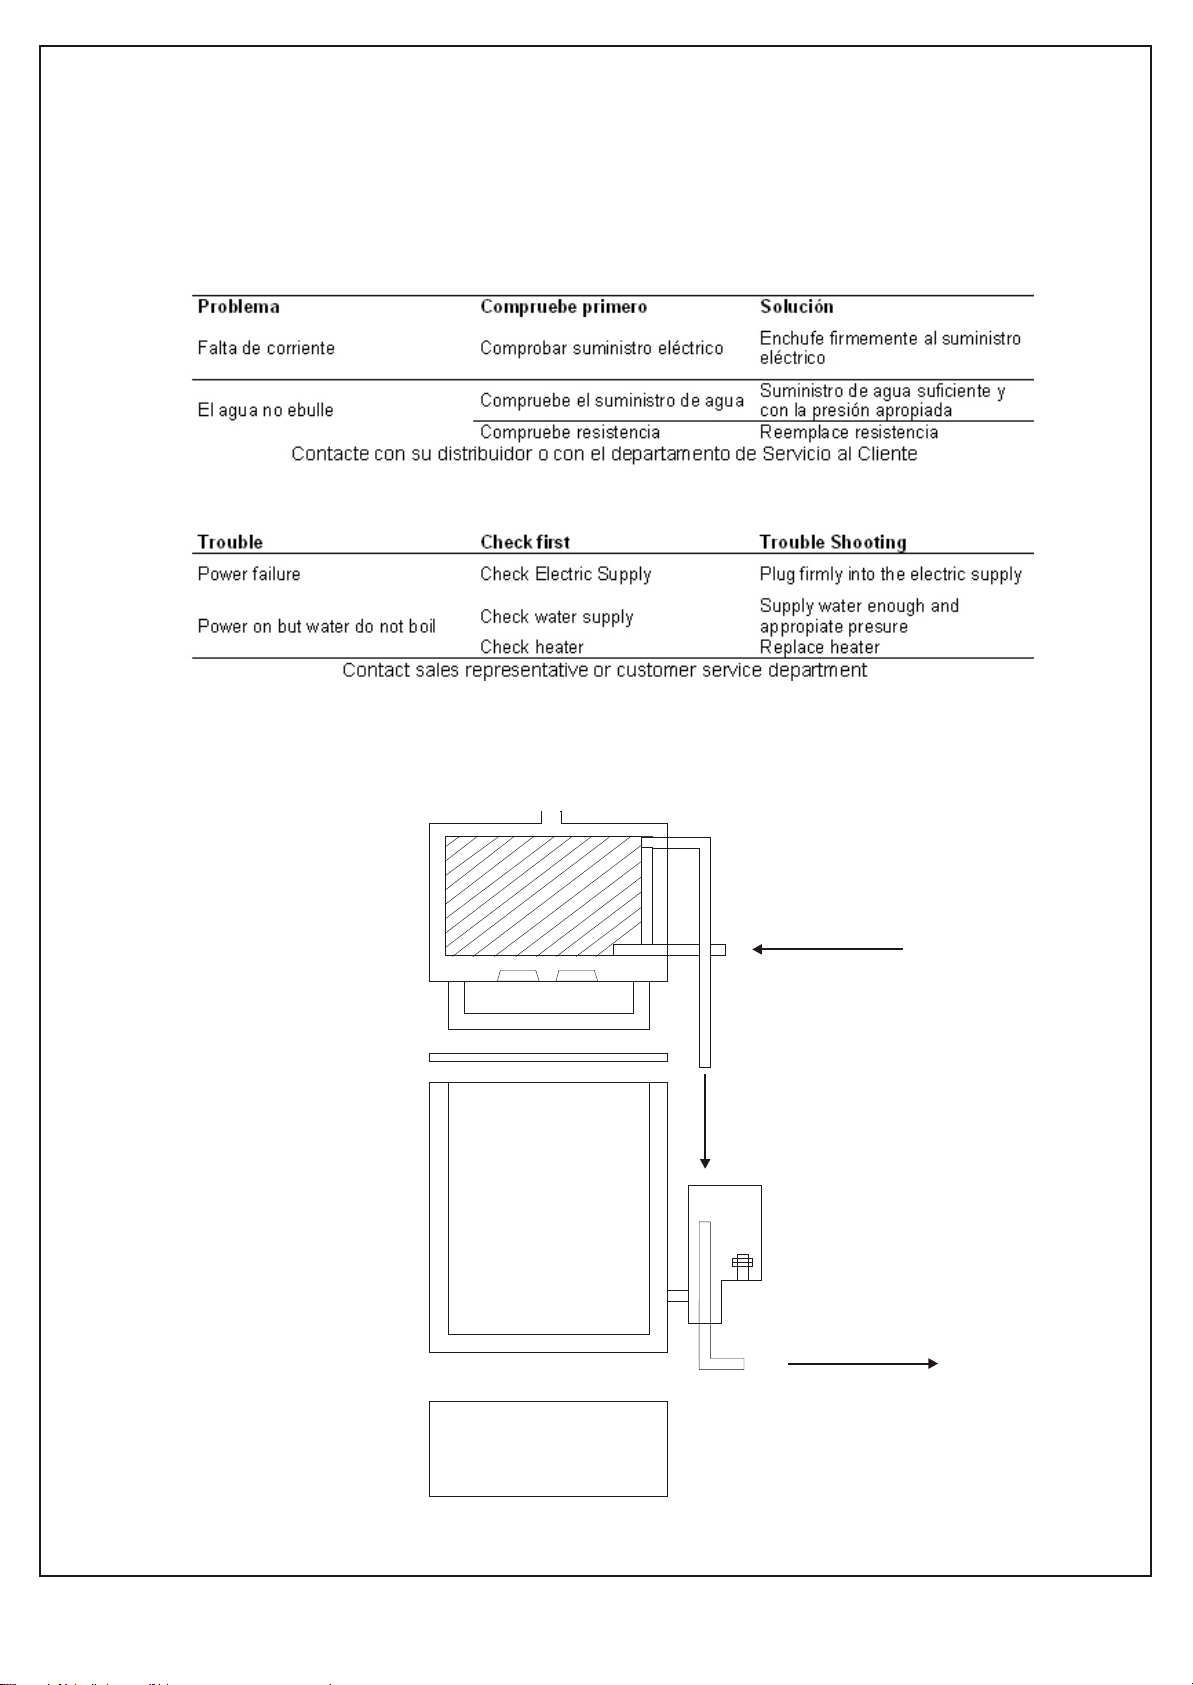
1. Make sure the electric supply is in accordance to
the given voltage on the name-plate, 50 / 60 Hz,
single phase.
Lime deposit should be removed from the evaporator
once or twice a month depending on the degree of
hardness of the tap water. Take off the upper part
of the water still and remove the silicone packing. A
mixture of 10% formic acid, 10% acetic acid and 80%
distilled water is recommended for cleaning the
apparatus. Fill the solvent into the evaporator to
just above the highest lime deposit and switch on
the water still. The evaporator is clean after appro
10 to 15 minutes. Pour out the lime and solvent mixture
thoroughly rise with water.
2. Place water still on a flat surface.
3. Do not touch top of the instrument. During operation,
surface of the top of the water still and steam
exhausted from the hole is very hot.
4.
1.7. Warning
1. Asegúrese que su suministro eléctrico es del
voltaje que indica la etiqueta, 50 / 60 Hz, mono-
fásica.

1.8. Fallos / Trouble Shooting
1.9. Diagrama de flujo de agua / Water flow diagram
- 8 -
090113

1.10. Diagrama del circuito / Circuit diagram
- 9 -
090113
F
N
1 -> Interruptor / Switch
2 -> Control nivel deposito / Level controller
C1 -> Contactor
C2 -> Contactor
R1 -> Resistencia / Heater
R2 -> Resistencia / Heater
R1
R2
C1
C2
1 2
AC L8
F
N
1 -> Interruptor / Switch
2 -> Control nivel deposito / Level controller
C1 -> Contactor
R1 -> Resistencia / Heater
R1
C1
1 2
AC L4
This manual suits for next models
3
Table of contents
Popular Water System manuals by other brands

Julabo
Julabo DYNEO DD BT19 operating instructions

ICA
ICA AQUA OCEAN AQ4000 instruction manual

BeaconMedaes
BeaconMedaes MAT-S Installation, operation and maintenance instructions

Condair
Condair RO Series Installation and operation manual

Aquion
Aquion Micro Budget owner's manual

Reflex
Reflex Servitec Instructions for use

Conergy
Conergy TS Owners & installation manual

Irrigatia
Irrigatia SOL-K12 Instructions for use

Lippert
Lippert Floe 868 Installation and owner's manual

Zip
Zip HydroTap BCS Compact series installation instructions

US Water Systems
US Water Systems USCRO-350 Installation and operation manual

deconta
deconta C 30 L instruction manual