SEMBOX DSM2009 User manual

1
DIGITAL SATELLITE FINDER
USER’S MANUAL

2
Please read this manual carefully before using this device for the first time.
The technical specifications and operating methods included in this manual
are subject to changes without notice. In case of any inquires after a period of
usage, please contact the manufacturer.
Please make sure of charging the battery before using for the first time.
Recommend 5 hours

3
Table of Contents
Chapter I. Introduction...................................4
Chapter II. Function........................................ 4
A. Front Panel....................................4
B. Quick Operation............................6
1. Language setting
2. Quick operation guide
C. Detailed operation Guide..............7
1. Turn on the equipment............ 7
2. Satellite Setting ………............ 7
3. System Setting..........................8
4. Spectrum....................................8
5. Angle Calculation......................9
Chapter III. Specification................................10


5
(1) LNB INPUT
Satellite signal input port, connects directly to satellite antenna with coaxial cable.
(2) LCD Screen
Shows menus and programs clearly
(3) Power Light
Indicates ON/ OFF mode
(4) Lock Light
This light will be on when signal is locked.
(5)22K/13V/18V light᧶
Indicates the mode of 22K/13V/18V
(6) Function Key
Consist of 2 keys, F1 – F2.
F1: Changes the signal bar on SIGNAL FINDING menu
F2: Actives DiSEqC1.2 function on the SIGNAL FINDING menu
AN/DG: Actives the spectrum on the SIGNAL FINDING menu
0/22K: A quick key to switch 22K output on the SIGNAL FINDING menu
H/V: A quick key to switch 13V/18V output on the SIGNAL FINDING menu
(7) Arrow Key and OK Key
Use Arrow key to browse the item, press OK key to select.
(8) Numerical Key
Enters numerical settings directly.
(9) FIND Key:
Accesses easy satellite find menu that sets and aligns a satellite dish quickly.
(10) MENU Key:
Enters or exits the main menu.
(11) EXIT Key
Exits from the present menu and backs to the previous one
(12)ANGLE Key
Accesses the AZ, EL and Polarity calculation menu
(13) SYSTEM Key
Sets up all system parameters
(14) POWER Key
For turn-on / turn-off. To press and hold for 3 seconds to power on the device
(15) TV/RADIO
Selects and plays TV/Radio channel in playing mode.

(16) AV᧤Optional᧥᧶
Shifts AV output /AV input
(17) Charge port:
Connects with the charger cord.
(18) USB Port:
Connects with PC for upgrade.
(19) R/L/VIDEO:
Output audio and video signal.
(20) AV IN:
Input audio and video signal to LCD screen.
B. Quick Operation
With this function, user can quickly and easily point the right satellite and accurately set
the dish.
1᧥Menu language Setting
1. Turn on the satellite finder
2. Press SYSTEM button to display the setting menu. see <Figure2-2>
<Figure2-2>
3. Use [][] button to change the language items . Select the language that you need.
2 Quick operation guide
1. Press the FIND button to display the signal finding menu, see <Figure2-3>
6

<Figure2-3>
2. SATELLITE NAME: Use [][] button to select the satellite .
3. LNB SETTING: Select the item needs to edit, and set its parameters as desired.
LNB Type: Use [][] button to select C/Ku/Universal
LNB.LOW: input the parameters as desired by number key
LNB.HIGH: input the parameters as desired by number key.
4. TRANSPONDER: Use [][] button to select the TP frequency
FREQUENCY: Set parameters and numerically input.
SYMBOL RATE: Set parameters and numerically input.
POLARITY Use [][] button to select between vertical and horizontal
5. In the course of signal searching, you can see the bar meter of the LEVEL and QUALITY,
as well the numerical of S/N, FEC, BER, at the same time the LOCK light will come on
with the speaker notification. DiSEqC will indicate which port is connected to the
DiSEqC1.0 switch.
6. Adjust the dish slightly to get the strongest signal
7. SCAN CHANNEL: Use [][] button to select the scan mode, then press OK to start.
(a.) TP SCAN: Scan transponders one by one, see<Figure2-4>
7

/
<Figure2-4>
(b.) TP NIT: Scan the transponders in one certain network
(c.) SAT SCAN: Scan all the transponders in one satellite (these transponders have been
set).
(d.) Blind 8MHz: Blind scan the frequency from 950-2150 by step 8MHz; see<Figure2-5>
<Figure2-5>
(e.) Blind 12MHz: Blind scan the frequency from 950-2150 by step 12 MHz.
8. MODE CHANGE: Press F1 to shift the signal bar mode between Outdoor / Normal
9. MOTOR SETTING: Press F2 to active the DiSEqC1.2 control menu , see<Figure2-6>
<Figure2-6>
(a.) MOTOR RESET: Clear the limit of the position, Press OK on the item.
8
(b.) MOTOR INITIAL: Back to the initial position, Press OK on the item.
(c.) COMMAND: Control motor moving to west or east, Use [][] button to shift.
Stop option automatically once the signal is locked.
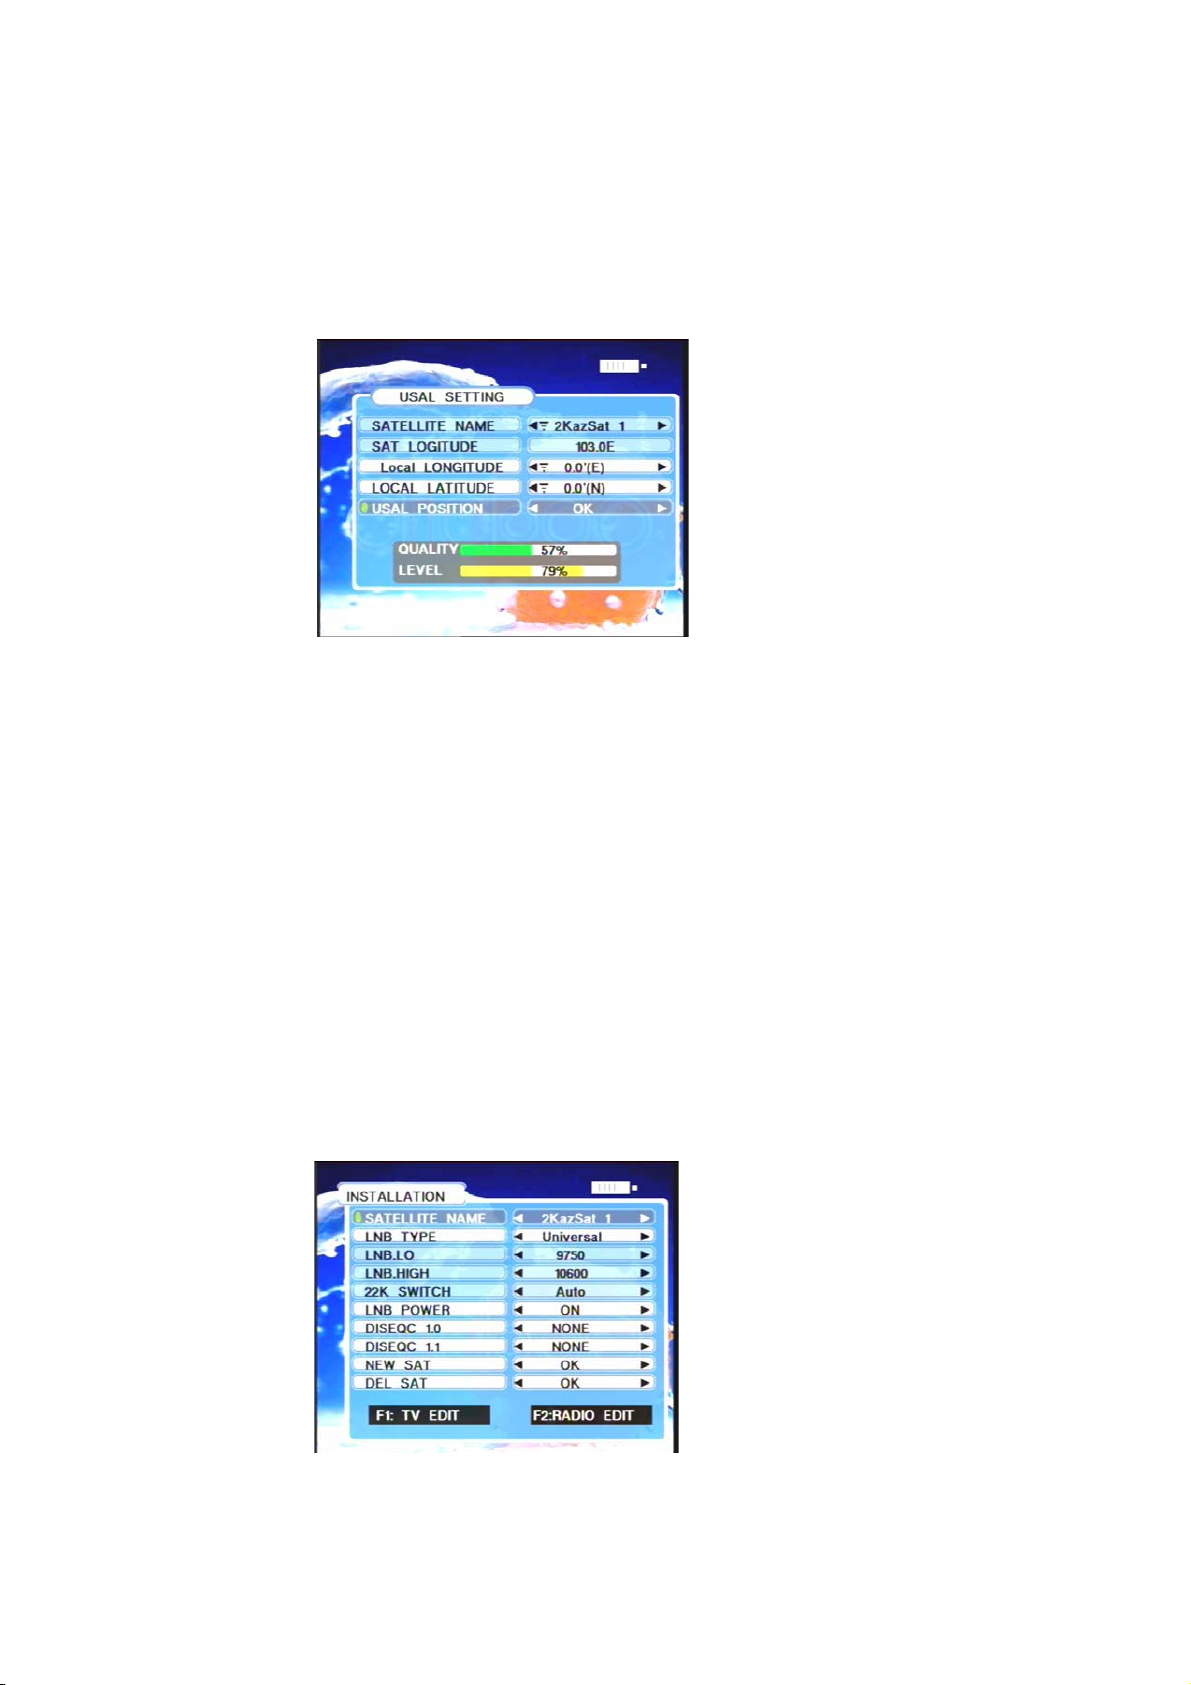
10. USAL SETTING: Press OK on the USAL SETTING item, see <Figure2-7>
<Figure2-7>
(a.) LOCAL LONGITUDE: The longitude of local city.
(b.)LOCAL LATITUDE: The latitude of local city.
(c.)USAL POSITION: To control the motor to be on the right position, Press OK to set up.
C. Detailed operation Guide
1) Turn on the equipment
Press POWER ON button and hold for 3 seconds to turn on the device
TIPS: Release the POWER ON button when the logo is displayed.
2) INSTALLATION
Press OK on INSTALLATION then the following window appears, see <Figure2-8>
<Figure2-8>
9

1᧪SATELLITE NAME: Use [][]button to browse or press OK to show the satellite list to
select.
2᧪LNB TYPE: Use [][]button to select the item
3᧪22K SWITCH: Use [][]button to shift AUTO/ON/OFF
4᧪LBN POWER: Use [][]button to choose OFF /ON
5᧪DISEQC1.0: Use [][]button to choose DISEQC switch port A/B/C/D
6᧪DISEQC1.1: Use [][]button to choose from DISEQC switch port 1 to port 16,
7᧪NEW SAT: Press OK to add a new satellite by entering satellite name
8᧪DEL SAT: press OK to delete the current satellite.
9᧪TV EDIT: Press F1 to edit TV channel, see <Figure2-9>
<Figure2-9>
(a.) MOVE INDEX:
(1.) Moves channel to another position. Press 2 to MOVE INDEX mode, and the
MOVE INDEX on the help information will be highlighted.
(2.) Press OK to select a channel.
(3.) Use UP/DOWN key to move the cursor, and then press OK to confirm the
destination position.
(b.) DELETE CHANNEL:
10

(1.) Deletes the current channel. Press 3 to DELETE CHANNEL, and the DELETE
CHANNEL on the help information will be highlighted.
(2.) Use UP/DOWN key to select a channel
(3.) Press OK to delete.
(c.) NAME EDIT
(1.) Press 4 to NAME EDIT, and NAME EDIT on the help information will be
highlighted.
(2.) Press OK to enter name with ᥈soft keyboard on screen.
᥈SOFT KEYBOARD instruction:
Use [][][] [] buttons to move cursor and Press OK to pick the alphabet.
Use SAVE button on keyboard to save the channel name entered in.
Use DEL button on keyboard to delete the alphabet entered.
Use OTHER button on keyboard for shifting upper/lower case.
Use EXIT button to leave soft keyboard mode.
11. RADIO EDIT: Press F2 to edit radio channel.
Usage instruction refers to TV EDIT
3) SYSTEM SETTING
1. Press SYSTEM button to display setting menu, see <Figure2-10>
11

<Figure2-10>
2. OSD TRANSPARENT: Use [][]button to adjust OSD transparent mode.
3. SLEEP TIMER: Use [][]button to set up the sleep timer mode.
4. PROFILE : Use [][]button to shift the normal mode and outdoor mode
5. LOCK BEEP: Signal locked beep mode, Use [][]button to switch on/off the beep
when signal locked
6. FACTORY DEFAULT: Remove all the user data, press OK to confirm on the item.
4) SPECTRUM
Press AN/DG on the signal finding menu, the spectrum of the current satellite signal will be
displayed as <Figure2-11>
<Figure2-11>
IF: the current selected frequency
Level: the selected frequency strength
5) ANGLE CACULATION
1 Press ANGLE button to display the Calculation menu, see <Figure2-12>
12

<Figure2-12>
2. SATELLITE NAME: Use [][]button to browse , or press OK to show the satellite list to
select.
3. LOCAL LONGITUDE: the longitude of local city.
4. LOCAL LATITUDE: the latitude of local city.
5. ANGLE CACULATION: Start to calculate the azimuth and elevation, and press OK to
confirm.
6. ANTENNA AZIMUTH: shows the azimuth of the chosen satellite.
7. ANTENNA ELEVATION: shows the elevation of the chosen satellite.
6) CHANNEL INFORMATION
Press F1 in the playing mode then < Figure2-13> shown
<Figure2-13>
Satellite name and transponder information will be displayed.
7) CHANNEL LIST
Press OK in the playing mode then < Figure2-14> shown:
13
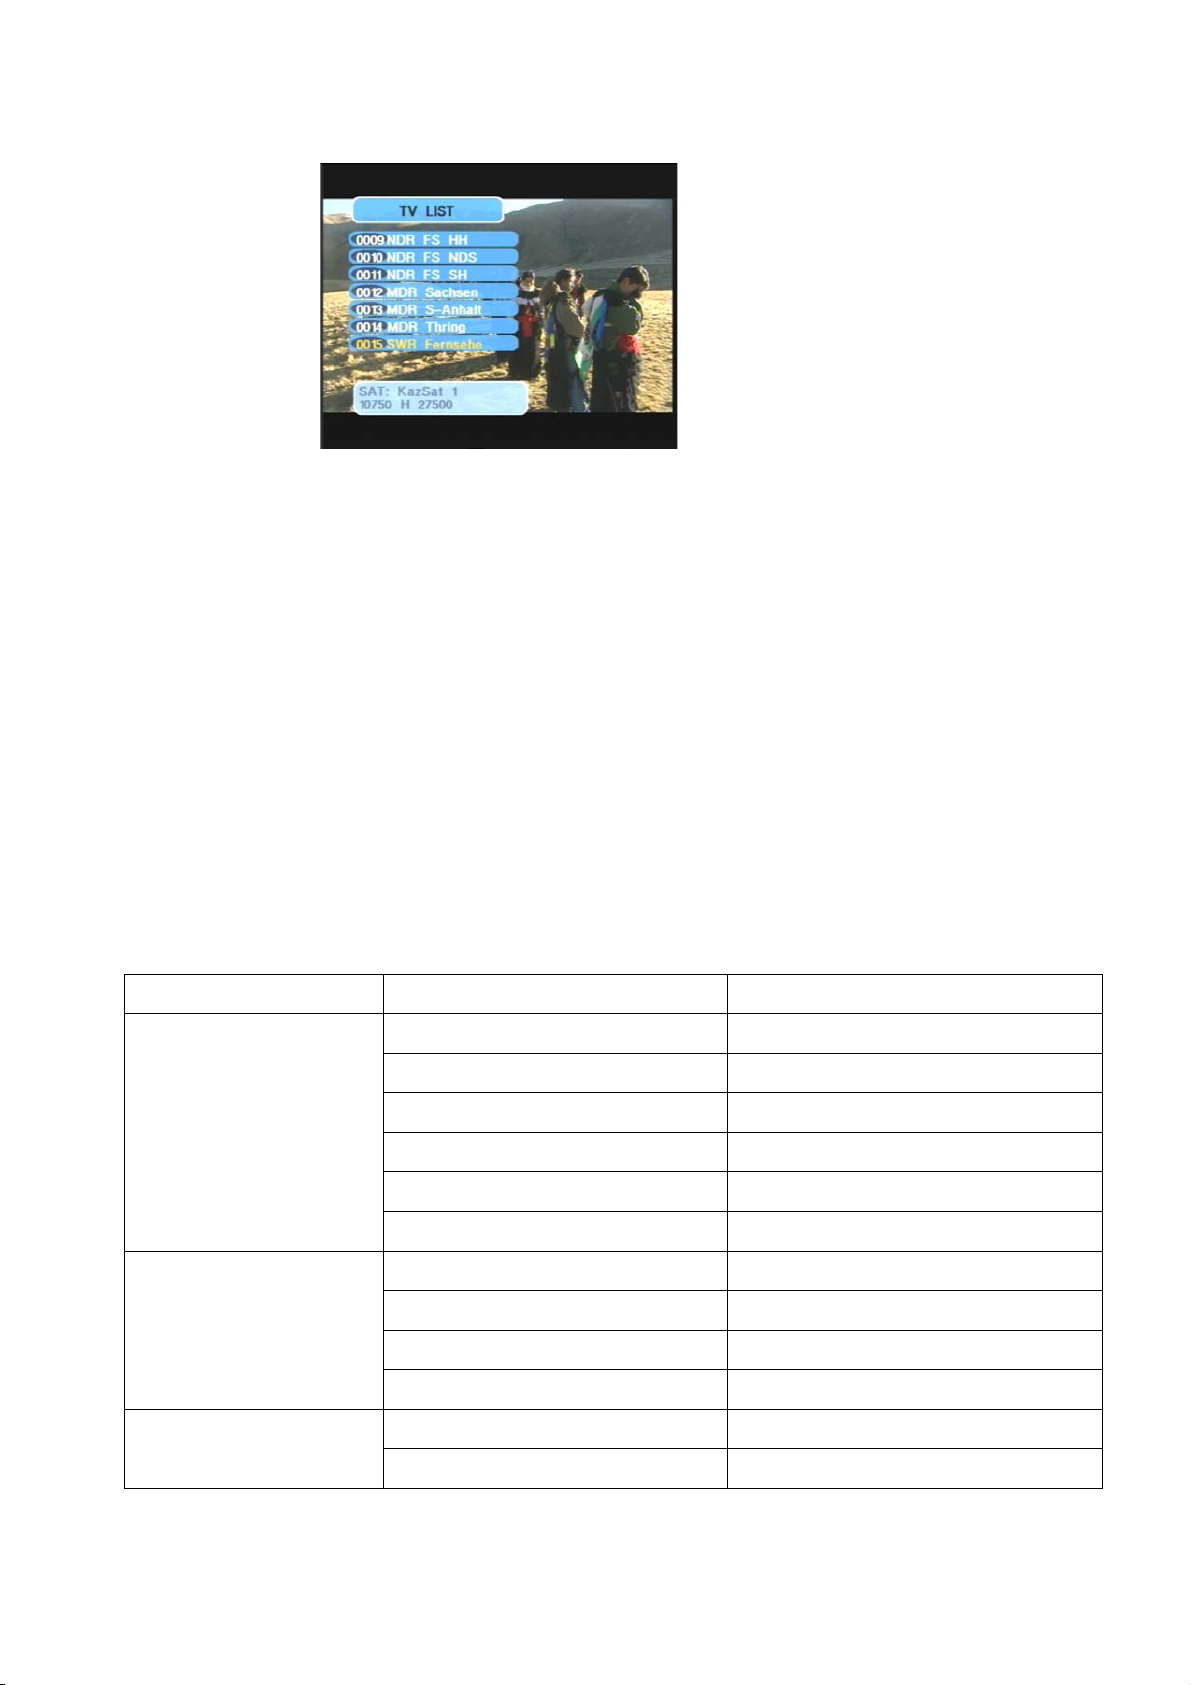
< Figure2-14>
1. Use UP/DOWN key to move the cursor,
2. Press OK to play a new channel
3. Press EXIT to back to playing mode.
8) TV/RADIO MODE CHANGE
Press TV/RADIO key in the playing mode to shift.
Specifications
System capabilities Fully DVB compliant Yes
Connector F type, male
Frequency range 950MHz-2150MHz
Signal lever -65dBm~-25dBm
LNB supply 13/18V,max400mA
LNB switch control 22KHz
LNB/Tuner input
DiSEqC DiSEqC1.0 DiSEqC 1.2
Front end QPSK
Symbol rate 2Mbps~45Mbps
SCPC and MCPC Capable Yes
Demodulator
Spectral inversion Auto conversion
Processor 32bit processor
System resource
SDRAM 8Mbytes
14

15
FLASH 1Mbyte
EEPROM
MPEG 2 Main Proflie@Main Level
Data Rate up to 15M bits/s
Resolution 720*576,720*480
Video decoder
Video format PAL/NTSC/SECAM
MPEG 1 layer 1&2
Type Mono
MPEG Audio
Sampling rates 32,44.1 and 48KHz
Serial data interface Connector USB type
Li-oN Battery 2200 mA
Supply voltage 13.3Volt
Power supply
charger 90-240V
Panel connectors Digital tuner input F type, male
Size 102x34x180 (mm)
Physical Specification
Weight(Net) 0.9 Kg
Table of contents


