Semco Indigo 6 User manual

Instruction Manual


When using an electrical appliance, basic safety should always be followed, including the following:
1. Read the instruction carefully before you use the machine
2. Keep the instructions at a suitable place close to the machine and hand it over if you give the
machine to a third party.
3. Use the machine only in dry locations.
4. Never leave the machine unattended.
5. This appliance can be used by children aged from 8 years and above and persons with reduced
physical, sensory or mental capabilities or lack of experience and knowledge if they have been
given supervision or instruction concerning use of the appliance in a safe way and understand the
hazards involved.
6. Cleaning and user maintenance shall not be made by children without supervision.
7. Always switch off the machine if you carry out preparation for work (change the needle, feed the
yarn thru the machine, change the footer, etc.).
8. Always unplug the machine if you leave it unattended, to avoid injury by expediently switch on the
machine.
9. Always unplug the machine if you changing the lamp or carry out maintenance (oiling, cleaning).
10.Don't use the machine if it's wet environment.
Read all instructions before using this sewing machine.
1. An appliance should never be left unattended when plugged in.
2. Always unplug this appliance from the electric outlet immediately after using and before cleaning.
DANGER - To reduce the risk of electric shock:
WARNING - To reduce the risk of burns, fire, electric shock, or injury to persons:
IMPORTANT SAFETY INSTRUCTIONS
I

11.Never pull at the cord, always unplug the machine by gripping the plug.
12.If the LED lamp is damaged or broken, it must be replaced by the manufacturer or its service
agent or a similarly qualified person, in order to avoid a hazard.
13.Never place anything on the pedal.
14.Never use the machine if the air vents are blocked keep the air vents of the machine and the
pedal free from dust.
15.The machine may only be used with foot pedal type KD-1902, FC-1902(110-120V area) / KD-
2902, FC-2902A, FC-2902C, FC-2902D(220-240V area) / 4C-316B(110-125V area), 4C-
316C(127V area) / 4C-326C(220V area), 4C-326G(230V area), 4C-336G(240V area), 4C-
336G(220-240V area).
16.The power cord of the foot controller can not be replaced. If the power cord is damaged the foot
controller must be disposed.
17.The sound pressure level at normal operation is smaller than 75dB(A).
18.Do not dispose of electrical appliances as unsorted municipal waste, use separate collection
facilities.
19.If electrical appliances are disposed of in landfills or dumps, hazardous substances can leak into
the groundwater and get into the food chain, damaging your health and well-being.
SAVE THESE INSTRUCTIONS
This sewing machine is intended for household use only. Be sure to use the sewing machine in the
temperature range from 5 to 40 C. If the temperature is excessively low, the machine can fail to
operate normally.
°C °
20.The appliance is not to be used by persons (including children) with reduced physical, sensory or
mental capabilities, or lack of experience and knowledge, unless they have been given
supervision or instruction.
21.Children being supervised not to play with the appliance.
(For outside Europe)
(For outside Europe)
II

Congratulations
As the owner of a new sewing machine, you will enjoy precision quality stitching
on all types of fabrics, from multiple layers of denim to delicate silks.
Your sewing machine offers the ultimate in simplicity and ease of operation. For
your safety and to fully enjoy the many ad antages and ease of operation of your
sewing machine, we recommend that you read all the important safeguards and
use and care instructions in this instruction book.
May we suggest that before you start to use your sewing machine, you disco er
the many features and ad antages by going through this instruction book, step by
step, while seated at your sewing machine.
III

List of contents
Details of the machine.............................................................2/3
Accessories ................................................................................4
Fitting the snap-in sewing table..................................................5
Connecting machine to power source ........................................6
Two-step presser foot lifter.........................................................7
Attaching the presser foot holder ...............................................8
Winding the bobbin.....................................................................9
Inserting the bobbin..................................................................10
Inserting the needle .................................................................11
Threading the upper thread......................................................12
Thread tension .........................................................................13
Raising the bobbin thread ........................................................14
Matching needle/ fabric/ thread ................................................15
Choose your pattern and start to sewing..................................16
Re erse sewing/ Remo ing the work/ Cutting the thread ........17
Blind hem/ lingerie stitch ..........................................................18
Sewing on buttons....................................................................19
Sew 4-step buttonholes............................................................20
Zippers and piping....................................................................21
3-step zig-zag...........................................................................22
Applique ...................................................................................23
Monogramming and embroidering with embroidery hoop*....24/25
Maintenance.............................................................................26
Trouble shooting guide.............................................................27
IV

1. Thread take-up le er
2. Thread tension dial
3. Face plate
4. Thread cutter
5. Presser foot
6. Needle plate
7. Sewing table and accessory box
8. Thread guide
9. Bobbin winder stopper
10. Pattern selector dial
11. Re erse sewing le er
Details of t e mac ine
1
2
4
6
7
5
3
8
10
9
11
2
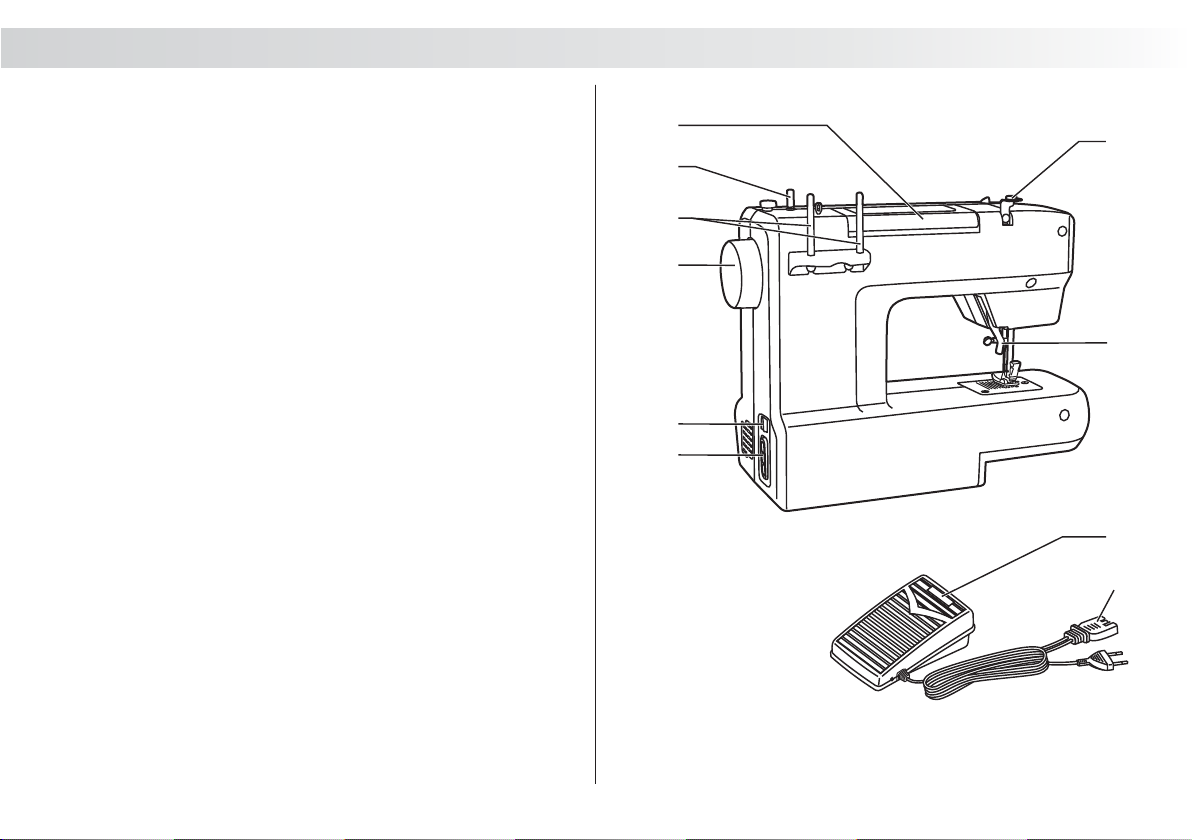
12. Handle
13. Bobbin winder spindle
14. Spool pins
15. Handwheel
16. Power switch
17. Main plug socket
18. Bobbin thread guide
19. Presser foot lifter
20. Foot control
21. Power cord
Details of t e mac ine
12
13
15
17
18
16
14
19
20
21
3
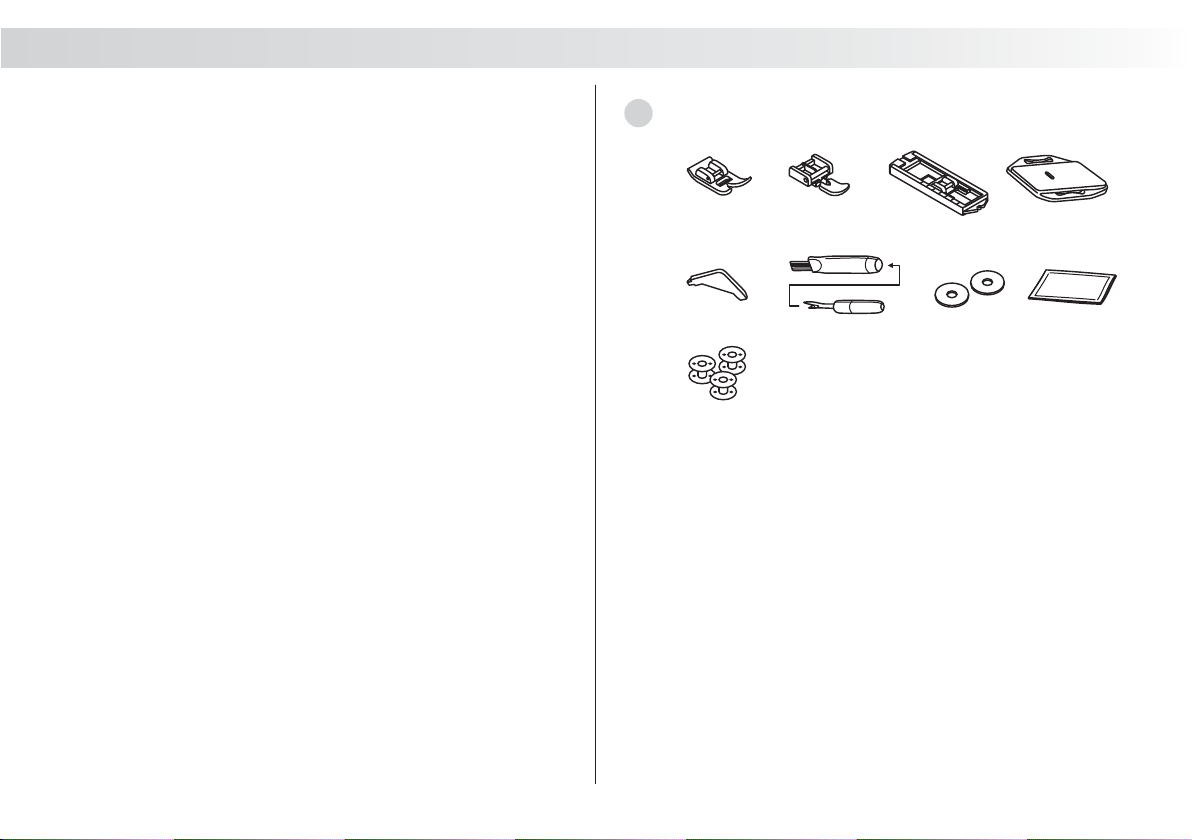
Accessories
Standard accessories (1)
a. All purpose foot
b. Zipper foot
c. Buttonhole foot
d. Darning plate
e. L-screwdri er
f. Seam ripper/ brush
g. Spool pin felt (2x)
h. Pack of needle
i. Bobbin (3x)
Standard accessories
1
abcd
g
ef
i
4

Hold the remo able accessory storage horizontally, and push it
in the direction of the arrow. (1)
To remo e the accessory storage, pull it toward the left.
The standard accessories are contained inside the remo able
accessory storage compartment.
To open, flip co er down as shown. (2)
1
2
Fitting t e snap-in sewing table
5

A
Polarized attachment plug
Conductor ilntended
to be grounded
1
2 3
Connecting mac ine to power source
Connect the machine to a power source as illustrated. (1)
For appliance is equipped with a polarized plug which must be
used with the appropriate polarized outlet. (2)
Unplug power cord when machine is not in use.
Foot control regulates the sewing speed. (3)
Consult a qualified electrician if in doubt as to connect
machine to power source.
Unplug power cord when machine is not in use.
Press main switch (A) for power and light on .
Attention:
Foot control
Attention:
Sewing lig t
(" l ")
For appliance with a polarized plug (one blade is wider than
the other). To reduce the risk of electric shock, this plug is
intended to fit in a polarized outlet only one way. If it does
not fit fully in the outlet, re erse the plug. If it still does not fit,
contact a qualified electrician to install the proper outlet. Do
not modify the plug in any way. (2)
IMPORTANT NOTICE
6

When sewing se eral layers or thick fabrics, the presser foot
can be raised a second stage for easy positioning of the work
.(A)
Two-step presser foot lifter
A
7

Raise the presser bar (a) with the presser foot lifter. Attach the
presser foot shank (b) as illustrated. (1)
Install the pin (d) of the presser foot (e) into the cut-out (c) of
the presser foot holder. (2)
Push the presser foot (e) to disengage from the cut-out (c). (3)
Attach the edge/quilting guide (f) in the slot as illustrated. Adjust
as needed for hems, pleats, quilting, etc. (4)
Turn power switch to off ("O") when carrying out any of the
abo e operations!
Attac ing t e presser foot
Removing t e presser foot
Attac ing t e edge/quilting guide
Attention:
Attac ing t e presser foot older
1
3
2
4
e
c
f
a
c
de
b
a
b
8
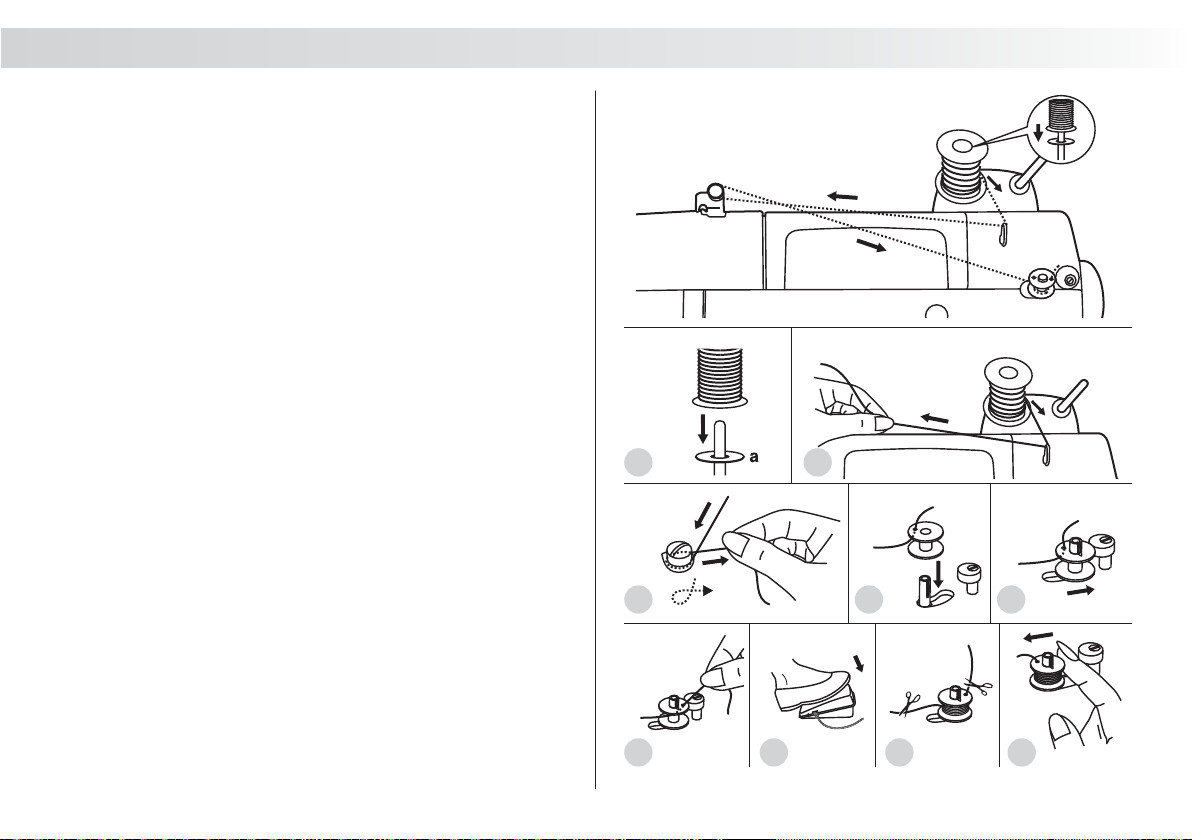
Winding t e bobbin
- Place the thread and spool pin felt (a) onto the spool pin. (1)
- Pass the thread through the thread guide. (2)
- Wind thread clockwise around bobbin winder tension discs. (3)
- Thread bobbin as illustrated and place on spindle. (4)
- Push bobbin spindle to right. (5)
- Hold thread end. (6)
- Step on foot control pedal. (7)
- Release the pedal after a few turns. Release the thread and
cut as close as possible to the spool. Press the pedal again.
Once the spool is full, it rotates slowly. Release the pedal and
cut thread. (8)
- Push bobbin spindle to left (9) and remo e.
When the bobbin winder spindle is in "bobbin winding" position,
the machine will not sew and the hand wheel will not turn. To
start sewing, push the bobbin winder spindle to the left (sewing
position).
Please Note:
12
5
34
6 87 9
9
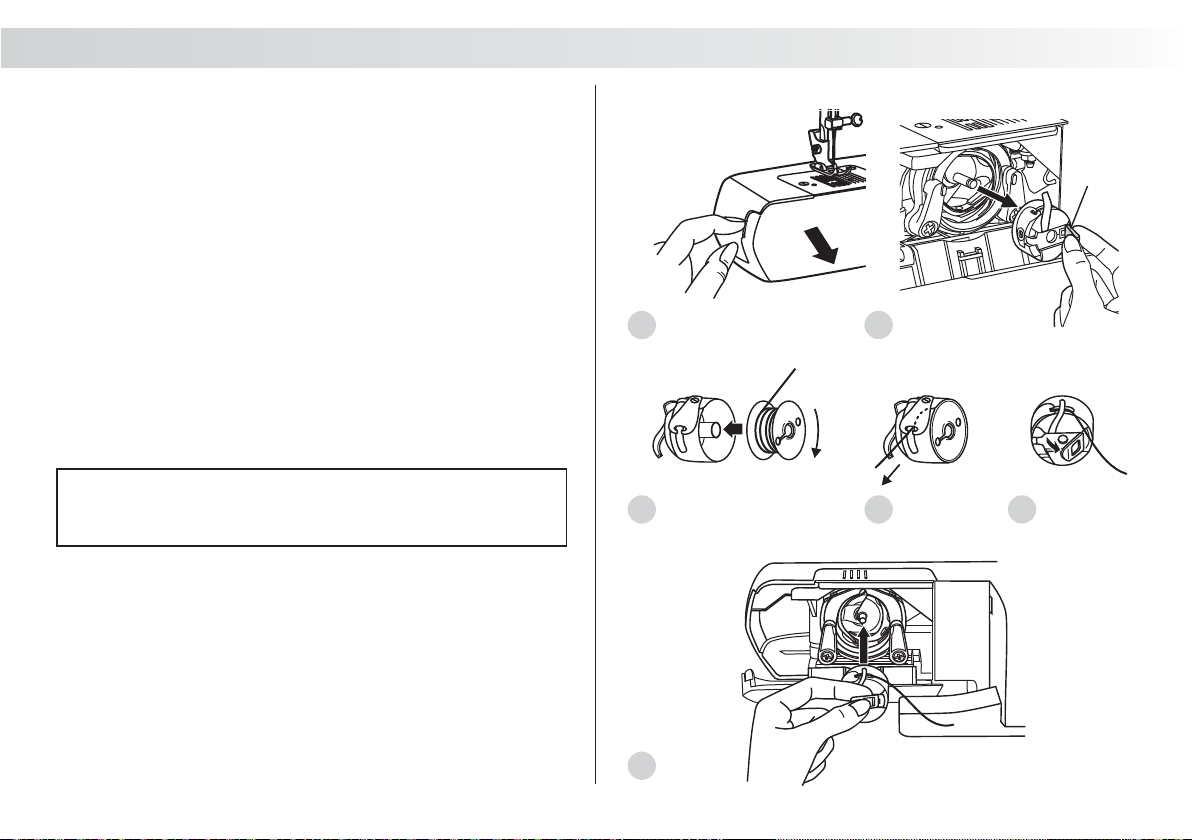
Inserting t e bobbin
W en inserting or removing t e bobbin, t e needle must be
fully raised.
Attention:
- Remo e the sewing table, then open the hinged co er. (1)
- Pull the bobbin case tab (a) and remo e the bobbin case. (2)
- Hold the bobbin case with one hand. Insert the bobbin so that
the thread runs in a clockwise direction (arrow). (3)
- Pull the thread through the slit and under the finger. (4) Lea e
a 6 inch tail of thread.
- Hold the bobbin case by the hinged latch. (5)
- Insert it into the shuttle. (6)
Turn power switch to off ("O") before inserting or remo ing
the bobbin.
3 4 5
6
1 2
a
10

Change the needle regularly, especially if it is showing signs of
wear and causing problems.
Insert the needle as illustrated as follows:
A. Loosen the needle clamp screw and tighten again after
inserting the new needle. (1)
B. The flat side of the shaft should be towards the back.
C/D. Insert the needle as far up as it will go.
Turn power switch to off ("O") before inserting or remo ing
the needle.
Needles must be in perfect condition. (2)
Problems can occur with:
A. Bent needles
B. Damaged points
C. Blunt needles
Attention:
1
2
Inserting t e needle
A
B
C
D
ABC
11

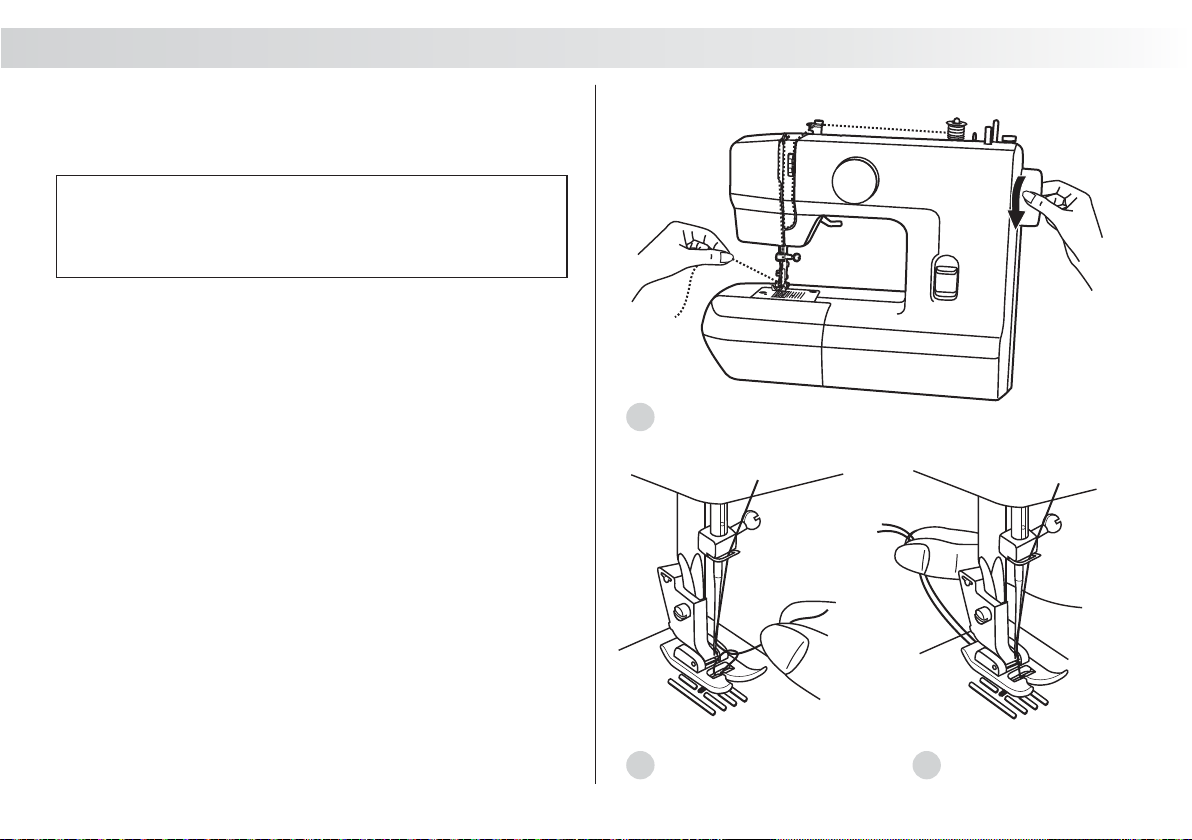
T reading t e upper t read
This is a simple operation but it is important to carry out correctly
as by not doing so
- Start by raising the needle to its highest point (1), and
continue turning the handwheel counterclockwise until the
needle just slightly begins to descend. Raise the presser foot
to release the tension discs. (2)
For safety, it is strongly suggested you turn off the
power before threading.
- Place the thread and spool pin felt (a) onto the spool pin. (3)
- Draw thread from spool through the thread guide to the upper
thread guide. (4)
- Thread tension module by leading thread down right channel
and up left channel. (5) During this process it is helpful to hold
the thread between the spool and thread guide.
- At the top of this mo ement pass thread from right to left
through the slotted eye of the take-up le er and then
downwards again. (6)
- Now pass thread behind the thin wire needle clamp guide (7)
and then down to the needle which should be threaded from
front to back.
- Pull about 6-8 inches of thread to the rear beyond the needle
eye. Trim thread to length with built in thread cutter. (8)
se eral sewing problems could result.
Note:
5
4
6 87
12

BA
CD
1 2
T read tension
Upper t read tension
Lower t read tension
Please note:
Basic thread tension setting: "4". (1)
To increase the tension, turn the dial to the next number up.
To reduce the tension, turn the dial to the next number down.
A. Normal thread tension for straight stitch sewing.
B. Thread tension too loose for straight stitch sewing. Turn dial
to higher number.
C.Thread tension too tight for straight stitch sewing. Turn dial to
lower number.
D.Normal thread tension for zig zag and decorati e sewing.
Correct thread tension is when a small amount of the upper
thread appears on the bottom side of fabric.
(2)
To test the bobbin thread tension, remo e the bobbin case and
bobbin and hold it by suspending it by the thread. Jerk it once or
twice. If the tension is correct, the thread will unwind by about
an inch or two. If the tension is too tight, it does not unwind at all.
If the tension is too loose, it will drop too much. To adjust, turn
the small screw on the side of the bobbin case.
- Proper setting of tension is important to good sewing.
- There is no single tension setting appropriate for all stitch
functions, thread or fabric.
- A balanced tension (identical stitches both top and bottom) is
usually only desirable for straight stitch construction sewing.
- 90% of all sewing will be between "3" and "5".
- For zig zag and decorati e sewing stitch functions, thread
tension should generally be less than for straight stitch sewing.
- For all decorati e sewing you will always obtain a nicer stitch
and less fabric puckering when the upper thread appears on
the bottom side of your fabric.
2
4
3
4
5
6
13
Raising t e bobbin t read
Hold the upper thread with the left hand. Turn the handwheel (1)
towards you (counterclockwise) lowering, then raising needle.
If it is difficult to raise the bobbin thread, check to make sure
the thread is not trapped by the hinged co er or the sewing
table.
Gently pull on the upper thread to bring the bobbin thread up
through the needle plate hole. (2)
Lay both threads to the back under the presser foot. (3)
Note:
1
32
14

Standard sharp needles. Sizes range thin to large.
9 (65) to 18(110)
Semi-ball point needle, scarfed. 9(65) to 18(110)
Full ball point needle 9(65) to 18(110)
Leather needles. 12(80) to 18(110)
NEEDLE, FABRIC SELECTION
Note: 1. European needles show sizes 65, 70, 80 etc. American and Japanese needles show size 9, 11, 12 etc.
2. Replace needle often (approximately e ery other garment ) and / or at first thread breakage or skipped stitches.
3. Use a backing for fine or stretchy fabrics.
Natural wo en fabrics-wool, cotton, silk, etc. Qiana.
Not recommended for double knits.
Natural and synthetic wo en fabrics, polyester blends.
Knits-polyesters, interlocks, tricot, single and double knits. Can
be used instead of 15 1 for sewing all fabrics.
NEEDLES EXPLANATION TYPE OF FABRIC
Sweater knits, Lycra, swimsuit fabric, elastic.
Leather, inyl, upholstery.
(Lea es smaller hole than standard large needle.)
NEEDLE, FABRIC, THREAD SELECTION GUIDE
NEEDLE SIZE FABRICS THREAD
9-11(65-75)
12(80)
Lightweight fabrics-thin cottons, oile, serge, silk, muslin, Qiana, interlocks,
cotton knits, tricot, jerseys, crepes, wo en polyester, shirt & blouse fabrics.
Medium weight fabrics-cotton, satin, kettleclote, sailcloth, double knits,
lightweight woollens.
Medium weight fabrics-cotton duck, woolen, hea ier knits, terrycloth, denims.
Hea yweight fabrics-can as, woolens, outdoor tent and quilted fabrics,
denims, upholstery material (light to medium).
Hea y woollens, o ercoat fabrics, upholstery fabrics, some leathers and inyls.
IMPORTANT: Match needle size to thread size and weight of fabric.
14(90)
16(100)
18(110)
Light-duty thread in cotton, nylon or
polyester.
Most threads sold are medium size and
suitable for these fabrics and needle sizes.
Use polyester threads on synthetic
materials and cotton on natural wo en
fabrics for best results. Always use the
same thread on top and bottom.
Hea y duty thread, carpet thread.
(Use hea y foot pressure-large numbers.)
HA 1
15 1
15 1/705H(SUK)
15 1/705H(SUK)
130 PCL
Matc ing needle/ fabric/ t read
15
Table of contents


