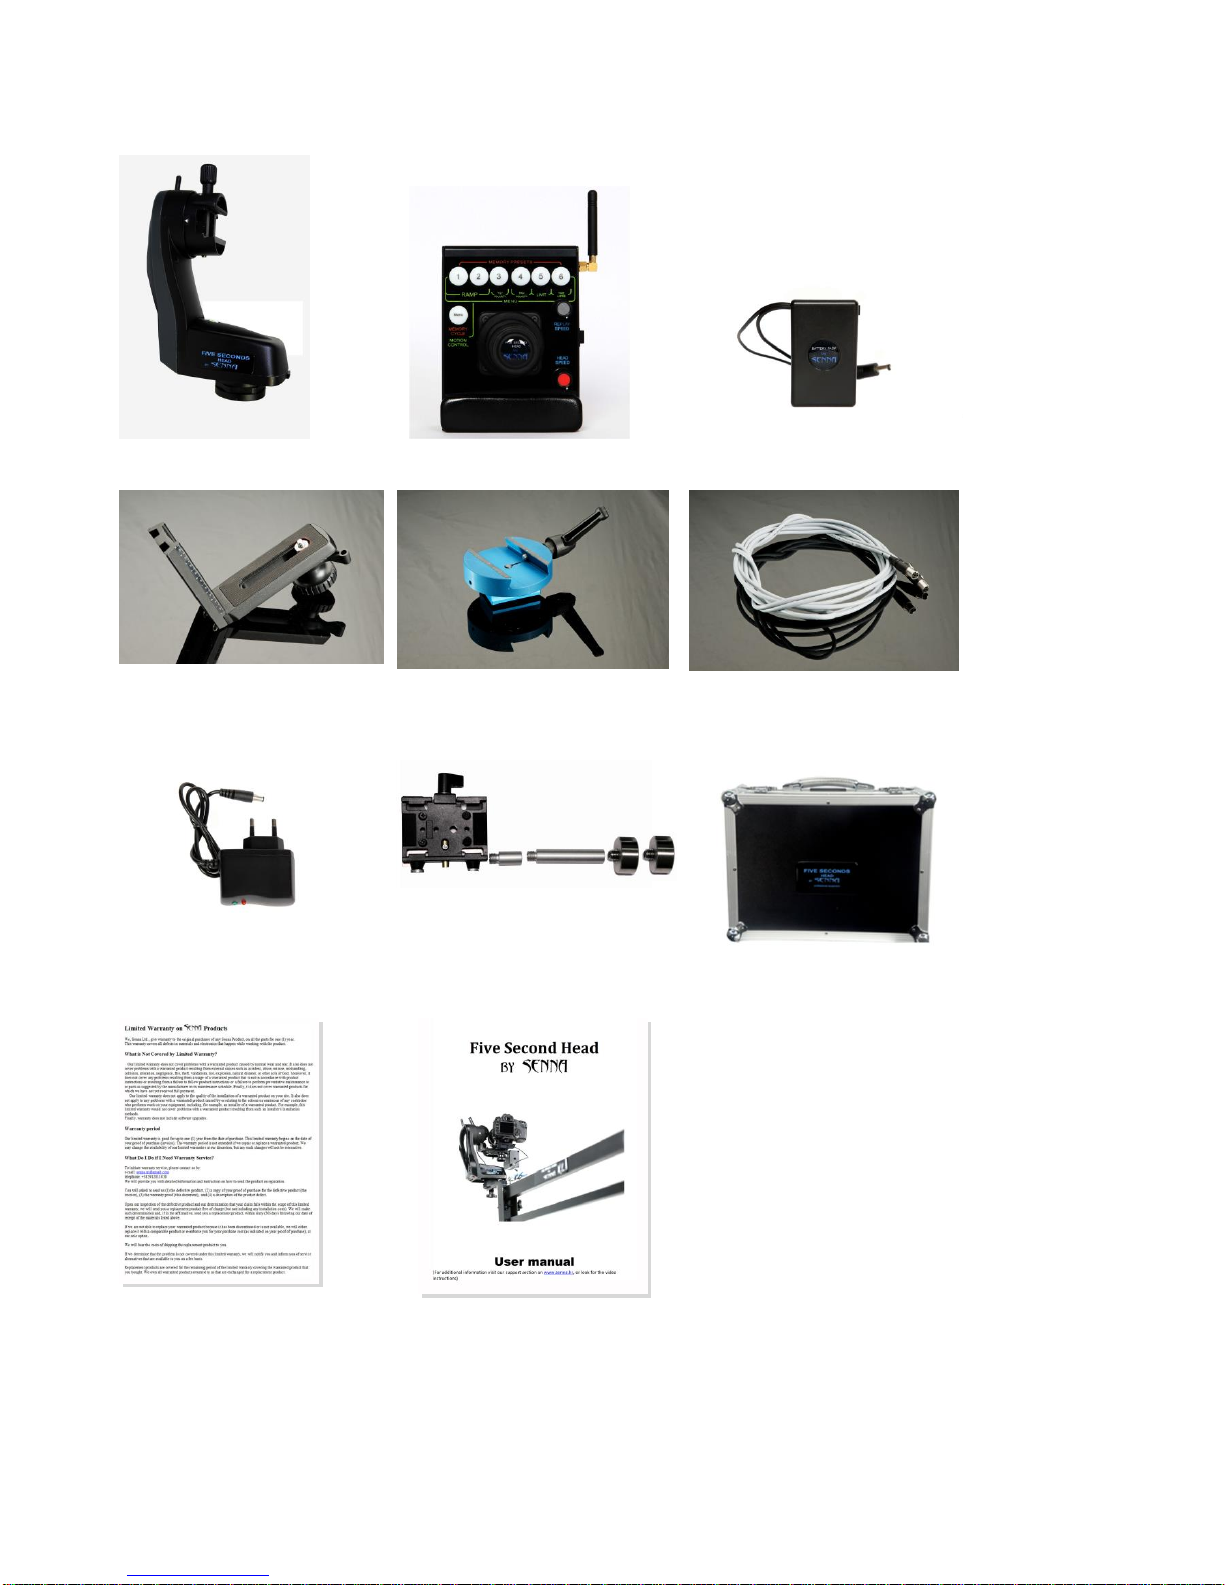
Senna Five Second Head User manual

Five Second Head
by SENNA
User manual
Look for the video instructions on You Tube and Vimeo:
http://www.youtube.com/watch?v=ocMmi8PmO_s
http://vimeo.com/65045628
http://vimeo.com/65038326

1. Introduction
Aimed toward the DSLR and small HD cam market, the Five Second Head weighs in at 4.4lbs (2kg), allows
360 degrees of pan/tilt, six points of memory for scene storage, speed replay, memory recalls and loop
cycles. Motion Control features allow time lapse in six different speed settings and storage of 30 seconds
head movements.
1.1 Features:
•Pan and tilt 360 degree rotations, two axes
•For payload up to 4 kg
•Wireless Range: 300m line of sight
•Time lapse function 90 degreed –60 minutes, six different speeds
•Six memory points to store favorite scene and speed replay
•Auto memory recalls and loop cycle
•Motion Control –store up to 30 seconds of wanted head movement
•Two ramp modes for smooth starting and stopping
•Tilt and Pan joystick polarity configuration
1.2 Specifications:
Parameter
Description
Operating voltage
12VDC
Head Weight
4.4lbs (2kg)
Weight Capacity
8.8lbs (4kg)
Operating temperature
0 ÷ 45 °C (or more if connected to power adapters)
Battery
Rechargeable 12V, 1200 mAh Joystick, 2450mAh Head
Motor power output
12VDC, 1A max. for one motor
Wireless frequency
431 ÷ 478 MHz, frequency is preset on 444 MHz and can
not be changed on device, only in factory when ordering,
in steps of 200 KHz (235 channels)
RF modulation
GFSK
Wireless output power
20 mW
Wireless range
up to 300 m in open area
Joystick dimension
10 x 9 x 14 cm (W x H x D) without antenna
Head dimension
23 x 28 x 12 cm (W x H x D) without antenna

1.3 Five Second Head set includes:
Five Second Head Unit
Five second head controller
External spare battery
L shaped camera
mount holder
Balancing adapter
Communication cable
2 Battery chargers
Camera plate with
rods and mini weights
Flight Case
Warranty letter
User Manual

2. Head Unit
2.1 Parts diagram
2.2 Mounting the 5s Head
Five Second Head can be mounted on any tripod, slider or a
crane. (See the picture)

The Remote Head Five Second can be mounted on
your crane in two different positions:
For shooting the sky use upwards position of the
head, as shown in the picture.
For shooting the ground use downwards position,
as shown in the picture.
Five Second Head allows changes of pan/tilt polarity
for both head positions. See the chapter
Configuration.
NEVER USE THE HEAD WITHOUT MAKING THE RIGHT CAMERA
BALANCE WITH THE BALANCE ADAPTER.
USING UNBALANCED CAMERA CAN DAMAGE THE REMOTE
HEAD’S MOTORS PERMANENTLY.
NEVER MOVE THE HEAD WITH YOUR HAND; IT CAN MAKE
UNREPARABLE DAMAGE TO THE HEAD'S MOTORS. TO MOVE
THE HEAD ALWAYS USE JOYSTICK

2.3 Balancing the camera
To make the right balance of your camera follow the steps:
1. Mount the balancing adapter instead of L-
shaped camera holder.
2. Balancing adapter is mounted. Now you can
attach the L-holder and your camera to it
3. Move the camera back and forth using the
camera plate until you find a position in which
the camera stands still (does not fall back or
forth)
4. Turn the camera in vertical position and now
move L-holder back/forth until you find a
position in which the camera stands still.
5. Mark the position of the L-holder in the blue
adapter.
6. Now remove the balance adapter and mount
the L-holder directly onto the Head but in the
same position as it was in the balance adapter.
Your camera is now properly balanced.
Detailed video instructions on making the right balance on Five Second Head are given on You Tube: 5S Head –User
Manual: http://www.youtube.com/watch?v=ocMmi8PmO_s )

MAKING CAMERA BALANCE ON FIVE SECOND HEAD USING MINI WEIGHTS
When mounting heavier lens on your camera, you may have difficulties with making the right
balance of the camera. In that case, mount holder with rods on your camera plate and attach
the mini weights from the back in order to make counter weight to your camera lens and find
the balance very easily. (See the pictures below)
1. Set includes holder, two-extension rods, 2 mini
weights
2. Attach the holder to the
camera plate with
enclosed screws
3. Depending on your lens weights you can use short or long extensions or both of them to make the
right balance.

4. Combine the extentions with weights and repeat the steps 3 and 4 of the charter Balancing the Head untill
you have reached the right balance.
3. Control plate diagram
3.1 First start
After you have installed 5sH and made the right balance of your camera, you can turn 5sH on by following
the steps:
1. Turn the power switch button on.
2. Blue LED will start flashing slowly.
3. Turn on the power switch of the head controller.
4. Head and controller will start establishing wireless connection and the lights will flash on all buttons.
5. When the lights on buttons turn off, wireless connection is established and your 5sH system is ready for
use.

3.2 Head Speed
Smart controller is equipped with big-knob joystick for the best precision of the head motion.
To get finest head control, you can also tune the speed of the head with the HEAD SPEED potentiometer. Left
end position will give you finest and slowest motion of the head, and right end position will give you the
fastest head motion.
4. Configuration
5sH system allows you to configure controls to suit your needs in the best way.
* Active option will be presented with button light turned on and vice versa. Every time you turn the
controller ON, previously stored configuration will be loaded from the memory.
4.1 Ramp
To perform smooth starting and stopping of the movements, there are two ramp stages. To set the desired
ramp stage, please follow the steps:
1. Press and hold the Menu button, indicators will flash and Menu button will turn from blue to yellow.
2. When the Menu button becomes yellow, you have entered the menu.
3. For the ramp stage 1 shortly press memory button 1; For the ramp stage 2 shortly press memory
buttons 1 and 2.
4. Memory button, 1 or 1 and 2 will turn green. (See the pictures below)
5. Shortly press the Menu button to confirm the changes.
6. You have now set the ramp.
Ramp 1 Ramp 2
To disable the Ramp option, follow the steps:
1. Press and hold the Menu button, indicators will flash and Menu button will turn from blue to yellow.
2. When the Menu button becomes yellow, you have entered the menu.
3. Press shortly the memory button with (1 or 1 and 2, depending on which stage of ramp is previously
set)
4. Green light on memory buttons will turn off.
5. Shortly press the Menu button to confirm the changes.
6. You have now disabled the ramp.

4.2 Polarity
To reverse the direction of pan/tilt movements on your joystick, please follow the steps:
1. Press and hold the Menu button, indicators will flash and Menu button will turn from blue to yellow.
2. When the Menu button becomes yellow, you have entered the menu.
3. Shortly press memory button 3 for tilt polarity/or memory button 4 for pan polarity, green light will
turn on. (See the pictures below)
4. Shortly press the Menu button to confirm the changes.
5. You have now changed pan or tilt polarity.
Changing tilt polarity Changing pan polarity
4.3 Limit
This option allows you to limit the range of the head
motion to ±240° in PAN direction from zero point and
±190° in TILT direction from zero point. (See the picture)
IMPORTANT! This option must be enabled when using
the advanced options such as memory points, motion
control, time laps and auto memory recall!
Zero position
To set the limit, please follow the steps:
1. Press and hold the Menu button, indicators will flash and
Menu button will turn from blue to yellow.
2. When the Menu button becomes yellow, you have entered
the menu.
3. Shortly press the memory button 5, green light will turn on.
(See the picture)
4. Shortly press the Menu button to confirm the changes.
5. You have now set the limit.
IMPORTANT! If you want that head moves TILT/PAN infinitely,
you need to deactivate the limit.
When limit is deactivated advanced options such as memory points,
motion control, time laps and auto memory recall are disabled!

To deactivate limit, please follow the steps:
1. Press and hold the Menu button, indicators will flash and Menu button will turn from blue to yellow.
2. When the Menu button becomes yellow, you have entered the menu.
3. Shortly press the memory button 5, green light will turn off.
4. Shortly press the Menu button to confirm the changes.
5. You have now deactivated the limit.
4.4 Time Lapse
This option allows you to set extremely slow head motion speed. There are 6 different time lapse speeds
available.
IMPORTANT! Time lapse speed only affects the head speed for the stored memory point’s recall.
Time lapse option is available only when limit is turned on.
For example:
If you want to make a panorama scene in time lapse, you should follow these steps:
1. Turn the remote head to the left end position (use joystick!)
2. Press memory button 1, green light will turn on.
3. You have now stored the initial point of movement.
4. Now turn the head to the right end position.
5. Press the memory button 2, green light will turn on.
6. You have now stored the ending point of movement.
7. Shortly press the memory button 1, Head will turn to the
initial point you have stored.
8. Press and hold the Menu button, indicators will flash and
Menu button will turn from blue to yellow.
9. When the Menu button becomes yellow, you have entered the
menu.
10. Shortly press memory button 6, green light will turn on. (See
the picture below)
11. Shortly press the Menu button to confirm the changes.
12. Turn the replay speed potentiometer to choose the desirable
speed of time lapse. Red lights will turn on the memory buttons
showing the speed presets of time lapse (See the picture in the charter Replay speed)
13. Shortly press the memory button 2.
14. Time lapse option is now activated.
To deactivate Time Lapse option, follow the steps:
1. Press and hold the Menu button, indicators will flash and Menu button will turn from blue to yellow.
2. When the Menu button becomes yellow, you have entered the menu
3. Shortly press the memory button 6, green light will turn off.
4. Shortly press the menu button to confirm the changes.
5. You have now deactivated time lapse option.
4.4.1 Replay speed
Time Lapse function allows 6 speed presents. The speed of Time Lapse is
set with REPLAY SPEED potentiometer (as described in step 12, charter
Time Lapse)
When you move the Replay Speed potentiometer, red light will turn on the
memory button showing which speed preset is selected:
One LED light on - slowest Time Lapse speed (90 degrees of head motion
in 1 hour)
Six LEDs lights on - fastest Time Lapse speed (90 degrees of head motion
in 30 minutes)

4.5 Memory presets
To store desirable memory point, please follow the steps:
1. Turn the head to desired direction using joystick.
2. Press and hold wanted memory button (1-6)
3. All memory buttons will flash red.
4. The desirable position is now stored and can be recalled any time by short press to the memory button.
When recalled, memory button will turn green.
To store another memory point, repeat the steps 1-4. The controller allows the storage of 6 different
memory points.
4.5.1 Replay speed
To change the speed of head moving from one stored position to another, use potentiometer labeled as
REPLAY SPEED. Left end position for slowest moving, right end for fastest.
4.6 Auto Memory Recall
After you have stored the desired memory points, you can set the automatic memory recall.
To set memory recall, follow the steps:
1. Press and hold Menu button (hold it to the last step)and before the system enters the Menu (before
the Menu button turns yellow) press memory button on which the first memory point is stored (with
which you would like to start the recall session). Green light on the memory button will turn on.
2. Now press memory button where the second wanted point is stored. Green light on the first memory
point will turn on, and then on the second memory point (the lights will constantly loop showing the
order of memory recall session)
3. Repeat the step 2 until you have set all wanted points of memory recall session.
4. Now you can release the Menu button.
5. Auto Memory recall session is now set.
To activate Auto memory recall press the Menu button shortly. The head will turn to the first stored memory
point, and then to each next added point and it will stop on the last stored position.
If a point is added to memory recall session by mistake, press that last memory point button again
and the point will be deleted from memory recall session.
You can check the order of your auto memory recall session by tracking the green lights.
4.6.1 Loop cycle
This option allows the head to constantly loop over the stored memory points in the order you have set.
To set loop cycle option, you should follow the steps 1-5 in the charter Auto Memory Recall, but pay
attention to set the same memory point as the first and the last in the memory recall session!
Set as described, the head will keep looping as long as you do not move the joystick or press the Menu
button shortly once again.
* For example:
You want to store the memory points: M1, M2, M3.
To visit all points starting with M1:
MENUBUTTON_HOLD
M1_BUTTON,M2_BUTTON ,M3_BUTTON
MENUBUTTON_RELEASE
The head will go to M1 - M2 - M3 and then it will stop.

To visit all point and repeat the session constantly:
MENUBUTTON_HOLD
M1_BUTTON,M2_BUTTON,M3_BUTTON,M1_BUTTON
MENUBUTTON_RELEASE
System will go to M1 - M2 - M3 - M1 - M2 - M3 - M1 … constantly looping.
To visit all point and go back over point M2 repeat the session constantly:
MENUBUTTON_HOLD
M1_BUTTON,M2_BUTTON,M3_BUTTON,M2_BUTTON,M1_BUTTON
MENUBUTTON_RELEASE
System will go to M1 - M2 - M3 - M2 - M1 - M2 - M3 - M2 - M1 … constantly looping.
To visit all point, go back to the first memory point but without loop cycle:
STORE THE SAME HEAD POSITION ON MEMORY BUTTONS 1AND 4(M1 =M4)
MENUBUTTON_HOLD
M1_BUTTON,M2_BUTTON,M3_BUTTON,M4_BUTTON
MENUBUTTON_RELEASE
System will go to M1 - M2 - M3 –M4=1 and then it will stop.
4.7 Motion control
Motion Control option allows you to record up to 30 seconds of the head movements.
To record the desirable head movement, follow the steps:
1. Turn the head to the position from where you want to start the desirable movement. (Use joystick)
2. Press and hold the Menu button
3. Before the system enters the Menu (before the Menu button turns yellow) move the joystick a little
bit in any direction.
4. System is now ready for recording, but recording has not started yet.
5. To start recording of the movement release the Menu button.
6. Recording has now started.
7. Make a desirable head moves using joystick.
8. Red light will turn on the memory buttons (one by one) showing how much time you have left.
9. Recording will stop when you press the Menu button again or automatically after 30sec of recording.
10. To play the recorded movements shortly press the Menu button. The head will first turn to the initial
position and then it will repeat the recorded movements.
You can repeat the recording movements as many times as you like by pressing the Menu button.
IMPORTANT! Auto memory recall and Motion control are both controlled with the same Menu button,
because of that Auto memory recall setting will erase Motion control record and vice versa.

5. Good to know
Loss of communication
In the case that communication between the head unit
and controller is lost, head will stop moving and try to
reconnect to the controller.
This can be caused by interference with used radio
frequency or due to the large distance between devices
or when the controller is turned off.
Time Lapse and Memory recall
When Time Lapse option is activated or when Auto
memory recall is started, 5sH will start to work
independently from the controller. Even if you turn the
controller off, the head will continue to work by itself.
To reestablish the connection between the controller and
the head, it is necessary to turn the head off and then on
again.
IMPORTANT! Do not move the head pan/tilt with your hand. It can cause unrepeatable damage to the
motors!
6. Wired connection
Whenever possible, it is recommended to use wired communication. When wired connection is used,
wireless modules are in standby mode and system uses less power.
When you use wired communication, system will start working when you turn ON either the Head or the
controller.
If you turn the head ON, the head’s battery will power the controller as well. If you turn the controller ON,
controller’s battery will power the head electronic and motors.
If you need extra power (when working in wired mode) you should turn both devices ON. This way the
capacity of the batteries will be summarized.
When the head and the controller are connected with cable, charging of one device will charge the other as
well (Power switch on both devices must be in power on position to charge the batteries with
communication cable!).
6.1 Power supply
If you want the system to work on electricity, you should connect 5sH and the controller with
communication cable, and then connect the controller to the power supply (5sH will be powered
automatically over communication cable). It is not necessary to connect both devices to the power supply.
7. Batteries
The head works on 8 AA 1.5V batteries. (Rechargeable AA batteries are included in the head set)
Head controller uses internal lithium batteries.
The head and controller can run on power supply as well.
Batteries of the head and controller should be charged for 3 hours max.
DO NOT charge the batteries over night!
DO NOT leave the batteries to get empty completely! You will not be able to charge them again!
The capacity of the head and controller batteries is 4 working hours.

7.1 Checking the state of batteries:
To check the state of the batteries in the
head unit please follow the steps:
1. Turn the Head ON.
2. Read the voltage on the display placed at the
bottom of the Remote Head.
If the voltage is under 10,0 batteries need to
be charged.
If the voltage is 12,0 batteries are fully
charged.
To check the state of the batteries in the control
plate, please follow the steps:
1. Connect the head and the controller with
communication cable
2. Keep the head OFF.
3. Turn the controller ON.
4. Read the voltage on the display placed at the
bottom of the Remote Head.
If the voltage is under 10,0 batteries need to be
charged.
If the voltage is 12,0 batteries are fully
charged.
7.2 When the batteries get empty:
If the head will be used for a longer time, it is strongly recommended to connect
it to the power supply to make sure that batteries will not get empty.
In the case the power supply is not available on
site and the batteries in the head get empty, it is
easy to replace them with standard AA 1.5V
batteries.
IMPORTANT! If standard batteries are in use, DO
NOT connect power adapter to the head power
socket.
Replacing the head batteries
If the batteries inside the head are empty, and you do not have spare AA batteries, extra power can be
achieved by connecting the head and the controller with the cable. This will allow the head to use the power
of controller’s batteries.

7.3 Spare batteries
If the batteries are empty or broken, you can replace them with external spare battery which is included in
the set. (See the pictures)
Attaching the external battery
The capacity of the spare battery is 4 working hours.
This spare battery should be charged for 3 hours max.
IMPORTANT! When being charged, spare battery must always be turned on.
Always turn the spare battery off when it is not in use or being charged. If it gets empty completely it cannot
be charged again.
Table of contents
Other Senna Camera Accessories manuals