Sens S1901DVD User manual

S1901DVD / S2201DVD
LCD TV + DVD
OWNER’S MANUAL

E - 2
SAFETY PRECAUTIONS
WARNING : TO REDUCE THE RISK OF ELECTRIC
SHOCK, DO NOT REMOVE COVER (OR BACK).
NO USER SERVICEABLE PARTS INSIDE.
REFER SERVICING TO QUALIFIED SERVICE
PERSONNEL.
CAUTION
• TO PREVENT ELECTRIC SHOCK, MATCH
WIDE BLADE OF PLUG TO WIDE SLOT OF
WALL OUTLET, THEN FULLY INSERT.
WARNING :
PLACEMENT INFORMATION
SAFETY INFORMATION
CONDENSATION INFORMATION
RATING PLATE LOCATION
FCC STATEMENTS
WARNING:
CAUTION
INVISIBLE LASER RADIATION WHEN
OPEN AND INTERLOCKS DEFEATED.
AVOID EXPOSURE TO BEAM
This product
contains a low
power laser device.
CLASS 1 LASER
PRODUCT
* CAUTION MARKING WAS LOCATED AT BOTTOM
ENCLOSURE OF THE APPARATUS
E - 3
IMPORTANT SAFETY INSTRUCTIONS
1) Read these instructions.
2) Keep these instructions.
3) Heed all warnings.
4) Follow all instructions.
5) Do not use this apparatus near water.
6) Clean only with a dry cloth.
7) Do not block any ventilation openings.
Install in accordance with the manufacturer’s
instructions.
8) Do not install near any heat sources such
as radiators, heat registers, stoves, or
other apparatus (Including ampliers) that
produce heat.
9) Do not defect the safety purpose of the
polarized or grounding-type plug. A polarized
plug has two blades with one wider than the
other. A grounding type plug has two blades
and a third grounding prong. The wide blade
or the third prong is provided for your safety.
Iftheprovidedplugdoesnottintoyourwall
outlet, consult an electrician for replacement
of the obsolete outlet.
10) Protect the power cord from being walked on
or pinched particularly at plugs, convenience
receptacles, and the point where they exit
from the apparatus.
11)Onlyuseattachments/accessoriesspecied
by the manufacturer.
12) Use only with the cart, stand,
tripod, bracket, or table
speciedbythemanufacturer,
or sold with the apparatus.
When a cart is used, use caution when
moving the cart / apparatus combination to
avoid injury from tip-over.
13) Unplug this apparatus during lightning
storms or when unused for long periods of
time.
14) Refer all servicing to qualified service
personnel. Servicing is required when the
apparatus has been damaged in any way,
such as the power cord or plug is damaged,
liquid has been spilled or objects have
fallen into the apparatus, the apparatus has
been exposed to rain or moisture, does not
operate normally, or has been dropped.
MAINTENANCE
CLEANING THE DISC
CLEANING THE UNIT
IMPORTANT NOTE

E - 4
CONTENTS
SAFETY PRECAUTIONS .......................... 2
IMPORTANT SAFETY INSTRUCTIONS .......
...................................................................... 3
MAINTENANCE ........................................ 3
CONTENTS ............................................... 4
QUICK INSTALLATION ............................. 5
DISC FORMATS ........................................ 6
ACCESSORIES ......................................... 7
GETTING STARTED ................................. 7
CONTROL REFERENCE GUIDE ........ 8 – 10
CONNECTIONS .............................. 11 – 14
INSTALLATION ....................................... 14
USING HEADPHONES ........................... 15
UNIT OPERATION .................................. 15
SOUND SYSTEM .................................... 15
TV SETUP ........................................ 16 – 20
CD/DVD OPERATION ..................... 21 – 22
SPECIAL FUNCTIONS ........................... 23
REPEAT PLAYBACK ........................... 24
DVD PROGRAMMABLE MEMORY ........ 25
CUSTOMIZING THE DVD FUNCTION
SETTINGS ............................................... 25
TROUBLE SHOOTING GUIDE ............... 27
E - 5
QUICK INSTALLATION
TURNING ON THE UNIT FOR THE FIRST TIME
ENTER
TV ANTENNA

E - 6
DISC FORMATS
NOTES ON COPYRIGHT
CD-R CD-RW
REGION MANAGEMENT INFORMATION
DISC FUNCTION OR OPERATION
THAT IS NOT AVAILABLE
ICONS USED ON DVDs
TITLES, CHAPTERS AND TRACKS
NOTES ON UNAUTHORIZED DISCS

E - 7
ACCESSORIES
Please check and identify the supplied accessories.
GETTING STARTED
USING THE REMOTE CONTROL
TO INSTALL THE BATTERIES
BATTERY REPLACEMENT
CAUTION:
WARNING :

E - 8
CONTROL REFERENCE GUIDE
1. STANDBY / ON button
2. TV button
DVD button
AV button
HD button
3. Number (0 - 9) buttons
4. •[dot]button
5. MENU button
6. VOLUME (- / +) buttons
7. CURSOR ( , , , ) buttons
ENTER button
8. / buttons
9. PREV button
10. SUBTITLE button
11. ANGLE button
12. TITLE button
13. GOTO button
14. MEMORY button
CLEAR button
15. MTS button
CC button
16. EXIT button
SLEEP button
E - 9
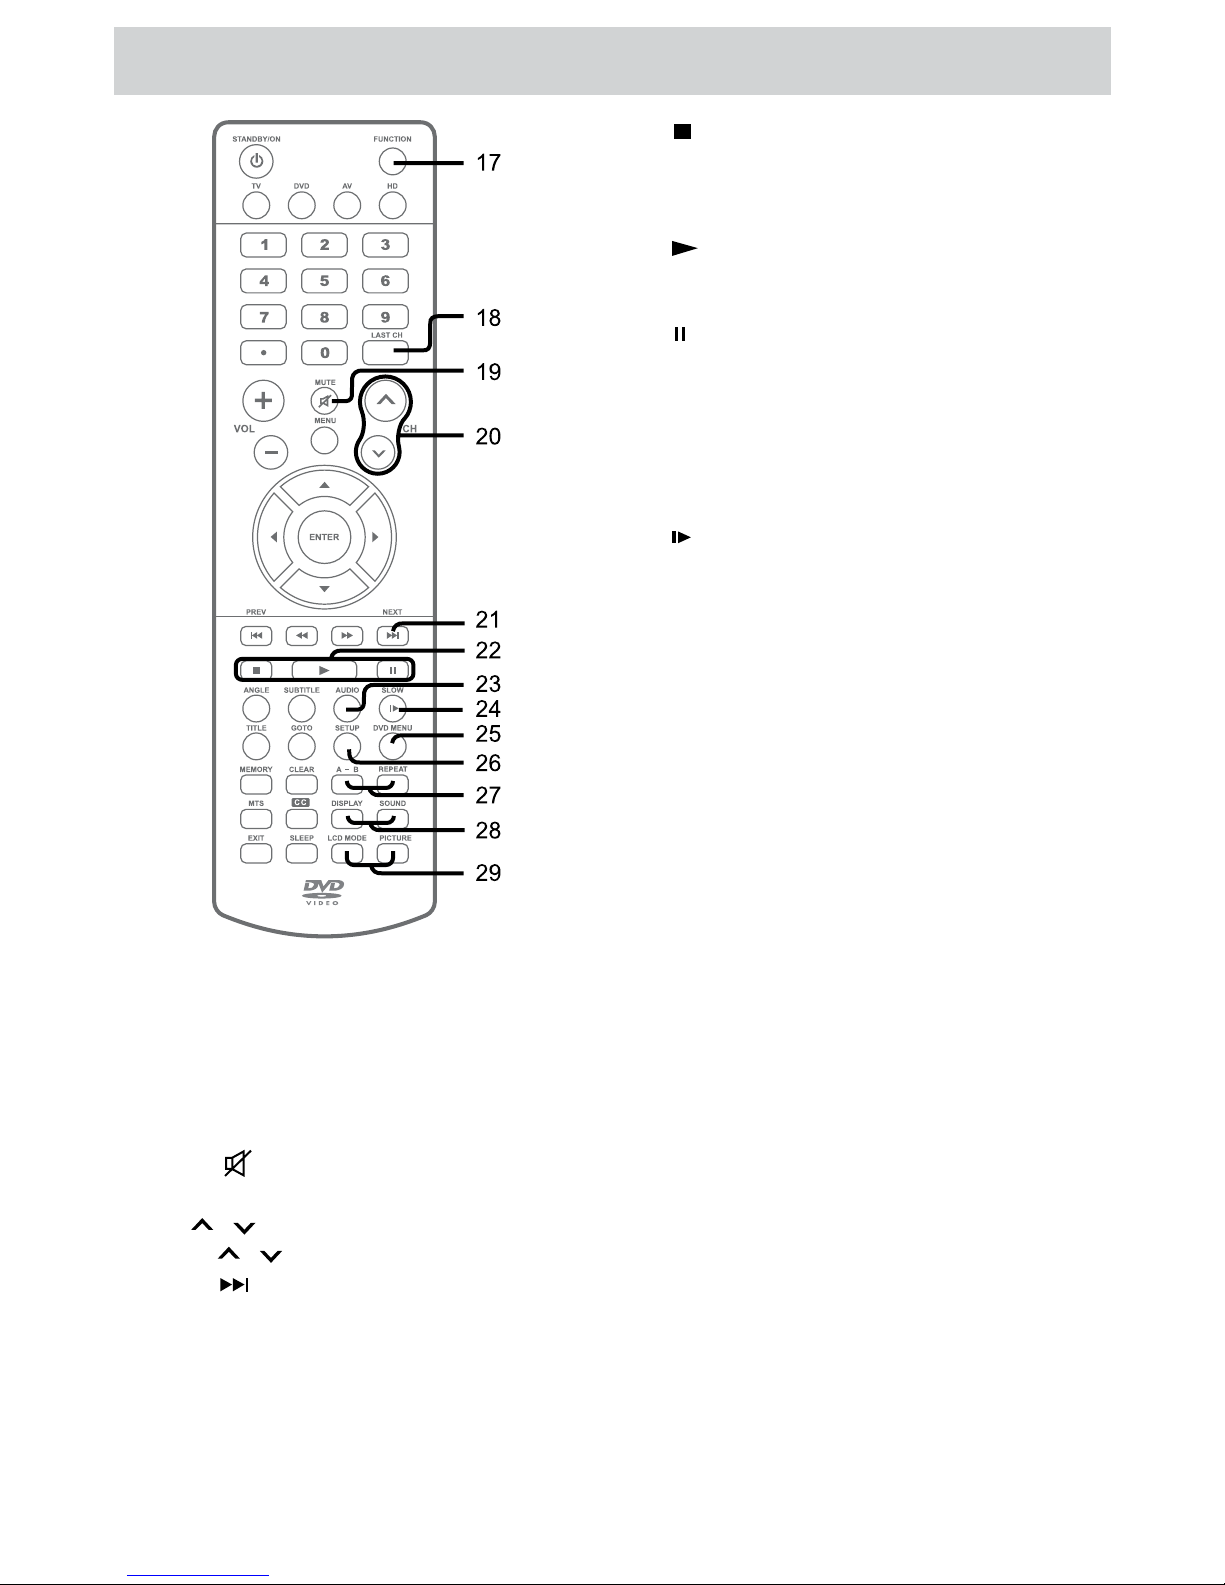
CONTROL REFERENCE GUIDE
17. FUNCTION button
18. LAST CH button
19. MUTE button
20. CH / CH buttons
21. NEXT button
22. button
PLAY button
PAUSE button
23. AUDIO button
24. SLOW button
25. DVD MENU button
26. SETUP button
27. A-B button
REPEAT button
28. DISPLAY button
SOUND button
29. LCD MODE button
PICTURE button
E - 10
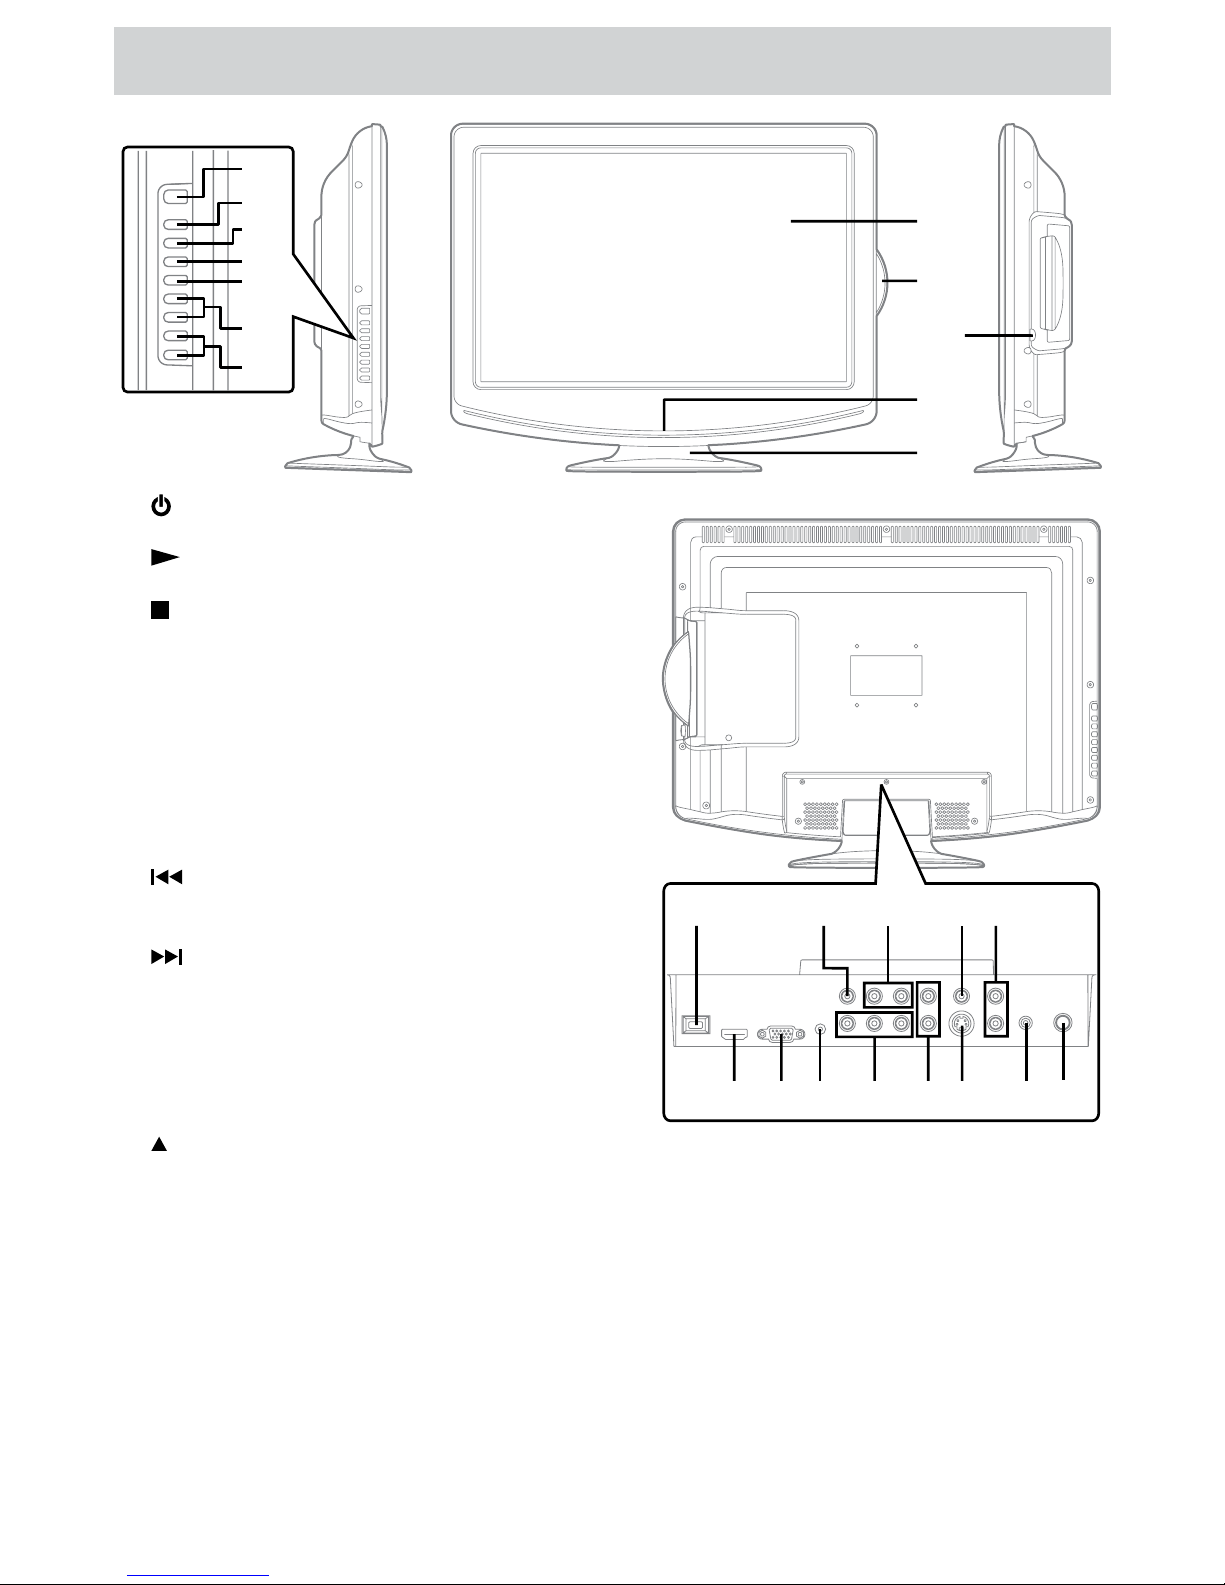
CONTROL REFERENCE GUIDE
1) / I button
2) PLAY button
3) STOP button
4) MENU button
5) FUNCTION button
6) CH buttons
button
button
7) – VOLUME + controls
8) Colour LCD Screen
9) Disc Door
10) button
11) Remote Sensor
Standby Indicator
12) Removable stand
13) Power Cord
14) AV OUT Video Output Jack
15) AV OUT Audio Output Jacks (Left/Right)
16) AV IN Video Input Jack
17) AV IN Audio Input Jacks (Left/Right)
18) HDMI IN jack
19) PC IN MONITOR/VGA Jack
20) PC IN Audio Jack
21) YUV IN Component Video Input Jacks (Y/PB/
PR)
22) YUV IN Audio Input Jacks (Left/Right)
23) AV IN S-Video Input Jack
24) Headphone Jack
25) TV Antenna Cable Terminal - Coaxial TV
Antenna Input
1
2
3
4
5
7
8
9
10
11
12
6
13 14 15 16 17
18 19 20 21 22 23 24 25

E - 11
CONNECTIONS
CONNECTING A TV ANTENNA / CABLE / SATELLITE
CONNECTING AN A/V DEVICE
(AV IN)
Connecting a Digital Antenna
Connecting an Analog Antenna or Device
Connecting to a VCR /
Camcorder / Satellite System
/ Cable
AUDIO
OUT S-VIDEO OUT
(AUDIO IN S-VIDEO IN
CONNECTING DEVICES WITH A COMPOSITE (YELLOW RCA-TYPE) VIDEO
OUTPUT
Connecting to a VCR / Video Game System / Camcorder
AUDIO VIDEO OUTAUDIO
VIDEO IN
AV IN
E - 12
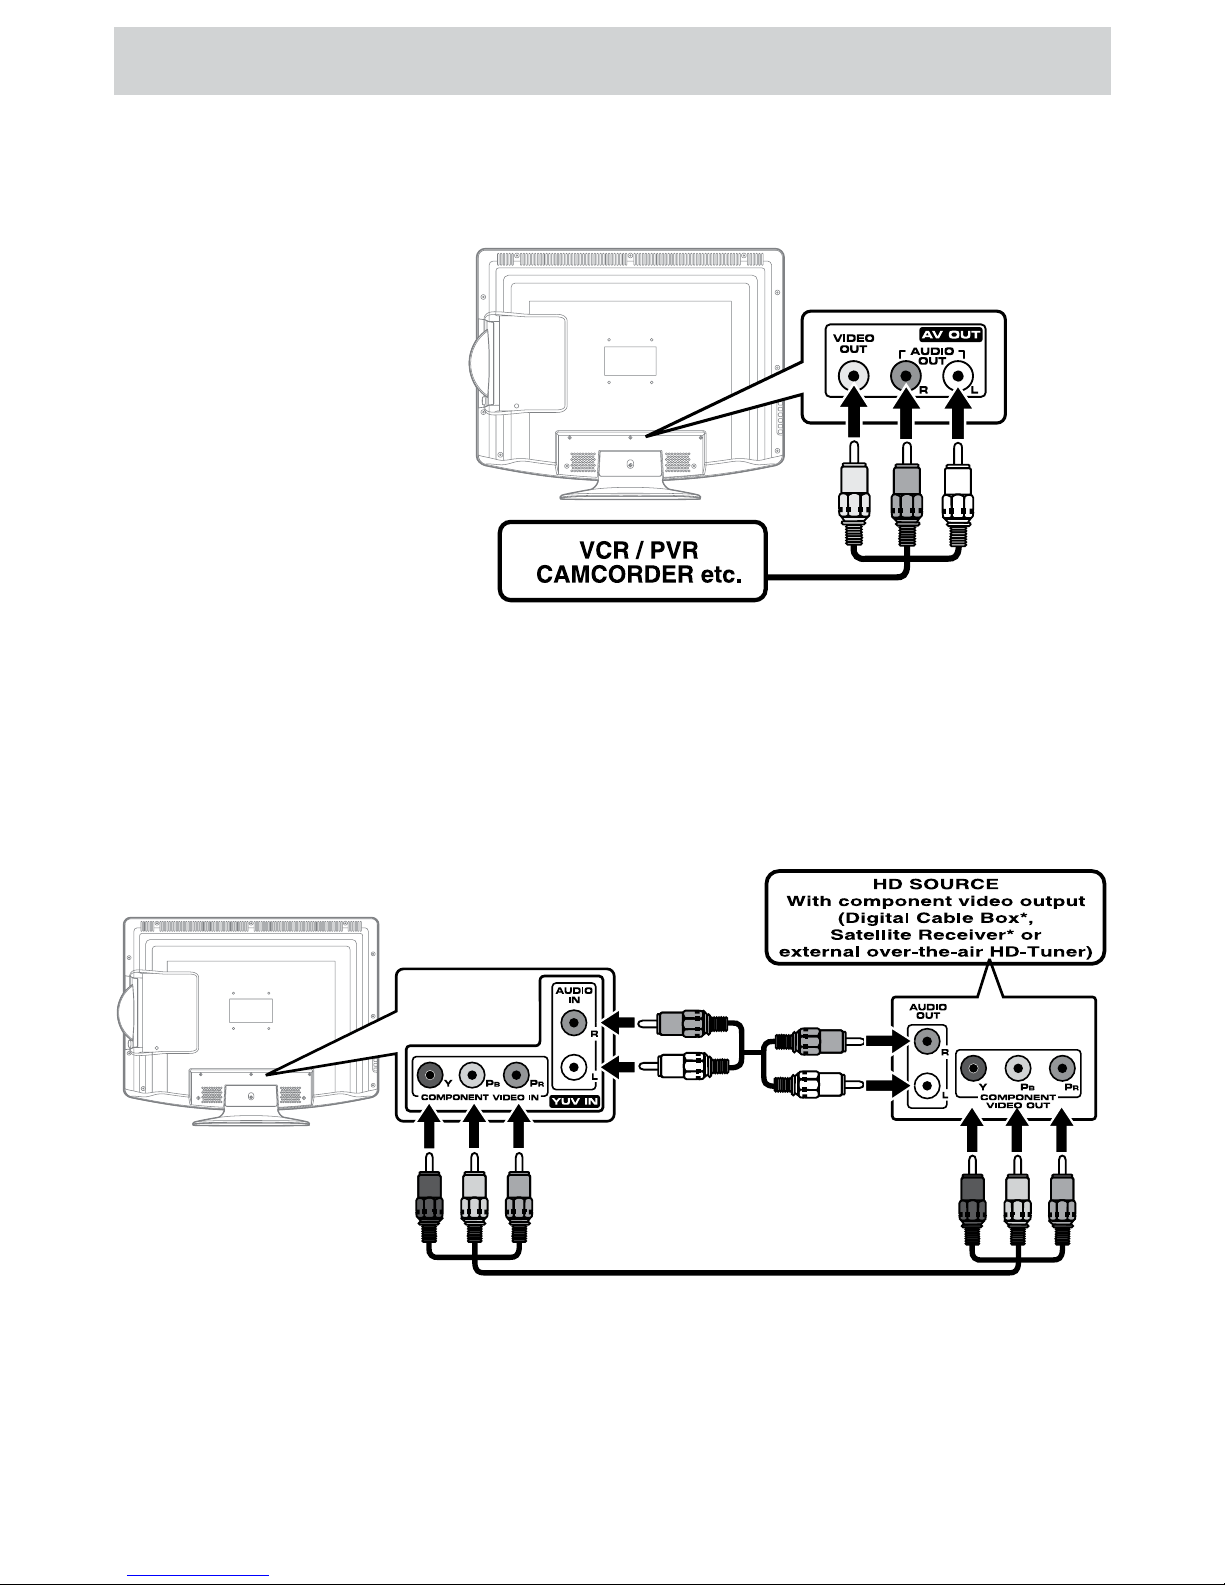
CONNECTIONS
CONNECTING DEVICES WITH A COMPOSITE (YELLOW RCA-TYPE) VIDEO
INPUT
Connecting to a VCR / PVR
/ Camcorder
(AUDIO VIDEO IN
AUDIO VIDEO OUT
CONNECTING A HIGH-DEFINITION (HD) SOURCE
COMPONENT
VIDEO OUT AUDIO OUTCOMPONENT VIDEO IN AUDIO IN - YUV IN
(YUV IN
(YUV IN

E - 13
CONNECTIONS
CONNECTING A PC
PC Connector AUDIO - PC
OUTMONITOR / VGA AUDIO
- PC IN
CONNECTING AN AUDIO AMPLIFIER
AUDIO IN AUDIO
OUT
CONNECTING HDMI
HDMI OUTHDMI IN
FUNCTION

E - 14
CONNECTIONS
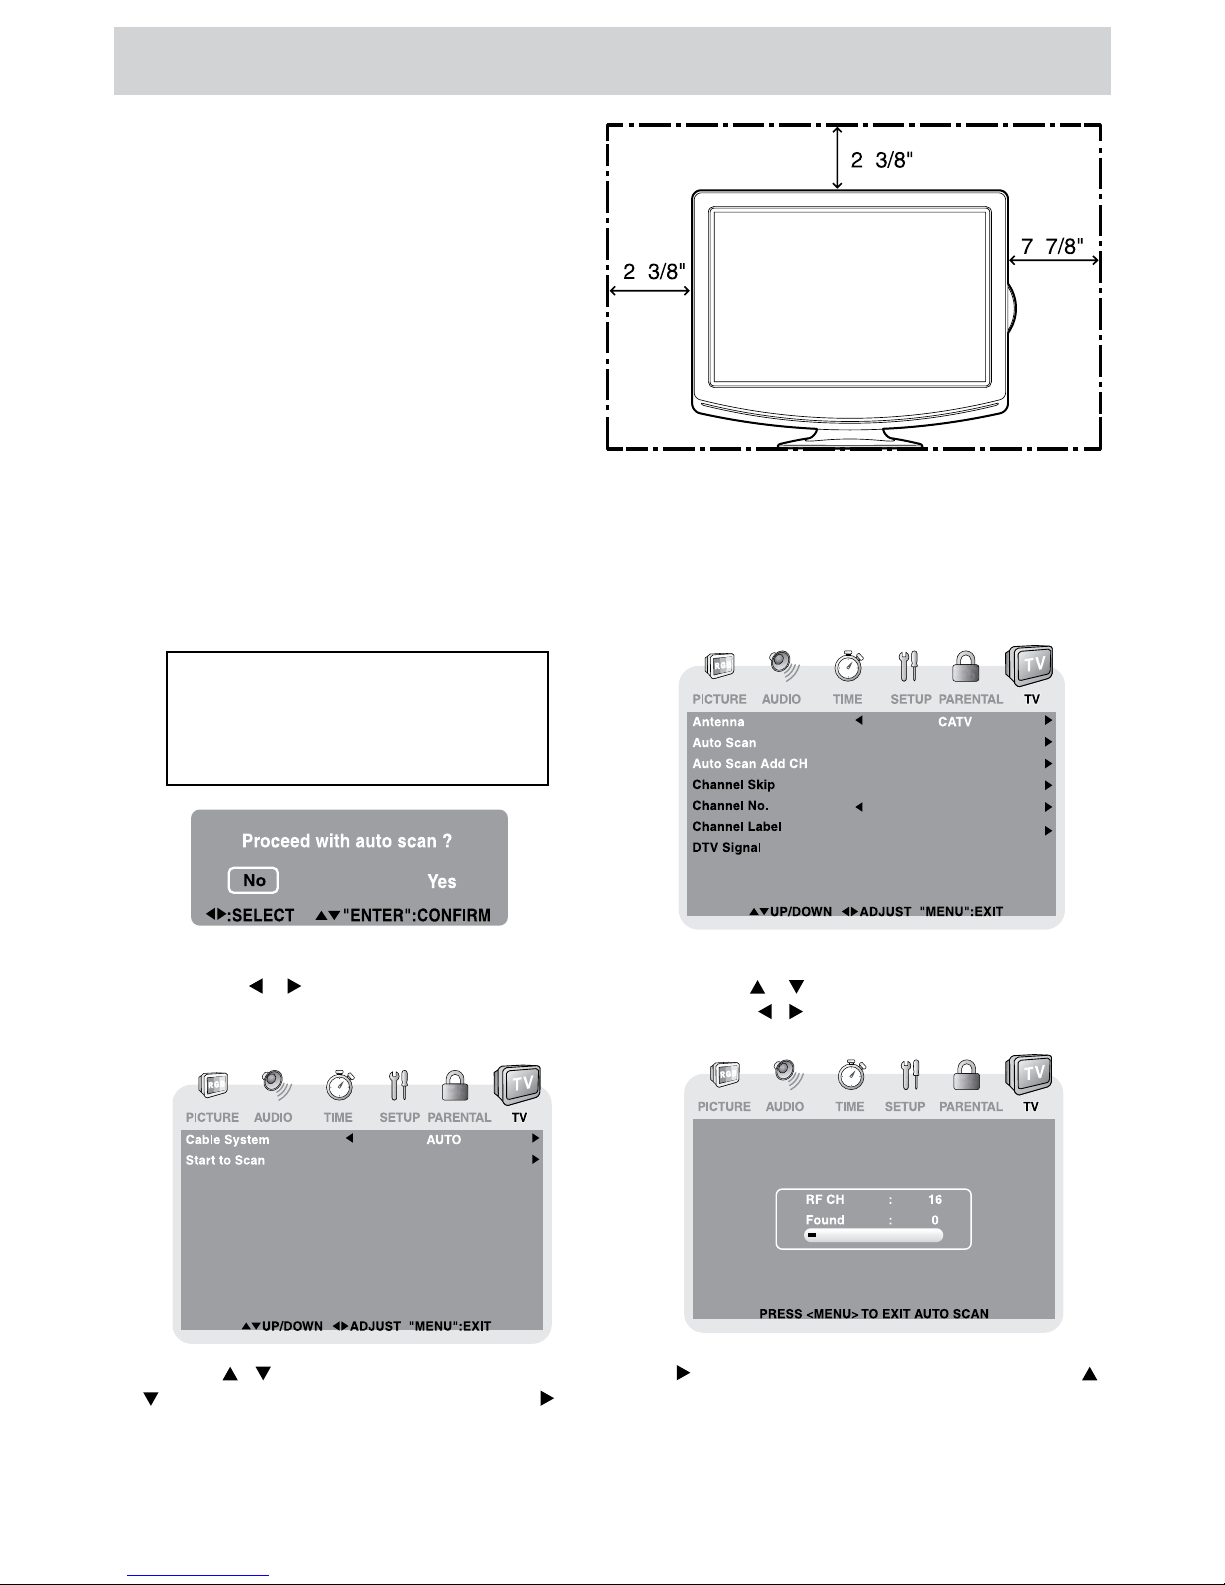
INSTALLATION
MOUNTING ON THE WALL
3”
3”
CONNECT THE POWER CORD
/ I
To prevent electrical shock, match wide blade of plug
to wide slot of wall outlet, then fully insert.
INSTALLING / REMOVING THE BASE STAND
WARNING: The LCD Display is very fragile, and must be protected at all times when removing the base stand. Be
sure that no hard or sharp object, or anything that could scratch or damage the LCD display, comes into contact
with it. Do NOT exert pressure on the front of the unit at any time because the screen could crack.
1. Disconnect all cables or cords connected to the unit.
2. Lay the unit down on a flat surface with the back side facing up. Please make sure to place a soft cushioned
material (such as a pillow or thick piece of foam) beneath the screen.
4. To remove the base stand, keep pressing the locking area
of the base stand and pull downwards to release the base
stand.
3. To install the base stand, place the base
stand on the mounting slot, push the stand
till it locks.
E - 15
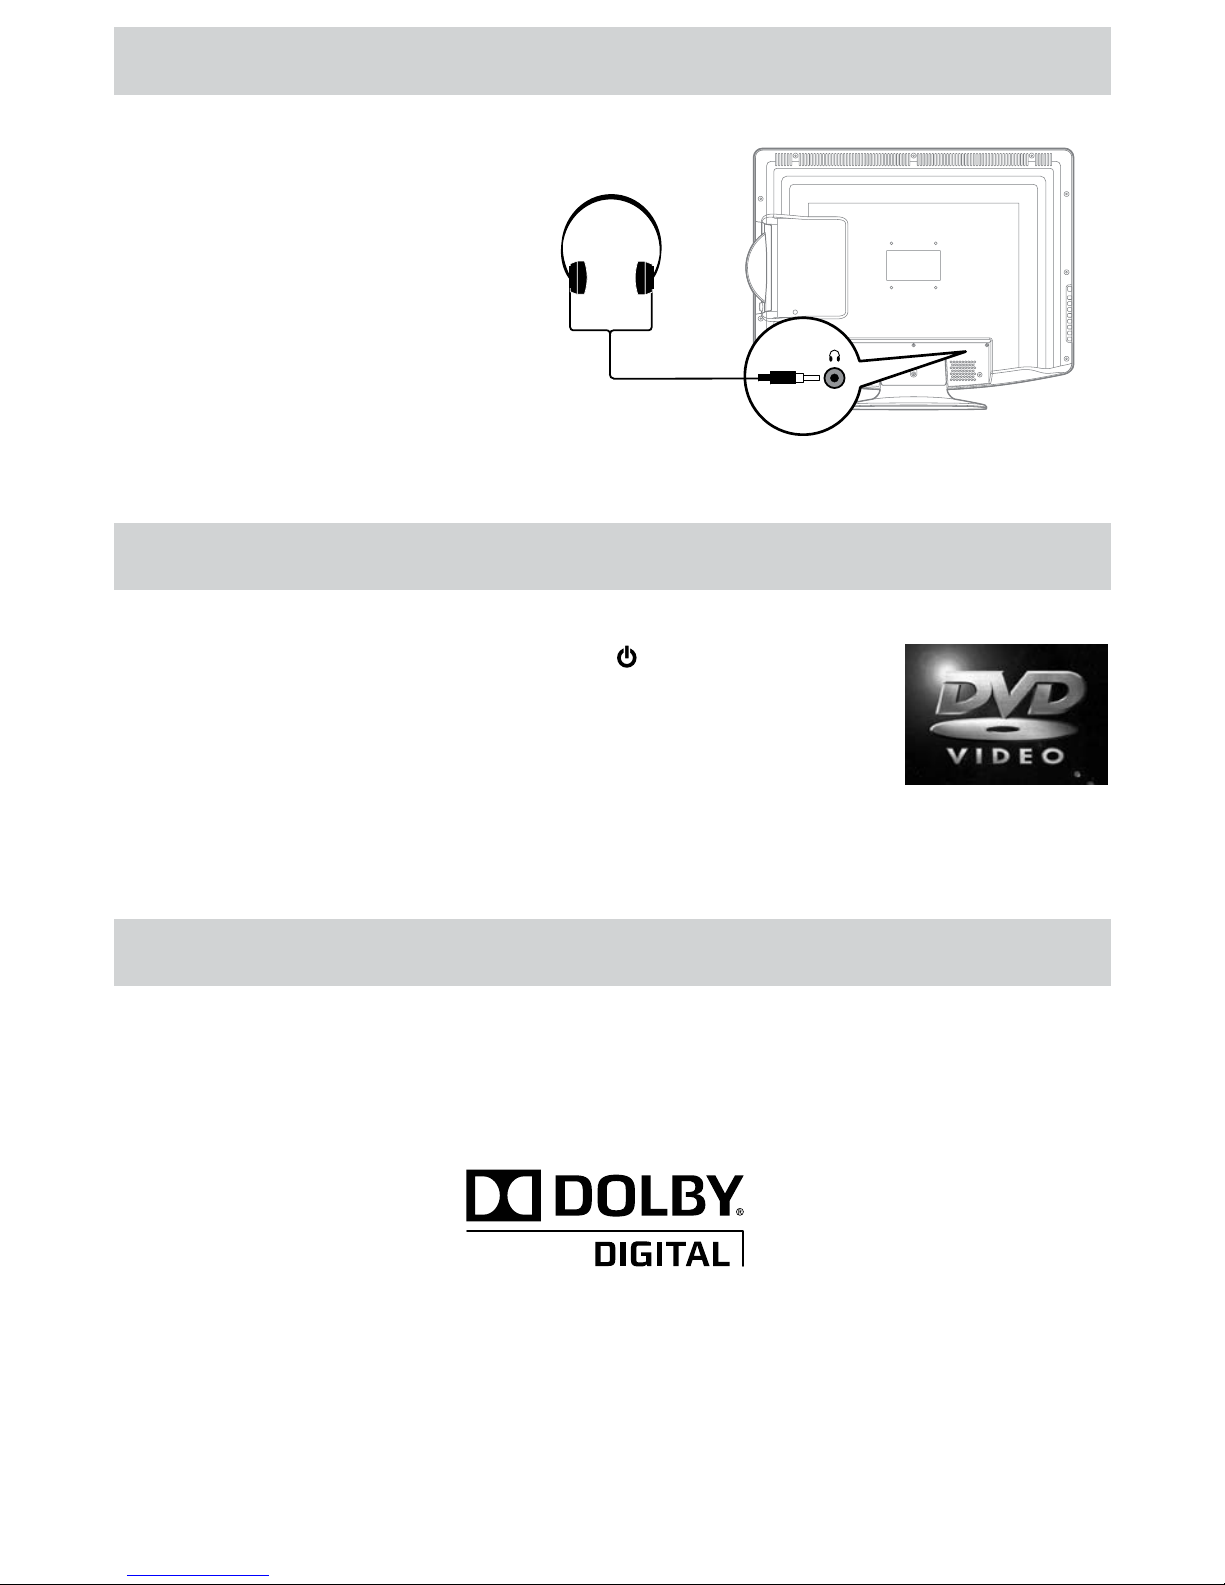
USING HEADPHONES
Headphones
TURNING THE UNIT ON
/ I
FUNCTION
DOLBY DIGITAL (FOR DVD)
UNIT OPERATION
SOUND SYSTEM
E - 16
TV SETUP
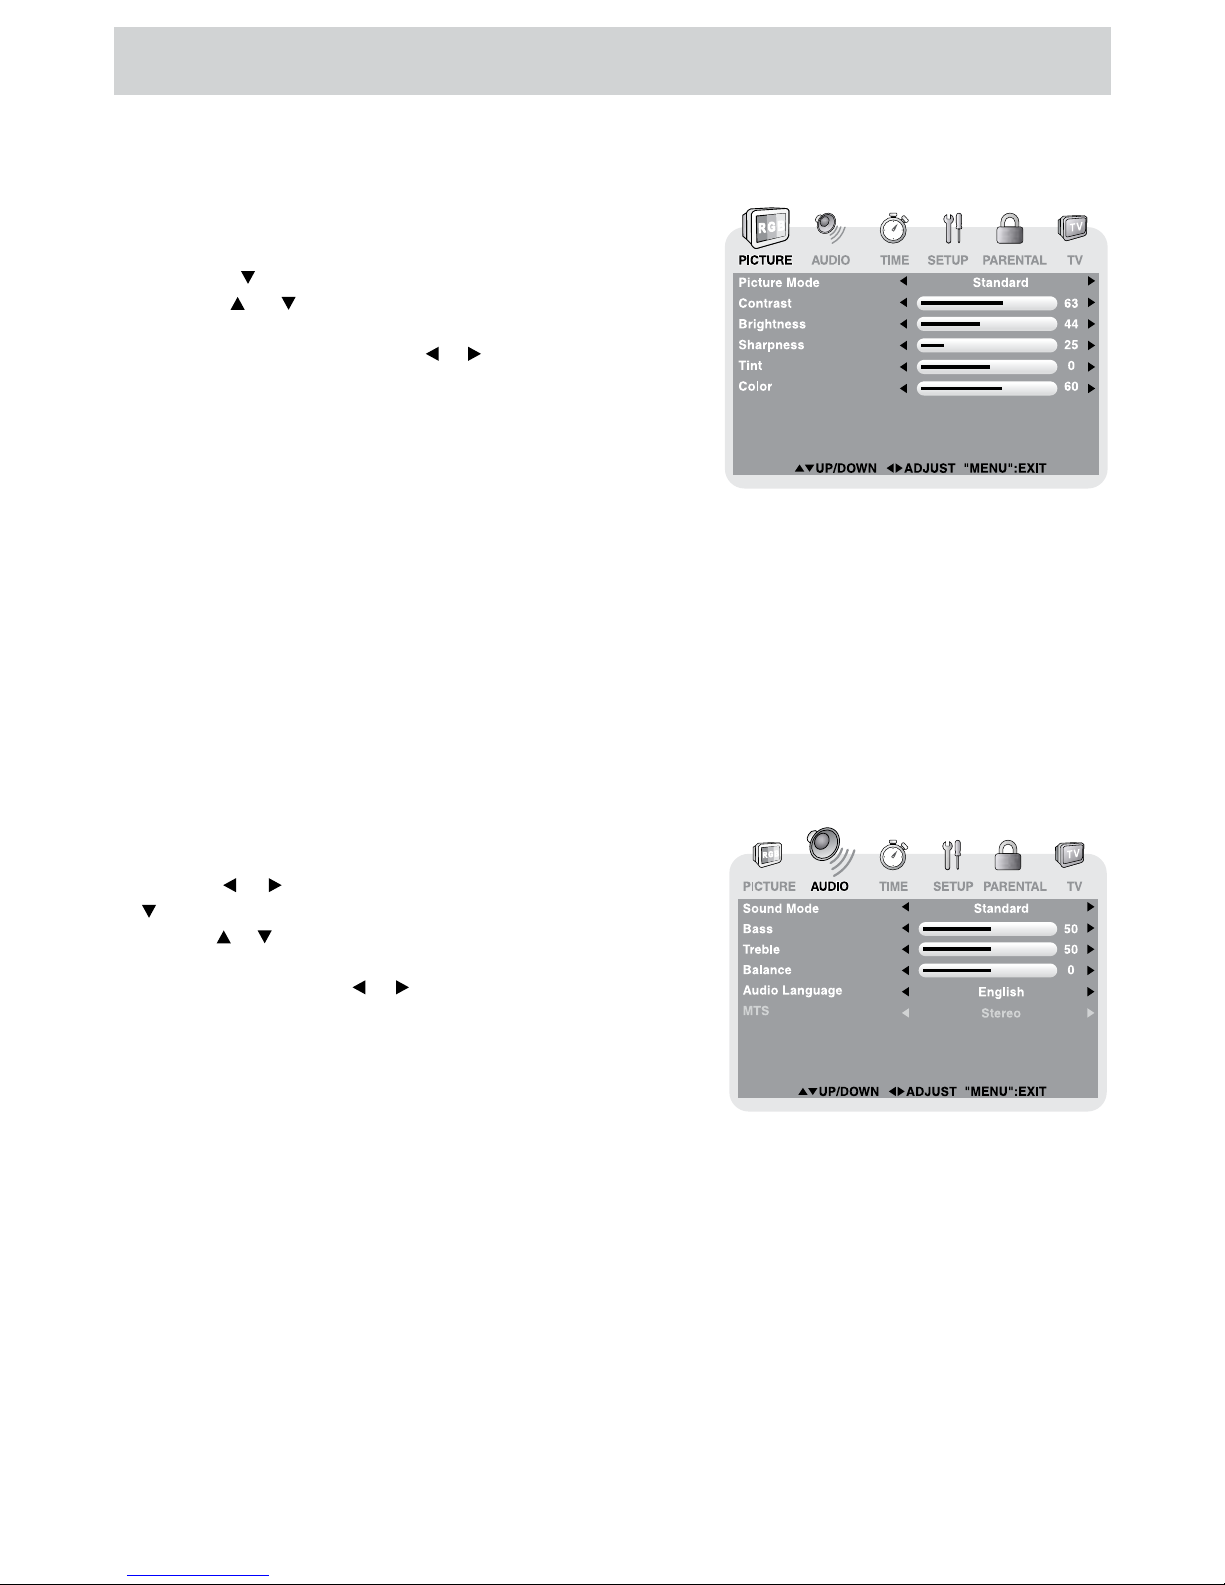
PICTURE MENU
MENU
PICTURE
Picture
Mode, Contrast, Brightness, Sharpness, Tint
Color
EXIT MENU
Note: Some setting items on the menu screen may not activate depending on what mode the unit is
currently in (TV/DVD/AV in/YUV in/PC in).
Picture Mode
Contrast
Brightness
Sharpness
Tint
Color
AUDIO MENU
MENU
AUDIO,
Sound Mode,
Bass, Treble, Balance, Audio Language MTS
EXITMENU
Sound Mode
Bass
Treble
Balance
Audio Language
MTS (Multi Channel Television Sound)
E - 17
TV SETUP
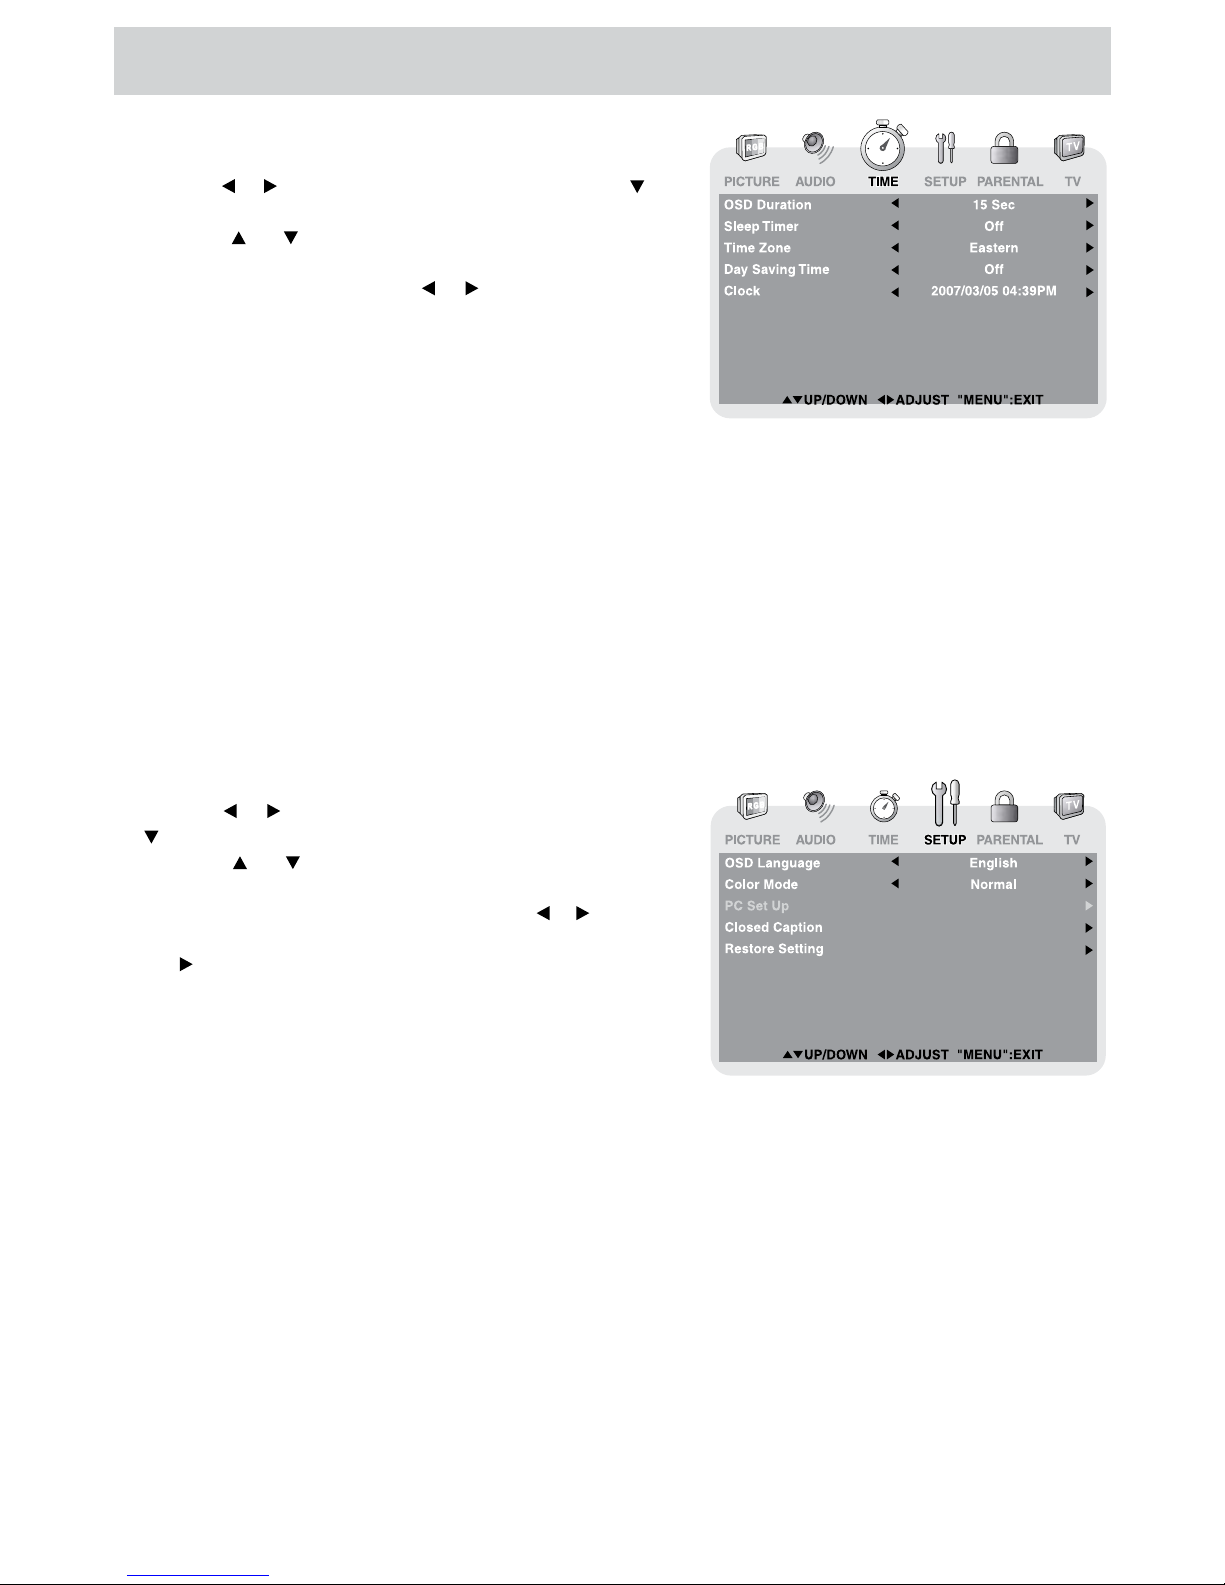
TIME MENU
MENU
TIME,
OSD
Duration, Sleep Timer, Time Zone Day Saving
Time
EXIT MENU
OSD (On Screen Display) Duration
Sleep Timer
Time Zone
Day Saving Time
Clock
SETUP MENU
MENU
SETUP,
OSD
Language, Color Mode, PC Set Up, Closed Caption
Restore Setting
MENU
EXIT MENU
OSD (On Screen Display) Language
Color Mode
Restore Setting
E - 18
TV SETUP
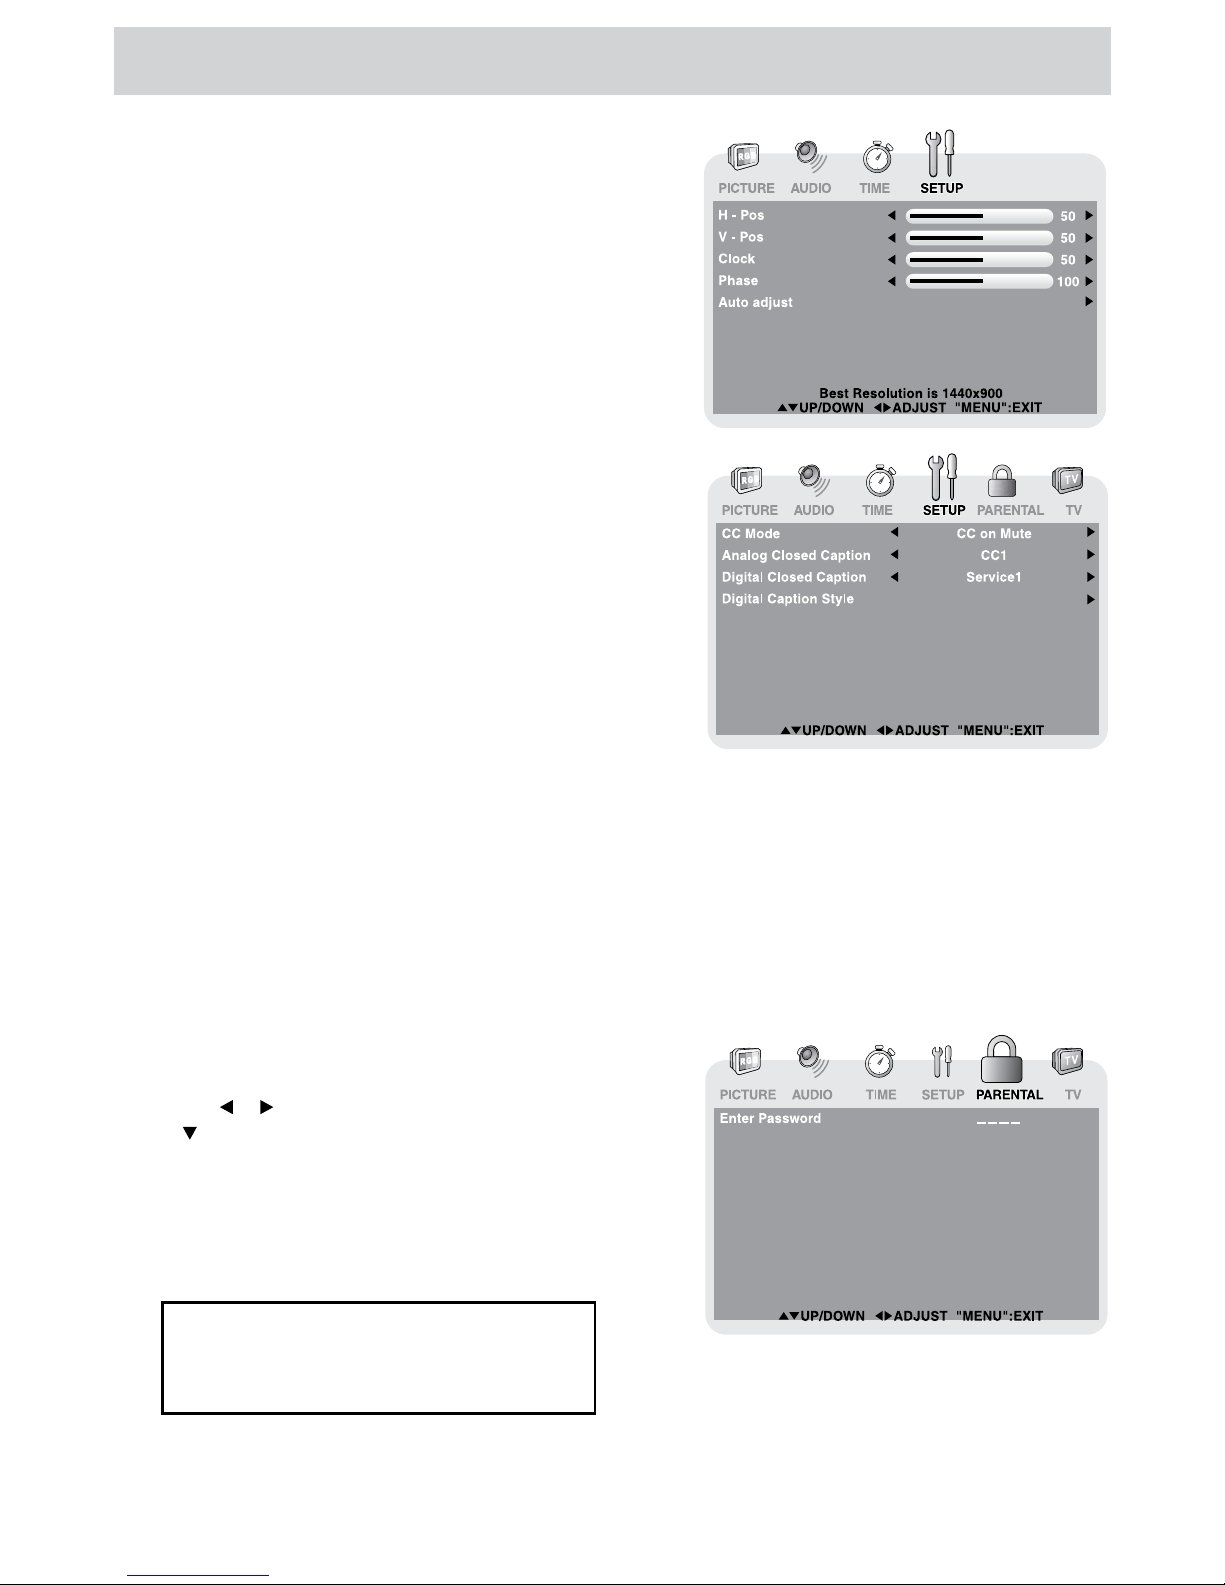
PC Set Up (in PC mode only)
(for S1901DVD)
(for S2201DVD)
H - Pos
V - Pos
Clock
Phase
Closed Caption
CC Mode
Analog Closed Caption
Digital Closed Caption
Digital Caption Style
PARENTAL MENU
Password
MENU
PARENTAL,
If you forget the password,
enter “ 8888 “ to unlock parental
control.

E - 19
TV SETUP
Parental
MENU
EXITMENU
Change Password
Rating Enable
US
Canada
RRT Setting
Reset RRT

E - 20
TV SETUP
Antenna
Auto Scan
Auto Scan Add CH
Channel Skip
Channel No.
Channel Label
DTV Signal
TV MENU (For TV Mode Only)
MENU
TV,
Antenna,
Auto Scan, Auto Scan Add CH, Channel Skip,
Channel No., Channel Label DTV Signal
MENU
EXIT MENU
Channel Skip
ENTER
CHCH
Channel Label
DISPLAY
This manual suits for next models
1
Table of contents


