Sensear smartPlug User manual

smartPlug™
MANUAL
ENGLISH
DOC00071 Rev.02


DOC00071 smartPlug™ Manual rev 02
1
INTRODUCTION
The smartPlug™ is a state-of-the-art hearing protection and
communication system that allows you to retain situational
awareness while being in full contact with all your communication
devices.
Situational awareness is provided by processing technology and
environmental microphones mounted within the headset.
Contact through other communication devices is enabled by:
•Two-Way Radio interface cables (sold separately).
•Bluetooth® to Two-Way radios and cell phones
•Direct headset-to-headset communications through Short-
Range
The smartPlug™ is designed to be worn with the main housing
attaching to the belt or pant seam, and the inline PTT attaching to
the shirt / upper garment of the user.
NOTE: For SR communications, the best communication range is
achieved with the Inline PTT set as high up on the user as possible.
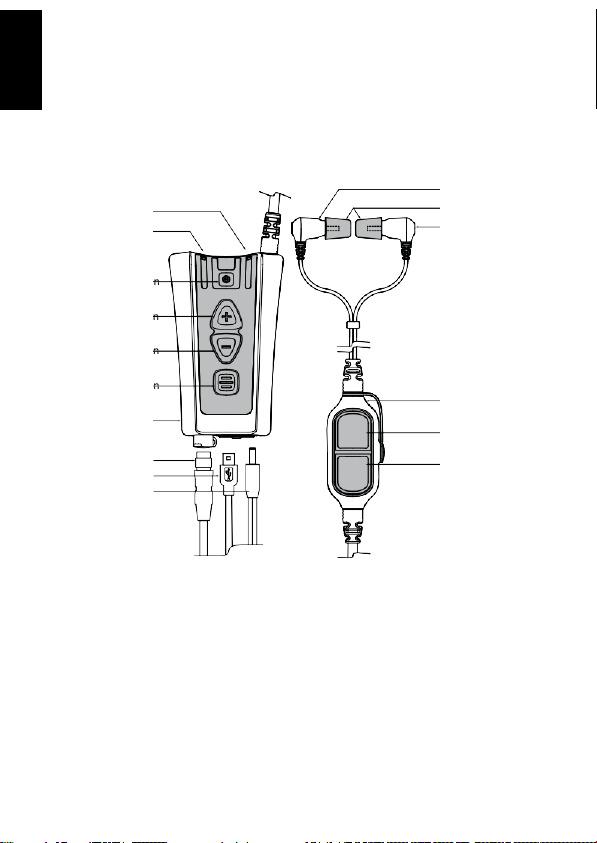
Ear Earpiece
Foam tip
In-ear speaker and mic.
microphone
Earpieces
Inline PTT
Main Housing Unit
English
DOC00071 smartPlug™ Manual rev 02
2
SMARTPLUG™ ANATOMY
Right Indicator Light
Left Indicator Light
Power Button
Volume Up Button
Volume Down Button
Multi-Function Button
Main Unit with Belt Clip
Two-Way Radio
Connection
Mini USBConnection
Battery Recharging
Connection
Right Earpiece
Disposable Foam Tip
Left Earpiece
Inline PTT
Inline 1Button
Inline2Button
English
DOC00071 smartPlug™ Manual rev 02
3
FITTING THE
EARBUDS
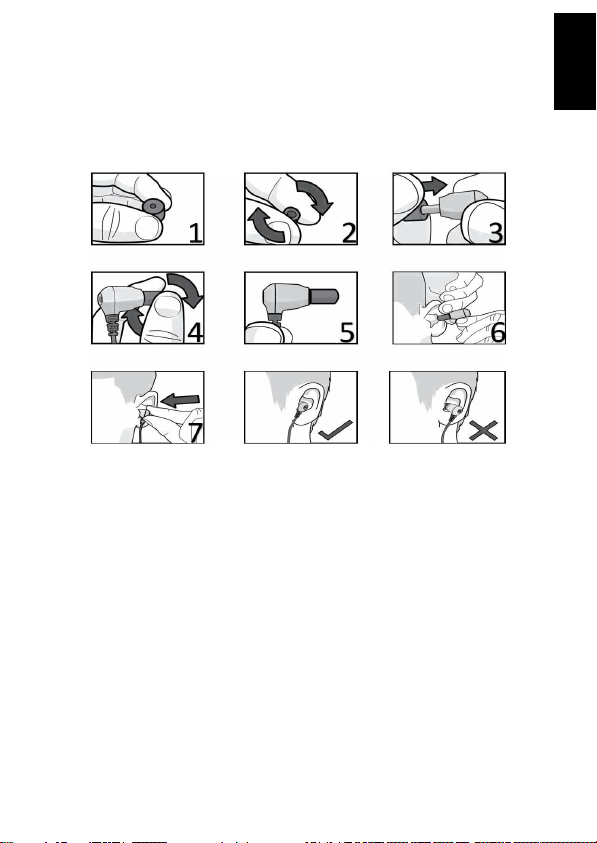
It is critical the earpieces are correctly fitted to ensure the correct level
of hearing protection and communication abilities. The earpieces
incorporate an in-ear pickup, if the earpieces are not fitted
correctly, the speech quality may be lower than expected.
1. Place disposablefoam tip between thumb and forefinger.
2. Roll foam tip toa compressed, crease-free cylinder.
3. Push the foam tip all the way onto the earpiece spout.
4. Roll the foam tip again between the thumb and forefinger.
5. Ensure the foam tip remains a compressed crease-free cylinder.
6. Using your opposite hand, pull your ear upward and outward.
7. Insert the earpiece and hold in place for 30 seconds while the
foam tip expands. Proper fit is ensured by not having any of
the foam tip visible while the earpiece is in the ear.
English

DOC00071 smartPlug™ Manual rev 02
4
OPERATING THE
HEADSET
Your smartPlug™ must be powered up to use situational awareness
and the communication connectivity features.
POWERON/OFF
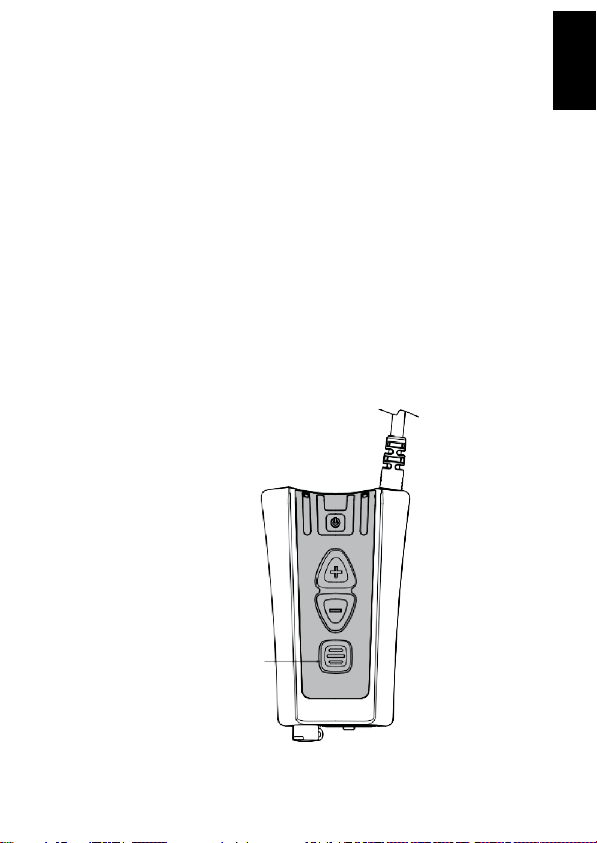
Topower up your smartPlug™, press andrelease the power button.
To power off your smartPlug™, press and hold the power button until the
unit powers off.
ENVIRONMENTAL MODES
Your smartPlug™ features situational awareness technology (Speech
Enhancement, Noise Suppression).
allows you to be in audible contact with your surroundings while
wearing your smartPlug™.
To toggle situational awareness on or off, momentarily press and
release the power button.
The volume control buttons can be used to raise or lower the audio level
of the mode
Right Indicator
Green fast flash: Quiet Mode
Green slow flash: Active
Red flash: Battery low (< 1hr)
smartPlug™ Power Button
English

DOC00071 smartPlug™ Manual rev 02
5
CONNECTING TWO-WAY RADIO
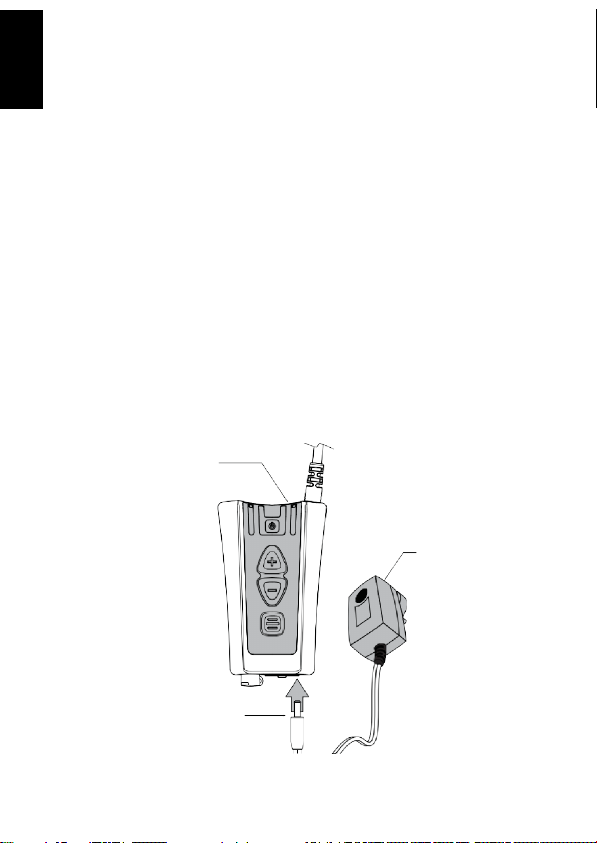
smartPlug™ can be connected to most two-way radios through interface
cables (sold separately).
1. Connect the two-way radio cable into the two-way radio
connector located on the bottom of the main unit.
2. Turn the two-way radio on. A tone will be heard through the
smartPlug™ indicating it has detected the two-way radio.
3. Adjust the volume of the two-way radio communication by
the normal controls of your two-way radio until a comfortable
level is reached.
4. To transmit, press and hold the inline 1 button or the button
programmed by your dealer.
NOTE: See ‘Using Bluetooth®’ for more information on connecting two-
way radios by Bluetooth®
Inline PTT
Inline 1 Button
Two-Way Radio Connector
Two-Way Radio Cable
English

DOC00071 smartPlug™ Manual rev 02
6
USING BLUETOOTH®
The smartPlug™ also features Bluetooth® connectivity. Bluetooth®
enables wireless connections to some models of two-way radio,
industrial computers, vibration analyzers, and most cell phones. If
Bluetooth® is installed on your smartPlug™, the following details
apply.
Default Automatic Connection Setting: When the smartPlug™ power
up, the smartPlug™ searches for previously paired devices. If a
previously paired device is within range, it will automatically attempt
to reconnect to this device. A blue light will flash slowly if a
Bluetooth® connection is made and you will hear a tone in the
smartPlug™.
NOTE: When entering pairing mode, the smartPlug™ forgets all
previously connected devices. Bluetooth® is discoverable for 2 minutes
in pairing mode. If no connection has been made within this time, the
process will need to be repeated.
Bluetooth® Phone: To answer calls, press the Multi-Function Button
(or programmed button, consult your dealer). To end or reject a call,
press, and hold the Multi-Function Button for 2 seconds.
Bluetooth® PTT: Some radios and cell phones feature PTT over
Bluetooth®. Please consult your dealer for more information.
English
DOC00071 smartPlug™ Manual rev 02
7
BLUETOOTH® PAIRING ANDCONNECTING
Bluetooth® Pairing to New Device:
For Bluetooth® functionality, the smartPlug™ must be paired and
connected.
1. Enable Bluetooth® on the device which you want to
connect to the smartPlug™
2. Powerup the smartPlug™
3. Hold the Multi-Function Button for 5 seconds to enable
pairing. A blue light indicator will switch on.
4. Follow pairing instructions on the device that you want to
connect to, search and pair the smartPlug™. If asked for
a passkey, enter 0000
5. Once paired, the smartPlug™ will automatically connect,
and the blue light indicator will flash slowly.
6. If automatic connection fails, use the device instructions to
connect to the smartPlug™.
Multi-Function Button
English

DOC00071 smartPlug™ Manual rev 02
8
me Up
utton
ume
utton
Inline 2Button
USING SHORT-RANGE
Short-Range (SR) is a technology enabling communication directly
between compatible smartPlugs™. Short-Range units tuned to the same
channel and within range will hear your transmissions. SR behaves
similarly to Two-Way Radios, where only one unit can transmit at one
time.
IfShort-Range is installed on your smartPlug™, the following applies:
By default, Short-Range is disabled and must be enabled. To enable
Short-Range press Volume Up and Volume
Down buttons simultaneously, the
smartPlug™ will make a tone
indicating SR has been enabled.
Headset-to-Headset Communication
with SR: To communicate with other
smartPlugs™, push and hold the
Inline 2 Button and talk. Other
smartPlugs™ within range and tuned
to the same frequency will hear your
transmissions.
SR Change Frequency Channel:
To change SR channel up press
and hold Volume Up. To change
SR channel down press and hold
Volume Down. The smartPlug™
will speak the channel number.
Up to 8 channels can be
programmed.
The SR frequency can only be set
by your dealer. Please contact
your dealer for reprogramming
of channels.
Vol u
B
Vol
Down B
English

DOC00071 smartPlug™ Manual rev 02
9
USING FMRADIO
The smartPlug™ can also be configured to receive FM radio stations.
This enables you to listen to FM radio while wearing the
smartPlug™. If FM Radio is installed on your smartPlug™, the
following applies:
By default, FM Radio Reception is disabled and must be enabled as
follows:
FM Radio On / Off: Press the Power Button + Multi-Function Button
together simultaneously. The smartPlug™ will make a tone indicating
that FM radio has been enabled and you will hear the currently
tuned radio station in the smartPlug™.
To change radio stations, scan for a new station:
FM Radio Scan: Press and hold the Volume Up button for 2 seconds
to scan up or press and hold the Volume Down button for 2 seconds
to scan down. The smartPlug™ will tune to the next stations.
NOTE: SR and FM radio cannot be enabled simultaneously. Enabling
FM radio will automatically disable SR Radio and vice versa.
Power Button
Volume Up Button
Volume Down Button
Multi-Function Button
English
DOC00071 smartPlug™ Manual rev 02
10
CHARGING
Your smartPlug™ comes supplied with a charger. Do not attempt to
use third party chargers as damage may result. Your smartPlug™
should be regularly charged. To charge your smartPlug™, connect the
charger to the smartPlug™ and connect to the main power.
While charging the Right Indicator LED will be Red. When charging is
complete the LED will turn Green.
NOTE: Be sure to charge your smartPlug™ fully before first use.
NOTE: Your smartPlug™ will automatically power up when the charger
is connected to the smartPlug™.
Charge Time: 5 hours Battery Life: 24 hours
Your smartPlug™ is powered by a built-in high-capacity Lithium-Ion
battery. This is designed to last the life of your smartPlug™ and should
be returned to the manufacturer for replacement and servicing. Any
attempt to access the battery will damage the smartPlug™. Please see
accompanying smartPlug™ Information guide for additional battery
safety precautions.
Right Indicator
Red: Charging
Green: Charge Complete
Charger
Charging Jack
English

DOC00071 smartPlug™ Manual rev 02
11
TROUBLESHOOTING
Having Trouble Pairing the smartPlug™: Make sure any previously
paired devices are powered off. Make sure the radio is configured
with Bluetooth® enabled.
smartPlug™ and Radio will not Connect Wired: Make sure the cable is
securely fastened to both the Two-Way Radio and the Main Housing.
Bluetooth®: Make sure your radio and smartPlug™ are paired together
and within range. Try pairing the two devices together again. Make
sure the Two-Way Radio is not connected to another device or
smartPlug™/headset.
Having Trouble Hearing: Check if your smartPlug™ is on. Make sure
your radio and smartPlug™ are paired, connected and within range.
Check the radio’s LED indicator to check transmit/receive is not stuck
on. Check your radio is functioning by turning off the smartPlug™ and
listening through the radio. If the radio is working, try turning up the
volume control on the smartPlug™ and on the radio controls.
Having Trouble Being Heard: Check if your smartPlug™ is on. Make
sure the radio and smartPlug™ are paired, connected and within
range. Check your radio is functioning by turning off the smartPlug™
and talking through the radio. Make sure you have fitted the
earpieces correctly.
Two-Way Radio Distorted: Check your Two-Way Radio volume level. If
the volume is set too high, this may be breaching the volume level on
the smartPlug™ and affecting the sound quality.
Light Indicator
smartPlug™ Function
Redon
Charging
Green on
Charge complete
Red slow flash
Battery low <1hr remains
Green fast flash
Quiet mode
Green slow flash
situational awareness active
Blue on Bluetooth® on and discoverable
Blue slow flash
Bluetooth® connected
Blue fast flash
Bluetooth® incoming call
English

DOC00071 smartPlug™ Manual rev 02
12
USER MAINTENANCE AND STORAGE
This product may be adversely affected by certain chemical substances.
Further information should be sought from the manufacturer.
The headset should be stored at room temperature (between 15°C/59°F
and 25°C/77°F). If storing for long periods (greater than 1 month)
discharge the unit for at least 2 hours before storing for maximum
battery life.
Please note that the battery is not user replaceable. If it becomes
damaged or faulty, return to a Sensear authorized distributor for repair.
ACCESSORIESANDSPARE PARTS
The following accessories and spare parts maybe ordered separately:
SRCK0xxx Various models, two-way radio interface cables for
most popular two-way radios
SMPW0001
Universal Wall Charger
FETSM010
Foam ear tip – small (10.5mm)–10 pair
FETMD010
Foam ear tip – medium (12mm) –10 pair
FETLG010 Foam ear tip – large(14mm) –10 pair
Further information may be obtained from your Sensear
representative, via the Sensear website, or by emailing or writing to
the address on this User Manual.
English

DOC00071 smartPlug™ Manual rev 02
13
SENSEAR STANDARD WARRANTY
TERMS &
CONDITIONS
Sensear Pty Ltd
(“SENSEAR”) warrants the SENSEAR manufactured HEARING PROTECTION products (“Product”) listed
below to be free from defects in material and workmanship under normal use and service for a period
of 12 months from the original date of purchase.
SENSEAR will at its absolute discretion repair or replace the Product where a defect in material or
workmanship occurs, at no charge to the end user for parts or labor. SENSEAR reserves the
right to replace the Product with the same or equivalent part or Product rather than repair it.
Where a part or Product is replaced, the part or Product becomes the property of SENSEAR.
SENSEAR reserves the right to use refurbished parts or Product for repair or replacement.
SENSEAR is not responsible for any damage caused to or by accessory or ancillary equipment
connected or attached to the Product that is not provided by SENSEAR and is not expressly designed to
operate in conjunction with the Product.
This warranty is not assignable or transferable to any other party, this warranty is extended to the
original purchaser of the Product only.
This warranty is in addition to your statutory rights provided under the Trade Practices Act, or
relevant legislation in your state or territory.
SENSEAR reserves the right to limit its liability to the repair, replacement, or refund of the
purchase price of a Product. Under no event shall SENSEAR be liable for damages more than the
original purchase price of the Product, for any loss of use, loss of time, inconvenience, loss of
profits or savings, loss of revenue, commercial loss, or any other incidental, special or
consequential loss to the full extent such may be disclaimed by the law.
This warranty does not cover:
•
Defect or damage resulting from use of the Production other than its normal or intended
manner.
•
Defects or damage occurring from misuse, abuse, accident, corrosion, fire, liquid intrusion, or neglect,
including during transportation.
•
Defects or damage occurred from improper or unauthorized testing, operation, maintenance,
service, repair, alteration, modification, or adjustment.
•
Freight costs to the place ofrepair.
•
Product that has been subjected to unauthorized orillegal alteration of the firmware or software
in the Product.
•
Cosmetic damage to the Product that does not interfere with the intended operation of the
Product.
•
Normal wear and tear.
•
Product where the serial number has been removed or altered.
•
Any batteries rechargeable or otherwise either shipped with or internal to the Product.
•
Any consumable items, for example replaceable ear-tips or ear-cup pads.
•
Warranty claims made outside of the warranty period.
•
Warranty claims made without appropriate proof ofpurchase bearing both the original purchase
price and date.
•
All other warranties, conditions, terms, representations, and undertakings whether express or
implied.
How to GetWarranty Service
To register yourproductvisit:sensear.com/support/headset-registration
Ifyou require warranty service visit: sensear.com/support/returns-repairs-new
English


smartPlug™
TECHNICAL
INFORMATION
Rev:
6/30/22
For most recent technical information,visit
sensear.com/support/technical-information

DOC00071 smartPlug™ Manual rev 02
16
FORWARD
Product Safety and RF Exposure Compliance: This product is designed
to be used in isolation or in conjunction with a two-way radio.
Before using this product with a two-way radio, read the operating
instructions for safe usage contained in the Product Safety and RF
Exposure booklet enclosed with the two-way radio.
Battery and Charging Information: The internal battery is shipped
with a nominal charge between 30 and 50% and should be stored
between -10°C (14°F) and 30°C (86°F) to minimize permanent capacity
loss.
Do not charge your headset in temperatures below 0°C (32°F) or above
40°C (104°F). Conditions inside a parked car can exceed this range. Do not
store your headset in a parked car. Do not store your headset in direct
sunlight. Storing your fully charged headset in high-temperature
conditions may permanently reduce the life of the internal battery.
Battery life may temporarily shorten in low- temperature conditions.
WARNING Never dispose of batteries in afire because they may explode.
NOTE: The battery is nota user replaceable part.
English

DOC00071 smartPlug™ Manual rev 02
17
FCCCOMPLIANCE STATEMENT
The smartPlug™ headset with Bluetooth® module, complies with Part 15 of
the FCC Rules. Operation is subject to the following two conditions:
(i) This devicemay not cause harmful interference
(ii) This device must accept any interference received, including
interference that may cause undesired operation.
WARNING Any changes or modifications not expressively approved by
Sensear Pty Ltd. could void the user’s authority to operate this
equipment.
This equipment has been tested and found to comply with the limits for a
Class B digital device, pursuant to Part 15 of the FCC Rules. These limits are
designed to provide reasonable protection against harmful interference
in a residential installation. This equipment generates, uses, and can
radiate radio frequency energy and, if not installed and used in
accordance with the instructions, may cause harmful interference to
radio communications. However, there is no guarantee that
interference will not occur in a particular installation. If this equipment
does not cause harmful interference to radio or television reception, which
can be determined by turning the equipment off and on, the user is
encouraged to try to correct the interference by one or more of the
following measures:
•
Reorient or
relocate the
receiving
antenna
•
Increase
the separation
between the
equipment
and receiver
•
Connect the equipment into an outlet on a circuit different
from that to which the receiver is connected
Consult the dealer or an experienced radio/tv technician for help.
English

DOC00071 smartPlug™ Manual rev 02
18
DECLARATION OF CONFORMITY
For most recent Declaration of Conformity, please visit
sensear.com/support/declaration-of-conformity
English
Other manuals for smartPlug
1
Table of contents


