Sensio CRUXGG KING User manual
FRONT Cover
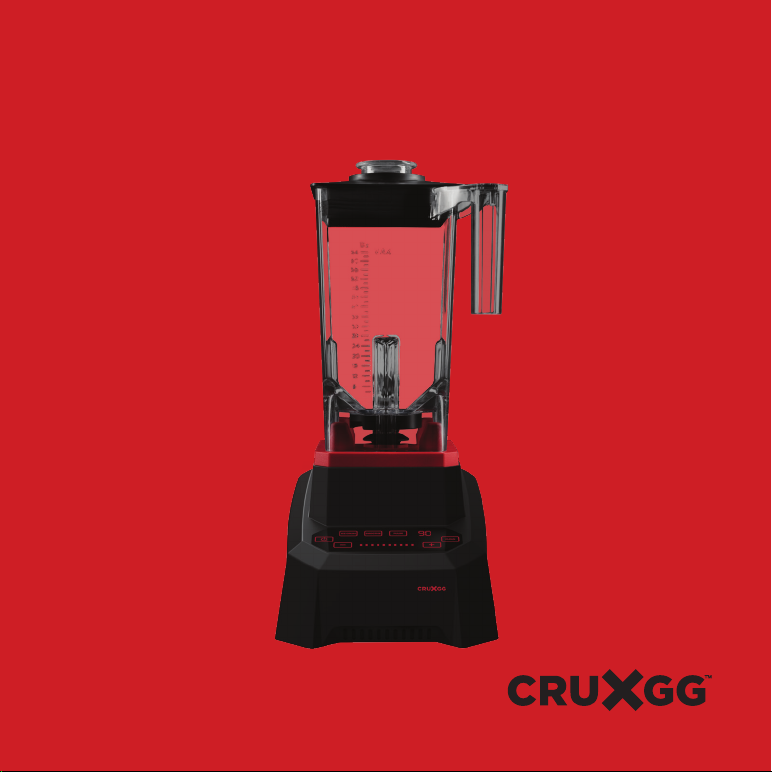
KING
HIGH PERFORMANCE BLENDER
INSTRUCTION MANUAL

THANK YOU CARD - inside Front Cover

THANK YOU CARD - inside Front Cover
Important Safeguards ............................................................................................................................................... 2-3
Additional Important Safeguards .......................................................................................................................4-5
Notes on the Cord ...........................................................................................................................................................5
Notes on the Plug.............................................................................................................................................................5
Plasticizer Warning..........................................................................................................................................................6
Electric Power.....................................................................................................................................................................6
Getting to Know Your CRUXGG™ High Power Blender............................................................................... 7
Control Panel ......................................................................................................................................................................8
Before Using For the First Time ...............................................................................................................................8
Operating Instructions................................................................................................................................................... 9
Using the Variable Speed Control Settings .....................................................................................................10
Using the Smoothie Function..................................................................................................................................10
Using the Ice Crush Function................................................................................................................................... 11
Using the Clean Function............................................................................................................................................11
Using the Pulse Function........................................................................................................................................... 12
User Maintenace Instructions ................................................................................................................................. 12
Manual Thermal Protector......................................................................................................................................... 12
Care & Cleaning Instructions................................................................................................................................... 13
Storing Instructions....................................................................................................................................................... 13
Warranty ........................................................................................................................................................................14-15
TABLE OF CONTENTS

2
IMPORTANT SAFEGUARDS
When using electrical appliances, basic safety precautions should always be
followed, including the following;
1. READ ALL INSTRUCTIONS.
2. To protect against risk of electrical shock do not put cord, plugs,
or appliance in water or other liquid.
3. This appliance is not intended for use by persons (including children)
with reduced physical, sensory or mental capabilities, or lack of experience
and knowledge, unless they have been given supervision or instruction
concerning use of the appliances by a person responsible
for their safety.
4. Close supervision is necessary when any appliance is used by or
near children.
5. This blender is not a toy. Children should be supervised to ensure they do not
play with the appliance.
6. Turn the appliance OFF, then unplug from outlet when not in use, before
putting on or taking o attachments and before cleaning. To unplug, grasp
the plug and pull from the outlet. Never pull from the power cord.
CAUTION: FLASHING LIGHT INDICATES READY TO OPERATE. AVOID
CONTACT WITH MOVING PARTS.
7. Do not operate any appliance with a damaged cord or plug or after the
appliance malfunctions, or it is dropped, or has been damaged in any
manner. Contact Consumer Service for examination, repair or adjustment.
8. The use of attachments, including canning jars, not recommended by the
manufacturer may cause a risk of injury to persons.

3
9. Do not use outdoors.
10. Do not let cord hang over edge of table or counter.
11. Do not let cord contact hot surfaces, including the stove.
12. Blades are sharp. Handle carefully.
13. Do not blend hot liquids.
14. Never use the blender jar to process food without the lid and lid cap properly
locked in place.
15. Never place any blender attachments into a microwave oven.
16. Keep hands and utensils out of the jar while blending to reduce the risk of
severe injury to persons or damage to the unit. A scraper may be used but be
used only when the blender is not running.
17. Always operate the blender with its cover in place.
18. Never add ingredients to the jar while the appliance is operating.
19. The jar must be properly assembled and in place before operating the
appliance.
SAVE THESE INSTRUCTIONS
FOR HOUSEHOLD USE ONLY

4
ADDITIONAL IMPORTANT
SAFEGUARDS
1. All users of this appliance must read and understand this instruction manual
before operating or cleaning this appliance.
2. The cord to this appliance should be plugged into a 120V AC electrical outlet
only.
3. If this appliance begins to malfunction during use, immediately press the
ON/OFF function or the function actively in use (with illuminated indicator
light) and unplug the cord. Do not use or attempt to repair the malfunctioning
appliance.
4. If this appliance falls or accidentally becomes immersed in water,
unplug it immediately. Do not reach into the water!
5. Do not use this appliance after it has fallen into or becomes immersed
in water.
6. To reduce the risk of injury to persons or property, never use this appliance in
an unstable position.
7. Do not use this appliance for other than its intended use.
8. Do not use if the jar is cracked or chipped.
IMPORTANT: DO NOT OVERFILL. NEVER FILL INGREDIENTS BEYOND
THE JAR’S MAX LINE.
WARNING: FAILURE TO ADD ENOUGH LIQUID BEFORE PROCESSING
MAY CAUSE THE JAR TO BREAK OR CHIP.

5
WARNING: TO AVOID SPILLS, MAKE SURE THE LID IS PROPERLY
LOCKED IN PLACE ON THE JAR WITH THE LID CAP IN POSITION
BEFORE PRESSING ANY SPEED OR PRE-PROGRAMMED BUTTONS.
NOTES ON THE PLUG
This appliance has a grounded 3-prong plug. Connect to a properly grounded
outlet only. If the plug does not fit fully into the outlet, contact
a qualified electrician. Do not attempt to modify the plug in any way.
NOTES ON THE CORD
A. A short power-supply cord (or detachable power-supply cord) is provided to
reduce risks from tangling or tripping over.
B. Longer detachable power-supply cords or extension cords are available and
may be used if care isexercised in their use.
C. If a long detachable power-supply cord or extension cord is used:
1) the marked electrical rating of the detachable power-supply cord or
extension cord should
be at least as great as the electrical rating of the appliance;
2) if the appliance is of the grounded type, the extension cord should be a
grounding-type 3-wire cord; and
3) the longer cord should be arranged so that it will not drape over the
countertop or tabletop where itcan be pulled by children or tripped over.

6
PLASTICIZER WARNING
CAUTION: TO PREVENT PLASTICIZERS FROM MIGRATING TO THE FINISH
OF THE COUNTER TOP OR TABLE TOP OR OTHER FURNITURE, PLACE
NON-PLASTIC COASTERS OR PLACE MATS BETWEEN THE APPLIANCE
AND THE FINISH OF THE COUNTER TOP OR TABLE TOP. FAILURE TO DO
SO MAY CAUSE THE FINISH TO DARKEN; PERMANENT BLEMISHES MAY
OCCUR OR STAINS CAN APPEAR.
ELECTRIC POWER
If the electrical circuit is overloaded with other appliances, your appliance may
not operate properly. It should be operated on a separate electrical circuit from
other appliances.
7
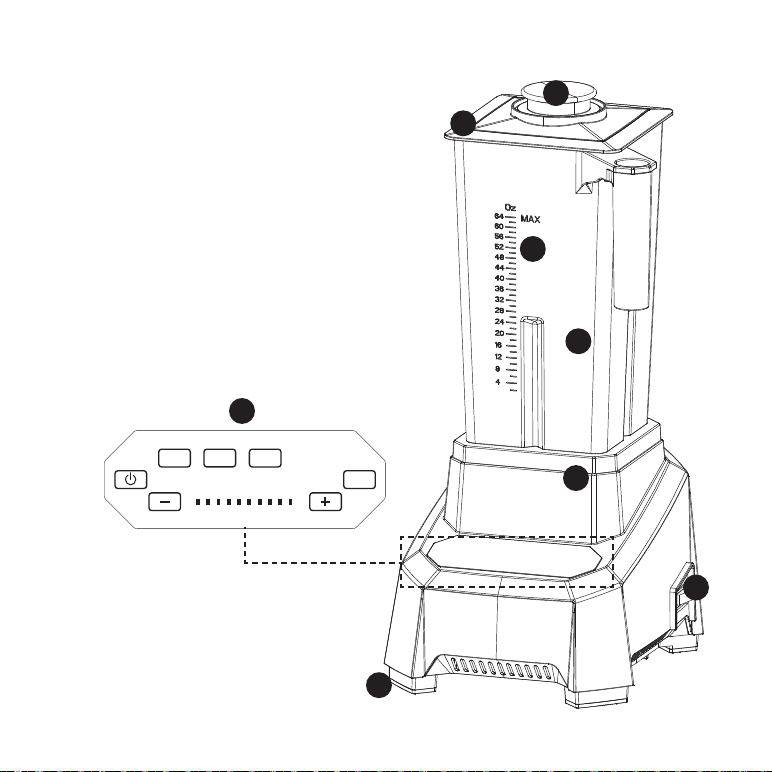
GETTING TO KNOW YOUR CRUXGG™ BLENDER
Product may vary slightly from illustration
1. 1.5 oz Center Measuring Cap
2. Blending Jar Cover
3. 64 oz Tritan™ Jar
4. Stainless Steel Blending Blades
5. Motor Base
6. ON/OFF switch
7. Control Panel
8. Grounded 3-prong plug (not shown)
9. Non-Skid Feet
90
1
2
3
4
5
7
9
6

8
CONTROL PANEL
1. The blender is equipped with an intuitive capacitive touch control panel with
dead front appearance and armed with 10 variable speeds, a Pulse function,
and 3 preset settings and timer.
2. Use the variable speed control settings to control how your ingredients are
incorporated and achieve your desired consistency.
3. Blending on the go? Use the 3 preset settings for seamless blending –
Smoothie, Ice Crush and Clean. Each setting is preset and timed to achieve
the expected result. Select the Pulse setting for short bursts of power. This
function blends ingredients through controlled pulses. This setting helps
dislodge ingredients clumped around the blade and at the bottom of the jar.
BEFORE USING FOR THE FIRST TIME
Carefully unpack the CRUXGG™ Blender and remove all packaging materials. Check
the contents to ensure that all attachments (64 oz. jar, lid, lid measuring cap and
blending blade) are present.
1. Wash the jar, lid, lid cap, and stainless steel blade in warm, soapy water
before first use. Rinse thoroughly.
WARNING: DO NOT TOUCH BLADES. BLENDING BLADES ARE VERY
SHARP. USE EXTREME CARE WHEN HANDLING. FAILURE TO DO SO
CAN RESULT IN PERSONAL INJURY.
2. Wipe the motor base with a damp cloth.
WARNING: DO NOT IMMERSE THE MOTOR BASE IN WATER.

9
OPERATING INSTRUCTIONS
1. Place the motor base on a flat, clean, dry counter top or table.
2. Place jar onto the motor base and add ingredients into the jar.
NOTE: WHEN BLENDING, FOODS OR LIQUIDS TEND TO EXPAND AS
THEY RISE UP THE SIDE OF THE JAR. DO NOT FILL JAR PAST ITS MAX
LINE.
WARNING: PAY CLOSE ATTENTION WHILE PROCESSING. NEVER
OPERATE THE CRUXGG™ BLENDER WHEN THE JAR IS EMPTY.
3. To avoid spills, ensure that the lid is firmly secured to the jar. Press the
lid down on the top portion of the jar until it rests firmly in place. Place the
measuring cap into the center of the lid and twist clockwise to secure it
safely in place. Use the measure cap to measure and add ingredients prior to
commencing any operation.
4. Plug the unit into a 120V outlet and turn the power switch on the side of the
housing to the ON position.
5. The Power button will flash for 15 seconds once the power switch on the side
of the housing has been turned to the On position.

10
USING THE VARIABLE SPEED CONTROL SETTINGS:
1. Press the Power button for the control panel to illuminate.
2. Press the + button to begin selecting your desired speed setting. All functions
besides the + function and the Power button will disappear. The + function
will begin flashing. Press the + function to activate the blender.
NOTE: IF YOU ACCIDENTALLY PRESS THE + FUNCTION, PRESS THE
POWER BUTTON AND THE ENTIRE CONTROL PANEL WILL ILLUMINATE.
3. Once you have moved to speed 2, the option to go up (+) or down (-) in speed
becomes available and the – function will illuminate.
4. The timer will begin counting up.
5. To end the blending process, select the Power button.
USING THE SMOOTHIE FUNCTION:
1. Press the Power button for the control panel to illuminate.
2. Press the Smoothie function. All functions besides the Smoothie function
and Power button will disappear. The Smoothie function will begin flashing.
Press the Smoothie function again to activate the blender.
NOTE: IF YOU ACCIDENTALLY PRESS THE SMOOTHIE FUNCTION,
PRESS THE POWER BUTTON AND THE ENTIRE CONTROL PANEL WILL
ILLUMINATE.
3. The timer will begin counting down from the preset 60 second cycle.
4. To end the blending process, select the Power button. If you do not end
the blending process before the 60 second blending cycle, the blender will
automatically power o once the cycle has ended.

11
USING THE ICE CRUSH FUNCTION:
1. Press the Power button for the control panel to illuminate.
2. Press the Ice Crush function. All functions besides the Ice Crush function and
Power button will disappear. The Ice Crush function will begin flashing. Press
the Ice Crush function again to activate the blender.
NOTE: IF YOU ACCIDENTALLY PRESS THE ICE CRUSH FUNCTION,
PRESS THE POWER BUTTON AND THE ENTIRE CONTROL PANEL WILL
ILLUMINATE.
3. The timer will begin counting down from the preset 10 second cycle.
4. To end the blending process, select the Power button. If you do not end
the blending process before the 10 second blending cycle, the blender will
automatically power o once the cycle has ended.
USING THE CLEAN FUNCTION:
1. Press the Power button for the control panel to illuminate.
2. Press the Clean function. All functions besides the Clean function and Power
button will disappear. The Clean function will begin flashing. Press the Clean
function again to activate the blender.
Note: If you accidentally press the Clean function, press the Power button and
the entire control panel will illuminate.
3. The timer will begin counting down from the preset 90 second cycle.
4. To end the blending process, select the Power button. If you do not end
the blending process before the 90 second blending cycle, the blender will
automatically power o once the cycle has ended.
5. For care and cleaning instructions, reference the section on page 12.

12
USING THE PULSE FUNCTION:
1. Press the Power button for the control panel to illuminate.
2. Press the Pulse function. All functions besides the Pulse function and Power
button will disappear. The Pulse function will begin flashing. The Pulse
function is used for short bursts of power. Press and hold the Pulse function to
activate. Once the function has been released, the blender will stop operating.
NOTE: IF YOU ACCIDENTALLY PRESS THE PULSE FUNCTION, PRESS
THE POWER BUTTON AND THE ENTIRE CONTROL PANEL WILL
ILLUMINATE.
4. The timer will begin counting the number of Pulses that are activated.
5. To end the Pulsing, select the Power button.
HINT! A SMALL SPATULA IS HELPFUL FOR REMOVING THICKER
PROCESSED FOODS.
6. Once you are done blending, turn the On/O switch to the O position.
7. Unplug the CRUXGG™ Blender when not in use and before cleaning.
USER MAINTENACE INSTRUCTIONS
This appliance requires little maintenance. It contains no user serviceable parts.
Do not try to repair it yourself. Contact the customer service department for any
unusual issues you may experience.
MANUAL THERMAL PROTECTOR
This product is equipped with a Manual Thermal Protector to protect the motor.
If the motor shuts down, turn the On/O switch to the O position and unplug
the blender. Let the blender rest for approximately 60 minutes. Once the resetting
period has elapsed, plug the power cord back into outlet and turn the side switch
to On position to continue blending.

13
CARE & CLEANING INSTRUCTIONS
CAUTION: NEVER IMMERSE THE MOTOR BASE, PLUG OR CORD IN WATER
OR ANY OTHER LIQUID.
1. Always unplug the CRUXGG™ Blender before cleaning.
2. To clean the blender jar by hand: Mix 1 drop of dishwashing detergent with
1 cup of cool water and add it to the blender jar. Scrub and rinse out the
interior of the blender jar and the lid to dislodge and remove as much residue
as possible. Empty the blender jar. Add another few drops of dishwashing
detergent to the blender jar with 1 cup of cool water. Put the lid on the blender
jar, place the jar on blender base, plug the blender in and run on high speed
for two minutes.
NOTE: DO NOT FILL THE BLEND JAR ABOVE THE MAX FILL LINE
FORCLEANING.
3. To clean the blender base, unplug the power cord. Wipe the exterior surfaces
with a soft cloth or sponge dampened with cleaning solution. Rinse with clean
water. Do not immerse the base in cleaning solution or water. Wipe the base
with a dry towel.
4. Always wash and rinse the blender jar prior to initial use.
STORING INSTRUCTIONS
1. Unplug and clean unit.
2. Store in original box or in a clean, dry place.
3. Never store the CRUXGG™ Blender while it is hot or plugged in.
4. Never wrap cord tightly around the appliance. Never place any stress on cord,
especially where the cord enters the motor base, as this could cause the cord
to fray and break.

LIMITED TWO-YEAR WARRANTY
SENSIO Inc. hereby warrants that for a period of TWO YEARS from the date of purchase,
this product will be free from mechanical defects in material and workmanship, and for
90 days inrespect to non-mechanical parts. At its sole discretion, SENSIO Inc. will either
repair orreplace the product found to be defective, or issue a refund on the product during
thewarranty period.
The warranty is only valid for the original retail purchaser from the date of initial retail
purchase and is not transferable. Keep the original sales receipt, as proof of purchase
isrequired to obtain warranty validation. Retail stores selling this product do not have
theright to alter, modify, or in any way revise the terms and conditions of the warranty.
Exclusions:
The warranty does not cover normal wear of parts or damage resulting from any
ofthefollowing: negligent use of the product, use of improper voltage or current, improper
routine maintenance, use contrary to the operating instructions, disassembly, repair,
oralteration by anyone other than qualified SENSIO Inc. personnel. Also, the warranty
doesnot cover Acts of God such as fire, floods, hurricanes, or tornadoes.
SENSIO Inc. shall not be liable for any incidental or consequential damages caused
by thebreach of any express or implied warranty. Apart from the extent prohibited
byapplicable law, any implied warranty of merchantability or fitness for a particular
purpose is limited in time to the duration of the warranty. Some states, provinces or
jurisdictions do not allow the exclusion or limitation of incidental or consequential
damages, or limitations on how long an implied warranty lasts, and therefore, the above
exclusions or limitations may not apply to you. The warranty covers specific legal rights
which may vary by state, province and/or jurisdiction.
14

1515
How To Obtain Warranty Service:
You must contact Customer Service at our toll-free number: 1-866-832-4843. A Customer
Service Representative will attempt to resolve warranty issues over thephone. If the Customer
Service Representative is unable to resolve the problem, you will be provided withacase
number and asked to return the product to SENSIOInc. Attach a tag to theproduct
that includes: your name, address, daytime contact telephone number, case number,
anddescription of the problem.
Also, include a copy of the original sales receipt. Carefully package the tagged product
with the sales receipt, and send it (with shipping and insurance prepaid) to SENSIO Inc.’s
address. SENSIO Inc. shall bear no responsibility or liability for the returned product while
in transit to SENSIO Inc.’s Customer Service Center.


INSIDE back cover

BACK Cover
For customer service, call 1-866-832-4843
For recipes, visit www.cruxgg.com
SENSIO Inc.
New York, NY 10016/USA
14981 Rev. 7
Table of contents
Popular Blender manuals by other brands

Black & Decker
Black & Decker PowerPro IB10 Series Use and care book

Hamilton Beach
Hamilton Beach 58149 use & care

Bosch
Bosch MSM66 Series instruction manual

Bosch
Bosch MSM66 KR Series operating instructions

homechoice
homechoice Maximo instruction manual

Black & Decker
Black & Decker Prep & Blend Chopper PS2000 Use and care book

Proctor-Silex
Proctor-Silex 840096000 Use and care

Wolfgang Puck
Wolfgang Puck WPIB0010 Use and care

Russell Hobbs
Russell Hobbs RHBL50 Instructions & warranty

White and Brown
White and Brown MM 548 TASTYMIX user manual

Cuizimate
Cuizimate RBSHIBLENDER instruction manual

Cuisinart
Cuisinart SmartPower Bar Basics CB-18BKSS INSTRUCTION AND RECIPE BOOKLET


