Sensio Beautiful TriZone User manual

9qt TriZone™Air Fryer with Touch-Activated Display
Instruction Manual
Freidora de aire TriZone™ de 9 cuartos de galón con
pantalla táctil
Manual de instrucciones

The kitchen is my family’s happy
place. It’s where we cook and eat
and bake and laugh and share our
most beautiful moments together.
That’s what inspired the creation
of Beautiful, my new collection
of easy-to-use kitchenware that
you’ll want to keep out on your
kitchen counter. So whether
your kitchen has flour all over
the place from a kid's baking
session or you’re throwing an adult
dinner party, I hope every step will
be simple, delicious and beautiful!
www.cookwithbeautiful.com

Section 1: Safety
Important Safeguards ...................................................4-6
Additional Important Safeguards......................................... 7-8
Notes on the Plug ........................................................9
Notes on the Cord ........................................................9
Plasticizer Warning ......................................................10
Electric Power ...........................................................10
Section 2: Instructions
Getting to know your 9qt TriZone™ Air Fryer .......................... 12-13
Touch-Activated Display Control Panel ................................. 14-16
Before using for the rst time ..........................................17
Operating instructions ...................................................18
6 Preset FUNCTIONS: AIR FRY, ROAST, BROIL, BAKE, REHEAT and
DEHYDRATE
Preset TEMPS & TIMES Chart ...................................... 20
Manual operation .............................................. 21
TriZone™ Mode: Using the Full Basket without Basket Divider (Using both
zones without basket divider) ............................................22
Dual Cook: Using both Zones (LEFT and RIGHT side) with Basket Divider. 23-24
Single Zone Mode: Using One Zone (either LEFT or RIGHT side) with
Basket Divider ....................................................... 24-25
Air fry technique .................................................... 25-26
Air frying pre-packaged frozen foods ....................................26
Hints for roast....................................................... 26-27
Hints for broil..........................................................27
Hints for bake...........................................................27
Hints for dehydrate................................................... 27-28
Air Fry / Roast cooking chart ........................................ 28-31
USDA Cooking Guidelines .................................................31
Dehydrate chart..........................................................32
User maintenance instructions ............................................33
Care & cleaning instructions.............................................33
Storing instructions .....................................................33
Warranty .............................................................. 34-35
Table of Contents

Sección 1: Seguridad
Medidas de seguridad importantes ..................................... 37-39
Otras medidas de seguridad importantes ............................... 40-42
Notas sobre el enchufe ..................................................42
Notas sobre el cable ....................................................43
Advertencia sobre plasticados...........................................44
Potencia eléctrica .......................................................44
Sección 2: Instrucciones
Conozca su freidora de aire TriZone™ de 9 cuartos de galón ........... 46-47
Panel de control de pantalla activado por toque ...................... 48-51
Antes del primer uso ....................................................52
Instrucciones de funcionamiento.......................................53-54
Seis conguraciones preestablecidas: AIR FRY (FREÍR AL AIRE), ROAST
(ROSTIZAR), BROIL (ASAR), BAKE (HORNEAR), REHEAT (RECALENTAR), DEHYDRATE
(DESHIDR ATAR)
Tabla de TEMPERATURAS y TIEMPOS preestablecidos.......................55
Operación manual ...................................................56
Modo TriZone™: Cómo utilizar la canasta completa sin el divisor
de canasta (ambas zonas sin el divisor de canasta) ..................57
Cocción doble: Cómo utilizar ambas zonas (lado IZQUIERDO y DERECHO) con
el divisor de canasta..............................................58-59
Modo de una sola zona: Cómo utilizar una zona (ya sea del lado
IZQUIERDO o DERECHO) con divisor de canasta .......................59-60
Técnica de freído al aire............................................. 61-62
Freír al aire alimentos congelados preenvasados .........................62
Consejos para rostizar...................................................63
Consejos para asar.......................................................64
Consejos para hornear....................................................64
Consejos para deshidratar ................................................65
Tabla de freído al aire / cocción de rostizado .......................66-69
Pautas de cocina del USDA ...............................................70
Tabla de deshidratación............................................... 70-71
Instrucciones de mantenimiento para el usuario...........................72
Instrucciones de limpieza y cuidado .....................................72
Instrucciones de almacenamiento..........................................72
Garantía.............................................................. 73-74
Índice

3
Section 1
Safety
1

4
IMPORTANT SAFEGUARDS
When using electrical appliances, basic safety precautions
should always be followed, including the following:
1. READ ALL INSTRUCTIONS.
2. Do not touch hot surfaces. Use handles or knobs. Use
oven mitts or potholders.
3. To protect against electric shock do not immerse cord,
plugs, or appliance in water or other liquid.
4. This appliance may be used and cleaned by children
age 8 and older or by persons with reduced physical,
sensory or mental capabilities, or lack of experience
and knowledge, ONLY IF they have been given supervision
or instruction concerning use of the appliance by a
person responsible for their safety.
5. Children should be supervised to ensure that they do
not play with the appliance.
6. Unplug from outlet when not in use and before cleaning.
Allow to cool before putting on or taking off parts,
and before cleaning the appliance.
7. Do not operate any appliance with a damaged cord or
plug, or after the appliance malfunctions, or has
been damaged in any manner. Bring it to a qualied
technician for examination, repair or electrical or
mechanical adjustment.

5
NOTE: DO NOT ATTEMPT TO REPAIR THE UNIT YOURSELF.
THIS WILL VOID THE WARRANTY.
8. The use of accessory attachments not recommended by the
appliance manufacturer may cause injuries.
9. Do not use outdoors.
10. Do not let cord hang over edge of table or counter,
or touch hot surfaces.
11. Do not place on or near a hot gas or electric burner,
or in a heated oven.
12. Extreme caution must be used when moving an appliance
containing hot oil or other hot liquids.
13. To disconnect, press and pull active fryer basket
out of the air fryer body. Remove plug from wall outlet.
14. Do not use appliance for other than intended use.
15. When using the crisping tray(s), make sure they are
properly inserted into the air fryer basket before
cooking.
16. Make sure the crisping tray is in place before adding
food to be air fried.
17. Always make sure air fryer basket is fully inserted
and locked into the front of the Air Fryer before
operation.
WARNING: Air Fryer will not operate unless the air
fryer basket is fully closed.

6
CAUTION: After hot air frying, roasting, broiling,
baking, or reheating, the fryer basket, crisping trays
(if used) and the cooked foods are hot. Extreme caution
must be used when handling the hot Air Fryer basket and
crisping trays.
FOR HOUSEHOLD USE
ONLY
SAVE THESE
INSTRUCTIONS

7
ADDITIONAL IMPORTANT
SAFEGUARDS
CAUTION HOT SURFACES: This appliance generates heat and
may release steam during use. Proper precautions must be
taken to prevent the risk of burns, res, or other injury
to persons or damage to property.
CAUTION: This appliance is hot during operation and
retains heat for some time after turning OFF. Always use
oven mitts when handling hot materials and allow metal
parts to cool before cleaning. Do not place anything on top
of the appliance while it is operating or while it is hot.
1. All users of this appliance must read and understand
this instruction manual before operating or cleaning
this appliance.
2. The cord to this appliance should be plugged into a
120V AC electrical outlet only.
3. If this appliance begins to malfunction during use,
press and pull air fryer basket out of the body.
Remove plug from wall outlet. Do not use or attempt to
repair the malfunctioning appliance. Contact Customer
Service.
4. Do not immerse power cord in any liquid. If the power
cord to this appliance is damaged, it must be replaced.

8
5. Keep the cord out of reach from children and infants to
avoid the risk of electric shock and choking.
6. Place the TriZone™ Air Fryer on a at, stable, heat-
resistant work area.
7. Do not obstruct the air outlet or air inlets on the back
and sides of the Air Fryer, with any objects. Avoid
escaping steam from the air outlet during air frying.
8. Keep appliance at least 4 inches away from walls or
other objects during operation.
9. Always use the fryer basket handle to remove the fryer
basket.
WARNING: Under- or over-lling the fryer basket may
damage the Air Fryer and could result in serious
personal injury.
10. Never move a hot Air Fryer or an Air Fryer containing
hot food. Allow to cool before moving.
WARNING! This Air Fryer should not be used to boil
water.
WARNING! This Air Fryer should never be used to deep
fry foods.

9
NOTES ON THE PLUG
This appliance has a polarized plug (one blade is wider
than the other). To reduce the risk of electric shock, this
plug will t in a polarized outlet only one way. If the
plug does not t fully into the outlet, reverse the plug.
If it still does not t, contact a qualied electrician.
Do not modify the plug in any way.
NOTES ON THE CORD
A. A short power-supply cord (or detachable power-supply
cord) is to be provided to reduce the risk resulting
from becoming entangled in or tripping over a
longer cord.
B. Longer detachable power-supply cords or extension cords
are available and may be used if care is exercised in
their use.
C. If a long detachable power-supply cord or extension
cord is used:
1. The marked electrical rating of the cord or
extension cord should be at least as great as the
electrical rating of the appliance;
2. If the appliance is of the grounded type, the
extension cord should be a grounding-type3-wire
cord.
3. The longer cord should be arranged so that it does
not drape over the countertop or table top where
it can be pulled on by children or tripped over
unintentionally.

10
PLASTICIZER WARNING
CAUTION: To prevent Plasticizers from migrating from the
nish of the counter top or table top or other furniture,
place NON-PLASTIC coasters or place mats between the
appliance and the nish of the counter top or table top.
Failure to do so may cause the nish to darken; permanent
blemishes may occur or stains can appear.
ELECTRIC POWER
If the electrical circuit is overloaded with other
appliances, your appliance may not operate properly.
It should be operated on a separate electrical circuit
from other appliances.

11
Section 2
Instructions
2
12
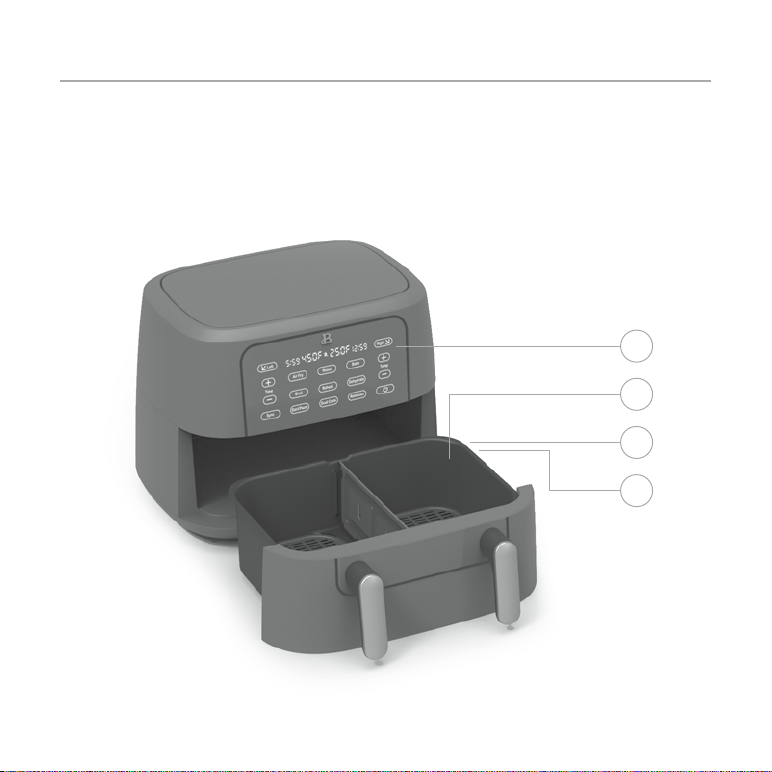
Getting To Know Your 9qt TriZone™ Air Fryer
Product may vary slightly from illustration
1. Touch-Activated Display Control Panel
2. 9QT Removable TriZone™ AirFryer Basket
3. Power Cord with Polarized Plug (not shown)
4. Non-Skid Feet (not shown)
1
2
3
4

13
1
1
2
1. 2 Non Stick Crisping Trays
2. Basket Divider

14
Touch-Activated Display Control Panel
A screen that only shows up when you need it.
The button and any FUNCTION button will illuminate when active and vanish
when not in use. Steady high heat combined with convection air, ensures crispy
results with a minimum or no oil. This Beautiful™ TriZone™ Air Fryer can be
programmed for precision TIME and TEMPs. No need to hover in the kitchen.
When TIME expires, the Air Fryer turns OFF automatically.
1. ON/OFF
2. Dual Digital TIME/TEMP Display
3. LEFT / RIGHT Zone Control
4. AIR FRY
5. ROAST
6. BROIL
7. BAKE
8. REHEAT
9. DEHYDRATE
10. TEMPERATURE
and
11. TIME and
12. REMINDER
13. SYNC
14. DUAL COOK
15. START/PAUSE
• When the Air Fryer is plugged in, a tone will sound, the control panel
will illuminate for 1 second. The button will illuminate and then
pulse slowly on and off.
• When is pressed, a tone will sound, the 6 preset functions:
AIR FRY, ROAST, BAKE, BROIL, REHEAT, DEHYDRATE and the DUAL COOK icons
will illuminate and remain active for 5 minutes.
• When in operation, press to turn the whole unit off.
• The function sound can be muted / unmuted by pressing the button
for 3 seconds.

15
• When the pulsing is pressed, a tone will sound, and the 6 preset
functions: AIR FRY, ROAST, BAKE, BROIL, REHEAT, DEHYDRATE and the
DUAL COOK button will illuminate. Press any preset FUNCTION button to
continue.
• When any of the 6 preset FUNCTION buttons (AIR FRY, ROAST, BAKE, BROIL,
REHEAT, DEHYDRATE) has been pressed, a tone will sound and the default
TIME and TEMP will illuminate and continue to ash on your screen.
• Press TIME or to increase or decrease cook TIME.
• Press TEMP or to increase or reduce TEMP in 5 degree increments.
• Press and hold or can quickly adjust the TIME and TEMP.
NOTE: By DEFAULT, the 9Qt TriZone™ Air Fryer is set up to use the whole
9Qt basket (with divider removed).
• When the DUAL COOK button has been pressed, a tone will sound and the
LEFT and RIGHT buttons will illuminate and the DEFAULT LEFT button
will continue to ash on your screen notifying you to program the LEFT
Zone (left side) rst, followed by the RIGHT zone in order to cook 2
different foods at once.
• Press the LEFT or RIGHT button to program the Left or Right zone.
While LEFT or RIGHT ashes, press any preset FUNCTION button
to continue.
NOTE: LEFT or RIGHT zones may be programmed independently, at any time
before or during operation.
NOTE: Be sure to add the basket divider if you are going to use
DUAL COOK (Left and Right zones) of the TriZone™ air fryer basket.
See instructions to add the basket divider. (Figure 1)
• The LEFT or RIGHT button will illuminate steadily on the screen when
active. To adjust or add programming at any time, press the appropriate
LEFT or RIGHT zone control button. When the button begins to ash,
TEMP/TIME can be adjusted.
• Press TIME or to increase or decrease cook TIME.
• Press TEMP or to increase or reduce TEMP in 5 degree increments.
• Press and hold or can quickly adjust the TIME and TEMP.

16
• Press REMINDER to turn this feature ON. The Reminder button will ash
when selected.
• For all preset FUNCTION selections except BROIL, REHEAT and DEHYDRATE, 5
tones will sound at 2/3 of the cook time, to remind you to shake
the basket.
• With the basket divider in place, program each zone independently with
its own cook times and temperatures.
• The default for DUAL COOK is to program the LEFT zone rst, then RIGHT
TIP: Do not set two extreme opposing temperatures in each zone.
Even with the basket divider in place, the temperature from the hotter
zone can affect the cooking temperature in the other zone.
• Both LEFT and RIGHT zones must be programmed rst.
• Press SYNC to ensure both zones will complete cooking together.
• HOLD will appear on the display as the TriZone™ Air Fryer synchronizes
the nal cook times.
NOTE: Once cooking has started SYNC function will not be operable.
• DEHYDRATE is not an option when you select SYNC.
• Press to START the cooking process or to PAUSE any operation.

17
Before Using for the First Time
Remove all packing material and labels
from the inside and outside of the Air
Fryer. Check that there is no packaging
underneath and around the fryer basket
and crisping trays.
1. Your 9qt TriZone™ Air Fryer is
shipped with 2 crisping trays and
the basket divider packaged inside
the TriZone™ air fryer basket.
2. Firmly grasp the fryer basket
handles, to pull fryer basket out
of the main body.
3. Grasp the basket divider and
crisping tray handle and lift to remove from the basket. (Figure 1)
4. Wash the fryer basket, crisping trays and basket divider in hot,
soapy water.
5. DO NOT IMMERSE THE AIR FRYER BODY IN WATER. Wipe Air Fryer body with
a damp cloth. Dry all parts thoroughly.
6. Replace crisping trays into the fryer basket. With the handle facing up,
insert each tray so that the rubber corners t and lock securely into
each basket.
NOTE: If you plan on using only ONE zone (one side) when using DUAL
COOK, be sure to place divider rmly in the middle of the air fryer
basket.
NOTE: Refer to Figure 1 for directions to insert the basket divider.
Follow the arrow direction on the basket divider to ensure that you
insert the basket divider the correct way.
7. Due to base unit’s gracious front curve, the air fryer basket must be
properly inserted.
NOTE: During rst use, the TriZone™ Air Fryer may emit a slight odor.
This is normal and will not affect avor.
Figure 1

18
Operating Instructions
IMPORTANT! The maximum food capacity recommended for the Air Fryer basket
is 9 quarts or 7.5 lbs. of food. Using the full basket will enable you to feed
up to 9 people.
WARNING! This TriZone™ Air Fryer should not be used to boil water.
WARNING! This TriZone™ Air Fryer should never be used to deep fry foods.
1. Place the TriZone™ Air Fryer on a at, stable, heat-resistant work area,
close to an electrical outlet. (Figure 2)
2. If needed, add crisping tray(s) and insert basket divider (add basket
divider only if you are planning to use ONE zone or using DUAL COOK
(both LEFT and RIGHT zones).
See “Before Using for the First Time” for a detailed description.
(Figure 1)
3. Place food into the fryer basket. Do not overll. To ensure proper
cooking and air circulation, NEVER ll any fryer basket more than 2/3
full. When air frying fresh vegetables, we do not recommend adding more
than 4 to 6 cups of food to the fryer basket. (Figure 4)
NOTE: Up to 6 cups of ingredients may be dehydrated as food will
shrink to a fraction of its original volume. Place a single layer of
ingredients into the empty air fryer basket. Create a second layer by
placing the crisping tray into the basket over the ingredients.
Add food on top of the crisping tray.
4. Insert the assembled fryer basket into the front of the TriZone™
Air Fryer. Always make sure the fryer basket is fully inserted
and fully closed before operating.
NOTE: By default, the air fryer uses its full capacity. Please remove
the basket divider. If you plan on using Dual Cook or only a Single
Zone, please insert the basket divider to control the temperature
in the left or right zone.
Table of contents
Languages:
Other Sensio Fryer manuals

Popular Fryer manuals by other brands


TEFAL
TEFAL FW201 instruction manual

TREVIDEA
TREVIDEA Girmi FG89 user manual

Breville
Breville vdf054 user manual

Metos
Metos EF-BA Series Installation and user manual

Bakers Pride
Bakers Pride BPF SeriesBPF 3540 Installation and operation maintenance owner's manual

mastro
mastro ABC0001 Instructions for installation, use and maintenance