SensioHome GOURMET PROFESSIONAL GPCC01 User manual


GOURMET
HY SENSIDHDME
Thank you for purchasing this gourmet by
sensiohome Clean Cook Air Oven/Dehydrator
What can you expect from this product
•
15L capacity with rotisserie function
• 1600W powerful output
•
Rapid air circulation technology to achieve perfectly cooked results.
• 14 preset multi functions for maximum versatility for cooking, baking, defrosting, dehydrating
and keeping food warm.
SAFETY IS IMPORTANT:To ensure your safety and the safety of others, please ensure you
read the Product Safety and Electrical Safety Information before you operate this product.
Keep these instructions in a safe place for future reference.
TECHNICAL DATA
Model Number: GPCC01
Voltage/Frequency: 220-240V-50-60Hz 1600W

Product Safety.
2
Electrical Safety .
6
Features
..
7
Before First Use .
8
Using the Air Oven /Dehydrator.
8
Function Guide
. . .
. .
11
Cleaning and Maintenance .
13
Storage.
13
Servicing
13
Guarantee
14

2
When using electrical appliances, basic safety
precautions should be followed including the
following: Read all instructions before you use the
appliance for the first time.
IMPORTANT
•
This appliance can be used by children aged
from 8 years and above and persons with
reduced physical, sensory or mental
capabilities or lack of experience and
knowledge, if they have been given supervision
or instruction concerning use of the appliance
in a safe way and understand the hazards
involved. Children shall not play with the
appliance. Cleaning and user maintenance
shall not be made by children unless they are
older than 8 and supervised.
•
Always use this appliance on a stable, level
surface, close to a power socket and out of reach
of children.

3
•
If the supply cord is damaged, it must be replaced
by the manufacturer, or similarly qualified persons
in order to avoid a hazard.
•
The used of accessory attachments not
e o mended by the manufacturer may cause
inJunes.
•
CAUTION:
Hot surfaces. Do not touch hot surfaces.
Use handles or knobs, do not let the cord hang over
edge of table or hot surface.
•
The appliance is not intended to be operated by
means of an external timer or separate
remote-control system.
•
Always ensure that hands are dry before handling
the plug or switching on the appliance.
•
Always carry out regular checks on the appliance
and power cord. Should there
be any signs of damage, do not attempt
to use or repair. This appliance has no user
serviceable parts.
•
Always unplug this appliance when not in use and
before cleaning.

4
•
Clean all surfaces in contact with food before first
use.
•
To protect against electric shock do not immerse
the cord, plug, or housing in water or any other
liquid.
•
Unplug from the mains socket when not in use,
before putting on or taking off parts, and before
cleaning.
•
Do not place on or near a hot gas or electric burner
or heated oven.
•
Do not move the unit during use.
•
Do not touch any moving or spinning parts of the
appliance during use.
•
Never switch on the appliance without the
accessories in the correct position.
•
Never allow children to use this appliance, close
supervision is necessary when this appliance is in
use near children.
•
Do not operate the appliance for other than its
intended use.

5
•
Never let the power cord hang over the edge of a
worktop, touch hot surfaces or become knotted,
trapped or pinched.
•
Never leave this appliance unattended during use.
•
Do not use outdoors.
•
This unit is intended to be used in household and
similar applications such as:
•
Staff kitchen areas in shops, offices and other
working environments;
•
Farm houses;
•
By clients in hotels and other residential type
environments;
•
Bed and breakfast type environments.
•
Place the appliance at least 2 inches (50 mm) away
from any walls and do not place under cabinets this is
to allow steam to escape from the vents which are on
the side of the unit.
FOR HOUSEHOLD USE ONLY
SAVE THESE INSTRUCTIONS

6
Read these instructions thoroughly before using this appliance or
connecting it to the mains supply.
•
A 10 amp 8S1362 ASTA approved fuse must be fitted.
•
This appliance must be earthed.
•
There are no user-serviceable parts inside this appliance. Always
refer servicing to qualified service personnel.
•
The mains lead of this product is not replaceable by the user. If
the mains lead is damaged, do not use until the appliance has
been inspected and approved by a qualified electrician.
•
Do not allow this product to be exposed to rain or moisture
during use or storage.
Before switching on, make sure that the voltage of your electricity supply is
the same as that indicated on the rating plate. Connecting
it to any other power source may cause damage.
This product may be fitted with a non-re-wireable plug. If it is necessary to
change the fuse in the plug, the fuse cover must be refitted. If the fuse
cover becomes lost or damaged, the plug must not be used until a suitable
replacement is obtained.
If the plug has to be changed because it is not suitable for your socket, or
due to damage, it should be cut off and a replacement fitted.
The old plug must be disposed of safely because inserting it into a 13 amp
socket could cause electrical hazard.
7
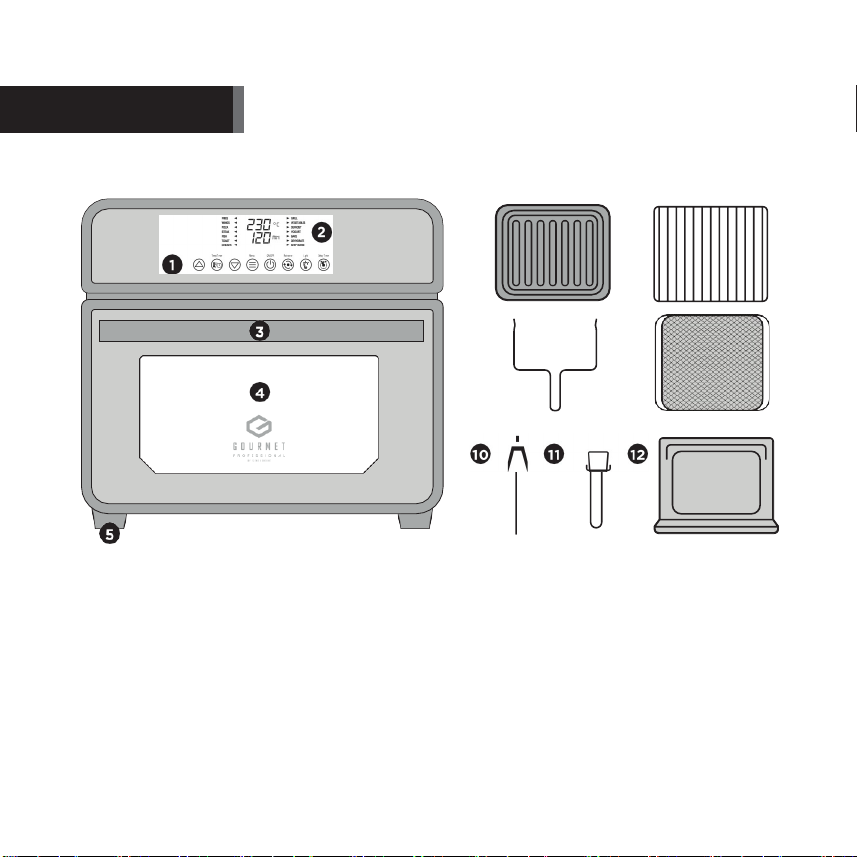
Product may vary slightly from illustration
1.
Control panel
2.
Digital LED display
3.
Oven door handle
4.
Viewing window
5.
Non-slip feet
6.
Enamel baking tray
7.
Baking rack
8.
Rotisserie handle
9.
Fryer net
10.
Rotisserie
11.
Rack
tong
12.
Crumb tray
u
I

8
STEAK
◄
,-,r,
m'I''
►
YOGURT
WINGS
◄
Or
►
VEGETABLES
ICLI
'"'
Before using your appliance for the first time, remove any packaging material and
promotional labels. You may wish to keep the packaging for future use or storage.
Thoroughly clean the accessories in warm soapy water and a non-abrasive sponge, and then dry
them with a clean, dry soft cloth.
Place the appliance on a flat, stable worktop and plug into the wall outlet, select the first program
and then adjust the temperature to 150°C. Operate the appliance for 10 min without anything
inside to burn off any manufacturing residue. A slight odour or smoke may be produced, however
there is no cause for concern as this will be manufacturing residue being burnt off.
Make sure there is adequate ventilation by opening a window.
Unplug the power cord and repeat Step 2 to clean the accessories again after they have cooled
down completely.
Plug the power cord into the electrical outlet socket.
Place the food to be cooked into the oven.
FRIES
◄
-,-,r,
►
GRILL
PIZZA
◄
CJLI
L
►
DEFROST
FISH
◄
►
BAKE
TOAST
◄
►
DEHYDRATE
CHICKEN
◄
►
KEEP WARM
Temp/Timer
Menu
ON/OFF
Rotisserie
Light
Delay
Timer

9
The
@
button increases the time and temperature. The
@
button switches between time and
temperature. The
@
button is for reducing the time and temperature. The @button is for
selecting the main menu. The©
button selects either ON or OFF. The
@
button selects the
rotisserie function. The
@
button selects the internal light. The
@)
button is for selecting the
delay timer function.
When the appliance is turned on it will display the temperature and time and enter standby mode
after two beeps, with the FRIES function is the default setting, and the
◄
icon will flash three
times. Press the @ button to select the desired function. Press the
@
button to adjust the
temperature, the temperature display will flash. Press the
@
or
@
button to adjust the
temperature setting. Pressing and holding of the
@
or
@
button increases the speed of
changing the temperature. Press the
@
button to adjust the time, the time display will flash.
Press the
@
or
@
button to adjust the time setting. Pressing and holding of the
@
or
@
button increases the speed of changing the time.
Once the required temperature or time has been selected the display will flash and the ◄icon
will also flash to show the selected function.
Press the © button to start the appliance. The time will start to countdown. During use,
continued pressing of the © button will return the function to the initial default state. When the
appliance is working, the delay timer button is locked and cannot be pressed.
Function modification:
If re-selection of the function is needed after setting the function, press the
@ button when the appliance is not working. Continually press the © button for three seconds
to return to the initial default setting. Press the @ button to select the function when the
appliance is working; and the menu light is normally on under the working state, and flashes
under the pause state.
If you require the time or temperature adjusted during operation, press the
@
button to adjust
the temperature or time.
If the rotisserie function is set, press the
@
button to cancel the rotation if this is not required,
alternatively if the rotisserie function is needed and has not been set, press the
@
key to start the
rotation.

10
When internal lighting is needed after the power has been is turned on, press the
@
button to
turn on the light. The light automatically turns off after the appliance enters a shutdown state.
When using the delay timer function, select the function menu, adjust the time and temperature as
required, press the
@)
button, and then adjust the required delay time after the icon indicator light
is on, and press the
©)
button to start the delay time. After setting the delay time, all other
functions become locked except the delay timer button and the light button. If delay time needs to
be changed, press the
@)
button once. The button indicator light will flash and the delay timer key
will be activated allowing the delay time to be adjusted. After readjusting the delay time, after
three seconds the delay timer indicator will not flash and the timer will automatically start
counting down from the new time. If you want to exit the reservation mode, long press the
©)
button for three seconds to return to the initial default setting.
Warning:
Since the oven is still at high temperature, be sure to use oven gloves or oven mitts
when touching any part except the handle during the use and after a period of time after the
appliance has been used.
Place the crumb tray into the oven to capture any grease flowing out of the food so they remain on
the tray for easy cleaning.
During cooking some food may need stirring, if this is the case, remove the food from the unit
using oven gloves or mitts and stir. Then replace the food back into the oven and close the door to
continue cooking.
The cooking cycle will be paused if the door is opened during operation, without affecting the
light, and will continue working after closing the door.
When you hear the beep, the cooking cycle has been completed. Wear oven gloves or oven mitts
to take the food out and place it on a heat-resistant surface.
Note: You can also turn off the appliance manually. To turn off, press the ON/OFF button to switch
the appliance off.
When the cooking cycle has been completed, the temperature and time will be displayed and will
return to the default setting after three alarm sounds. The light will turn off and the appliance will
transfer to a standby mode without any operation after 30 seconds.

11
WARNING I ALWAYS USE A MEAT THERMOMETER
TO ENSURE THAT MEAT, POULTRY AND FISH ARE
COOKED THOROUGHLY BEFORE EATING.
The following chart is intended as a guide only. The quantity of food cooked at one time, the thickness or
density of the food, and whether the food is fresh, thawed, or frozen may alter the total cooking time
necessary.
Adjust cooking temperatures and times as necessary to suit your taste. Examples of recommended cooking
times and temperatures which differ from the default settings are shown in the guide on the next page for
reference purposes only.
Always check whether the food has been cooked. If the desired result has not been achieved, place the food
back into the oven and increase the cooking time by a few minutes.
When cooking meat the juices should run clear and if cooking fish, cook until the flesh is opaque
throughout.
TIP:
When cooking whole chicken do not cook whole chickens larger than 1.25kg when using the rotisserie
function. It may be come possible for the wings to touch the heating elements. We recommend banding or
cutting off the wings before roasting to prevent them contacting the heating elements during use of the
rotisserie function. For cooking larger sized whole chickens we recommend use of the enamel baking tray.
Using the rotisserie
Prepare food to be cooked, such as whole chicken under 1.25kg, lamb shoulder, beef or pork joints
according to your recipe.
With the forks of the rotisserie bar removed, insert the rotisserie bar into the centre of the food.
Attach the forks to the rotisserie bar and move the rotisserie forks up into the food to clamp the food
securely at either end. Secure the forks into place by turning the screws to avoid food slipping.
Insert one end of the rotisserie bar into the appliance before then inserting the other end of the rotisserie
bar.
Insert the crumb tray to catch any juices or residue from food during cooking.
Remove the rotisserie using the rotisserie handle.
Fryer net
The fryer net can be used to cook small foods such as chips, wedges and chicken wings. Place food to be
cooked evenly over the net and place the net onto the enamel bak ng tray or by sliding it directly into the
appliance. If the baking tray is not used ensure the crumb tray is placed inside to capture any juices or
residue during cooking.
Enamel baking tray
The tray can be used to cook a variety of foods. Evenly distribute food across the tray for best results and
slide the tray into the appliance to cook.

12
Function
1
.
'
C
"
u
iii .
·
'
C
z
"
u
"
a
il
0
I
E
J
.
'"
i=
.
"
i=
.
'C"
1l
E
.
"
1l
E
FRIES
1600
YES
YES
11
20
185
230
1 - 60
100 - 230
5"C
WINGS
1600
YES
YES
8
10
180
200
1 - 60
100 - 230
5"C
PIZZA
1600
YES
YES
9
13
230
1 - 60
100 - 230
5"C
STEAK
1600
YES
YES
13
16
200
230
1 - 60
100 - 230
5"C
FISH
800
YES
15
16
200
1 · 60
100 - 230
5"C
TOAST
1600
YES
YES
4
230
1 -30
100 - 230
5"C
CHICKEN
1600
YES
YES
30
40
180
230
1 - 90
100 - 230
5"C
GRILL
1600
YES
YES
10
12
230
1 - 30
100 - 230
5"C
VEGETABLES
1600
YES
YES
10
12
180
1 - 60
150- 180
5"C
DEFROST
800
YES
60
65
1 - 180
60 - 100
5"C
YOGURT
800
YES
420
50
1 - 990
40- 60
5"C
BAKE
800
YES
60
70
180
1 - 180
100- 180
5"C
DEHYDRATE
1600
YES
YES
240
70
1 - 990
30
60- 80
5"C
KEEP
WARM
800
YES
30
70
1 · 990
60 · 100
5"C
Troubleshooting
In case of a temperature detector fault, the display screen will display "E02", which will flash after two beeps, with no operation
being selected. The light will turn off and the product will be in the standby mode without any operation for 30 seconds.

13
1.
Before cleaning, please ensure that the plug has been disconnected from the socket.
2.
After use, allow the appliance to cool down before you start to clean it.
3.
To clean the exterior of the unit, use a soft damp cloth and a mild detergent.
4.
When cleaning the interior and exterior do not use any abrasive detergents or alcohol.
5.
To clean the appliance, NEVER submerge it in water or any other liquid.
6.
Wash the accessories in warm soapy water.
7.
Do not use any abrasive detergents or cleaning products as this may damage the coatings
and the cosmetic finish.
8.
This appliance requires little maintenance. It contains no user serviceable parts. Do not try
to repair it yourself. Any servicing requiring disassembly must be performed by a qualified
appliance repair technician.
All parts must be completely cleaned and dry before being stored. Store the appliance in the box
in which it was supplied or in a clean, dry place well out of the reach of children.
If you drop or damage your appliance it should not be used until it has been examined by
an authorised service centre or appliance technician. Always refer servicing to qualified service
personnel.

14
This product is guaranteed for twelve months from the date of original purchase.
Any defect that arises due to faulty materials or workmanship will either be
replaced or refunded where possible during this period by the dealer from whom
you purchased the unit.
The following conditions apply:
•
The guarantee does not cover accidental damage, misuse, cabinet parts, knobs
or consumable items.
• The product must be correctly installed and operated in accordance
with the instructions contained in this manual.
• It must be used only for domestic purposes.
•
The guarantee will be rendered invalid if the product is re-sold or has been
damaged by inexpert repair.
• Specifications are subject to change without notice.
• The manufacturer disclaims any liability for the incidental
or consequential damages.
• The guarantee is in addition to, and does not diminish your statutory
or legal rights.
• Valid in the
UK
only.
Customer Helpline: 0345 467 6743
UK
CR
(€

15
Disposal Information
Waste electrical products should not be disposed of with household waste.
Please recycle where facilities exist. Check with your local authority for recycling
advice.
This symbol on appliance, instruction manual and packaging puts
your attention to this important issue. The materials used in this
appliance can be recycled. By recycling used domestic appliances you
contribute an important push to the protection of our environment.
Ask your local authorities for information regarding the point of
recollection.
For technical queries, please contact:
MPL Home Ltd, Lytchett House, 13 Freeland Park,
Wareham Road, Poole, Dorset, BH16 6FH, UK
MPL Home Ltd, Unit 5, The Courtyard Business Centre,
Orchard Lane, Blackrock, Co. Dublin. A94 Y6C3
UK
CA
fl
CE


Table of contents


