SENSOHIVE MATURIX Gaia 200 User manual
Quick Start Guide
Gaia 200
Wireless Transmitter for Maturix®
Temperature and Strength Monitoring

Manufactured by Sensohive Technologies ApS
CVR-nr 36424540
Wichmandsgade 1, 1st oor le
5000 Odense C
Denmark

About this guide
This Quick Start Guide covers the most fundamental product information and instructions.
For more documentation and information please visit maturix.com/help
Disclaimer
Information in this guide is based on specications believed correct at the time of publication.
The right is reserved to make changes as design and general improvements are introduced.
Find the latest version in the Help Center at maturix.com/help
Version 1.0 // February 2021
About Maturix®
Maturix® is a smart system for monitoring the concrete curing process. It is one of the most
advanced solutions for wireless concrete monitoring, being used by leading companies
within the construction industry worldwide. Read more at maturix.com
About Sensohive
Maturix® is developed by Sensohive Technologies ApS, a Danish tech start-up for wireless
sensor solutions and IoT. Our mission is making it easy to collect, analyze and understand
valuable data for businesses through intelligent wireless sensor solutions.
Read more at sensohive.com
1
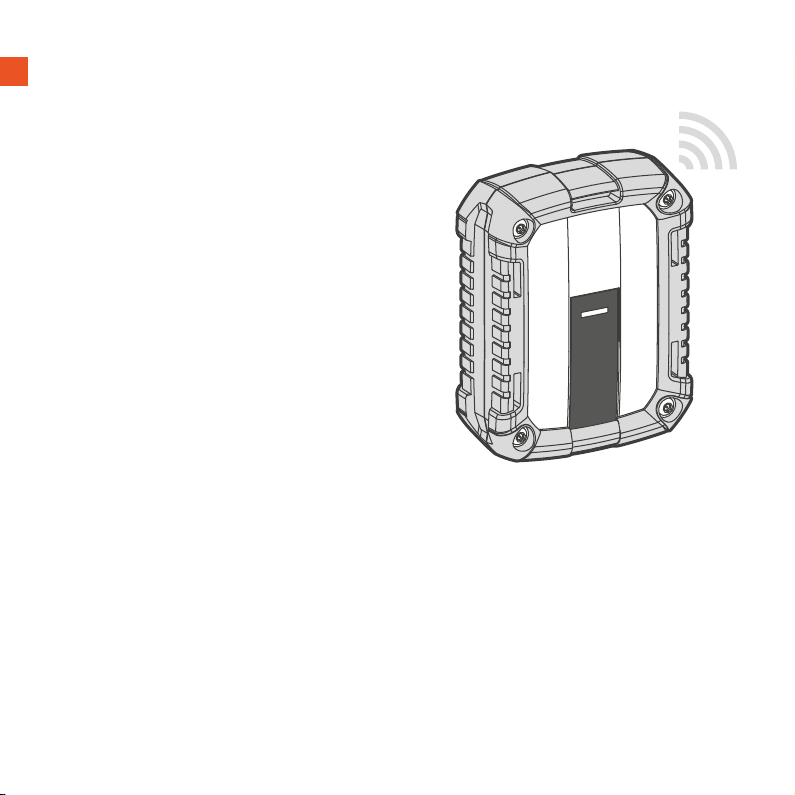
Introduction
Gaia 200 is a wireless transmitter for
Maturix® Temperature and Strength Monitoring
using type K thermocouples.
The device transmits the temperature readings
wirelessly to the cloud using the Sigfox network.
Sigfox is a global wireless network dedicated
to the Internet of Things (IoT). It has low power
consumption and longer range than WiFi and
Bluetooth. Learn more at maturix.com/sigfox
The transmitter is designed to withstand harsh
environments and outdoor use. It is protected
against the ingress of dust and water, and its
rubber frame oers increased shock-absorption
and better handling.
The temperature data can be monitored in real-time online in our web portals.
Visit maturix.com/getstarted to learn how to get started.
Activation and Data Access

2
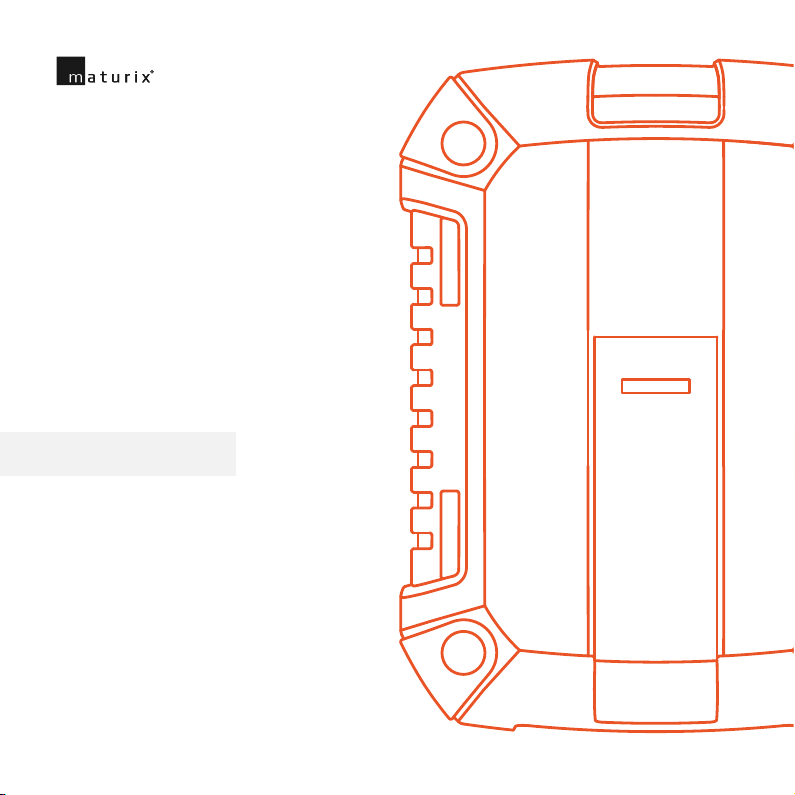
Product Diagram
Front Back
Rubber frame
LED indicator
Mounting slots
Type K connector
Back cover
Battery cover
Label with Device ID
Device ID (under the back cover)
Opening slot
3
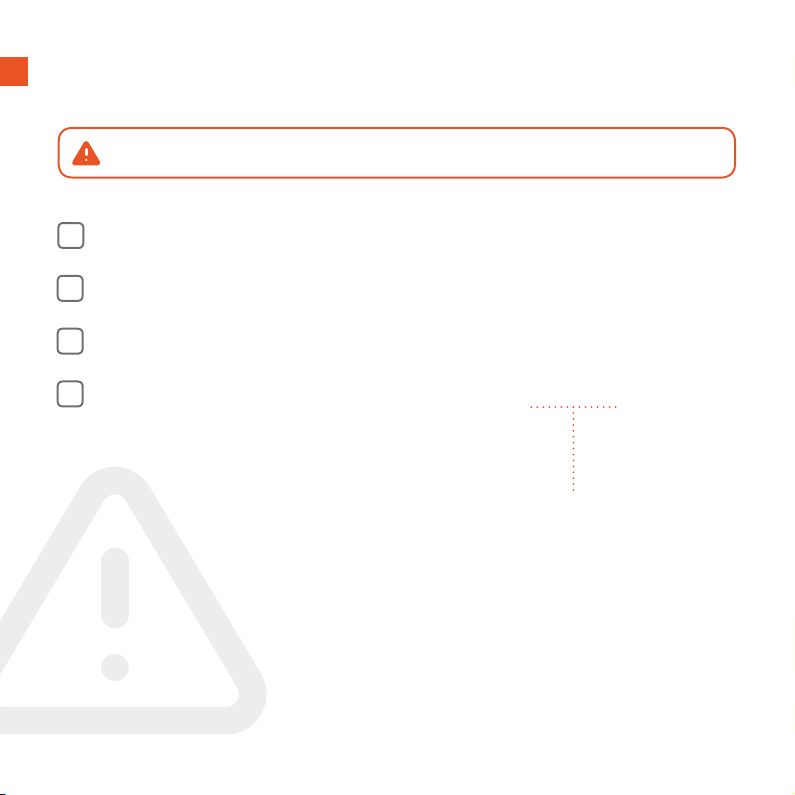
Before you start
Ensure good Sigfox coverage at the monitoring location (page 4)
Install the batteries (page 5)
Connect a type K thermocouple (page 9)
The device must be activated and added in the respective web portal prior to use
The steps below are strictly required for Gaia 200 to operate correctly!
Read the soware-specic guide or visit
maturix.com/getstarted for more information
4
Getting started
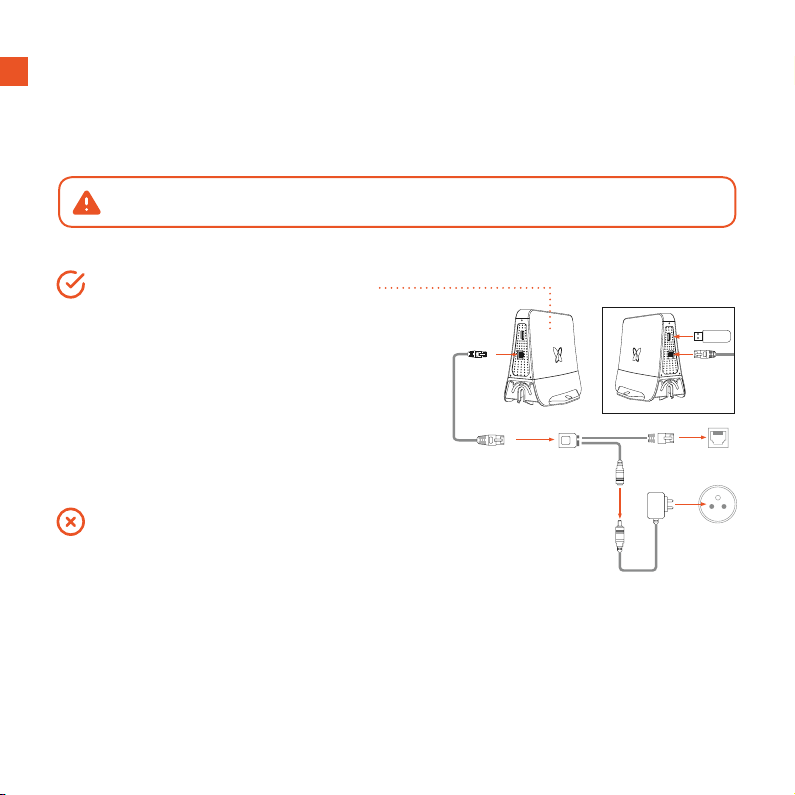
Connectivity
If you are in doubt about the coverage, we strongly recommend using the Sigfox Gateway
to create network coverage in areas with poor reception and to ensure better connectivity.
If you don’t have a Sigfox Gateway:
Check that you have good/excellent coverage at your
location prior to use. Learn how at maturix.com/sigfox
To purchase a gateway, contact your reseller.
If you have a Sigfox Gateway:
Install it following the steps in the Quick
Start Guide provided with the gateway.
The gateway may have to be congured
before use. For installation guides visit
maturix.com/gateway
Good Sigfox coverage is required for Gaia 220 to work, otherwise data will be lost!

5
Install batteries
Step 1
Use a screwdriver to open the bottom ap of the back cover.
closed
open
Gaia 200 works with 4 x AA batteries.
For general use, we recommend using high-quality 1.5 V alkaline batteries (included).
For use at temperatures below 0 °C (32 ºF), we recommend lithium batteries*.
* Lithium batteries have a dierent (and less linear) discharge curve than alkaline.
Please visit maturix.com/batteries for more information.
6
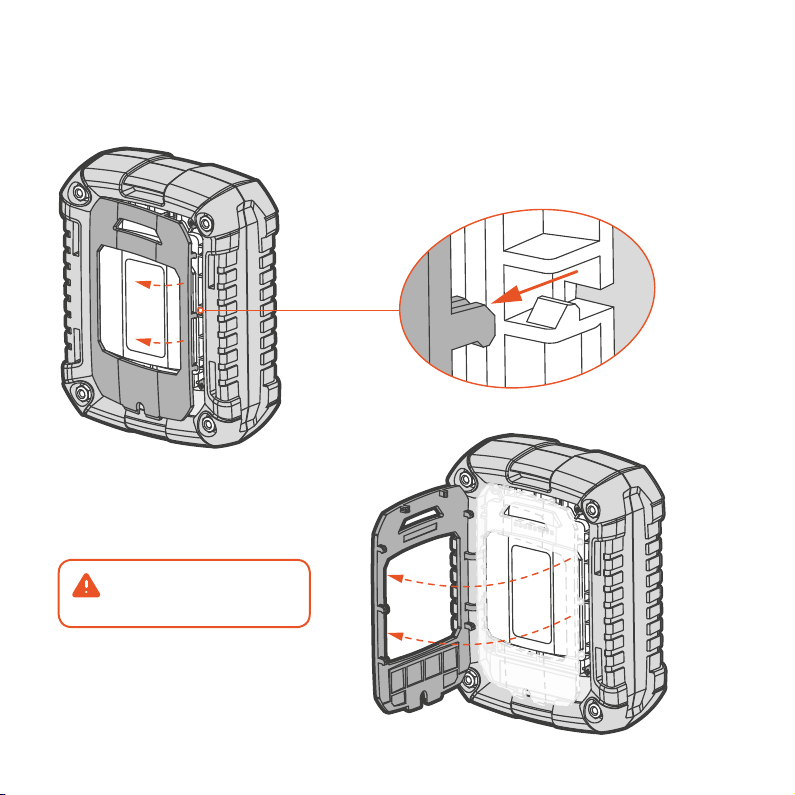
Step 2
Detach the snap-ts of the back cover and rotate it to the le .
The cover is attached to le side.
Be careful not to tear it!

7
Step 3
Unscrew the 4 screws from the
battery cover (the hard plastic
part with the Sensohive logo).
Be careful not to lose the screws. 1
Caution:
Do not insert any tool in
the pressure vent opening.
Step 4
Remove the battery cover and
insert the batteries in place.
Observe the indications in the
holders for the right polarity.
1In case you lose a screw, here’s the size: M3 x 8

8
Step 5
Screw the battery cover on again and ip the back cover in place, pressing the snap-ts
back. Once batteries have been inserted, the device is ready for use.
To extend the battery life, disconnect the thermocouple when not in use.
Gaia 200 will mainly consume energy when a thermocouple is connected.
Battery status
The battery status is shown in the web portals under “Devices” or “Sensors”.
An indication of low power will appear when it is needed to replace the batteries.*
* Lithium batteries have a dierent (and less linear) discharge curve than alkaline.
Please visit maturix.com/batteries for more information.

9
Operation
LEFT:
Slim pin
RIGHT:
Wide pin
Turn on
Connect a type K thermocouple.
Turn o
Disconnect the thermocouple.
Turning on / o
Connecting the thermocouple
Follow the indications next to the connector
to correctly insert the type K thermocouple.
When a cable is connected, data will be
transmitted every 15 minutes.

10
Gaia 200 has an LED indicator which lights up and blinks
when a type K thermocouple is connected and when the
device is transmitting data.
LED indicator
Situation LED behaviour
Batteries installed (device is starting up) Solid yellow for 15 seconds
Data transmission Solid blue while taking measurement
and transmitting data
Operating (battery OK) Two green blinks every 20 seconds
Operating (low battery, change soon) Two yellow blinks every 20 seconds
Operating (critical battery, change now) Two red blinks every 20 seconds
No thermocouple connected LED is turned o
If the LED is not blinking, but a thermocouple is connected, check the batteries or see
Troubleshooting on page 17.
11
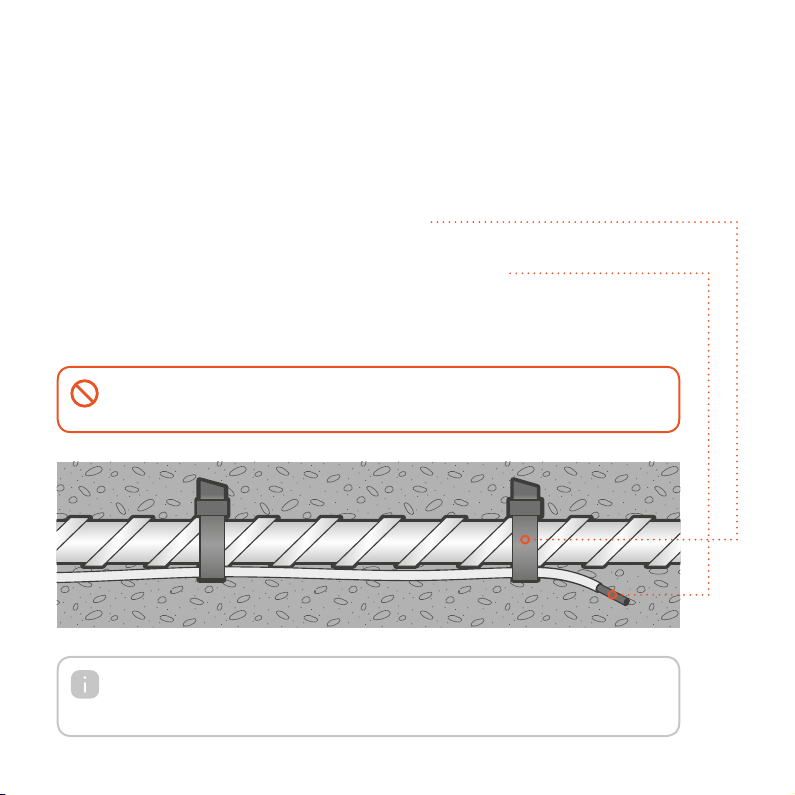
Installation of type K thermocouple
Example 1: Installation on rebar (wet cast concrete)
1. Determine the positions for the thermocouples in the structure before pouring.
2. Secure the thermocouples to the rebars using plastic cable ties or strong tape.
Fasten them along the bottom of the reinforcement to shelter them from direct
impact during pouring. Note: The sensor is situated at the tip of the cable.
3. Connect each thermocouple to a transmitter (see page 9)
4. Mount the transmitters at a secure location (see page 13).
Caution:
Do not use metal ties or alike as they may damage the thermocouples.
Consider good cable management practices, e.g. marking each thermocouple with a label.
This will make it easier to remember where each thermocouple is positioned in the structure
and assist when assigning each thermocouple to a transmitter in the web portal.

12
When the monitorings are done and readings are no longer needed, cut the thermocouple
cable at the concrete surface.
For a more detailed guide with pictures and video, please visit maturix.com/help
Example 2: Installation in hollow-core slabs (dry concrete)
1. Determine the positions for the thermocouples in the structure.
2. Use a tool (e.g. a screwdriver) to penetrate the dry concrete and make a small hole.
Consider the right depth of the hole for correct positioning of the thermocouple’s tip,
which is where the temperature will be measured.
3. Insert the thermocouple into the concrete.
4. Close the hole thoroughly by pushing the concrete around it to ensure the
thermocouple stays in place.
5. Once the thermocouple has been installed correctly, immediately connect it to a
Gaia 200 transmitter and place it at a secure and visible location (see next page)
Caution:
The tip of the thermocouple must not touch a prestressed wire or the metallic
bed, otherwise, the measurements might be incorrect.

13
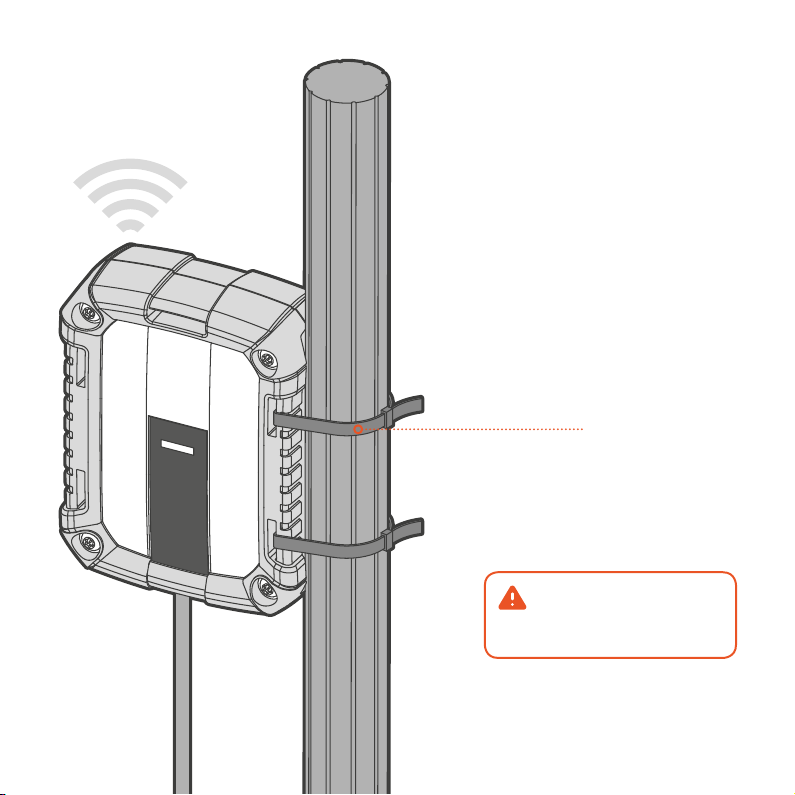
For better signal strength, we
recommend placing Gaia 200:
• Positioned as high as possible
• Free from obstacles
• With the connector facing down
Mounting on site
The device has 5 mounting slots for
diverse possibilities of installation.
14
Use cable ties or other preferred
fastening method to securely
mount Gaia 200 in place.
Carefully read the precautions
on the next pages to ensure
correct mounting of the device.
15
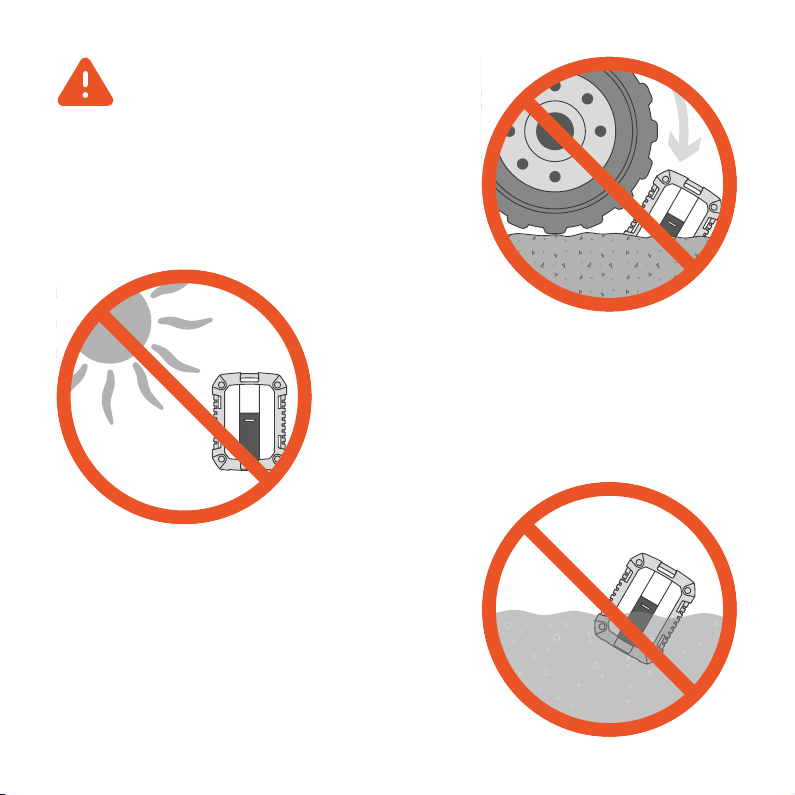
Precautions
Do not place Gaia 200 in such a way that it
could get permanently damaged.
Do not place Gaia 200 in direct sunlight.
This may result in wrong temperature
readings and lower battery life.
Do not leave Gaia 200 submerged in water.

16
Do not place Gaia 200 up against
large metal surfaces, as this may
aect the antenna performance.
Do not block Gaia 200, as this may
aect the antenna performance.
Do not drop Gaia 200 from heights.
Take care of your tools!

17
Troubleshooting
Problem Possible cause Solution
No data received
or
Sporadic data received
The transmitter might be outside of
good Sigfox coverage
Make sure the transmitter is
mounted correctly for ideal antenna
performance (see page 13)
Install a Sigfox Gateway on-site
The thermocouple might be damaged Replace the faulty thermocouple
The battery might be too low Replace with fresh batteries
Wrong readings received
The thermocouple tip might be
touching a conductive material
(e.g. metal)
Install the thermocouple so the tip is
protected or not in contact with any
conductive materials
The thermocouple might be damaged Replace the faulty thermocouple
The thermocouple type might be wrong Use type K thermocouples
The thermocouple polarity might
be swapped (self-assembled
thermocouple)
Change the polarity in the Data
Editor in the web portal (only
Maturix® In-situ)
or
Change the polarity by reassembling
the connector correctly
The LED is not lighting/blinking
(thermocouple connected)
The thermocouple might be damaged Replace the faulty thermocouple
The battery might be too low Replace with fresh batteries
For detailed troubleshooting and help, please visit maturix.com/troubleshooting
If a problem persists, contact your reseller for support/service.
Table of contents


