Sensorex SD7000 Series User manual

Page 1 of 8
Congratulations on your purchase of your Sensorex SD7000
Series pH or ORP true differential electrode. Please follow
instructions and tips to get the maximum life out of your
electrode.
Introduction
Electrode Care and Use Tips
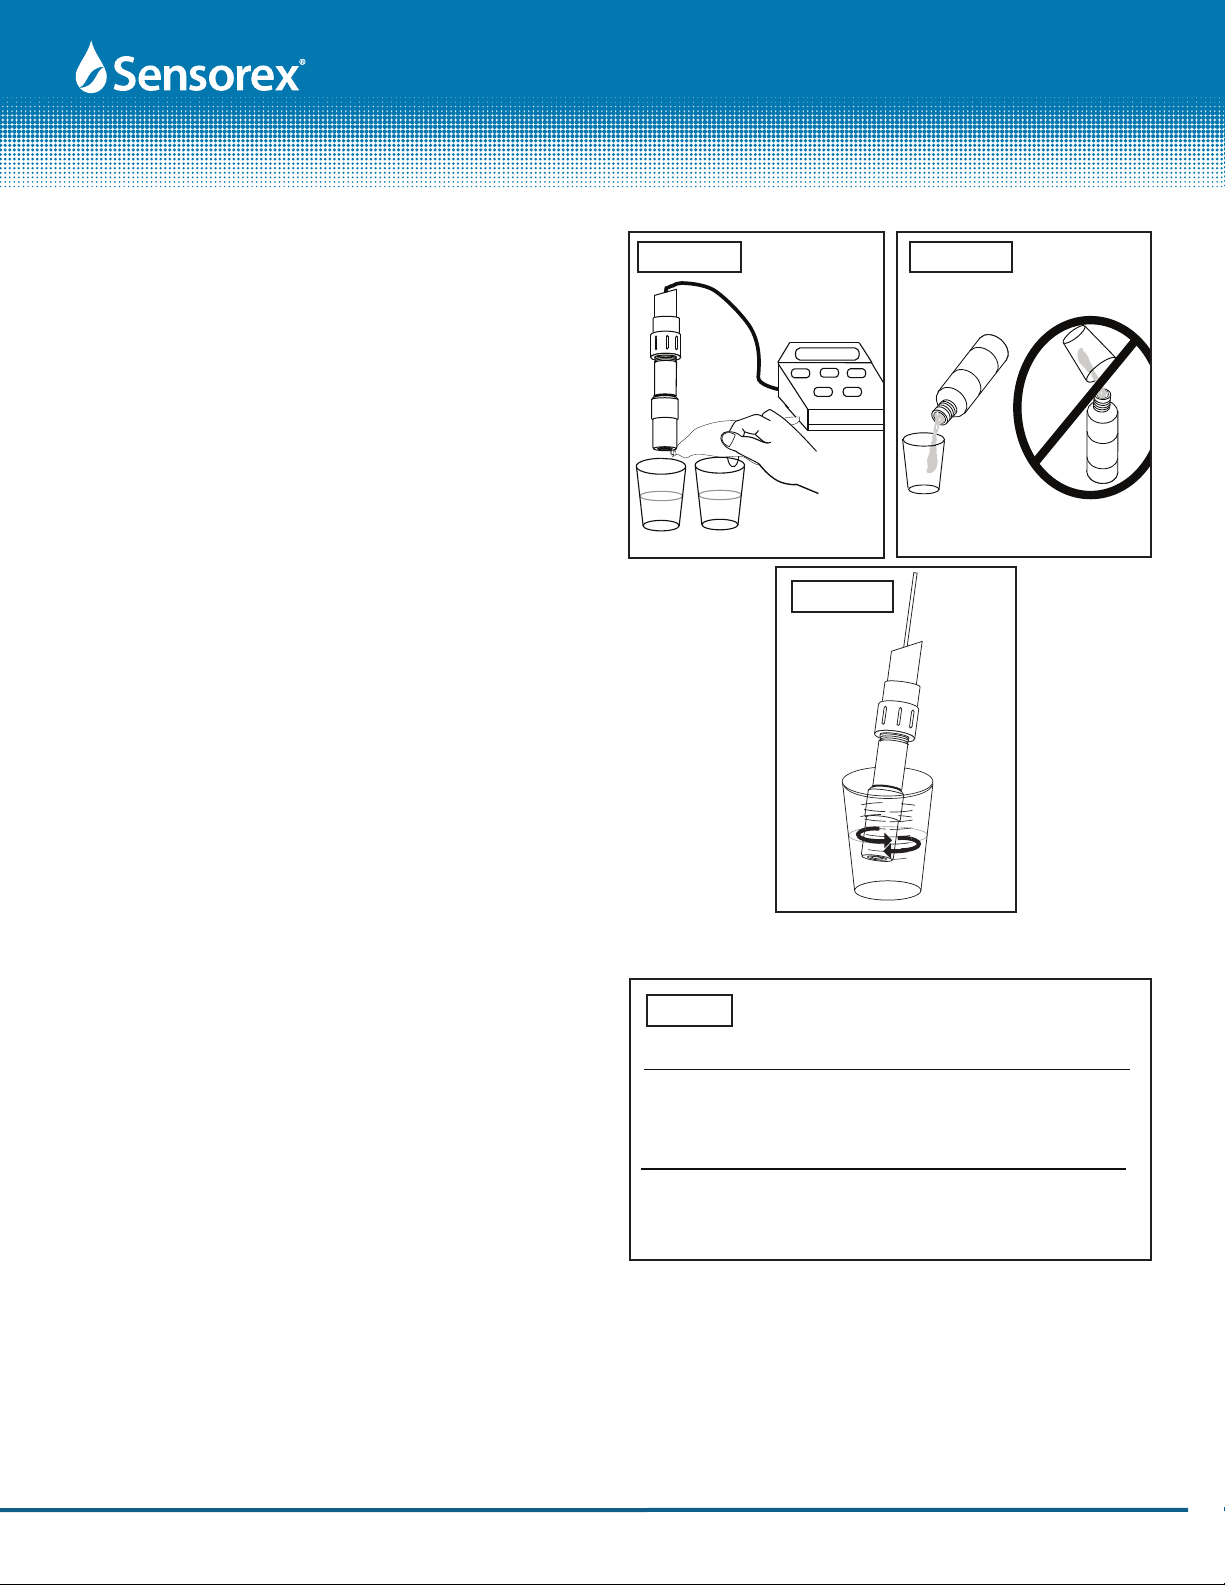
1. The SD7000 Series pH and ORP electrodes are shipped with a
cap containing a solution of pH 4 buffer and potassium
chloride.
The cap should remain on the electrode until it is used. If the
electrode is used infrequently the cap and its solution should
be saved and the electrode stored in it. Store pH and ORP
electrodes in pH 4 buffer if soaking solution is discarded.
Before using the electrode remove the soaker cap as shown
in FIG 1.
2. Sensorex true differential electrodes have a 2 year prorated
warranty from the date etched in the electrode body as shown
in FIG 2. Electrodes in inventory should be rotated so that the
older electrodes are used first. The date code is stamped on
each electrode by fiscal week and year (Example: 4613 = week 2
of November 2013).
3. After exposure to a sample, buffer or rinse solution, carryover
can be minimized by blotting—never by wiping—the elec-
trode with a clean non-abrasive paper or a clean cloth towel.
Do not use a brush on pH glass.
4. As a rinse solution, measure and use a portion of the next
sample or buffer. This action will minimize carryover
contamination.
5. When calibrating pH electrodes, use a buffer close in value to
that expected from the sample for one-point calibrations or as
the second buffer for two-point calibrations (See below). This
action will minimize span errors. ORP electrodes are typically
not calibrated. However, a solution to verify electrode perfor-
mance should be used periodically. 225mV solution, Zobell's
solution (Part no. B225), is a good choice for single point
verification.
PRODUCT INSTRUCTION SHEET
Parts covered by this product data sheet include:
SD7000CD, SD7000CD-ORP, SD7500CD, SD7500CD-ORP, SD7420CD, SD7420CD-ORP
SD7000 Series Differential
pH/ORP Electrode Instructions
FIG. 1
FIG. 2
Form: InstrSD7000-05 [Rev: 2016-08-15]
©2016 Sensorex Corporation
Model SD7000CD Dierential pH
4615

PRODUCT INSTRUCTION SHEET
Page 2 of 8
Mechanical Installation
FIG. 3
Submersion Installation
Make a submersible conduit assembly using 1.5" F x 1" F
reducer and 1" pipe. On top of the pipe, mount a junction
box. with a 2-sided terminal strip. Thread the electrode onto the
reducer. Be sure to use sealing tape or paste. Attach the wires to
one side of the terminal strip and an extension cable to the other.
Match colors if using the same wires colors. See FIG 3.
In-Line Installation
Use pipe sealing tape or paste on the 1.5" threads near the
pH glass and salt bridge. Thread into user-supplied SCH80 1.5"
threaded tee. See FIG 4.
FIG. 4
6. Readings stabilize faster in some solutions than in others; allow
time for the readings to stabilize. In general, new pH electrodes
stable readings display in 10-15 seconds. ORP stability in
samples can take much longer.
7. All pH electrodes age with time. Aging is characterized by
shortened span and slower speed of response. Aging is best
detected by the two-point calibration method. If the pH meter
has manual or microprocessor slope (span) controls, the
controls can be adjusted to compensate for electrode span
errors (but will not affect the speed of response).
8. Salt bridge should be replaced when the electrode readings
cannot be corrected by the meter's controls and/or when their
speed of response is too slow for the application for which
they are being used. The frequency of electrode replacement
is a function of the application; electrodes operating in hot
liquids at very high or very low pH values will have shorter lives
than those operating at neutral pH and ambient temperature.
9. Coatings on an electrode's surface prevent new liquids from
contacting an electrode's measuring surface and can mimic the
effects of electrode aging. Before concluding that a salt bridge
needs replacing, check the pH glass surface for coatings by
removing the pH electrode cartridge and looking at the pH
glass.
10. Temperature affects electrode readings in two ways. First, the
output of an electrode varies with temperature. For pH elec-
trodes this effect can be corrected by automatic
temperature compensation (ORP/Redox readings are not
corrected for temperature effects). Secondly, the real pH or ORP
value, independent of the electrode measuring the value or use
of the temperature compensation, is temperature dependent.
Form: InstrSD7000-05 [Rev: 2016-08-15]
©2016 Sensorex Corporation
Electrode
1.5" x 1" reducer
1" pipe
Conduit box
Pipe sealing
tape

PRODUCT INSTRUCTION SHEET
Page 3 of 8
Salt Bridge Removal and Replacement
1. Remove the salt bridge using an adjustable wrench or pliers
by turning counterclockwise. SEE FIG 5.
2. Pull up on salt bridge to remove. SEE FIG 6.
3. Flush out chamber with fresh standard cell buffer then refill
with standard cell buffer (refill solution) to level shown in FIG. 7
(below top thread).
4. Install new salt bridge by turning clockwise on hex of salt
bridge (OPPOSITE OF FIG5) DO NOT OVER-TIGHTEN. Make
sure o-ring is properly seated. The salt bridge will be slightly
below the body surface . See FIG. 6A.
FIG. 5 FIG. 6
Form: InstrSD7000-05 [Rev: 2016-08-15]
©2016 Sensorex Corporation
1
4
m
m
FIG. 7
Electrode Cleaning Tips:
Coating of an electrode’s measuring surface can lead to er-
roneous readings including shortened span and slow response
times. The type of coating determines the type of cleaning
technique.
Soak the sensor in a mild soap solution for 2-3 minutes. Using
a soft bristle brush, scrub the entire measuring end of the sen-
sor, taking care not to scratch the glass measuring electrode.
Rinse in clean, warm water. If the sensor is usually in a process
above 7 pH, it is advisable to soak it 4 - 5 minutes in a weak
acid solution (hydrochloric recommended). Place the sensor
back in the soap solution for 2 - 3 minutes. Rinse it in clean
warm water.
Hard Coatings should be chemically removed. The chemical
used to remove the coating should be the least harsh chemical
that dissolves the coating in one or two minutes and does not
attack the electrode’s materials of construction. For example,
a calcium carbonate coating might be removed with 5% HCl
(muriatic acid). Do not keep electrode in acid for more than 5
minutes. Rinse with clean water after acid.
Oily or Organic Coatings are best removed with detergents
or an appropriate solvent that does not attack the electrode’s
materials of construction.
NOTE: When using chemicals or solvents, care should be taken
and appropriate eye, face, hand, body and/or respiratory pro-
tection should be used.
Protein-based coatings are best removed with an enzyme-
based cleaner such as TERG-A-ZYME (www.alconox.com).
Abrading or sanding a pH electrode’s surface should never be
done.
O-ring
must be
seated in
groove
for proper
seal
install a little
below surface
FIG. 6A
O-ring
must be
wet before
installation
ll to bottom
thread only
14mm
Socket wrench
PRODUCT INSTRUCTION SHEET
Page 4 of 8 Form: InstrSD7000-05 [Rev: 2016-08-15]
©2016 Sensorex Corporation
Electrode Calibration Guidlines:
As a rule, follow the procedures shown in the pH Meter's
Instruction Manual. These procedures will vary depending on
whether the meter is a simple type with manual adjustments, a
micro-processor type or a pH transmitter.
The frequency of calibration is a function of many factors. These
factors include:
1) The accuracy required by the application.
2) The value of the off-specification product versus the cost
of calibration.
3) The coating or abrasive nature of the application.
4) The stability of the pH Electrode and pH Meter as a system.
The frequency of calibration is really determined by experience.
At a new installation, calibration might initially be checked every
few hours or shift with the calibration changes
noted in a log. As a pattern of longer stability is found, the time
between calibration checks can be increased to once a day or
once a week.
System Calibration Concepts
The pH Electrode and the pH controller should always be cali-
brated as a system. Electronic calibration of a pH controller with a
pH signal simulator checks the controller only and does not cor-
rect for imperfections of the pH electrode. Even if perfect when
new, the performance of pH electrodes varies with time, usually
in an unpredictable way. When changing electrodes or connect-
ing an electrode to a different pH controller, re-calibration must
be performed. ORP is usually not calibrated but quinhydrone
based solution or other standards
can be used to verify ORP sensor performance. See FIG. 9.
Two-Point Calibrations
Two-point calibrations correct for both the pH electrode's offset
and span errors. Since both the offset and span vary with time
the two-point method is the onr preferred. Choose buffer pH 7
for zero-point and a second buffer close to your normal operat-
ing range (usually pH4.01 or pH 10.00). See FIG. 8 A-C.
Grab Sample Calibrations
The Grab Sample Calibration method is used when it is difficult
or undesirable to remove an electrode from a system. This meth-
od involves obtaining a sample of the liquid being measured and
noting the meter's reading at that time. The sample's reading is
obtained by use of a calibrated lab or portable meter and that
reading is compared to that of the on-line meter. The on-line
meter is adjusted by the difference between the readings. It is
important to use the difference between the readings because
the system's reading may have changed in the intervening time.
It is important that the sample being measured by the lab meter
be at the process temperature or erroneous results may occur.
pH 4.01
BUFFER
pH 4.01
BUFFER
pH Meter
7.00 pH
pH 4.01/10.00
pH 7.00
FIG. 8A FIG. 8B
FIG. 8C
PLATINUM ORP ELECTRODE IN 7 BUFFER/QUINHYDRONE MIXTURE
Temperature 20C (68F) 25C (77F) 30C (86F)
Readings (mV) 89-107 83-101 76-94
Readings (pH) 5.20-5.50 5.30-5.60 5.42-5.72
PLATINUM ORP ELECTRODE IN 4 BUFFER/QUINHYDRONE MIXTURE
Temperature 20C (68F) 25C (77F) 30C (86F)
Readings (mV) 260-287 254-281 247-274
Readings (pH) 2.15-2.60 2.25-2.70 2.37-2.82
FIG. 9

PRODUCT INSTRUCTION SHEET
Page 5 of 8 Form: InstrSD7000-05 [Rev: 2016-08-15]
©2016 Sensorex Corporation
Intermittent Operation
Some facilities are only operated part of the time. When out
of operation, electrodes must not be allowed to be exposed
to air and become dry. Electrodes should be removed from
such systems and stored in their bottles or caps or in a beaker
filled, preferably, with pH 4.0 Buffer. In some instances, power
to the meter is shut off; this condition can be harmful to elec-
trodes. Electrodes should be disconnected from un-powered
meters.
Electrode Wiring
See the figures 10 through 17 to find wiring for your particu-
lar pH or ORP controller or transmitter. Figures 10-17 apply
to SD7000CD and SD7000CD-ORP sensors only. If you don't
see a wiring diagram for your make and model number of
controller, please contact Sensorex Technical support at tech-
Figure 18 is wiring for the SD7420CD & SD7420CD-ORP sen-
sors. These sensors are loop powered 4-20mA.
Figure 19 is wiring for SD7500CD & SD7500CD-ORP sensors.
These sensors DO NOT REQUIRE POWER. Do not connect to
power. These are self-powered.
Aquametrix
Shark
Controller
Aquametrix
Shark
TX/P
Transmitter
FIG. 10
FIG. 11
GLI PRO P3
FIG. 12

PRODUCT INSTRUCTION SHEET
Page 6 of 8 Form: InstrSD7000-05 [Rev: 2016-08-15]
©2016 Sensorex Corporation
GLI P33
FIG. 14
Troubleshooting Your SD7000 Series Electrode
General Troubleshooting
Always check all electrical connections. Make sure all parts are
assembled correctly and o-rings are well greased.
Electrode Troubleshooting
1. Put the sensor in a pH 7 buer solution and wait for the tempera-
ture of the sensor and buer to reach room temperature.
2. Disconnect the red, green, yellow and black sensor wires from
the module ( applies to SD7000CD, SD7000CD-ORP, SD7500CD,
SD7500CD-ORP).
3. Measure the resistance between the yellow and black wires to ver-
ify the operation of the temperature element. The resistance should
be between 250 and 350 ohms at approximately 25 ºC (SD7000CD
only). For SD7500CD the resistance should measure about 1100
ohms at 25 ºC. If the temperature element is good, reconnect the
yellow and black wires to the module.
4. Measure the DC mV with the multimeter (+) lead connected to the
red wire and the (–) lead connected to the green wire. The reading
should be between –50 and + 50 mV. If the reading is outside of
these limits, clean the sensor and change the salt bridge and stan-
dard cell solution.
5. With the multimeter still connected the same way, rinse the sensor
with water and put it in a pH 4 or pH 10 buer solution. Wait for the
temperature of the sensor and buer to reach room temperature.
6. Compare the mV reading in the pH 4 or 10 buer to the reading in
the pH 7 buer. The reading should dier by approximately 160 mV. If
the dierence is less than 160 mV, call technical support.
7. The SD7420CD & SD7420CD-ORP sensors are loop-powered
4-20mA. In pH7 buer the SD7420CD output should measure ap-
proximately 12mA. For SD7420CD-ORP, use B225 solutions. The
reading should be approxiamately 8.9mA.
Buer reading Possible Cause Corrective Action
6.2-6.8 in all buers a) Cracked pH glass a) Replace electrode
b) Stress crack b) Contact Sensorex for
Return Authorization
7.00 in all buers a) Bad connection a) Check/x connection
b) Internal short circuit b) Contact Sensorex for
Return Authorization
Buers read close to a) Dirty electrode pH glass a) Clean electrode
expected value but and/or reference junction
speed of response* is
slow (>30 seconds)
Short span*** a) Dirty pH glass or reference a) Clean pH glass or replace
(Less than 70%) junction salt bridge
b) Aged electrode b) Replace electrode (too old)
Unstable or
drifting reading Reference dirty or plugged Clean pH glass or replace salt bridge
pH ELECTRODE TROUBLESHOOTING
SEE CONTROLLER MANUAL
FIG. 13 GLI P63

PRODUCT INSTRUCTION SHEET
Page 7 of 8 Form: InstrSD7000-05 [Rev: 2016-08-15]
©2016 Sensorex Corporation
GLI P53
GLI P53 - "A" prex Serial Nos.
FIG. 15
FIG. 16
Ordering Information
Part Number Description
SD7000CD Differential pH sensor with replaceable salt
bridge, 20ft cable, tinned leads, 1.5” NPT mounting.
Replacement salt bridges sold separately.
SD7000CD-ORP Differential ORP sensor with replaceable salt
bridge, 20ft cable, tinned leads, 1.5” NPT mounting.
Replacement salt bridges sold separately.
SD7420CD Differential pH sensor with replaceable salt
bridge, 20ft cable, tinned leads, 1.5” NPT mounting,
4-20mA loop-powered. Replacement salt bridges sold
separately.
SD7420CD-ORP Differential ORP sensor with replaceable salt
bridge, 20ft cable, tinned leads, 1.5” NPT mounting.
4-20mA loop-powered. Replacement salt bridges sold
separately.
SD7500CD Differential pH sensor with replaceable salt
bridge, 20ft cable, tinned leads, 1.5” NPT mounting, self-
powered. Replacement salt bridges sold separately.
SD7500CD-ORP Differential ORP sensor with replaceable salt
bridge, 20ft cable, tinned leads, 1.5” NPT mounting, self-
powered. Replacement salt bridges sold separately.
SDA-7001 Replacement salt bridge quantity 1 each for pH and
ORP differential sensors
SDA-7003 Replacement salt bridge quantity 3 each for pH and
ORP differential sensors
SDA-7010 Replacement salt bridge quantity 10 each for
pH and ORP differential sensors
SDS-7015 Standard Refill solution for PH and ORP differential
sensors, 150mL
SDS-7025 Standard Refill solution for PH and ORP differential
sensors, 250mL
SDS-7050 Standard Refill solution for SD7000 Series sensors,
500mL
Product Specications
Electrode Specications:
SD7000CD , SD7000CD-ORP
pH Range: 0-14
Temp/Pressure: Min 32° F(0°C)/ Max 140° F/(60° C)
Speed of Response: 95% in 5 seconds
Wetted Materials: PPS (Body), PVDF(Salt bridge junction),
pH glass (pH), Platinum (ORP),
Titanium (ground pin), Viton (o-rings)
Cable Length: 20ft
Max ow Rate: 10ft./sec
Max transmission
distance: 3000ft (914m)
GLI P53 - "B" prex Serial Nos.

PRODUCT INSTRUCTION SHEET
Page 8 of 8 Form: InstrSD7000-05 [Rev: 2016-08-15]
©2016 Sensorex Corporation
1 2 1 2 3 4 5 6 7 8
J4 J5
HACH SC200 pH/ORP/DO Module
RED GRN CLR WHT YEL BLK
FIG. 17
SENSOREX CORPORATION LIMITED WARRANTY
SENSOREX warrants the SD7000, SD7500 and SD7420 sensors
all to be free of defects in materials and workmanship for 2
years from date marked on the product. Sensorex will replace
any sensor that is deemed to have a workmanship defect
within 1 year of the manufacture date stamped on the product
(WWYY code) free of charge. Products beyond 1 year date
code will have a prorated warranty cost for replacement. Con-
tact Sensorex for details. SENSOREX oers no warranty, either
expressed or implied, as to the useful life of these products.
There are no implied warranties of merchantability or tness
for a particular purpose given in connection with the sale of
any goods. In no event shall SENSOREX be liable for conse-
quential, incidental or special damages. The buyer’s sole and
exclusive remedy and the limit of SENSOREX’s liability for any
loss whatsoever shall not exceed the purchase price paid by
the purchaser for the product to which claim is made.
Cable 20ft,
Red = +
Black = -
+
-
+
-
Power
Supply
PLC or other
4-20mA input
device
FIG. 18
Cable 20ft,
Red = active (pH or ORP)
Green = Reference
Black & Yellow = Temperature
(Pt1000 RTD)
SD7500CD, SD7500CD-ORP
FIG. 19
SD7420CD &
SD7420D-ORP
SD7500CD &
SD7500D-ORP
Cable 20ft
Red = Active (pH or ORP)
Green = Reference
Black & Yellow = Temperature
(PT1000 RTD)
Table of contents
Other Sensorex Industrial Electrical manuals


Popular Industrial Electrical manuals by other brands


HALE
HALE SmartFOAM 1.7AHP Description, Installation and Operation Manual

Phoenix Mecano
Phoenix Mecano Lambda Assembly instructions

Murata
Murata GRM0335C1H3R9WA01 Series Reference sheet

Murata
Murata GRM0225C1E6R0CDAE Series Reference sheet

Murata
Murata GRM188R71E682KA01 Series Reference sheet

Murata
Murata GRM033R60J273KE01 Series Reference sheet


