Sensory Communications TextLink 9100M User manual

TextLink 9100M
V.18 Textphone
User Manual
Revision 1.1

2
Index
1 Function overview ...................................................................................................................4
2 General information.................................................................................................................6
2.1 Connection information...................................................................................................6
2.2 Guarantee information....................................................................................................7
3 Getting started.........................................................................................................................8
3.1 How to set the time and date........................................................................................10
4 Making text calls....................................................................................................................11
4.1 How to dial a number....................................................................................................12
4.2 TextLink Textphone conversations............................................................................... 13
4.3 Sticky keys....................................................................................................................13
4.4 Using menus during a call............................................................................................13
4.5 How to end a call..........................................................................................................13
4.6 Dialling by name...........................................................................................................14
4.7 How to redial the last number.......................................................................................14
4.8 How to add ‘pause’ when dialling................................................................................. 14
4.9 How to dial with a voice phone.....................................................................................15
4.10 How to set up your TextLink 9100M for mobile calls.................................................... 16
4.11 How to make a mobile textphone call...........................................................................17
5 Receiving text calls ...............................................................................................................17
5.1 How to answer a call ....................................................................................................17
5.2 How to answer a call with a voice phone .....................................................................18
5.3 How to answer a mobile textphone call........................................................................18
5.4 How to review and delete conversations...................................................................... 19
5.5 How to delete all old conversations..............................................................................20
6 Using voice carry over (VCO) ...............................................................................................21
6.1 How to switch between a text and voice conversation.................................................21
6.2 How to return to text conversation................................................................................ 21
6.3 How to use the voice announcer..................................................................................22
7 Using the answering machine...............................................................................................22
7.1 How to write your own outgoing message (OGM) .......................................................23
7.2 How to switch your text answering machine on ........................................................... 24
7.3 How to switch your answering machine off..................................................................24
7.4 To interrupt the answer machine..................................................................................25
7.5 New message indicator................................................................................................25
7.6 How to read your text messages..................................................................................26
7.7 How to delete a single text message............................................................................27
7.8 How to delete all text messages...................................................................................28
7.9 How to adjust the ring delay.........................................................................................29
8 Phone book operation...........................................................................................................30
8.1 How to store a name and number................................................................................30
8.2 How to display and dial an entry in the phone book.....................................................31
8.3 How to search for an entry ...........................................................................................32
8.4 How to edit an entry......................................................................................................33
8.5 How to delete an entry..................................................................................................35
9 Call lists operation.................................................................................................................35
9.1 How to view details of calls made ................................................................................36
9.2 How to view details of calls received............................................................................37
9.3 How to dial a number from the Call lists.......................................................................38
9.4 How to copy a number to the Phone book...................................................................39
9.5 How to delete the Call lists...........................................................................................40
9.6 Additional Caller Display information............................................................................41
10 How to use the Function buttons ..........................................................................................42
10.1 How to set a Function button as a Quick Memo ..........................................................43
10.2 How to send a Quick Memo .........................................................................................44
10.3 How to set a Function button as a Quick Dial ..............................................................44
10.4 How to dial one touch Quick Dial numbers ..................................................................45
10.5 How to set a Function button as Quick Menu ..............................................................45
11 Emergency Functions ...........................................................................................................48
11.1 Emergency Number......................................................................................................48

3
11.2 How to dial the Emergency Number.............................................................................48
11.3 How to change the Emergency Number ......................................................................49
11.4 Emergency Memo ........................................................................................................50
11.5 How to use the Emergency Memo...............................................................................50
11.6 How to write your Emergency Memo ...........................................................................51
12 Optional Settings...................................................................................................................52
12.1 How to adjust the contrast............................................................................................52
12.2 How to adjust the backlight settings.............................................................................53
12.3 How to switch the ringer on/off.....................................................................................55
12.4 How to switch the TextDirect prefix On/Off ..................................................................56
12.5 How to change the TextDirect prefix............................................................................57
12.6 Language settings........................................................................................................58
13 Power Management..............................................................................................................59
13.1 How to switch automatic shutdown on/off....................................................................59
14 “Undo” function in the Main menu.........................................................................................60
15 Using your Textlink Textphone with the BT Call Sign...........................................................60
15.1 How to adjust your Call Sign settings...........................................................................61
16 How to print...........................................................................................................................63
16.1 How to print a conversation..........................................................................................63
16.2 How to print a received answer message ....................................................................64
16.3 How to print the whole phone book..............................................................................65
16.4 How to print one entry from the phone book................................................................66
17 Help & Information ................................................................................................................67
17.1 Your TextLink Textphone does not receive Caller Display messages or Call Sign....67
17.2 Your TextLink Textphone does not switch on .............................................................. 67
17.3 Your TextLink Textphone does not flash the ultra bright light...................................... 67
17.4 Your TextLink Textphone screen does not work properly..........................................67
17.5 If you have to return your TextLink Textphone.............................................................67
17.6 Resetting your TextLink Textphone..............................................................................67
17.7 How to reset your TextLink Textphone to its factory settings....................................... 68
17.8 Permanent memory...................................................................................................... 69
17.9 Text and phone book memory capacity .......................................................................69
17.10 Using a PC ...................................................................................................................69
17.11 Remote upgrade...........................................................................................................69
17.12 Useful abbreviations.....................................................................................................69
18 World wide Textphone communication codes ......................................................................70
18.1 How to select a specific code/return to the pre-set code V.18.....................................70
18.2 Parity mode and Direction mode.................................................................................. 70
19 Menu structure ......................................................................................................................72
20 Notes.....................................................................................................................................74

4
1 Function overview
Function buttons
Use the pre-programmed
options to set the F1– F8
keys to work the way you
want just by pressing one
key,
eg:
To send a standard
personal text message
To select a frequently used
menu setting
To store and dial a
frequently called number.
Dial/End Call
Allows you to dial
a displayed number
or end a call
VCO
Lets you switch
between text
and voice
communication
during a call, page 21.
On/Off
Used for switching your
textphone on and off
Incoming calls
/new message
Indicator
Flashes every two
seconds to indicate
an incoming call.
Flashes every four
seconds to indicate
a new answer
machine message.
Emergency number
button
Press to call the emergency
number you have stored,
page 48.
Esc
Returns the display to
standby and cancels any
editing in progress.
Menu
Displays the menu options.
.
Cursor/Navigation
buttons
Enables you to easily scroll
through menu options and
move the cursor on the
screen
SK
Quick word for
‘stop keying.’
GA
Quick word for
‘go ahead’.
Enter
Used for
confirming actions
Backspace
Moves the cursor back
one space..

5
Expansion port
For connecting to a printer
or PC.
You will need a special
cable.
External telephone
For connecting additional
telephone equipment ie.
amplified voice phone or
fax.
Mobile port
For connection to a mobile
phone
Line in
For connection to the
telephone line
Mains power socket
For connecting the textphone
to the mains. Only the adaptor
supplied should be used.
Battery compartment
4 x Alkaline AA batteries
Standby screen
(When the product is idle) V18
Ready for automatic
communication with other
textphones.
(Answer)
Text answering machine
is ON or OFF.
(Prefix)
When ON the Textphone
automatically connects
calls to voice and text
phones via TextDirect
service.
(Calls)
Number of new answering
machine messages
received.

6
2 General information
Your TextLink textphone should be cleaned with a damp cloth, or an anti-static wipe.
Do not:
•Use household polish.
•Use a dry cloth, (as this may cause static shock).
•Use an unauthorised power supply. This will invalidate your guarantee and could
damage the unit.
•Dispose of batteries in a fire. There is a serious risk of explosion with the
possibility of the release of highly toxic chemicals.
Environmental
•Do not leave flat batteries in the TextLink textphone. Batteries should be replaced
after 2 years even if they have not been used.
•Apart from the batteries, there are no customer replaceable parts.
•Do not expose to direct sunlight.
•Do not stand your product on carpets or other surfaces which generate fibres, or
place it in locations preventing free flow of air over its surfaces.
•Do not submerge any part of your product in water and do not use it in damp or
humid conditions, such as in bathrooms.
•Do not expose your product to fire, explosive or other hazardous conditions.
•There is a slight chance that your phone could be damaged by an electrical storm.
We recommend that you unplug the power and telephone line cord for the
duration of the storm.
2.1 Connection information
Your TextLink Textphone may be connected to public networks in the UK. It may be
connected to switchboards that use tone signalling. If you are in doubt, contact your
switchboard supplier.
How many phones can you have?
All items of telephone equipment have a Ringer Equivalence Number (REN), which is
used to calculate the number of items that may be connected to any one telephone
line. Your TextLink Textphone has a REN of 1. A total REN of 4 is allowed. If the total
REN of 4 is exceeded, the telephones may not ring. With different telephone types
there is no guarantee of ringing, even when the REN is less than 4.
Adjusting the TextLink Textphone codes
Your TextLink Textphone uses special communication codes to send the text to
another phone. Both phones need to be set to the same code in order to communicate
properly. See page 70.
The pre-set code is V.18
This is the automatic mode and enables your TextLink Textphone to connect to any
other textphone and automatically select the right code setting. However, if you have
problems communicating with textphones in other countries, you can try setting your
TextLink Textphone to a specific code as shown on page 71.

7
2.2 Guarantee information
Your TextLink textphone is guaranteed for a period of 12 months from date of
purchase.
Subject to the terms listed below the guarantee will provide for the repair of, or at
Sensory Communications, or its agent’s discretion. The option to replace the TextLink
Textphone, or any component thereof, (other than batteries), which is identified as
faulty or below standard, or as a result of inferior workmanship or materials. Products
over 28 days old from the date of purchase may be replaced with a refurbished
product.
The conditions of this guarantee are:
•The guarantee shall only apply to defects that occur within the 12 month
guarantee period.
•Proof of purchase is provided.
•The equipment is returned to point of purchase.
•This guarantee does not cover any faults or defects caused by accidents, misuse,
fair wear and tear, neglect, tampering with the equipment, or any attempt at
adjustment or repair other than through approved agents.
This guarantee does not affect your statutory rights.

8
3 Getting started
Planning the location of your TextLink Textphone
Situate your TextLink textphone close enough to the telephone and mains power
sockets so that cables will reach.
1 Connect power supply unit to the TextLink textphone and power supply socket.
2 Install the back-up batteries.
If the power fails or if you need to unplug your TextLink textphone,the back-up batteries
will ensure you can still operate the TextLink textphone.
Press down on the two clips on the bottom of your TextLink textphone and flip open the
battery compartment cover. Insert 4 x Alkaline AA batteries. Make sure they are the
right way around. See the battery + and - symbols in the compartment. Hold the clips
with one hand and clip the cover back into place with the other hand.
HANDY HINTS
Only use approved batteries. Using unapproved batteries will invalidate your guarantee
and may damage the textphone.
3 Plug the telephone line cord into the back of your TextLink textphone. Plug the
other end into the telephone line wall socket.
4 If required, connect a telephone or fax machine into the external telephone
socket on the back of your TextLink textphone.

9
5 (ON/OFF)
Press and hold this button for 2 seconds.
Your TextLink textphone switches on and goes through it’s setup procedure. The
display shows the main screen.
To turn the textphone off, press and hold the button for 2 seconds.
HANDY HINTS
If the product is running on the mains power supply it does not need to be switched off.
If you are subscribing to the Caller Display service it must be left on to receive the
caller information.
You are now ready to make and receive calls
If you experience difficulties in setting up your TextLink textphone please contact the
RNID Sound Advantage Customer Services on the following numbers:
Text - 01733 238020
Voice - 01733 232607
Fax - 01733 361161
Or Sensory Communications Helpline on
Text - 020 8964 5590
Voice - 020 8960 5660
The lines are open 8.30 to 17.30 Monday to Friday.
If you have purchased your TextLink textphone outside the UK please contact your
local supplier.
Do you need to set the time and date?
If you have subscribed to your network’s Caller Display service, the time and date are
set automatically when your TextLink textphone receives its first call.
If you do not have Caller Display, you can set the time and date yourself.
If you do not set the time and date it simply means that the textphone will not record the
times that calls were made.
10
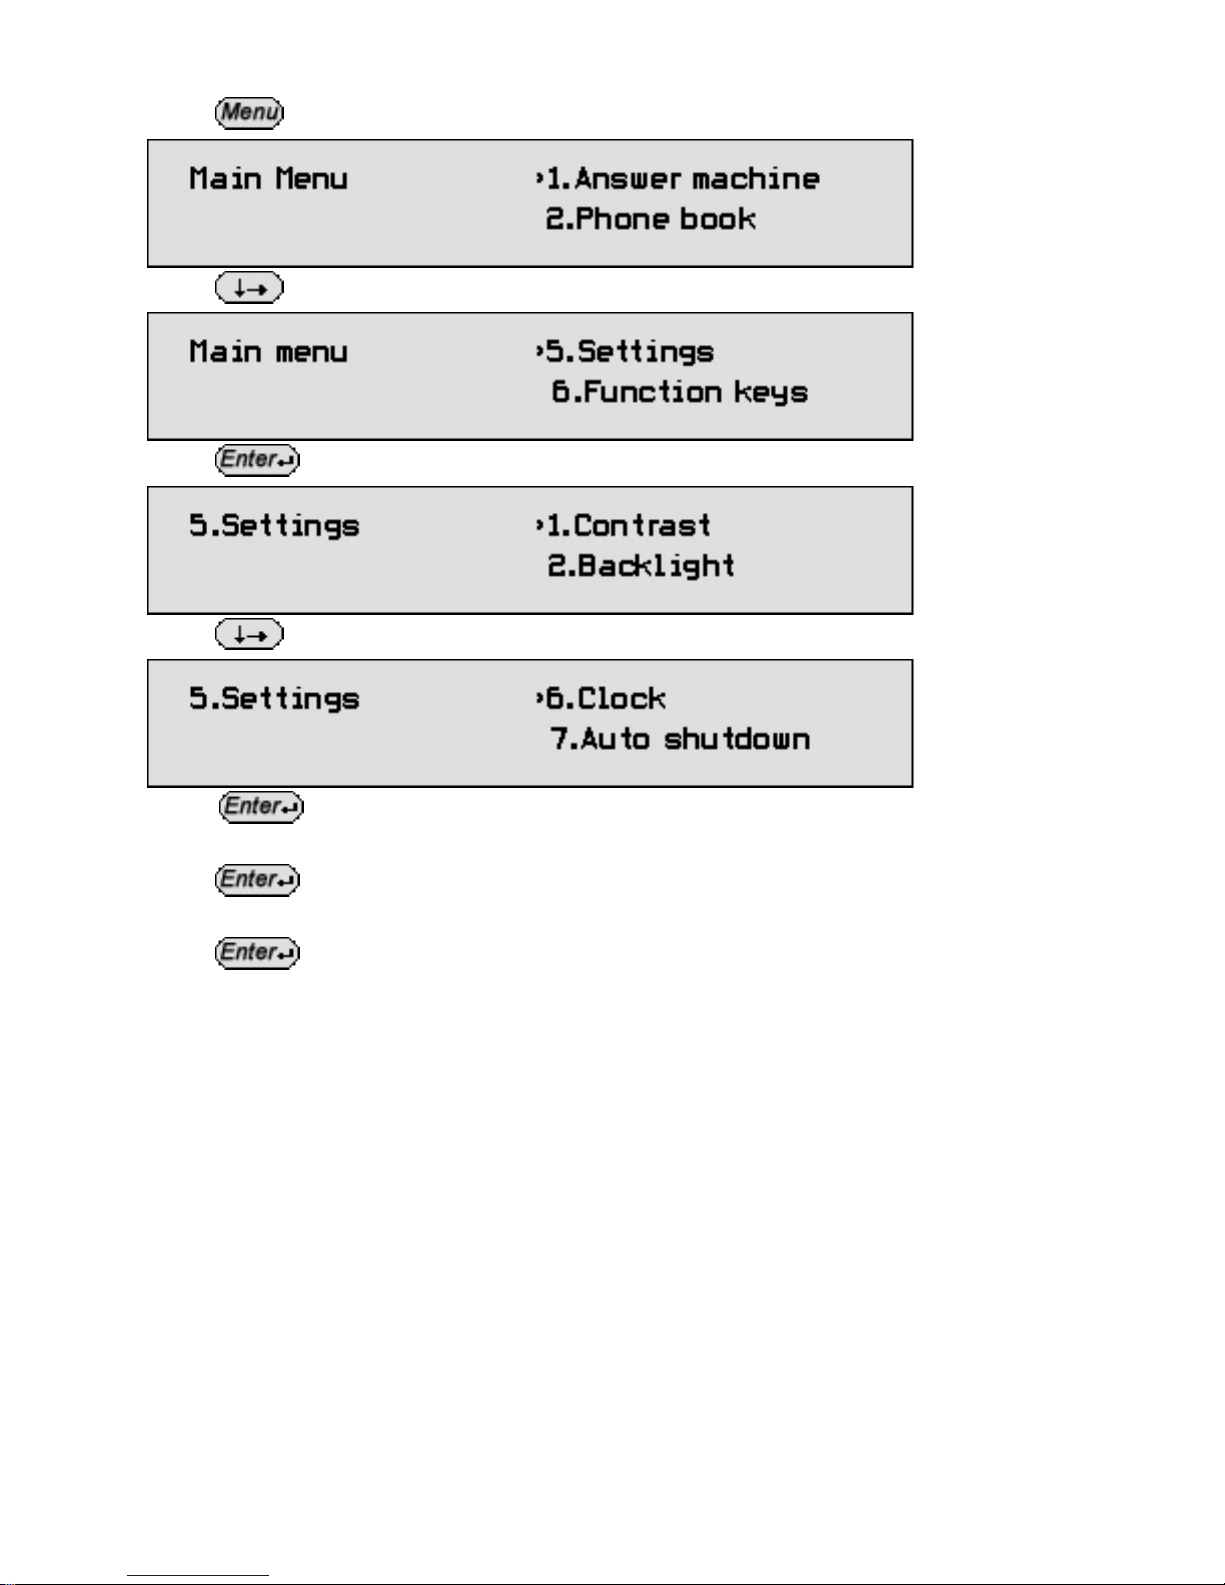
3.1 How to set the time and date
Press The menu is displayed.
Press until the arrow points to >5.Settings.
Press The display shows:
Press until the arrow points to >6.Clock.
Press Enter the correct time using the 24 hour clock (eg. 0930 for 9.30am,
1615 for 4.15pm).
Press
Enter the correct date (ddmmyy eg. 19 November 2000 = 191100).
Press
The display returns automatically to standby.

11
4 Making text calls
When you make a call through BT TextDirect (using the necessary prefix), you will
receive messages on the display of your TextLink textphone telling you whether the
person you are calling is busy, or their phone is ringing.
The service also recognises whether the call is to another TextLink textphone or a
voice phone.
If the call is to a voice phone, it will automatically be connected through a TextDirect
operator. They will type what is said by the other person and speak your written reply.
If the call is to another TextLink textphone, the Typetalk operator will not be contacted.
To use the BT TextDirect service simply switch on the Prefix as described on page 56.
For more information on BT TextDirect and Typetalk contact the following numbers:
Text – 0800 500888
Voice – 0800 7311888
12
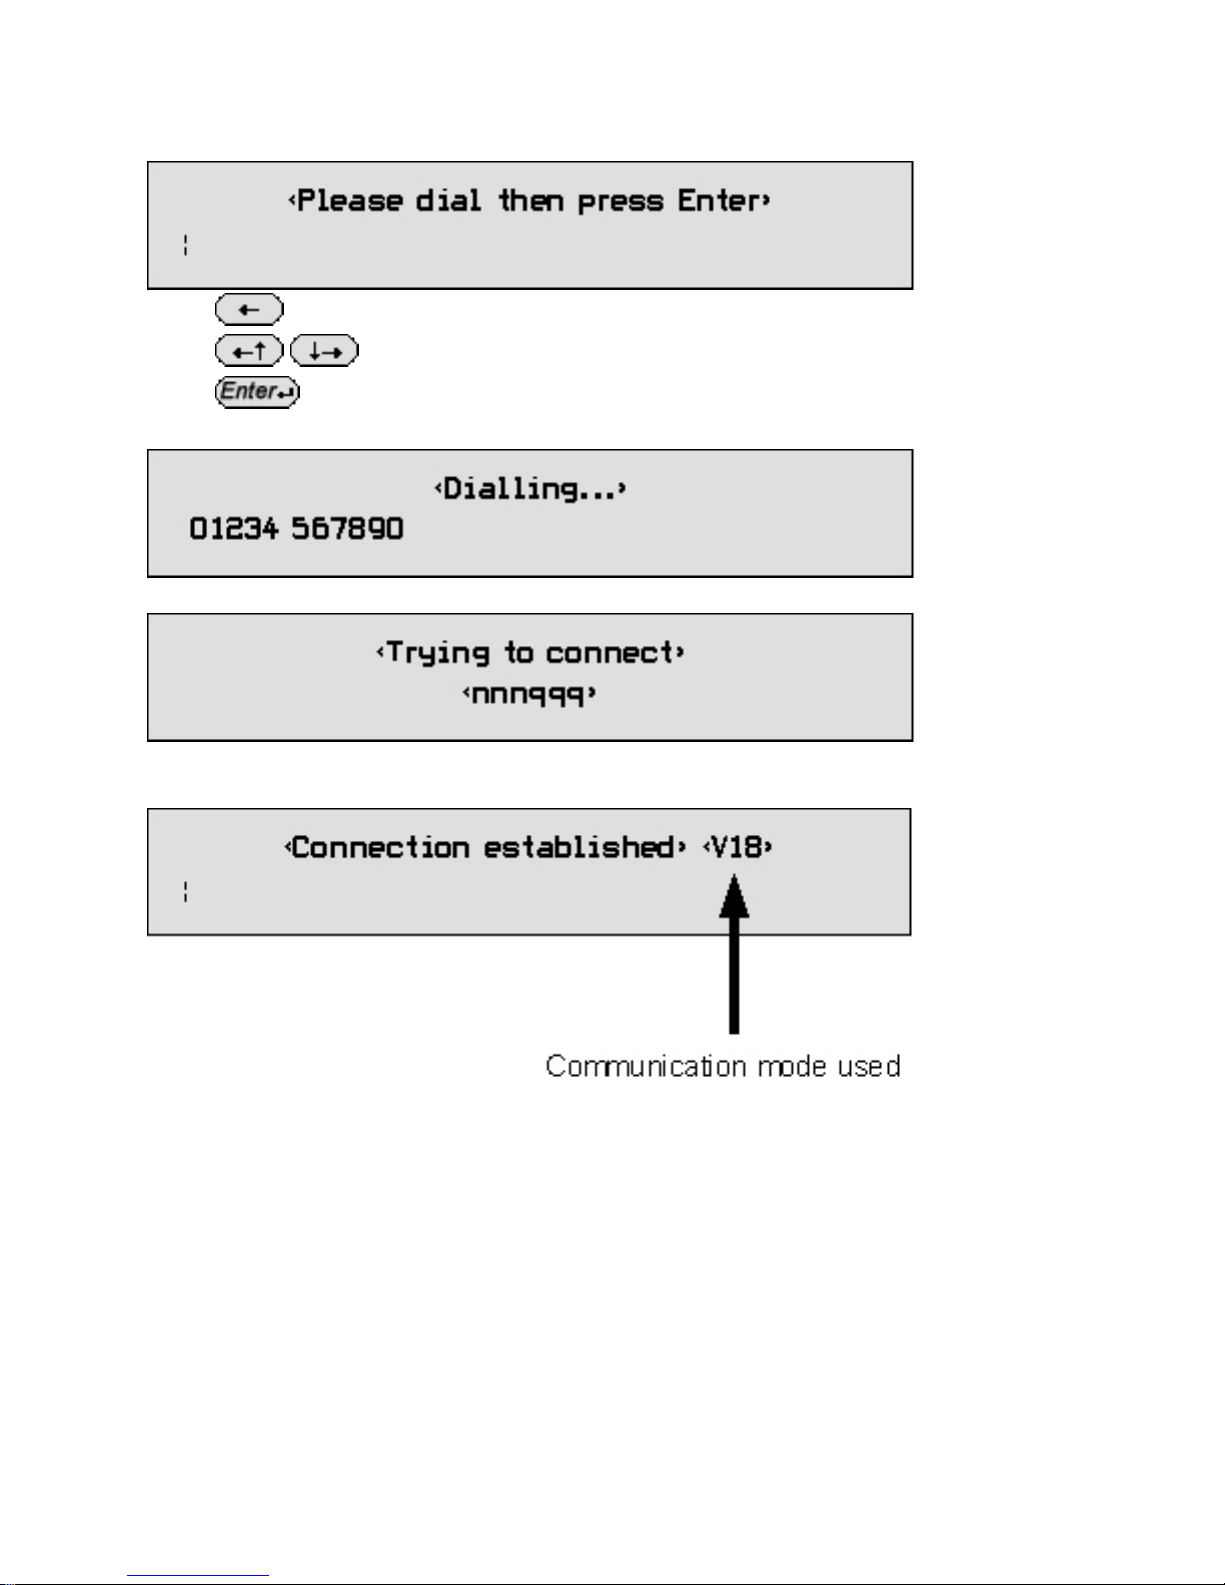
4.1 How to dial a number
Type the phone number you want.
The display shows:
Press to delete the last digit.
Press to move the cursor.
Press The number is dialled.
The display shows:
When the call is answered, the TextLink Textphone will display:
Note: It may take up to 60 seconds to establish a connection.
When the connection is made, the display shows:
13
4.2 TextLink Textphone conversations
When you call out you must wait for the person to type first. They will usually type
"Hello GA". You can then type back what you would like to say. If you type something
incorrectly, you can press to delete text.
If you wish to review what has been said, you can press to look at previous text.
If you then type, or the other person types, the text will go back to the bottom.
4.3 Sticky keys
During a call it is possible to use lower case and capital letters.
To use capital letters press and hold and at the same time press the letter you
wish to use in capital. This method also allows you to use the symbols above the
number keys. You can also use the sticky key function.
Press twice.
Press the key you wish to see in capitals. The letter will appear.
Note: on some products this feature is not enabled.
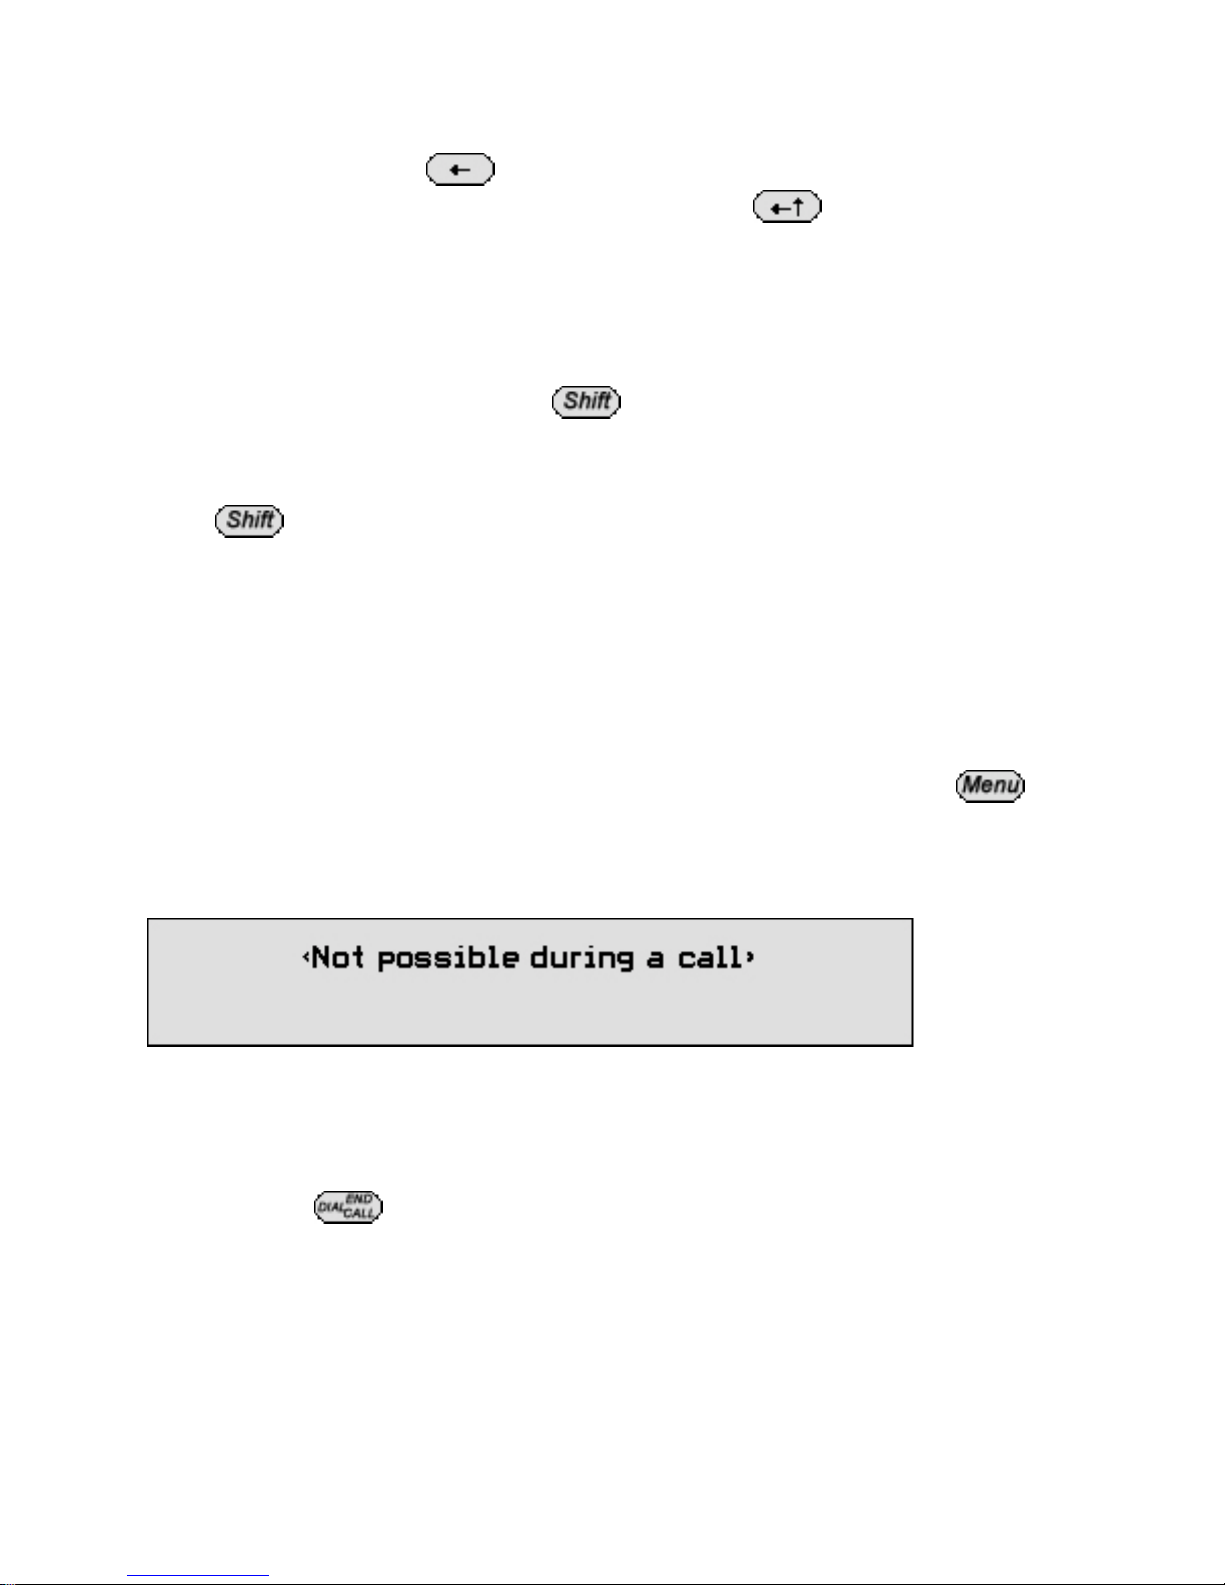
4.4 Using menus during a call
It is possible to access the menu during a call. To do so, press and hold You
can access the phone book, previous calls and change settings during a call. There are
certain settings you cannot change during a call. The following message will appear if
you try to use forbidden functions:
4.5 How to end a call
Press and hold

14
4.6 Dialling by name
Instead of dialling by entering their phone number, it is possible to call someone by
entering their name. For this to be possible, their name and telephone number must be
in the phone book. See page 30 on adding telephone entries.
For example if you type the persons name and press (you do not have to type
all their name, just the first few letters).
The following message will appear:
If you press the number will be called.
If it is not the correct person press to return to the main screen or press
to move to the nearest entries in the phone book.
4.7 How to redial the last number
From the standby screen press The last number you called is redialled.
4.8 How to add ‘pause’ when dialling
If your TextLink textphone is connected to a switchboard or if you are using a
chargecard, you may need to put a ‘pause’ into the phone number.
To enter a pause, press the between the number.
Examples of using a ‘pause’ when dialling
Calling an outside line via a switchboard
You may need to dial 9 then pause to dial an outside line.
To do this type 9,020 1234 5678.
The TextLink Textphone will then pause for two seconds between dialling the 9 and the
0.
Press to dial the number.

15
4.9 How to dial with a voice phone
If you dial using the voice phone and decide you wish to change to text you need to:
From the telephone standby screen
Press twice
and then press
The following message will appear. You may now put down the handset.
Soon afterwards the following message will appear:
When a connection is made the display shows:

16
4.10How to set up your TextLink 9100M for mobile calls
Press The menu is displayed.
Press until the arrow points to >7.Communications.
Press The display shows:
Press until the arrow points to >2.Mobile.
Press
Insert the 2.5 mm jack of the mobile cable into the back of the TextLink 9100 Mobile
Connect the 2.5 mm jack of the mobile cable into the handsfree connector of your
mobile phone.
Your TextLink 9100 Mobile is now ready to make calls.
Please note when to use the following mobile modes.
“mobile”: This mode is used only for calls made directly to another V.18 textphone
capable of supporting a special mode called “CTM” This mode currently cannot be
used with TextDirect.
“mobile baudot”: This mode is used only for calls made directly to another textphone
set in “baudot” mode. You may call other textphones in different modes via TextDirect,
though occasionally you may find errors in the text.
17
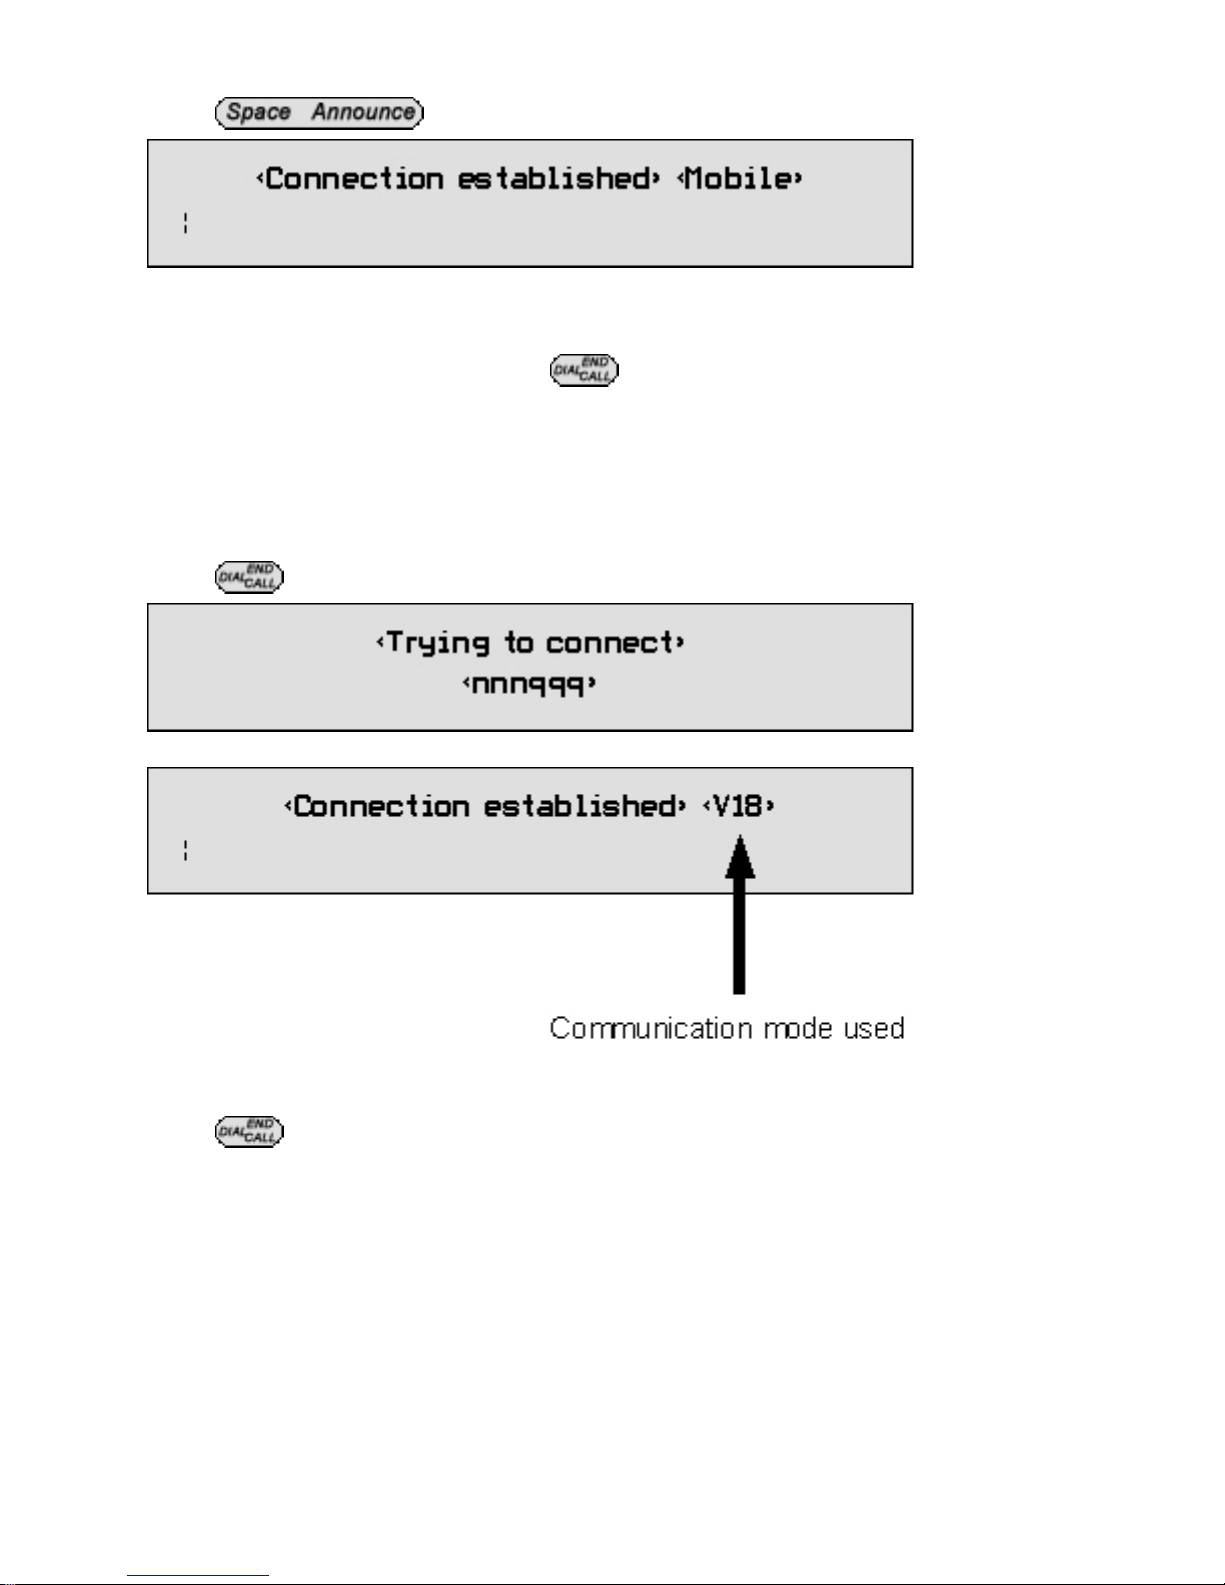
4.11How to make a mobile textphone call
Press The display shows:
Dial the number of the person you wish to call on your mobile phone.
Wait for the other user to answer and type a greeting.
Once they have answered, you can start your conversation.
Once you are finished your call press and press end call on your mobile.
5 Receiving text calls
When your TextLink textphone receives a call, the extra bright indicator flashes.
5.1 How to answer a call
Press The display shows:
You are connected when the display shows:
Note: It may take up to 60 seconds to establish a connection.
Type your greeting. Type your conversation.
Press to end the call.

18
5.2 How to answer a call with a voice phone
If you have a voice phone connected to the Telephone extension at the back of your
TextLink textphone, you can answer the call with the voice phone. If you then find that
the person is using a textphone it may be necessary to switch to text.
To do this:
From the TextLink textphone standby screen press and hold and at the same
time press The display shows:
When a connection is made the display shows:
5.3 How to answer a mobile textphone call
Firstly answer the call on your mobile.
Press The display shows:
Type your greeting e.g: “ Hello GA “
You are now in a mobile textphone conversation.
Once you are finished your call press and press end call on your mobile.

19
5.4 How to review and delete conversations
You can replay your text conversation.
Press The display shows:
Press until the arrow points to >4.Conversation.
Press The display shows:
Press
The details of the last conversation are shown.
Press
The display shows the Options menu >1.Read.
Press
Press to scroll through the conversation.
Press to return to standby.
If you wish to delete the conversation instead of reading it then select >2.Delete from
this menu.
20
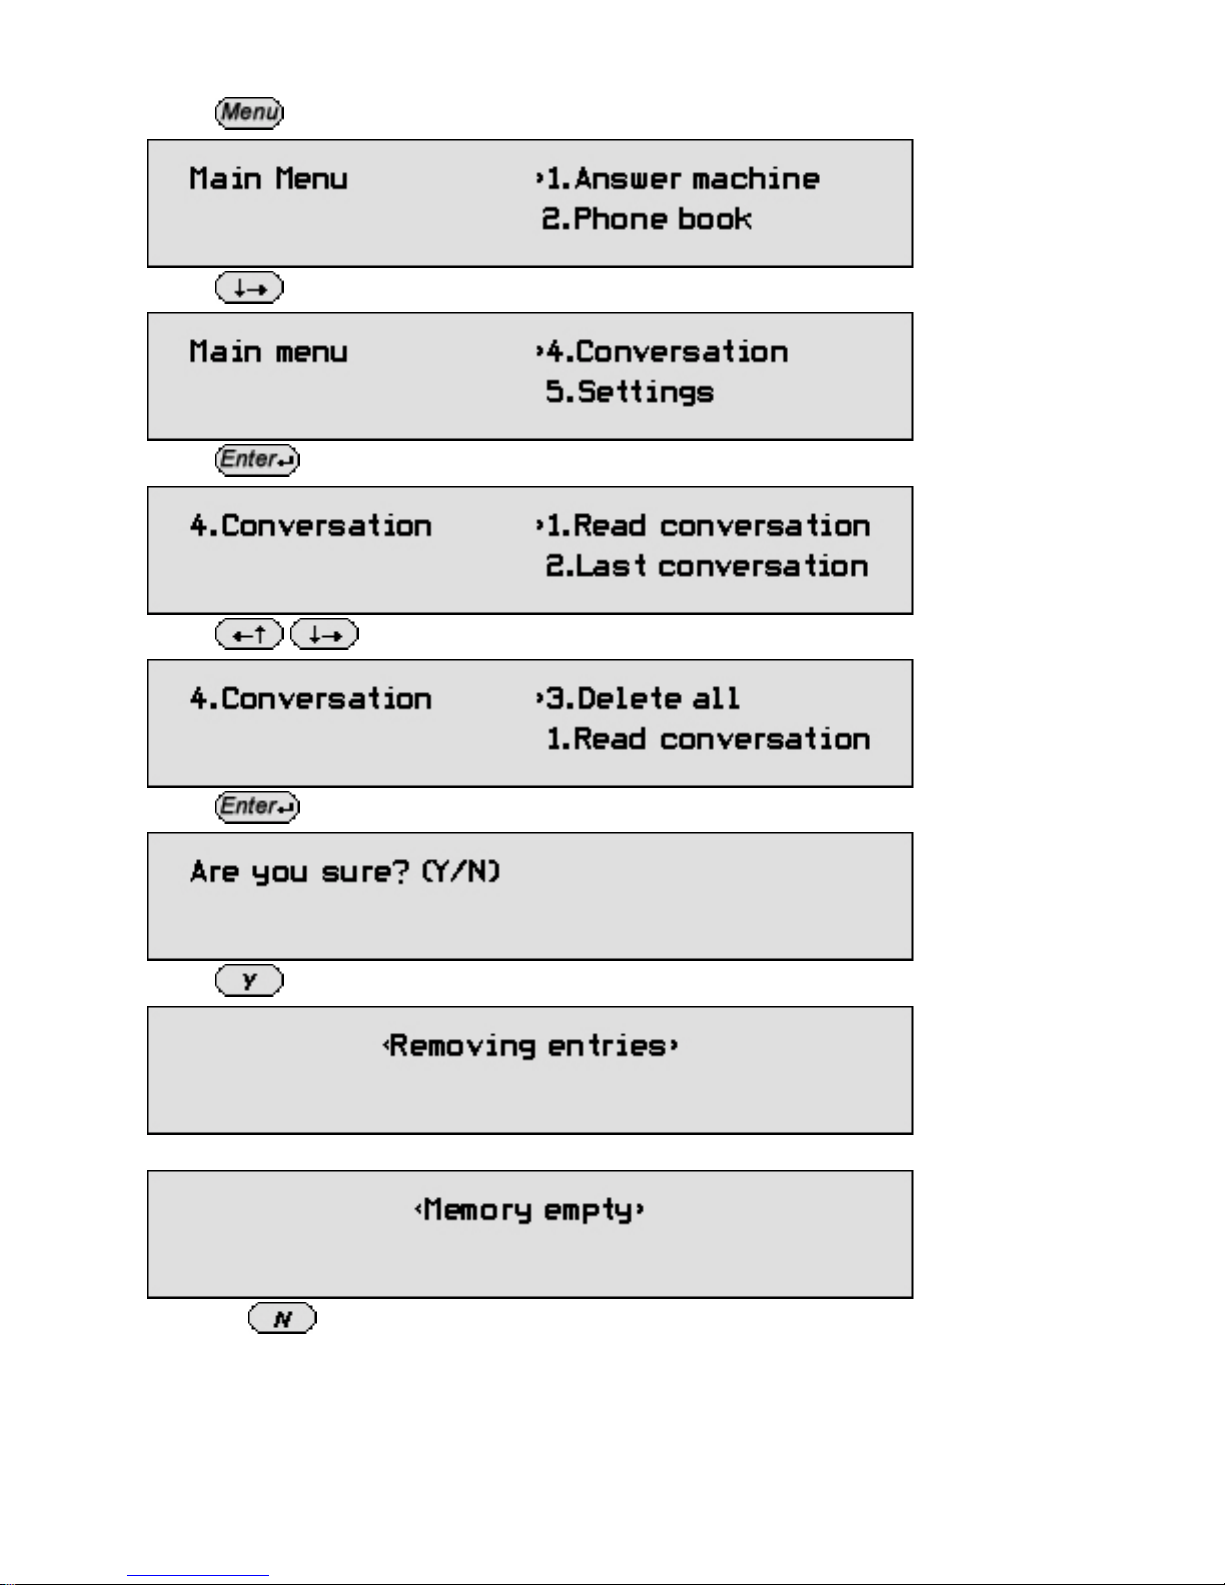
5.5 How to delete all old conversations
Press The display shows:
Press until the arrow points to >4.Conversation.
Press The display shows:
Press until the arrow points to >3.Delete all.
Press The display shows:
Press The display shows:
Followed by:
Or Press to cancel.
You will be returned to the standby screen.
Table of contents


 quick guide")


