Serco S-420 User manual

S-420
RIGID DOCK SHELTER
W/ INTEGRATED
S-900DD DRYDOCK®
RAIN SEAL SYSTEM
SERCO STEELGALVANIZED STEEL FRAMING
Installation Instructions
FORM NO: 4F-420-DD-INT-9/16
PART NUMBER: T31645
Do not install this product unless you read and
understand the Warnings and Installation
Instructions contained in this manual. Failure to
do so could result in serious injury or death.
4Front Engineered Solutions, Inc.
W183 S8253 Racine Avenue
Muskego, WI 53150
Tel: (262) 679-6200
Fax: (262) 679-6210
WARNING

1. Mark centerline location of door opening width on dock floor. Take ½ of the truck shelter or wiper seal
head frame width and mark this distance on either side of door centerline.
NOTE:This will determine position of outside edges of foam side members.
Serco S-420 Rigid Dock Shelters with the integrated S-900DD® Rain Seal System are custom built for each
application. Installation procedures are the same for all S-420/ S-900DD Dock Shelters regardless of size.
Installation requires two people and a forklift truck or similar device to lift and position the shelter components.
Lifting equipment to be determined by installer.
Improper installation of anchoring devices or installation into aged or unsound concrete or other faulty or
inadequate building wall construction could result in serious injury or death, as well as premature product
wear, product failure or property damage.
Inadequate lifting equipment or unsafe lifting practices can cause a load to fall, tip or swing unexpectedly.
Make sure lifting devices are in good condition and have a rated capacity of at least 500 lbs. at the lifting angle
being used. Never allow anyone to stand on or near the dock shelter component when it is lifted or placed.
Failure to follow this warning could result in serious personal injury or death to bystanders if component
unexpectedly falls, tips or swings. If you have any questions contact your supervisor or your local Serco
distributor for assistance.
A
ssembly of components should be performed in such a way so as to maintain cleanliness of equipment before
final installation. Lifting equipment to be determined by installer (man lift and forklift or boom lift typical). Wear
safety glasses, gloves, hard hats, safety shoes and all necessary protective clothing.
WARNING
MANDATORY INSTALLATION NOTE:
To insure proper functioning of the S-900DD DryDock rain seal system, this rigid frame dock shelter must
be applied so that top of shelter is in a range of from 14’-10” to 15’-2 off grade. Installation of the top of
the shelter at less than 14’-10” off grade may result in damage to the DryDock. Installation of the top of
the shelter at greater than 15’-2” of grade will reduce or eliminate the DryDock’s rain sealing
effectiveness. Correctness of product sizing for various applications must be established at the time of
equipment order.
SERCO S-420 RIGID FRAME DOCK SHELTER W/ INTEGRATED
S-900DD DRYDOCK RAIN SEAL SYSTEM
2. Mount steel supports. Outside edge of steel support protector should be placed at mark on dock wall.
Top flat surface of steel support should be mounted level with dock floor or at the top of raised dock
bumpers. Use supports as either right or left.
3. Mount side frames to wall. Side frame is positioned on top of flat portion of steel support protector.
The outside edge of the side frame should be flush with outside edge of steel support protectors. Be sure
frames are plumb from top to bottom. Three (3) anchors are recommended for each side frame. Unscrew
and remove cross banding on side frames.

! IMPORTANT !
IF BUILDING WALL SURFACE IS IRREGULAR, DAMAGE TO SIDE AND HEAD FRAME COVER
MATERIAL CAN OCCUR AS ANCHORING FASTENERS ARE TIGHTENED. USE SHIMS AS
REQUIRED TO COMPENSATE FOR IRREGULARITIES. TIGHTEN FRAME TO WALL CAREFULLY.
4. Attach side frames to steel supports using ¼” bolt, spinlock nut and 1-½” fender washers (provided)
through pre-punched hole in top of steel support. If pre-punched holes don’t align due to dock offset, drill
hole in side frame as required.
5. Assemble side curtains to side frames. Position side curtain on frame and push panel clip (pre-
inserted in side curtain) into pre-drilled hole in top front of side frame. Aluminum angle must be mounted
flush with bottom of side frame. Fasten aluminum angle to side frame with TEK screws (supplied) through
V-groove on angle and stays, and at 4” up from bottom of side frame.

7. Mount shelter head frame to wall. Center head frame on top of side frames, taking care to avoid damage to
fiberglass at top of side frame. It is necessary to anchor head frame to building in three (3) locations, one
on center and two approx. 12” from each end. For mounting on metal building walls, an a factory installed rear
brace on head frame is required. Three (3) anchors for this style of head frame are recommended (two anchors
evenly spaced is acceptable). Mounting anchors must support 1150 lbs in tension.
6. Attach wiper seal head frame mounting angles to truck shelter head frame. Position mounting angles as
shown with long leg of angle against ends of head frame. Fasten #10-16 x ¾” TEK screws through holes in long
leg of head frame bracket into side of head frame. These screws will be removed and re-installed through side
cover fabric later in the installation process. Note: Truck shelter head frame does not have stop plate on
front or head curtain mounting angle on bottom. These items are found on the wiper seal head frame.
8. Attach head frame to the side frames. Use 3” x 3” x 1” angle brackets with TEK screws to connect
bottom of head frame to top front inside edges of side frame. Removal of head frame banding is optional.
Fasten ¼”–14 x 1” TEK screws through top of side frame, head frame mounting angle, and bottom of head
frame in 3” from front and back of head frame.

9. Attach foam wiper pad to wiper seal head frame stop plate. Position back of wiper seal head frame on the
ground and secure from tipping over. Mark a reference line on the front of the stop plate that extends between
the top corners of head frame. Mount top of foam wiper even with this reference line.
NOTE: Clamp a temporary 1” to 2” spacer (by others) between back of foam wiper and front of top plate. This
provides the foam wiper with a forward bias after attachment.
Screw through galvanized steel strip (located inside pocket in top flap) and stop plate on 12” centers with self-
drilling TEK screws (provided). A portion of the top flap of the foam wiper will extend above the top of the stop
plate. Fold this fabric over the top of edge of the stop plate and cap with the plastic trim provided.

10. Connect wiper seal head frame to truck shelter head frame. Remove banding from bottom of wiper seal
head frame. Loosen TEK screws closest to the ends of the head curtain mounting angle to provide clearance for
the wiper seal mounting angle. Slide wiper seal head frame onto mounting angles. Fasten to shelter head frame
using (6) TEK screws in a minimum of three (3) areas (center and approx. 12” from each end). Fasten TEK
screws through bottom of mounting angle into bottom wiper seal head frame. Re-tighten TEK screws in head
curtain mounting angles.
11. Mount side covers to combined head frame assembly. Remove and save TEK screws from shelter head
frame fiberglass along top end. Remove and save TEK screws (installed in Step 5) from head frame mounting
angle and end of head frame and save. Insert 1-½” flap at top of side covers between fiberglass and steel frame
and re-install TEK screws. Fasten side cover to ends of head frame through head curtain mounting angle holes,
in two locations on back edge and two locations on front edge of side frames.
12. Assemble head curtain to head frame. Center head curtain on head curtain mounting angle and
fasten with ¼” x 1” TEK screws through ¼” washers. All stays must be fastened to mounting angle.
Fasten curtain at each end and in two places evenly spaced over pleats.
13. Attach side curtain retention straps to head curtain mounting angle. Connect between grommet
tab on top inside edge of side curtain and holes in bottom leg of head curtain mounting angle. Crimp ends
of S-hooks.
14. Attach head curtain wind straps to side frames. Attach end of wind strap to head curtain grommet
tab. Extend strap to nearest curtain screw below the grommet tab, loosen screw and attach S-hook
behind aluminum angle and screw head. Crimp ends of S-hooks. Tighten curtain screw. (Wind straps
must not be pulled to a higher or lower curtain screw).

15. Attach draft pads. Bottom of pad should be level with dock floor. Attach to inside of side frame with
aluminum angle over fabric flap using TEK screws in two locations. Insure snug fit of draft pad to frame.
16. Caulk shelter head and side members at wall around the outside edges. Caulk between truck
shelter and wiper seal head frames and across front of wiper seal head frame behind stop plate. A
silicone caulk (supplied by others) is recommended.
IMPORTANT !
INSTALLATION OF HEAD CURTAIN WIND STRAPS OR SIDE CURTAIN RETENTION STRAPS
UNDER TENSION WILL RESULT IN SEVERE HEAD AND SIDE CURTAIN DAMAGE. UNDER NO
CIRCUMSTANCES SHOULD ANY WIND STRAP OR RETENTION STRAP IN THIS SYSTEM BE
STRETCHED BEFORE FINAL ATTACHMENT TO SHELTER.
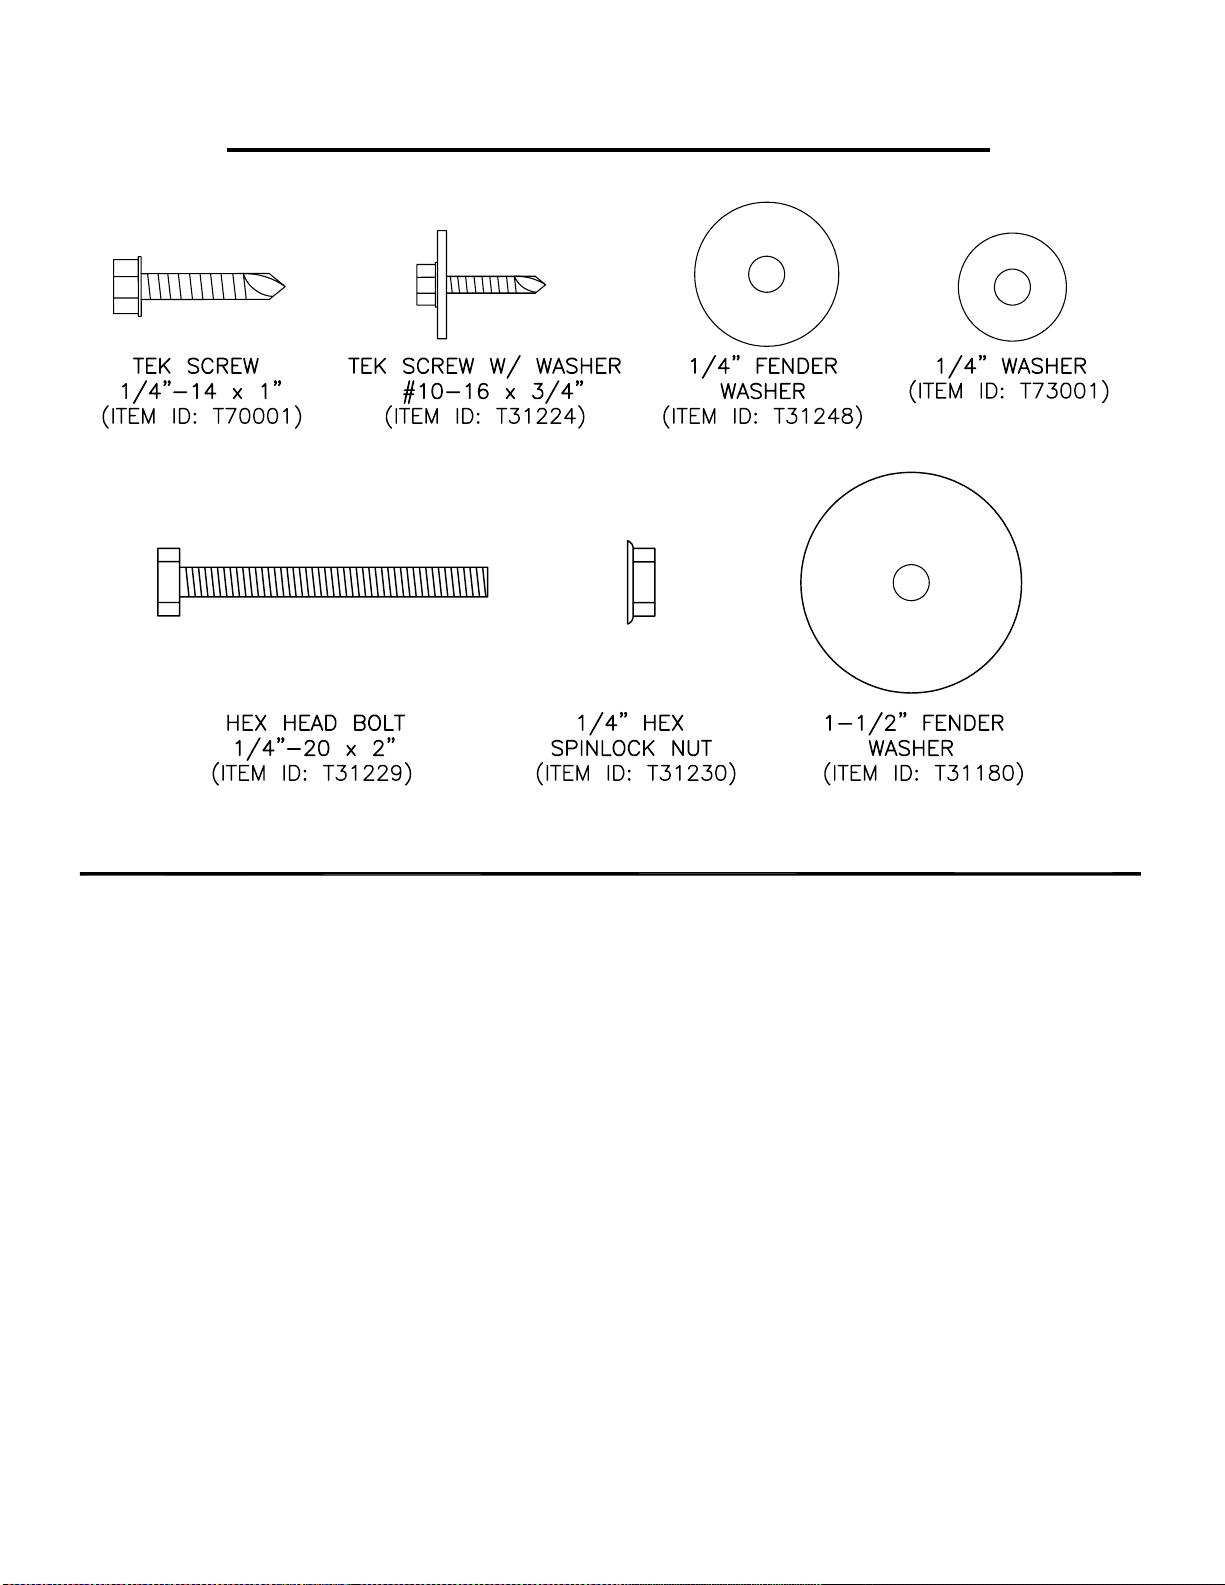
S-420/ S-900DD DOCK SHELTER FASTENERS
WARRANTY
4Front Engineered Solutions, Inc. expressly warrants that this Dock Seal or Shelter will be free from defects in materials
and workmanship under normal use for a period of one (1) year from the earlier of 1) 60 days after date of shipment by
4Front Engineered Solutions, Inc. or 2) the date of installation of the Dock Seal or Shelter by the original purchaser,
provided the product is properly applied and installed. In the event this Dock Seal or Shelter proves defective in material
or workmanship, 4Front Engineered Solutions, Inc. will, at its option:
1. Replace the Dock Seal or Shelter or the defective portion thereof without charge to the purchaser; or
2. Alter or repair the Dock Seal or Shelter, on site or elsewhere, without charge to the purchaser.
The warranty stated in the preceding paragraph is the sole and exclusive warranty for this product AND IS IN LIEU OF
A
LL OTHER GUARANTEES AND WARRANTIES, EXPRESS OR IMPLIED. This warranty does not cover any failure
caused by improper installation or application, abuse, or negligence. Parts requiring replacement due to damage
resulting from vehicle impact, abuse or improper installation are not covered by this warranty. Seller assumes no
responsibility or liability for (1) consequential damages of any kind which result from the use or misuse of the Dock Seal
or Shelter, (2) damage or failure resulting from the use of unauthorized replacement parts or modification of the Dock
Seal or Shelter; (3) damage resulting from the misuse of the Dock Seal or Shelter. THERE ARE NO WARRANTIES,
EXPRESS OR IMPLIED, WHICH EXTEND BEYOND THE DESCRIPTION ON THE FACE HEREOF, AND THERE IS
NO WARRANTY OF MERCHANTABILITY OR OF FITNESS FOR A PARTICULAR PURPOSE.
DryDock, Serco, SnapBack, Ultra Dock Shelter, Ultra Seal, and WeatherAll are registered trademarks of 4Front Engineered Solutions, Inc.
Serco Steel is a trademark of 4Front Engineered Solutions, Inc. COVERED BY PATENT # 6,170,204, OTHER PATENTS PENDING
Table of contents
Popular Enclosure manuals by other brands


Pulsar
Pulsar 17/TRZ40/S-F Assembly instructions

Supermicro
Supermicro SC847E1C Series user manual

EndurEnergy Systems
EndurEnergy Systems ESP-5100 manual

Stahl
Stahl 8102 Series operating instructions

Extron electronics
Extron electronics HSA 822MS Installation and maintenance manual

Konig
Konig CMP-MOBPLAY40 manual


