manuals.online logo
Brands
  1. Home
  2. •
  3. Brands
  4. •
  5. Serene
  6. •
  7. Cordless Telephone
  8. •
  9. Serene HD Phone CL-60A User manual

Serene HD Phone CL-60A User manual

Model: CL-60A
Amplified DECT Cordless Telephone (50dB)
With Talking CID & Talk-Back Features
Model: CL-35A
Amplified DECT Cordless Telephone (40dB)
NOTICE 38-39
Modification 38
Part 15 Of FCC Rules Information 37
This Equipment Complies With Part 68 Of The FCC Rules 36-37
Warranty Service Information 35-36
82
83
84
85
86
CONTENT CONTENT
40 Call log review (re ceived calls) 19-20
39 Base default setting 19
Product Features 2-3
1
Importan t safety instruc tions 4
2
Package content 6
4
Installation 6
5
De tailed features and controls 7
6
Handset screen icons 8
7
Handset’s menu function flow chart 9
8
Answering a call 10
9
Making a call 10
10
Receiver vo lume control 10
11
(Amplify) function 10
12
Receiver tone control 10
13
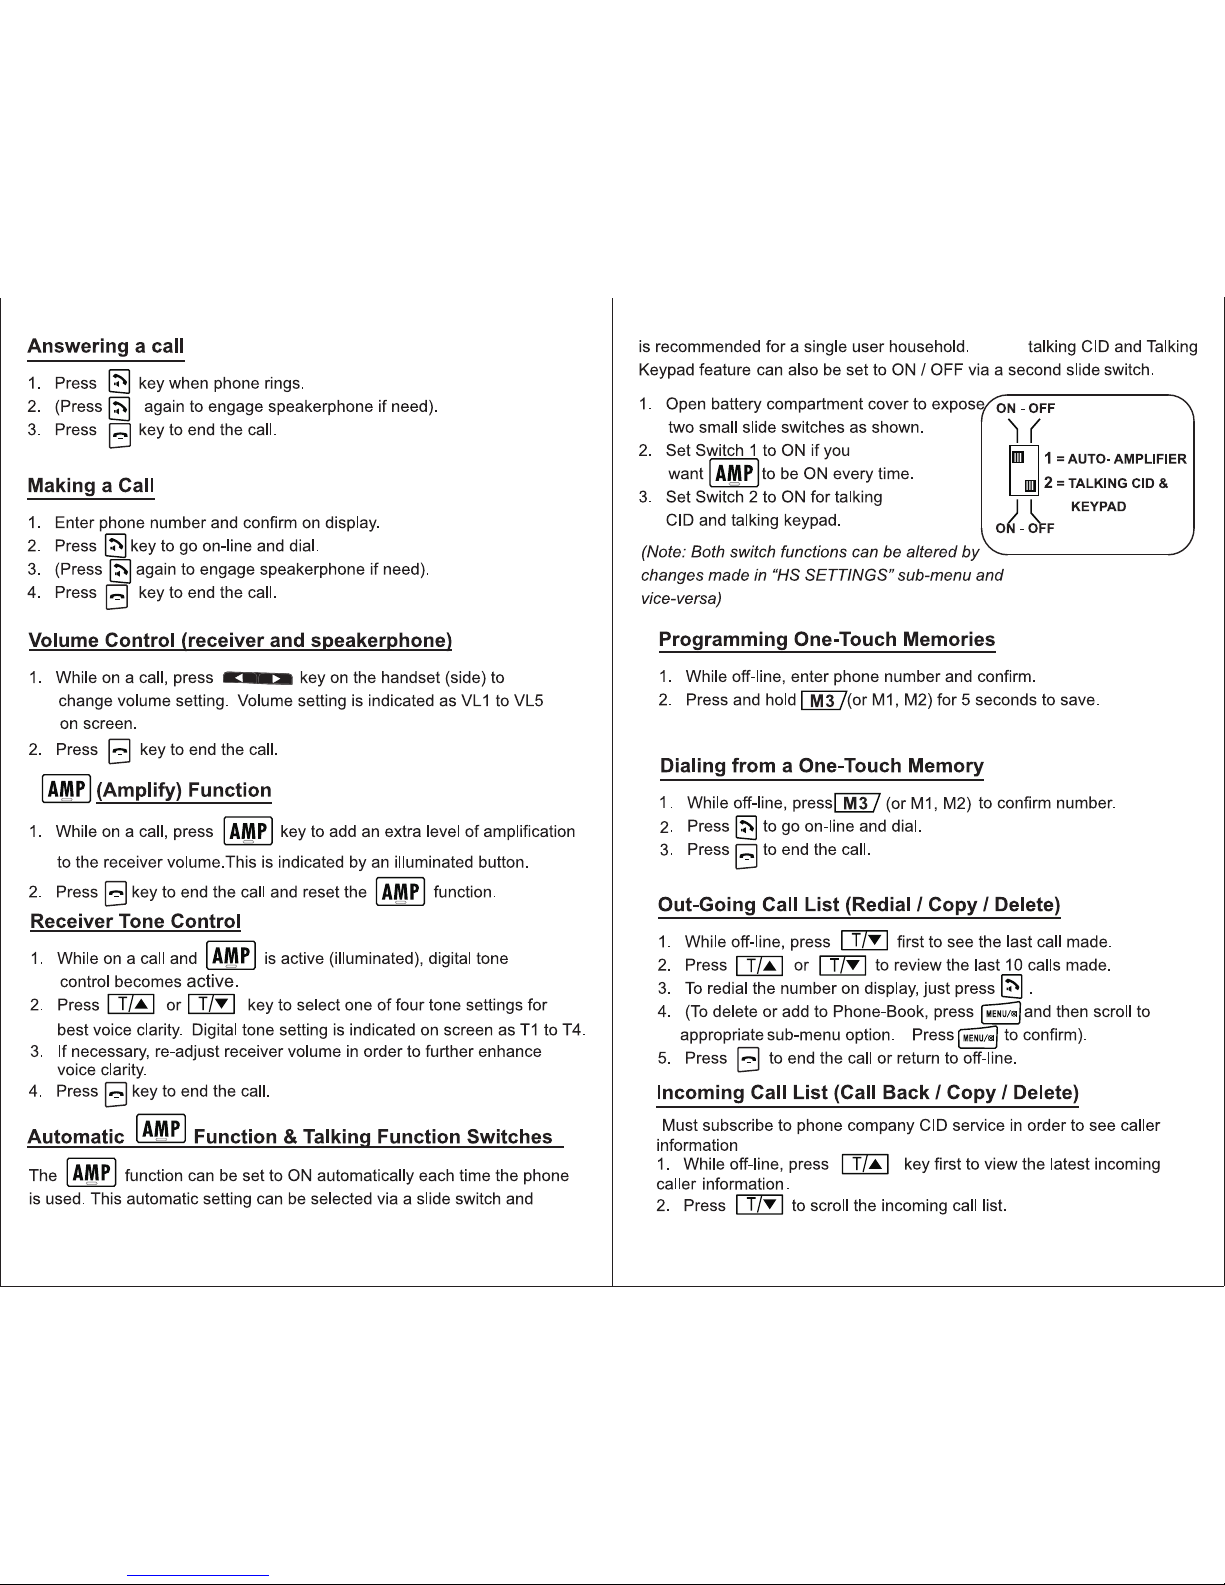
Automatic function & Talking function swi tche s 10-11
14
Programm ing one -touch m emories 11
15
Dialing from a one- touch memory 11
16
Out-going call list (Redial / copy / delete) 11
17
Incoming call list (call back / copy / delete) 11-12
18
Create phone book entries 12
19
List and search a phon e-boo k entry 12
20
Edi t a phone-book entry 12-13
21
Dele te (dele te all ) phon e-boo k en tries 13
22
Review memory status (phone-book) 13
23
General procedures f or sub-menu fun ction settings 14
25
Register a new handset t o base 14
26
Handset de-register 15
27
De-register all handsets 15
28
Area code setting 1529
Dialing mode setting 16
30
Auto-answe r when lifting handset 16
31
Flash time setting 16
32
Handset name se tting 17
33
Language selection 17
34
Modify PIN (changing the password) 17
35
Time format setting 18
36
Date & time setting 18-19
37
Handset defaul t setting 19
38
24 CL-35 Talking CID/Keypad 13
3 Battery And AC Power Adapter 5
OGM operation from remote control phone 32-33
72
Set answer machine mode from remote control phone 33
73
Set security code from remote control phone 33
74
Specification 34
75
Trouble Shooting 34-35
76
ing phone
41 anincoming caller
Call back to 20
42 Save an incom call to -book 20
43 Delete an incoming call record from call log 20
44 Delete all incoming call records from call log 20-21
45 Call log review (dialed calls ) 21
46 Save from call list to ph one-book 21
47 Delete a call from call list 21
48 Intercom be tween handsets 22
50 Keypad tone & warning tone se tting 23
49 Handset ring tone & volume setting 22
waiting
51 Call 24
52 Forward an incoming call from handset 1 to handset 2 24-25
53 Conference call 25
54 Barring (toll call restricti on) 25
55 Handset microphone mute funcion 26
56 Pause function 26
57 Handset power on / off 26
58 TAM Operation from Base Unit 26
59 Answer machine mode setup 26
60 OGM (Out Going Message) operation 26-27
61 Memo operation 27
62 ICM (Incoming Call Message) operation 27-28
63 New message indication 28
64 Message playback 28-29
65 Erase messages 29
66 Time setup 29-30
67 Ring setup 30-31
68 Toll Saver 31
69 Volume increasing/decreasing 31
70 Remote Operation 31-32
71 Message Operation Form Remote Control Phone 32
-2- -3-
PRODUCT FEATURES
1. DECT 6.0 Technology ensures crystal clear conversation
2. Up to 50 dB Of receiver amplification (5 volume levels); 40dB for CL-35
3. “AMPLIFY” key that automatically returns to the last receiver volume
setting
4. Four (4) digital tone control settings
5. High performance speakerphone
6. Talking CID & Talking keypad on CL-60 (English or French)
-
can be
switched off.
7. Large LCD display with backlight
8. Three display languages (English, French & Spanish)
9. Loud ringer in handset and base(CL-35 has no base ringer )
10. Bright ring flasher in handset and base
11.
Handset flasher also serves as voice-mail and new-call
12.
indicator
13.
Compatible with FSK CID (Type II) and voice mail signals
14.
Extra-large keypad buttons
15.
Three one-touch memory
16.
Emergency one-touch memory (dials number and turns on speakerphone)
17.
18.
40 Incoming call list memories; 10 Out-going call list
19.
memories;
150 Phone Book Memories
20.
21.
22.
23.
24.
25.
26.
27.
28.
Max link up to 5 handsets
Keyboard non-disturb function
Volume adjustment (5 levels)
Low battery voice warning; Out-of-range alarm
ingAuto-answer when lift handset off the base
10 handset ring tones and 5 base ring tones
Intercom function
Three-way conference
On-line and Off-Line buttons
Battery back-up option on Base
battery between handset and base Swap
29. 22kbps compression algorithm, 60minutes of voice storage time
30. 2 available Voice date-time stamp (DTS) and user prompts
(English / German)
31. Options to work without voice prompt selectable.
32. Recording up to 59 messages
33.OGM recording up to 60 seconds
34.Memo and ICM recording up to 120 seconds
35.2-way recording function
36. Erase each message/all messages
37.Ring delay selectable
38.Busy tone/Ring tone/continuous tone detection
39.DTMF detection for remote control
40.Call screening
41.Call intercepts function by stop key
42.VOX function, 5 seconds/8 seconds voice detection selectable for
line disconnection
43.New Message LED indication
44.7-segment digit LED display enable or disable
45.Digital volume control (7 steps volume adjustable at least)
46.Remote control from handset
47.Remote control from the other end telephone
48.-digit user selectable remote codes, default “0000”
WARNING - When using electric appliances, basic precautions should
Instructions pertaining to a risk of fire, electric shock or injury to persons.
leakage.
installing batteries.
phone.
Important Safety Instructions
Privacy of communications may not be ensured when using a cordless
Caution: To maintain compliance with the FCC's RF exposure guideline,
place the base unit 20 cm from nearby persons.
always be followed, including the following:
1. Read all the instructions before using the appliance.
2. This product uses rechargeable batteries. Do not use any non-
rechargeable battery as charging of this type can cause battery
3. Always disconnect phone cord to wall jack before changing or
4. To reduce the risk of injury, close supervision is necessary
5. Do not contact moving parts or any exposed metal surface.
6. Only use attachments recommended or sold by the manufacturer.
7. Do not use outdoors. Do not use near water.
8. To disconnect, turn all controls to the off position, then remove plug
from outlet.
9. Do not unplug by pulling on cord. To unplug, grasp the plug, not the
cord.
10. Unplug from outlet when not in use and before servicing or cleaning.
11. Do not operate any appliance with a damaged cord or plug, or after
the appliance
malfunctions or is dropped or damaged in any manner.
Return appliance to the nearest authorized service facility for
examination, repair, or electrical or mechanical adjustment.
12. To reduce the risk of e lectric shock, this appliance has a polarized
plug (one blade is wider than the other). This plug will fit in a polarized
outlet only one way. If the plug does not fit fully in the outlet, reverse
the plug. If it still does not fit, contact a qualified electrician to install
the proper outlet. Do not change the plug in anyway.
13. Avoid using any telephone product during an electrical storm.
There may be a remote risk of electric shock from lightning.
14. Do not use the telephone to report a gas leak in the vicinity of the leak.
15. Specifications of this product are subjected to change without notice.
used near children. when an appliance is
-4- -5-
5
(60 and 6.5 hours for CL-35)
-6-
CL-60 & CL-35 Comparison
Maximum amplification......................... 50dB 40dB
Talking CID/keypad.............................. yes no
Audio output Jack................................ yes no
Back light Color................................... white amber
Battery life ......................................... 8 hrs 6.5hrs
Base ringer ........................................ yes no
CL-60 CL-35
To wall phone jack
To AC outlet
-7-
T
T
off-line.
This function is on CL-60 only
-8-
(CL-60 only)
(CL-60 only)
/line
TAM
Message
NEW MSG
TAM ON/OFF
SET OGM
SET RING
TAM VOICE
REMOTE CODE
TAM DEFAULT
SAVED MSG
MEMO
DELETE ALL
OGM OGM1
OGM2
TAM SETTING
ON
OFF
TAM ALERT ON
OFF
OGM1
OGM2
-9-
-10- -11-
CL-60
-12- -13-
CL-35 Talking CID/Keypad
CL-35 does not offer this feature. Therefore, they are set to “off” at
the software menu. Do not try to change this setting.
PAGE
-14-
and
-15-
PAGE
PAGE
to confirm Input PIN to confirm
to confirm name.
FL/DEL
first
to confirm. A
-16-
Factory default is tone dialing
-17-
Talking feature is for CL-60 only.
-18-
then press . It
display “NEW PIN”
-19-
-20- -21-
-22- -23--
-24--
PAGE
indicating
-25-
PAGE
-26-
-
TAM Operation from Base Unit
There are approximately 60minutes of total recording time.
Answer machine mode setup
1. Press “ ” key to toggle between answer on/off. It will announce
“Answer on” with the LED turned “ON” and “Answer off” with the
LED turned “OFF”.
2.Press and hold “ answer”key for 3 seconds to toggle between new
message alert on/off
OGM (Out Going Message) operation
1. Press and hold “ OGM ”key for 3 seconds to start OGM recording.
The machine will announce “To record a new outgoing message,
please speak after the tone”. During OGM recording, press“ ”
key to end the recording.
ANSWER
ON/OFF
3. While Answering Machine is in standby mode, press “ ”key
once to playback OGM. Default OGM voice is: “Hello, your call
can not
be taken at the moment, please leave your message after the tone.”
4. During OGM playback, press “ ” key once to delete recorded
OGM,and the default OGM will be announced and used at once.
5. New OGM can not be recorded if memory is full.
6. Default OGM can not be erased.
Memo operation
1. Press and hold “MEMO”key for 3 seconds to start memo recording.
The machine announces “To record a message, please speak after
the tone”. During memo recording, press “ ”key once to end
recording.
2. You have max 180 seconds for memo recording. If you don't press
any key, it will automatically finish recording after 180 seconds.
3. If memory full occurs during memo recording, a “Sorry, the memory
is full” message will be announced before the machine returns to
standby mode
ICM (Incoming Call Message) operation
1. During “Answer on” mode, incoming calls will be received by the
answering machine, plays OGM followed by a beep tone then
performs ICM recording..
2. You have 180 seconds to record your message.
3. The ICM recording will stop if any of the following events occur,
i.e., 5 or 8seconds of silence, continuous signal or busy tone,
the 180 seconds record time is used up, the parallel phone is
picked up, or “ ” key is pressed.
4. If parallel phone picked up is detected, the message being
recorded will be saved as a new message.
2. There are 60 seconds for OGM recording. If you don't press any
key, it will automatically finish OGM recording after 60 sec.
-27-
-28-
Press “ ” key during recording, the message being recorded
will not be saved.
A long beep tone will be transmitted to indicate that ICM recording
is finished.
7. With only ten seconds remaining before memory is full, the machine
will announce “Please complete your call within ten seconds.” After
ten seconds, it will stop the ICM recording and releases the line.
The message will be saved as a new message.
8. If the memory is full, an incoming call will be picked up by the
machine,plays back the OGM followed with “Sorry, memory is full”
and then hangs up the line.
New message indication
If there are new messages, the new message LED will be flashing
and the 7 segment LED will indicate the number of messages.
A display of “2” means there are two new messages.
If there are new messages but with old messages, the new
message LED still will be flashing but the LED display shows the
total message count not just the number of new messages.
If message alert is on, the machine will beep every 30 seconds.
Message playback
1. Press “ ” key once to play messages.
* If there are new messages, it will announce “you have X new
messages, new message one (message content), new message
two (message content)”, until the X new message. After finishing
the playback, it announces “End of messages”.
5.
6.
1.
2.
3.
* If there are no new messages but there are old messages, it will
announce “You have no new messages. You have X messages,
message one (message content), message two (message content)”,
until the X message. After playback is finished, it announces “End
of messages”.
* If there are no any messages, it announces “You have no messages”.
2.Press “ ”key for one time will display the next one message;
press “ ” key for one time ,will display the last one message;
press “ ” key for one time , will stop displaying ;press “ ” for
one time return to standby mode;
Erase messages
During message playback, press “ ” key once to erase individual
message; it will announce “Message deleted”. The machine will
then play the next message but if all messages are deleted, it will
announce “End of messages”.
At standby mode, press and hold “ ” key for 3 seconds to erase
all messages, the machine will announce “All messages deleted”.
1.
2.
Time setup
This setting allows you to set the current day and time for Time/Day
stamp attached to each message. Messages' Time/Day stamp will
not be attached when it is not set up.
2. The LED display shows “PL” when Date and Time are not set up.
3. Time setup resets every time the power supply is unplugged.
4. If the date and time are not set, the machine will say “Please set
date and time” when the “ TIME ” key is pressed once.
Press and hold “TIME ” key for 3 seconds to enter date/time setup
mode:
The machine announces “Set year”. The LED display indicates
the year, for example “06”. Press “ ” or “ ” key to increase or
decrease respectively the year setting and press “TIME ” key to
confirm;
1.
5.
6.
DELETE
DELETE
VOL
VOL
-29-
VOL VOL
VOL VOL
VOL VOL
VOL VOL
-30-
7.
The machine announces “Set month”. The LED display indicates
the month, for example “12”. Press “ ” or “ ” key to increase
or decrease the month setting and press “TIME ” key to confirm;
8. The machine then announces “Set day”. The LED display
indicates
the day so press “ ” or “ ” key again to increase or
decrease the day setting and press “TIME ” key again to confirm;
9. The machine finally announces “Set hour”. The LED display now
indicates the hour. Press “ ” or “ ” key to scroll the correct
hour setting and press “TIME ” key again to confirm. Note: The
hour setting is in 24hour format. Example: If it is 5 in the afternoon,
place the hour to 17, the machine will be announcing it as 5 P.M.;
10.The machine will then announce “Set minute”. The LED display this
time indicates the minute. Press “ ” or “ ” key to scroll the
correct minute then press “TIME ” key to confirm;
11.After the minute confirmation, the machine will instantly announce
the new day and time. i.e. “Tuesday, Five P.M.”. Please note that
the voice DTS will not prompt the year and month.
12.If no key input within eight seconds, the set up procedure will be
abandoned.
13.In standby mode, press “TIME ” key once to play DTS, the machine
will play the entered day and time
Ring setup
1. This setting allows you to input the desired number of rings before
the machine will receive the call, the procedure is as follows:
2. There are 2 to 9 rings and a Toll saver (“SA”) mode to select from.
3. Press and hold “ ” key for 3 seconds to set ringer mode. The
machine announces the initial setting; i.e. “Nine”. (This means,
it will receive the call after nine rings.) The LED display also
indicates “09”.
4. Press “ ” or “ ” key to select the desired number of rings or
toll saver mode.
VOL VOL
-31-
Press “ ” key again to confirm setup. The machine will
immediately announce the new entered Ring setup and returns
to standby mode.
5.
6. At standby mode, press and hold “ ”key for 3 seconds .The
machine will say “Calls will be answered after nine rings”.
7. When Ring setup selected is “Toll saver”, it performs these
functions. (see explanation below)
Toll Saver
Volume increasing/decreasing
Press “ ” / “ ”keys to increase/decrease speaker volume.>>
These keys can also be used to scroll the desired settings for time,>>
pin code and message play back
VOL VOL
1.if the unit has new message,calls will be answered after 3 rings.
2.if
So if user want to review family machine's messages from outside telephone
byremote mode,he can choose to range up telephone after 3 rings if no new
message.
the unit has not new message,calls will be answered after 7 rings.
when toll saver mode is selected,at standby mode,press andhold ” ” key
for 3 seconds.the machine will announce "time saver", wait a monent ,it
continuously announce "ring delay is set to time saver"
If is selected
"TOLL SAVER"
Remote Operation
Enter remote operation
>> Call the DAM.-wait for ogm to be played or when memory is full,
finishplaying the voice prompt:“hello,your call can not be taken
at this moment,please call again later”then enter the 4 digit
securitycode that you have set for the answering machine.
>> If the security code you entered is incorrect,themachine will
announce“security code is incorrect,please enter your security
code”.you are allowedThree times to re-enter your security code.
if the third try is incorrect,the machineWill hang up the line.
>> Once you entered the correct security code,you are in the remote
controloperation mode.if you have no new messages,the machine
will be playingthe following voice prompts.
OGM operation from remote control phone
In remote control operation main menu, you can record a new OGM
from remote control phone by pressing “6”. The machine will
announce “Please speak after the tone”, “To end recording, press
Hash”. After the recording it will announce “to listen to the main
press 1”.
.
1.
menu,
3.
4.
Once “#” is pressed, it will play the security code, “Your security
code is XXXX”, then announces “To listen to the main menu, press 1”
4 digits can be entered for security code.
If no key input within 8 seconds, the machine will say “to listen to
the main menu, press 1”
Default OGM and announcement can not be erased
Set answer machine mode from remote control phone
In remote control operation main menu, you can change answer
machine mode as following:
Press “5” to set answer on/off, it announces “Answer on” or
“Answer off”
During recorded OGM playback, pressing “4” can erase OGM, a
long beep tone to confirm OGM deleted and then play the default
OGM.
Set security code from remote control phone
In remote control operation main menu, press “9” to set a new
security code for your answer machine. The machine will say “To
set a new security code, press *”, “To listen to your security code,
press #”
Once “*” is pressed, it will say “Please enter your new security
code after the tone”; 4 digits can be entered from the keypad; After
you enter new security code, it will say “Your security code is XXXX”,
then the machine will say“To listen to the main menu, press 1”.
1.
1.
2.
1.
2.
-32- -33-
“You have no new messages”
“To listen to the main menu,press 1”
when you press 1,the following voice
prompts will be announced:
“to play new messages,press 2”
“ ”
“
to play new messages,press 3
to delete messages,press 4”
“to set answer on or off,press 5”
“to record a new outgoing message,press 6”
“to listen to the main menu again,press 1”
>> if no key input within eight seconds,the remote operation
will be canceled and hangs up the line.
>> pressing “ ”key on the machine or picking up parallel
hpone will stop theremote operation.
message operation form remote control phone
>> at remote control opration main menu,the following
procedure can be done:
>> if there are new messages,the machine will immediately
play the new m e s s ages. it w i l l say “y o u have X new
messages,new message one”.
>> if there are no messages,it will announce“you have no
messages”,the machine will announce“to listen to the main
menu,press 1”.
>> after finish playback fo the last message,it will announce“end
of ,messages,to delete all messages press 4”then beeps followed
by“you have no messages”
>> during message playback,the following can be done:
>> press
“1”to play previous message
>> press“2”to play next message;
>> press“3”to play again the message;
>> press“4”to delete the current message,it will announce
“message deleted”and plays the next message;
>> you have 120 seconds to record your message.after 120
seconds,along beeptone will be played and the message
will be saved as new message;the machine will go to main menu.
2. During recorded OGM playback, pressing “0” can erase OGM, a
long beep tone to confirm OGM deleted and then play the default
OGM.
-34- -35-
-
CL-60:
CL-35: 22
CL-60 (English voice in Spanish mode)
NOTE: Specifications are subject change without any notice
(2)
right
Specification
( T1 to T4 )
5
-36- -37--

Other manuals for HD Phone CL-60A

2

This manual suits for next models

2

Other Serene Cordless Telephone manuals

Serene CL-65 User manual

Serene

Serene CL-65 User manual

Serene CL-60P User manual

Serene

Serene CL-60P User manual

Serene CL-30 Installation guide

Serene

Serene CL-30 Installation guide

Serene HD Phone CL-60A User manual

Serene

Serene HD Phone CL-60A User manual

Serene HD Phone CL-60A User manual

Serene

Serene HD Phone CL-60A User manual

Serene CL-30 User manual

Serene

Serene CL-30 User manual

Serene CL-60P User manual

Serene

Serene CL-60P User manual

Serene CL-60P User manual

Serene

Serene CL-60P User manual

Serene CL-65C User manual

Serene

Serene CL-65C User manual

Popular Cordless Telephone manuals by other brands

Topcom BUTLER 2511 Deluxe user guide

Topcom

Topcom BUTLER 2511 Deluxe user guide

Uniden EXI976C - EXI 976C Cordless Phone Guide d'utilisation

Uniden

Uniden EXI976C - EXI 976C Cordless Phone Guide d'utilisation

Panasonic KX-TGM420 Operating	 instruction

Panasonic

Panasonic KX-TGM420 Operating instruction

AUDIOLINE FF 888-2 user guide

AUDIOLINE

AUDIOLINE FF 888-2 user guide

Panasonic VE-GD58DL Quick reference guide

Panasonic

Panasonic VE-GD58DL Quick reference guide

BT Freestyle 70 user guide

BT

BT Freestyle 70 user guide

Fanvil X5S Quick installation guide

Fanvil

Fanvil X5S Quick installation guide

Alcatel-Lucent 8232 quick guide

Alcatel-Lucent

Alcatel-Lucent 8232 quick guide

Panasonic KX-TG8022E operating instructions

Panasonic

Panasonic KX-TG8022E operating instructions

AEG VOXTEL D500 quick start guide

AEG

AEG VOXTEL D500 quick start guide

LG LSP-2000 user manual

LG

LG LSP-2000 user manual

GE 22430 user guide

GE

GE 22430 user guide

AUDIOLINE Nova 50x operating instructions

AUDIOLINE

AUDIOLINE Nova 50x operating instructions

ATLINKS VERSATIS 60 DIGITAL Getting started

ATLINKS

ATLINKS VERSATIS 60 DIGITAL Getting started

AT&T E2812B quick start guide

AT&T

AT&T E2812B quick start guide

Hawking Net-Talk HNT1A Quick installation guide

Hawking

Hawking Net-Talk HNT1A Quick installation guide

Memorex MC4285 operating instructions

Memorex

Memorex MC4285 operating instructions

Uniden EXAI8580 - EXAI 8580 Cordless Phone owner's manual

Uniden

Uniden EXAI8580 - EXAI 8580 Cordless Phone owner's manual

manuals.online logo
manuals.online logoBrands
  • About & Mission
  • Contact us
  • Privacy Policy
  • Terms and Conditions

Copyright 2025 Manuals.Online. All Rights Reserved.