SereneLife PSLTLL1854 User manual

PSLTLL1854
18VElectricTiller/Cultivator
Cordless Garden Tiller Cultivator
with Rechargeable Battery

Read the instructions thoroughly before operating the tool
and keep this manual for future reference!
INTENDED USE
Your rotary tiller has been designed for garden.
Do not use for any other purpose. This tool is intended for domestic
use only. Your charger has been designed for charging batteries of the
type supplied with this tool. Do not use to charge other batteries.
EXPLANATION OF SAFETY SYMBOLS
Warning!
SAFETY INSTRUCTIONS
WARNING!
When using the machine the safety rules must be followed. For your
own safety and that of bystanders please read these instructions before
operating the machine. Please keep the instructions safe for later use.
www.SerenLifeHome.com 2
Read the instruction manual before use
Keep bystanders away
Do not use in rain or wet conditions.
Always wear eye protection.

3
Safety Instructions for Cordless Rotary Tiller
Warnings - Do’s
Read and understand the owner’s manual. Pay particular attention to all
sections regarding safety.
1. Always keep a rm grip on both handles while the tines are moving.
BE AWARE!! The tines may coast after the triggers are released. Make sure
tines have come to a complete stop before letting go of the tiller.
2. Always maintain a rm footing and good balance. Do not over reach
while operating the tiller. Before you start to use the tiller, check the work
area for obstacles that might cause you to lose your footing, balance or
control of the machine.
3. Thoroughly inspect the area where equipment is to be used and remove
all objects, which can be thrown by the machine.
4. Always keep area clear of children, pets, and bystanders.
5. Always stay alert. Watch what you are doing and use common sense.
Do not operate unit when fatigued.
6. Always dress properly. Do not wear loose clothing or jewelry, they might
get caught in moving parts. Use sturdy gloves. Gloves reduce the
transmission of vibration to your hands. Prolonged exposure to vibration
can cause numbness and other ailments.
7. While working, always wear substantial footwear and long trousers.
Do not operate the equipment when barefoot or wearing open sandals.
8. Always wear eye protection.
9. Keep all nuts, bolts and screws tight to be sure the equipment is in safe
working condition.
10. Use extreme caution when reversing or pulling the machine towards
you.
11. Work only in daylight or good articial light.
12. Always be sure of your footing on slopes.
13. Exercise extreme caution when changing direction on slopes.
14. Always keep a safe distance between two or more people when
working together.
www.SerenLifeHome.com

15. Always inspect your unit before each use and ensure that all handles,
guards and fasteners are secure, operating, and in place. Be sure that all
electrical cords are not damaged or broken.
16. Always maintain and examine your tiller with care.
Follow maintenance instructions given in manual.
17. Always store tiller in a sheltered area (a dry place), not accessible to
children.
Warnings - Don’ts
1. Don’t use tiller with one hand. Keep both hands on handles with ngers
and thumbs encircling the grips when the tines are moving.
2. Don’t overreach. Keep a good footing at all times.
3. Don’t run with the machine, walk.
4. Don’t work on excessively steep slopes.
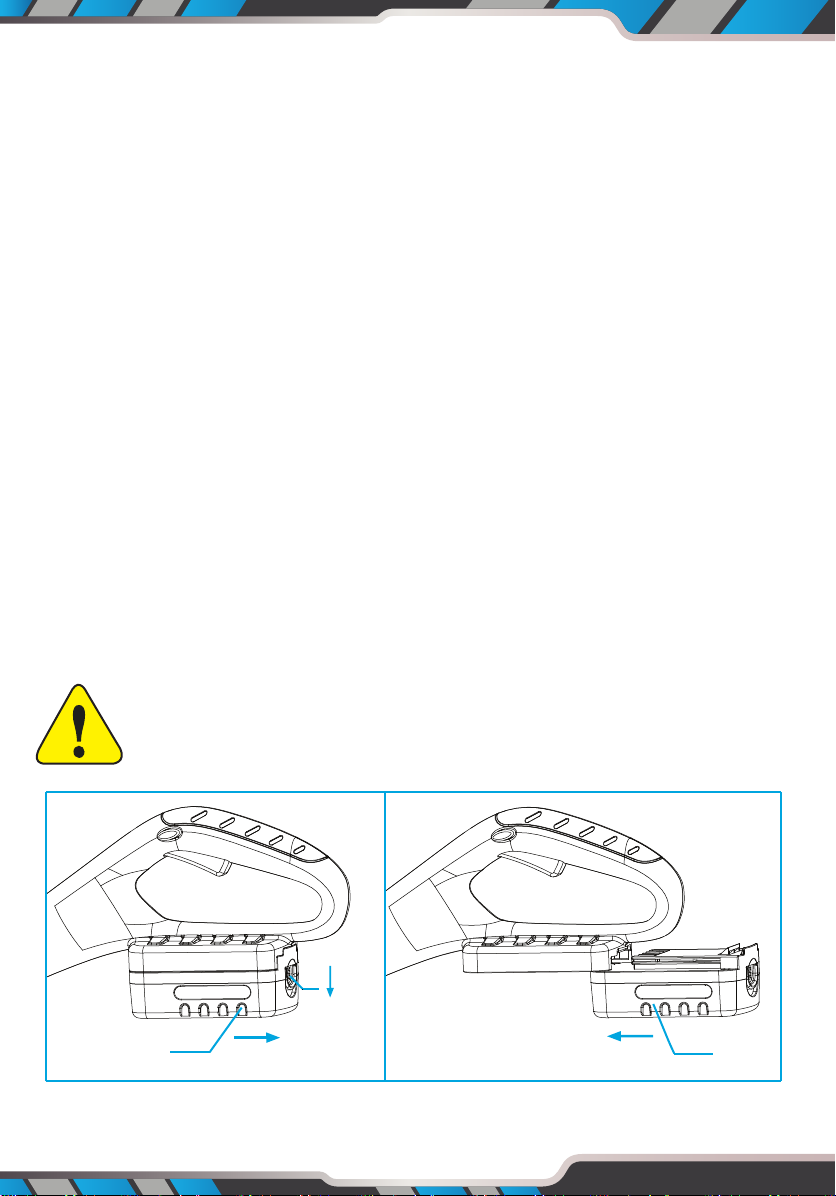
5. Don’t attempt to clear tines while they are moving. Never try to remove
jammed material before unplugging the cord and making sure the tines
have stopped completely.
6. Don’t allow children or incapable people to operate this tiller.
7. Don’t operate while under the inuence of alcohol or drugs.
8. Don’t attempt to repair this tiller. Have repairs made by a qualied dealer
or repairman. See that only original PSLTLL1854 parts are used.
9. Don’t run the tiller in rain or wet conditions
Additional safety instructions for battery
• Never attempt to open for any reason
• Do not expose to water
• Do not incinerate the battery pack even if it is severely damaged or is
completely worn out. The battery pack can explode in a re.
• Do not store in locations where the temperature may exceed 104°F
• Do not leave the battery pack in the charger when the charging is
nished, otherwise battery leakage may occur.
• Charge only at room temperature.
• Charge only at using the charger provided with the tool (see technical data)
• Before charging , make sure that the battery is dry and clean.
www.SerenLifeHome.com 4

5
• Use only the correct type of battery for the tool (see technical data).
• When dispose of batteries follow the instructions given in the section
"protecting the environment".
• Under extreme conditions ,battery leakage may occur.
When you notice liquid on the battery, proceed as follows:
• Carefully wipe the liquid off using a cloth. Avoid skin contact.
• In case of skin or eye contact, follow the instructions below.
The battery uid, a 25-30% solution of potassium hydroxide, can be
harmful. In case of skin contact, immediately rinse with water. Neutralize
with a mild acid such as lemon juice or vinegar. In case of eye contact, rinse
abundantly with clean water for at least 10 minutes. Consult a physician.
NOTE:
The batteries in your battery pack are the Lithium-Ion type. Do not dispose
of battery packs/batteries into household waste, re or water. Battery
packs/batteries should be collected, recycled or disposed of in an
environmental-friendly manner.
ASSEMBLY INSTRUCTIONS
For Your Safety
www.SerenLifeHome.com
Warning! Remove the battery pack before cleaning the tool.
1
2
Remove
Insert
2

Insert/Remove the battery pack
• Always release the ON/OFF switch before insertion or removal of the
battery pack.
• To remove the battery pack, depress the button 1 on end of the battery
pack, and then remove the pack 2 from the tool.
• To insert the battery pack, align the latches on both side of the battery
cartridge with the groove in the housing and slip it into place. Always
insert it all the way until it locks in place with a little click. If not, it may
accidentally fall out of the tool, causing injury to you or someone around
you. Do not use force when inserting the battery pack. If the cartridge
does not slide in easily, it is not being inserted correctly.
Attach adjustable handle (FIG A)
a. Turn the handle knob and Draw out the bolt from the adjustable handle.
b. Insert the adjustable handle in the machine handle.
c. Insert the bolt and handle knob, then turn the handle knob lightly tighten.
d. Before tightening completely, turn the adjustable handle in desired
angle. When adjustable handle is in desired angle, tighten the handle
knob securely.
www.SerenLifeHome.com 6
FIG A

1
2
3
4
5
6
7
OVERVIEW (FIG B)
1. Lock - off button
2. On/off switch
3. Battery pack
4. Grip Area
5. lock Nut
6. Blade
OPERATION
1. Handle Assembly
2. Working Part
www.SerenLifeHome.com
FIG B
FIG C

The Head Assembly:(FIG C)
1. When inserted, the arrow 1 would have to target the arrow 2, and must
be inserted fully. as shown in Fig C
2. Turn the locking knob in the “LOCK” direction.
(IMPORTANT: Must turn the locking knob tightly) See Fig D
Setting the adjustable handle angle:(FIG E)
Loosen the locking button and turn adjustable handle to required angle.
There are 7 working positions. Then turn the locking button tightly.
www.SerenLifeHome.com 8
FIG D
FIG E
FIG F

9
Starting the Rotary Tiller:(FIG F)
Switching the Rotary Tiller ON:
1.Press and hold the safety lock-off button (A) and then press the start
button (B) on the handle.
2.Release the safety lock-off button (A) again.
Switching the Rotary Tiller OFF:
1.Release the start button (B) on the handle.
CHARGING THE BATTERY (FIG G)
The battery needs to be charged before rst use and whenever it fails to
produce sucient power on jobs that were easily done before.
The battery may become warm while charging; this is normal and does not
indicate a problem.
NOTE: After several charge and discharge cycles, the battery will attain
full capacity.
DO NOT CHARGE THE BATTERY AT AMBIENT TEPERATURES BELOW
39.2°F OR ABOVE 104°F.
RECOMMEND CHARGING TEPERATURE: APPROX. 75.2.°F
www.SerenLifeHome.com
RISK OF INJURY! Cutting elements continue to rotate after the
motor is switched o. Do not try to stop the cutting device with
your hands. Always let it come to a stop by itself.
9
7
8
6
FIG G

1. Connect the charger 7 to the charger station 8.
2. Plug the charger into an appropriate AC power outlet.
The LED 9 lights green to tell you that the charger is ready for use.
3. Insert the charger station 8 into the battery pack 6, as shown in Fig 13,
making sure the charger station is fully seated in the battery pack.
The LED 9 lights red to tell you that the battery pack is on charge.
Attention! It can not be charged if charging the battery immediately
after using the machine. The battery pack should be cooling for a period
of time. The LED 9 lights from green to red means it can be charged.
4. The battery pack will be fully charged in about 4 hours. And the LED 9
lights green again to tell you that the battery pack is fully charged.
Important Charging Notes
Longest life and best performance can be obtained if the battery pack is
charged when the air temperature is between 64.4-75.2°F. Do not charge
the battery pack in a very low or very high air temperature.
This is important and will prevent serious damage to the battery pack.
1. When using your tool continuously, the batteries in your battery pack will
become hot. You should let a hot battery pack cool down for
approximately 30 minutes before attempting to recharge.
2. The charger and battery pack may become warm to touch while
charging. This is a normal condition, and does not indicate a problem.
3. Use the charger in normal room temperatures whenever possible.
To prevent overheating, do not cover the charger and do not charge
www.SerenLifeHome.com 10

11
battery packs in direct sunlight or near heat sources.
4. If the battery pack does not charge properly – (1) check current at
receptacle by plugging in a lamp or other appliance. (2) move charger
and battery pack to a location where the surrounding air temperature is
approximately 64.4-75.2°F. (3) if charging problems persist, take or send
the tool, battery pack and charger to your local service center.
5. The battery pack should be recharged when it fails to produce sucient
power on jobs which were easily done previously.
DO NOT CONTINUE to use under these conditions. Follow the charging
procedure. You may also charge a partially used pack whenever you
desire with no adverse affect on the battery pack.
6. Under certain conditions, with the charger plugged in to the power
supply, the exposed charging contacts inside the charger can be shorted
by foreign material. Foreign materials of a conductive nature such as, but
no limited to, steel wool, aluminum foil, or any buildup of metallic
particles should be kept away from charger cavities. Always unplug the
charger from the power supply when there is no battery pack in the
cavity. Unplug charger before attempting to clean.
7. Do not immerse charger in water or any other liquid.
8. WARNING! Don’t allow any liquid to get inside charger. Electric shock
may result. To facilitate the cooling of the battery pack after use, avoid
placing the charger or battery pack in a warm environment such as in a
metal shed, or an uninsulated trailer.
www.SerenLifeHome.com

9. CAUTION! Never attempt to open the battery pack for any reason. If the
plastic housing of the battery pack breaks or cracks, return to a service
center for recycling; do not put it into further use.
MAINTENANCE
1. After use, remove the battery pack from the rotary tiller;
2. When not in use store the machine out of the reach of children;
3. Use only manufacturer recommended replacement parts and
accessories;
4. To clean the tool, remove battery pack and use only mild soap and a
damp cloth to clean the tool. Do not immerse tool in water or squirt it
with a hose. Do not allow any liquid to get inside it. Do not clean with a
pressure washer.
www.SerenLifeHome.com 12

13
PSLTLL1854
18V Electric Tiller / Cultivator
Cordless Garden Tiller Cultivator with Rechargeable Battery
Features:
• Electric Garden Tiller & Cultivator System
• Landscaping Made Easy: Hassle-Free & Easy-to-Use
• High-Powered Spinning Motor
• Cordless Design with Rechargeable Battery
• Includes Removable Battery & Wall Plug Charge Base
• Easy-to-Use, Hassle-Free Control
• Integrated Debris Protection Shield
• Heavy-Duty, Rugged & Reliable
• Angle Adjustable Handle Grip
• Perfect for Lawns, Gardens, Back Yards, Walkways, Landscapes
What’s in the Box:
• Cordless Tiller
• 18-Volt Li-iOn Battery
• Wall Plug Battery Charger
Technical Specs:
• Power Output: 18V
• Operation Speed: 280+ RPM
• Till Path Width: 7.9’’ -inches
• Till Path Depth: 3.2’’ -inches
• Construction Material: Engineered ABS, Metal Alloy Blades
• Working Time: Up to 25-Mins
• Battery Charging Time: Approx. 4 Hours, Full Charge
• Battery Type: 18V Lithium-iOn Battery, 1500mAh (1.5A)
• Power: 120V
• Dimensions (L x W x H): 45.3’’ x 8.7’’ x 8.7’’ -inches
• Sold as: 1
www.SerenLifeHome.com

Table of contents