SEYSSO PLANET MERCURX User manual
PLANET
MERCURX/NEPTUNX
SONIC TOOTHBRUSH
PLANET
MERCURX/NEPTUNX
SZCZOTECZKA SONICZNA
EN / PL
Please read the user manual
before use. Keep the manual for
possible future reference.
Przed użyciem zapoznaj się
z instrukcją obsługi. Zachowaj
instrukcję do ewentualnego
wykorzystania w przyszłości.
User Manual
Instrukcja Obsługi

2 3
1 Safety
instructions
Warning:
1. Before connecting the
product to the power supply,
Make sure that your outlet
voltage corresponds to the
voltage stated on the rating
label – 100-240V~,50-60Hz.
2. Do not charge the toothbrush
in damp places.
3. Do not pull the cord when
disconnecting the charger.
Do not touch the cord with
wet hands.
4. If the charger falls into water
during charging, disconnect
the power supply before
taking it out.
5. Do not immerse the tooth-
brush in water at a tempera-
ture above 40º.
6. Do not charge, use or leave
the device if it is exposed
to high temperatures
or environmental factors.
7. The device is not intended for
unattended use by children
or persons with reduced
motor, mental or cognitive
abilities. Keep the device out
of their reach. The product is
not a toy.
8. Children or persons with
reduced motor, mental or
cognitive abilities may only
use the toothbrush under
appropriate supervision.
9. Do not press the toothbrush
against your teeth or gums,
or brush in the same place
for a long time, as this can
damage your gums.
10. Inspect the device thoroughly
before use. Do not use it
if you detect any visible
damage.
11. If you have undergone any
oral surgery or treatment of
your teeth and gums in the
last two months, ask your
dentist if using the toothbrush
is advisable.

2 3
12. The device may cause slight
bleeding of the gums during
the rst days of use. If the
bleeding does not stop within
a week or is unusually heavy,
contact your doctor.
13. Persons with an implanted
cardiac pacemaker or other
electronic device should
consult a doctor before using
the toothbrush.
14. Do not attempt to repair,
modify or disassemble parts
of the device by yourself.
In case of damage, please
contact the customer service
centre.
15. We recommend replacing the
brush head every 3 months
or more often, depending on
the frequency of use.
16. If you use toothpastes
containing brightening or
whitening substances, e.g.
sodium bicarbonate or other
bicarbonates, wash the brush
thoroughly after each use.
17. The device is designed for
brushing teeth, gums and
tongue. Do not use it for any
other purpose. If you feel any
pain or discomfort after using
the toothbrush, or if you
have any concerns about the
impact of the device on your
health, contact your doctor.
The power cord should not
be replaced. If the cord is
damaged the appliance
should not be used.
Electromotive force:
The SEYSSO sonic toothbrush
meets all standards for the
operation of electromagnetic
devices. If used properly and
in accordance with this manual,
it will not pose any danger
to the user.
4 5
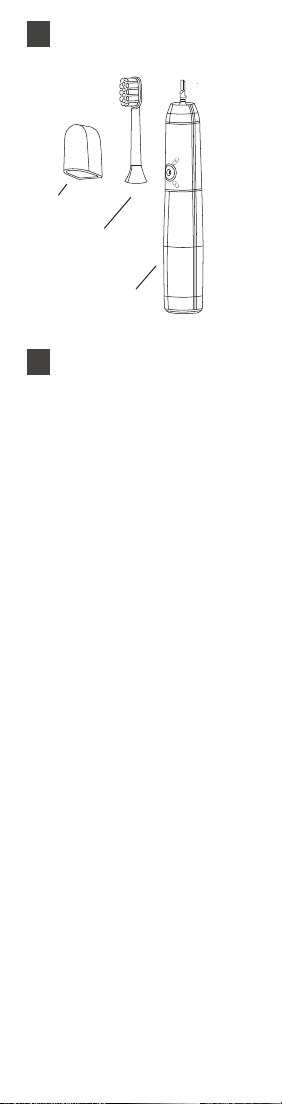
2 Toothbrush design
3 Charging before
the rst use:
1. Discharge the toothbrush completely
before the rst charging. Next, charge
the toothbrush until it is fully charged.
The rst charging should last 32
hours. During this time, you can re-
move the toothbrush from the charger
to clean your teeth.
2. A LED ring on the toothbrush
ashes in four different colors during
charging. The LED ring goes out 2
minutes after the toothbrush is fully
charged.
3. Each subsequent recharging should
last 32 hours or until the LED ring
goes out.
ATTENTION: Switch off the toothbrush
before the rst charging. Place the
charging base on a at and stable
surface and align the slot on the bottom
of the toothbrush with the locking pin of
the charging base. Place the toothbrush
on the charging base and connect the
plug to a power outlet.
ATTENTION: Before charging, make
sure that the output current specication
is compatible with 100-240 V AC 50
Hz/60 Hz 1.4 W. Otherwise, do not
connect the charger to the power supply.
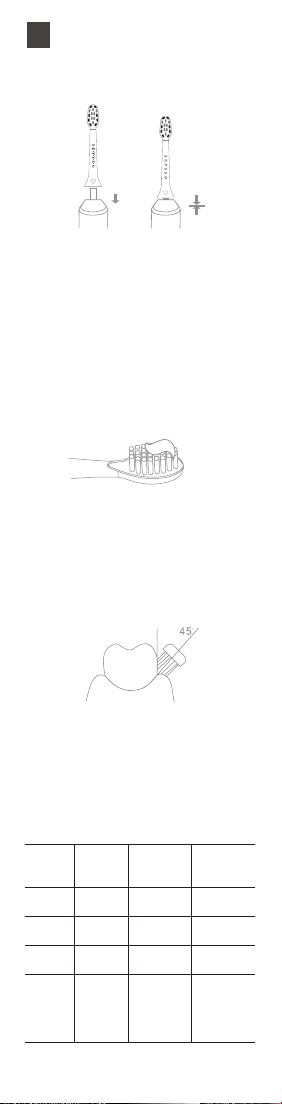
Step 1: Attach the replaceable head
to the hand grip.
* The diagram shows the correct way
to attach the head to the toothbrush
Step 2: Next, apply an appropriate
amount of toothpaste to the bristles of
the toothbrush. We recommend using
toothpaste dedicated to sonic brushes
(Sonic Friendly). We recommend the
SEYSSO toothpastes which, thanks to
their excellent ingredients and texture,
fully utilise the potential of sonic
toothbrushes.
Step 3: Put the head into your mouth
before switching on the toothbrush.
Position the toothbrush near your teeth
so that its bristles are at a 45-degree
angle to your gum line and switch on
the toothbrush by pressing and holding
the function button for 3 seconds.
Step 4: Briey press the function
button while the toothbrush is running
to select the appropriate brushing
mode. Each time you press the button,
the device switches between the four
programs in sequence and changes
the colour of the LED ring.
4 Brushing:
Hand grip
Cap
Brush head
Mode LED ring
color
Symbol
on the
toothbrush
Function
Clean Yellow C Teeth
cleaning
White Blue W Teeth
whitening
Polish Red P Polishing
front teeth
Massage Green M
Gum
massage
and teeth
cleaning
4 5
2 Toothbrush design
3 Charging before
the rst use:
1. Discharge the toothbrush completely
before the rst charging. Next, charge
the toothbrush until it is fully charged.
The rst charging should last 32
hours. During this time, you can re-
move the toothbrush from the charger
to clean your teeth.
2. A LED ring on the toothbrush
ashes in four different colors during
charging. The LED ring goes out 2
minutes after the toothbrush is fully
charged.
3. Each subsequent recharging should
last 32 hours or until the LED ring
goes out.
ATTENTION: Switch off the toothbrush
before the rst charging. Place the
charging base on a at and stable
surface and align the slot on the bottom
of the toothbrush with the locking pin of
the charging base. Place the toothbrush
on the charging base and connect the
plug to a power outlet.
ATTENTION: Before charging, make
sure that the output current specication
is compatible with 100-240 V AC 50
Hz/60 Hz 1.4 W. Otherwise, do not
connect the charger to the power supply.
Step 1: Attach the replaceable head
to the hand grip.
* The diagram shows the correct way
to attach the head to the toothbrush
Step 2: Next, apply an appropriate
amount of toothpaste to the bristles of
the toothbrush. We recommend using
toothpaste dedicated to sonic brushes
(Sonic Friendly). We recommend the
SEYSSO toothpastes which, thanks to
their excellent ingredients and texture,
fully utilise the potential of sonic
toothbrushes.
Step 3: Put the head into your mouth
before switching on the toothbrush.
Position the toothbrush near your teeth
so that its bristles are at a 45-degree
angle to your gum line and switch on
the toothbrush by pressing and holding
the function button for 3 seconds.
Step 4: Briey press the function
button while the toothbrush is running
to select the appropriate brushing
mode. Each time you press the button,
the device switches between the four
programs in sequence and changes
the colour of the LED ring.
4 Brushing:
Mode LED ring
color
Symbol
on the
toothbrush
Function
Clean Yellow C Teeth
cleaning
White Blue W Teeth
whitening
Polish Red P Polishing
front teeth
Massage Green M
Gum
massage
and teeth
cleaning

6 7
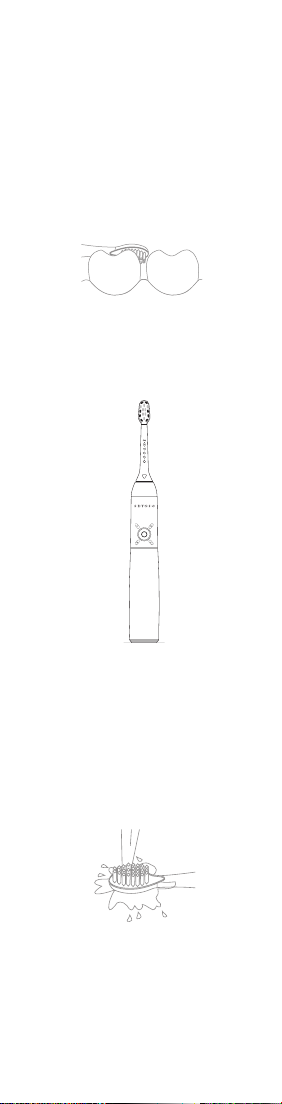
Step 5: Slowly move the toothbrush
along the gum line without pressing
your teeth too hard. The toothbrush
has a built-in automatic 2-minute timer
to help you keep the recommended
brushing time. Thanks to 30-second
intervals, signalled by a short pause
of the toothbrush operation, you can
evenly distribute the brushing time to
all quarters of your teeth.
Step 6: The device will automatically
switch off after 2 minutes. Press and
hold the button for 3 seconds to turn
off the toothbrush while it is running.
Step 7: After brushing your teeth,
remove the head from the hand grip,
rinse it with water and dry it before
storing it. Remember to remove the
head after each use of the toothbrush.
When the battery runs out, place
the toothbrush on the charging base
and charge it according to the above
instructions.
Step 8: When the battery level drops
below 3.3 V, the LED ring will start to
ash slowly, whereas when it drops
below 3 V, the LED ring will be ashing
quickly, and the toothbrush will turn off
automatically.
5 Replaceable
heads:
The set includes the SEYSSO Planet
XCleaning brush head. Use only
original SEYSSO heads dedicated to
the toothbrush. Any damage caused
by using non-original heads will not
be covered by the manufacturer’s
warranty.
6 Cleaning
and maintenance
WARNING Disconnect the brush from
the power supply before cleaning. Do
not immerse the charging base in wa-
ter. Rinse the hand grip and the tooth-
brush head with water at a temperature
not exceeding 40º. Wipe the charging
base and hand grip with a soft cloth.
Never use strong cleaning agents.
WARNING: Do not use chemical
cleaners or tools that may damage
the toothbrush. Do not wash the head,
charger or hand grip in a dishwasher.
WARNING: Li-ion batteries must be
charged at room temperature. Too
low (below 0º) or too high (above 45º)
temperature may cause serious safety
problems.
7 Warranty
and servicing
The SEYSSO toothbrush is covered by
a two-year manufacturer’s warran-
ty, which is valid from the date of
purchase. During the warranty period,
the manufacturer undertakes to repair
or replace a defective toothbrush with
a new one if the defect is caused by
a structural aw. The warranty does not
cover damage resulting from improper
use of the device.
8 Quality guarantee
– restrictive clause
The quality guarantee covers only
SEYSSO devices.
Explanation:
Please ll in the warranty card thoroughly
and keep it for possible future use.
The user is entitled to a two-year period
of free service, which starts on the day
of purchase.

6 7
Step 5: Slowly move the toothbrush
along the gum line without pressing
your teeth too hard. The toothbrush
has a built-in automatic 2-minute timer
to help you keep the recommended
brushing time. Thanks to 30-second
intervals, signalled by a short pause
of the toothbrush operation, you can
evenly distribute the brushing time to
all quarters of your teeth.
Step 6: The device will automatically
switch off after 2 minutes. Press and
hold the button for 3 seconds to turn
off the toothbrush while it is running.
Step 7: After brushing your teeth,
remove the head from the hand grip,
rinse it with water and dry it before
storing it. Remember to remove the
head after each use of the toothbrush.
When the battery runs out, place
the toothbrush on the charging base
and charge it according to the above
instructions.
Step 8: When the battery level drops
below 3.3 V, the LED ring will start to
ash slowly, whereas when it drops
below 3 V, the LED ring will be ashing
quickly, and the toothbrush will turn off
automatically.
5 Replaceable
heads:
The set includes the SEYSSO Planet
XCleaning brush head. Use only
original SEYSSO heads dedicated to
the toothbrush. Any damage caused
by using non-original heads will not
be covered by the manufacturer’s
warranty.
6 Cleaning
and maintenance
WARNING Disconnect the brush from
the power supply before cleaning. Do
not immerse the charging base in wa-
ter. Rinse the hand grip and the tooth-
brush head with water at a temperature
not exceeding 40º. Wipe the charging
base and hand grip with a soft cloth.
Never use strong cleaning agents.
WARNING: Do not use chemical
cleaners or tools that may damage
the toothbrush. Do not wash the head,
charger or hand grip in a dishwasher.
WARNING: Li-ion batteries must be
charged at room temperature. Too
low (below 0º) or too high (above 45º)
temperature may cause serious safety
problems.
7 Warranty
and servicing
The SEYSSO toothbrush is covered by
a two-year manufacturer’s warran-
ty, which is valid from the date of
purchase. During the warranty period,
the manufacturer undertakes to repair
or replace a defective toothbrush with
a new one if the defect is caused by
a structural aw. The warranty does not
cover damage resulting from improper
use of the device.
8 Quality guarantee
– restrictive clause
The quality guarantee covers only
SEYSSO devices.
Explanation:
Please ll in the warranty card thoroughly
and keep it for possible future use.
The user is entitled to a two-year period
of free service, which starts on the day
of purchase.

www.seysso.com
WM Brands Sp. z o.o.
Ul. Dziupli 12
02-454 Warsaw
The user shall not be entitled to the free
service if:
1. The product is damaged due to
improper use or storage;
2. The product has been dismantled or
repaired by a repair facility other than
that indicated by the manufacturer;
3. The user has no valid proof of purchase
of the product;
4. Product damage is caused by an
unstable voltage in the mains or a
voltage exceeding the specied range;
5. The warranty period for the product
has expired.
SEYSSO Planet NeptunX/MercurX:
100-240 V~, 50/60 Hz; 1,4W;
After-service card
Product
model:
Date
of purchase:
Customer
surname:
Contact info:
Fault description:
Enviromentally
friendly disposal
Package includes:
W zestawie:

www.seysso.com
WM Brands Sp. z o.o.
Ul. Dziupli 12
02-454 Warsaw
The user shall not be entitled to the free
service if:
1. The product is damaged due to
improper use or storage;
2. The product has been dismantled or
repaired by a repair facility other than
that indicated by the manufacturer;
3. The user has no valid proof of purchase
of the product;
4. Product damage is caused by an
unstable voltage in the mains or a
voltage exceeding the specied range;
5. The warranty period for the product
has expired.
SEYSSO Planet NeptunX/MercurX:
100-240 V~, 50/60 Hz; 1,4W;
Package includes:
W zestawie:
Travel case
Etui podróżne
Sonic tootbrush
Szczoteczka
soniczna
XCleaning
brush head
Końcówka
XCleaning
Charger
Ładowarka

10 11
1 Instrukcje
bezpieczeństwa
Warning:
1. Przed podłączeniem do prądu
upewnij się, czy napięcie
w gniazdku elektrycznym
jest zgodne z wymaganiami
urządzenia - 100-240V~,
50-60Hz
2. Nie ładuj szczoteczki
w miejscach, gdzie występuje
wilgoć.
3. Przy odłączaniu ładowarki,
nie ciągnij za przewód.
Nie dotykaj przewodu
mokrą dłonią.
4. Jeśli podczas ładowania,
ładowarka wpadnie do wody,
przed jej wyjęciem odłącz
zasilanie.
5. Nie mocz szczoteczki
w wodzie, o temperaturze
wyższej niż 40º.
6. Nie ładuj, nie używaj, ani nie
zostawiaj urządzenia narażo-
nego na działanie wysokich
temperatur, ani czynników
zewnętrznych.
7. Urządzenie nie jest prze-
znaczone do samodziel-
nego użycia przez dzieci
albo osoby o ograniczonej
sprawności motorycznej,
psychicznej albo poznawczej.
Przechowuj urządzenie poza
ich zasięgiem. Produkt nie
jest zabawką.
8. Dzieci oraz osoby
o ograniczonej sprawności
motorycznej, psychicznej albo
poznawczej mogą używać
szczoteczki tylko pod odpo-
wiednim nadzorem.
9. Nie dociskaj szczoteczki
do zębów lub dziąseł, ani
nie szczotkuj w tym samym
miejscu przez długi czas, po-
nieważ może to doprowadzić
do urazu dziąseł.
10. Obejrzyj dokładnie urządze-
nie przed użyciem. Nie uży-
waj w przypadku widocznych
uszkodzeń.
11. Jeśli przechodziłeś zabieg
chirurgiczny w obrębie jamy
ustnej lub leczenie zębów

10 11
i dziąseł w ciągu ostatnich
dwóch miesięcy, zapytaj
stomatologa, czy korzystanie
ze szczoteczki jest wskazane.
12. Urządzenie może powodo-
wać delikatne krwawienie
dziąseł w pierwszych dniach
stosowania. Jeśli krwawienie
nie ustanie w przeciągu tygo-
dnia lub jest wyjątkowo obte,
skontaktuj się z lekarzem.
13. Osoby z wszczepionym roz-
rusznikiem serca lub innym
urządzeniem elektronicznym,
przed użyciem szczoteczki
powinny skonsultować
z lekarzem.
14. Nie próbuj samodzielnie
naprawiać, modykować
ani demontować części
urządzenia. W przypadku
uszkodzenia skontaktuj się
z centrum obsługi klienta.
15. Zaleca się wymieniać
końcówkę szczoteczki
co 3 miesiące lub częściej,
w zależności od częstotli-
wości użytkowania.
16. Jeśli stosujesz pasty
zawierające substancje
rozjaśniające lub wybielające
np. wodorowęglan sodu lub
inne dwuwęglany, dokładnie
umyj szczoteczkę po każdym
użyciu.
17. Urządzenie przeznaczone
jest do czyszczenia zębów,
dziąseł i języka. Nie używaj
go w żaden inny sposób.
Jeżeli po użyciu szczoteczki
odczuwasz ból albo dyskom-
fort lub masz jakiekolwiek
obawy związane z wpływem
urządzenia na Twoje zdrowie,
skontaktuj się z lekarzem.
Siła elektromotoryczna:
Szczoteczka soniczna
SEYSSO odpowiada wszelkim
standardom eksploatacji
urządzeń elektromagnetycznych.
Jeśli będzie używana
właściwie i zgodnie z niniejszą
instrukcją, nie stanowi żadnego
niebezpieczeństwa dla
użytkownika.

12 13
2 Budowa
szczoteczki
3 Ładowanie
szczoteczki przed
pierwszym użyciem
1. Przed pierwszym ładowaniem
szczoteczka powinna zostać
rozładowana całkowicie. Następnie
należy ładować szczoteczkę
do pełnego naładowania. Pierwsze
ładowanie powinno trwać 32 godziny.
W tym czasie szczoteczkę można
zdejmować z ładowarki na czas
mycia zębów.
2. Pierścień LED na szczoteczce miga
w czterech różnych kolorach podczas
ładowania. Pierścień LED gaśnie
2 minuty po pełnym naładowaniu
szczoteczki.
3. Każde kolejne ładowanie powinno
trwać 32 godziny lub do momentu
aż zgaśnie pierścień LED.
UWAGA: Przed ładowaniem
szczoteczka powinna zostać wyłączona.
Podstawę ładowarki należy umieścić na
płaskiej i stabilnej powierzchni, a otwór
w dolnej części szczoteczki należy
naprowadzić na bolec lokujący podstawy
ładowarki. Szczoteczkę należy postawić
na ładowarce, a wtyk podłączyć
do gniazda zasilania.
UWAGA: Przed rozpoczęciem
ładowania należy sprawdzić, czy
specykacja prądu wyjściowego jest
zgodna z 100-240 V AC 50 Hz/60 Hz
1,4 W. W przeciwnym razie ładowarki
nie należy podłączać do zasilania.
Krok 1: Umieść końcówkę wymienną
na rękojeści szczoteczki.
* Schemat przedstawia poprawny sposób
nakładania końcówki na szczoteczkę
Krok 2: Następnie nałóż odpowiednią
ilość pasty do zębów na włókna szczo-
teczki. Rekomendujemy stosowanie
past dedykowanych dla szczoteczek
sonicznych (Sonic Friendly). Polecamy
pasty SEYSSO, które dzięki ideal-
nemu składowi i konsystencji w pełni
wykorzystują potencjał szczoteczek
sonicznych.
Krok 3: Przed włączeniem szczo-
teczki umieść końcówkę w jamie ust-
nej. Ustaw szczoteczkę przy zębach,
tak aby jej włókna były ustawione pod
kątem 45 stopni do linii dziąseł i włącz
szczoteczkę naciskając przycisk
funkcyjny przez 3 sekundy.
Krok 4: Naciskaj krótko przycisk
funkcyjny podczas pracy szczoteczki,
aby wybrać odpowiedni program mycia
zębów. Każde naciśnięcie przycisku
powoduje przełączenie urządzenia
kolejno pomiędzy czterema programa-
mi oraz zmianę koloru pierścienia LED.
4 Instrukcja używania
szczoteczki
Kapturek
ochronny
na końcówkę
Końcówka
szczoteczki
Rękojeść
szczoteczki
Program
Kolor
pierściena
LED
Symbol na
szczoteczce Funkcja
Clean Żółty CCzyszczenie
zębów
White Niebieski WWybielanie
Polish Czerwony P
Dodatkowe
polerowanie
przednich
zębów
Massage Zielony M
Masaż
dziąseł
i czyszczenie
zębów

12 13
2 Budowa
szczoteczki
3 Ładowanie
szczoteczki przed
pierwszym użyciem
1. Przed pierwszym ładowaniem
szczoteczka powinna zostać
rozładowana całkowicie. Następnie
należy ładować szczoteczkę
do pełnego naładowania. Pierwsze
ładowanie powinno trwać 32 godziny.
W tym czasie szczoteczkę można
zdejmować z ładowarki na czas
mycia zębów.
2. Pierścień LED na szczoteczce miga
w czterech różnych kolorach podczas
ładowania. Pierścień LED gaśnie
2 minuty po pełnym naładowaniu
szczoteczki.
3. Każde kolejne ładowanie powinno
trwać 32 godziny lub do momentu
aż zgaśnie pierścień LED.
UWAGA: Przed ładowaniem
szczoteczka powinna zostać wyłączona.
Podstawę ładowarki należy umieścić na
płaskiej i stabilnej powierzchni, a otwór
w dolnej części szczoteczki należy
naprowadzić na bolec lokujący podstawy
ładowarki. Szczoteczkę należy postawić
na ładowarce, a wtyk podłączyć
do gniazda zasilania.
UWAGA: Przed rozpoczęciem
ładowania należy sprawdzić, czy
specykacja prądu wyjściowego jest
zgodna z 100-240 V AC 50 Hz/60 Hz
1,4 W. W przeciwnym razie ładowarki
nie należy podłączać do zasilania.
Krok 1: Umieść końcówkę wymienną
na rękojeści szczoteczki.
* Schemat przedstawia poprawny sposób
nakładania końcówki na szczoteczkę
Krok 2: Następnie nałóż odpowiednią
ilość pasty do zębów na włókna szczo-
teczki. Rekomendujemy stosowanie
past dedykowanych dla szczoteczek
sonicznych (Sonic Friendly). Polecamy
pasty SEYSSO, które dzięki ideal-
nemu składowi i konsystencji w pełni
wykorzystują potencjał szczoteczek
sonicznych.
Krok 3: Przed włączeniem szczo-
teczki umieść końcówkę w jamie ust-
nej. Ustaw szczoteczkę przy zębach,
tak aby jej włókna były ustawione pod
kątem 45 stopni do linii dziąseł i włącz
szczoteczkę naciskając przycisk
funkcyjny przez 3 sekundy.
Krok 4: Naciskaj krótko przycisk
funkcyjny podczas pracy szczoteczki,
aby wybrać odpowiedni program mycia
zębów. Każde naciśnięcie przycisku
powoduje przełączenie urządzenia
kolejno pomiędzy czterema programa-
mi oraz zmianę koloru pierścienia LED.
4 Instrukcja używania
szczoteczki
Program
Kolor
pierściena
LED
Symbol na
szczoteczce Funkcja
Clean Żółty CCzyszczenie
zębów
White Niebieski WWybielanie
Polish Czerwony P
Dodatkowe
polerowanie
przednich
zębów
Massage Zielony M
Masaż
dziąseł
i czyszczenie
zębów
14 15
Krok 5: Powoli przesuwaj szczoteczkę
wzdłuż linii dziąseł, nie przyciskając
jej za mocno do zębów. Szczoteczka
posiada wbudowany automatyczny,
2-minutowy timer, który pomaga
w przestrzeganiu zalecanego przez
stomatologów czasu mycia zębów.
Dzięki 30-sekundowym interwałom,
sygnalizowanym przez chwilowe
wstrzymanie pracy szczoteczki,
możesz równomiernie podzielić czas
mycia zębów na wszystkie ćwiartki
uzębienia.
Krok 6: Urządzenie wyłączy się
automatycznie po upływie 2 minut.
Aby wyłączyć szczoteczkę podczas
jej pracy, przytrzymaj przycisk przez
3 sekundy.
Krok 7: Po umyciu zębów zdejmij
końcówkę z rękojeści szczoteczki,
przepłucz wodą i osusz przed
przechowywaniem. Pamiętaj, aby
zdejmować końcówkę po każdym
użyciu szczoteczki. Gdy akumulator
szczoteczki ulegnie wyczerpaniu,
umieść szczoteczkę na podstawie
ładowarki i ładuj zgodnie ze
wskazówkami opisanymi powyżej.
Krok 8 : Gdy poziom naładowania
akumulatora spadnie poniżej 3, 3 V,
pierścień LED zacznie wolno migać.
Natomiast kiedy spadnie poniżej 3 V,
pierścień LED zacznie migać szybko
i szczoteczka automatycznie się
wyłączy.
5 Końcówki wymienne:
W zestawie znajduje się końcówka
SEYSSO Planet XCleaning. Używaj
tylko oryginalnych końcówek SEYSSO
dedykowanych dla tej szczoteczki.
Ewentualne uszkodzenia spowodowane
użyciem nieoryginalnych końcówek nie
zostaną objęte gwarancją producenta.
6 Czyszczenie
i konserwacja
OSTRZEŻENIE: Odłącz szczoteczkę
od źródła zasilania przed rozpoczęciem
czyszczenia. Nie zanurzaj podstawy
ładowarki w wodzie. Przepłucz rękojeść
i końcówkę szczoteczki wodą o tempe-
raturze nie wyższej niż 40º. Wytrzyj
miękką ściereczką podstawę ładującą
i rękojeść szczoteczki. Nigdy nie stosuj
silnych środków czyszczących.
OSTRZEŻENIE: Do czyszczenia
szczoteczki nie stosuj chemicznych
środków czyszczących, ani narzędzi,
które mogą ją uszkodzić. Końcówki,
ładowarki ani rękojeści szczoteczki
nie należy myć w zmywarce.
OSTRZEŻENIE: Akumulatory litowo-jo-
nowe muszą być ładowane w tempe-
raturze pokojowej. Zbyt niska (poniżej
0º) lub zbyt wysoka (powyżej 45º) tem-
peratura może spowodować poważne
problemy z bezpieczeństwem.
7 Gwarancja i serwis
Szczoteczka SEYSSO objęta jest
dwuletnią gwarancją producenta obo-
wiązującą od daty zakupu. W okresie
objętym gwarancją, producent zobo-
wiązuje się do naprawy lub wymiany
na nową wadliwej szczoteczki, jeśli
wada została spowodowana defektem
konstrukcyjnym. Gwarancja nie obej-
muje uszkodzeń wynikających
z niewłaściwego użytkowania
urządzenia.
8 Gwarancja jakości
– klauzula ograniczająca
Gwarancja jakości obejmuje wyłącznie
urządzenia marki SEYSSO.
Wyjaśnienie:
Prosimy o dokładne wypełnienie
karty gwarancyjnej i zachowanie
jej do ewentualnego wykorzystania
w przyszłości. Użytkownikowi przysługuje
dwuletni okres darmowego serwisu licząc
od dnia zakupu.

www.seysso.pl
WM Brands Sp. z o.o.
Ul. Dziupli 12
02-454 Warszawa
Karta poserwisowa:
Darmowy serwis nie przysługuje
użytkownikowi, jeśli:
1. Produkt został uszkodzony z powodu
niewłaściwego sposobu użytkowania
lub przechowywania;
2. Produkt został rozmontowany lub był
naprawiany przez punkt naprawy inny
niż wskazany przez producenta;
3. Użytkownik nie posiada ważnego
dowodu zakupu produktu;
4. Uszkodzenia produktu spowodowane
są niestabilnym poziomem napięcia
w sieci albo napięciem przekraczającym
określony zakres;
5. Okres gwarancji produktu minął.
SEYSSO Planet NeptunX/MercurX:
100-240V~, 50/60 Hz; 1,4W;
Model:
Data zakupu:
Nazwisko
klienta:
Kontakt:
Opis uszkodzenia:
Utylizacja bezpieczna
dla środowiska
This manual suits for next models
1
Table of contents
Languages:
Other SEYSSO Electric Toothbrush manuals


