SG SG1 Assembly instructions
USER’S MANUAL GUIDE
SG1SG1

1
Specification
Operation
Plastic smell might appear temporary in water at first use.
Turn faucet to hot water side until temperature display shows.
To adjust temperature, simply rotate power selector : 0=cold, 4=hottest
Simply turn off faucet or turn to cold water to disconnect power.
Note :
Temperature display represents power indicator; illuminating = power on.
Power auto cuts off at 75°C, restart heating when temp. lowers down to 40°C.
Power:2.2kW
Current:10A
Power:4.4kW
Current:20A
Power:6.6kW
Current:30A
Power:8.8kW
Current:40A
Power:9.9kW
Current:45A
SG 1- 22 SG 1- 44 S G1 -6 6 S G1 -8 8 SG 1- 99
Vol t a g e / Fr e q u en c y :2 2 0 V/ 6 0 Hz
Dis t a n c e b et w e en i n l et & o u t l et : 1 3. 5 c m
Wo r k i n g wa t e r pr e s su r e :0.39~6.37bar
Inl e t & o u t l et c o n ne c t io n : P F- 1 / 2” x 1 4T P I
Dim e n s i o ns ( L xW x H ):
29 . 4 x 2 4 .0 x 11 .8 c m
We i g h t :2 . 5 kg
Tem p e r a t ur e : 36~75°C
Accessories:sho w e r h e a d, h o s e, s h o we r h e ad h o l de r a n d br a c ke t
Opt i o n a l in t e r na l l e ak a g e ci r c ui t b r ea k e r
SU P E R G U I D ER
Hot water outlet
temperature display
Power
selector

Replace with new water heater every 5 years for best performance.
Clean shower head regularly to prevent clogs as well as for hygienic.
Regularly test the leakage circuit breaker by turning on power and press
“test” button; the breaker works fine if it auto switches to OFF.
Remember to switch back to ON afterwards for hot water.
Turn off isolating switch before cleaning and maintaining so as to isolate
electricity and water supply.
The use of abrasive or solvent cleaning fluids is prohibited and it is recommended
that the water heater and accessories are cleaned using a soft cloth.
All electrical installation should be carried out by a qualified person.
Isolate electricity and water supply before proceeding with the installation.
Water purification before installation could extend the life span of water heater.
The water heater is not suitable for installation in places subject to frosty or
freezable conditions. However, do not switch on if there is a possibility that
the water in the heater is frozen.
In the case of cord damage, new cord must be acquired from the manufacturer
or your distributor.
The water heater is not to be used by children or people with reduced physical,
sensory or mental capabilities, or lack of experience and knowledge, unless
they have been given supervision or instruction.
2
Advice
Reminder
Should there be any problems after installation, please switch off the power,
contact the distributor you purchased from or contact any qualified person.
Meanwhile, do not undo the unit by unqualified person.

3
Install the unit on the wall in an upright position; avoid lying down or upside
down. (See Unit Installation Steps on Page 4)
Link the shower head and the water heater with the hose provided.
There are 2 installation methods: single point usage and multipoint usage.
(Refer to Diagrammatic Views on Page 6,7) Note: former option can lower
the possibility of malfunction and extend the life span of unit.
Install No Fuse Breaker (20A/30A/40A/50A) in accordance with amperage
required for the model to prevent electrical overloads.
Install cold water valve and a swing check valve in the supply pipe work to
prevent back flow.
Installation
To comply with Electrical Regulation, it is highly recommended to install Super
Guider’s leakage circuit breaker in switchboard or next to water heater.
Turn on electric supply at the isolating switch.
Power cord entry points are on the top and on the side of the base brim of water
heater unit, which needs to be cut off to extend out the cord.
For first time use after installation, please allow water to flow into water heater
so that the water heater contains water before electricity is connected, at the
same time, it can help to clean impurities from pipe line.
“E”,neutral cord to terminal “N”, live cord to terminal to “L”.
NOTE: the water heater must be earthed.
Route the cords (4mm²/6mm²/10mm² standard cords according to model for
safety purposes) into water heater and connect the earth cord to terminal

4
Installation
Screw the bolts provided into the holes on the wall.
Attach the bracket to the bolts with screws supplied.
Hook up the water heater and nail on the fixing hole.
Unit Installation Steps
Make sure it is flat on the wall surface that you
want to install the water heater on. Install it using
the install sticker and screws provided. Space
for each side of the sticker must be at least 25cm.
Drill the wall for indicated holes. Be cautious when
using power tools near water.
Ma k e sur e no ca bl es or p ipe s hi dde n in th e wa ll.
Fi x i n g h o l e
5
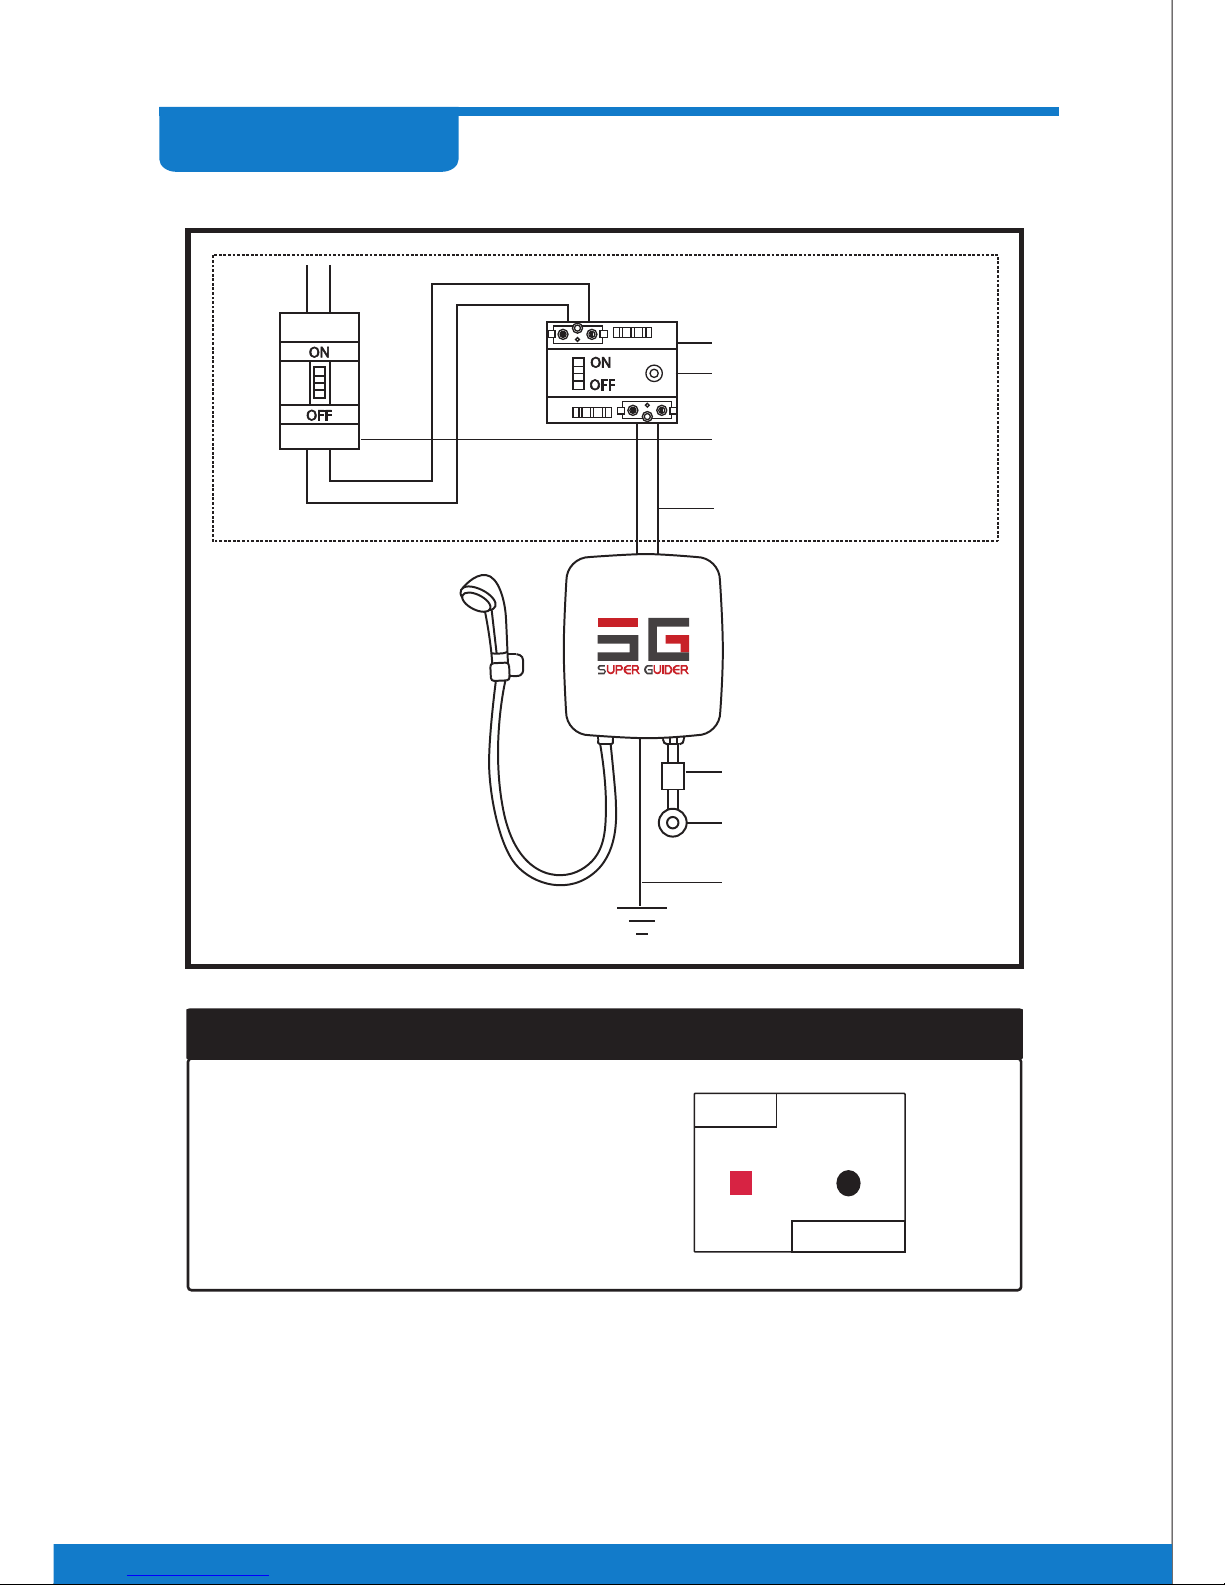
Diagram
Leakage circuit breaker
Test button
Electric supply cable
Swing check valve
Main water supply valve
Green earth cable
Separate isolating
electric supply switch
Test button
Load
Power
OF F
ON
Install location :
Inside switch box
1
Inside water heater
(LB models only)
2
Next to water heater
3
SUPER GUIDER Leakage Circuit Breaker

6
Advice
Diagrammatic View
Hot
water
outlet
Cold water inlet
Cold water valve
Outlet & inlet
distance:13.5cm
Located in mains
electric supply or
outside bathroom
Swing check valve
Single-point Usage
Leakage circuit
breaker & separate
isolating electric
supply switch
Electric supply cable
(hidden cable)

7
Diagrammatic View
Cold water valve
Electric supply cable
(hidden cable)
Cold water
hidden pipe
Swing check valve
Outlet & inlet
distance : 13.5cm Located in mains
electric supply or
outside bathroom
Leakage circuit
breaker & separate
isolating electric
supply switch
Hot
water
valve
Cold
water
valve
Cold
water
Hot water
hidden pipe
Hot
water
Fa u cet
Multipoint Usage
Outlet Inlet
8
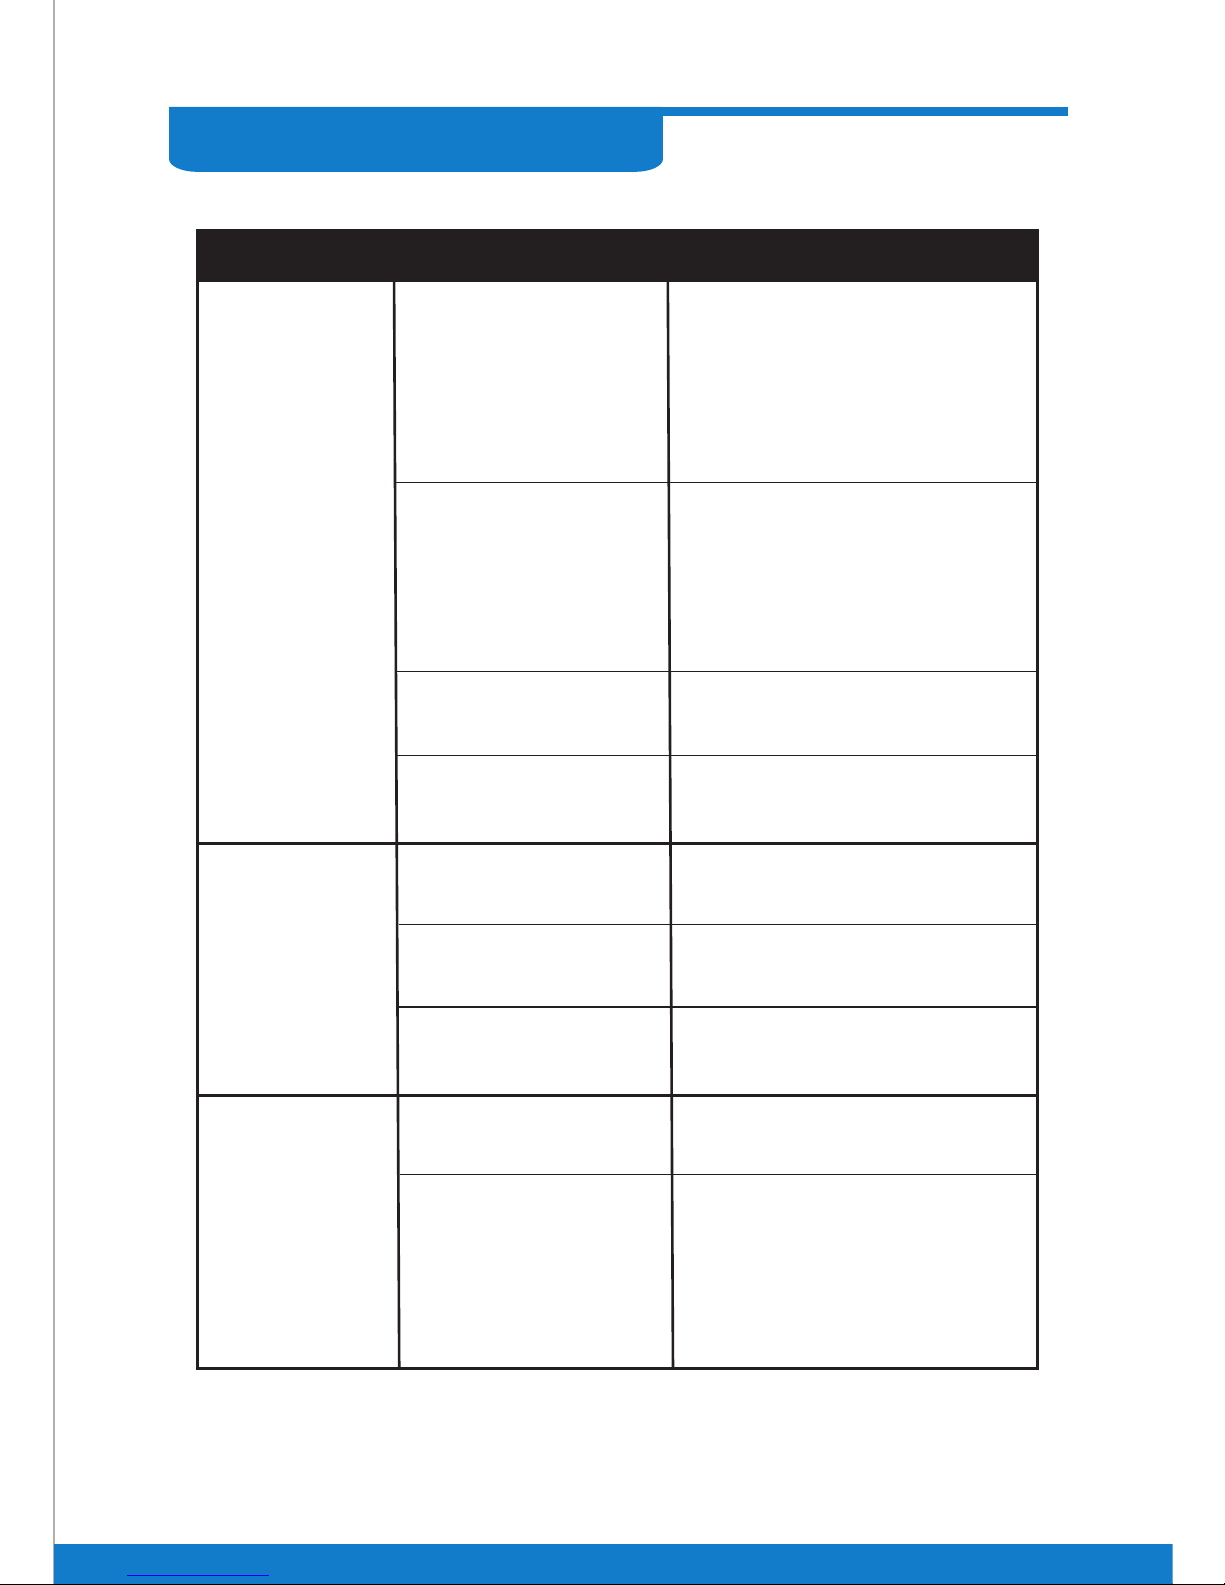
Problem Solving
Problem Cause Cure
Power
indicator
does not
illuminate
upon
switching on
of the faucet
Interrupted power supply
Water pressure below
minimum required
or
Insufficient water
flowing through heater
Blockage in water supply
Blocked showerhead
No hot water
upon
turning on
of the faucet
or
during halfway
of shower
No power supply Reset power switch
Blocked showerhead
No water supply
Power
indicator
still on upon
turning off
of the faucet
Water leaks between inlet
copper and water heater
Check if the electric supply switch
and leakage circuit breaker are
sufficient for amperage required
Yes
amperage required
Replace the switch for the
-
Switch off and reset it
-
No
Clean the filter
Clean or replace blocked spray
plate in showerhead
3. Fully open water supply valve
2. Make water storage cistern at
least 3m above heater
1. Fit a pump
Clean or replace blocked spray
plate in showerhead
Check if the water supply valve
is fully opened
Replace a new washer
Water leaks inside heater
or inside hidden pipe
or
Unit malfunction
- Turn off water supply
- Examine by professionals
- Ring customer service
- Switch off isolating power supply
switch immediately

2012.02
Pictures and descriptions in this manual are for reference only. Super Guider has the right to make any change without notice.
Table of contents
Popular Water Heater manuals by other brands

Amtrol
Amtrol WELL-X-TROL WX Series Replacement instructions

Kenmore
Kenmore 153.332362 owner's manual

Quooker
Quooker Combi+ installation guide

A.O. Smith
A.O. Smith 500 User's information manual

Eccotemp
Eccotemp EM-2.5 Installation and operating instruction manual

State Water Heaters
State Water Heaters SBD71120 Service handbook


Philips
Philips AWH1110 user manual

Giant Factories
Giant Factories InnoFlue Centrotherm Owner's manual installation and operating instructions

Rinnai
Rinnai REU-VR2626W Series Service manual

Spheros
Spheros DBW 300 installation instructions

NRG
NRG Eco Series Installation and operation manual

ITR
ITR WindowWasher Installation and operating manual