Sharp 56FW-53H User manual

56FW-53H
COLOUR TELEVISION
OPERATION MANUAL
Printed on recycled paper

4.
5.
6.
7.
8.
12.
15. 34.
35.
36.
37.
31.
32.
33.
19.
21.
23.
27.
28.
29.
30.
25.
24.
26.
22.
20.
16.
17.
18.
13.
14.
9.
10.
11.
1.
2.
3.

TERMS OF GUARANTEE
Subject to the conditions listed below Sharp Electronics (U.K.) Ltd. (Hereinafter called
«the Company») guarantee to provide for the repair of, or at its option replace the Sharp
Equipment, or any component thereof, (other than Batteries), which is faulty or below
standard, as a result of inferior workmanship or materials.
The conditions of the guarantee are:
1. This guarantee shall only apply to defects or faults which are notified to the Company,
or its approved Service Facility within one year from the date of purchase of the
equipment.
2. This guarantee covers equipment intended for private domestic use only. This
guarantee does not apply to equipment used in the course of a business, trade or
profession.
3. This guarantee does not cover any faults or defects caused by accident, misuse, fair
wear and tear, neglect, tampering with the equipment, or any attempted at adjustment
or repair other than by an approved Service Facility.
4. In the unlikely event of your equipment requiring repair, please contact the Dealer or
Supplier from whom it was purchased.
5. The cost of carriage to and from the Dealer, Supplier or Sharp approved Service
Facility shall be borne by the purchaser.
6. No person has any authority to vary the terms or conditions of this guarantee.
7. This guarantee is offered as an additional benefit to the consumer’s statutory rights
and does not affect rights in any way.
1
In the unlikely event of this equipment requiring repair during the guarantee period, you will need to
provide proof of date of purchase to the repairing company.
Please keep your invoice or receipt, which is supplied at the time of purchase.

2
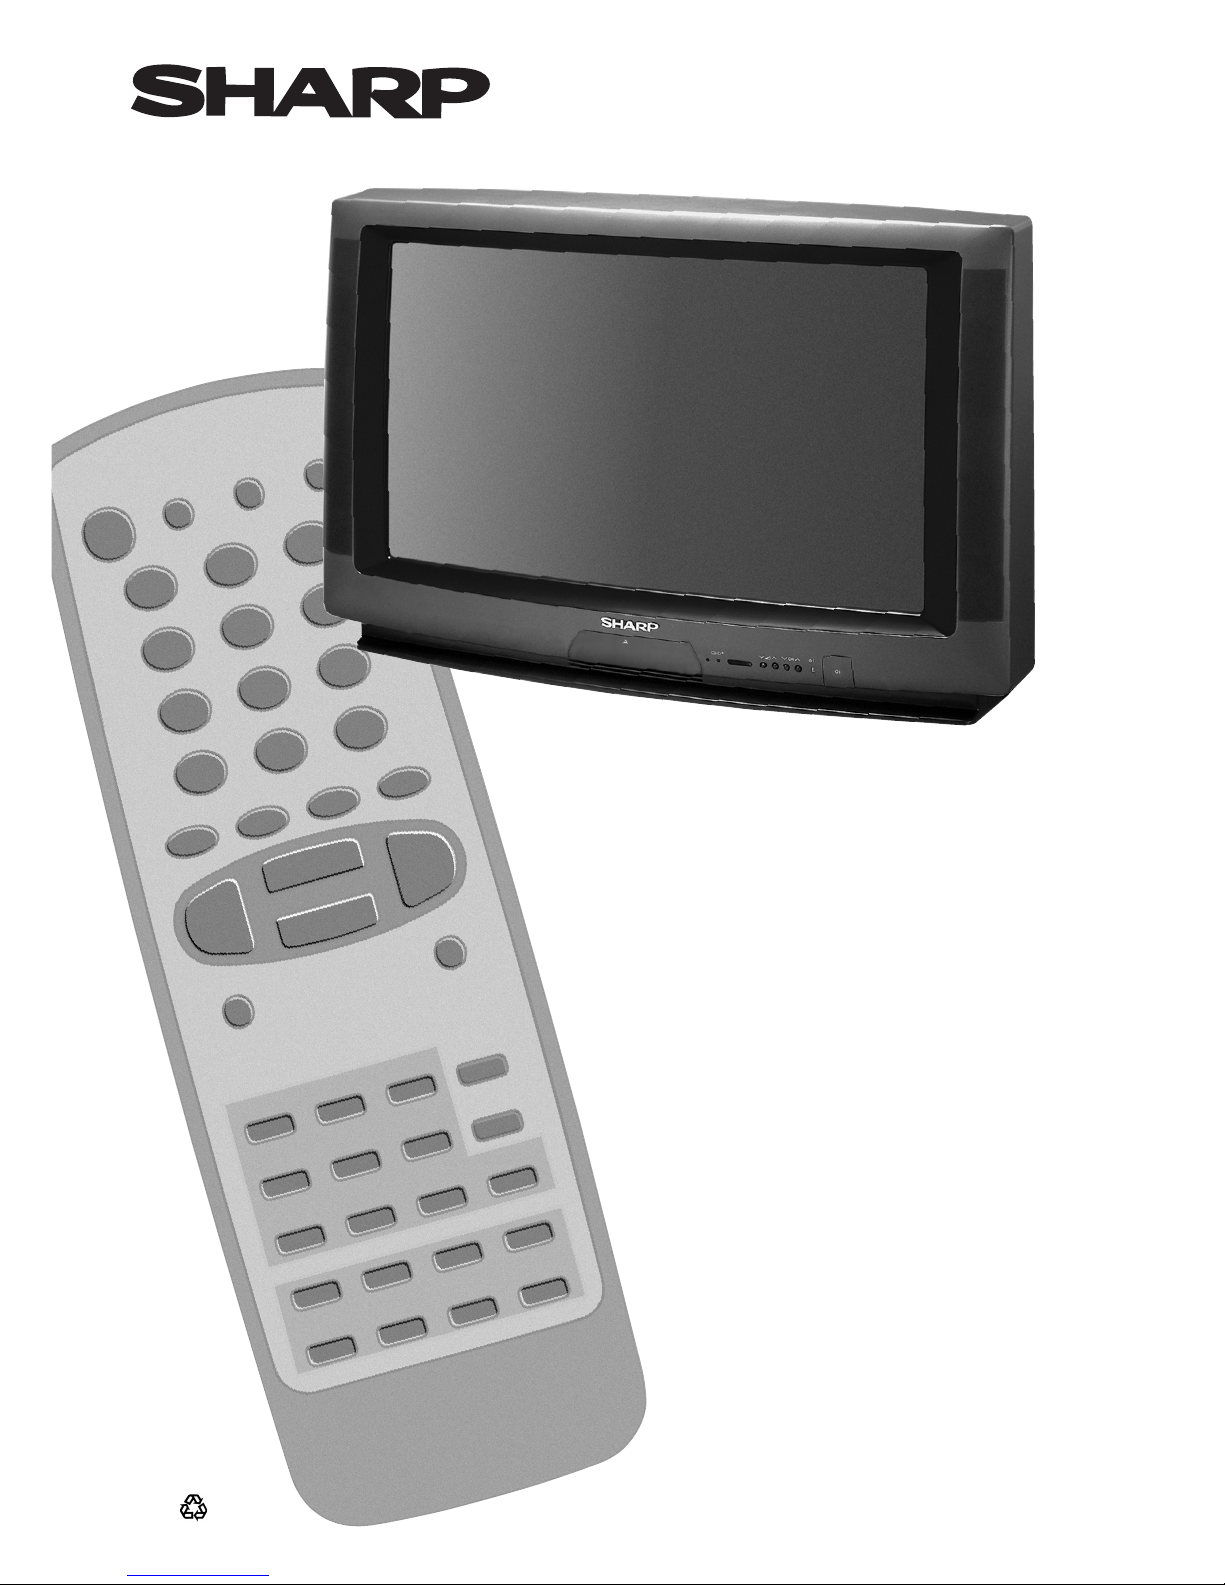
“SHARP” consumer electronic products have established a world-wide reputation for unsurpassed quality and precision
manufacturing techniques since 1924, when the famous SHARP trademark first appeared on a radio receiver.
Your new SHARP Colour TV uses the very latest electronic circuitry and engineering advances for the best possible
performance.
Given proper care, your new TV will provide many years of entertainment for the entire family. Please read the following
instructions before operating this set.
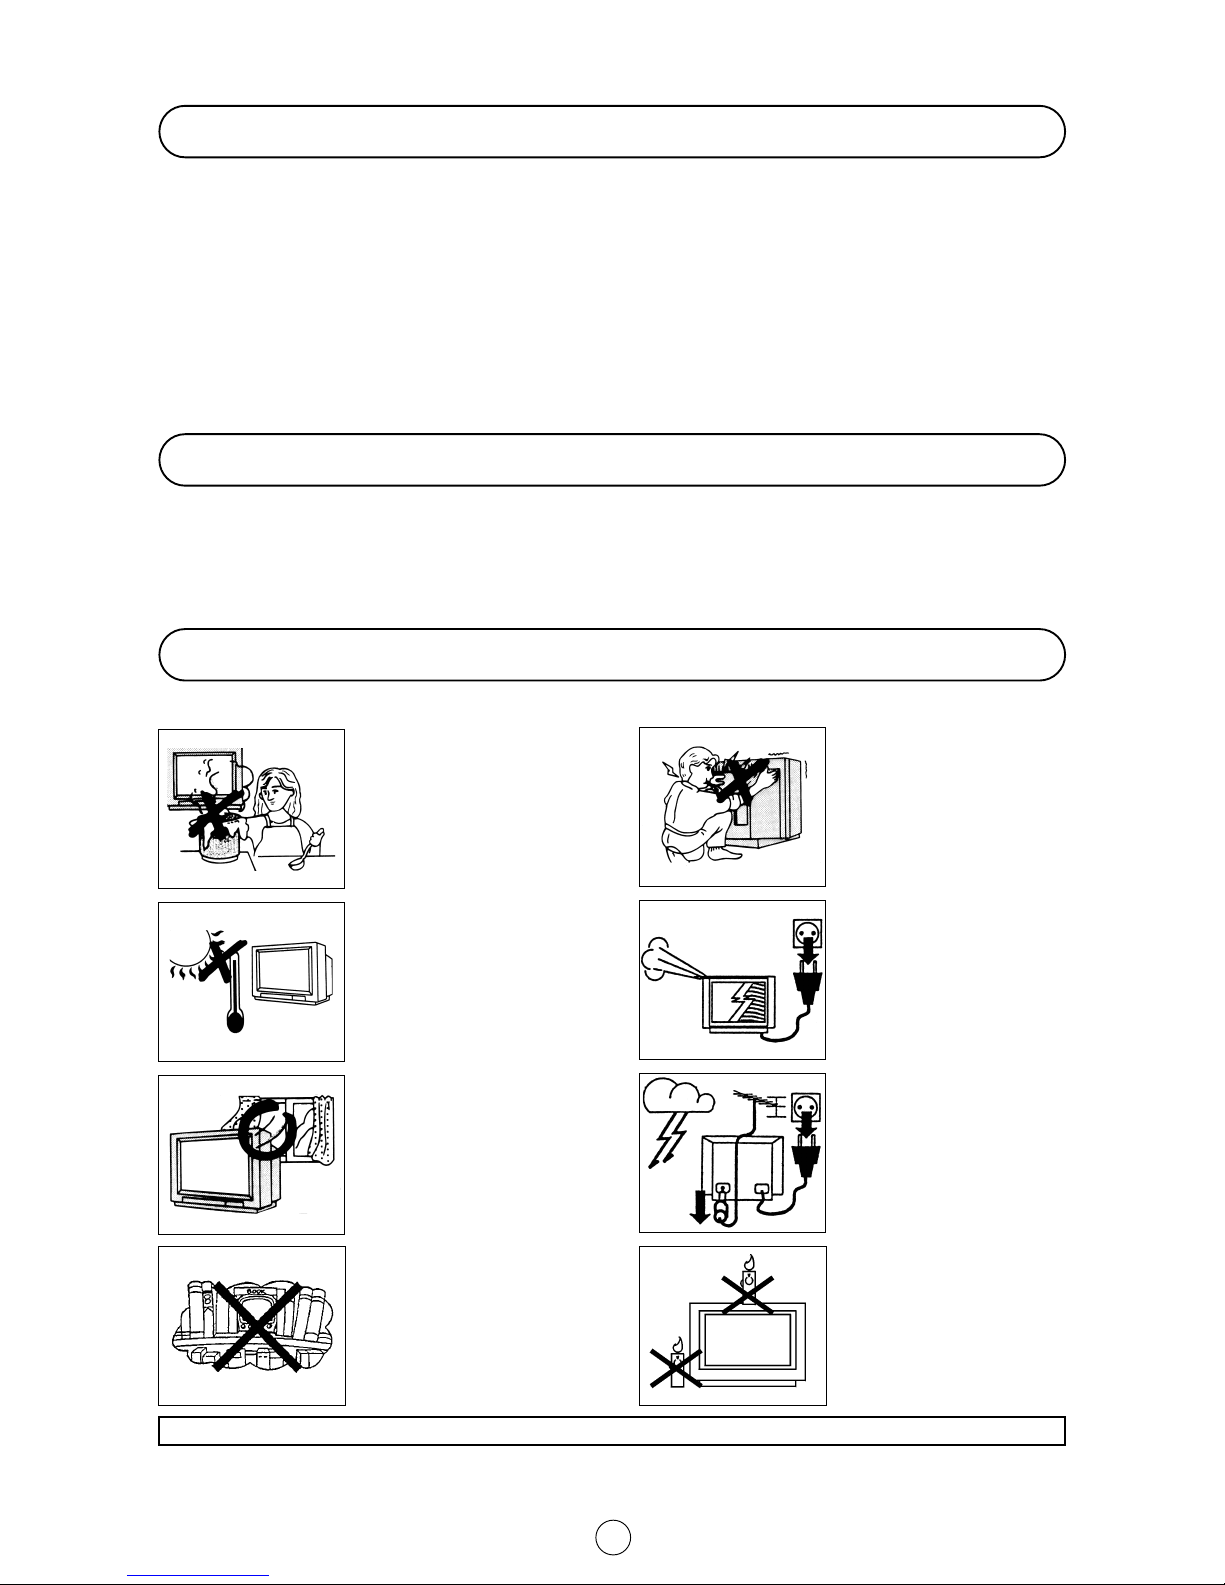
CAUTION: Make sure that the main power is switched off when going out.
Dear SHARP Customer
Contents
Safety Precaution
Terms of guarantee ........................................................ 1
Safety precaution ........................................................... 2
Feature List ..................................................................... 3
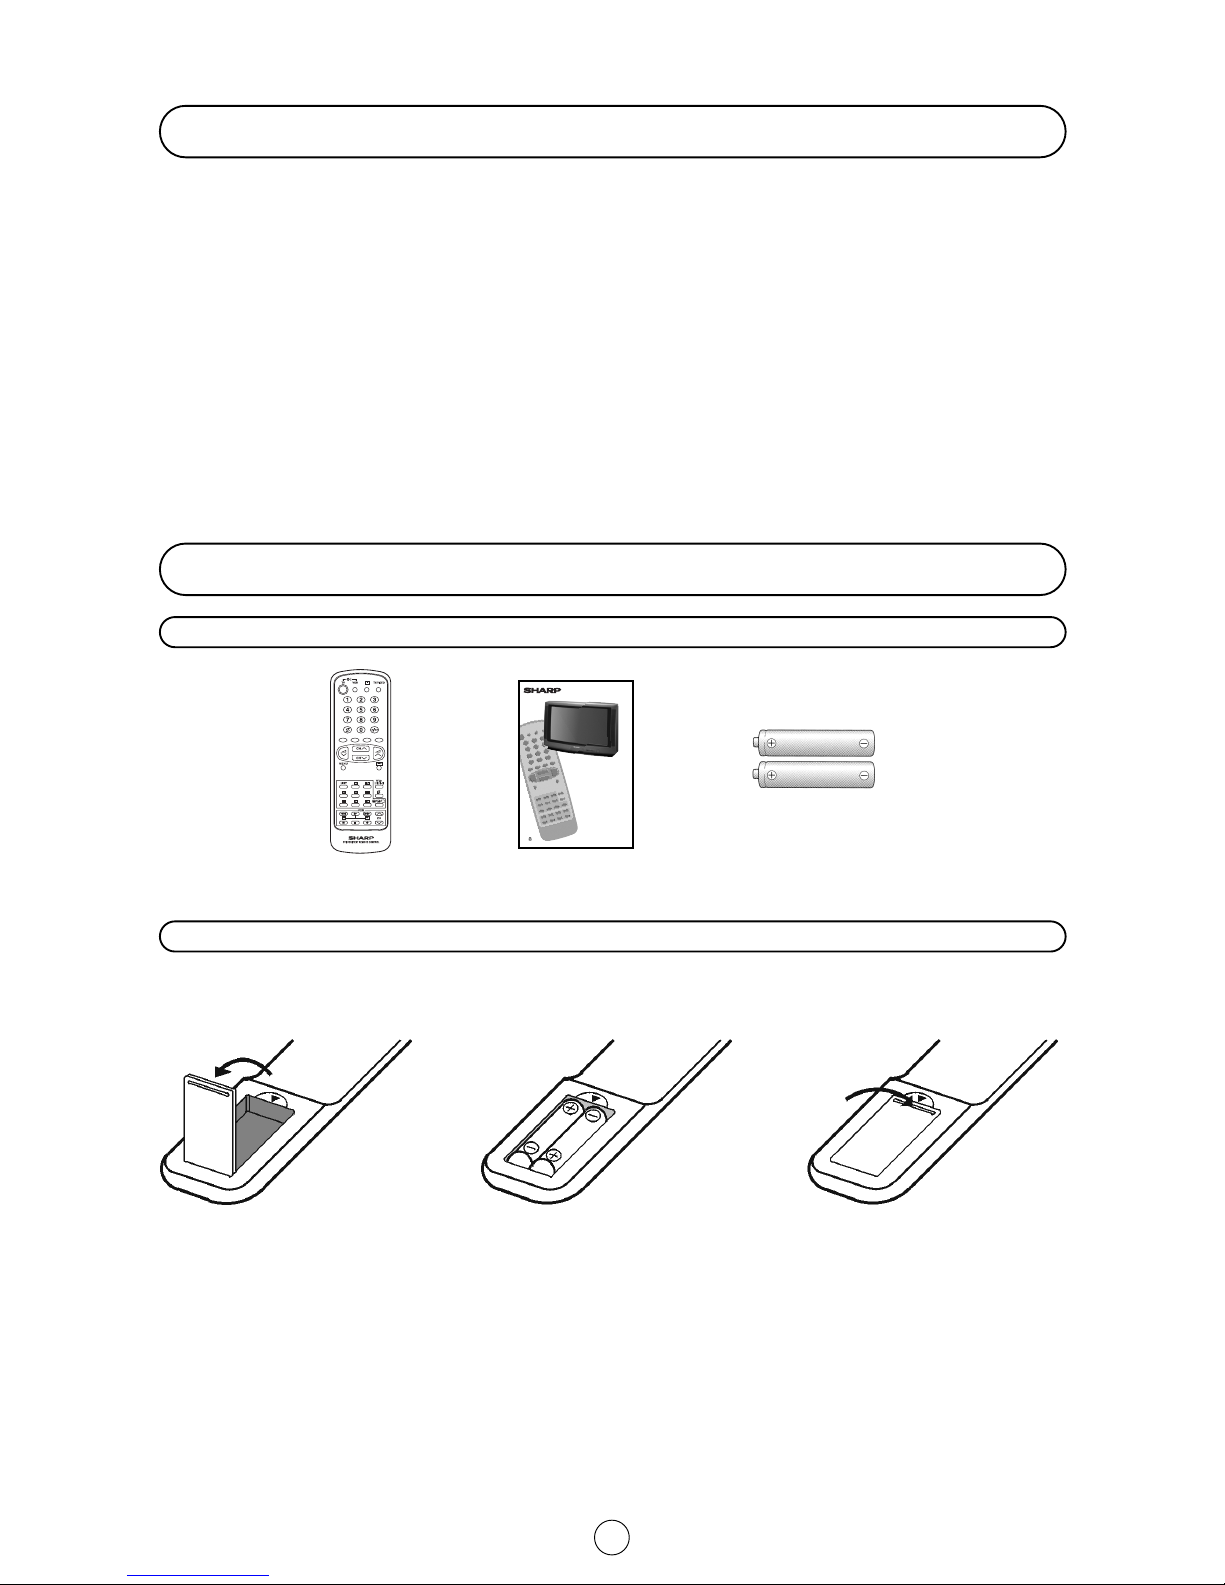
Accessories .................................................................... 3
Remote Control Battery Installation .............................. 3
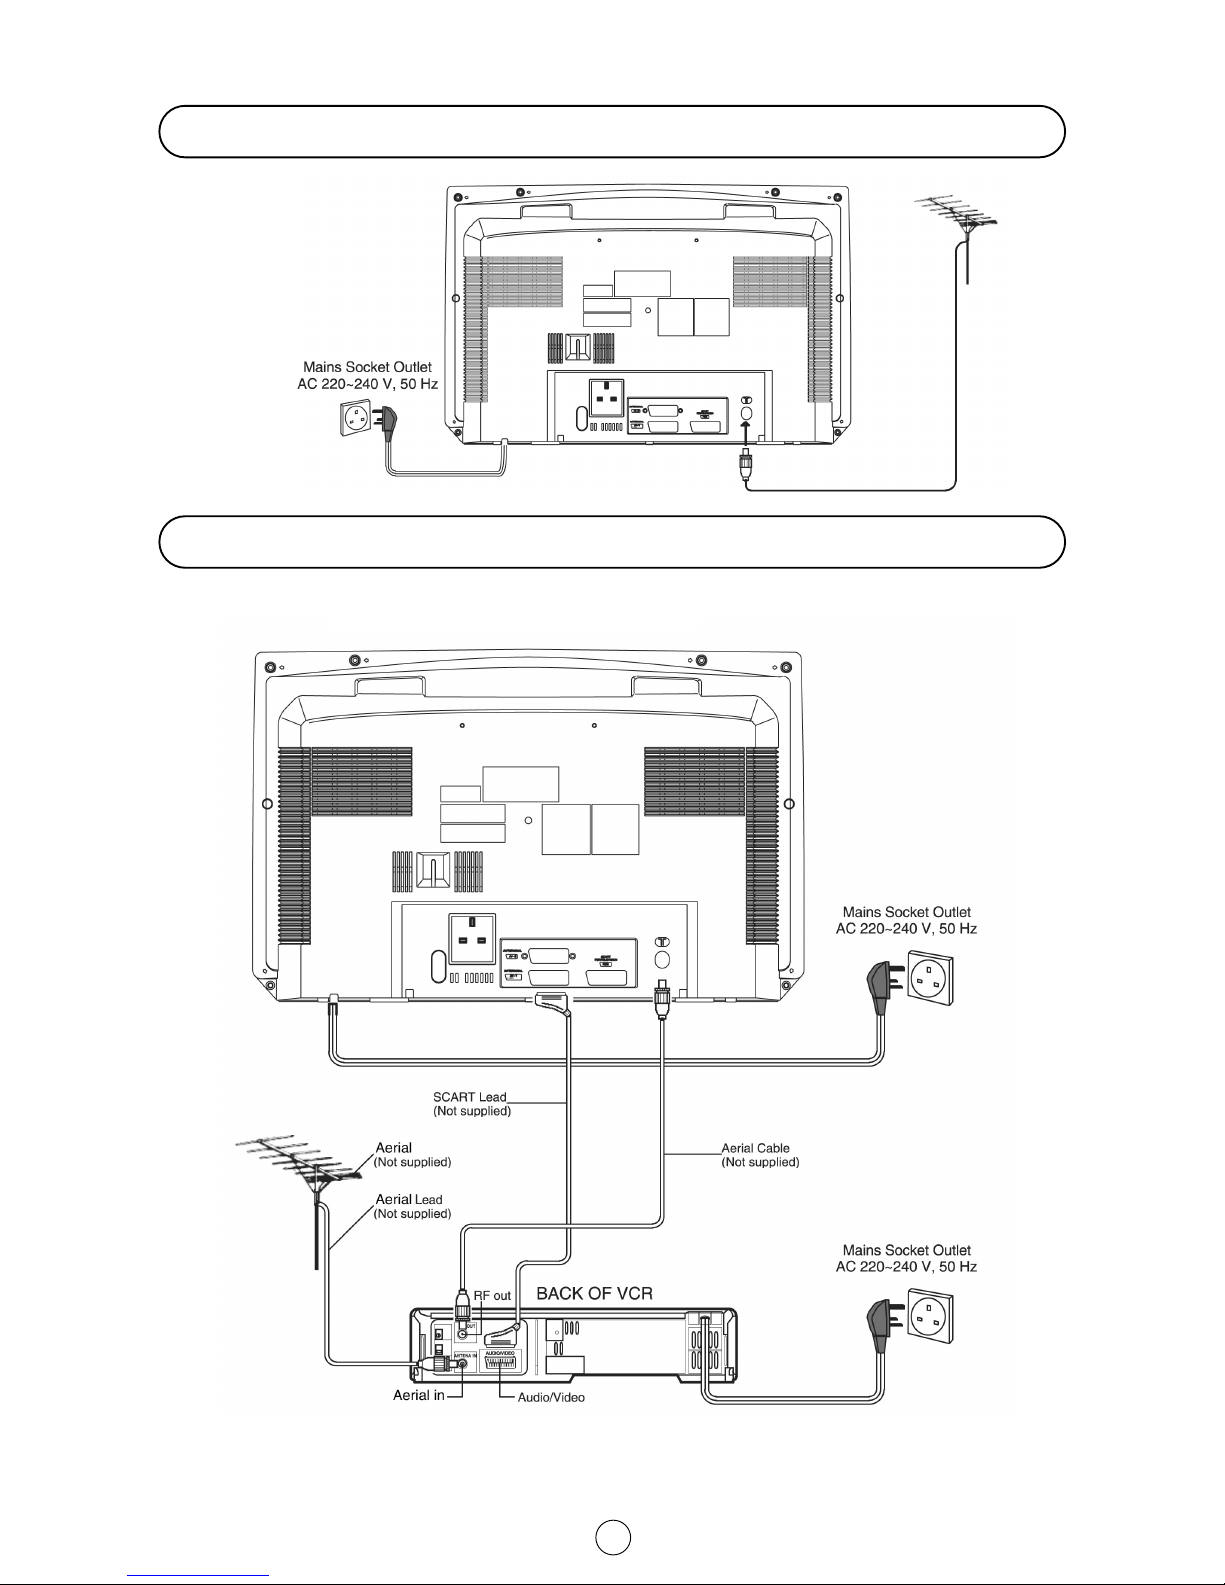
Antenna Connections (Installation) ................................ 4
Controls & Terminals ...................................................... 6
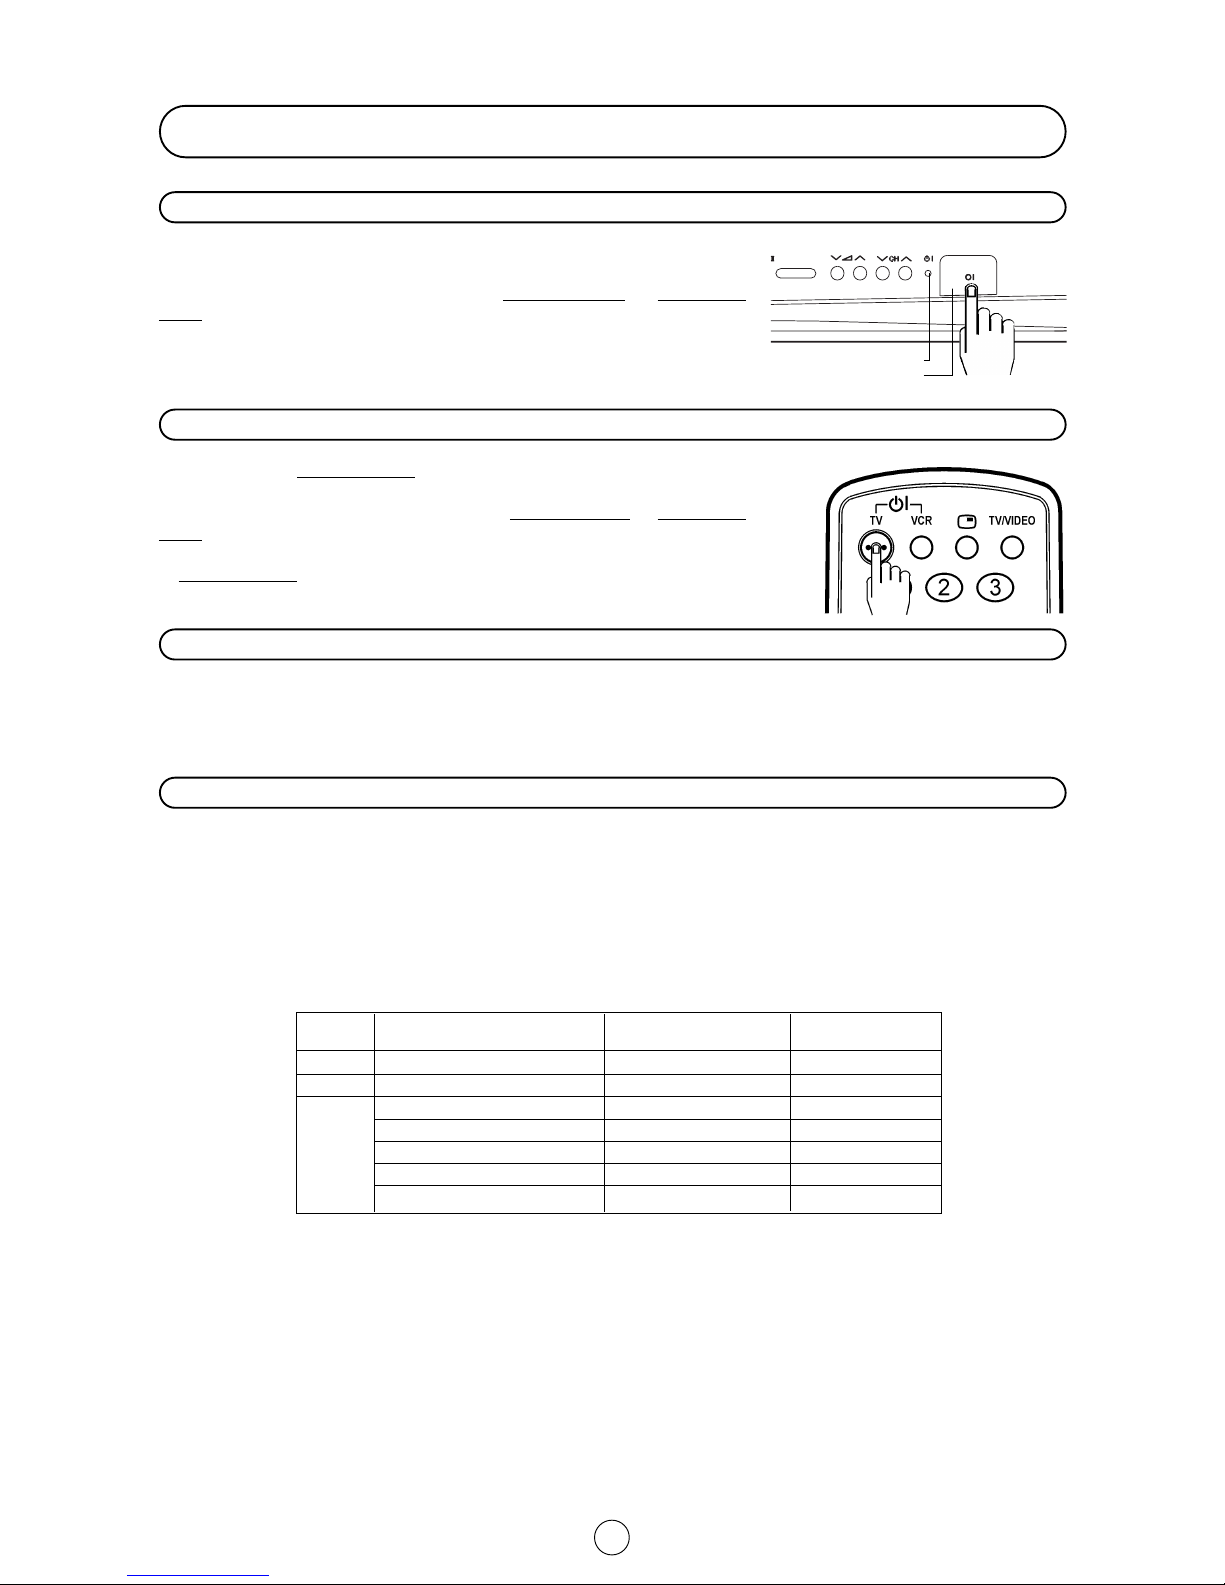
Switching on ................................................................... 7
Auto Installation .............................................................. 8
TV operation - Channel selection - .............................. 10
Picture Adjustments ..................................................... 11
Wide Mode ................................................................... 13
Audio Adjustments ....................................................... 15
On Timer and Off Timer ................................................ 19
Help, Demo and Post Code ......................................... 20
Child Lock (Chanel Block) ............................................ 21
Menu Structures ........................................................... 23
Teletext Mode ............................................................... 24
TV Channel Setting (Advanced) ....................................28
TV/VIDEO Selector ....................................................... 32
Headphone Jack .......................................................... 33
Sub-titles ...................................................................... 33
VCR mode ..................................................................... 34
21-pin Euro-SCART and 21-pin Audio/Video .............. 35
Typical connections ...................................................... 36
Troubleshooting ............................................................ 38
General Specifications for Television Receiver ........... 39
To prevent fire or electrical
shock, do not use the TV set
in an excessively damp place.
Position the TV set out of
direct sunlight and away from
heat, as high temperatures
can damage the cabinet, CRT,
or other electronic parts.
Do not cover the ventilation
holes at the back of the TV
set, this can cause fire or
other serious problems. Leave
an adequate open space
behind the TV set for good
ventilation.
Always disconnect your tele-
vision from the mains and the
aerial cable during thunder-
storms.
Even if your television is
switched off, it can still be
damaged by lightning striking
the mains and/or aerial cable.
Never remove the back of the
cabinet, as there is high volt-
age in the TV set.
Please call for service.
Unplug the power cord from
the wall outlet immediately if
the TV set begins to make
unusual noises or give off
smoke or an odd smell, then
call your dealer for service.
Do not install this equipment
in a confined space such as a
bookcase or a built-in cabinet.
To prevent fire, never place
any type of candle or naked
flames on the top or near the
TV set.
This equipment complies with the requirements of Directives 89/336/EEC and 73/23/EEC as amended by 93/68/EEC.

3
NOTE: •Remove batteries if weak or if the unit is not in use for long periods.
•Do not mix old and new batteries.
•Incorrect installation of the batteries may damage the remote control.
Quick reference Guide
Accessories
Remote Control Battery Installation
Before using the TV set for the first time, install the supplied dry batteries in the remote control.
Remote control Operation Manual Type-AA Dry Batteries
With your thumb nail, pull up the
slit as indicated by the arrow to
remove the battery cover.
Insert two batteries 1.5 V (Size «AA»).
Be sure to match the battery A/D
terminals with the A/Dmarks inside
the compartment.
Replace the battery cover.
•Digital Comb Filter
•Auto Installation System
•ACSS function (Auto Channel Sorting System)
•99 Channel Programming System
•Cable and Hyperband
•Teletext
•OSD System (On Screen Display)
•Tint Control
•NTSC Hue Control
•ECO mode
•Wide Mode Function
•Digital Stereo NICAM
•AVC (Automatic Volume Correction)
•AV/SCART Volume
•Graphic Equalizer
•ON-OFF Timer
•Interactive Help
•Child Lock System
•21 pin Euro SCART Connector (RGB)
•21 pin Audio/Video Connector (AV-1) With S-Video Input
•21 pin Audio/Video Connector (AV-2)
•Front Audio/Video Input Terminal
•NTSC playback AV Input
•Front S-Video Input Terminal
•Headphone Terminal
•Blue Back Noise Mute Function
Feature list
56FW-53H
COLOUR TELEVISION
OPERATION MANUAL
Printedon recycled paper
If you require any advice or assistance
regardingyour Sharp product please visit
our web-site www.sharp.co.uk/support.
Customers without Internet access may
telephone 0990 274277 during office
hour.
Please read this operation manual carefully
before using the colour television.

4
Aerial connections - TV set only -
Aerial connections - VCR and TV -
Note: See on -Typical connections- (page 38) for details of further connection possibilities.
BACK OF TV

5
TV 1. Stand-by ON/OFF switch (TV)
Video 2. Power ON / OFF switch (VCR)
TV 3. Digit buttons 0 ~ 9
4. Flashback button
Teletext 5. Colour button (green)
6. Colour button (red)
TV 7. Volume DOWN/Cursor control LEFT
8. Menu button
Teletext 9. Reveal button
10. List selector
11. Store button
12. Cancel button
13. Half page button
14. Cursor button
Video 15. Rewind/picture search/reverse
16. Play button
17. Pause / Still button
18. Stop button
TV 19. TV / VIDEO selector
20. Call button
21. Single/Double entry
Teletext 22. Colour button (yellow)
23. Colour button (cyan)
TV 24. Channel UP/Cursor control UP
25. Volume UP/Cursor control RIGHT
26. Channel DOWN/Cursor control DOWN
27. Wide Mode selector
TV /Teletext 28. Time button
TV 29. Sound mode selector
Teletext 30. Hold button
TV 31. Sound Mute button
Teletext 32. Text/Mix/Picture button
33. Index button
Video 34. Channel Up selector
35. Fast forward/picture search/forward
36. Channel Down selector
37. Record button
Remote control
See together with the pull-down page of the cover.

6
L/S/G/I R/D/D/D
AUDIO
S-VIDEO VIDEO
910 11 12 13
Controls & Terminals
FRONT TV
1. Main Power On/Off Switch
2. Power Indicator
3. Program Selector (UP/DOWN)
4. Volume Buttons (UP/DOWN)
5. Remote Control Sensor
6. Sound Indicator
7. Remote Control Indicator
8. Door
HOW TO OPEN THE DOOR
Press the top of the door, opening it slightly
hook your finger inside and pull open.
Behind the door
9. Headphone Socket (3.5 mm ø/ 16~600 B)
10. S-Video input terminal
11. Video Input Terminal (PAL/SECAM/NTSC)
12. Audio Input Terminal (left)
13. Audio Input Terminal (right)
REAR TV
21-pin In/Out
1. 21-pin Audio/Video (AV-2)
With PAL/SECAM/NTSC Video Input
2. 21-pin Audio/Video (AV-1)
With PAL/SECAM/NTSC/S-Video Input
3. 21-pin Euro SCART (RGB)
With PAL/SECAM/NTSC Video Input
RF Input
4. Aerial terminal
12345678

7
STATION REAL CHANNEL FREQUENCY
SIGNALS NUMBERS MHZ
VHF I-1 (A) ÷I-9 (J) CH-01 ÷CH-09 45.75 ÷215.25
UHF I-21 ÷I-69 CH-21 ÷CH-69 471.25 ÷855.25
CM1/S1 ÷M10/S10 CC-01 ÷CC-10 105.25 ÷168.25
AU-1/S-11 ÷U-10/S-20 CC-11 ÷CC-20 231.25 ÷294.25
TS-21 ÷S-41 CC-21 ÷CC-41 303.25 ÷463.25
VCC-42 ÷CC-63 48 ÷304
CC-64 ÷CC-68 69.25 ÷98.25
Switching on
Power supply on/off button
This TV memorizes the Mode last used when it was switched off. When the
main power button (I) is pressed to turn on the set, the power indicator will
light and the set will resume in either the Stand-by mode or Programme
mode, depending upon its condition when it was switched off.
On-Off/Stand-by button
When the TV is in Stand-by mode, to turn ON the TV press the Stand-by but-
ton (BlTV) on the remote control, or one of the four buttons on the TV
(
V
a
/\, V
CH
/\
). The TV will change from Stand-by mode to Programme
mode, the sound indicator will light a few moments and an image will appear
on the screen. Press the Stand-by button (BlTV) again and the TV will return
to Stand-by mode.
Blue back off timer
If noise appears in TV or VCR mode, the screen turns blue. The blue back off-timer is then engaged and will automati-
cally switch to Stand-by mode after 15 minutes.
Real Channel Number (terrestrial/cable TV Programmes)
Channel setting is mainly performed using the remote control. Please follow the instructions with the remote control in
hand.
Television broadcasting stations have channel numbers assigned to them (real channel numbers). You can assign your
own channel number to a real channel and store it in the programme preset memory.
CORRESPONDING REAL CHANNEL
Power indicator
Main power button

8
Auto Installation System
Your television set is provided with an Automatic Installation System which makes Installation easier.
This new system is activated when you turn on the TV for the first time.
Procedure:
1. Put batteries into the remote control and connect the antenna jack into the antenna input terminal at the rear of your
TV, as shown on pages 3 and 4.
2. Connect the TV power cable to a 220 ~ 240 V system.
3. Press the main power button (I), on the right hand side of the TV
set, to start the “AUTO INSTALLATION”.
4. The red power indicator will light.
5. The “AUTO INSTALLATION” message will appear on your TV
screen.
•The TV is ready to preset automatically all local channels for you.
•If the TV is being used with a VCR, turn on the VCR and play back
a pre-recorded tape.
6. Now, press any button on the TV remote control and follow the
instructions on the screen, to start Auto Channel Preset.
Automatic Channel Sorting System (ACSS): The TV set SEARCHES
FOR FREQUENCIES, memorises the channels found, and sorts them
(according to technical criteria) from Pr-01 of the TV, to a maximum of
99 programmes.
Notes: This tuning process may take several minutes to perform.
If you need to repeat the “AUTO INSTALLATION”, please read TV
Channel Setting (page 28).
Stored programmes: When the AUTOMATIC SEARCH has been
completed, the "Stored programmes" Menu will appear on screen and
you can change the order of the channels and change or give the
channels a four letter name with the available options:
a) Select programme to be edited.
b) Delete this programme.
c) go to sorting mode.
d) Edit this programme.
e) Exit.
For a more detailed explanation see page 9.
If you wish exit from the menu, press the BLUE button.
Auto Installation
VCR
Automatic searching and sorting.
Press the menu button to cancel.
Power indicator
Main power button

9
Stored programmes Menu
a) Select programme to be edited.
Use this option to select a programme from the list. Each time you
press Eor Fthe memorised channel will be viewed and
will remain selected on the list by means of white background.
b) Delete this programme.
Use this option for cancelling programmes which are badly tuned
or repeated.
b.1 Select the programme (Pr) you wish to delete using Cursor
UP/DOWN buttons E/ F(marked with white
background).
b.2 Press the YELLOW button to see the “Delete Menu”.
When the YELLOW button is pressed, the TV will ask for
confirmation that you wish to cancel, and you must press the
YELLOW button again. The channels that follow it on the list
will automatically rearrange themselves by moving up one
programme (Pr) place, to restore the space of the cancelled
channel (CH).
c) Go to sorting mode
Use this option for sorting the channels (CH) into the desired
programme (Pr), as follows:
c.1 Select the programme (Pr) you wish to change using Cursor
UP/DOWN buttons E/ F(marked with white
background).
c.2 Press the GREEN button to see the “Sorting Menu”.
c.3 Press the Cursor UP/DOWN buttons E/ Fto move the
channel (CH) to the required position.
c.4 Press the GREEN button to finish.
d) Edit this programme
Use this option for giving a name made up of four digits to the
channels or for changing the one which appears on some
channels, in the following way:
d.1 Select the channel using the Cursor UP/DOWN buttons
E/ F.
d.2 Press the RED button to see the “Edit Menu”.
d.3 Press the Cursor UP/DOWN buttons E/ Fto change the
first letter. Letters A to Z of the alphabet, a blank space and the
numbers 0 to 9 will appear sequentially. Some of the broadcasting
stations names such as BBC1 or CH4 are already incorporated in
the TV and appear among the alphabet to make this task easier.
d.4 Press the Ibutton for changing the position of the cursor and the
E/ Fbuttons for changing the letters (repeat this action
for other letters).
d.5 When you have finished the fourth letter, press the Ibutton to quit
the “Edit Menu”option.
e) Exit
Use this option to quit the menu by pressing the BLUE button .
Stored programmes Menu
Delete Menu
Sorting Menu
Sorting Menu

10
Channel selector buttons E/F
Select the programme channel number you want to see, using the
channel selector buttons Eor F.
When you press these buttons the list of programmes appears.
Press the Eor Fagain to select another program.
Note: The channels that are in SKIP mode cannot be seen with these
buttons. Use numerical buttons to display these channels.
Single/Double entry selector button 6
This button selects between one or two digit channel number entry.
0~9 Digit buttons ~
You can select channels by pressing the 0 ~ 9 digit buttons on the remote control.
(For single and double digit entry see section B above).
Flash-back button
Press this button to change from the current channel to the channel previously selected. Press the button again to
switch back to the original channel.
Channel Call button (l)
Press this button to display the current programme number and the
name if it has been set and the sound mode on the screen. If the on or
off timer have been set this information will be displayed also.
Press the button again to make the on-screen display disappear.
If the channel you are viewing has been set to be skipped with the
channel skip function, the programme number and name, if set, are
displayed in red. If the channel was fine-tuned, programme number
and name, will be displayed in yellow.
Channel Selection
TV OPERATION
Single digit
entry mode
Double digit
entry mode
Previously
viewed channel
Currently
viewed channel
NAME Pr
MONO
TIME :12:21
ON TIMER :15:35
OFF TIMER :120 Min

11
Picture Adjustments
Picture quality are adjustable in this menu.
1. Press the MENU button ●to see the MAIN Menu.
2. Press the RED button to see the PICTURE LEVELS Menu
PICTURE LEVELS Menu
3. Press the Cursor LEFT/RIGHT buttons C /I to select a prede-
termined level: Factory settings / Memorized / Cinema / Rich /
Game.
4. Press the Cursor UP/DOWN buttons E/ Fto select a param-
eter from the list: Contrast, Colour, Brightness or Sharpness.
The red point mark indicates the selected parameter.
5. Adjust the picture quality to your liking with the Cursor
LEFT/RIGHT buttons C /I.
6. Press the GREEN button if you wish to memorize the
“Personal”levels in the “Memorized”position of PICTURE MODE.
In this menu you can switch to the following menus:
Press the YELLOW button to see the ADVANCED Menu.
Press the BLUE button to see the OTHERS Menu.
7. Press the MENU button ●to close the PICTURE Menu.
MAIN Menu
PICTURE LEVELS Menu

12
ADVANCED Menu
1. Press the Cursor UP/DOWN buttons E/ Fto select one
of the following parameters from the list: OSD contrast, Tint control,
NTSC Hue control, ECO mode or SVM. The red point mark
indicates the selected parameter.
2. Press the Cursor LEFT/RIGHT buttons C /Ito adjust picture qual-
ity to your liking.
Select OSD contrast to adjust the contrast level of the On Screen
Display menus.
Select Tint control to adjust your desired skin colour (Cool or Warm).
Select NTSC Hue control to adjust the skin colour (Green or Red) dur-
ing NTSC signal reception through the external connectors.
Select ECO mode “On”to attenuate the contrast in the excessively
white areas of the picture.
In this menu you can switch to the following menus:
Press the RED button to return to the LEVELS Menu.
Press the BLUE button to see the OTHERS Menu.
3. Press the MENU button ●to close the ADVANCED Menu.
OTHERS Menu
1. Press the Cursor UP/DOWN buttons E/ Fto select:
Comb filter, Black level expander or Rotation. The red point mark
indicates the selected item.
2. Press the Cursor LEFT/RIGHT buttons C /Ito select ON/OFF.
Select Comb filter (ON) to reduce the colour interference in picture
with fine details and the picture gets sharper.
Select Black level expander (ON) to activate the Dynamic
Compensation in the dark area of the picture.
In this menu you can switch to the following menus:
Press the RED button to return to the LEVELS Menu.
Press the YELLOW button to return to the ADVANCED Menu.
3. Press the MENU button ●to close the OTHERS Menu.
ADVANCED Menu
OTHERS Menu

13
Wide Mode Fast Menu
With this menu you can select the width of the picture: AUTO,
PANORAMA, FULL, NORMAL, ZOOM 14:9 or CINEMA, by pressing
the WIDE MODE button.
Each time you press the WIDE MODE button, the width of the picture
changes as indicated:
AUTO *
v
PANORAMA
v
FULL
v
NORMAL
v
ZOOM 14:9
v
CINEMA
When you Select: PANORAMA, ZOOM 14:9 or CINEMA, 4 options
appear on the screen:
●V-SCROLL: Press the RED button to see the Vertical SCROLL
menu.
●V-SIZE: Press the GREEN button to see the Vertical SIZE menu.
●NORMALIZE: Press the YELLOW button to normalize the Vertical
SCROLL and SIZE,.
●EXIT: Press the CYAN button to quit the menu.
●V-SCROLL menu: Press the Cursor LEFT/RIGHT buttons C /Ito adjust the Vertical SCROLL (UP/DOWN).
●V-SIZE menu: Press the Cursor LEFT/RIGHT buttons C /Ito adjust the Vertical SIZE (LARGE/SMALL).
* AUTO mode (VPS code): The VPS signal is sent by some broadcasting stations with information of the original size.
When the TV is in AUTO mode and receives the VPS signal, it changes the size automatically as indicated below:
When the TV is receiving VPS code 16:9 the TV selects CINEMA automatically.
When the TV is receiving VPS code 14:9 the TV selects ZOOM 14:9 automatically.
When the TV is receiving VPS code 4:3 the TV selects PANORAMA automatically.
When the TV does NOT receive VPS code the TV selects PANORAMA automatically.
External source: When you are watching the TV-set through the Euro-SCART AV-1 or AV-2 terminals and it receives
information of 16:9 format (through the audio-video control pin) the TV selects FULL automatically.
WIDE MODE Button
Vertical SIZE menu
Vertical SCROLL menu

14
Wide Mode (Special detail information)
PANORAMA
The Panorama Mode adapts the broadcast
picture to 16:9 format without changing the
centre of view. This is especially useful for
programmes like the News when the speaker in
the centre of the picture needs to be seen
clearly.
FULL
With Full Mode you adapt the picture 16:9
format while also stretching the centre of view.
This is an advantage, for example, when
watching sports games where there is no real
fixed centre of the picture.
NORMAL
You can watch 4:3 programs in 4:3 format by
switching to Normal Mode function.
ZOOM 14:9
Adapts the 14:9 broadcast cinema movies to
the 14:9 Mode.
CINEMA (16:9)
Adapts the 16:9 broadcast cinema movies to
the 16:9 Mode, thereby getting rid of the black
borders.
Special detail information about PANORAMA, FULL, NORMAL, ZOOM 14:9 and CINEMA (16:9).
16:9
4:3

15
Audio Adjustments
Loudspeakers Sound Volume C /I
Use the C /Ibuttons to increase/decrease the volume level. The
volume indicator will appear on the screen.
Note: To adjust the headphone volume, see the
-HEADPHONES LEVELS Menu- (page 17).
Sound mute button (c)
Press the button to mute the sound. The symbol c appears on the screen. Press the button again to turn the sound
back on.
Sound Mode Selector button (5)
Press the button to change the sound in the speakers. The sound mode will appear on the screen.
Depending on the sound transmission the sound reproduction can be chosen as indicated below :
When the TV set is receiving a STEREO (NICAM) programme, the TV selects STEREO automatically, and you can
change:
STEREO MONO
When the TV is receiving a BILINGUAL (NICAM) programme, the TV selects DUAL CHANNEL A automatically, and you
can change:
DUAL CHANNEL A DUAL CHANNEL B DUAL CHANNEL A B MONO
When the TV is receiving a MONO (NICAM) programme, the TV set selects MONO NICAM automatically, and you can
change:
MONO NICAM MONO (FM)
When the TV is receiving a MONO (FM) programme, the TV set selects MONO automatically but the sound mode
cannot be change.
Note: See the -STEREO Menu- (page 18) to change the Sound Mode in the headphones or in the audio output of the
external connectors.
Sound Indicator: When the TV set is receiving a STEREO, BILINGUAL or MONO Nicam programme the Sound
Indicator lights.
External source: When you are watching the TV-set through the Euro-SCART, AV-1, AV-2, Front A/V or S-Video
terminals, the Sound Mode Selector button and Sound indicator light are not operative.
STEREO MONO
I/II/I+II

16
Sound Setting Mode
Sound quality is adjustable in this menu.
1. Press the MENU button ●to see the MAIN Menu.
2. Press the GREEN button to see the AUDIO EFFECTS Menu.
AUDIO EFFECTS Menu
3. Press the Cursor LEFT/RIGHT buttons C /Ito change the AUDIO
MODE: Bypass or Spatial expander. The AUDIO EFFECTS Menu
depends on the AUDIO MODE as indicated below:
AUDIO MODE: Bypass
Bypass: Normal sound without sound effect.
1. Press the Cursor UP/DOWN buttons E/ Fto select
Automatic volume correction []. The red point mark indicates the
selected parameter.
2. Press the Cursor LEFT/RIGHT buttons C /Ito select three
different levels: Short, Middle or Long.
Select Off to deactivate the Automatic volume correction.
AUDIO MODE: Spatial expander []
1. Press the Cursor UP/DOWN buttons E/ Fto select:
Automatic volume correction or Spatial strength.
2. Automatic volume correction: Press the Cursor LEFT/RIGHT
buttons C/ Ito select three different levels: Short, Middle or Long.
Select Off to deactivate the Automatic volume correction.
3. Spatial strength: Adjust the sound quality to your liking with the
Cursor LEFT/RIGHT buttons C /I.
About Automatic volume correction
Different sound sources, fairly often do not have the same volume level, for example the changing from movie to the
advertisements. The Automatic Volume Correction (AVC) solves this problem and equalizes the volume levels.
About Spatial expander
The kind of Spatial expander effect depends on the source mode. If the incoming signal is in mono mode, Pseudo
Stereo Effect is active; for stereo signals, Stereo Basewidth Enlargement is effective.
The Pseudo stereo effect cannot restore any room or panning information from a mono signal. It does, however
produce two uncorrelated output signals which can give a dramatic improvement to mono signals without sounding
like a musical effect rather than true stereo.
Spatial strength
When the AUDIO MODE is in Spatial expander effect, you can reduce or enlarge the stereo image by Spatial strength
control.
AUDIO EFFECTS Menu
AUDIO MODE: Bypass
MAIN Menu
AUDIO MODE: Spatial expander

17
1. Press the MENU button ●to see the MAIN Menu.
2. Press the GREEN button to see the AUDIO EFFECTS Menu.
AUDIO EFFECTS Menu
3. Press the RED button to see the SPEAKER LEVELS Menu.
SPEAKER LEVELS menu
4. Press the Cursor UP/DOWN buttons E/ Fto select:
Volume, Balance or Loudness mode.
The red point mark indicates the selected item.
5. Adjust the sound quality to your liking with the Cursor LEFT/RIGHT
buttons C /I.
Select Loudness mode (NORMAL, SPECIAL or OFF) to improve
the sound quality [].
6. Press the RED button to see the HEADPHONES LEVELS
menu.
HEADPHONES LEVELS Menu
7. Press the Cursor UP/DOWN buttons E/ Fto select:
Volume, Balance, Loudness mode, Bass or Treble.
The red point mark indicates the selected item.
8. Adjust the sound quality to your liking with the Cursor LEFT/RIGHT
buttons C /I.
9. Press the RED button to see the EXTERNAL LEVELS Menu.
EXTERNAL LEVELS Menu
10. Press the Cursor UP/DOWN buttons E/ Fto select:
SCART volume or AV volume.
The red point mark indicates the selected item.
Select SCART volume to adjust the sound level output to the
Euro-SCART connector (RGB) with the Cursor LEFT/RIGHT
buttons C /I.
Select AV volume to adjust the sound level output to the external
connectors (AV-1/AV-2) with the Cursor LEFT/RIGHT buttons C /I.
11. Press the MENU button ●to close the AUDIO LEVELS Menus.
Loudness increases the volume of low and high frequency signals according to the current volume setting.
In NORMAL mode keeping the amplitude of the 1 KHz reference frequency constant.
In SPECIAL mode keeping the amplitude of the 2 KHz reference frequency constant.
1. Press the MENU button ●to see the MAIN Menu.
2. Press the GREEN button to see the AUDIO EFFECTS Menu.
AUDIO EFFECTS Menu
3. Press the GREEN button if you wish to normalize audio lev-
els to default factory setting.
Audio Levels menus
Normalize audio levels
EXTERNAL LEVELS Menu
AUDIO EFFECTS Menu
HEADPHONES LEVELS Menu
SPEAKER LEVELS Menu
AUDIO EFFECTS Menu

18
Equalizer & Stereo menus
1. Press the MENU button ●to see the MAIN Menu.
2. Press the GREEN button to see the AUDIO EFFECTS Menu.
AUDIO EFFECTS Menu
3. Press the YELLOW button to see the EQUALIZER Menu.
EQUALIZER Menu
4. Press the YELLOW button to select a pre-defined
equalization: Personal / Classic / Jazz / Pop / In concert / Sport.
5. To change the Personal option:
a) Press the Cursor LEFT/RIGHT buttons C /Ito select:
100Hz, 330Hz, 1KHz, 3.3KHz or 10KHz
The red point mark indicates the selected item.
b) Press the Cursor UP/DOWN buttons E/ Fto Adjust.
Note: The Equalizer adjustments are not operative for the
headphones.
6. Press the BLUE button to see the STEREO Menu.
STEREO Menu
7. Press the Cursor UP/DOWN buttons E/ Fto select:
Speakers matrix, Headphones matrix, AV Matrix [] or
Identification.
The red point mark indicates the selected item.
8. Press the Cursor LEFT/RIGHT buttons C /Ito change.
Select Speakers matrix to change the sound mode in the
speakers.
Select Headphones matrix to change the sound mode in the
headphones.
Select AV matrix to change the sound mode in the audio output of
the external connector (AV-1/AV-2).
Select Identification to activate (ON) or deactivate (OFF) the
automatic Identification of audio system of the current program
[].
9. Press the MENU button ●to close the STEREO Menu.
About Matrix: Depending on the sound transmission the sound reproduction can be chosen in the STEREO Menu.
In this menu you can select a sound mode to the speakers, another to the headphones and another to the external connectors (AV-1/AV-2).
When the TV set is receiving a STEREO NICAM programme, the TV selects STEREO automatically, and you can change:
STEREO MONO
When the TV is receiving a BILINGUAL NICAM programme, the TV selects DUAL CHANNEL A automatically, and you can change:
DUAL CHANNEL A DUAL CHANNEL B DUAL CHANNEL A B MONO
When the TV set is receiving a MONO NICAM programme, the TV set selects MONO NICAM automatically, and you can change:
MONO NICAM MONO
When the TV is receiving a MONO FM programme, the TV set selects MONO automatically but the sound mode cannot be change.
About Identification
IDENTIFICATION ON: The TV automatically identifies the received audio system MONO FM, STEREO NICAM or DUAL NICAM SIGNAL.
IDENTIFICATION OFF: Disqualifies the automatic identification of the audio system and forces the sound into MONO FM.
This mode can be convenient when the level of the signal received is extremely weak. This function is independent for every program.
MAIN Menu
AUDIO EFFECTS Menu
EQUALIZER Menu
STEREO Menu
Other manuals for 56FW-53H
1
Table of contents
Other Sharp CRT TV manuals

Sharp
Sharp VT-1480B User manual

Sharp
Sharp 54DS-02S User manual

Sharp
Sharp 32C530 User manual

Sharp
Sharp 21LF-90H Instruction Manual

Sharp
Sharp 27F640 User manual

Sharp
Sharp 51CS-03H User manual

Sharp
Sharp CR19M10 User manual

Sharp
Sharp 32UF5 User manual

Sharp
Sharp 37ET-35H User manual

Sharp
Sharp 51GT-25H User manual

Sharp
Sharp CR20S10 User manual

Sharp
Sharp 37AT-25H User manual

Sharp
Sharp 14AG2-DC User manual

Sharp
Sharp 21HS-50H User manual

Sharp
Sharp 51CS-D8H User manual

Sharp
Sharp 32R-S400 User manual

Sharp
Sharp 72FF-57E User manual

Sharp
Sharp 27F640 User manual

Sharp
Sharp 54GT-25S User manual

Sharp
Sharp 37ET-35H User manual