Sharp R-842IN User manual

Important
Ważne
Σημαντικό
Pomembno
Důležité
Dôležité
Fontos
Svarīgi
Svarbu
Tähelepanu
Важно
Important
R-842IN
MICROWAVE OVEN WITH TOP AND BOTTOM GRILL AND CONVECTION - OPERATION MANUAL
KUCHENKA MIKROFALOWA Z GÓRNYM I DOLNYM GRILLEM ORAZ TERMOOBIEGIEM - INSTUKCJA OBSŁUGI
ΦΟΥΡΝΟΣ ΜΙΚΡΟΚΥΜΑΤΩΝ ΜΕ ΑΝΩ ΚΑΙ ΚΑΤΩ ΣΤΟΙΧΕΙΟ ΓΚΡΙΛΛ ΚΑΙ ΕΠΑΓΩΓΙΚΗ ΛΕΙΤΟΥΡΓΙΑ - ΕΓΧΕΙΡΙΔΙΟ ΛΕΙΤΟΥΡΓΙΑΣ
MIKROVALOVNA PEČICA Z ZGORNJIM IN SPODNJIM ŽAROM TER KONVEKCIJO - NAVODILA ZA UPORABO
MIKROVLNNÁ TROUBA S HORNÍM A SPODNÍM GRILEM A KONVEKCÍ - NÁVOD K OBSLUZE
MIKROVLNNÁ RÚRA S HORNÝM A DOLNÝM GRILOM A HORÚCIM VZDUCHOM - NÁVOD NA POUŽITIE
LÉGKEVERÉSES MIKROHULLÁMÚ SÜTŐ ALSÓ ÉS FELSŐ GRILL FŰTŐSZÁLLAL - KEZELÉSI ÚTMUTATÓ
MIKROVIĻŅU KRĀSNS AR AUGŠĒJO UN APAKŠĒJO GRILU UN KONVEKCIJU - LIETOŠANAS INSTRUKCIJA
MIKROBANGŲ KROSNELĖ, KARŠTO ORO PŪTIMO SU KEPIMO IŠ VIRŠAUS IR APAČIOS FUNKCIJA - VALDYMO VADOVAS
ÜLEMISE JA ALUMISE GRILLI NING KONVEKTSIOONIGA MIKROLAINEAHI - KASUTUSJUHEND
МИКРОВЪЛНОВА ФУРНА С ГОРЕН И ДОЛЕН ГРИЛ И КОНВЕКЦИЯ - РЪКОВОДСТВО ЗА УПОТРЕБА
CUPTOR CU MICROUNDE CU GRILL SUPERIOR ŞI INFERIOR ŞI CU CONVECŢIE - MANUAL DE UTILIZARE
ČESKYSLOVENSKYMAGYARLIETUVIŠKAI LATVISKIEESTIБЪЛГАРСКИROMÂNĂ SLOVENŠČINA ΕΛΛΗΝΙΚΑ POLSKI
900 W (IEC 60705)
ENGLISH

GB
This operation manual contains important information which you should read carefully before using your microwave oven.
Important: There may be a serious risk to health if this operation manual is not followed or if the oven is modied so that it operates with the
door open.
PL
Niniejsza instrukcja zawiera ważne informacje, z którymi należy się zapoznać przed przystąpieniem do korzystania z kuchenki.
Ważne: Nieprzestrzeganie informacji zawartych w niniejszej instrukcji lub doprowadzenie do uruchomienia kuchenki przy otwartych
drzwiczkach może być przyczyną niebezpieczeństwa dla życia i zdrowia.
GR
Αυτό το εγχειρίδιο λειτουργίας περιέχει σημαντικές πληροφορίες, τις οποίες θα πρέπει να διαβάσετε προσεκτικά πριν τη χρήση του φούρνου
μικροκυμάτων.
Σημαντικό: Ενδέχεται να υπάρξει σοβαρός κίνδυνος για την υγεία, αν δεν ακολουθήσετε αυτό το εγχειρίδιο λειτουργίας, ή αν τροποποιηθεί ο
φούρνος έτσι ώστε να λειτουργεί με την πόρτα ανοικτή.
SI
V teh navodilih za uporabo najdete pomembne informacije, ki jih pred uporabo pečice pozorno preberite.
Pomembno: Če teh navodil za uporabo ne upoštevate ali pečico predelate tako, da deluje z odprtimi vrati, lahko to resno škoduje vašemu
zdravju.
Tento návod k obsluze obsahuje důležité informace, které byste si měli pozorně přečíst před použitím této mikrovlnné trouby.
Důležité: Pokud se nebude postupovat podle tohoto návodu k obsluze nebo se mikrovlnná trouba upraví tak, že bude moci pracovat s otevřenými
dveřmi, může dojít k vážnému ohrožení zdraví.
Tento návod na obsluhu obsahuje dôležité informácie, ktoré by ste si mali pred použitím mikrovlnnej rúry pozorne prečítať.
Dôležité: Nedodržanie pokynov uvedených v tomto návode na použitie, ako aj akýkoľvek zásah, ktorý dovoľuje prevádzkovanie rúry s otvorenými
dvierkami, môže viesť k závažnému poškodeniu zdravia osôb.
A kezelési útmutató fontos információkat tartalmaz. Olvassa végig gyelmesen a mikrohullámú sütő használata előtt!
Fontos: A jelen kezelési útmutató előírásainak be nem tartásával, illetve a mikrohullámú sütő nyitott ajtajú működését lehetővé tevő módosításával
súlyos egészségkárosodási kockázatot vállal!
Šī lietošanas instrukcija ietver svarīgu informāciju, kuru pirms mikroviļņu krāsns lietošanas jums vajadzētu uzmanīgi izlasīt.
Svarīgi: Šīs lietošanas instrukcijas neievērošana vai krāsns pārveidošana tā, lai tā darbotos ar atvērtām durvīm, var nopietni apdraudēt veselību.
Šiame valdymo vadove rasite svarbią informaciją, kurią, prieš naudodamiesi mikrobangų krosnele, turite atidžiai perskaityti.
Svarbu: Jūsų sveikatai gali kilti rimtas pavojus, jei nesivadovausite šiuo valdymo vadovu ar krosnelė veiks su atidarytomis durelėmis.
Käesolev juhend sisaldab olulist teawvet, mis tuleks teil enne oma mikrolaineahju kasutamist tähelepanelikult läbi lugeda.
Tähtis: käesoleva juhendi eiramine või ahju muutmine selliselt, et see töötab ka avatud ukse korral, võib kujutada tervisele tõsist ohtu.
Това ръководство за употреба съдържа информация, която трябва да прочетете внимателно, преди да започнете да използвате Вашата
микровълнова фурна.
Важно: може да има сериозен риск за здравето, ако не се спазва настоящата инструкция или фурната е преправена така, че да работи и
при отворена врата.
Acest manual de utilizare conţine informaţii importante, care trebuie citite cu atenţie înainte de utilizarea cuptorului cu microunde.
Important: Nerespectarea instrucţiunilor descrise în acest manual sau modicarea cuptorului pentru a funcţiona cu uşa deschisă poate duce la
rănirea utilizatorului.

GB-1
ENGLISH
GB

GB-2
SPECIFICATIONS
CONTENTS
INFORMATION ON PROPER DISPOSAL ......................................................................................................................................1
CONTENTS ...........................................................................................................................................................................................2
SPECIFICATIONS ................................................................................................................................................................................2
OVEN AND ACCESSORIES ..............................................................................................................................................................3
CONTROL PANEL ...............................................................................................................................................................................4
IMPORTANT SAFETY INSTRUCTIONS .....................................................................................................................................5-7
INSTALLATION ....................................................................................................................................................................................7
BEFORE OPERATION ........................................................................................................................................................................8
SETTING THE CLOCK.........................................................................................................................................................................8
MICROWAVE POWER LEVELS ........................................................................................................................................................8
MANUAL OPERATION ......................................................................................................................................................................9
MICROWAVE COOKING ...................................................................................................................................................................9
GRILL COOKING/ COMBI COOKING....................................................................................................................................10-11
CONVECTION COOKING......................................................................................................................................................... 11-12
OTHER CONVENIENT FUNCTIONS ............................................................................................................................................13
WEIGHT DEFROST AND TIME DEFROST OPERATION ..........................................................................................................14
AUTO MENU OPERATION .............................................................................................................................................................14
AUTO MENU CHART .......................................................................................................................................................................15
SUITABLE OVENWARE ....................................................................................................................................................................16
CARE AND CLEANING ....................................................................................................................................................................17
Operation manual
Model name: R-842
AC Line Voltage : 230 V, 50 Hz single phase
Distribution line fuse/circuit breaker : 16 A
AC Power required: Microwave : 1450 W
Output power: Microwave : 900 W (IEC 60705)
Top Grill (Quartz / Infrared) : 1200 / 1100 W
Bottom Grill (Infrared) : 500 W
Convection : 2300 W
O Mode (Energy Save Mode) : less than 1,0 W
Microwave Frequency : 2450 MHz*(Group 2/Class B)
Outside Dimensions (W) x (H) x (D) mm : 513,0 x 306,0 x 430,0 mm
Cavity Dimensions (W) x (H) x (D)** mm : 330,0 x 208,0 x 368,0 mm
Oven Capacity : 25 litres**
Turntable (metal) : ø 301 mm
Weight : approx. 15,8 kg
Oven lamp : 25 W / 240 V
* This Product fulls the requirement of the European standard EN55011.
In conformity with this standard, this product is classied as group 2 class B equipment.
Group 2 means that the equipment intentionally generates radio-frequency energy in the form of electromagnetic
radiation for the heat treatment of food.
Class B equipment means that the equipment is suitable to be used in domestic establishments.
** Internal capacity is calculated by measuring maximum width, depth and height. Actual capacity for holding food is
less.
AS PART OF A POLICY OF CONTINUOUS IMPROVEMENT, WE RESERVE THE RIGHT TO ALTER DESIGN AND SPECIFICATIONS
WITHOUT NOTICE.

GB-3
ENGLISH
OVEN AND ACCESSORIES
NOTES:
• The waveguide cover is fragile. Care should be taken when cleaning inside the oven to ensure that it is not
damaged.
• After cooking fatty foods without a cover, always clean the cavity and especially the grill heating element
thoroughly, these must be dry and free from grease. Built-up grease may overheat and begin to smoke or
catch fire.
• Always operate the oven with the turntable and turntable support fitted correctly. This promotes thorough,
even cooking. A badly fitted turntable may rattle, may not rotate properly and could cause damage to the
oven.
• All food and containers of food are always placed on the turntable for cooking.
• The turntable rotates clockwise or anti-clockwise. The rotary direction may change each time you start the
oven. This does not affect cooking performance.
WARNING:
The door, outer cabinet, oven cavity, accessories and dishes will become very hot during operation.
To prevent burns, always use thick oven gloves.
OVEN
1. Grill heating element (top grill)
2. Oven lamp
3. Control panel
4. Door handle
5. Waveguide cover (DO NOT REMOVE)
6. Oven cavity
7. Turntable motor shaft
8. Grill heating element (bottom grill)
9. Ventilation openings
10. Door seals and sealing surfaces
11. Power cord
12. Outer cabinet
ACCESSORIES:
Check to make sure the following accessories are
provided:
(13) Turntable (14) Coupling (15) Rack
• Place the coupling into the turntable motor shaft.
Then place the turntable on to the turntable motor
shaft; ensuring it is located firmly.
• To avoid turntable damage, ensure dishes and
containers are lifted clear of the turntable rim when
removing them from the oven.
• For use of the rack, refer to the grilling sections on
pages GB-11.
Never touch the grill when it is hot.
NOTE: When you order accessories, please mention
two items: part name and model name to your
dealer or SHARP authorised service agent.
13. Turntable
(metal)
14. Coupling
15. Rack
12
3
5
6
7
8
10
9
12
11
4

GB-4
CONTROL PANEL
1. DIGITAL DISPLAY and INDICATORS
MICROWAVE indicator
CONVECTION indicator
GRILL indicator
DEFROST indicator
CHILD LOCK indicator
AUTO MENU indicator
TEMPERATURE indicator
WEIGHT indicator
Index for the temperature
2. Auto Menu options:
A1: Reheat menu
A2: Jacket potato
A3: Meat
A4: Fresh vegetables
A5: Fish
A6: Pasta
A7: Soup
A8: Sponge cake
A9: Frozen Pizza
A10: Chicken
3. ENTRY dial
Rotate to enter the cooking time, time,
power level, temperature, weight, portion
and select auto menu.
4. GRILL MODE/ COMBI MODE button
1 PRESS (G-1) = TOP QUARTZ GRILL
2 PRESSES ( G-2) = TOP QUARTZ GRILL &
BOTTOM GRILL TOGETHER
3 PRESSES (G-3) = BOTTOM GRILL
4 PRESSES (C-1) = MICROWAVE & TOP
QUARTZ GRILL & BOTTOM
GRILL
5 PRESSES (C-2) =
MICROWAVE (73%) & TOP
GRILL & CONVECTION (27%)
6 PRESSES (C-3) =
MICROWAVE (52%) & TOP
GRILL & CONVECTION (48%)
5. WEIGHT/ TIME DEFROST button
6. START/ +1min/ CONFIRM button
7. STOP button
8. MICROWAVE POWER LEVEL button:
Press to select microwave power level.
9. CONVECTION button
10. CLOCK SET/ KITCHEN TIMER button
2
3
4
5
6
7
9
8
10
1

GB-5
ENGLISH
IMPORTANT SAFETY INSTRUCTIONS
15. Utensils should be checked to ensure that they
are suitable for use in the oven. See Page GB-16.
Use only microwave safe containers and utensils
on microwave modes.
16. The contents of feeding bottles and baby
food jars must be stirred or shaken and the
temperature checked before consumption, in
order to avoid burns.
17. The door, outer cabinet, oven cavity, dishes,
accessories and especially the grill heating
elements will become very hot during operation.
18. Care should be taken to avoid touching these
areas. To prevent burns, always use thick oven
gloves. Before cleaning make sure they are
not hot. When heating food in plastic or paper
containers, keep an eye on the oven due to the
possibility of ignition.
19. If smoke is observed, switch off or unplug the
oven and keep the door closed in order to stifle
any flames.
20. Clean the oven at regular intervals and remove
any food deposits.
21. Failure to maintain the oven in a clean condition
could lead to deterioration of the surface that
could adversely affect the life of the appliance
and possibly result in a hazardous situation.
22. Do not use harsh abrasive cleaners or sharp
metal scrapers to clean the oven door glass since
they can scratch the surface, which may result in
shattering of the glass.
23. Steam cleaner is not to be used.
24. See instructions for cleaning door seals, cavities
and adjacent parts on page GB-17.
1. This oven is designed to be used on a countertop
only. It is not designed to be built into a kitchen
unit. Do not place the oven in a cabinet.
2. The oven door may become hot during cooking.
Place or mount the oven so that the bottom of
the oven is 85 cm or more above the floor. Keep
children away from the door to prevent them
burning themselves.
3. Ensure there is a minimum of free space above
the oven of 30 cm.
4. This appliance is not intended for use by
persons (including children) with reduced
physical, sensory or mental capabilities, or lack
of experience and knowledge, unless they have
been given supervision or instruction concerning
use of the appliance by a person responsible for
their safety.
5. Children should be supervised to ensure that
they do not play with the appliance.
6. WARNING: Only allow children to use the oven
without supervision when adequate instructions
have been given so that the child is able to use
the oven in a safe way and understands the
hazards of improper use.
7. WARNING: When the appliance is operated in the
GRILL/COMBI and CONVECTION modes, children
should only use the oven under adult supervision
due to the temperature generated.
8. WARNING: Accessible parts may become hot
during use. Young children should be kept away.
9. WARNING: If the door or door seals are damaged,
the oven must not be operated until it has been
repaired by a competent person.
10. WARNING: Never adjust, repair or modify the
oven yourself. It is hazardous for anyone other
than a competent person to carry out any service
or repair operation which involves the removal of
a cover which gives protection against exposure
to microwave energy.
11. If the power supply cord of this appliance is
damaged, it must be replaced with a special cord.
The exchange must be made by an authorised
SHARP service agent.
12. WARNING: Liquids and other foods must not be
heated in sealed containers since they are liable
to explode.
13. Microwave heating of beverages can result in
delayed eruptive boiling, therefore care must be
taken when handling the container.
14. Do not cook eggs in their shells, and whole hard
boiled eggs should not be heated in microwave
ovens since they may explode even after
microwave cooking has ended. To cook or reheat
eggs which have not been scrambled or mixed,
pierce the yolks and the whites, or the eggs may
explode. Shell and slice hard boiled eggs before
reheating them in the microwave oven.

GB-6
2. Do not operate the oven with the door open or
alter the door safety latches in any way.
3. Do not operate the oven if there is an object
between the door seals and sealing surfaces.
4. Do not allow grease or dirt to build up on the
door seals and adjacent parts. Clean the oven at
regular intervals and remove any food deposits.
Follow the instructions for ''Care and Cleaning''
on page GB-17.
5. Individuals with PACEMAKERS should check
with their doctor or the manufacturer of the
pacemaker for precautions regarding microwave
ovens.
To avoid the possibility of electric shock
1. Under no circumstances should you remove the
outer cabinet.
2. Never spill or insert any objects into the door lock
openings or ventilation openings. In the event of
a spill, turn o and unplug the oven immediately,
and call an authorised SHARP service agent.
3. Do not immerse the power supply cord or plug in
water or any other liquid.
4. Do not let the power supply cord hang over the
edge of a table or work surface.
5. Keep the power supply cord away from heated
surfaces, including the rear of the oven.
6. Do not attempt to replace the oven lamp
yourself or allow anyone who is not an electrician
authorised by SHARP to do so. If the oven lamp
fails, please consult your dealer or an authorised
SHARP service agent.
To avoid the possibility of explosion and sudden boiling:
1. Never use sealed containers. Remove seals and
lids before use. Sealed containers can explode
due to a build up of pressure even after the oven
has been turned o.
2.
Take care when microwaving liquids. Use a
widemouthed container to allow bubbles to escape.
Never heat liquids in narrow necked
containers such as baby bottles, as this may
result in the contents erupting from the
container when heated and cause burns.
To prevent sudden eruption of boiling liquid and
possible scalding:
1. Do not use excessive amount of time
2. Stir liquid prior to heating/reheating.
3.
It is advisable to insert a glass rod or similar
utensil (not metal) into the liquid whilst
reheating.
4. Let liquid stand for at least 20 seconds in the
oven at the end of cooking time to prevent
delayed eruptive boiling.
3. Pierce the skin of such foods as potatoes,
sausages and fruit before cooking, or they may
explode.
To avoid the danger of re.
1. The microwave oven should not be left
unattended during operation. Power levels
that are too high, or cooking times that are too
long, may overheat foods resulting in a re.
2. The electrical outlet must be readily accessible
so that the unit can be unplugged easily in an
emergency.
3. The AC power supply must be 230V, 50Hz,
with a minimum 16A distribution line fuse, or a
minimum 16A distribution circuit breaker.
4. A separate circuit serving only this appliance
should be provided.
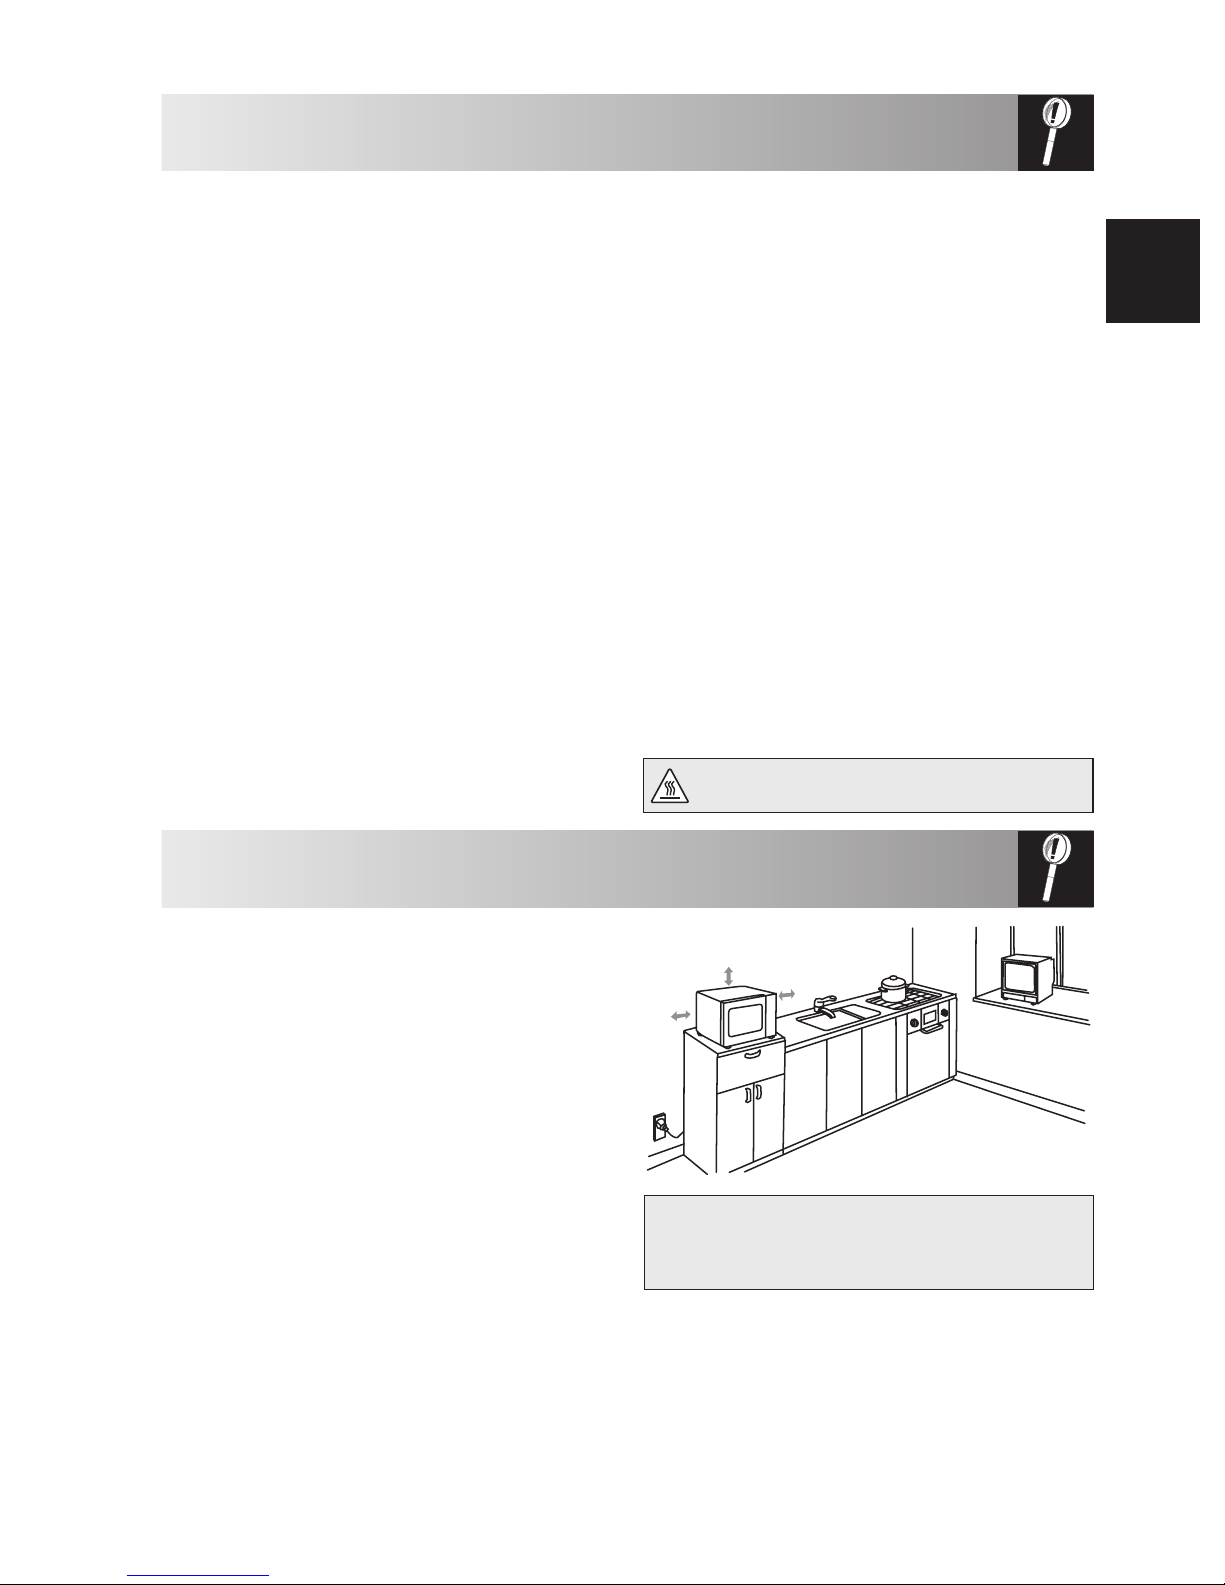
5. Do not place the oven in areas where heat is
generated. For example, close to a conventional
oven.
6. Do not install the oven in an area of high
humidity or where moisture may collect.
7. Do not store or use the oven outdoors.
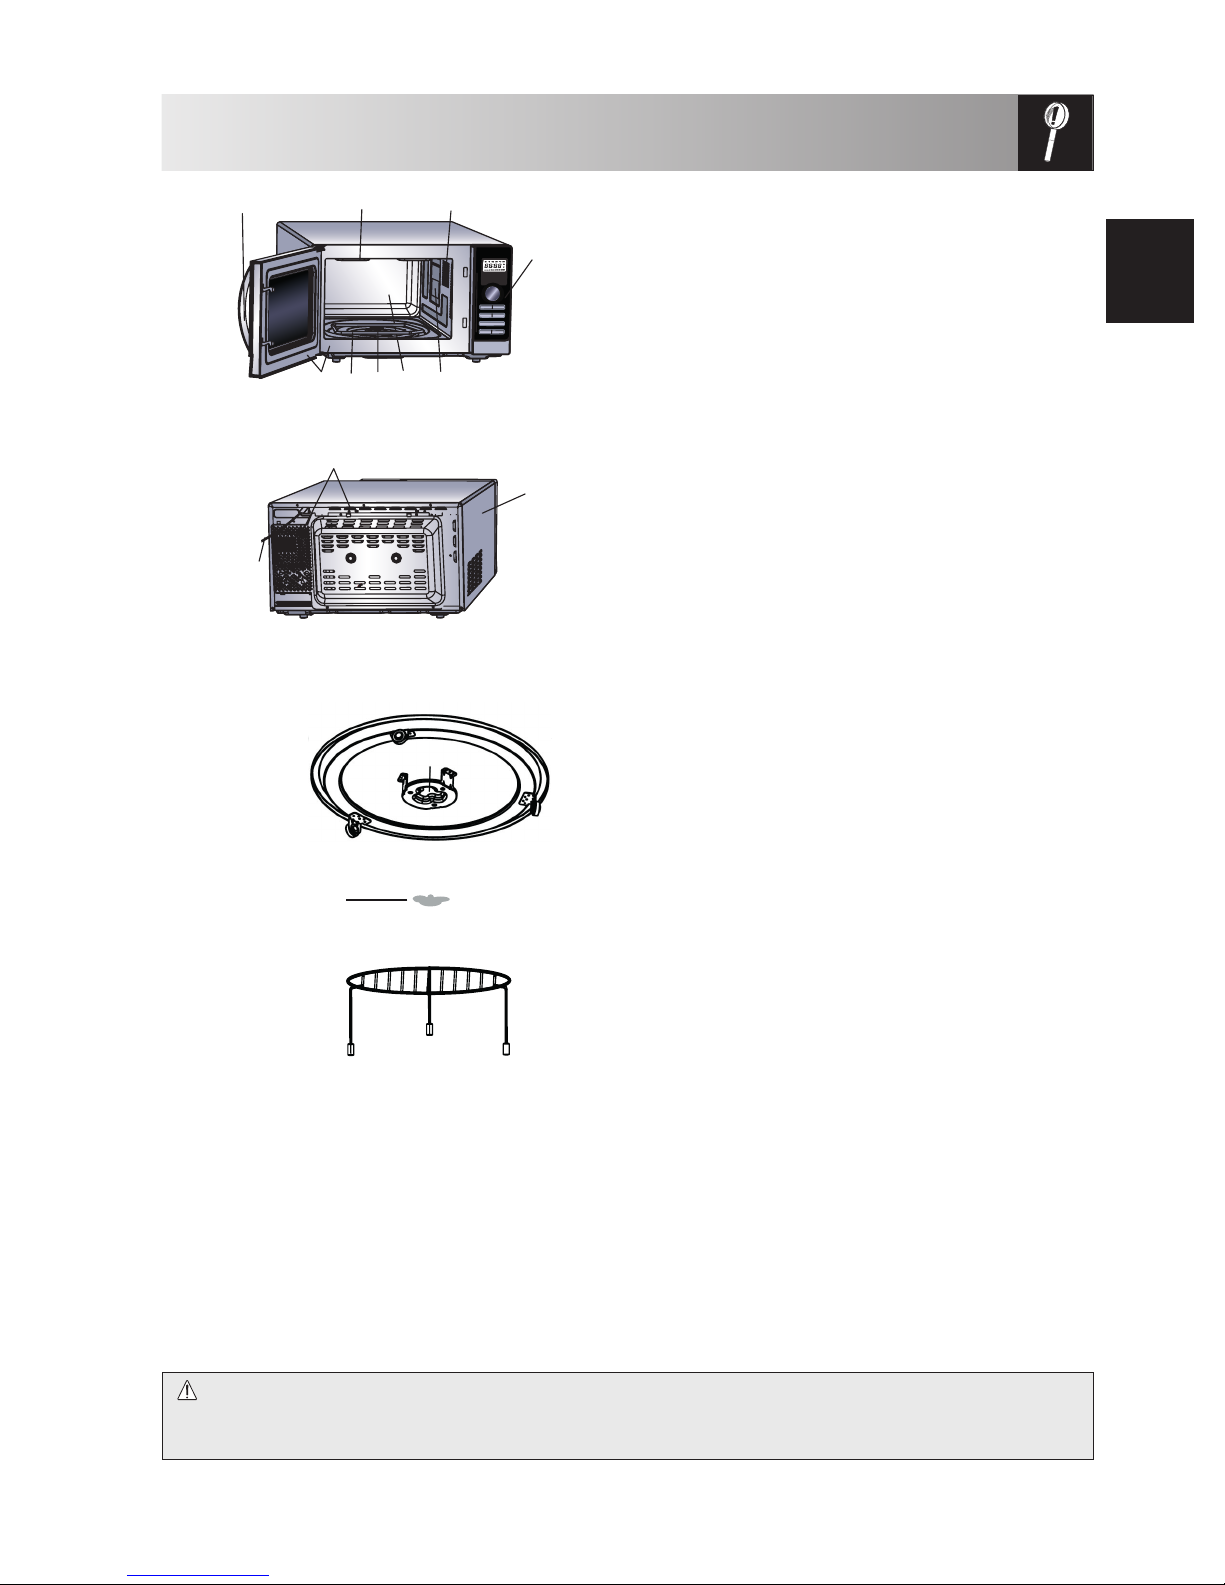
8. Clean the waveguide cover, the oven cavity, the
turntable and turntable support after use. These
must be dry and free from grease. Built-up grease
may overheat and begin to smoke or catch re.
9. Do not place ammable materials near the oven
or ventilation openings.
10. Do not block the ventilation openings.
11. Remove all metallic seals, wire twists, etc., from
food and food packages. Arcing on metallic
surfaces may cause a re.
12. Do not use the microwave oven to heat oil
for deep frying. The temperature cannot be
controlled and the oil may catch re.
13. To make popcorn, use only special microwave
popcorn makers.
14. Do not store food or any other items inside the
oven.
15. Check the settings after you start the oven to
ensure the oven is operating as desired.
16. To avoid overheating and re, special care must
be taken when cooking or reheating foods with
a high sugar or fat content, for example, Sausage
rolls, Pies or Christmas pudding.
17. See the corresponding hints in operation manual.
To avoid the possibility of injury
1. WARNING:
Do not operate the oven if it is damaged or
malfunctioning. Check the following before use:
a) The door; make sure the door closes properly
and ensure it is not misaligned or warped.
b) The hinges and safety door latches; check to
make sure they are not broken or loose.
c) The door seals and sealing surfaces; ensure
that they have not been damaged.
d) Inside the oven cavity or on the door; make
sure there are no dents.
e) The power supply cord and plug; ensure that
they are not damaged.
IMPORTANT SAFETY INSTRUCTIONS

GB-7
ENGLISH
INSTALLATION
IMPORTANT SAFETY INSTRUCTIONS
4.
The oven door may become hot during cooking. Place
or mount the oven so that the bottom of the oven is
85 cm or more above the floor. Keep children away
from the door to prevent them burning themselves.
5. Securely connect the plug of the oven to a standard
earthed (grounded) household electrical outlet.
WARNING: Do not place the oven where heat, moisture
or high humidity are generated, (for example, near
or above a conventional oven) or near combustible
materials (for example, curtains).
Do not block or obstruct air vent openings.
Do not place objects on top of the oven.
1. Remove all packing materials from the inside of
the oven cavity and remove any protective film
found on the microwave oven cabinet surface.
Check the oven carefully for any signs of damage.
2. Place the oven on a secure, level surface, strong
enough to take the oven weight, plus the heaviest
item likely to be cooked in the oven. Do not place
the oven in a cabinet.
3. Select a level surface that provides enough open
space for the intake and/or outlet vents. The rear
surface of appliance shall be placed against a wall.
•A minimum space of 20 cm is required between
the oven and any adjacent walls. One side must
be open.
•Leave a minimum space of 30 cm above the oven.
•Do not remove the feet from the bottom of the
oven.
•Blocking the intake and/or outlet openings can
damage the oven.
•Place the oven as far away from radios and TV
as possible. Operation of microwave oven may
cause interference to your radio or TV reception.
To promote troublefree use of your oven and
avoid damage.
1. Never operate the oven when it is empty except
where recommended in the operation manual.
Doing so may damage the oven.
2. When using a browning dish or self-heating
material, always place a heat-resistant insulator
such as a porcelain plate under it to prevent
damage to the turntable and turntable support
due to heat stress. The preheating time specied
in the dish’s instructions must not be exceeded.
3.
Do not use metal utensils, which reect microwaves
and may cause electrical arcing. Use only the
turntable and the turntable support designed for this
oven. Do not operate the oven without the turntable.
4. Do not place anything on the outer cabinet
during operation.
NOTE:
If you are unsure how to connect your oven, please
consult an authorised, qualified electrician. Neither
the manufacturer nor the dealer can accept any
liability for damage to the oven or personal injury
resulting from failure to observe the correct electrical
connection procedure. Water vapour or drops may
occasionally form on the oven walls or around the
door seals and sealing surfaces. This is a normal
occurrence and is not an indication of microwave
leakage or a malfunction.
This symbol means that the surfaces are liable
to get hot during use.
To avoid the possibility of burns
1. Use pot holders or oven gloves when removing
food from the oven to prevent burns.
2. Always open containers, popcorn makers, oven
cooking bags, etc., away from the face and hands
to avoid steam burns and eruption of boiling.
3. To avoid burns, always test food temperature
and stir before serving and pay special
attention to the temperature of food and drink
given to babies, children or the elderly.
Temperature of the container is not a true
indication of the temperature of the food or drink;
always check the food temperature.
4.
Always stand back from the oven door when opening
it to avoid burns from escaping steam and heat.
5. Slice stued baked foods after heating to release
steam and avoid burns.
To avoid misuse by children
1. Do not lean or swing on the oven door.
2. Children should be taught all important safety
instructions: use of pot holders, careful removal
of food coverings; paying special attention to
packaging (e.g. self-heating materials) designed
to make food crisp, as they may be extra hot.
Other warnings
1. Never modify the oven in any way.
2. Do not move the oven while it is in operation.
3. This oven is for home food preparation only
and may only be used for cooking food. It is not
suitable for commercial or laboratory use.
20 cm
30 cm 20 cm

GB-8
BEFORE OPERATION
Plug in the oven. The oven display will display:“0:00”, an audible signal will sound once.
This model has a clock function and the oven uses less than 1,0 W in stand by mode. To set the clock, see below.
SETTING THE CLOCK
There are two setting modes: 12 hour clock and a 24 hour clock.
1. To set the 24 hour clock, press the CLOCK SET/ KITCHEN TIMER button once ( ) and “24H” will appear
in the display. To set the 12 hour clock, press the CLOCK SET/ KITCHEN TIMER button ( ) once more
and“12H”will appear in the display.
2. Rotate the ENTRY dial until the correct hour is displayed, the input time should be within 0-23 (24-hour
clock) or 1 -12 (12-hour clock).
3. Press the CLOCK SET/ KITCHEN TIMER button ( ), the minute gure will ash.
4. Set the minutes. Rotate the ENTRY dial until the correct minutes are displayed, the input time should be
within 0-59.
5. Press the CLOCK SET/ KITCHEN TIMER button ( ) once to start the clock. The icon “:” of the digital
time will be ashing on the display.
NOTES:
•If the clock is set, when cooking is complete, the display will show the correct time of day. If the clock has not
been set, the display will show“0:00”.
•To check the time of day during a cooking process, press CLOCK SET/ KITCHEN TIMER button ( ) and
the LED will display the time of day for 2-3 seconds. This does not aect the cooking process.
•
In the process of clock setting, if the STOP button is pressed, the oven will go back to the former setting.
•
If the electrical power supply to your microwave oven is interrupted, the display will intermittently show “0:00
”
after the
power is reinstated. If this occurs during cooking, the programme will be erased. The time of day will also be erased.
MICROWAVE POWER LEVELS
Power Level Press the
MICROWAVE POWER
LEVEL button
Display
(Percentage)
•Your oven has 5 power levels, as shown.
•To change the power level for cooking, press the
MICROWAVE POWER LEVEL button or rotate
the ENTRY dial until the display indicates the desired
level. Press the START/+1min/CONFIRM button
() to confirm, enter the cooking time
and then press the START/+1min/CONFIRM button
() to start the oven.
•To check the power level during cooking, press
the MICROWAVE POWER LEVEL button , the
current power level will be displayed for 2-3 seconds.
The oven continues to count down although the
display will show the power level.
HIGH x1 P100
(100%)
MEDIUM
HIGH x2 P80
(80%)
MEDIUM x3 P50
(50%)
MEDIUM LOW
(DEFROST) x4 P30
(30%)
LOW x5 P10
(10%)
Generally the following recommendations apply:
P100 - (HIGH output = 900W) used for fast cooking or re-
heating e.g. for casseroles, hot beverages, vegetables etc.
P80 - (MEDIUM HIGH output = 720W) used for longer
cooking of dense foods such as roast joints, meat loaf
and plated meals, also for sensitive dishes such as
sponge cakes. At this reduced setting, the food will
cook evenly without over cooking at the sides.
P50 - (MEDIUM output = 450W) for dense foods which
require a long cooking time when cooked convention-
ally, e.g. beef casserole, it is advisable to use this power
setting to ensure the meat will be tender.
P30 - (MEDIUM LOW output = 270 W) Defrost setting)
to defrost, select this power setting, to ensure that the
dish defrosts evenly. This setting is also ideal for sim-
mering rice, pasta, dumplings and cooking egg cus-
tard.
P10 - (LOW output = 90 W) For gentle defrosting, e.g.
cream gateaux or pastry.

GB-9
ENGLISH
Your oven can be programmed for up to 95 minutes (95.00).
The input unit of cooking (defrosting) time varies from 5
seconds to 5 minutes. It depends on the total length of the
cooking (defrosting) time as shown on the table.
Cooking Time
0-1 minutes
1-5 minutes
5-10 minutes
10-30 minutes
30-95 minutes
Increasing Unit
5 seconds
10 seconds
30 seconds
1 minute
5 minutes
MANUAL COOKING/ MANUAL DEFROSTING
• Enter the cooking time and use microwave power levels P100 to P10 to cook or defrost (see example below).
• Stir or turn the food, where possible, 2 - 3 times during cooking.
• After cooking, cover the food and leave to stand, where recommended.
• After defrosting, cover the food in foil and leave to stand until thoroughly defrosted.
Example:
To cook 2 minutes and 30 seconds on P80 (80%) microwave power.
1. Input the power
level by pressing the
MICROWAVE POWER
LEVEL button twice
for P80 or turn the
ENTRY dial to select
the microwave power
to P80.
x2 or
2. Press the START/
+1min/CONFIRM
button to conrm the
selected power level.
At the same time the
microwave indicator will
light up on the display.
3. Enter desired cooking
time by rotating the
ENTRY dial.
4. Press the START/+1min/
CONFIRM button to
start the timer.
(The display will count
down through the set
cooking time.)
NOTE:
• When the oven starts, the oven lamp will light and the turntable will rotate clockwise or anticlockwise. If the door
is opened during cooking/defrosting to stir or turn over food, the cooking time on the display stops automati-
cally. The cooking/ defrosting time starts to count down again when the door is closed and the START/+1min/
CONFIRM button ( ) is pressed.
• When cooking/ defrosting is complete, open the door or press STOP button and the time of day will reappear on
the display, if the clock has been set.
• If you wish to know the power level during cooking, press the MICROWAVE POWER LEVEL button . The
current power level will be displayed for 2-3 seconds.
IMPORTANT:
• Close the door after cooking / defrosting. Please note that the light will remain on for 10 minutes when the door
is open, this is for safety reason to remind you to close the door.
MICROWAVE COOKING
MANUAL OPERATION
Opening the door:
To open the oven door, pull the door opening handle.
Starting the oven:
Prepare and place food in a suitable container onto the turntable or place directly onto the turntable.
Close the door and press the START/+1min/CONFIRM button after selecting the desired cooking mode.
Once the cooking programme has been set and the START/+1min/CONFIRM button is not pressed in
5 minutes, the setting will be cancelled.
The START/+1min/CONFIRM button must be pressed to continue cooking if the door is opened during
cooking. The audible signal sounds once by ecient press, inecient press will be no response.
Use the STOP button to:
1. Erase a mistake during programming.
2. Stop the oven temporarily during cooking.
3. Cancel a programme during cooking, press the STOP button twice.
4. To set and to cancel the child lock (refer to page GB-13).

GB-10
GRILL COOKING/ COMBI COOKING
1. GRILL ONLY COOKING
The oven has top and bottom grills which can be used separately or combined. These have one power setting
only. The grill is assisted by the turntable which rotates simultaneously to ensure even browning. Input the desired
grill mode by pressing the GRILL MODE/COMBI MODE button as indicated below.
Press GRILL MODE/ COMBI MODE button Display Grill heating element in use
x1 G-1 Top quartz grill only
x2 G-2 Top quartz grill and bottom grill together
x3 G-3 Bottom grill only
Example:
Suppose you want to cook for 20 minutes using the TOP GRILL only.
1. Choose TOP GRILL
function by pressing
GRILL MODE/COMBI
MODE button once. G-1
and the grill indicator will
light up on the display.
2. Press the START/ +1min/
CONFIRM button to
conrm the cooking
mode.
3. Use the ENTRY dial to
input the grilling time 4. Press the START/+1min/
CONFIRM button to start the
grilling.
(The display will count down
through the set grilling time.)
NOTE:
After half of grilling time the audible signal sounds twice and will remind you to turn the food over to ensure even
browning. Please be aware that the oven will not stop automatically during grilling. For a better grill effect the food
should be turned over after halfway through cooking time. After the food has been turned over halfway through cooking,
re-closed the door grill result, close the door and then press the START/ +1min / CONFIRM button to continue grilling.
2. COMBI COOKING
The COMBI COOKING feature enables a combination microwave power with grill or convection COMBI means to cook
by microwave power and grill power or convection power alternately. The combination cooking reduces cooking time
and provides a crisp, brown nish giving you the convenience of fast cooking with a traditional appetising appearance.
There are 3 choices for the combination as shown in the chart below:
Press GRILL MODE/COMBI
MODE button
Display Microwave/
duty cycle Top grill/ duty
cycle Bottom grill/
duty cycle Convection/
duty cycle
x4 C-1 • / 24% • / 76% • / 76% -
x5 C-2 • / 73% • / 27% - • / 27%
x6 C-3 • / 52% • / 48% - • / 48%
Follow the example on the next page for details on how to operate the combi cooking function.
WARNING:
The door, outer cabinet, oven cavity and accessories will become very hot during operation. To prevent
burns, always use thick oven gloves.

GB-11
ENGLISH
GRILL COOKING/ COMBI COOKING
Example for Microwave and Convection:
Suppose you want to cook for 30 minutes using the combination of microwave and convection (C-2).
1. Press GRILL
MODE/ COMBI
MODE button
once. G-1 will light
up on the display
2.
Select C-2 by pressing
the button repeatedly (4
times) or turn the ENTRY
dial until the display will
show C-2.
At the same time
the microwave and
convection indicator light
up on the display.
3. Press the
START/ +1min/
CONFIRM button
to conrm the
cooking mode
4. Use the
ENTRY dial
to input the
grilling time
5. Press the START/ +1min/
CONFIRM button to start
the cooking. (The display
will count down through
the set cooking time.)
NOTES for GRILL and COMBI COOKING:
• It is not necessary to preheat the grill.
• When browning food place it either on rack or in a deep container on the turntable. Use the rack for grilling
small items of food such as bacon, gammon and teacakes.
• You may detect smoke or a burning smell when using the grill for the first time. This is normal and not a
sign that the oven is not operating correctly. To avoid this problem, when rst using the oven, heat the oven
without food for 20 minutes on grill.
IMPORTANT: During operation, to allow smoke or smells to disperse open a window or switch the kitchen ventilation on.
CONVECTION COOKING
Your oven can be used as a conventional oven using the convection facility and 10 pre-set oven temperatures. Pre-
heating is recommended for better results. The temperature can be chosen from 140°C to 230°C in 10°C increments.
Press CONVECTION button 1 2 3 4 5 6 7 8 9 10
Oven Temp (°C) 140 150 160 170 180 190 200 210 220 230
For each settable temperature there is an index for the temperature in the display e.g. 170°C = fourth bar. During
preheating this display will be ashing and the increasing bars on the display will be indicating the preheating process.
Example 1: To cook with preheating
Suppose you want to preheat to 200°C and cook for 25 minutes at 200°C.
1. Press the CONVECTION button once
and the temperature indicator will
ash on the display. Additionally the
convection indicator will light up.
x1
2. Enter the desired preheat
temperature by pressing the
CONVECTION button (6 times) or
turn the ENTRY dial until the display
shows 200.
3. Press the START/ +1min/ CONFIRM
button to conrm the temperature.
4. Press the START/ +1min/ CONFIRM
button once more to start preheating.
When the preheated temperature
has been reached the audible signal
will sound twice to remind you to put
the food into the oven. The current
temperature will ash in the display.
5. Open the door, place the food inside
the oven and close the door. Use the
ENTRY dial to input the cooking time
(25 minutes).
6. Press the START/ +1min/ CONFIRM
button to start cooking. The display will
count down through the set cooking
time. The convection indicator will
ash.

GB-12
CONVECTION COOKING
Example 2: To cook without preheating
Suppose you want to cook at 230°C for 20 minutes.
1. Open the door, place
the food inside the oven
and close the door.
Press the CONVECTION
button once and the
temperature indicator
will ash on the display.
Additionally the
convection indicator will
light up.
x1
2. Enter the desired
temperature
by pressing the
CONVECTION
button (9 times)
or turn the ENTRY
dial until the
display shows 230.
3. Press the
START/
+1min/
CONFIRM
button to
conrm the
temperature.
4. Use the ENTRY
dial to input
the cooking
time (20
minutes).
5. Press the
START/ +1min/
CONFIRM
button to start
cooking.
NOTES:
1. The cooking time cannot be input until the preheating temperature arrives. If the temperature arrives, door
must be opened to input the cooking time.
2. The convection heater will stop automatically; if there is no input for the cooking time within 5 minutes. The
audible signal will sound ve times to remind you and the LED will display the time of day, if the clock has
been set. If the clock has not been set, the display will only show“0:00”.
3. When the oven is preheating, the turntable should be in the oven. During preheating and convection cook-
ing, you will hear the cooling fan cycling on and o. This is completely normal and will not aect the cooking.
4. Food manufacturers instructions are only a guideline, so cooking times may need to be adjusted.
5. After cooking is complete the cooling fan will continue working for a short time to lower the temperature of
the electrical and mechanical parts.
6. You may detect smoke or a burning smell when using convection for the rst time. This is normal and is not
a sign that the oven is not working correctly. To avoid this problem, when rst using the oven, heat the oven
without food for 20 minutes on grill and then at convection 230
°
C.
IMPORTANT: During operation, to allow smoke or smells to disperse open a window or switch the kitchen venti-
lation on. Make sure there is no food in the oven.
WARNING:
The door, outer cabinet, oven cavity and accessories will become very hot during operation. To prevent
burns, always use thick oven gloves.

GB-13
ENGLISH
OTHER CONVENIENT FUNCTIONS
1. SEQUENCE COOKING
This function allows you to cook using up to 3 dierent stages which can include manual cooking time and
mode and/or time defrost as well as weight defrost function. Once programmed there is no need to interfere
with the cooking operation as the oven will automatically move onto the next stage. The audible signal will
sound once after the rst stage. If one stage is defrosting, it should be in the rst stage.
NOTE: Auto menu cannot be set as one of the multiple sequences.
Example : If you want to defrost the food for 5 minutes, then cook with P80 microwave power for 7 min-
utes. The steps are as follows:
- 1. Press the WEIGHT/TIME DEFROST button twice, in the LED display will appear dEF2.
- 2. Enter the defrosting time by rotating ENTRY dial until the display show “5:00” minutes.
- 3. Press the MICROWAVE POWER LEVEL button once.
- 4. Input the power level by pressing the MICROWAVE POWER LEVEL button once more for P80 or turn
the ENTRY dial to select the microwave power to P80.
- 5. Press the START/+1min/CONFIRM button ( ) to conrm the setting.
- 6. Enter the cooking time by rotating the ENTRY dial until the display show“7:00”minutes.
- 7. Press the START/+1min/CONFIRM button ( ) to start cooking.
2. +1min FUNCTION (Auto minute)
The START/+1min/CONFIRM button ( ) allows you to operate the two following functions:
a. Direct start
You can directly start cooking on P100 microwave power level for 1 minute by pressing the START/+1min/
CONFIRM button ( ). The cooking process will start immediately and each time the button is pressed
this will increase the cooking time by 1 minute.
b. Extend the cooking time
You can extend the cooking time during manual, grill, convection and combi cooking in multiples of 1 min-
utes if the START/+1min/CONFIRM button ( ) is pressed while the oven is in operation. During the
weight defrost, auto menu function and sequence cooking, the cooking time cannot be increased by pressing
START/+1min/CONFIRM button ( ).
NOTE: The cooking time may be extended to a maximum of 95 minutes.
3. KITCHEN TIMER FUNCTION
You can use the kitchen timer for timing where microwave cooking is not involved for example to time boiled
eggs cooked on conventional hob or to monitor the standing time for cooked/defrosted food.
Example:
To set the timer for 5 minutes.
1. Press the CLOCK
SET/ KITCHEN TIMER
button twice.
x 2
2. Enter the desired time
by rotating the ENTRY
dial until the correct
minutes are displayed.
3. Press the START/
+1min/CONFIRM
button to start the
timer.
4. Check the display.
(The display will count
down through the set
time.)
When the timer time arrives, the audible signal will sound 5 times and the LED will display then time of day.
You can enter any time up to 95 minutes. To cancel the KITCHEN TIMER whilst counting down,
simply press the STOP button.
NOTE: The KITCHEN TIMER function cannot be used whilst cooking.
4. CHILD LOCK:
Use to prevent unsupervised operation of the oven by children.
a. To set the CHILD LOCK:
Press and hold the STOP button for 3 seconds until a long a beep sound. The display will light the lock indicator:
b. To cancel the CHILD LOCK:
Press and hold the STOP button for 3 seconds until a long beep sound. The lock indicator will disappear.

GB-14
WEIGHT DEFROST AND TIME DEFROST OPERATION
The AUTO MENU programmes automatically work out the correct cooking mode and cooking of the foods (details on page
GB-15). Follow the example below for details on how to operate this function.
Example: To cook 350 g carrots by using the AUTO MENU function for fresh vegetables.
1. Rotate the ENTRY dial and
select the desired auto menu.
The display will show:
2. Press the START/+1min/
CONFIRM button
() to conrm
the setting.
3. Enter the desired weight
by rotating the ENTRY
dial until the display
shows:
4. Press the START/+1min/
CONFIRM button
() to start
cooking. (The display
will count down through
cooking time.)
NOTES:
• The weight or quantity of the food can be input by rotating the ENTRY dial until the desired weight/ quantity is displayed.
Enter the weight of the food only. Do not include the weight of the container.
•
For food weighing more or less than the weights/quantities given in the AUTO MENU chart on page GB-15 cook by manual operation.
1. WEIGHT DEFROST
The microwave oven is pre-programmed with a time and power level so that the following food is defrosted easily: Pork, beef
and chicken. The weight range for this food is from 100g – 2000g in 100g steps. The frozen foods are defrosted from -18°C.
Follow the example below for details on how to operate these functions.
Example: To defrost a meat joint weighing 1,2 kg using WEIGHT DEFROST.
Place the meat in a an dish or microwave oven defrost rack on the turntable.
1. Select the menu required by pressing
the WEIGHT/ TIME DEFROST button
once.
x1,
the display will show:
2. Enter the desired weight by
rotating the ENTRY dial until the
display shows:
At the same time “g” indicator
will light on the display.
3. Press the START/+1min/CONFIRM
button ( ) to start defrosting.
The time and defrost indicators will
light and“g”indicator will disappear.
(The display will count down through
defrosting time).
NOTES for WEIGHT DEFROST:
• Before freezing foods, ensure food is fresh and of good quality.
• Place food with a weight less than 200 g at the edge of the turntable and do not place it to the centre of the turntable.
• Food weight should be rounded up to the nearest 100 g, for example, 650 g to 700 g.
• If necessary, shield small areas of meat or poultry with at pieces of aluminium foil. This will prevent the areas from becoming
warm during defrosting. Ensure the foil does not touch the oven walls.
2. TIME DEFROST
This function quickly defrosts food while enabling you to choose a suitable defrost period, depending on the food type. Follow
the example below for details on how to operate this function. The time range is 0:05 – 95:00.
Example: To defrost the food for 10 minutes.
1.
Select the menu required by pressing the
WEIGHT/ TIME DEFROST button twice.
x2,
the display will show:
2. Enter the desired cooking time
by rotating the ENTRY dial until
the display shows 10:00
3. Press the START/+1min/CONFIRM
button ( ) to start defrosting.
The time and defrost indicators will light.
NOTES for TIME DEFROST:
• After cooking the audible signal will sound ve times and the LED will then display time of day, if the clock has been set. If the
clock has not been set, the display will only show“0:00
”
when cooking is complete.
• The preset microwave power level is P30 and can not be changed.
AUTO MENU OPERATION

GB-15
ENGLISH
AUTO MENU CHART
Auto Menu Display Cooking
method WEIGHT/ PORTION / UTENSILS Procedure
Reheat
Dinner Plate
(pre-cooked food
e.g. meat, vegetable
and garnishes)
A1 100% Micro 150g, 250g, 350g, 450g, 600g
(initial temp. 5°C)
Plate and vented microwave
cling lm or suitable lid
Put the pre-cooked food on a plate. Use vented
microwave cling lm or a suitable lid to cover the
plate. Place the plate in the centre of the turntable.
Stir after cooking.
Jacket Potato A2 100% Micro 1, 2, 3 potatoes (pieces)
1 potato = approx. 230g
(initial temp. 20°C)
Please use potatoes with a similar size of approx.
230g. Pierce each potato in several places and place
towards the edge of the turntable. Turn over and re-
arrange halfway through cooking. Stand for 3 - 5
minutes before serving.
Meat
(boneless meat e.g.
beef, lamb, pork or
poultry)
A3 100% Micro 150g, 300g, 450g, 600g
(initial temp 5°C)
Flan dish and vented microwave
cling lm or suitable lid
Cut the meat into small stripes and place it in a an
dish. Use vented microwave cling lm or a suitable
lid to cover the an dish. Place the an dish in the
centre of the turntable.
Fresh vegetables e.g.
Cauliower, carrots,
broccoli, fennel, leek,
pepper, courgettes
etc.
A4 100% Micro 150g, 350g, 500g
(initial temp 20°C)
Bowl and lid
Cut, chop or slice fresh vegetables into even sized
pieces. Place fresh vegetables in a suitable container.
Place on the turntable. Add the required amount of
water (1 tbsp per 100 g). Cover with a lid. Sir after
cooking and let the food stand for approx. 2 minutes.
Fish
(Only sh llet is
recommended for
this programme)
A5 80% Micro 150g, 250g, 350g, 450g, 650g
(initial temp. temp 20°C)
Flan dish and vented microwave
cling lm or suitable lid
Place in a single layer in a an dish. Use vented
microwave cling lm or a suitable lid to cover.
Pasta
(dried pasta e.g.
Fussili, Farfalle,
Rigatoni)
A6 80% Micro Pasta Water
50 g 450 ml
100 g 800 ml
150 g 1200 ml
(initial temp. for the water: 20°C)
Big and wide bowl
Place pasta in an appropriate sized bowl and add the
water. Do not cover. Place the bowl in the centre of
the turntable.
After cooking, stir well and stand for 2 minutes
before draining.
Soup A7 100% Micro 200g, 400g, 600g
(initial temp. 5°C)
Cups (200 g per cup)
Place the cups on the turntable and stir after cooking.
Sponge Cake*
Ingredients:
4 eggs
110 g sugar
100 g our
10 g corn starch
60 g water
60 g vegetable oil
A8 Preheat at
160°C 475g
(initial temp. 20°C)
Spring form
(about 26 cm diameter)
Rack
The oven will preheat to 160°C. When the
temperature is reached, open the door and place
the cake on the rack inside. Press the START/+1min/
CONFIRM button ( ) to start the baking.
Frozen Pizza (Oven
Ready Pizza Æ
prebaked)
A9 C-1 200g, 300g, 400g
(initial temp. -18°C)
Rack
Remove packaging and place directly on the rack. No
standing time is required.
Roast Chicken A10 C-1 500g, 750g, 1000g, 1200g
(initial temp. 20°C)
Rack
If desired, season with salt, pepper and paprika.
Pierce the skin of the chicken a few times. Place the
chicken, breast side up, onto the rack.
* Preparation of the sponge cake (A8):
1. Separate the eggs.
2. Cream the egg yolk, oil and water with a handheld blender (low speed) until light and uy.
3. Add the our and mix well.
4.
In a separate dish, beat the egg white, sugar and cornstarch with a handheld blender (high speed) until sti. Carefully fold into the cake mixture.
5. Spoon in the mixture into the greased spring form and smooth the surface.
6. After preheating place the spring form on the rack.
NOTES:
• The nal temperature will vary according to the initial food temperature. Check food is piping hot after cooking. If necessary,
you can extend the cooking manually.
•
The results when using auto cook depend on variances such as the shape and size of the food and your personal preference as regards
cooking results. If you are not satised with the programmed result, please adjust the cooking time to match your requirement.

GB-16
SUITABLE OVENWARE
To cook/defrost food in a microwave oven, the microwave energy must be able to pass through the container to
penetrate the food. Therefore it is important to choose suitable cookware.
Round/oval dishes are preferable to square/oblong ones, as the food in the corners tends to overcook. A variety
of cookware can be used as listed below.
Cookware Microwave
Safe Grill Convection Mix Cook Comments
Aluminium foil
Foil Containers
✔/ ✘✔✔
✔/ ✘
Small pieces of aluminium foil can be used
to shield food from overheating. Keep foil
at least 2cm from the oven walls, as arcing
may occur.
Foil containers are not recommended un-
less specified by the manufacturer, e.g.
Microfoil®, follow instructions carefully.
Browning dishes
✔✘✘✘
Always follow the manufacturers instruc-
tions. Do not exceed heating times given.
Be very careful as these dishes become very
hot.
China and ceramics
✔/ ✘✘✔✔
Mix Conv.
only
Porcelain, pottery, glazed earthenware and
bone china are usually suitable, except for
those with metallic decoration.
Glassware e.g. Pyrex ®
✔✔✔✔
Care should be taken if using ne glassware
as it can break or crack if heated suddenly.
Metal
✘✔✔✘
It is not recommended to use metal cook-
ware as it will arc, which can lead to re.
Plastic/Polystyrene e.g.
fast food containers
✔✘✔
✔/ ✘
Care must be taken as some containers
warp, melt or discolour at high tempera-
tures.
Cling lm
✔✘✘✘
It should not touch the food and must be
pierced to let the steam escape.
Freezer/Roasting bags
✔✘
✔/ ✘✘
Must be pierced to let steam escape. Ensure
bags are suitable for microwave use. Do not
use plastic or metal ties, as they may melt or
catch re due to the metal‘arcing’.
Paper - Plates, cups and
kitchen paper
✔✘✘✘
Only use for warming or to absorb moisture.
Care must be taken as overheating may
cause re.
Straw and wooden
Containers
✔✘✘✘
Always attend the oven when using these
materials as overheating may cause re.
Recycled paper and
newspaper
✘✘✘✘
May contain extracts of metal which will
cause‘arcing’and may lead to re.
Rack
✔✔✔✔
The metal rack supplied have been specially
designed for all cooking modes and will not
damage the oven.
WARNING:
When heating food in plastic or paper containers, monitor the oven due to the possibility of ignition.

GB-17
ENGLISH
CAUTION: DO NOT USE COMMERCIAL OVEN
CLEANERS, STEAM CLEANERS, ABRASIVE, HARSH
CLEANERS, ANY THAT CONTAIN SODIUM HYDROX-
IDE OR SCOURING PADS ON ANY PART OF YOUR
MICROWAVE OVEN.
Before cleaning, make sure the oven cavity, door,
oven cabinet and accessories are completely cool.
CLEAN THE OVEN AT REGULAR INTERVALS AND
REMOVE ANY FOOD DEPOSITS – Keep the oven
clean, or the oven could lead to a deterioration of
the surface. This could adversely aect the life of
the appliance and possibly result in a hazardous
situation.
Oven exterior
The outside of your oven can be cleaned easily with
mild soap and water. Make sure the soap is wiped o
with a moist cloth, and dry the exterior with a soft
towel.
Oven controls
Open the door before cleaning to de-activate the
oven controls. Care should be taken when cleaning
the oven control. Using a cloth dampened with water
only, gently wipe the panel until it becomes clean.
Avoid using excessive amounts of water. Do not use
any sort of chemical or abrasive cleaner.
Oven Interior
1. For cleaning, wipe any splatters or spills with a soft
damp cloth or sponge after each use while the oven
is still warm. For heavier spills, use a mild soap and
wipe several times with a damp cloth until all resi-
dues are removed. Built-up splashes may overheat
and begin to smoke or catch re, and cause arcing.
Do not remove the waveguide cover.
2. Make sure that mild soap or water does not pen-
etrate the small vents in the walls which may cause
damage to the oven.
3. Do not use spray type cleaners on the oven interior.
4. Heat up your oven regularly by using the convection
and grill. Remaining food or fat can cause smoke or a
bad smell.
5. Food will release steam during cooking and cause
condensation inside the oven and door. It is impor-
tant to wipe the oven dry. A build up of condensa-
tion will eventually lead to rust forming on the oven
interior.
SPECIAL NOTE for WAVEGUIDE COVER: Keep the
waveguide cover clean at all times. The waveguide
cover is constructed from a fragile material and should
be cleaned with care (follow the cleaning instructions
above).
Excessive soaking may cause disintegration of the
waveguide cover. The waveguide cover is a consum-
able part and without regular cleaning, will need to
be replaced.
Accessories
The accessories like turntable and rack should be
washed in a mild washing up liquid solution and
dried. They are dishwasher safe.
Door
To remove all traces of dirt, regularly clean both sides
of the door, the door seals and adjacent parts with a
soft, damp cloth. Do not use harsh abrasive cleaners
or sharp metal scrapers to clean the glass oven door
since they can scratch the surface, which may result in
shattering of the glass.
NOTE: A steam cleaner should not be used.
Cleaning tip - For easier cleaning of your oven:
Place half a lemon in a bowl, add 300ml (1/2 pint) water and heat on 100% for 10 -12 minutes.
Wipe the oven clean using a soft, dry cloth.
IMPORTANT:
• If you cook food for more than the standard time (see chart below) using the same cooking mode, the oven's safety
mechanisms automatically activate. The microwave power level will be reduced or the grill heating element will
turn on and o.
Cooking Mode Standard time
Microwave P100 30 minutes
Grill/ Convection/ Combi cooking mode Intermittent operation, temperature and time
controlled
CARE AND CLEANING

GB-18
Other manuals for R-842IN
1
Table of contents
Languages:
Other Sharp Microwave Oven manuals

Sharp
Sharp R-763IN User manual

Sharp
Sharp R-222T Carousel User manual

Sharp
Sharp R-82STM-A User manual

Sharp
Sharp Carousel R-3S56 User manual

Sharp
Sharp R-7280G-BS User manual

Sharp
Sharp R-622STM User manual

Sharp
Sharp R-757H User manual

Sharp
Sharp SM327FHW User manual

Sharp
Sharp R-32STM Instruction Manual

Sharp
Sharp R642BKW User manual

Sharp
Sharp R-239 Instruction Manual

Sharp
Sharp R-230HW User manual

Sharp
Sharp R-9570 User manual

Sharp
Sharp Carousel R-216L User manual

Sharp
Sharp YC-GC52FU-B User manual

Sharp
Sharp R-420CK User manual

Sharp
Sharp R-82STN Instruction Manual

Sharp
Sharp R-360 User manual

Sharp
Sharp KB-6021MK Assembly instructions

Sharp
Sharp AX-1100 User manual