Sharp R-9320 User manual

SHARP SERVICE MANUAL
S8404R9320J//
MICROWAVE OVEN
R19320
MODELS R-9450
in the interests of user-safety the set shouid be restored to its originai
condition and only parts identical to those specified be used.
/ TABLE OF CONTENTS \
page
FOREWORD ....................................................................... ..t
CAUTION, MICROWAVE RADIATION. ..................................................... .l
THUMB INDEX ..................................................................... ..l
PRODUCT DESCRIPTION .............................................................. ..Z
OPERATING INSTRUCTIONS. ....................................................... .3 y 19
OPERATlON....................................................................20~2 7
SERVICING ..................................................................... 28-35
TOUCH CONTROLPANELASSEMBLY ................................................. 36 w 51
COMPONENT REPLACEMENT AND ADJUSTMENT PROCEDURES ............................. 52 h 60
MICROWAVE MEASUREMENT .......................................................... .61
SCHEMATIC DIAGRAM (R-9320) ....................................................... 62
PICTORIAL DIAGRAM (R-9320) ...................................................... 6364
CONTROL PANEL CIRCUIT (R-9320) .................................................. 6566
PRINTED WIRING BOARD ............................................................ 67
SCHEMATIC DIAGRAM (R-9450) ....................................................... 68
PICTORIAL DIAGRAM (R-9450) ...................................................... 69,70
CONTROL PANEL CIRCUIT (R-9450) .................................................. 71,72
PACKING AND ACCESSORIES ......................................................... 73
PARTS LIST ................................................................. ..74-8 4
SHARP CORPORATION

R-9320
R-945Q

SERVICE MANUAL
SHARP
R-9320/R-9450
FOREWORD
This Manual has been prepared to provide Sharp Service
Personnel with complete Operation and Service Informa-
tion for the Sharp Microwave Ovens, R-9320/ R-9450.
It is recommended that service personnei carefully study
the entire text of this Manual so they will be qualified to
render satisfactory customer service.
CAUTION
MICROWAVE RADIATION
Personnel should not be exposed to the microwave
energy which may radiate from the magnetron or other
microwave generating devices if it is improperly used or
connected.
All input and output microwave connections, waveguides,
flanges, and gaskets must be secured.
Never operate the device without a microwave energy
absorbing load attached.
Never look into an open waveguide or antenna while the
device is energized.
SHARP CORPORATION
OSAKA, JAPAN
R-9320
R-94!5C
PRODUCT DESCRIPTION
J I t
< - a, P.
? ’ c *,.
INSTRUCTIONS
*SERVICING
71” ’ *
%x& b z _
i‘* _ Tte ; j ” + k+@“” %&I
tl, 2 >I ’ * ?e?: j’ ,j,( $.“, ‘<‘:j:
‘r ~~g&yz : i
TOUCH CONTROL
PANEL ASSEMBLY
*COMPONENT REPLACEMENT
AND ADJUSTMENT PROCEDURE-;
MICROWAVE MEASUREMENT
,;w”
e-y&darr*r fr,* , ^_ cx..“_ *- 4ijl x _
i
2)I’
i$.’ PARTS LIST
<> _
sW”,

PRODUCT DESCRIPTION
EXPLANATION OF MICROWAVE COOKING
The Sharp Microwave Oven uses microwave energy to Materials with a high moisture content, like most foods,
produce heat in the food to be cooked. Unlike will absorb microwave energy. As the microwave energy
conventional ovens microwave energy will cook foods at a frequency of 2450 Megahertz enters the food, the
without applying external heat. molecules align themselves with the energy. Because the
microwaves are changing polarity every half cycle, the food
Microwaves, which are short electromagnetic waves of molecules are changing direction every half cycle or oscil-
RF (radio .frequency) energy, pass through materials lating back and forth 4,900,000,000 times per second. This
such as glass, paper, china and most plastics. Materials high speed oscillation causes friction between the mole-
such as metal and aluminum foil tend to reflect micro- cules, thereby converting the microwave energy to heat.
waves and may be used only as recommended in the cook-
ing instructions.
SPECIFICATIONS
Power requirements
Power consumption
Microwave output power
Case dimensions
Width
Height
Depth
Cooking cavity dimensions
Width
Height
Depth
Turntable diameter
Control complement
Weight
j-/
!
I
,
I
I
I
i
j-
I
240V
50Hz
Single phase, 3 wire earthed
1.3kW
650W (2 litre water load)
627mm
400mm
458mm I
1
395mm
260mm
422mm I
,
385mm
Start Pad, Stop Pad and Clear Pad I
/
Ciock (1:OO - 12:59)
Minute Timer (0 - 99 minutes 99 seconds)
Temperature Control: 30 - 93°C (R-9450 only) 1
Variable Cooking Mode Selector /
/
Repetition Rate :
HIGH........... Full power throughout the cooking time
MED HIGH.. . . , .24 sec. ON, 8 sec. OFF, approx. 70% of full power I
MED . . . . . . . . . . . . 18 sec. ON, 14 sec. OFF, approx. 50% of full power
MED LOW
DEFROST ” ” ’ . .12 sec. ON, 20 sec. OFF, approx. 30% of full power
LOW . . . . . . . . . . . . .6 sec. ON, 26 sec. OFF, approx. 10% of full power I
Auto Start Cooking /
Sensor Temp. Cooking /
Approx. 28kg (R-93201
Approx. 29kg (R-9450)

- R-9320
R-9450
OPERATING INSTRUCTIONS
..-_____
-.- _____ - --- _-- ~~~-.
OPERATION OF AUTO-TOUCHTMCONTROL PANEL ___-----
-. -_ .___ _ ---_._____~---_---~ -.- -
This new Auto-Touch microwave oven uses a microprocessor, the electronic brain that provides the
wide variety of cooking programs which could not be achieved by conventional control methods.
The operation of the oven is controlled by touching the appropriate pads arranged on the surface of
the control panel. The lighted digital readout will display the cooking time, time of day or minute
timer, etc. Indicators show the variable cooking setting or cooking function you have programmed.
An entry signal tone should be heard each time you touch the control panel to make a correct entry.
If you do not hear this sound,
1) You have not used enough pressure in touching the pad,
2) You have made more entries than the control panel will accept,
3) You have made an incorrect entry.
In addition to the entry signal tone, an audible signal will sound for approximately 2 seconds at the
end of the cooking cycle.
* You cannot program the oven if the door is not closed tightly.
* During cooking, the program cannot be changed until CLEAR pad is touched twice. All functions
are locked in to prevent accidental changes.
Auto-Toucti”ControlPanel (R-9320)
p.__-__--___--
compu defrost, auto start, cook and kg.
Shows readout of cooking time, compu defrost operation or time of day.
COMPU DEFROST PADS
Touch to select compu defrost setting.
NUMBERING PADS
Touch to enter cooking times, clock time or weights of food.
PROGRAM SELECTOR PADS
Touch to set clock, auto start or timer.
VARIABLE COOKING CONTROL PADS
. If not touched, HIGH is automatically selected.
en during cooking.
I i I-uma /
2-w Touch to erase during programming.
3- ~D*chol~
i
,z.zz -START PAD
/ \clmi..a
4-- cmalLIc.wa
, -‘Pw.*cmu
I
!t
Touch to start oven.
LmeoIp INSTANT COOK PAD
Touch to cook for 1 minute at HIGH or increase 1 minute at variable cooking
during cooking.
PUSH-0OPFY3ooFI COMPU DEFROST CHART
.- Foods cooked with compu defrost settings.

ZE
s ! Auto-Touch’“Contro1 Panel ,(R-9450)
--
i
---‘““:::“,“, start,,,,k a”d kg.
lndrcator lrghts for variable cooking, temp, sensor temp, compu
’ i-
,/ f-
I ’
I3
/ :
!
! ’
~ ’
!I i
! /
COYU YED LOW YE0 H&W
;;g: /g/jBjy/fyj- LIGHTED DIGITAL DISPLAY
Shows readout of cooking time, temperature, sensor temp setting,
COOK AUTO rr compu defrost operation or time of day.
~__~_ -, OMPU DEFROST PADS
Touch to select compu defrost settings.
SENSOR TEMP PAD
Touch to select Sensor Temp settings for fresh roasts, poultry or
simmering, Inset-t temperature probe when indicated in display.
ROGRAM SELECTOR PADS
Touch to set clock, auto start, timer, or temperature.
NUMBERING PADS
I
I i
1 i
i 1
I
j /
i i
ii,
)i
~I
I
~I
-
Touch to enter cooking times, temperature settings, clock time
sensor temp settings or weight of food.
VARIABLE COOKING CONTROL PADS
Touch to select power setting. If not touched, HIGH is auto-
matically selected.
Touch to stop operation of oven during cooking.
CLEAR PAD
Touch to erase during programming.
-INSTANT COOK PAD
Touch to cook for 1 minute at HIGH or increase cooking time.
I
I
PUbH TO OPEh DOOR
I
I
COMPU DEFROST CHART
Foods cooked with compu defrost settings.
SENSOR TEMP CHART
Foods cooked with sensor temp settings.
---__-- ____
_~-------~...-

EE:
m
CLOCKSETTING
This oven functions as a clock to keep the time of day. To set the clock, follow this procedure. When
oven is plugged in, the display will show [ss:83] and variable cooking indicators, flashing each
second. Touch the CLEAR pad; i::li-;‘z! will appear. After one minute the display will show
y---my .
* Suppose you want to enter the correct time of day 12:30 (A.M. or P.M.)
Procedure / Pad Order Display 1
1. Touch the AUTO START/CLOCK
pad. AllToslwT :
/-
, UCXK i
I I
j 2. Enter the correct time of day by - 1 ____-
I touching the numbers in sequence. 1 2 ~3 O:/
~ ------------------I
! I /
I I
I 3. Touch the AUTO START/CLOCK
pad again.
1 AuTosm?T /
i CLOCK i
I
l Zl l ,7 I-..
II- l J-s
I I
I
The clock is now set and will keep the time of day. If power to the unit is interrupted, the display will
intermittently show 1
j88: 1’1381and variable cooking indicators after the power is reinstated. To reset
the clock, touch the CLEAR pad and then repeat the steps above.
NOTE: * This is a 12 hour clock. L
c RP,“R I will appear in the readout if you attempt to enter an in-
correct clock time. Forexample, if you ateempt to enter 8:61 or 13:00, ,m and
incorrect clock time will appear repeatedly. To erase ERR~/Wouch the CLEAR pad. If
you accidently touch more than 4 number pads, the last 4 numbers you have touched will
appear on the display.
MINUTE TIMER SETTING
This oven can be used as a timer for timing up to 99 minutes, 99 seconds. There is no cooking involved.
+ Suppose you want to time a 3 minute long distance phone call.
Procedure Pad Order Display
1. Enter desired time. ,I I
r-i 17 1
-1 I,/ 1-r 1
2. Touch the TIME R pad. jTIMER
The timer will begin counting down to zero. When the timer reaches zero, the signal will sound. The
time of day will reappear on the display. To cancel the minute timer during operation, simply touch
the CLEAR pad and the time of day will reappear.

R-g450MICROWAVE COOKING
To Cook at HIGH
Many foods are cooked at HIGH (100%) for best results. The variabie cooking control allows you to
select the rate of microwave cooking, but the oven will automatically operate at HIGH if no variable
cooking control pad is touched. If you wish to cook at HIGH, it is not necessary to touch the HIGH
pad. For other variable cooking control levels, the desired setting must be entered.
+ Suppose you want to heat 2 cups of coffee for I minute 30 seconds at HIGH.
Procedure Pad Order
j -____-
1. Enter desired cooking time. I 1 3 0;
/ p-y
The cooking time will count down to zero. When the timer reaches zero, the indicators will go out and
an audible signal will sound, The time of day will reappear on the display. Microwave energy will stop.
I To Cook by Variable Cooking Control
There are five preset power ieveis.
’ .
Approximate percentage of microwave power for each power level.
HIGH (Full Power) 100%
MED HIGH (Roast) 70%
MED (Simmer) 50%
MED LOW/DEFROST (Defrost) 30%
LOW (Warm) 10%
Some foods give best results when cooked more slowiy at a lower cooking power. Your cookbook
indicates the recommended variable setting for each recipe. See your Sharp Carousei microwave cook-
book for guidelines on how to use the variable cooking contra!.
* Supoose you want to heat soup for 2 minutes 15 seconds at MED HIGH.
Procedure Pad Order Display /
1. Enter desired cooking time. 2 1 5 : 1 /q
t -
2. Select desired variable cooking
control setting. M. HIGc:
I
I MEL tiIGH 1 /
,i l/Z :
t . l-1 I
3. Touch the START pad. STAFiT
MEC HIGH
2 I II
COOk
The cooking timer will count down to zero. When the timer reaches zero, all indicators will go out and
an audible signal will sound. The time of day will reappear on the display.
NOTE. If you accidentally touch the wrong variablecooking control pad, immediately touch the
correct pad. The last pad touched will be the setting the oven accepts. For example, if you
touch the MED HIGH pad and then immediately touch the MED pad, the oven will cook at
MED.

Multiple Sequence Cooking I(R-9320)
This oven can be programmed for up to 3 automatic cooking sequences, switching from one
variable power setting to another automatically.
Check the microwave recipe section of your Sharp Carousel Microwave Cookbook for ideas on
when to use multiple sequence cooking.
+ Suppose you want to roast beef for 5 minutes at HIGH, and continue to cook for 30 minutes at
MED HIGH.
Procedure Pad Order Display
i
I
/ 1. Enter desired time for first cooking I
5 0 0 / I,- 1-i t-i
I sequence. ____ ____ ip -I 1-r i-1
/ 2. Select first variable cooking control HIGH j HIGH
‘-7 l-l r-j
I I ,I *
/ setting. I -1 9 l-1 1-f
1 I
3. Enter desired time for second
cooking sequence.
____~~- 1
;3 0 0 0 ,-, l-i 17 17
-I Cl i-1 I,/
~~___.~
/ i
4. Select second variable cooking
control setting.
VEC HIGH ~-
M.HIGH ! ,7 I7 l-ir-i
I
I -I l-l . l-1 1-J
/----
5. Touch the START pad. START
;y- HIGH
C I7 I7
/ COOK -I * l-1 1-1
The timer begins to count
down when it reaches zero.
I zero.
/
1 j 1
MED HIGH 1
I
i ’ ,7 I7 /7/-l :
i/ -
-1 Cl l lJl-I I
I
When the timer reaches zero, all indicator lights will go out and an audible signal will sound. The
time of day will reappear on the display.
NOTE: If HIGH is selected as the final sequence, it is not necessary to touch the HIGH pad.
If HIGH is programmed as the first or second sequence, HIGH pad must be touched, even
though the HIGH indicator may already be lighted.
R-9320
R-945C
7

q-9320
?-9450 ---p-----
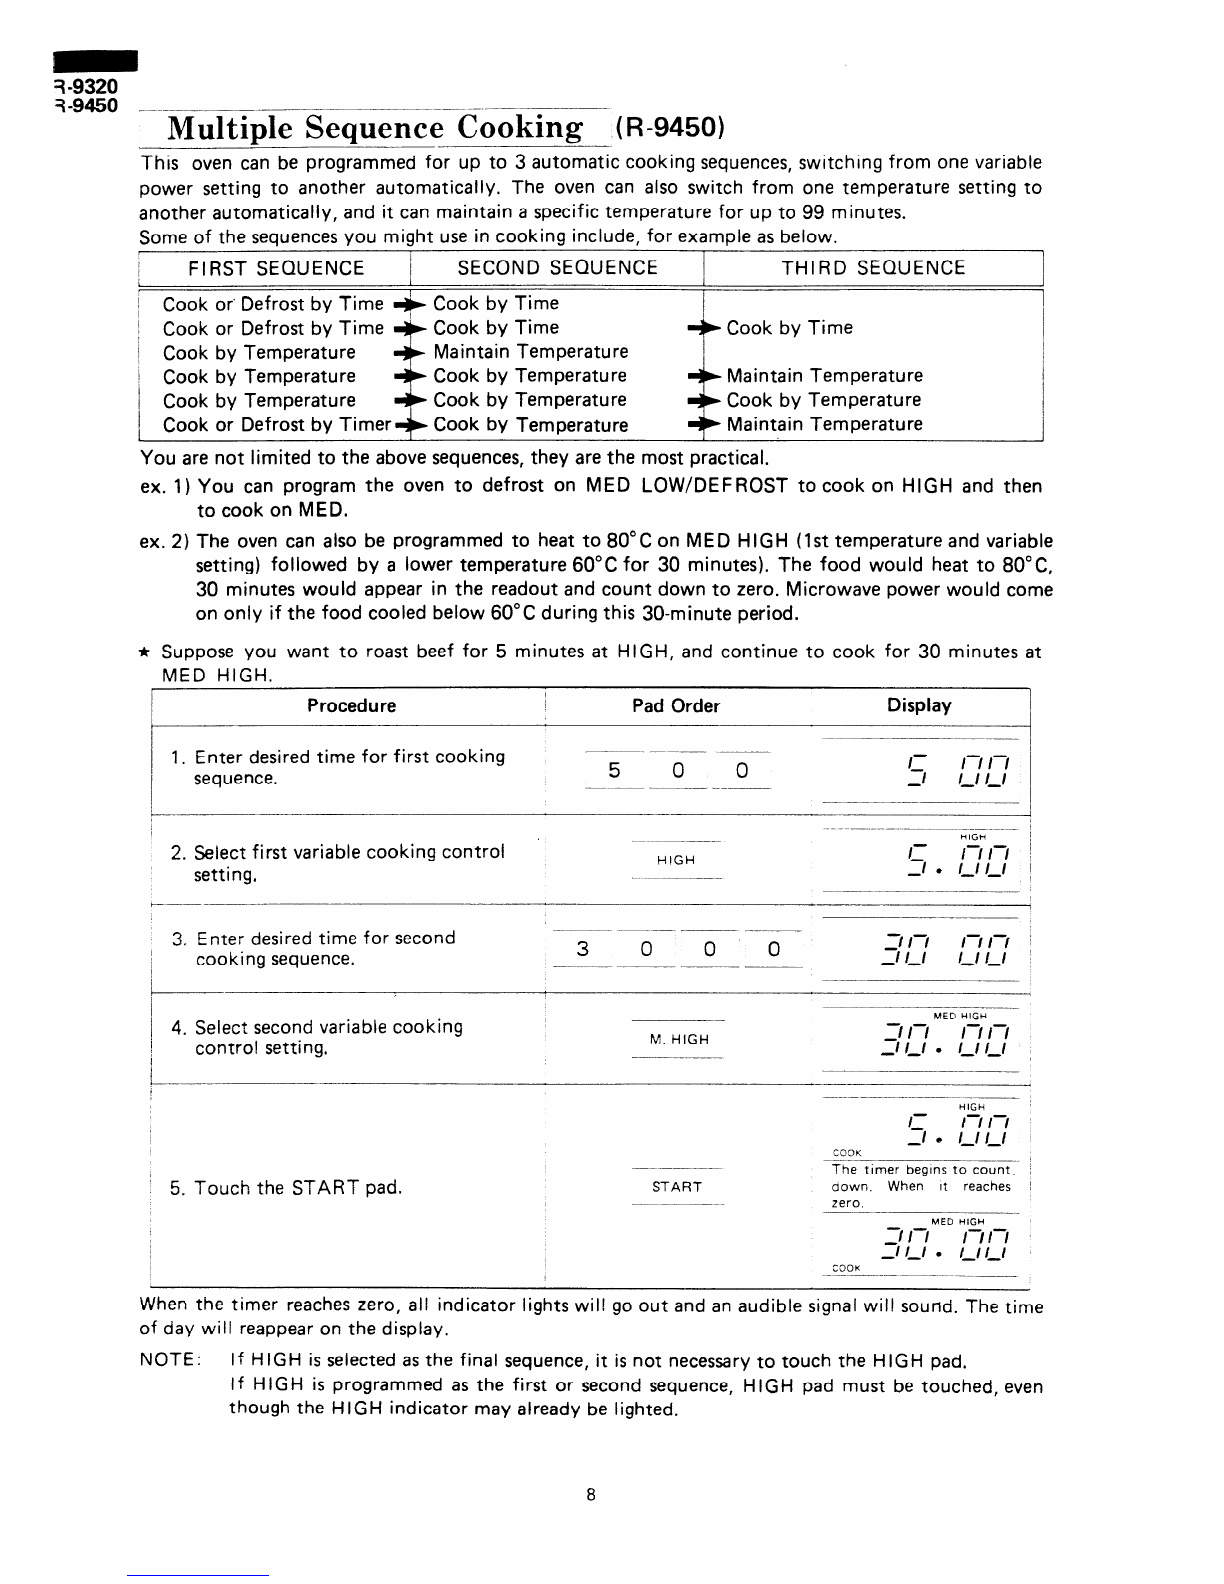
Multiple Sequence Cooking (R-9450)
This oven can be programmed for up to 3 automatic cooking sequences, switching from one variable
power setting to another automatically. The oven can also switch from one temperature setting to
another automatically, and it can maintain a specific temperature for up to 99 minutes.
Some of the sequences you might use in cooking include, for example as below.
I FIRST SEQUENCE / SECOND SEQUENCE ( THIRD SEQUENCE
L I
f
j Cook or Defrost by Time + Cook by Time i
1 Cook or Defrost by Time + Cook by Time Cook by Time
j Cook by Temperature Maintain Temperature
1 Cook by Temperature Cook by Temperature Maintain Temperature
/ Cook by Temperature Cook by Temperature Cook by Temperature
/ Cook or Defrost by Timer Cook by Temperature Maintain Temperature
You are not limited to the above sequences, they are the most practical.
ex. 1) You can program the oven to defrost on MED LOW/DEFROST to cook on HIGH and then
to cook on MED.
ex. 2) The oven can also be programmed to heat to 80°C on MED HIGH (1st temperature and variable
setting) followed by a iower temperature 60°C for 30 minutes). The food would heat to 60°C,
30 minutes would appear in the readout and count down to zero. Microwave power would come
on only if the food cooled below 60°C during this 30-minute period.
* Suppose you want to roast beef for 5 minutes at HIGH, and continue to cook for 30 minutes at
MED HIGH.
Procedure Pad Order Display
1, Enter desired time for first cooking
sequence.
__-. --___
5 0 0
____ ----.~ 11 1-i i-i
-I i-1 1-i
2. Select first variable cooking control
setting. HIGH
HIGH
II- i-i 17
-I * i-1 /-I
3. Enter desired time for second
I coo king sequence.
/
--__
3 0 0 0
____________- 3 17 i-i i-i
-IL1 1-I i-1
-
1 4. Select second variable cooking
I control setting.
I M. HIGH
MED HIGH
1-i 1-i
-1 i-1 l 1-i i-i
5. Touch the START pad.
_---
START
______--
HIGH
11 17 r7
-I * i-1 l-1
COOK
The timer beglns to count.
aown. When reaches
zero.
- ME0 HIGH
17 i-i
-1 i-1 l l-1 l-1
COOK
When the timer reaches zero, all indicator lights will go out and an audible signal will sound. The time
of day will reappear on the display.
NOTE: If HIGH is selected as the final sequence, it is not necessary to touch the HIGH pad.
If HIGH is programmed as the first or second sequence, HIGH pad must be touched, even
though the HIGH indicator may already be lighted,
8

OPERATION FOR INSTANT COOK‘”
The “Instant Cook” system allows YOU to cook for an extra minute at HIGH by simply touching the
“INSTANT COOK” pad. You can also extend cooking time in multiples of 1 minute by repeatedly
touching the “INSTANT COOK” pad during a cooking program.
* Suppose you want to cook 1 minute at HIGH easily.
Procedure Pad Order Display ;
I
I
/
1 Touch the INSTANT COOK pad.
I HIGH
I I
1 INSTANT COOK’ 1 I
I i-i 17 1
j
jCOOK
I l IJIJ /
The timer begins to count
down.
When the timer reaches zero, all indicators will go out and an audibie signal will sound. The time of
day will reappear on the display.
NOTE: The Instant Cook system can be only inputted within 1 minute after cooking or closing the
door.
* Suppose you want to increase 1 minute cooking time during 5 minutes at MED HIGH cooking.
Procedure Pad Order Display-
1. Enter desired cooking time. 5 0 0 11 1-j i-i
-I l l-1 i-1
1
2. Select desired variable cooking control MED HIGH
M. HIGH C i-1 1-i 1
setting. -I l 1-i i-1
I
3. Touch the START pad. 1
START
The timer begins to count
/ down.
I
/ ME0 HIGH 1
:~c_I(1.3L;‘~~
4. Touch the INSTANT COOK pad. ~~
J
The cooking time is increas-
ed 1 minute and continues _
to count down.
When the timer reaches zero, all indicators will go out and an audible signal will sound. The time of
day will reappear on the display.
NOTE: The cooking time can be increased in multiples of 1 minute by repeatedly touching the
INSTANT COOK pad during the cooking program.

;-z: s OPERATIONFORCOMPU DEFROST'"COOKING
This Microwave Oven has special function keys to defrost meats faster and better.
Compu Defrost 1 - 5 automatically defrost minced beef, steak, whole chicken, chicken pieces and
chops. Each key has 3 cooking stages. Select the desired Compu Defrost number and input the food
weight by using the number pads.
+ Suppose you want to defrost 1.36 kg steak by Compu Defrost.
i Procedure
1. Select food category for
Compu Defrost.
2. Touch number pads to enter weight.
(Ex: 1.36 kg should be 1.4 kg)
Pad Order Display
2
/ 3. Touch the START pad. START
COMPU - - I
DEFmsT/ /i /i yI--:f’ 1
-- l
COMPU
DEFFOST 1: n I a- I-
i- Ll /,I I-
I kg 1
COVER and EDGE will be
displayed repeatedly and
COMPU DEFROST appears,
especially kg is flashing for
the entrance of weight.
I COMPU
DEFROST
, 1. I
1-i
Fiashing of kg stops and
kg goes on.
COMPU
DEFROST
MED HIGH I
1.
, COOK ha 1
1 .4 and kg WIII go off
and 13.27 will appear.
TOMW
M’RXT
MED HlGti /
Tne timer begins to coun: down Wher, the 1st stage flnishs, an
audible slgnai wtll sound and oven IS stopped
COMPU
DEFROST T; ;:fi/~~ /
/
I
COMPV
DWWXT I7 \ I I- i-1 :
l-l \I I,- I? *
COMPU
,,ZFmT i- i7 \ i i- 17
I
/ COMPU - I-.. i- i-
/ DEFR(IST /I Li i-l ,,-
1
TURN, OVER and COVER,
EDGE WIII be displayed
repeatedly.
1 4. Open the door. Turn over and shield
the hot portions.
10

i Procedure Pad Order ( KfE
m
Display I
i 5 PI
j * ease put food in the oven.
/ Close the door.
Touch the START pad. START ’
I
1
j
i
START will be displayed.
/ COMPU
DEFROST
COOK
The Timer begins to count down. When the 2nd stage finishs, an
i audible signal WI/I sound.
UED LOW
COMPU -
COVER and EDGE will oe ’
displayed 4 times repeatedlv. /
I
The 3rd stage continues after the 2nd stage without stopping. I
i The cooking rime WIII count down :o zero. When the flmer reacnes :
zero, an audible signal will sound.
,
/ / I
1 /
1
II 5 7 jqy Ly /
/ J
/
1 STAND will be displayed j
/ continuously. I
/
1 I I
When door is opened or CLEAR pad is touched, STAND will go out and the time of day will appear
on the display.
[NOTE] -
1. The weight which can be entered 0.1 kg steps by 10 key pads. Kilogram must be rounded off to the
nearest of a kilogram. (Example: 1.75 kg should be rounded off to 1.8 kg.)
2. Foods weighing more or less than the quantity listed in the chart should be defrosted following
guidelines in the cookbook. If the incorrect weight is entered and START pad is touched m,
and incorrect weight will be displayed repeatedly. The CLEAR pad has to be touched to reprogram
the oven.
3. The temperature probe is not used.
11

R-9320
R-9450 1
/ Comou Defrost”Chart /
Compu Defrost Food
Setting Amount Display Procedure Comment
a-
l Minced 0.5 l Remove any thawed Stand, covered ’
beef 215 kg
p--j
[ncvEj pieces after each stage. lo- 15 minutes. /
Steak 0.2 ‘m -1 l Before defrosting . . . \
I Shield the edge and
2:0 kg 0
0
the thin portions.
After the 1st stage . . .
Turn over and shield
the warm portions.
After the 2nd stage
Stand, covered
1O-l 5 minutes.
...If there are warm
portions, shield them.
i /I
Whole
chicken
1Roast beef
pork
3 j lamb
I
1.0
I
3.0 kg
j-1 l Before defrosting . . .
Shield the thin por-
tions, wing tips and
legs.
lm/ [I l After the 1st stage
iC,“:‘ERIm] . . sTurn over and Stand, covered
shield the warm 1O-l 5 minutes.
port ions.
jC3:‘iR]l&y j
( l After the 2nd stage
. . . If there are warm
portions, shield them.
i 1’Chicken 0.2
1,pieces I
[m jc:‘,cF?J @ After the 1st stage
/ !RE-][RRR~~L~ . . . Turn over and
I I 1.5 kg rearrange.
/ 4 /:
I
/ /,
I
1 ii
I
i RE - 1i ,qpR,ys i @ After the 2nd stage
* . * If there are warm Stand, covered
1O-l 5 minutes.
or thawed portions, I
I ll rearrange or remove. /
5
/ Pork chops
,’ Lamb chops 3.0 kg
j:L’R::-jl
i PE- 1jfiPR::5:
After the 1st stage
. . . Turn over and
rearrange.
After the 2nd stage
. . . If there are warm
or thawed portions,
rearrange or remove.
Stand, covered
lo-15 minutes.
12

EZ
w
TEMPERATURE COOKING (R-9450 ONLY)
This oven is equipped with a removable temperature probe which is plugged into the receptacle in the
top centre of the oven cavity when cooking by temperature. Directions for correct use of the tempera-
ture probe are as follows.
To Use the SHARP Temperature Probe
1 Insert the pointed metal probe portion of the temperature probe
into the food. It is easier to position the probe correctly if this
is done while the food is outside the oven. Be sure to insert the
probe at least 2/3 length of probe portion into the food.
For casseroles, place the probe in the centre of the food. When Temperature Probe
cooking meats, insert in the centre and fleshy portion, away
from bone or fatty sections, For poultry, insert between the
inner thigh and body of the bird.
2. Place the food on the Carousel turntable inside the oven.
8
Plug ,/f
A I/
Handle ,-I
’ ,’
,(’
3. Insert the plug into the receptacle in the top centre of the oven
cavity (ceiling of oven). Be sure the probe is securely inserted.
This portion rotates as the food turns on the Carousel.
4. Shorten or lengthen the cord loop by moving the adjusting ring.
Avoid placing the rubber cord directly on or in the food. By
using the adjusting ring it is easy to place the probe at the
desired angle.
5. Program oven for cooking by temperature as explained on pages
14 and 15 or use sensor temp setting.
6. When the food reaches the programmed temperature, the oven
will turn off automatically. The time of day will reappear on
the display, If you wish to check the temperature during the
standing time, leave the food in the oven with the probe in
place. You can monitor any changes in temperature by simply
touching TEMP pad,
:
Loop ‘.i”
/I =$ ;/(\ Cord
,\“(~2
\ \ F%
~ i..../‘/ 1
‘--.+l ’ Adjusting Ring
I
‘i
,+
: \
Q ‘Handle
I
,:c
/I’ Probe
7. Unplug the probe plug from the receptacle before removing the
food from the oven.
/
1 Use and Care of Temperature Probe :
1. Do not operate the oven empty with the temperature probe inside. To avoid this possibility, do not
leave the probe in the oven when not in use.
2. The temperature probe should be unplugged and removed from the oven when not in use. Store
the probe in a safe, convenient place outside the oven.
3. Carefully wash the temperature probe in warm sudsy water and wipe dry. It is immersible, but
should not be soaked. Do not wash in dishwasher.
4. Insert the thermometer portion of the probe at least 2/3 length of probe portion into the food.
5. The temperature probe should never be allowed to touch the interior walls or door of the oven.
6. DO not use the temperature probe when using a browning dish.
7. The Sharp temperature probe is designed specifically for use in this Sharp Carousel microwave
oven. Do not substitute any other probe for this one. The probe cannot be used in conventional
cooking or in other microwave ovens.
13

EE
- 8. Avoid harsh treatment of the probe. Do not drop the probe.
9. Pot holders may be needed when removing the temperature probe.
10. Do not remove the probe from the receptacle or from the food by pulling on the cord. Use the
insulated handles.
11. Do not try to force the temperature probe into solidly frozen food.
12. Temperature readings are given for some recipes which should be cooked covered. If you wish to
use the probe, cover the food with clear plastic wrap and insert the probe through the plastic wrap.
13. You will often notice a change in the temperature readout after stirring. This is normal and occurs
in conventional cooking also.
14. Recommended cooking temperatures are given on meat and poultry roasting chart and some recipes
in your Sharp Carousel microwave cookbook. YOU may choose to cook by either time or tempera-
ture.
To Cook by Temperature 1
The internal temperature of the food will be displayed in the range of 30°C to 112°C. The temperature
for cooking which can be entered is between 30°C and 93°C. lf a temperature settingabove 93°C or
under 30°C is entered, [m]and incorrect temperature will appear on the display repeatedly. The
CLEAR pad must be touched in order to reprogram the oven.
The display will show 1 LG [] until the temperature reaches 30°C. This indicates that the temper-
ature is below 30°C.
* Suppose you want to roast whole chicken to 85°C on MED HIGH.
Procedu re Pad Order I
Display I
1. Place probe in meat. / I
Insert plug into the receptacle in the / I 11
top centre of the oven cavity. I 8 5 I
/ /J- /,- ! I
l-I -1 ’ !
Enter desired temperature. I
I / (
2. Touch the TEMP pad to select
temperature cooking. TEMP
HIGH
1111: I-
TEhw 1-r -1 c
3. Select variable cooking control
setting. M. HIGH
MED HlGh
j When oven temperature is t
lower than 30°C. 1
, 4. Touch the START pad. START
When the internal temperature reaches 3O”C, the readout will display the actual temperature of
the food as it increases to 85°C. When it reaches 85°C as detected by the temperature probe, the
oven will automatically shut off and the end of cooking signal will sound. All indicator lights will
go out. The time of day will reappear on the display.
NOTE: If you are in the process of cooking using the temperature probe and wish to check the
temperature you have programmed, simply touch the TEMP pad. As long as your finger is
touching the TEMP pad, the final temperature will be displayed.
14

R-9320
R-9450
To Monitor Temperature ;
If the temperature probe is plugged into the receptacle in the top centre of the oven cavity and the
probe is placed in water or food, the temperature of the water or food can be monitored on the
readout.
Procedure Pad Order Display
/
1 1. Touch the TEMP pad.
I
/
I
TEMP
i Temperature detected by ,
temperature probe will appear/
/ on display. 30°C to 112” C
/ will be displayed.
I 1
1 The time of day will reap-
pear on the display.
1
CLEAR
/ 2. To return to the time of day.
To Cook by Temperature Followed by Time
This oven can be programmed to maintain any temperature from 30°C to 93°C for up to 99 minutes,
similar to the automatic thermostat on an electric skillet or on a conventional range. This feature can
be used to keep food warm at the desired serving temperature until ready to eat, or food can be
simmered at a specific temperature for up to 99 minutes.
* Suppose you want to heat a spaghetti sauce to 80°C on MED HIGH and then maintain exactly
80°C for 1 hour to blend the flavors and thicken the sauce.
r- Procedure Pad Order / Display
c
1. Place probe in casserole of spaghetti
sauce. Insert plug into the receptacle
in the top centre of the oven cavity.
Enter desired temperature.
-I__
8 0
2. Touch the TEMP pad to select tem-
perature cooking. / TEMP TEMP
3. Select desired variable cooking cont-
rol setting.
MED HIGH
TEMP
M. HIGH
4. Enter desired cooking or “holding”
time to maintain 80°C for 1 hour.
i
When oven temperature is
lower than 30°C.
5. Touch the START pad.
When the internal temperature reach-
es 3O”C, the readout will display the
actual temperature of the food as it
increases to 80” C.
When it reaches 80°C.
I,- r-l I7 i-l
TEMP l-1 1-1 l i-i I-I 1
COOK
The cooking time will count down to zero. When the timer reaches zero, all indicator lights will go c
and an audible signal will sound.
The time of day will reappear on the display.
It
NOTE. In the above example, if the actual temperature drops below 90°C during the 60 minutes
“holding” time, microwave energy will come on long enough to boost the temperature back
up to 80°C. The HIGH indicator will light momentarily while the microwave energy is on.
The programmed temperature can be checked during cooking or during the “holding” time
by touching the TEMP pad. AS soon as your finger is removed from the TEMP pad, the
display will resume counting down to zero.
15

:-z: s - To Cobk with Sensor Temp l- 5 -
-. -._~- -____
Sensor Temp l-5 automatically cooks roasts and poultry to an exact internal doneness.The turn-
over, finished temperatures and power levels are already calculated. Just select the appropriate
Sensor Temp setting and the oven does the rest.
* Suppose you want to cook Roast Beef (Med) with Sensor Temp 2.
c
I
L
1
Procedure I Pad Order
1. Place probe in meat. Insert plug into /
the receptacle in the top centre of the 1
oven cavity. Touch the SENSOR SENSOR TEMP ]
TEMP pad.*
2. Select desired Sensor Temp setting.
Touch 2 to cook roast to medium
doneness. i 2 I
i
3. Touch the START pad. ,
START /
/
-__
4. Approximately halfway through the
cooking time, meat should be turned
over. At that time, and an audible
signal will sound four times,
___-_----- - .--
5. Open the door and turn over meat.
Then close the door.
L
Display
1SENSOR 1: T -1
TEMP ,I I - 1:
/
SENSOR
/ TEMP
COOK
COOK
i
SENSOR
TEMP ly ‘\:;I I+’ /
COOK ’
TURN and OVER will be
displayed repeatedly.
SENSOR
TEhlD
When the internal tempera-
ture of the meat is 42°C.
6. Touch the START pad. START SE NSOF
TMF I-(! (-7 I--
--
COOk
The temperature will be dis-
played as it increases.
SENSOR I,- r-i I-
TEMP i-1 1-r l-
COOK
-- --__--___
When ftnal temperature IS
reached, an audible slgnal
WI/! sound.
And then STAND and
COVER will be displayed
repeatedly.
7. Open oven door or touch the STOP
pad. STOP STAND and COVER will go
Out.
* If you program Sensor Temp without plugging the temperature probe into the receptacle in the top
centre of the oven cavity, TEMP indicator and ;PR/-j&F,will flash on the display. Insert probe plug
into the receptacle to stop flashing. Continue to program as directed.
NOTE. Insert the temperature probe at least 2/3
length of probe portion into the food
from the side. And check the point of
the probe is located in the centre of the
food.
16

R-9320
R-9450
j TO Cook with Sensor Temp 6 (Simmer) ’
Sensor Temp 6 is used for SIOW cooking. Sauces, stews or meats that benefit from slow cooking can
be done very easily. Sensor Temp will bring the food quickly up to temperature and maintain it for
up to 4 hours.
* Suppose you want to cook Beef Stew with Sensor Temp 6 (Simmer).
i Procedure Pad Order Display
I 1. Place probe in casserole.
Insert plug into the receptacle in the
top centre of the oven cavity. Touch
the SENSOR TEMP pad.
1 SENSOR TEMP j
2. Touch 6 to simmer stew. 6
t
I 4. When stew reaches 80°C, stew should
/ be stirred, At that time, an audible SENSOR 1: 7 i 1-i
signal will sound four times. TE MP -1 I I Ii
COOK ---
l j STIR will be displayed. I
/
t
SENSOR 5 r -
TEMP
+
SENSOR
TEMP
: 3. Touch the START pad. START SENSOR
TEMP
1
j 5. Open the door and stir stew, then close /
I the door. - T/7,77-
g;OR 5 I l-l IT I
/
I
j
I / SENSOR l,i 17 I-
! ’ TEMP
6. Touch the START pad. START 1-I Cl L ,
, COOK
j 80°C WIII be displayed for
. , / up to 4 hours.*
+ If you want to simmer food for less than 4 hours, stop oven after desired simmer time.
NOTE: If you touch the wrong pad, retouch the correct pad.
You cannot select a setting higher than 6 (7, 89, 0).
Temperature Chart 1
For more complete information see your Sharp Carousel microwave cookbook.
/ \
Food Internai Temperature Internal Temperature After
at End of Cooking Time Standing Time (10 to 15 min.)
Beverages Water base 65-70°C
Milk base 60-65” C
I Casseroles I 60-65” C I j
I Leftovers i 60-70” C I I
I soups I 60-70°C I 1
Lamb Medium
Well Done 60°C 68- 70” C
70°C 77-82°C
/ Veal I 68-71°C I 77-82” C
Meat loaf 70°C 73°C
17

zE8L- ISensor Temp Menu Guide ’
Sensor Temp Food Internal Temp. Comment
Setting at End of Cooking
1
~~
Roast beef 50°C l Turn over after oven signals four times.
(Rare) (Approximate half way of total cooking time.)
l Stand, covered with foil 1O-l 5 min. after cooking.
/
2
El
Roast beef 60°C a Turn over after oven signals four times. \
WedI (Approximate half way of total cooking time.)
l Stand, covered with foil 10-l 5 min. after cooking,
Roast beef
(well) 70°C l Turn over after oven signals four times.
(Approximate half way of total cooking time.)
l Stand, covered with foil lo-15 min. after cooking.
Roast Pork 75°C \
l Turn over and remove shield after oven signals four timeS.
(Approximate half way of total cooking time.)
l Stand, covered with foil lo-15 min. after cooking.
Poultry
/
80°C l Turn over after oven signals four times.
(Approximate half way of total cooking time.)
l Stand, covered with foil 1O-l 5 min. after cooking.
Simmer
J
80% l Stir and replace probe in casserole after oven signals four \
times, (When temperature of food reaches 80°C.)
l Stir some times if desired during cooking for up to 4 hours.,
TQCANCEL A PROGRAMDURINGCOOKING
If you are in the process of cooking and wish to stop the oven and cancel the entire cooking program,
follow either of the steps below:
1. Open the oven door. 2. Close the door. 3. Touch the CLEAR pad.
or
1. Touch the STOP pad. 2. Touch the CLEAR pad.
18
This manual suits for next models
1
Table of contents
Other Sharp Microwave Oven manuals

Sharp
Sharp R-190HK/HW User manual

Sharp
Sharp R-970 Instruction Manual

Sharp
Sharp R-320BB User manual

Sharp
Sharp R-242E User manual

Sharp
Sharp Carousel R-1871 User manual

Sharp
Sharp R-230F User manual

Sharp
Sharp R-259 Instruction Manual

Sharp
Sharp R-8320E User manual

Sharp
Sharp R-209BW User manual

Sharp
Sharp Carousel R-1751 Use and care manual

Sharp
Sharp R-830B User manual

Sharp
Sharp KM-2002B User manual

Sharp
Sharp Carousel R-308K User manual

Sharp
Sharp YC-MS252A User manual

Sharp
Sharp R-200S User manual

Sharp
Sharp R-795M Instruction Manual

Sharp
Sharp R-380LS User manual

Sharp
Sharp R-244(W)M User manual

Sharp
Sharp R-360 User manual

Sharp
Sharp R-9A11 User manual